
Lesson Files | iLife08_Book_Files > Lessons > Lesson03 > L3_fixer-uppers |
Time | This lesson takes approximately 60 minutes to complete. |
Goals | Crop pictures Rotate and straighten pictures Touch up pictures Adjust color and exposure Apply effects |
“Picture perfect.” You’ve probably heard that phrase before: It’s used to describe anything that looks just right.
Most photographers know quite well, of course, that this phrase is misleading: Most pictures aren’t perfect. But just because a picture isn’t perfect doesn’t mean you have to give up on it. iPhoto has a wide assortment of tools that you can use to bring your pictures closer to perfection. You’ll get a chance to play with those tools in this lesson.
To get ready for the lesson, you need to import some specially selected pictures into your iPhoto library that have the kinds of problems photographers—even the very best ones—run across all the time.
If iPhoto isn’t open, open it.
Open the Lessons folder that you copied to your Mac from the enclosed DVD.
Open the Lesson03 folder and drag the L3_fixer-uppers folder inside onto the iPhoto window.
iPhoto makes a new Event named L3_fixer-uppers that contains the pictures you’ll work on in this lesson.
If the L3_fixer-uppers Event isn’t open, click Last Import in the source list.
If the picture titles aren’t visible, choose View > Titles.
When you finish, the iPhoto window should look like the one below.

Cropping is the act of trimming the edges of a picture. You may want to crop a picture for several reasons:
To improve the picture’s composition
To change the picture’s shape
To remove unwanted elements from the picture
To highlight an important detail in the picture
Among the pictures you just imported is one that you’ll crop for both the first and the last of these reasons.
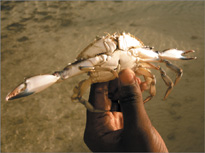
In the L3_fixer-uppers Event, click to select the picture of the crab.
The picture is titled “crop.”
In the toolbar below the viewing pane, click the Edit button.
iPhoto’s viewing pane becomes a picture editing pane. The picture expands to fill the pane, a collection of editing tools appear in the toolbar below the picture, and thumbnails of the pictures in the Event appear in a row above the picture. Now you’ll crop the picture so that the crab fills the frame.
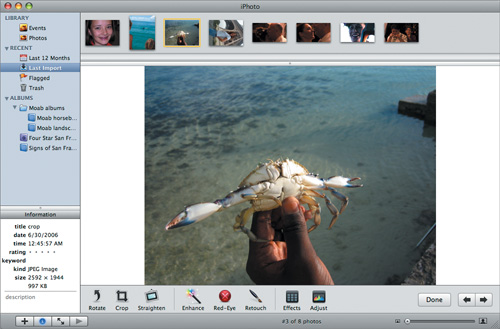
Click the Crop button in the editing toolbar.
A frame is superimposed on the picture, and a small, semi-transparent floating crop panel appears. A pop-up menu in the crop panel is labeled with the picture’s current dimensions. You can drag the crop panel to move it anywhere you like on your screen.

Note
The crop panel’s pop-up menu offers several different choices for the cropping frame’s aspect ratio; that is, the ratio between the frame’s horizontal and vertical dimensions. Choosing a 2 x 3 aspect ratio, for example, produces a frame that is two units along one dimension and three units along the other: A three-inch-wide picture with this aspect ratio would have a height of two inches. Later in this lesson you’ll learn how to change a picture’s aspect ratio.

Click the Constrain checkbox to select it.
When the Constrain checkbox is selected, changing the size of the cropping frame maintains the selected aspect ratio. When the picture’s original dimensions are selected in the crop panel’s menu and Constrain is selected as well, cropping the picture changes the picture’s size but retains its shape.
Drag the upper-right corner of the cropping rectangle down and to the left.
Your pointer becomes a crosshair cursor. As you drag, the cropping frame changes size. It also displays thin guidelines that divide the frame into thirds both horizontally and vertically. These lines help you compose your cropped picture using the “rule of thirds” described in Lesson 1.

Click the center of the frame and drag it down.
When your pointer is inside the cropping frame, it becomes a hand cursor, and dragging slides the frame over the picture. You can also see the “rule of thirds” guidelines when you drag the frame over the picture.

Continue adjusting the size and position of the cropping frame until the crab is just barely contained within the frame, and the crab’s body is aligned with the top guideline in the frame.
In the crop panel, click Apply.
The crop panel and the cropping frame go away and the cropped picture fills the editing pane.
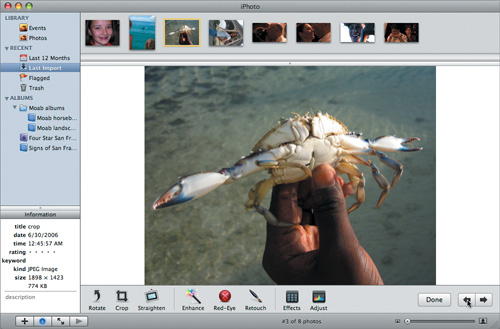
In the toolbar, click Done to save your changes and to see the iPhoto viewing pane again.
Tip
If the iPhoto window seems too cramped for you when you’re editing pictures, you can have iPhoto’s editing view take over your entire screen. Click the double-arrow segment of the multi-segment button at the bottom-left of the iPhoto window to enter full-screen editing mode. The current picture takes over the entire screen. To see the editing tools, move your pointer to the bottom of the screen; to see the thumbnails of other pictures in the current Event, move your pointer to the top of the screen. To go back to the normal iPhoto window (and finish your editing session), click the X button that appears at the far right of the full-screen mode’s editing toolbar.


iPhoto’s full-screen editing view
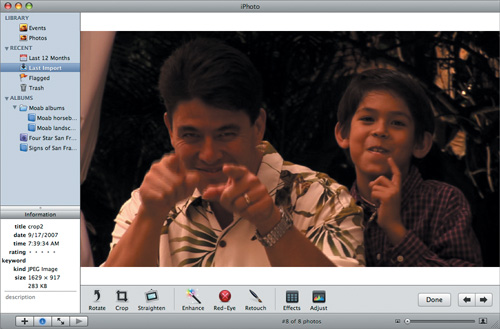
Next you’ll crop a picture to create a portrait of a young guest at a wedding. The photo you’ll start with is taken from the Hawaiian Wedding Event. It’s not an ordinary photograph, however, but a single frame from the wedding video. Because the video is a high-definition video, the picture is wider than a normal photograph, and it shows some motion-blurring. Nonetheless, it can still be salvaged to produce an acceptable portrait.
Note
To extract a single frame from a video clip to use as a still image, open iMovie and choose File > Save Frame. For more information, see Lesson 9.
Click the picture titled “crop2” to select it.
Click the Edit button in the viewing pane’s toolbar.
Choose View > Thumbnails > Hide.
This command hides the row of picture thumbnails across the top of the editing pane so that you have more room in which to work.
In the editing toolbar, click Crop.
Choose “4 x 3 (Book)” from the crop panel’s pop-up menu.
This choice produces a cropping frame that’s taller than it is wide, which is more suitable for portraits. Choosing “4 x 3 (Book)” automatically selects the Constrain checkbox in the crop panel as well.

Adjust the cropping frame’s size and position so that the top horizontal guideline in the frame is over the boy’s eyes.

In the crop panel, click Apply.

In the editing toolbar, click Done to save your changes.
Tip
You can experiment freely to see what various settings in the floating crop window’s pop-up menu do. After you click Apply to view your cropped image, choose Photos > Revert to Previous. The changes you’ve made will be discarded, leaving the original picture ready for you to experiment with a different crop.
Most cameras are designed to take photos with a landscape orientation: that is, photos that are wider than they are tall. People, on the other hand, are usually taller than they are wide. So, if you want to take portrait-style photos, or to photograph somebody standing, you have to turn the camera 90° clockwise or counter-clockwise in order to orient the picture properly.
However, unless your camera can detect its orientation and mark the photo with that information in a way that iPhoto can recognize, those pictures will end up sideways in iPhoto when you import them.
Changing a picture’s orientation is such a common thing to do that iPhoto makes that task very easy to accomplish, as you’re about to see:
Click the photo titled “rotate-and-enhance” to select it.

In the viewing pane’s toolbar, click Rotate.
By default, iPhoto’s Rotate tool rotates the selected picture (or pictures—you can rotate more than one at a time) 90° counter-clockwise, which is what this particular picture needs. However, you can adjust iPhoto’s preferences to set the Rotate tool to turn pictures clockwise instead. Or you can just press the Option key when clicking the tool: When the Option key is pressed, the Rotate tool reverses the direction in which it rotates pictures, and its button in the toolbar changes to show you the new direction in which it will rotate the picture.


Even if a picture is rotated properly, it may not be quite on the level. It’s easy to take a crooked picture; many otherwise perfect pictures suffer from this flaw.
You can straighten out such pictures with iPhoto’s Straighten tool. The L3_fixer-uppers Event includes a tilted picture for you to untilt:
Click the picture titled “crooked” to select it.
Click the Edit button in the viewing pane’s toolbar.
In the editing pane’s toolbar, click the Straighten button.
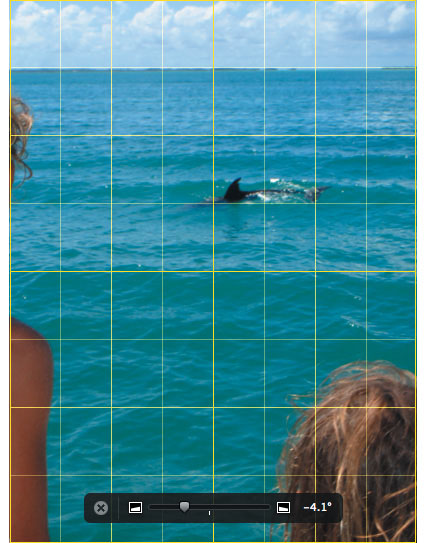
The Straighten tool’s panel appears over the editing pane, and a grid of yellow lines is superimposed on the picture.

Drag the slider in the Straighten panel to the left.
As you drag the slider, the picture begins to tilt in the direction that you’re dragging.
Continue dragging until the horizon aligns with one of the horizontal grid lines.
Click the close button at the left side of the Straighten panel.
The grid lines and the panel disappear.

In the editing pane’s toolbar, click Done.
Note
When you straighten a picture, iPhoto must trim the picture’s top, bottom, and sides in order to keep them straight as well. Take a close look at the picture you just straightened: The puffy cloud at the top-right has been cropped, and portions of the figures on the right and the left of the picture have been lopped off as well. The more a picture needs to be straightened, the more you’ll lose from the edges of the image.
Cameras can be cruel. Not only can they reveal, in all-too-visible detail, every blemish, wrinkle, or scar on your face; they can even add new flaws—especially when the camera’s flash is involved.
In this part of the lesson, you’re going to undo some of the flaws that either nature or the camera has imposed.
The first flaw you’ll tackle is the photographic phenomenon known as red-eye. When you take a picture using a flash attachment mounted directly on the camera, the light from the flash can travel directly into your subject’s eyes, brightly illuminating the blood vessels at the back of the subject’s eyeballs. The iPhoto red-eye tool can get the red out.
Click the picture titled “red-eye” to select it.
Click Edit in the viewing pane’s toolbar.
Slide the magnifying slider at the bottom of the iPhoto window far enough to the right to allow you to see the eyes of the image in detail, adjusting the editing pane’s scroll bars as needed to keep the eyes in view.
Click the Red-Eye button in the editing pane’s toolbar.
A Red-Eye tool panel appears over the editing pane, with a pop-up Size menu that’s set to Automatic. Your pointer becomes a crosshair cursor.
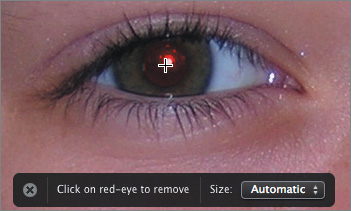
Place the pointer over one of the red pupils in the picture and click.
The red part of the pupil turns black.
Choose Manual from the Red-Eye tool panel’s pop-up menu.
A slider appears beside the menu and the crosshair cursor changes to show a circle at the intersection of the crosshairs.
Drag the panel’s Size slider to the right until the circle in your pointer is about the same size as the remaining red pupil in the picture.
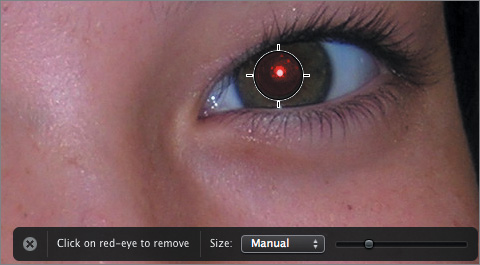
Place the pointer over the red pupil and click.
The part of the pupil inside the circle turns black.

In the editing pane’s toolbar, click Done.
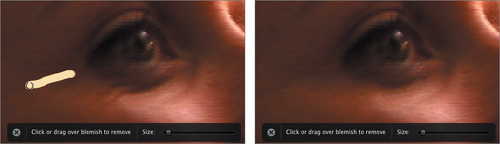
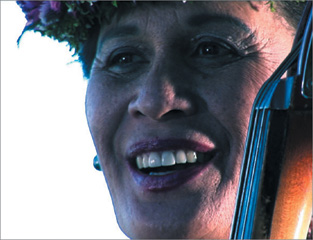
Next, you’ll engage in a different kind of touch-up: removing a few laugh-lines from the eyes of a bride using iPhoto’s Retouch tool.
Click the picture titled “touch-up” to select it, and then click Edit in the viewing pane’s toolbar.
Adjust the iPhoto window’s magnifying slider and the editing pane’s scroll bars so you can see the bride’s right eye magnified in the editing pane. Notice the laugh-lines at the corner of the bride’s eye.
Click the Retouch button in the editing pane’s toolbar.
The Retouch tool panel appears and your pointer becomes an open circle.
Adjust the Retouch panel’s slider so that the pointer becomes about twice as wide as one of the laugh-lines.
Drag the pointer along one of the laugh-lines, then release the mouse button. Repeat for each line by the eye.
As you drag, the pointer paints a light color over the laugh-line. When you release the mouse button, the light color and the laugh-line both vanish.
Optionally, retouch the creases in the bride’s forehead.
Click Done.
Note
The Retouch tool continuously calculates an average of the color and texture of the area surrounding the pointer as you drag and it applies that average to the area under the pointer. The result is usually a smooth blend that eliminates small flaws and blemishes. However, when you drag the tool over the edge of an object you’ll often see strange smears and similar artifacts appear. Experiment with this tool on various parts of an image to see what it can and can’t smooth.
Your eye and your brain make a wonderful team: Your eye provides the image, and your brain processes it, compensating for things like poor illumination, tinted light, and obscuring haze. As the eye and brain work together, you end up seeing a much richer image than the one your eye started out with.
Your poor camera, on the other hand, doesn’t have the power of your brain to adjust its images with the same subtlety or dexterity—the images it produces may not match in color or clarity what you remember seeing when you took them. iPhoto has several tools, however, to provide the image-processing capabilities that your camera lacks.
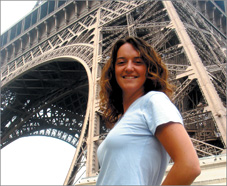
To see these tools in action, you’ll start with a picture you’ve previously seen, and adjust it to improve its color and clarity. When this picture was taken, the weather was hazy, resulting in a photo with muted colors and dark areas that the haze made look more gray than black.
Select the picture titled “rotate-and-enhance” in the L3_fixer-uppers Event, and then click Edit in the viewing pane’s toolbar.

In the editing pane’s toolbar, click the Enhance button.

iPhoto uses predefined operations that adjust a picture’s brightness and contrast and that intensify its colors. Often, clicking this tool is all you need to improve a drab-looking picture.
Although the Enhance tool has done a pretty good job with this picture, the result isn’t picture perfect: The enhancement has made the subject’s face look a little too dark. A quick trip to iPhoto’s Adjust panel can fix that.

In the editing pane’s toolbar, click the Adjust button.
The Adjust panel appears. This panel has a variety of controls you can use to modify a picture’s colors, brightness, and sharpness. You’ll be using this panel a lot in the remainder of this lesson.

Near the top of the panel, drag the rightmost Levels slider to the left until the percentage number under it reaches 80%.

As the slider moves to the left, the lighter parts of the picture become even lighter, making areas that were almost white become white. At the 80% setting, the parts of the picture that were 80% as light as the very lightest parts of the picture now have the same level of lightness. The result is a brighter picture that still retains most of the dark shadows under the Eiffel Tower, but that lightens the subject’s face.
The next problem you’ll deal with is color cast. Your brain is pretty good at compensating for the color of the light that illuminates what you see: Put on a pair of sunglasses, for example, and in just a few minutes you adjust to the color shifts that the glasses impose.
Modern automatic cameras try to do the same thing, eliminating slight color variations in lighting to produce pictures with more accurate colors, but sometimes they just don’t quite get it right. When that happens, a picture ends up with a color cast that is bluer, or greener, or redder, than it should be. The effect is most apparent in the white or gray areas of the picture, but it actually affects the entire image.
Here’s how you adjust the color cast of a picture:
Select the picture titled “unbalanced-color” in the L3_fixer-uppers Event.
Click Edit in the viewing pane’s toolbar.
This picture, taken near sunset in Hawaii, has a blue cast to it, caused when the camera tried to compensate for the orange tint of the setting sun’s light. Your job is to restore the warm look of sunset to the picture.
Click Adjust to bring up the Adjust panel.
Tip
Although you could tweak the individual sliders that control the picture’s saturation (how intense the colors are), the temperature (how warm/orange or cool/blue the picture looks), or the tint (the balance between green and red in the picture), the Adjust panel provides a quick shortcut for adjusting color cast: the white point eyedropper.

Click the white point eyedropper in the Adjust panel.
The pointer becomes a small crosshair cursor and instructions for using it appear in a panel over the editing pane. The color of the place you click in the picture is used by iPhoto to calculate the other colors in the picture. It takes that color and treats it as a neutral white or gray color, and then moves the Saturation, Tint, and Temperature sliders in the panel to compensate.
Click the gray part of the subject’s front tooth, as shown.
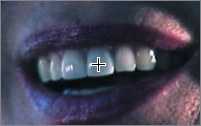
The picture becomes warmer looking.

Click Done.
Note
As long as the Color Cast tool is selected, you can click various parts of the picture to see how the color cast changes. Depending on where you click, you can see some startling results.
Tip
When you’re in the editing pane, you can always compare how your work has changed the picture from the original by pressing the Shift key. When the Shift key is down, iPhoto displays the picture as it was before you began making changes. This feature is very useful when you work with color casts, which often cause subtle changes that are hard to detect without a comparison.
Next, you’ll fix a picture that has a combination of problems: It’s both under-exposed (the camera’s shutter was not open for long enough) and it has a warmer color temperature than it should.

You can correct both problems in the Adjust panel:
Select the picture titled “exposure-temp” in the L3_fixer-uppers Event, and then click Edit in the viewing pane’s toolbar.
Click Adjust.
Slide the Exposure slider to the right until the number at the right side of the slider is between 1.45 and 1.55.
The picture becomes brighter, and the warm color cast is even more apparent.

Note
Although you can’t go back in time and increase the camera’s shutter-speed or aperture, you can adjust the relationship between the darkest and the lightest part of the picture, and thus simulate a change in how the picture was exposed. The Exposure slider adjusts that relationship mathematically and it does a pretty good job—within limits, of course.
To correct the color temperature, move the Temperature slider slightly to the left until the number at the right side of the slider is about -15.0.
The color cast of the picture becomes cooler and looks more natural.

Finally, now that you’ve done the hard work of fixing problems, it’s time to play.
iPhoto includes an Effects panel that presents a number of interesting and amusing visual effects you can apply to pictures. Some effects can be applied multiple times to intensify what they do. Other effects act like switches: They’re either on or off. You might want to apply effects, for example, to pictures that you plan to use for cards, or books, or calendars (you’ll find out how to make these things with iPhoto in Lesson 4).
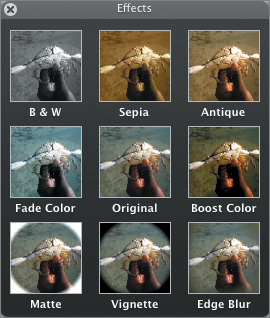
Rather than working through an exercise, you should simply pick a picture or two and try some effects out. Below you can see a few different effects that have been applied to the crab picture with which this lesson began. Have fun!
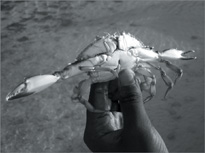
Black and white crab
Antique crab

Crab with color boosted four times

Crab with edges blurred seven times

Crab with matte applied five times