Lesson 8. Finishing Your DVD
Lessons > lesson08 > 08_Swiss_start (or the My Projects > Swiss_DVD project file you created in Lesson 7)
Media
Media > Swiss folder
Time
This lesson takes approximately 45 minutes to complete.
Goals
Add DVD-ROM content to your DVD
Build and format a DVD project
Burn a disc
Test projects in Apple DVD Player
Prepare a project for replication
After your project is complete, it’s time to systematically test it to make sure that all of the menus, tracks, slideshows, and other elements function properly. After it has been tested, the next step is to build and format your project for output.
If you aren’t familiar with the terms build or format, don’t worry. Build is just a fancy word for exporting your project from DVD Studio Pro into files that adhere to the DVD specification. In most cases, format is just another way to say burn to disc. But the term format also takes into consideration that you may be placing the finished VIDEO_TS folder on a DLT (digital linear tape) or exporting it as a disc image to a hard disk drive. Format is a blanket term for any final process of writing the files to a particular medium.
DVD Studio Pro offers more options for finishing your project than ever before. There are two primary finishing methods: The first is building and formatting your project directly to a DVD-R (DVD-recordable) disc, using a DVD burner, or to digital linear tape using a DLT drive for standard definition projects. The second is building to a folder on your hard drive that you can test with the Apple DVD Player, just as you did at the beginning of this project (in Lesson 3).
In this lesson, you will add DVD-ROM content, test and finish your DVD, and then prepare your project for distribution.
Adding DVD-ROM Content to a DVD-Video Disc
In addition to containing standard DVD-Video content—which includes the tracks, menus, slideshows, and other elements of a complete project—your project can include additional DVD-ROM content. By placing an extra folder alongside the VIDEO_TS folder, you can put several types of data on a disc, including Flash files, PDF files, HTML files, and many other document files.
A DVD-Video with DVD-ROM content is called a hybrid DVD. Discs of this type will play normally in a DVD player, but also can be read by a computer-based DVD drive to access the DVD-ROM files.
Adding DVD-ROM content to a DVD-Video disc is simple in DVD Studio Pro. Use the following steps to select a folder of DVD-ROM content that will be placed on your disc when it is built. When doing so, make certain that all of your DVD-ROM files are in a single folder and that the folder is organized exactly the way you want it to appear on the finished DVD.
- Choose File > Open and open the My_Projects > Swiss_DVD file that you created in Lesson 7.
- At the top of the Outline tab, click the SWISS_DVD disc icon.
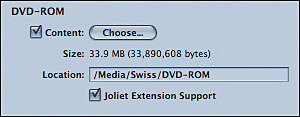
The Inspector displays the properties of the disc. At the bottom of the General tab in the DVD-ROM area, you can choose to add DVD-ROM content to the DVD.
- Select the Content checkbox and the Joliet Extension Support checkbox.
The Joliet Extension Support must be selected to allow PC users who are running Windows 95 or later to access files in the DVD-ROM folder that have long filenames.
- Click Choose.
In the DVD-ROM Contents dialog, navigate to Media > Swiss > DVD_ROM.
- Select the DVD-ROM folder.
- Click Choose to add the selection.
Notice that in the DVD-ROM section of the Inspector, the Location field lists the local file path of the folder you have chosen on your hard drive. When DVD Studio Pro formats the disc, the folder inside the selected folder will be written alongside the VIDEO_TS and AUDIO_TS folders. Also, the file size of the contents you added is now listed in both binary and true bytes and is also added to the overall size of the disc.
- In the top right of the Inspector, note that the Est. Size number has increased. Also, the Disc Meter in the toolbar has increased to reflect the size of the additional DVD-ROM material.
Tip
It is important to remember that any DVD-ROM content you add to a disc should be factored into the total file size of your project. You should view the file size of data you have added to a project before adding it to a DVD project. You may wish to wait until the last moment to incorporate DVD-ROM content so that you are sure to combine the estimated final project size (located in the toolbar and at the top of the Disc Inspector window) with the size of the extra files. In addition to affecting the way you encode your video and audio assets (for example, using a lower bit rate for your movie to fit extra content on a disc), a project with DVD-ROM files might influence your choice of a DVD-5 or DVD-9 disc to hold all the material.

Testing Your Project
Once you are finished assembling your project, you should test the entire disc’s functionality with the Simulator. The Simulator works like a DVD player, using the same controls to navigate a disc as a DVD player’s remote control. However, testing with the Simulator is not a replacement for testing your project in a real DVD player. It is simply the first phase of testing your DVD to ensure that all of the links and other elements you have added to your project function as you intend. Once you have tested the DVD with the Simulator, it is always a good idea to build the DVD to a hard drive and test it with Apple’s DVD Player.
Unlike a DVD player, which plays a properly formatted VIDEO_TS folder that was created in the building process, the Simulator uses assets that may not be formatted for a DVD. As a result, your playback may skip or stutter a little. The degree of difficulty that you experience when playing back a project with the Simulator depends on the performance of your computer and the type of assets you are using. In most cases, it will be fine for gauging the performance of your project. Just know that your final disc should operate much more smoothly after it has been built.
Note
In the Simulator pane of Preferences (DVD Studio Pro > Preferences), you can set up the Simulator to operate like a real DVD player, with options for region codes, languages, resolution, and player aspect ratios.
You can simulate an entire project (instead of individual disc elements, as you have done in previous lessons) by accessing the Simulator from the File menu, or by clicking the Simulate icon on the toolbar. Doing so will recreate the experience of a user inserting a DVD into a DVD player.
- Click the Log tab (Command-3).
By clicking the Log tab, you tell DVD Studio Pro to generate a log file. The log file contains status information that may be useful for fixing problems when you simulate a project, build a disc, or encode content.
- Click the Simulate icon on the toolbar.

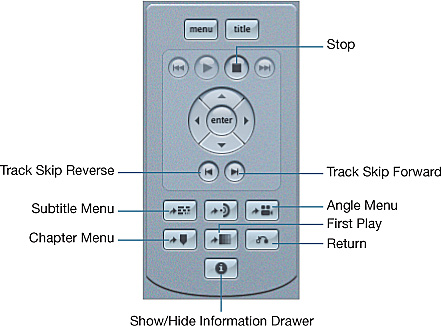
The Simulator interface consists of a preview window on the right and a bank of remote control buttons on the left. These buttons are just like the buttons you would find on a standard DVD player remote control or in Apple’s DVD Player. Using these buttons, you can test your project, just like you tested it in Lesson 3, or as you would any commercially produced disc.
Here’s a close-up of the Simulator’s remote control buttons.
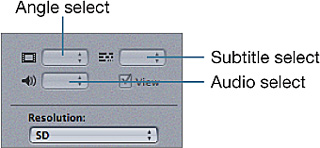
On the bottom portion of the Simulator window, you can view the current time for the asset you are playing. You can also use the pop-up menus to access alternate video, audio, and subtitle streams, if any.
Tip
When simulating HD DVD projects in DVD Studio Pro, you can dynamically change the resolution in the Resolution pop-up menu.
Things to Look Out For When Testing Your Project
It is important to be thorough when testing a project. Make sure all of your buttons and links work correctly. Once you proceed to the next step and build the project, even if you don’t format (or burn) it to disc, you will not be able to fix any problems without opening up the project file again and building again from scratch. In the Simulator window, use the controls on the left side of the screen to test the playback of your disc. Explore the disc as you would any DVD that you rent or buy.
- If the Simulator is not already open, click the Simulator icon in your toolbar.
- First, and most important, make certain that your startup action has been set for the DVD.
You should see the SwissIntroMenu playing to the SwissMainMenu fading through red. If this is not playing first, you may need to go back and set the First Play action in the Disc Inspector.
- Click the Play Video button to activate the SwissMovie track.
Make sure that the buttons on the remote control operate correctly.
- Click the Menu button from the remote control in the upper-left corner of the Simulator window to get back to the SwissMainMenu.
- Check all of the links from your menu buttons, including the chapter index menu, which links to the various markers.
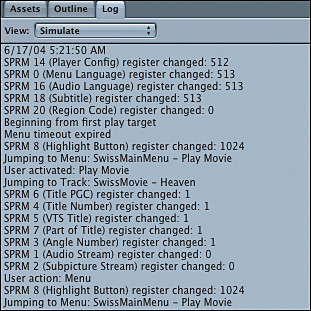
- Observe the output of the log file.
Every process the DVD player invoked, or the user chose, right down to which buttons are navigated, is listed.
- Close the Simulator and save your work.

Building and Formatting a DVD
After testing, the next step in creating a finished DVD is performing a build. You can either build and format your project in two separate steps, or combine both steps in one process by using Build and Format or the Burn command. In this section, you’ll look at building and formatting as separate steps. Then you’ll go back and take a look at the “all-in-one” method.
Building a project means, in effect, that a VIDEO_TS (Video Title Set) folder is created. The VIDEO_TS folder contains your finished DVD project. At the end of the building process your files will be multiplexed, which means that all audio, video, menus, and other disc elements are woven together to create DVD-compliant files.
Every DVD player, regardless of type (software or hardware), looks for the VIDEO_TS folder on the first level of the DVD to play a disc. Without this folder, your disc will not play. However, you do not have to put the VIDEO_TS folder onto a disc. You may choose to create the folder, which can be opened and tested with Apple’s DVD Player application, on your hard drive instead. Outputting a finished project to your hard drive also makes it available for duplication at a later time.
Note
When you build a disc, an AUDIO_TS folder is created along with the VIDEO_TS folder. Although the AUDIO_TS folder is empty (and relevant only to specialized DVD-Audio titles), you should include it with your VIDEO_TS folder on any discs you create. Since the DVD specification includes the use of an AUDIO_TS folder, most DVD players automatically look for it. If that folder is not found on a disc, you might experience playback issues (although most discs and players operate fine without it). For this reason, it is good practice to include the AUDIO_TS and VIDEO_TS folders together on a disc.
Setting Your Build Preferences
Before you actually build your disc, you should make certain that your preferences are set correctly. Follow these steps:
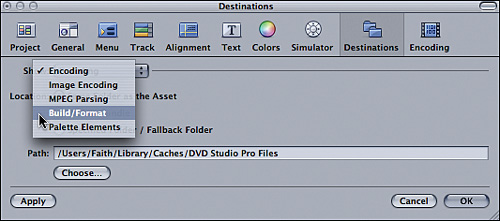
- Choose DVD Studio Pro > Preferences and select the Destinations pane.
The important thing to check is that the location, or destination, where you want to place a completed build is correct. To check or change the destination for your built VIDEO_TS folder, you must choose Build/Format from the Show pop-up menu.
- From the Show pop-up menu, choose Build/Format.
The default destination for your build is set to a folder called DVD Studio Pro Files, which was created by DVD Studio Pro inside your Users folder when you installed the software. Your Users folder, located on your boot drive, is not a great place for your build. A better option is a dedicated media drive. (External FireWire hard drives are great for this.) You should create a dedicated folder on the drive as the location for your build. Further, it’s best not to use the same location (drive and folder) for both the build and your DVD assets.
- Click the Choose button.
- Select an appropriate location in which to save your builds, and then click Choose.
- Click OK to close the Destinations pane.
Creating a Build of Your DVD
Now that the preferences are set correctly, you can build the Swiss_DVD project. While building a project, you should watch the Log tab, which is useful for checking your work while the VIDEO_TS folder is being created.
- Click the Build button in the toolbar, or press the keyboard shortcut Option-Command-C.
- In the Choose Build Folder dialog that appears, select a location for your finished build folder, or accept the default location (which you just set in the Destinations pane) and click Choose.
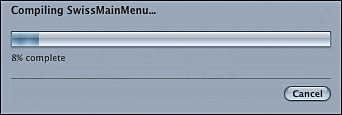
The build process is now initialized, and DVD Studio Pro begins compiling the menus and multiplexing (or muxing) your tracks. You can view the progress of your build with the status bar that appears. The build process will take a while, depending on the speed of your computer. This will give you a chance to explore the Log tab as it outputs its information.
- Check the Log tab for any error messages. If you have any, it’s easy to see in the Log where you went wrong.
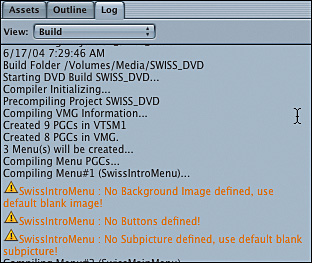
As your VIDEO_TS folder is built, you can see in the Log tab which part of the process is currently taking place. In most cases, the Log simply lists each part of the process as it is completed. But in some cases, it may list errors, such as a missing asset or the first-play action not being set.
You can disregard the DVD Studio Pro alerts, because you have intentionally set up the SwissIntroMenu without buttons or any other elements.
When the build is complete, an Alert dialog appears when the files have been successfully compiled. If there were any problems in your project, such as mismatching audio files in your menu domain, your build would not have been completed and you would have received the appropriate error message.
- Close the Alert dialog and check the location where you saved your build.
The Build command has your project compiled into a finished VIDEO_TS folder, which you can burn onto a DVD disc or view with a software DVD player on your computer’s hard drive.
Contents of the VIDEO_TS Folder
Every VIDEO_TS folder that is created contains a unique set of files, which make up a DVD title set. The following are a few of these files:
• DVD Studio Pro layout file—This file is unique in DVD Studio Pro and contains all formatting information about the DVD project.
• VIDEO_TS.IFO—An IFO file contains the information about a disc, including its capacity, and the way navigational elements should work, such as menus, buttons, and links.
• VIDEO_TS.BUP—The BUP files are backups of IFO files. Backups are important if a disc is damaged or a player cannot otherwise read the original IFO file.
• VIDEO_TS.VOB—A VOB file is the video object file containing all the actual video, audio, and subtitle information for the menus, tracks, and slideshows you’ve created. Each VOB file may contain up to 1 GB of information. Larger projects may be broken up into several VOB files.

Formatting Your Project
Formatting your project can occur either as a separate step after the building or as part of the build. In the last exercise, you chose the Build command, rather than Build and Format, so now you need to format your project as a separate step, after compiling is completed. (In the next section, we’ll take a look at the one-step Build and Format process.)
The Format command takes the finished VIDEO_TS folder, which was assembled with the Build command, and writes it to a DVD-recordable drive, to a DLT drive, or as a disc image to a hard drive. There are specific settings for each one of these output options.
Note
In this process, a folder containing DVD-ROM content can be included. This option is also available if you build and format in a single step using the Burn feature in DVD Studio Pro, as described later in this lesson.
One advantage of building and formatting in two separate steps is that you can choose any VIDEO_TS folder you want to burn. If, at a later time, you decide you would like to use an older VIDEO_TS folder you created, you can use the Format option in DVD Studio Pro to place it on a disc.
A second and perhaps more important advantage of building and formatting in separate steps is that you can test the build for errors with Apple’s DVD Player before physically burning those errors into a DVD. This is frequently referred to as “burning a coaster,” because placing drinks on them to avoid leaving a ring on a table is about the only thing an unplayable DVD is good for.
Note
You may also use a separate DVD-burning application, such as Roxio’s Toast Titanium, to place the VIDEO_TS folder on a disc.
Building and Formatting in a Single Step
If you are satisfied with your project and want to simply finish and place it on a disc, you can build and format in a single step. To do this, choose File > Advanced Burn > Build and Format or click Build/Format in the toolbar.
The Build and Format command combines these separate tasks: assembling a VIDEO_TS folder and then writing it to the drive of your choice (DVD, DLT, or hard disk).
- Click Build/Format in the toolbar.
The Build & Format window will appear.
- Make sure you have chosen the appropriate settings for your project.
In the Source section, it is important to choose the correct build of your project. As you will include DVD-ROM content, the DVD-ROM checkbox has to be checked and the correct Location needs to be selected. In the Destination section of your Build & Format window, you can choose the Output device. As a default, the DVD recorder is selected. You can also output your project to a hard drive or to a DLT drive. If you have the Lossless Linking checkbox selected, it adds protection against buffer underrun conditions. This is achieved by allowing the DVD recorder to pause during the writing process, and then pick up where it left off when additional data becomes available.
- Insert a blank DVD-R disc into your recordable drive.
- Click Build & Burn.
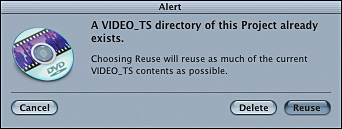
An alert will appear.
- Click Reuse.
Clicking Reuse will reuse as much of the current VIDEO_TS contents as possible. Because you did not change anything since you built the project, all the contents will be reused.

Using the Apple DVD Player
When the build is complete, the next step in finishing your DVD is to use the Apple DVD Player to play back the VIDEO_TS folder’s contents and test the project.
- Locate the Apple DVD Player application in your hard drive’s Applications folder, and double-click its icon to launch the application.
- Choose File > Open DVD Media.
- Select the VIDEO_TS folder you created for this project and click Choose.
- Click the Play button on the Apple DVD Player’s remote control to begin playing the project.
Test all of the links as you did when you used the Simulator at the beginning of this lesson, and as you did with the sample build in Lesson 3.
- Quit DVD Player.
- Go back to DVD Studio Pro 4 and choose File > Save to save your project.


Burning a Disc Using the Burn Command
The Burn command simplifies the output of a project by automatically building a VIDEO_TS folder and burning it in one step to a DVD-recordable disc in an Apple SuperDrive or external DVD recorder. You used Burn in Lesson 1 as a quick way to create a disc. It’s also a convenient function for making multiple copies of a project.
In this lesson, you have already built, formatted, and burned the Swiss Tourism project using the Build and Format command, but you should know that you can also use the Burn command to build, format, and burn a disc in one step. Burning a disc is the only way to accurately test a finished project. Whenever possible, you should burn a disc and then test it in a set-top DVD player; these often function differently than software players. Since you may experience variations in performance among different brands and models of DVD players, it’s a good idea to test your disc in as many types of players as possible.
Note
If you are creating a DVD-9 project (a disc with dual layers on a single side), you can test it with the Apple DVD Player. Another option is to use one of the newly introduced dual-layer DVD recorders, allowing you to burn your entire DVD-9 project on a single DVD disc.
For this lesson, you do not need to go through the process of burning a second disc, particularly if you are using DVD-R media, which is more expensive than CD-R media but is the most common choice to burn recordable DVDs. If you don’t wish to burn the disc, skip the following exercise.
Follow these steps to burn a DVD using the Burn command:
- Insert a blank DVD-R disc into your recordable drive.
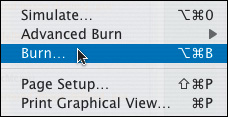
- Click the Burn icon in your toolbar, or choose File > Burn, to initiate the process.
- Watch the Log tab as DVD Studio Pro builds, formats, and burns your project onto a disc.
Since your next project will be in NTSC, you will need to reset your encoding preferences.
- Choose DVD Studio Pro > Preferences.
- Click the Project pane and select the NTSC radio button to switch your video standard from PAL to NTSC.
- Click OK to save the changes.
Choosing Recordable DVD Media
There are many flavors of DVD media. If you purchase a new Apple computer today, you will get a multiformat DVD recorder. DVD Studio Pro 4 now supports the RW format. If your built-in DVD recorder is a multiformat drive, you can even write DVD+R and DVD+RW media. The only drawback to using recordable media, such as DVD-R, is that it will not work in every player. (It does, however, work fine with most new players.) Replicated discs, produced at a DVD-manufacturing plant, are the only discs guaranteed to work in all DVD players and computers equipped with DVD-ROM drives.
Of course, the type of media you choose is dependent on the formats supported by your recordable drive. Here is a list of the available formats of DVD media:
• DVD-R is the preferred format for burning DVD discs, since it is still the most compatible format. Also, the variety and availability of DVD-R media—including inkjet printable discs—make it the least expensive option.
Note
DVD Studio Pro supports the DVD-R authoring media, using the Pioneer S201 DVR-S201 drives for preparing projects for DVD replication. However, this media is rarely used, because the required drives are not readily available.
• DVD-RW is the rewritable flavor of the DVD-R discs. All Apple SuperDrives support this format.
• DVD+R is a newer writable format initially introduced by Philips and HP. It is now supported by all newer multiformat DVD recorders and by DVD Studio Pro 4.
• DVD+RW is the rewritable version of the DVD+R media.
Tip
Rewritable DVD-RW and DVD+RW media are great for testing discs, because you can rewrite numerous times.
• DVD+R DL (dual-layer) is a format introduced in 2004. This is highly recommended for anyone who wants to burn or replicate DVD-9 discs, because it allows you to test DVD-9 discs before going to DVD replication.
Note
DVD-RAM media, which is compatible with a very small number of players, is mostly used for storage and backup.

Distribution of Your Completed DVD
Once you’ve completed a DVD project, you must decide how to deliver your final disc. The most common option is to duplicate a disc with a recordable DVD drive or a DVD duplication tower. However, for professional projects that require several hundred to thousands of discs, replication is the best option. Replication also ensures that your discs are compatible with all players.
Duplication vs. Replication
In the world of DVD production, duplication is the process of creating copies of a disc using recordable media and drives. For example, burning discs using Apple’s SuperDrive, an external DVD recorder, or a DVD duplication tower is considered duplication. Discs duplicated in this way are relatively easy to produce. This method is best suited for quantities of up to 300 discs. Duplicated discs are not 100 percent compatible with all DVD players, but using better quality media will improve the playback compatibility.
Replication, on the other hand, uses a glass master process to produce a large quantity of discs on media that is usable in any player. This process must be done at a special facility possessing the equipment to create a professional DVD from a disc, FireWire hard drive, or DLT (10/20 GB or 20/40 GB) that you provide.
Replication is impractical for small runs of discs, because the price per disc is too high unless large quantities are required. It is usually cost-effective when you need 500 discs or more. Replication is, however, the highest-quality and most reliable method for producing DVDs. In addition, DVD replication is the only method of adding copy protection to your DVDs.
Choosing a Disc Type
Before you decide either to duplicate your disc or to send your project off to a manufacturing plant for replication, you should carefully consider the different options available for your disc. Some of the options—especially the selection of the type of disc to use—should be a part of the planning that takes place as you are beginning a new project.
There are several types of discs to choose from when you are distributing a DVD. Although the size of your project (the amount of data) is the most important consideration for choosing a disc type, other factors are important, too.

DVD-5 A DVD-5 disc is the most common type of disc used for both duplication and replication. This disc format is the most practical for short films or other projects that do not require a lot of space. DVD-5 discs can hold 4.7 GB of data, which is roughly equivalent to about two hours of video and audio content (encoded at lower bit rates), on one side of a disc.
Dual-Layer DVD-9 The next step up from a DVD-5 is a DVD-9 disc, with a maximum capacity of 8.54 GB. DVD-9 discs utilize a single side with two thin layers stacked on top of each other. The laser in a DVD player can read through the first layer to the one beneath, which nearly doubles the capacity of a single-sided, single-layer DVD-5.
For any projects over two hours (or for projects with lots of extra content), this is the recommended type of disc. In fact, DVD-9 discs are used for the majority of Hollywood releases. What’s more, since only one side of the disc is used, labels can be placed on the unused side. In addition, the use of dual layers makes these discs hard to copy, since amateur video pirates cannot write the same amount of content to a DVD-5.

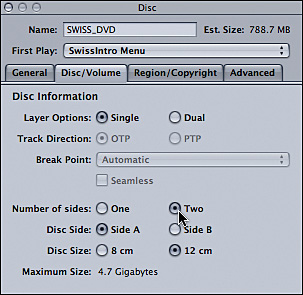
DVD-10 and DVD-18 The next larger disc is a DVD-10, which is essentially a dual-sided disc with a DVD-5 on each side. This means a DVD-10 needs to be manually flipped over in order to play the other side. For this reason, and the lack of an adequate solution for labeling (since both sides are occupied), these discs are rarely used.
For extremely large projects that need to squeeze as much data as possible onto a single disc, there are DVD-18 discs. These are dual-sided, dual-layer discs that are basically two back-to-back DVD-9s. They are more expensive and difficult to create, and they are rarely used, because two separate DVD-9 discs are usually cheaper and easier to produce. Also, DVD-18 discs, like DVD-10 discs, do not have space for disc labels.
Mini-DVDs Mini DVDs can be created using small, 8 cm discs, which are similar to the miniature CD singles you sometimes find at a record store. These discs can hold up to 1.47 GB of data. Although these discs are impractical for most projects, they can be a good way to deliver a DVD “business card” or other short, promotional pieces.

Note
The small 8 cm discs will currently not play in slot-loading DVD drives. In order to play these discs, you must use a DVD player with a tray.
Media Issues for Replication
If you are planning to use replication as your distribution method, you should also consider the following:
• If you are using DVD-R general media, it is critical to use DVD-R rather than DVD+R/+RW or DVD-RW media. Because of a different recording process, DVD+R media seems to cause problems for DVD replication. The problems occur when the discs are read for glass mastering. Also, if you decide to use DVD-R media, make certain you use the highest quality discs available. Sending an extra disc as a backup whenever possible is a good idea as well.
• If you are using DLT tapes for replication of SD projects, the preferred type of media is Type III, 10/20 GB and 20/40 GB tapes, because most of the DVD replication plants are equipped to read these tapes. Just remember to always write uncompressed information to a DLT.
Note
You can receive check disc packages from a replication plant, which consist of a small quantity of discs to test your project before going forward with the replication of the entire order.
Setting a Layer Break Point
For DVD-9 projects, you need to set a layer break point. The layer break point determines where to switch between layers in a disc.
If you are authoring a DVD-9 project, DVD Studio Pro will automatically set a break point. If you are not happy with the automatic layer break point, you have the option to set it manually. Typically, you should place a layer break at a point in a movie where there is no picture or sound, such as a point where audio and video fade to black. This makes the freeze that occurs while the disc switches layers less noticeable to a viewer, although you are still likely to notice the layer break. Layer breaks must also occur on the I-frame of a closed GOP MPEG stream.
Tip
The easiest way to ensure a perfect layer break point is to create a chapter marker in Final Cut Pro, which you can convert into a layer break point marker in DVD Studio Pro.
- In the timeline of the Track Editor window, click a chapter marker that is a suitable break point.
You will turn this chapter marker into a dual-layer break marker.
- In the Inspector, click the Dual-Layer Break Point checkbox.
- You can choose to deselect the Chapter checkbox if you wish to make this marker a break point exclusively.
You have now set the break point for the disc.

Adding Copy Protection
Copy protection is an important option for DVDs that are commercially produced and sold. However, copy protection systems are not always effective and are relatively easy to circumvent. Typically, copy protection is only important for discs sold in stores, and not for corporate projects distributed internally at a company. In fact, you might decide that the cost and risk factor are negligible for a commercially distributed project as well, particularly if you are producing only small quantities and do not wish to pay the licensing fees.
If you decide your project would benefit from some form of copy protection, you currently have two choices: CSS (Content Scrambling System) or Macrovision. Basically, CSS is a form of protection that prevents a disc from being copied digitally (from a DVD to a hard drive or another disc). Macrovision prevents the copying of video using analog connections from a player to a recording device.
Before you decide to use either one of these protection schemes, be sure the replication plant you have chosen offers them, because only certain plants license these services. Additionally, any copy protection information you add to a project, such as CSS, can be transmitted to a replicator only on DLT tapes or DVD-R authoring media (as opposed to DVD-R general media). This is because the DVD-R general media is unable to unlock a portion of the disc where copy protection information needs to be written. A final issue to consider is that the addition of copy protection to a disc may delay the replication process.
If you choose to add CSS to your project, you can “flag” or mark it in DVD Studio Pro, although you will need to add a “CSS-key” from the replication plant to activate this form of copy protection. Macrovision also requires you to sign a contract in order to license its copy protection technology. The price is usually determined by the quantity of discs produced.
Follow these steps to set up copy protection for your disc:
- In the Outline tab, click the Disc icon to activate the Inspector.
- Click the Region/Copyright tab to get to the copyright information.
- Click the Copyright Management checkbox to activate the copyright options.
- From the Copy Generation pop-up menu, choose No Copy Permitted.
- Select the “Format for CSS” checkbox, or set Macrovision to one of the Type settings (contact your replicator).


Lesson Review
1. What is the term for a DVD-Video disc that includes DVD-ROM content?
2. Before outputting a project, what should you always do?
3. What is the name of the folder where DVD Studio Pro records all the DVD-Video formatted files?
4. Why is it a good idea to format a copy of your project to a folder on your hard drive before you burn a DVD disc?
6. How do you set a dual-layer disc break point?
Answers
2. Simulate the project inside DVD Studio Pro, and check every button on every menu to ensure your navigation structure does not contain any errors.
4. Because you can open the project in the Apple DVD Player and test it in an actual DVD-Video player before burning a disc. If it works in the Apple DVD Player, it will work on a set-top DVD-Video player.
5. A disc with two data layers on one side that holds 8.54 GB of data.
6. Find a marker in one of your tracks where you want to make the break point, select it, and select the Dual-Layer Break Point checkbox.
Keyboard Shortcuts
