Lesson 3. Setting Up a Simple DVD
None
Media
Media > Swiss folder
Time
This lesson takes approximately 45 minutes to complete.
Goals
Storyboard your DVD
Set DVD Studio Pro preferences
Use encoding preferences
Import video and audio tracks
Manage assets in the Assets tab
Set chapter markers for faster navigation
Set first-play action
Simulate your DVD
In the next five lessons, you will create a simple DVD for Swiss tourism that contains a promotional movie and a slideshow designed to attract visitors to Switzerland. As befits its European subject matter, the Swiss Tourism project uses the PAL video format, which is the standard in Europe and many countries around the world.
The Swiss Tourism project is a good example of a corporate-style DVD that is relatively simple to put together. It builds on the features that are commonly used in iDVD and at the same time introduces some exciting capabilities of DVD Studio Pro, such as flexible drop zones. As you step through the various exercises, you’ll learn how to build one of the most common types of DVD on the market.
Storyboarding Your DVD
Before beginning any new DVD project, even simple projects with only a few assets, you should plan out the way you want the buttons and links to work by creating a storyboard. A storyboard is like a road map that simplifies the creative process. It reduces the possibility of mistakes and alerts you to problems you may have while authoring, such as missing media or graphics. We’ll go over the process of creating a generic storyboard here, and then go on to create the storyboard for the Swiss Tourism DVD.

The best way to create a storyboard is to make a visual diagram, almost like a flowchart. Your diagram illustrates the navigation path the viewer will follow, from menu to menu, and from button to track or slideshow.
Start your storyboarding process by listing all of the media you want to include, as well as any special elements you might require, such as subtitles or alternate tracks of audio and video. Think about how many menus you will need to link these elements together.
Then begin to draw the chart. Each element in your DVD—menu, video track, slideshow, and so on—gets its own box.
Most DVDs have at least one main menu containing buttons that link to the other project elements. Consider how many buttons you should put in a menu. Although you can have as many as 36 buttons per menu, that would not create a good user experience.
You can handle the need to offer additional choices by adding submenus and creating buttons in the main menu to link to the submenus. Draw squares in each menu or submenu to represent buttons. Then draw a line from each button to the box that represents the element it links to. When you are done, you should have a simple diagram, much like a family tree, that shows how each element is linked, either to a menu, submenu, or another element.
Creating the Swiss Storyboard Using the Graphical Tab
In DVD Studio Pro, the most convenient way to create your storyboard is by using the Graphical view. (In fact, you’ll be using the Graphical view throughout this book for various projects.) You can even print the contents of the Graphical tab, or save it as a PDF file, so that you can present the project’s structure to your clients and collaborators.
Let’s go ahead now and use the Graphical tab to generate the storyboard for the Swiss Tourism project. Our DVD will contain one video track (including markers), one audio track, and a slideshow. The video track will contain markers that can be accessed by the remote control’s Next Chapter and Previous Chapter buttons, or by a submenu that contains buttons linked to each chapter. You’ll need the following elements for this project:
• An intro menu
• A main menu
• A chapter index menu
• A video track
• A slideshow
- If it is not open already, launch DVD Studio Pro by double-clicking the DVD Studio Pro icon in your Dock or Applications folder.
- Change to Extended view by pressing F2.
- Click the Graphical tab to activate the Graphical view.
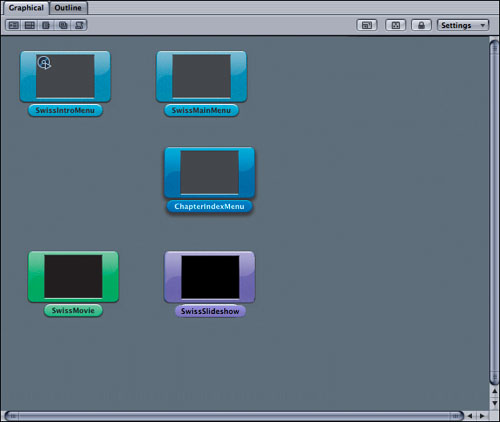
Menu 1 and Track 1 are already there in the Graphical view.
- Select Menu 1 and rename it SwissIntroMenu. This will be an intro menu that transitions to the main menu.
- Click Add Menu in your toolbar and name the new menu SwissMainMenu.
This will be the main menu, with button links to the chapter index submenu, the video track, and the slideshow.
- Click Add Menu in your toolbar again to add another menu, and name it ChapterIndexMenu. This will be the chapter index submenu.
- Select Track 1 and name it SwissMovie. This will be the video track.
- Click Add Slideshow in your toolbar and name the new slideshow Swiss Slideshow. This will be the slideshow.
At this point, you have set up the basic structure of your Swiss DVD.
In order to connect all your elements with arrows indicating how the menus will function, you would need to create all the buttons and connections with the appropriate links. That is beyond the scope of this lesson. For now, you’ve achieved a basic overview of your project. It’s a lot easier to print the Graphical tab and use a pencil to sketch the desired navigation in your storyboard.
- Choose File > Print Graphical View.
If you don’t have a printer connected when the print dialog opens, there are options that will allow you to “print” the file as a PDF, which you can open in Apple Preview or Adobe Acrobat.
- Choose File > Save to save your project. Save your project as Swiss_DVD, and place it in the My_Projects folder.
- In the Outline tab, click the Disc icon.
As you can see, the disc is automatically named SWISS_DVD. This name is also updated in the Disc Inspector.
Once you output your DVD, this name will appear on it. For example, when you place the disc in the DVD-ROM drive of a computer, the name of the disc that appears on the Desktop will be SWISS_DVD.


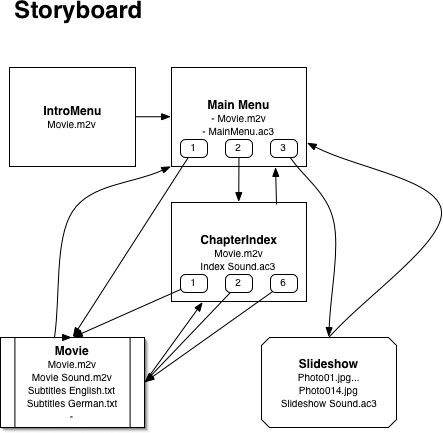
To create a comprehensive storyboard, you can use an application such as OmniGraffle or any other storyboarding/flowchart application. Use the image below as a guide. Notice that the main menu connects to all three of the submenus, and the chapter index menu provides an additional connection to the video track. Notice also that each submenu connects back to the main menu.
This step helps tremendously to give you a feeling for how a DVD works. Each element in your DVD project needs to be linked to another element. For example, if an item, such as a track, does not have an end jump link (an assigned element that the user returns to when the current item finishes playing), it will freeze on the last frame played. If you want to get back to the menu, the only way to achieve this would be by clicking the Menu button on the remote control.
Previewing the Finished Project with Apple’s DVD Player
The Apple DVD Player can be used to play back the contents of a DVD’s VIDEO_TS folder in order to test the project prior to formatting, or burning, it to disk. The Swiss PAL project is not included on the NTSC build of this book’s companion DVD. However, you can still watch the final build of the Swiss project using the Apple DVD Player.
To help you fully understand storyboards, as well as familiarize you with the DVD you are about to create, it might be helpful to examine the storyboard as you navigate through an example of the completed Swiss Tourism DVD.
Opening the Swiss Project in DVD Player
- Navigate to the Applications folder on your hard drive, and find the icon of the DVD Player program. Double-click the icon to launch the DVD Player application.
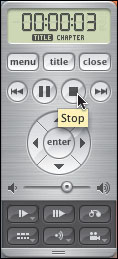
- Click the Stop button on your DVD Player controller.
- Choose File > Open DVD Media (Command-O).
- Navigate to the Media > Swiss > Swiss_builds > VIDEO_TS folder in the DSP4 Book Files folder, that you copied to your hard drive, to open the Swiss PAL project.
- Click the Play button on the DVD Player’s onscreen remote control to begin playing the project.

Exploring the DVD
The first thing that appears is the SwissIntroMenu that leads to the SwissMainMenu.

- Click the down arrow navigation button on the remote control.
The Chapter Index button lights up with a yellow highlight, indicating that you have selected it.
- Move the pointer to the Slideshow button.
Now it is highlighted, and the other two buttons remain white. In this menu, yellow highlights are used to indicate a button in its selected state, and white indicates a button in its normal, unselected state.
- Click the Slideshow button.
Notice that the button changes color for a split second before the slideshow starts playing. The red color indicates that a button is in its activated state.
A 1-minute slideshow with multiple transitions will play. When it is finished, the screen will return to the main menu.
- Press the Up Arrow on your keyboard once to select the Chapter Index button.
Now you know three ways to navigate with DVD Player: clicking the remote control arrow buttons on the onscreen remote, moving and clicking the mouse, and using the arrow keys on the keyboard.
- Press Return.
The Enter button on the remote control presses down, as though pressed by remote control. Pressing Return, clicking the Enter button on the remote control, and clicking a button with the mouse will all activate a button.
The Chapter Index submenu will appear. Using any method, navigate to one of the buttons and activate it. It will jump directly to a chapter marker and begin to play from that point.
- Click the Next Chapter button (the button to the right of the Stop button) on the remote.
The disc will jump to the next chapter marker. Now you know there are two ways to jump to a chapter marker: using the remote control and using the buttons from a chapter submenu.
- Click the Menu button on your remote control.
The disc returns to the main menu.
- Click Play Video.
The disc will play SwissMovie from the beginning.
- Watch the movie to familiarize yourself with the content.
- Click the Next Chapter button on the remote control to jump to another chapter marker.
- When you have familiarized yourself with the Swiss DVD, click the Stop button on the remote control.
- Press Command-Q to quit DVD Player.
- Examine the storyboard in the beginning of this lesson.
It should now seem very familiar to you, having navigated the DVD. Now you can draw lines from the elements in your printout to the proper places.
You have seen the blueprint for the Swiss Tourism DVD, and you have seen the finished product. It’s time to begin authoring it yourself with DVD Studio Pro.
Identifying Source Video Settings
Before starting a DVD project, you must choose the video standard for your DVD depending on the source material you have (NTSC for North America and Japan; PAL for Europe and just about everywhere else), and set your preferences in DVD Studio Pro to encode and output your video in the correct format. As you collect and prepare your video, audio, and graphic assets for import into DVD Studio Pro, it is important to know how the footage was originally recorded. If it isn’t in the same format you intend to use for your DVD, it must be converted prior to encoding and importing it.
The difference between standard-definition PAL and standard-definition NTSC is primarily in the frame rate and size. PAL runs at 25 frames per second (fps), and its frame size is 720 × 576 pixels. NTSC runs at approximately 30 fps, and its frame size is 720 × 480 pixels. The video for the Swiss Tourism DVD was shot with a PAL Betacam camera, and because this project is intended for the PAL market, you will not need to do any conversion. However, you will need to change the encoding settings in the Preferences window, as explained next.
Setting DVD Studio Pro Preferences
At times, you may need to modify the global default settings of DVD Studio Pro to meet the requirements of future projects. In the following exercise, you will open the Preferences window and learn about some of the most essential preferences in DVD Studio Pro.
- Choose DVD Studio Pro > Preferences.
The Preferences pane opens. This pane lists preferences that apply to the overall DVD project.
The Preferences window lists several panes, each containing settings for specific areas of DVD Studio Pro.
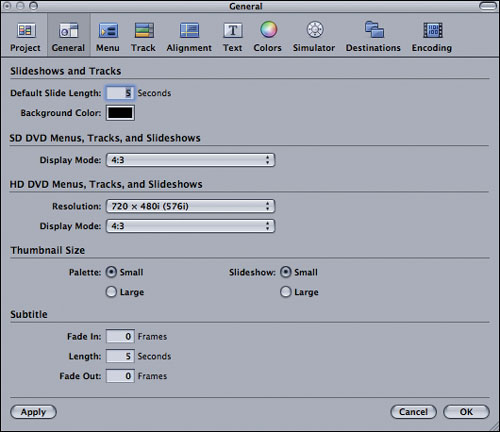
- Click the Menu icon to view an example of a Preferences pane.
By clicking the Menu icon, you can access the preferences for menus. The default Motion Duration for any motion elements in your menu is 30 seconds. Buttons are automatically assigned from left to right. The default for Final Rendering is your graphics card (this is “Hardware based”). You can also choose the Drop Palette Delay and the Video Background Color for your menu.
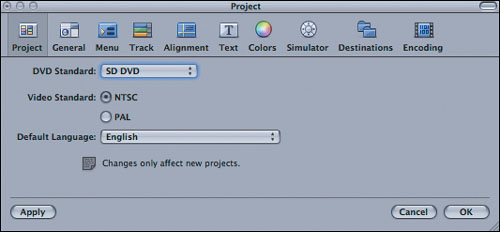
- Click the Project icon.
This is where you can choose the DVD Standard, Video Standard, and Default Language settings that will be applied when creating new projects.
Settings you define in the Preferences window will apply to all new projects created in DVD Studio Pro. However, for individual projects, you can override most of these settings. For example, in the next exercise, you will use the Inspector window to change your Disc settings from NTSC to PAL for the Swiss_DVD project.
- Click OK.


Setting Up Disc Properties
Now that you have learned how to get around in the DVD Studio Pro workspace and how to adjust your preferences, you can begin to assemble a simple DVD project. Putting together a simple DVD will introduce you to methods for working in the application. You will see how easy it is to create a working DVD title in DVD Studio Pro with one video track and an associated audio track.
The first step is to set up disc properties, including the navigation on the remote control.
- Be sure you’re in Extended view (press F2).
- At the top of the Outline tab, click once on the disc icon to select it.
- Go to the Inspector window, which will display the name “Disc” in its window title bar. The Inspector window displays only properties for the currently selected project element.
The Inspector window appears in the lower right of the screen.
If the Inspector window does not display global properties for your disc, and “Disc” does not appear in its title bar, click once on the disc icon at the top of the Outline tab (in the upper-left corner of the screen).
- Near the top of the Inspector window, click the PAL radio button.

Setting the Remote Control
By default, DVD Studio Pro sets the Menu button on the remote control to Menu 1. Menu 1 is now SwissIntroMenu, as you renamed this menu at the beginning of the lesson. Since you are using the SwissMovie track only in this exercise, you should set the remote control Title and Menu buttons to go to the SwissMovie track.
- Click the Title pop-up menu, and choose Tracks and Stories > SwissMovie > [Track].
- Click the Menu pop-up menu and again choose the SwissMovie track.
Now if the user presses the Menu or Title buttons on his or her remote, the SwissMovie track will start playing again.

Setting the First-Play Action
The first-play action is used to specify what is displayed when the disc starts playing for the first time after it is inserted into a DVD player. Since the first play is automatically set to Menu 1 when you begin a project, you will need to change this assignment to suit the project you have created. In the following exercise, you will change this property to SwissMovie in the Inspector window for the disc.
- At the top of the Outline tab, verify that the SWISS_DVD disc icon that is selected, and then go to the Disc Inspector window.
- At the top of the Disc Inspector window, locate the First Play pop-up menu and choose Tracks and Stories > SwissMovie > [Track].

You have now changed the First Play option from Menu 1 to SwissMovie. If a user puts the disc into his or her DVD player or DVD-ROM drive, the SwissMovie will play automatically.
Importing Video and Audio Files
DVD Studio Pro offers you two methods for importing and managing assets:
• The Palette window
• The Import function of the Assets tab
The Palette window, which is similar to the iDVD Palette window, is basically a file browser. You can use it to select the folders that contain the assets you want to make available to all of your projects. The Palette method is helpful if you need to use the same assets in several projects, such as logos and other identity elements.
The second method for importing assets—the Import function in the Assets tab—is highly recommended if you intend to use your media for only one project. Using the Assets tab, you can organize your media in a way that is very similar to using bins in Final Cut Pro’s Browser window.
The difference between the Assets tab and the Palette window is that the Assets tab lists media that have actually been added to your project, whereas the Palette window lists media that are available to be added to your project.
In the following steps, you will import an audio file and a video file, and organize them in the Assets tab.
- Find the Assets tab in the top-left corner of the DVD Studio Pro interface.
- At the top of the Assets tab, click the Import button.
- Navigate to Media > Swiss using your file browser.
- Open the Swiss_Assets folder and navigate to the Tracks folder.
- Select SwissMovie.m2v and SwissMovie.ac3 from the Tracks folder.
You can select more than one file sequentially by holding down the Command key and clicking each file, one at a time.
- Click Import to bring the files into DVD Studio Pro.
The video and audio files will show up in the Assets tab. As you do this, DVD Studio Pro creates a parsing file that contains all the information about the MPEG2 video assets. This process takes a little while, depending on the size of the assets. You will see a “P:” and a progress bar in the Status column of the asset. As soon as the progress bar reaches 100%, a green ready symbol will indicate that the parsing file has been created and the asset is now ready to be used.
- In the Assets tab, create a folder by clicking the New Folder button.
- Type SwissMovie for the name of your folder and press Return.
- Drag both SwissMovie.m2v and SwissMovie.ac3 into the SwissMovie folder.
- Drag SwissMovie.m2v from the Assets tab onto the Outline tab, and continue to hold the mouse button down.
This will activate the Outline tab, which is now accessible to you.
- Continue dragging SwissMovie.m2v down onto the SwissMovie track icon in the Outline tab, and release the mouse button.
This step causes a few things to happen automatically. The audio is automatically assigned to the track (as long as the audio file’s name before its extension is the same as our video file name before its extension). In addition, the movie becomes available in the Track Editor timeline along with any markers that may have been set in Final Cut Pro. However, for this video you will set markers manually, as explained next.


Setting Chapter Markers
In the following exercises, you will learn how to navigate through the Track Editor and set two chapter markers to permit faster navigation through your video track. Typically, chapter markers will already be set at a specific spot in Final Cut Pro (or Final Cut Express or iMovie) and exported to DVD Studio Pro. In this exercise, you will learn how to set these chapter markers in DVD Studio Pro using three different methods. Also you will learn how to move your playhead in the Track Editor.
Resizing the Track Editor
Before you begin working with tracks and adding markers, you may want to adjust the Track Editor window and its timeline to make them easier to view.
- If the Track Editor is not already open, click the Track tab to open it.
- Press Shift-Z to resize the video and audio tracks and fit the entire timeline into the Track Editor.
You can also use the Track Editor zoom controls, located in the lower-left corner of the Track tab, to resize the track contained in the timeline. Adjust the slider controls until the window looks like the one shown here.
Notice that there is already a marker named Chapter 1 at the beginning of the track. DVD Studio Pro automatically creates a start marker for every track, which is a requirement of the DVD specifications.

Importing Marker Lists from a Text File
You will now import some markers from a text list. A text list is a convenient way to quickly add markers in DVD Studio Pro. The list you import should be a plain text file (TextEdit or another ASCII file without formatting applied). Once you’ve imported the markers, you’ll use them to view the Swiss Tourism movie in the Track Editor.
If you want to set up your own chapter marker list, use Apple’s TextEdit application and just type in the timecode, set a tab as a delimiter, and type the name of the chapter marker. The result is a file that looks similar to the Swiss_Markers.txt file. Once you import this file, chapter markers will be set at the timecode specified, and these markers will be named according to the text you have entered.

Tip
If you determine the chapter markers based on the timecode in Final Cut Pro, your asset-based timecode typically starts at 01:00:00:00. It is recommended to use a zero-based timecode to set up your chapter marker list, but you can easily change the settings in DVD Studio Pro. Choose View > Timescale > Asset-Based to switch your timescale to asset-based timecode.

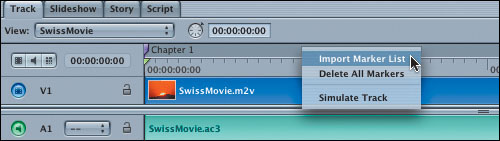
- Control-click in the dark gray marker area of the Track Editor, and choose Import Marker List from the shortcut menu.
- Navigate to the Swiss_Docs folder inside the Media > Swiss folder, and select the text file called Swiss_Markers.txt.
- Click Import to import the text file with the marker names and the timecode, then click OK.
DVD Studio Pro displays a message that states how many markers were imported. Your new markers should appear automatically in the timeline.
- In the Track Editor, press the Down Arrow key on your keyboard to move the playhead to the next chapter marker.
Tip
You can also use Shift-M or Control–Right Arrow to get to the next chapter marker. To move the playhead to the previous chapter marker, you can use Option-M or Control–Left Arrow.
- Navigate to the marker called Living in Switzerland, and press the Spacebar to play this section in your Viewer window.
- Press the Spacebar again to stop playing the track in your Viewer window.
- Check out the other chapter markers you have created by pressing Control–Right Arrow and pressing the Spacebar to start and stop playback.


Creating Chapter Markers Manually
At this point, you need to manually add two more chapter markers. The positions of these two chapter markers will be 00:06:13:05 for the marker named Wintersports and 00:08:08:03 for the marker named Explore the Mountains. You will move to the correct marker positions for these chapters using two different techniques.
- Press Control–Right Arrow to move the playhead to the Winter Wonderland chapter marker in the Track Editor timeline.
- Click the playhead and drag it to the approximate location where you want to place a new chapter point—at about 00:06:13:05.
You can view the current timecode to the left of the Start field in the Track tab (directly above the timeline).
If you want to move the playhead one frame at a time, use the Right and Left Arrow keys on your keyboard, and find the exact frame for your marker.
- Press the Right Arrow or Left Arrow key to navigate to the exact position for this chapter marker, represented by the timecode numbers 00:06:13:05.
- When you arrive at the exact position for your marker, press M on your keyboard, which sets a new chapter marker.
When you place a new marker, a thumbnail image of the frame is created in the timeline track.
- Name the new chapter marker Wintersports in the Name field at the top of the Marker Inspector window.
Properties for the marker you have created should be displayed in the Inspector window. If you accidentally deselect your marker, you can easily select it again by clicking its purple pointer above the timeline.
Now let’s use the second method for locating the spot for the next marker—entering the marker position in the current timecode field.
- Select all the text in the current timecode field, enter 080803, and press Return.
When you enter a new time in the timecode field, DVD Studio Pro adds the appropriate colon separators—08:08:03—and moves the playhead to that position.
- Press M once to create a new chapter marker.
- Name the chapter marker Explore the Mountains in the Marker Inspector window.
- Choose File > Save to save your project to your My_Projects folder.
- Click the Simulate icon in your toolbar to automatically test your project.
The keyboard shortcut for the Simulator is Command-Option-0 (zero).
Tip
You may Control-click individual project elements, the entire disc in the Outline tab, or many other places to quickly simulate specific elements in your project.
- Check out all chapter markers in your project by clicking the Menu, Title, Next Chapter, and Previous chapter buttons on the remote to ensure proper disc operation.
Note
You will be using the Simulator throughout this book. It is an extremely helpful feature to quickly test what you have created in DVD Studio Pro. However, since the Simulator uses assets that have not yet been converted into the final DVD format, loading an asset or jumping to links on a disc may take longer than it will when the disc is finally built.


Lesson Review
2. True or false: DVD Studio Pro allows you to print the Graphical view.
3. What is the standard-definition PAL frame dimension?
4. True or false: You must set all of your chapter markers by hand inside DVD Studio Pro.
5. True or false: You can drag assets in the Outline view to move them from folder to folder.
Answers
1. A simple flow chart that shows you how your project’s buttons, menus, tracks, and other items link together, giving you a good idea of your finished DVD-Video’s navigation structure.
2. True. You can even use the print dialog to “print” a PDF version of the menu to email to your client.
3. Standard-definition PAL video frames are 720 × 576 pixels (NTSC is 720 × 480 for DVD-Video).
4. False. You can import a plain text file (.txt) that lists your markers using timecode values and names.
5. True. The Outline view works much the same way as your computer’s Finder window, so you can drag assets from folder to folder, and even create new folders to group similar assets together.
