Lesson 12. Scripting
Lessons > lesson12 > 12_Scripting_start
Media
Media > Blackbox folder
Time
This lesson takes approximately 60 minutes to complete.
Goals
Create simple menu loop scripts
Use pre-scripts
Script with GPRMs
Use compare commands to program your DVD-Video to make its own decisions
Scripting extends the interactivity of your DVD. Because DVD-Video is relatively old technology—the format was finalized in 1994 when solutions like Flash and the Web were in their infancy—its interactivity is limited. But you can increase the functionality and interactivity of your DVDs by tapping into the communications between your discs and the DVD player.
Because scripts are situation-dependent, your scripting requirements will change from project to project. This lesson introduces you to a couple of the important scripts you’ll use day-to-day with DVD Studio Pro. It will help you understand how to create scripts and familiarize you with the ways that scripting can add interactivity to DVDs.
Building Menu Loop Scripts
At its core, DVD-Video’s interactivity simply consists of the ability to jump between project items. Whether you’re using a track end jump to link to a menu or a menu button to target a slide in a slideshow, DVD authoring is focused solely on building a navigational structure to display your items.
Scripting is a method for enhancing this kind of interactivity. When you write DVD scripts, you are essentially building complex and advanced project navigation structures—things you can’t do using button targets or end jumps alone.
When writing scripts, you’ll use jump actions a lot. Menu loop scripts allow you to jump back to the loop points of your motion menus, instead of their start points. Viewers enjoy watching a menu build the first time, but when they return to a menu, they don’t want to wait to get to the loop point to see the menu’s navigation.
You’ll begin the lesson by building a menu loop script.
- Open the DVD Studio Pro Project named 12_Scripting_start.
- Control-click the Graphical view and choose Add > Script from the shortcut menu. When the new script tile appears, rename it Main Menu Loop.
- Double-click the script tile to open it in the Script Editor.
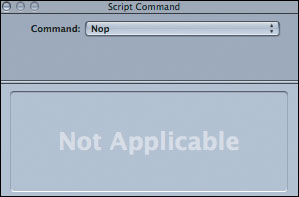
By default, each new script has a single Nop command. Nop stands for “no operation,” or do nothing. When a DVD player runs into a scripted Nop command, it does exactly what the Nop command says to do—nothing! In other words, the DVD player will literally stop playback right at that point—usually displaying a black screen—because it has no further commands to follow. Because of this, you need to replace this default Nop command with a command that’s a bit more useful.
- In the Script Editor, select the Nop command.
The Inspector updates to display the selected command’s properties. As you can see, there’s not much to this script, because all of the Inspector’s property areas currently read, Not Applicable.
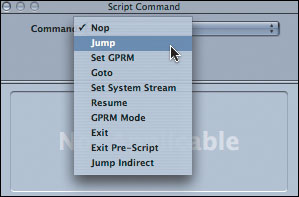
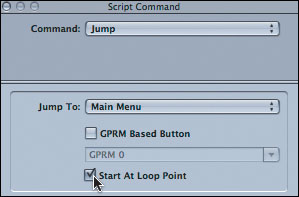
- Turn the Nop command into a jump action by choosing Jump from the Inspector’s Command pop-up menu.
The Inspector updates to show you the jump command’s unique properties. Back in the Script Editor, the command line changes to Jump not set. The next step is to set the project item that this command targets.
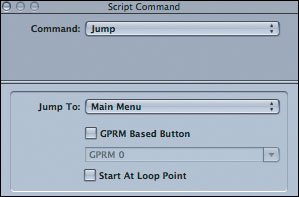
- From the Inspector’s Jump To pop-up menu, choose Menus > Main Menu > [Menu]. Notice that additional options for your jump command become available, including Start At Loop Point.
- Select the Start At Loop Point option.
Now, when the script command executes, it will not only jump to the Main Menu, but will also jump directly to the loop point of the menu.
Having written your first script, it’s time to create the same basic script for the other menus in your DVD that have loop points. These menus include the Gallery Menu, Commercials Main Menu, and Client Spots Sub Menu.
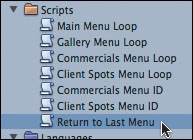
- In the Graphical view, create three additional scripts and name them Gallery Menu Loop, Commercials Menu Loop, and Client Spots Menu Loop.
You may move your tiles around in the Graphical view as desired.
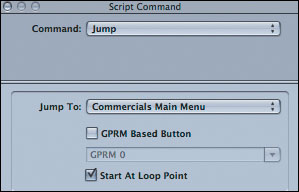
- Double-click the Commercials script tile to open it in the Script Editor.
- In the Script Editor, select the Nop command.
- From the Inspector’s Command pop-up menu, choose Jump.
- From the Jump To pop-up menu, choose Menus > Commercials Main Menu > [Menu] and select the Start At Loop Point option.
Now it’s time to finish the scripts for the Client Spots Sub Menu and the Gallery Menu.
- Open the Client Spots Menu Loop script into the Script Editor and select the Nop command. Then, in the Inspector, set the jump command, target it to the Client Spots Sub Menu and make sure Start At Loop Point is selected.
- Open the Gallery Menu Loop script into the Script Editor and select the Nop command. Then, in the Inspector, set the jump command, target it to the Gallery Menu, and make sure Start At Loop Point is selected.


You have now written four scripts. Each script will allow your viewers to jump back to a specific menu and its loop point. There’s only one problem. The scripts you wrote are part of your project, but nothing is actually connected to them.
Connecting the Scripts
After you have created your scripts, you’re ready to connect them to the project. Connecting scripts requires more work than creating scripts. For instance, a menu loop script needs to be connected in several places because it will replace the normal functionality of a DVD. End jumps for your tracks will also have to be connected to the appropriate script so they jump to the loop point of the menu when the track has finished playing.
In this project, each of the four scripts jumps to a different menu and its loop point in your project. To work, they need to be connected properly. To do this, you’ll start with the disc level functionality and then move on to other parts of your project.
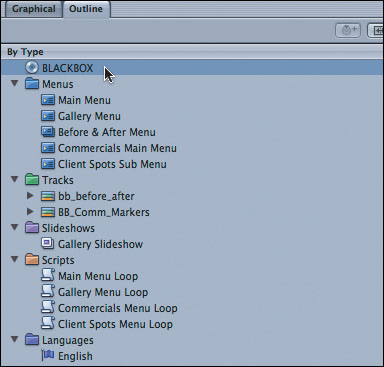
- Select the Outline tab and click the top element, BLACKBOX, which has the disc icon to its left.
- In the Inspector, under the General tab, set the Remote Control’s Title settings to Scripts > Main Menu Loop.
The Title button is connected to the Main Menu Loop script. Now, whenever viewers press the Title button on their remotes, they return to the loop point of the main menu.
- From the Menu pop-up, choose Scripts > Main Menu Loop.
Now that both Title and Menu buttons of the remote are connected, you can take care of any menus that link back to the main menu.
- In the Outline tab, select the Gallery Menu.
- In the Menu Editor, Control-click the Main Menu button and, from the shortcut menu, choose Target > Scripts > Main Menu Loop.
Now, when the Main Menu button is selected, the viewer is returned to the Main Menu’s loop point, and not to the start point of the menu.
- In the Outline tab, select the Before & After Menu. In the Menu Editor, target the Main Menu button to the Main Menu Loop script.
- In the Outline tab, select the Commercials Main Menu. In the Menu Editor, target the Main Menu button to the Main Menu Loop script.
- In the Outline tab, select the Client Spots Sub Menu. In the Menu Editor, target the Main Menu button to the Main Menu Loop script.
Now all of your Main Menu links connect to the loop point of the main menu. You will also want to target your tracks and stories and slideshow to the correct menu loop scripts.
- In the Outline tab, select the Gallery Slideshow.
- In the Inspector, change the End Jump to Scripts > Gallery Menu Loop.
When the slideshow finishes playing, it will now jump to the loop point of the Gallery Menu.
- In the Inspector, under the Advanced tab, change the Menu target to Scripts > Gallery Menu Loop.
This action ensures that the Menu button on the remote will target the script you created in the previous step.
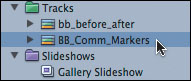
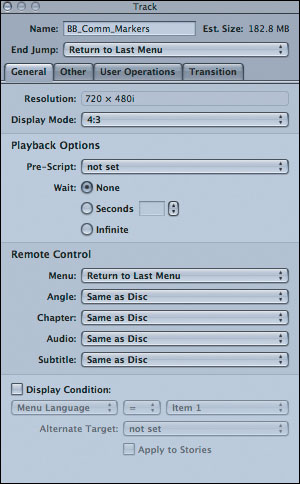
- In the Outline tab, select the BB_Comm_Markers track.
- In the Track Inspector, change the End Jump to Scripts > Commercials Menu Loop.
- In the Inspector, under the General tab, change the Menu target to Scripts > Commercials Menu Loop.
Now it’s time to handle the stories.
- In the Outline tab, click the disclosure triangle next to the BB_Comm_Markers track and select Mini Story.
By default, the Remote Control Menu target for a story will be the same as the track from which it’s created. In this case, you will need to reset the target, because the menu that links to the stories is different from the menu that links to the Play All for the track. You will change the target for the Menu button on a remote, along with the end jump for each story.
- In the Inspector, change the End Jump to Scripts > Client Spots Menu Loop.
- In the Inspector, change the Menu target to Scripts > Client Spots Menu Loop.
With your first story targeted, it’s time to do the same thing for the other two stories.
- In the Outline tab, select Honda Story. In the Inspector, change the End Jump and the Remote Control Menu targets to Scripts > Client Spots Menu Loop.
- In the Outline tab, select Jaguar Story. In the Inspector, change the End Jump to Scripts > Client Spots Menu Loop.
- In the Inspector, change the Menu target to Scripts > Client Spots Menu Loop.
Finally, you need to make sure that the bb_before_after track is targeting the right menu.
- In the Outline tab, select bb_before_after. In the Inspector, change the Remote Control Menu target to Menus > Before & After Menu > [Menu].
Now when viewer presses the Menu button on her remote control, she will return to the Before & After Menu instead of the Main Menu.
Your menu loop scripts are now complete.
- Save your work.
- Simulate your project to thoroughly test your new scripts.
Now that you have created your first set of scripts for your project, it’s time to build some intelligence into your DVD by creating pre-scripts and a return to menu script.


Creating Return to Menu Scripts
DVD-Video titles commonly access the same track from more than one video. For example, you may press the Play All button on the main menu of a DVD and also access that same track from one of the scene selection menus.
In this exercise, you will create two pre-scripts. A pre-script is a script that launches before the item it’s assigned to, instead of after the item. The pre-scripts you create will assign values to two of your menus. Then, you’ll create a script that uses these values to determine which menu to return to when the viewer finishes playing the track or presses the Menu button on the remote control.
Using Pre-Scripts
Scripting is powerful because it lets you program your DVD-Video to make its own decisions. These decisions can be based on viewer input, such as which buttons are clicked, or they can be automatic decisions based on the order in which project items are played. In either situation, you will need to use variables to give your scripts maximum playback power.
In this exercise, you’ll work with pre-scripts to assign a unique value to each menu that accesses the BB_Comm_Markers track (Commercials and Client Spots). As a result, you’ll be able to write a script that can make a decision based on those values.
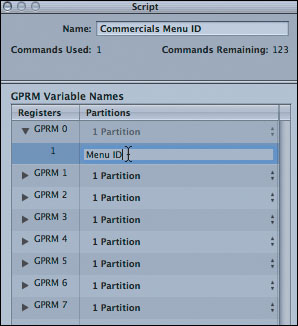
- In the toolbar, click Add Script. When the new script appears in the Outline tab, rename it Commercials Menu ID.
- Add another script. When the new script appears, rename it Client Spots Menu ID.
Naming all of your scripts will make it much easier to figure out what’s what as you go on.
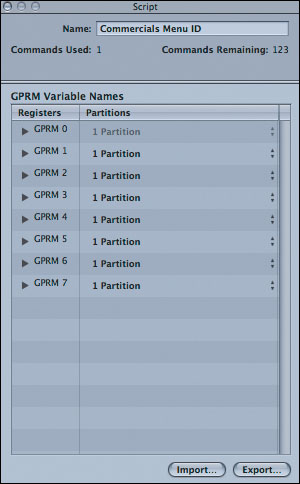
- In the Outline tab, click the Commercials Menu ID script to open the script into the Inspector.
In DVD-Video scripting, variables are called General Parameter Register Memory, or GPRMs for short. In DVD Studio Pro, you have access to eight GPRMs that you can use in your scripts. By giving these GPRMs jobs, you can get them to do some pretty cool stuff.
Note
The DVD-Video specification provides for 16 GPRMs. DVD Studio Pro gives you access to eight of them, and reserves the other eight GPRMs for behind-the-scenes calculations.
You should start by naming the GPRM that you are about to use. Choose a name that relates to the job it is going to perform. GPRMs are global to your entire project, so it’s often beneficial to use one GPRM in one script, a second GPRM in the next script, and so on. Renaming a GPRM makes it less likely that you will accidentally use the same GPRM in two conflicting scripts.
- In the Script Inspector, click the disclosure triangle next to GPRM 0. In the Partitions column, double-click GPRM 0 and rename it Menu ID.
GPRM 0, now called Menu ID, will be used to store the identification (value) of either the Commercials Main Menu or the Client Spots Sub Menu. This first script will move the value of 1 to the MENU ID, which will then be assigned to a specific menu in the project.
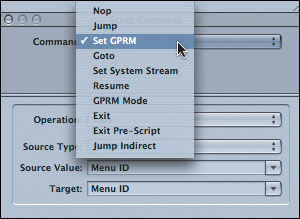
- In the Script Editor, select the Nop command. In the Command pop-up menu in the Inspector, choose Set GPRM.
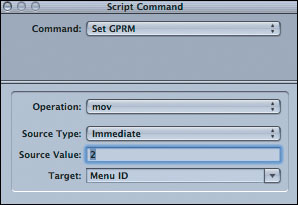
- Choose mov from the Operation pop-up menu and Immediate from the Source Type pop-up menu.
This action allows you to move a value into a GPRM immediately.
- Set the Source Value to 1 and press Enter. Make sure the Target is set to Menu ID.
The Target pop-up menu displays all of the GPRMs, including the one you renamed to Menu ID. As its name implies, the Target menu determines the GPRM into which you will move the value.
Your first script is complete. Now you need to finish the second one you created called Client Spots Menu ID.
- In the Outline tab, click the Client Spots Menu ID.
- In the Script Editor, select the Nop command. In the Inspector, from the Command pop-up menu, choose Set GPRM.
- Choose mov from the Operation pop-up menu and Immediate from the Source Type pop-up menu.
- Set the Source Value to 2 and press Enter. Make sure the Target is set to Menu ID.
Your second script is complete. When executed, it will assign the value of 2 to the Menu ID. Now, you need to attach the new scripts to your project as pre-scripts.
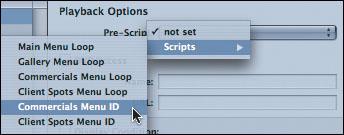
- In the Outline tab, select Commercials Main Menu. In the Inspector, select the Advanced tab.
- Under Playback Options, from the Pre-Script pop-up menu, choose Scripts > Commercials Menu ID.
This action assigns the pre-script to the Commercials Main Menu. Each time the pre-script executes, it will assign the value of 1 to the menu. Now, you need to assign the other script to the Client Spots Sub Menu.
- In the Outline tab, select Client Spots Sub Menu. If necessary, in the Inspector, select the Advanced tab.
- Under Playback Options, from the Pre-Script pop-up menu, choose Scripts > Client Spots Menu ID.
This action assigns the second pre-script to the Client Spots Sub Menu. Each time the pre-script executes, it will assign the value of 2 to the menu.


Now that values are being assigned to the two menus that access the BB_Comm_Markers track, it is time to create a script that will jump back to the last menu the viewer accessed the track from.
Choosing the Last Menu
With your pre-scripts in place that assign a value of 1 to the Commercials Main Menu and 2 to the Client Spots Sub Menu, you are ready to write the script that will jump back to the last menu that accessed the BB_Comm_Markers track. This script will tie everything together and ensure, for instance, that the viewer won’t wind up on the Commercials Main Menu when he accessed the BB_Comm_Markers track from the Client Spots Sub Menu.
- In the Outline tab, Control-click and, from the shortcut menu, choose Add > Script.
- Rename the new script Return to Last Menu.
- Open the Return to Last Menu script into the Script Editor, and select the Nop command. In the Inspector, set the jump command.
- Set the Jump To pop-up menu to Menus > Commercials Main Menu > [Menu] and select Start At Loop Point.
This command will jump to the root of the Commercials Main Menu so that the pre-script can execute. It will also start at the loop point of the motion menu. With the jump set, you now need to decide when this script will execute by using a compare command.
Note
Pre-scripts execute only when the DVD jumps to the root of the item to which the pre-script is assigned. The root of an item is denoted in the DVD Studio Pro target menus by the item name in square brackets. For example, when targeting the root of a menu, choose the [Menu] option. If you target a button on the menu, the pre-script you assigned will not execute.
- Select the Compare Command checkbox to activate its options.
In DVD Studio Pro, a compare command is similar to a conditional statement in other programming languages. Classically, a conditional statement has an “if/then” structure. In other words, a conditional statement might say, “If the last menu has a value of X, then jump to that menu.
However, in DVD Studio Pro, the conditional statement is configured backward. So, the conditional statement would say, “Jump to the last menu if the last menu has a value of X.” In both cases, the result is the same.
As with all things in DVD Studio Pro, learning by example is the best way, so let’s create a compare command and see how it works.
- In the Inspector’s Compare Command area, set the “Execute if” pop-up menu to Menu ID, the “is” pop-up menu to =, and the “to” pop-up menu to Immediate.
- Type 1 in the “with value” field and press Return.
This compare command will look at the Menu ID and, if the value it’s storing is equal to 1 (based on the pre-scripts), it will then immediately Jump to the Commercials Main Menu.
With that command finished, it is time to create another command that jumps to the Client Spots Sub Menu if the value of 2 is being stored in Menu ID.
- In the Script Editor, add a new command line at the end by clicking the + (plus sign) button.
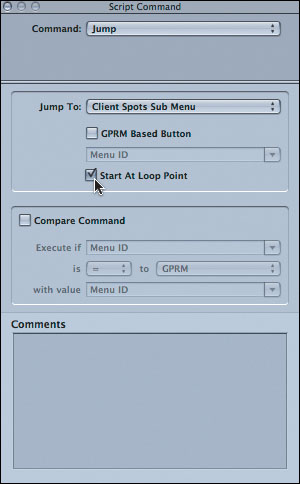
- In the Inspector, set the jump command and then set the Jump To pop-up menu to Menus > Client Spots Sub Menu > [Menu] and select Start At Loop Point.
- Select the Compare Command checkbox.
- Set the “Execute if” pop-up menu to Menu ID, the “is” pop-up menu to =, the “to” pop-up menu to Immediate, and enter 2 in the “with value” field. Press Return.
Note
DVD players execute scripts beginning at command line 1, and then progress to command line 2, command line 3, and so on. If a particular command line cannot be executed (for example, if a compare command is false or doesn’t match its criteria), the player simply skips to the next command line, and it keeps going until it finds a command line that jumps it out of the script.
- Save your work.
Now it’s time to create an escape command for your script.


Using Escape Commands
As just mentioned, DVD players execute scripts beginning at command line 1, progress to command line 2, and so on. But what happens if the script does not contain any command lines that the player can execute? The player continues to the end of the script and stops. Black screen . . . oh no!
To guard against the black screen, you should place an escape command at the end of every script. An escape command is a jump action placed in a script’s last command line. If by some chance the player works through every line in the script without executing, the escape command ensures that your DVD keeps playing. Typically, you’ll use the escape command to jump the viewer back to an easily recognizable menu, such as the project’s main menu, although the choice is up to you and depends on the particular situation.
Let’s add an escape command to the Return to Last Menu script you just created.
- In the Script Editor, add a new command line to the end of the script.
- In the Inspector, configure the new command as a jump command.
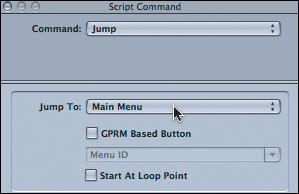
- Set the Jump To menu to target Menus > Main Menu > [Menu].
Now it’s time to target your tracks and stories to your new Return to Last Menu script.
Targeting Your Script
Your final step is to make sure that viewers return to the last menu after watching the BB_Comm_Markers track (or if they press the Menu button on their remotes). By setting the end jump and menu targets to the script, you will have completed your return to menu script.
- In the Graphical tab, select the BB_Comm_Markers track.
- In the Inspector, set the End Jump to Scripts > Return to Last Menu.
This action changes the end jump of the track to execute the Return to Last Menu script, which will determine and jump to the last menu the viewer came from when she accessed the track.
- In the Inspector, under the General tab, change the Menu pop-up menu to Scripts > Return to Last Menu.
- Save your work.
- Simulate your project.
Note
You could, in fact, use the Connections tab in DVD Studio Pro to target all of your scripts in future projects. In large projects with many elements and scripts, the Connections tab makes fast work of authoring your DVDs. However, performing these steps manually, as you have in this chapter, helps you understand where everything is connected so that when you use the Connections tab, you’ll have a greater understanding of the structure.
Congratulations! You just set up a sophisticated DVD project with scripts that make the DVD more interactive. In the next lessons, you will learn about additional advanced features, such as creating transitions and alternate angles, that can further enhance the user experience of your DVDs.
Lesson Review
1. What is the purpose of menu loop scripts?
2. How does a pre-script work?
5. What do escape commands do, and why is important to place them at the end of every script?
Answers
1. They allow you to return to the loop points of motion menus, instead of the start points.
2. If a script is assigned as a pre-script, it will execute before the item that it is attached to plays.
3. General Parameter Register Memory
4. GPRMs are variables that you can use to hold values as a script executes.
5. Escape commands return the viewer to an easily recognizable menu. They prevent the script from stopping and the screen from going black if all previous conditional statements are not met.