Appendix A. Advanced Encoding
All encoding for DVD aims at achieving a delicate balance of maximum encoding speed, minimum file size, and the best audiovisual quality. Each asset type created in Compressor (which ships as part of Final Cut Studio) calculates that balance differently, based largely on the source media and distribution platform. The more you know about advanced encoding options and file size management techniques, the more likely it is that you’ll be able to improve the quality of your DVD content while ensuring that you’ll have room to include all of the content on the disc.
Bit Budgeting
Bit budgeting gets its name from the smallest unit of measurement in the digital world: a bit. A bit has a value of either 1 or 0 in the digital binary system. Bits are measured in units of thousand, million, billion, or trillion bytes. A byte is really just a packet of 8 bits, and both bits and bytes are units of measurement. Bits are usually used to measure speed (for example, 56 kilobit per second modem), whereas bytes are usually used to measure size (for example, 120 gigabyte hard drive). When abbreviated, measurements of bits use lowercase letters, and measurements of bytes use uppercase letters, as in Kbps (kilobits per second) versus MB (megabytes).
The goal of bit budgeting is to encode your video and audio assets at the highest possible quality, while keeping the combined file sizes of your assets under the total disc capacity. Figuring out the maximum bit rate with which you can encode your files without making them too large to fit on the DVD is where the “budgeting” part of bit budgeting comes in.
It is often helpful to use bit budgeting equations or special calculators to estimate the size of a DVD project. We’ve included one calculator for you to experiment with on the book’s companion DVD, as Appendix B. These formulas can assist you in choosing a bit rate for your media, so that it fits easily on a disc. For example, if you have video that is 2 hours long, a very high bit rate—such as 8 megabits per second (Mbps)—might make the resulting MPEG-2 file too large for a 4.7 GB DVD-5 disc, particularly after other assets, such as audio, subtitles, slideshows, and so on, are added into the equation.
Compressor enables you to control the file size of your final project. There is a little bit of math involved, but don’t worry, you will learn a few tricks that will make it easy to calculate the estimated disc size. But do take bit budgeting seriously. Even experienced authors are sometimes forced to re-encode asset files if they don’t properly budget their projects, especially when encoding feature-length materials.
What If the Data Doesn’t Fit?
If all of your assets will not fit on the DVD, you have a number of options:
• Encode your audio to Dolby Digital AC-3 files. This is almost required for programs longer than 90 minutes. If you encode a two-hour movie, the available bit rate for the video is a mere 3.4 Mbps. Using Dolby Digital audio encoding, you can still encode your video at 4.7 Mbps. Why do you save this much space? PCM, although high in quality, is the least efficient file format in the DVD-Video specification. PCM audio files consume 1.5 Mbps of the total bandwidth for playback. However, encoding audio files using Dolby Digital at 192 Kbps frees an additional 1.3 Mbps for your video bit rate.
• Use stories rather than duplicating media. Since stories allow you to perform relatively seamless branching, you can combine several versions of the same program on a disc by reusing media. However, viewers may notice a brief pause when the jump occurs.
• Leave assets off the disc. This works only if you are not required to use all elements in your project.
• Author a DVD-9, which will give you a total disc capacity of 7.95 GB.
Measuring Disc Size
The DVD Studio Pro toolbar includes a Disc Meter indicator to measure how much space your assets occupy.

The problem with using this indicator to monitor progress is that by the time the assets are in your project, they’re already encoded. Unless you want to spend time re-encoding video (and you probably don’t), you’ll need to calculate the combined file sizes of all audio and video assets—including motion menu backgrounds, audio for slideshows, and all alternate audio and video streams—before adding them to your project.
Using Bit Budgeting Methods
An easy bit budgeting method is to calculate a bit rate for your video using the formula 560 ÷ x, where x is the length in minutes of your video assets. This formula assumes that you are using compressed audio, such as AC-3. If you are using PCM audio, you need to subtract another 1.3 Mbps from the result of this equation.
For example, if you have 120 minutes of video, you get an approximate bit rate of 4.67 Mbps (560 ÷ 120 = 4.67). If you are using the AIFF uncompressed audio that the QuickTime encoder supplies, your available bit rate for your video will be 3.37 Mbps.
Tip
Do not forget that this bit rate is the combined bit rate for audio and video, so you will have to split it between the audio and video streams.
If you are using multiple audio and video streams, you can also use a bit budget calculator, which is usually a simple spreadsheet that helps you calculate the bit rate for your video and audio assets. See Appendix B for information about a bit budget calculator.
Choosing MPEG-2 Encoder Settings
In Lesson 9, you learned that the Quality settings are important because they affect both the appearance of the encoded MPEG-2 file and the stream’s resulting file size. In general, as you lower the quality, you also lower the file size. In fact, if you encode using Compressor at a minimum quality setting of 2.0 megabits per second (Mbps), you can squeeze nearly three hours of video onto a DVD-5 disc.
The following figure displays the Inspector window inside Compressor with MPEG-2 encoder settings:

In general, you should never encode MPEG streams with a maximum bit rate higher than 8 Mbps. The DVD-Video specification requires DVD-Video players to stream no more than 10.08 Mbps from a DVD disc. If you set your maximum bit rate to 8 Mbps, you are left with only 2.08 Mbps for the audio and subtitle streams. A 48 kHz, 16-bit stereo PCM audio stream has a data rate of approximately 1.5 Mbps. Add that bit rate to the 8 Mbps you need for the video stream, and your DVD-Video will stream at a maximum bit rate of 9.5 Mbps, only 0.58 Mbps under the overall maximum allowed by the DVD-Video specification. When in doubt, a bit rate of 4.5 Mbps is always a good rate to start with, because it generally provides a great balance between quality and file size.
About Motion Estimation
When an MPEG encoder creates an MPEG-2 stream, it divides each source frame into a matrix of 16×16-pixel squares called macro-blocks. As the encoder progresses from frame to frame, it determines the color information in each macro-block and then calculates how far the blocks of color have moved within the frame.
For example, if you have a tripod shot of a balloon drifting across the sky, the blocks of color in the balloon never change. They simply float from left to right. Using motion estimation, Compressor can determine how far these blocks of color have moved, and then encode a motion vector to define the change of position. As a result, a tiny algorithm is all that’s used to define the motion of these color blocks over time. The individual pixels inside the blocks do not need to be re-encoded.
Compressor has three levels of motion estimation: Good, Better, and Best. The only difference between the three is that, compared to the Better setting, the Best setting searches farther into the frame to find macro-blocks that have moved. Similarly, the Better setting searches farther than the Good setting. However, all of the additional searching will increase encoding time. If you choose Best motion estimation, be prepared for lengthy encoding times.
If time is critical, set motion estimation to its lowest value.
Understanding GOP Structures
Let’s take a moment to dive deep into the science behind MPEG-2 encoding. MPEG-2 streams achieve incredibly low data rates because they employ both spatial compression and temporal compression. Spatial compression occurs within a single video frame, similar to the way the JPEG file format spatially compresses still images. Temporal compression occurs between multiple frames in the video stream.
All MPEG encoders begin the compression process by dividing the video stream into small units called group of pictures (GOP). A GOP can have three types of frames: I-frames, P-frames, and B-frames. Of the three, both I- and P-frames are considered reference frames because they can be used as the base from which to derive other frames in the GOP. With that in mind, let’s examine these three frame types.
About I-Frames, P-Frames, and B-Frames
I-frame stands for intra-frame. I-frames are spatially encoded within the video frame. You can consider an I-frame to be the GOP’s keyframe. It is the highest-quality frame in the GOP, but it’s also the one that takes the most bits to encode because the I-frame is not mathematically derived from any other frame. Rather, it contains all of the data needed to completely reproduce the frame, independent of any other frame in the GOP. I-frames are very important to the MPEG stream because all chapter markers are locked onto I-frames.
P-frame stands for predicted frame. A P-frame is derived mathematically from content within the reference frame that immediately precedes it. This preceding frame could be an I-frame or another P-frame. Remember, both I-frames and P-frames are considered reference frames.
For example, if a macro-block is black in the preceding reference frame and is also exactly the same shade of black in the current P-frame, the encoder doesn’t need to re-encode that macro-block’s color information. Rather, the P-frame can contain only a small motion vector that simply says: leave the macro-block the same as it was in the last frame.
Note
Portions of the P-frame that aren’t covered by motion vectors are encoded the same way as an I-frame.
A B-frame is a bi-directional frame. Although B-frames are similar to P-frames, they differ in that they are derived from information in both the preceding and following reference frames. B-frames are the most efficient of the three types of GOP frames.

The GOP structure you select dictates how far apart P-frames are placed in the stream. If the stream has a low degree of motion, P-frames can be spaced farther apart because less change occurs between successive pixels over time. However, if the stream contains a high degree of motion, you can enhance image quality by moving the P-frames closer together, resulting in fewer B-frames between the P-frames. In this case, the encoder does not have to span extra B-frames as it encodes successive P-frames, which makes it easier to create motion vectors.
Adjusting the GOP structure and size can result in higher-quality MPEG-2 streams, but will also increase your file size, though the increase will sometimes be modest. By adjusting the GOP structure, you can create streams with more P-frames and fewer B-frames. P-frames more accurately reproduce the source image than B-frames, producing high-quality images; but that extra quality means P-frames also have larger sizes than B-frames. Consequently, if you add more P-frames to each GOP, you increase the size of each GOP.
Note
There are no hard and fast rules about the GOP structure and size you should use. Your choices of structure and size depend upon the content of the stream you are encoding. A GOP size of 15 frames for NTSC (12 frames for PAL) and an IBBP structure generally provide sufficient quality for most MPEG streams.
GOPs can be either open or closed. When Closed structure is selected, the GOP begins with an I-frame and ends with a P-frame. An I-frame is self-contained and does not refer to any other frame in the GOP. A P-frame, on the other hand, refers to the previous reference frame to derive its image data. Consequently, a closed GOP is a self-contained unit in the final MPEG stream because it contains all of the information necessary to recreate every frame in the GOP.
Note
If you are creating multi-angle or mixed-angle tracks, you must use closed GOPs. Multi-angle or mixed-angle tracks use I-frames as the bridge between video streams. In a closed GOP, an I-frame is always the first frame in the GOP. Consequently, if both streams use closed GOPs of the same GOP size and structure, all I-frames will align throughout the multi- or mixed-angle stream, which means the DVD-Video player can easily switch from one stream to another.
When Open structure is selected, the GOP Size updates to 14 frames. Additionally, the open GOP begins with a B-frame and ends with a P-frame. A B-frame refers to both the preceding and following reference frames. In other words, to derive its image data, the B-frame at the front of the open GOP refers to the P-frame at the end of the previous GOP. Thus, in contrast to a closed, self-contained GOP, an open GOP does not contain all of the information needed to fully recreate every frame in the GOP.
So why use open GOPs? The quick answer is file size. Open GOPs tend to have one fewer P-frame and one more B-frame than a closed GOP. B-frames are smaller than P-frames, so an open GOP structure will enjoy a smaller file size than a closed GOP structure, even if it’s only a few kilobytes smaller. Because a lot of GOPs are contained in an MPEG stream, all those kilobytes quickly add up.
Understanding Audio Encoding Formats
DVD Studio Pro supports all of the following DVD-Video–compliant digital audio formats. DVD-Video–compliant means that format meets the DVD-Video specification and is legal for use in DVD-Video titles. The supported audio formats are:
• PCM—PCM stands for pulse code modulation, or uncompressed, digital audio. AIFF, WAV, and SDII (Sound Designer 2) files all fall into the PCM category. For DVD-Video, PCM files must use a sampling rate of 48 or 96 kHz, at a bit depth of 16-bit, 20-bit, or 24-bit. PCM is a mandatory audio format for DVD-Video players.
• AC-3—Also called Dolby Digital, AC-3 is a common 5.1 surround sound format. Like PCM, AC-3 is a mandatory audio format for DVD-Video. So, if you deliver nothing but PCM or Dolby Digital audio streams on your discs, you can be sure your viewers will hear them.
• MPEG-1 Layer 2—MPEG-1 Layer 2 is an audio-compression format on PAL DVDs. MPEG-1 Layer 2 supports 5.1 surround sound and data rate compression, but it is not a mandatory audio format for DVD-Video.
• DTS—DTS (Digital Theater Systems) is a high-quality surround format that offers higher data rate settings than AC-3. However, DVD players are not required to have a DTS decoder. DTS streams are typically included as optional soundtracks, provided in addition to an AC-3 or PCM stream.
Note
The DVD Studio Pro Simulator does not have a DTS decoder. If you need to hear how a DTS audio stream sounds, you must burn a DVD disc and play it in a DVD player that supports DTS playback.
DVD Studio Pro comes with all the tools necessary to work with PCM and AC-3 files. If you want to use MPEG-1 Layer 2 or DTS files, you’ll have to look elsewhere for encoders.
Encoding AC-3 Files
AC-3 is more than just a playback standard. It also includes playback controls not available to the other formats. For example, AC-3 files incorporate a dynamic range control setting, as well as a volume control circuit (dialogue normalization) that is designed to automatically adjust dialogue levels between audio streams.
Choosing Encoded Data and Control Parameter Settings
When an AC-3 file is created, two types of data are wrapped into the package: encoded data and control parameters.
Encoded data settings control things like the number of channels in the file or the data rate. These parameters are “hardwired” with the file and cannot be changed after encoding is finished.
Control parameter settings are simply playback hints sent with AC-3 files that tell the playback device how to play the encoded data. Examples of control parameters are a file’s compression preset and downmix settings. These settings are interpreted by the playback device when the disc is played. Most control parameters can be overridden or altered by the playback device.
The following table lists encoded data settings and control parameters settings:
Encoded Data and Control Parameter Settings

Note
In the Disc Setup pane of the Apple DVD Player Preferences window, you can disable Dolby dynamic range compression. This option overrides the included compression profile control parameters to help you avoid gain pumping (dramatic and unexpected fluctuations in volume) as a result of incorrectly encoded AC-3 streams.

Using Frequency Masking
AC-3 files achieve significant file size reduction through a process of perceptual coding algorithms that selectively remove frequencies from the final AC-3 stream that we can’t hear. This process is based on frequency masking.
To get a sense of what frequency masking does, consider the following example. You’re talking to a client on your cell phone, and a cement truck drives by. The rumble of the cement truck is loud, and it overrides your client’s voice on the cell phone. Even though the client’s voice is in a much higher frequency range than the rumble of the truck, loud sounds in one frequency range tend to override quieter sounds in adjoining frequency ranges. This phenomenon is called masking, and it lies at the heart of the AC-3 encoder.
When the AC-3 encoder creates a stream, it begins by separating the audio frequency spectrum into thousands of tiny bands. It then searches these bands to find which ones are relatively loud when compared with their neighbors. Bands that are so quiet they will not be heard are removed from the stream. Consequently, AC-3 is a lossy compression process, because some bits of audio are lost, that is, permanently removed.
Choosing Audio Bit Rates
Dolby Digital’s biggest virtue is its ability to compress digital audio to reduce the file size while maintaining high-quality sound. Although you could encode all AC-3 streams at the maximum setting for DVD-Video (448 Kbps), doing so would create AC-3 streams that have far bigger file sizes than necessary. Instead, you should learn how to clamp down Compressor’s digital “vise” to squeeze the smallest possible file size out of your AC-3 files while maintaining optimal sound quality.

You can accomplish this goal by adjusting Compressor’s Data Rate setting. The data rate (or bit rate) you select will depend entirely upon the content of the source material you are encoding. For example, if you’re encoding a mono stream consisting only of narration, you can use a lower data rate than you would use for a complete stereo mix (music and vocals) while maintaining high quality for that narrative content. Similarly, 5.1 streams, which include six channels of audio, need a higher data rate than stereo streams.
Note
There’s no hard and fast rule about which data rate to use. When in doubt, you may need to encode the same file with two or three data rates and then audition the final files to hear which one sounds the best, given the resulting file size.
The following table lists common data rates used with three common audio coding modes:
Data Rates for Common Audio Coding Modes

About Dialogue Normalization
In the audio world, normalization is the process of matching the volume levels of two songs. For example, it’s common to normalize the volume of CD-Audio so that peak volumes of all songs on the disc are close to 0 dB on the digital scale (also referred to as 0 dBFS, or 0 decibels full scale).
In the video world, audio is normalized in a slightly different way. When you watch a video, your ear pays the most attention to the audio stream’s dialogue, because the dialogue provides most of the information. During the video, certain sounds, like explosions or chirping crickets, are either louder or quieter than the dialogue. Nonetheless, viewers continue to focus on the dialogue. Because of this phenomenon, it’s common practice to normalize the audio levels of your video so that all dialogue reaches the viewer at the same volume level, across all programs. Dialogue normalization is the reason why the news announcer on one television channel is heard at the same volume as the narrator in a documentary on the next channel. With CD-Audio discs, you are concerned only with peak volumes (specifically, you strive to get the audio as loud as possible without clipping by driving the level past 0 dBFS), but in the video world you’ll usually look at average volume levels. Peak volumes are still important, because you need to ensure that your audio stream doesn’t clip. But, because dialogue is not a steady sound—it fluctuates over time and even within individual words—you’ll mainly need to focus on average volume levels.
Tip
Properly encoded AC-3 files for DVD will always sound quieter than broadcast television. If your project’s audio must sound as loud as broadcast television, use PCM audio files that have an average level of dialogue of –12 dB and peak levels no higher than –6 dB.
For reference, the following table lists the average and peak volume levels commonly used for several different audio and video formats:
Average and Peak Dialogue Level Comparison

If you compare the settings in the preceding table, you’ll see that movie soundtracks and DVD-Videos use the same average dialogue level (–31 dBFS), as well as the same peak volume. This is because DVD-Video was designed as a delivery format for movies. Although DVD uses have extended far beyond Hollywood, AC-3 files were nonetheless designed with films in mind.
However, not all audio streams are created using an average dialogue level of –31 dBFS. If you’re editing in Final Cut Pro, you will often mix dialogue so that it uses an average dialogue level of –12 dB. You’ll need to lower the volume of this audio stream to the –31 dB required to create perfect audio for DVD-Video. Dialogue normalization will perform this job automatically.
More Info
For a good discussion on creating audio in Final Cut Studio, see the book Apple Pro Training Series: Soundtrack Pro 2 (Peachpit Press, 2007).
Before encoding audio, you need to determine the average level of the dialogue in your audio stream. To do this, you can watch Final Cut Pro’s audio meter and make an educated guess. Alternatively, you can use sophisticated audio analyzing tools such as the Waves Paz Analyzer (www.waves.com) and Logic Pro. Whichever method you use, remember the average level of your audio stream’s dialogue, because this is the value you will type into Compressor’s Dialog Normalization setting.
The dialogue normalization value (DNV) is stored as a control parameter in the encoded AC-3 stream. During playback, your DVD player’s AC-3 decoder applies the normalization value by attenuating (lowering) the volume of your AC-3 stream by (31 + DNV) dB. So, if your source audio stream has dialogue at an average level of −12 dB, and you set its DNV to −12 at the time of encoding, the stream will be attenuated during playback by (31 + (−12)) dB, or 19 dB. That’s a lot of attenuation, but the result is that the stream plays with an average dialogue level of of −31 dB.
Similarly, if a second audio stream on your DVD has an average dialogue level of −20 dB, at playback it will be attenuated (31 + (−20)) dB, or 11 dB. The result is that this audio stream will also play back with an average dialogue level of −31 dB. The two audio streams are both normalized to −31 dB.
Understanding Compression Profiles
AC-3 files contain special control parameters that set dynamic range compression at playback. Not to be confused with data rate compression, dynamic range compression does not lower the data rate of the final AC-3 file. Instead, it helps to even out the difference between the highest and lowest volumes in a single audio stream.
You can assign one of six compression profiles to AC-3 files through the Dolby Digital preset’s Preprocessing tab. Each compression profile is descriptively named. For example, if your audio stream contains music, the Music Standard profile is the one to select. If your audio stream contains nothing but dialogue, use the Speech profile.
Note
AC-3 compression profiles are designed by Dolby, and you can’t change them or their sound parameters.

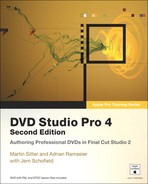
What do these compression profiles sound like? Well, it’s hard to tell sound from numbers, but the following table lists the profile qualities:
AC-3 Dynamic Range Compression Profiles
Notice that the null band of each compression profile straddles –31 dB. The null band specifies a range in which no dynamic range compression is applied to the file. When the volume of the stream rises above the top of the null range, dynamic range compression is applied to lower the volume. When the volume drops below the bottom of the null band range, dynamic range compression is applied to raise the volume. The result is that the sound is always pushed toward the volume levels at the top and bottom of the null band.
If you’ve properly set your dialogue normalization value, your audio stream’s dialogue will play at –31 dB. At this setting, dynamic range compression will not often be applied to the file—another important reason to properly assign your dialogue normalization value. In fact, there’s one thing about dynamic range compression that you must keep in mind:
If you don’t correctly set your dialogue normalization value, you must disable dynamic range compression, or your AC-3 file will very likely exhibit gain pumping—that is, dramatic and unexpected volume fluctuations.