Lesson 7. Adding Subtitles
Lessons > lesson07 > 07_Swiss_start (or the My_Projects > Swiss_DVD project you created in Lesson 6)
Media
Media > Swiss folder
Time
This lesson takes approximately 30 minutes to complete.
Goals
Investigate the uses of subtitles
Create and edit subtitles in DVD Studio Pro
Import subtitles from a text file
Learn about using buttons over video in a subtitle stream
Learn about closed captioning
Subtitles allow you to communicate with audiences in markets around the world. Like closed captioning for the hearing impaired, subtitles display the dialog in text, usually in the bottom portion of the screen, or provide a narration of the audio track. A feature that distinguishes closed captioning from subtitles is that closed captions also include descriptions of other sounds that are part of a scene, such as sound effects and music.
DVD subtitles have many advantages over closed captioning. One of the main advantages is that a viewer can turn subtitles on or off as they are needed, or select among 32 different subtitle streams. Each stream can represent a different language, which gives the viewer lots of control over the language to display for dialog and narration.
In addition to displaying text, a subtitle stream can contain overlays for buttons or other simple graphics. With the press of a button on the remote control, a viewer can jump to behind-the-scenes information.
In this lesson, you will learn how to easily create your own subtitles using DVD Studio Pro’s built-in subtitler. You will also import one German subtitle file and use it for the SwissMovie track.
Creating Subtitles in DVD Studio Pro
DVD Studio Pro includes a powerful and convenient subtitling feature, which allows you to create subtitles directly in the Timeline window of the Track Editor. This enables you to easily sync your text with the video track and to rearrange, edit, and delete existing subtitles. For this lesson, you will create subtitles that indicate the places depicted in the SwissMovie.m2v track.
- Choose File > Open and open the My_Projects > Swiss_DVD file that you created in Lesson 6.
If you did not complete Lesson 6, open Lessons > 07_Swiss_start and relink the media if necessary.
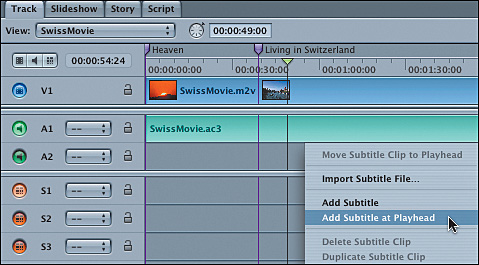
- Click the Track tab to open the Track Editor.
- Type 4900 directly in the timecode field, and press Enter to move the playhead to 00:00:49:00.
- Control-click in the first subtitle stream (S1), and choose Add Subtitle at Playhead from the shortcut menu.
When you choose Add Subtitle at Playhead, a subtitle is placed on the subtitle track starting at the playhead location. The subtitle is automatically selected for you and loaded into the Viewer window, so you can simply start typing the text of your subtitle immediately.
By default, all new subtitles are 5 seconds long. After your subtitles have been created, you may decide that they need to be longer or shorter to give a viewer more time to read them. Or you might need to reposition them to more accurately match the timing of a scene.
- Type Lucerne, Chapel Bridge.
- Click the new yellow subtitle in the subtitle stream to deselect the text, and then press the Spacebar to play the SwissMovie including the subtitle.
This allows you to see the appearance and length of your subtitle stream. The “Lucerne” text is a little bit longer than the actual shot, but it can be easily adjusted. You’ll adjust the length of the subtitle in the next exercise.
- Type 12800 in the timecode field and press Enter to move the playhead to the next important place.
- Control-click the Subtitle stream and choose Add Subtitle at Playhead from the shortcut menu.
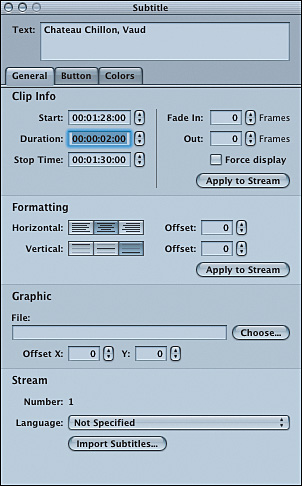
- Enter Chateau Chillon, Vaud.
- Click the new yellow subtitle in the subtitle stream to deselect the text, and then press the Spacebar to play the SwissMovie, including the subtitle.
When you watch these two subtitles, you will see that both are playing for too long and the subtitle entries need to be adjusted. Let’s deal with this next.


Adjusting the Length of Subtitles in the Track Editor
Adjusting the length or position of a subtitle in DVD Studio Pro is similar to trimming or moving a clip in Final Cut Pro, Soundtrack Pro, or any other digital editing program. Simply drag the beginning or ending edges of the subtitle clip to resize it, or click and drag the clip itself to move the clip without altering duration. You may also choose to enter exact timecode values for your subtitles in the Subtitle Inspector, if you know exactly where you want them to begin or end.
Tip
You can play to a position where you want the subtitle to begin, pause the playhead on the frame you wish to start on, and Control-click the subtitle and choose Move Subtitle Clip to Playhead from the shortcut menu.
As a general recommendation, text should be displayed long enough for a viewer to read through it twice before it disappears. However, you may need to leave text on the screen for longer or shorter periods of time, depending on the pace of the dialog or narration.
- Drag the playhead to the left until it is positioned on the first subtitle clip and you can see “Lucerne, Chapel Bridge” in the Viewer.
- Zoom in to the subtitle using the Timeline Zoom control at the bottom-left corner of the Track Editor.
- Grab the back edge of the subtitle and reduce the subtitle text by using the video in the Viewer window as a visual reference. This subtitle should stop playing at the point where the video transitions from the Chapel Bridge to the flower field.
This subtitle text should now be about 3 seconds.
- Click the “Chateau Chillon, Vaud” subtitle text to select it.
If necessary, scroll or zoom out to locate the “Chateau Chillon, Vaud” subtitle text.
- In the Subtitle Inspector, enter 2 seconds for the Duration.


Modifying the Font and Color of Subtitles
Once you have decided on where to place your subtitles and how long they should display, you should choose the appropriate font and color for your text. You do this using the same font tools you use when creating text for menus. In this example, you will change the font from Helvetica 36 to Arial Bold 30.
- Double-click the “Lucerne, Chapel Bridge” subtitle clip in Stream 1, and use your pointer to highlight the text.
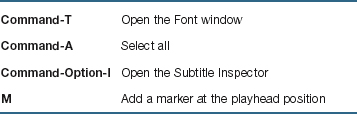
- Press Command-T to open the Font window.
- Select Arial as the font Family and Bold as the Typeface. Make the Size 30 points.
- In the Formatting section of the Subtitle Inspector, click Apply to Stream.
This will apply all font and position settings to all subtitles in this stream.
- Click the Colors tab in the Subtitle Inspector and select Chroma for the Mapping Type.
As subtitle text is treated like an overlay graphic, you have the same options available as for an advanced overlay. You can change the color and the opacity of the actual font color, and for Outline 1 and 2. The outlines, or text borders, help improve the contrast with the video underneath the subtitle. In this exercise, you will choose orange as the font color with black outlines, which makes it easy to read the text over light and dark video content.
- Choose Orange from the Text Color pop-up menu, and move the Opacity slider to 8.
To choose an opacity level for your subtitle, drag the Opacity slider or enter a value between 1 and 15. Usually you will set the text to 15, but for this example, we reduced the opacity of the orange color to make it less bright.
- Choose Black for Outline 1 and Outline 2 color, but set the opacity of Outline 2 to 7 to achieve a softer outline.
You may set the outlines at full opacity or make them semitransparent. For subtitles, the Background slider is usually left at its default setting of 0, or else a color screen is added to the image.
Tip
Outlines can help to make your text more visible against a dark or visually busy background. You should consider adding outlines to any subtitle text you create, since they will make reading much easier for your audience. If your subtitle does not sufficiently stand out against the background video, consider adding Outline 2 in the same color to make an outline that is twice as thick.


Importing Subtitles from a Text File
Although you can use any of the methods you’ve just learned about to add, trim, and move subtitles, there are easier and more precise ways to create these streams. Like Final Cut Pro markers, subtitles are best added using timecode from the source movie file.
If you have a lot of subtitles to create, or if you are receiving translated subtitle text files from a service bureau, you will find that it is easy to import subtitles from a subtitle text file. Subtitle text files are specially formatted text files that list the text of each subtitle along with its timecode in and out points. These files are easy to create once you understand their code, and may become your preferred method of working with subtitles, even if you are doing all of the translation yourself.
You can examine the subtitle text files for this project to understand the proper formatting and placement of timecode and text information in a file. All the options you see can be easily changed in the subtitle text file.
In the following example, the font is Arial, set at 30 points, and will appear centered on the bottom of the frame. The text will be bold (TRUE), and it is not underlined or italic (FALSE). The subtitles are offset neither horizontally nor vertically ($XOFFSET, $YOFFSET = 0). The primary text color ($Text Contrast) is set with an opacity of 10, Outline 1 is fully opaque, Outline 2 is about 50% transparent, and there is no background contrast. The subtitles will be forced to display ($Force display = TRUE), and they won’t fade in or fade out (value is 0). $TapeOffset = TRUE means that the asset-based timecode is used. If this were set to FALSE, the subtitles would be referenced to the streams’ zero-based timecode.
The timecode entry in the left-most column indicates when the subtitle starts playing, and the timecode entry in the middle column indicates when the subtitle ends. The entries are delimited by a tab and a comma. In the right-most column, you see the actual subtitle text.

Note
In addition to plain text files, you can import STL (Spruce), SON (Sonic Solutions), and SCR (Daiken-Comtec Laboratories Scenarist) formats.
Now let’s import some subtitle text files.
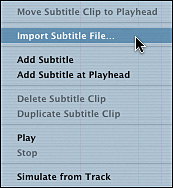
- Control-click the first subtitle stream (S1) in the Track Editor window, and choose Import Subtitle File from the shortcut menu.
- Choose Swiss_Subtitles_English.txt from the Media > Swiss > Swiss_Docs folder.
- Click Choose to import the subtitles. An alert appears telling you that 16 subtitles were imported from the text file and automatically added to the subtitle stream. Click OK to dismiss the alert.
This will overwrite the subtitles that you were working on in the previous section.
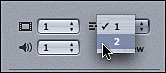
- From the Language pop-up menu for S1, choose C-F > English.
- Control-click the second subtitle stream (S2) in the Track Editor, and choose Import Subtitle File from the shortcut menu.
- Choose Swiss_Subtitles_German.txt from the Swiss_Docs folder.
- Click Choose to import the subtitles, and click OK to dismiss the alert.
- Choose German from the Language pop-up menu.
The final result should look like this:


Previewing Subtitles
Once your subtitles are created, you should preview them to make certain that they are properly aligned with your video, easily visible over the background, and displayed on the screen long enough to read.
- Control-click in the S1 subtitle stream area, and choose Simulate from Track from the shortcut menu to open the Simulator.
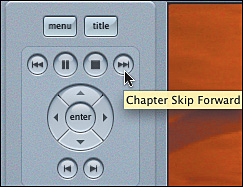
- Click the Next Chapter button once to move to the Zurich subtitle.
- Click the Subtitle pop-up menu, located above the View checkbox, and choose subtitle stream 2.
The German subtitle will now appear in your Simulator window.
- Close the Simulator and save the project.

Creating Buttons over Video
In addition to using the subtitle streams to display text information, you can also use them to contain overlays for buttons or other simple graphics. This way, you can add the interactivity of a menu to video tracks, or animations, with a series of overlay images.
For example, you could create an overlay with a button that appears at certain points in a movie and links the viewer to information about a particular scene. You could even allow a viewer to choose whether to activate this option in a menu before watching a track. (Otherwise, the overlay graphics or buttons could be distracting.) There are many possibilities for this type of interactivity, depending on your imagination and the needs of your project.
Note
Only one subtitle stream can be displayed at a time. If you are adding overlay buttons to a subtitle stream, any other subtitles that appear at that point in time will be disabled.
You create button overlays for a subtitle stream just as you would create overlays for an ordinary menu. However, you first need to create markers in the video track to indicate where each of these buttons should appear. These markers are considered button highlight markers, and they are easy to create in DVD Studio Pro.
Button highlight markers—represented by an orange pointer—are used when you display special buttons over video tracks using the subtitle function. You can use these buttons to present viewers with choices as they watch a video track. A well-known example of this technique is the “white rabbit” feature on the DVD for the movie The Matrix, which lets you jump to special features if you press Enter on your remote control whenever a white rabbit overlay appears on the screen.
In this exercise, you will create a subtitle stream for activating a single button that leads to the main menu. In order to achieve this, you will need to set two button highlight markers to define when the button overlay will be playing.
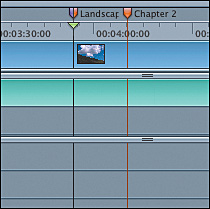
- Click the Landscape marker in your SwissMovie track.
- Click the Button Highlight checkbox in the Marker Inspector.
- Type 041000 in the timecode field of your Track tab to move the playhead about 15 seconds away from your Landscape marker.
- Press M to create another marker.
- Click the Chapter checkbox to deselect it, and click the Button Highlight checkbox to use this marker as a Button Highlight marker.
An orange marker will appear in your timeline.
- Double-click in the space between your two markers in the S1 subtitle stream.
A new subtitle with the correct duration will appear in the subtitle stream between your two markers, and a blinking I-beam will appear in the Viewer window.
- To create a new name, type Main Menu.
- Click the “Force display” checkbox in the General tab of the Subtitle Inspector.
- In the Formatting area of the Subtitle Inspector, click the Align Right button to set the Horizontal alignment.
The subtitle text will move to the right of the window, and this subtitle will be forced to display.
- Click the Background of the Viewer window, and drag your pointer to draw a button around the text “Main Menu.”
Now you are going to establish the actual link from the button to the main menu.
Note
You can create a maximum of 36 buttons per video track with a 4:3 aspect ratio, and 18 buttons for a video track with a 16:9 aspect ratio.
- Control-click Button 1, and choose Target > Menus > SwissMainMenu > [Menu] from the shortcut menu.
- Control-click in the Track Editor, and choose Simulate from Track from the shortcut menu to open the Simulator.
- Click the Next Chapter button four times to move to the Landscape chapter marker.
“Main Menu” should appear as text on the lower-right corner of your screen. If you click this button, it should lead you back to the main menu.
- Save your project to the My_Projects folder.


Button Graphics over Video
If you want to use multiple buttons or graphics over video, you will need to use graphic overlays. These graphics can be easily imported into the subtitle stream, and you can use the same techniques as described in this exercise to create buttons and set the overlay colors. Please refer to page 460 of the DVD Studio Pro manual for more information regarding buttons over video.

About Closed Captioning
Although subtitles represent the majority of text that is created for a DVD, you may also include closed caption text, which is similar to what is broadcast by TV stations for hearing-impaired viewers. When closed captions are included, a television with the proper decoder interprets the closed caption information and displays the text on the screen. Note that only the captions themselves, plus the color and position of the text, are interpreted; the decoding device chooses the font.
The main difference between subtitles and closed captions is that closed captions include descriptions of sounds heard in a scene (telephone ringing, music playing, and so on) in addition to the usual text. Also, closed captions are included in line 21 of a video signal, which means that they are a part of the video stream and not strictly a DVD-only feature.
DVD Studio Pro allows you to include closed captioning on a DVD as an advanced feature. Please refer to the DVD Studio Pro manual for more information regarding setting up closed captioned streams.
Lesson Review
1. How many subtitle streams can each track hold?
2. True or false: Viewers must always choose the subtitle stream they want to view from a subtitle selection menu.
3. Why should you add outlines and/or drop shadows to subtitle text?
4. Can subtitles be imported as a text file?
5. True or false: You can use images and graphics other than text in a subtitle stream.
Answers
2. False. If you tag the subtitle stream with a language setting, the DVD-Video player will automatically display the correct subtitle stream (provided the DVD-Video player is properly set up, of course).
3. To make the subtitles easier to view.
4. Yes, but they must be saved in a properly formatted plain text file (.txt) before they are imported.
5. True. This is how you make buttons over video, for example.
Keyboard Shortcuts