Lesson 6. Creating a Slideshow
Lessons > lesson06 > 06_Swiss_start (or the My_Projects > Swiss_DVD project file you created in Lesson 5)
Media
Media > Swiss folder
Time
This lesson takes approximately 20 minutes to complete.
Goals
Understand the concept of a slideshow
Know what file formats can be used in a slideshow
Import slides
Add multiple audio files to the slideshow
Add transitions to a slideshow, a group of slides, and individual slides
Change the order of slides
Change the duration of slides
Set the slideshow Fit To Audio option
Convert a slideshow to a track
Slideshows are a good way to display a sequence of still images, and a DVD is a great delivery mechanism for a slideshow, whether you’re using it for a presentation, a photo album, scrapbooks, training courses, or corporate presentations. DVD Studio Pro 4 lets you dramatically enhance the impact of your slideshow by adding transitions between images, or by using multiple audio tracks, including MP3 files, to add narration or music to a slideshow. In addition, you can combine slideshows with video by converting a slideshow to a track.
In this lesson, you will use a folder of already prepared images to create a slideshow for the Swiss Tourism project. The exercises explore the options available to you in DVD Studio Pro’s slideshow feature. You’ll start by importing images for the slides into the Assets tab. Then you’ll learn how to add transitions to the slideshow and each of the slides. You’ll also change the duration and the order of the slides, and add multiple audio clips to the slideshow.
Using Slideshows
When images are added to a slideshow, you can arrange them in the order in which you want them to display. You can also set the amount of time that each slide is shown, either by assigning an audio file to the slide (which determines its duration) or by setting the display duration value for each slide.
Tip
Slideshows created in DVD Studio Pro can contain up to 99 still images. If you need to include more than 99 images, you can simply link several slideshows together. You may also choose to convert a slideshow to a track, which allows it to function like any other movie or video clip.
If you want the user to be able to advance the slides manually, you can set the Pause option. Each slide will then pause for the viewer to click the Next Track button on the remote control to advance to the next slide. This is useful for creating Microsoft PowerPoint–style presentations.
Tip
If you want to create a slideshow with other special effects, you can build the slideshow in Final Cut Pro and bring it into DVD Studio Pro as a video track.
Of course, the real advantage of using DVD Studio Pro over, say, PowerPoint is that you can easily include DVD-quality video along with your static images. Also, the project you create is platform-independent (Mac or PC) and can be played back on widely available set-top and software players.
No matter how you choose to present your slides, creating a slideshow in DVD Studio Pro couldn’t be easier.
File Formats for Slideshows
Creating a slideshow is simple as long as your images are prepared according to the required DVD specifications. Fortunately, DVD Studio Pro supports most of the common image formats for use in its slideshows: Photoshop (PSD), PICT, BMP, JPEG, QuickTime, MacPaint, Targa (TGA), and TIFF (TIF).
Note
When working with PSD files in slideshows, the image layers that were visible when the file was last saved in Photoshop become the layers that are visible in DVD Studio Pro.
All images are converted to an MPEG format and, if necessary, automatically scaled to fit the frame size for the video standard you are using (NTSC or PAL). If any of the still images do not fit the aspect ratio, a background color is automatically added to fill in the gaps.
If you want to change DVD Studio Pro’s resizing of an image, you can prepare your images in an image-editing application, such as Photoshop, first, and then resize them for the video format you’re using (720 × 576 for PAL; 720 × 480 for NTSC). This way, you have complete control over how your image will be displayed. Also, keep in mind that the pictures and graphics have to be in the broadcast color space. Highly saturated colors look completely different on a TV monitor than on a computer screen, and, therefore, using a “broadcast” or “video safe” filter in the image-editing application is highly recommended. This way, you’ll be able to constrain the colors to the NTSC or PAL color space.
All DVD-compliant audio formats can also be imported into slideshows. This includes MPEG1-Layer 2, Dolby Digital (AC-3), WAVE, PCM, and AIFF (uncompressed PCM) audio. A useful feature in DVD Studio Pro is the capability to use MP3 and AAC files, which can be brought in from iTunes. DVD Studio Pro automatically takes the MP3 or AAC file and converts it to an AIFF file, which is compatible with the DVD specifications.
Note
All audio files used within a slideshow must be the same format and have identical settings for resolution and bit rate. For example, do not mix 44.1 kHz and 48 kHz audio in the same slideshow. For best results, use Compressor to encode the audio files to AC-3 before importing them into DVD Studio Pro.
Adding a Slideshow
You will begin your exploration of slideshows by importing some images from the Slideshow folder. Then you’ll connect the slideshow images to the SwissSlideshow tile in the Graphical view. (You created the SwissSlideshow tile in Lesson 3.)
- Choose File > Open to open the Swiss_DVD project you created in Lesson 5.
If you did not create the project, open Lessons > 06_Swiss_start and relink the media if necessary.
- Press F3 to switch to Advanced view.
This action groups your Outline and Graphical tabs and is a great configuration for most projects.
- Click the Assets tab and double-click anywhere inside of the Assets tab window.
The Import Assets window appears. This is fastest way to import your assets.
- Navigate to the Media > Swiss > Swiss_Assets > Slideshows folder and click Import.
All Slideshow assets will be imported into DVD Studio Pro.
- Drag SwissPhoto_01.jpg into the Slideshows folder.
This will keep all photos organized in one folder. Notice that SwissPhoto_01.jpg has a checkmark in the In Use column, indicating that it is already in use for the Chapter Index Menu.
Tip
If you want to preview your images, you can select each image in the Assets tab, and the Picture Asset Inspector window will show your picture in the View Asset area. By double-clicking your picture asset, you can even preview your images in the Viewer window.
- In the Assets tab, select the Slideshows folder and drag it onto the Swiss Slideshow tile in the Graphical tab.
The Swiss Slideshow is automatically generated.
- Double-click the Slideshow tile in the Graphical view.
You will switch to the Slideshow tab, which contains the Slideshow Editor. At the top of the Project window, the Viewer window appears, and the Slideshow Inspector appears at the lower right of the interface.
- Click the End Jump pop-up menu and choose Menus > SwissMainMenu > [Menu]. Now, when the slideshow ends, it will jump back to the main menu.
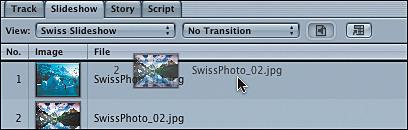
You are now ready to make additional changes to the slideshow. The Slideshow Editor has seven columns. The three on the left show the display order (No.), a thumbnail (Image), and the name (File) for each slide. The remaining columns display various attributes of each slide, such as when in the slideshow it will appear (Time), its duration, and whether it will advance when the duration is finished or pause to allow the viewer to advance to the next slide using the remote control.


Modifying Your Slideshow
After your slide files are in place, you can assign audio files to an individual slide or to the entire slideshow. You can also adjust the duration of slides and move and delete slides. The following exercises show you how.
Adding Audio
DVD Studio Pro includes a number of flexible methods for handling slideshow audio. One of the nicest features is the way slides automatically respond to audio settings. Your options include Fit To Audio and Fit To Slides.
If you choose Fit To Audio, the duration of your slides is automatically set to have the slides play evenly over the entire length of the audio file. This is the best option to use if you want your audio and slides to finish playing at the same time. It is also an easy way to automatically set the duration of your slides, particularly for large slideshows.
Choosing Fit To Slides does not alter the duration of your slides. However, if your audio file is shorter than the duration of your slideshow, the last set of slides will continue to play without audio (unless you check the Loop Audio option). On the other hand, if your audio file is longer than the duration of your slideshow, the last slide will remain on the screen until the audio file has finished playing.
In the following exercise, you will add two audio clips.
- From the Slideshows folder in the Assets tab, drag SwissSlideshow_01.AC3 onto the Audio icon in your Slideshow tab.
The speaker symbol will have a black frame, indicating that an audio file has been applied to the slideshow. Also, the audio file will appear in your Slideshow Inspector with the actual running time.
- Select any slide in the slideshow, and press the Spacebar to play the slideshow.
Your slideshow will automatically begin playing in the Viewer tab, starting from the slide you have selected. This will give you a preview of your slideshow, including the audio you added to it. You can stop playback or advance to other slides by using the controls at the bottom of the window or by pressing the Spacebar again. When the slideshow is finished, it will pause on the last slide.
- From the Assets tab, select SwissSlideshow_02.AC3, and drag it onto the Audio icon.
A second audio clip will be added to your slideshow.
- Click the Outline tab, and select SwissSlideshow to open up the Slideshow Inspector.
In your Slideshow Inspector, you should now see both audio files listed.
You should also see that Fit To Slides is selected by default.
Tip
If you choose the Fit To Audio option, DVD Studio Pro will calculate each slide’s duration based on the total duration of the audio clips assigned to the slideshow. The slide duration in your slideshow will instantly change.


Changing the Duration of Slides
You can change the duration of individual or multiple sets of slides in the Slideshow Editor. The duration value indicates how long a slide is displayed. There are only a few preset choices in DVD Studio Pro: 1, 3, 5, or 10 seconds. However, you can customize your own value by double-clicking Slide Duration Value and then typing a number directly into the Slide Duration field. In this exercise, you will change the slide duration of two slides, so that the duration of the first six slides matches the duration of the slideshow’s first audio file.
- In the Slideshow Editor, hold down the Shift key and click SwissPhoto_01.jpg and SwissPhoto_02.jpg to select these two images.
- Type 6 in the Duration box at the top of the Slideshow Editor to change the duration value for these two slides to 6 seconds.
Notice that the first six slides now exactly match the 32-second SwissSlideshow_01.AC3 audio file.
- Activate Pause on slide 6 by checking the box to the right of the slide in the Slideshow Editor.
Your slideshow will only advance manually from this point. To advance in the slideshow, the user must press the Next button on the remote control.
Tip
To set the Pause option on a group of slides, hold down the Shift key to select multiple slides, then click the Manual Advance checkbox on the Pause column of the Slideshow Editor. Any selected slides will be set to Pause.
You can only test the Pause function by using the Simulator. Let’s try it now.
- Click the Outline tab to access all of your current disc elements, and then Control-click Swiss Slideshow, and choose Simulate Slideshow to test the slideshow.
- After testing the slideshow, close the Simulator.
- Now deselect the pause checkbox, as you no longer need it for this slideshow.

Moving and Deleting Slides
You can easily move and delete slides in the Slideshow Editor, just as you can with other elements that appear in lists in DVD Studio Pro.
- In the Slideshow tab, select SwissPhoto_02.jpg.
- Drag slide 2 to the top of the slide list.
You will see a black line above slide 1 and below the column headers indicating the new position of slide 2, above slide 1. Release the mouse button to complete the move.
You have now changed the order of the slideshow.
- Select SwissPhoto_04.jpg in the slide list.
- Press Delete to remove slide 4.
Once you have brought in your slides, you can easily remove slides from your slideshow. When a slide is removed, all of the other slides beneath it are automatically renumbered.
- Undo the deletion of slide 4 by pressing Command-Z.
- Save your work in your My_Projects folder.
Slideshow Transitions
One of the best new features of DVD Studio Pro 4 is transitions. Since transitions are integrated into DVD Studio Pro, it’s considerably easier and faster to build your slideshow in DVD Studio Pro, rather than using another editing application and then importing the transition. You can choose a transition effect for each slide, or apply one transition to the entire slideshow. When setting up transitions, keep in mind that transitions are considered part of the slide.
In this exercise, you will set the slideshow’s default transition and choose a transition effect for several individual slides, as well as for a group of slides.
- Double-click an empty place in the Slideshow Editor’s control area to show the Slideshow Inspector.
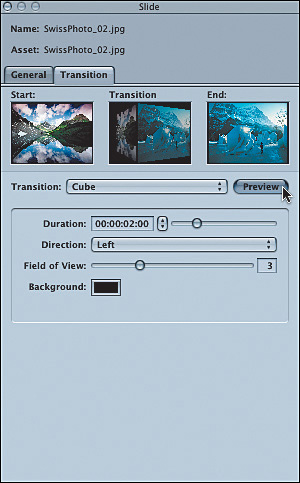
- In the Slideshow Inspector, click the Transition tab.
- Choose the Motion Dissolve transition from the Transition pop-up menu.
You have now set the default transition for the entire slideshow, but you can still choose a custom transition for each slide. The duration for this transition is set to 2 seconds.
Now let’s set some transitions for the other slides in the show.
- Select SwissPhoto_02.jpg in the Slideshow Editor.
- Click the Transition tab, then choose the Cube transition from the Transition pop-up menu.
For this transition, a few more options are available for modifying the transition. You can choose the direction in which the cube turns, as well as the background color that is visible while the cube is turning.
- Click the Preview button next to the selected transition.
You can now see a preview of the actual transition in the Slideshow Inspector. This is a fast way to test the chosen transition for the actual slide.
- Select SwissPhoto_01.jpg in your slideshow, and choose Dissolve as your transition effect.
- Select a transition of your choice for slides 3 to 6.
- In the Slideshow Editor, Shift-click slides 7 through 9 to select them.
- Control-click one of the slides in the selected area, and choose Transition > Flip from the contextual menu.
You have now selected six individual transitions for the first six slides, and a group transition for slides 7 to 9. The rest of the slideshow will play with the default transition, Motion Dissolve.
- Press Command-S to save your project.
- Control-click anywhere in your Slideshow Editor, and choose Simulate Slideshow to simulate your entire slideshow.


Converting a Slideshow to a Track
At this point, you’ve explored most of the basic things you can do with slideshows in DVD Studio Pro. If you want your slideshow to do even more, you can convert the slideshow into a track. This gives you access to features that are available for tracks, such as multiple audio tracks, subtitle streams, 16:9 aspect ratio slides, and buttons over video. For presentations, you can even combine video and slides in your slideshow.
In this exercise, you will add a second audio stream that gives the user the option to choose a different piece of audio for the slideshow.
- Click the Convert To Track button in the Slideshow Editor’s control area.
The slideshow reappears in the Track Editor, and its icon changes to a track icon. The duration of the slides, the slides’ transitions, and all other properties you’ve set in the Slideshow Editor are preserved. A purple chapter marker is set at the beginning and end of each slide, and a green cell marker is set at the beginning of each transition
- Click the Assets tab.
- Drag SwissSlideshow_03.AC3 onto audio track A2.
Notice that the new audio clip is too long and needs to match the length of the audio in A1 to conform to the DVD-Video specification. You can easily adjust it with DVD Studio Pro’s trimming tool.
- Position the pointer right at the end of the audio file SwissSlideshow_ 03.AC3.
The pointer will turn into a trimming tool.
- Trim the end of the second audio clip back to match the end point of the audio clip in A1.
All alternate audio streams should to be the same length, so you should check the Inspector to make sure they match.
- Select the audio clip in A2 and check the stream duration in the Audio Clip Inspector. If it doesn’t read 00:01:12:00, manually change the duration to that value by changing the timecode in the Duration field. The duration will now match that of the audio in A1 exactly.
Now that you have an alternate audio stream for the project, you need to determine which stream plays when a user clicks the Slideshow button in the main menu.
- In the Graphical view, double-click SwissMainMenu; then on the Menu tab, click the Slideshow button to load the Button Inspector.
- On the Advanced tab in the Button Inspector, within the Streams section, click the Audio pop-up menu and change the audio stream to Audio Stream 2.
Now the music in A2 will play by default when the user clicks the Slideshow button on the main menu. One problem remains, however: Your Slideshow button is still not linked to anything.
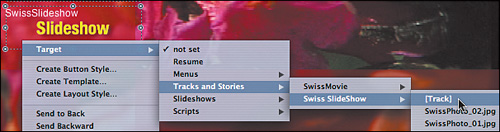
- Control-click the Slideshow button on the main menu and choose Target > Tracks and Stories > Swiss SlideShow > [Track].
- In the Graphical view, Control-click the SwissSlideshow tile and choose Simulate Track from the shortcut menu.
You can now make sure that the slideshow works as designed, and you can switch between the two audio streams by clicking the Audio Select option next to the audio symbol in the Simulator.
- Save your project.


Lesson Review
1. True or false: You can add together multiple audio streams in a single slideshow.
2. Can you mix audio formats inside a slideshow?
3. If you import a multilayer Photoshop file into a slideshow, which layers display?
4. How do you change the order of slides in a slideshow?
5. When you fit a slideshow to an audio stream, what happens?
6. What happens when you convert a slideshow to a track?
Answers
2. No. All of the audio streams in a single slideshow must be exactly the same format.
3. Only the layers that were enabled the last time the multilayer file was saved.
4. Open the Slideshow Editor, and drag slides up and down the list to reorder them.
5. DVD Studio Pro divides the total duration of the audio stream by the number of slides in the slideshow to determine the duration of each slide.
6. Each slide becomes a clip in the new track, and chapter markers are automatically created for each clip so you can navigate between them using the remote control’s Next and Previous chapter buttons.
Keyboard Shortcuts
