
8
PRE-PRODUCTION
The Role of the Producer During the Pre-production Phase
As a producer, if you have reached this phase in the process, you should be patting yourself on the back. It is a huge achievement to get a project greenlit, meaning that all the funds are in place and you have the go-ahead from the buyer to produce the show. You have made it through some of the toughest hurdles and now the fun begins with pre-production.
Pre-production is the phase in which the elements that lay down the foundation for the production are assembled. This configuration can differ greatly from project to project due to wide variation in pipelines and software capabilities. Whether a production goes smoothly depends on how the producer procures the key ingredients at this juncture. (See Figure 2-1 for reference.) The following is a list of the items necessary in order to begin pre-production:
- A production-ready script
- The series bible (and at least three final scripts for a series)
- Conceptual artwork
- A list of assumptions (See Chapter 6, “The Production Plan,” for a list of assumptions.)
- An approved budget and schedule (See Chapter 6, “The Production Plan,” for more information on budgeting and scheduling.)
- The crew plan (See Chapter 6, “The Production Plan,” for more information on crew plans.)
- Asset management and tracking system (See Chapter 11, “Tracking Production,” for more information on tracking systems.)
As the development phase wraps up, the production manager (under the producer’s guidance) devises a master schedule using the production-ready script and the conceptual artwork. By breaking down all the tasks that need to be accomplished into detailed department “micro schedules,” the management team in collaboration with the department supervisors begin to set up assignments and due dates, thereby officially starting the pre-production phase. Areas of work scheduled in this manner on episodic television, for example, include designs, storyboards, casting, recording sessions, song sessions (if applicable), and color keys. These schedules aid in tracking, planning quotas, and projecting the length of time needed to produce each element. (See Chapter 11, “Tracking Production,” for more information on scheduling.)
At this point, the producer’s main task is to recruit a crew and build a team, staggering the start dates to match the timing and needs of the various production goals to be accomplished. As the project is geared up for new employees, the producer begins to delegate duties to his or her administrative staff. For producers who have limited resources for a support staff, prioritizing their daily goals in accordance with the production’s needs is essential.
First impressions count. It is important for the management team to work like a well-oiled machine as they welcome the new crew members. On a most basic level, it is necessary to make sure that the needs of every new employee are met. The producer or an administrative staff person should work with operations or the office manager to guarantee that space, equipment, and supplies are ready for each crewmember on his or her start date. It is also essential to establish a system to inform the current staff about who is starting when. Items to consider when preparing for the arrival of a new employee include an informal meet-and-greet with the producer and director. This meeting serves as an opportunity to welcome the new employee and tell him or her the status and goals of the project. When orienting more senior crewmembers, it is important to discuss immediate production agendas in order to quickly integrate such key players into the framework of the project.
Other details to organize for new employees include startup paperwork, assignment handouts, a studio tour, instructions on telephone use, a parking pass, and studio identification badge (if applicable). These small details make a big difference to the individual joining the team. Although this information seems obvious, it is all too often overlooked. Utilizing the production tracking system, the management team should also be sure all the applicable material, such as the latest script and artwork, are digitally available to the crewmembers. It is critical that right from the start, the artists know that they can access and prioritize their assignments via the production tracking system. (See Chapter 11, “Tracking Production,” for more details.)
Before the production gets too far underway, the producer and director hold a kickoff meeting. The purpose of this meeting is to communicate the creative and administrative goals of the production. This gathering is a great opportunity to harness everyone’s enthusiasm and get the project started on the right foot, with the proper timing and deadlines in mind. The producer and director let everyone know what their expectations are and how they intend to reach their goals. The crew also gets the chance to ask questions. Depending on the number and timing of crew roll-ons, multiple kickoff meetings may be required. General crew meetings should be ongoing throughout pre-production to keep everyone informed and on board with the project. Keeping the team enthusiastic is key, especially when the workload increases as revisions come in. If artists are working remotely, video conferencing is a necessity for enabling the staff to stay in the loop. Some projects may consider videotaping production meetings and posting an edited version online, thereby allowing all members to be up to date with the project’s latest news and immediate and long-terms goals.
Besides making sure that all crewmembers are properly oriented and off to a good start, it is also the producer’s role during pre-production to facilitate the buyer’s input on the various elements produced before these assets get too far into the process and become cost-prohibitive to change. Creative checkpoints, or reviews and approvals (as established in Chapter 6, “The Production Plan”), must therefore already be established in order to allow for this feedback. The buyer commonly has input on all key elements, including voice casting, the voice track, all main character and location designs, the story reels/animatic (essentially the rough cut of the film), assets and pre-vis reel. (See descriptions for all items noted later in this chapter.) The storyboard may be viewed as either rough or cleaned-up artwork, depending on the experience of the buyer, or storyboards may be skipped as a review step altogether in exchange for a pre-vis review. If the buyer requests significant changes, he or she may need to have a second review of the materials once revisions are addressed. If the buyer is satisfied with the work, the producer need only communicate that the changes are being handled. When revisions are not being dealt with according to the buyer’s requests, the producer’s relationship with the buyer can quickly get off track as the trust between the two groups erodes, which is why establishing a clear loop-back or follow-up strategy is very important to the success of a project.
During pre-production, it is also important that a producer start creating a link between the project and various ancillary groups. Unless these departments (publicity, advertising, promotions, consumer products, etc.) are on board with the show, its degree of success once it has been completed can be limited. It is therefore critical for the producer to meet with the ancillary groups early in the production process and then on an ongoing basis. The purpose of these meetings is to get these individuals excited and invested in the property. Keeping them up to date on the story status, character and locations designs, color artwork, voice and musical talent especially when stars are attached is all very helpful. (For a detailed perspective on working with ancillary departments, see Chapter 12, “Distribution, Marketing, Licensing, and More.”)
Would You Marry Your Co-Producer?
Irene Weibel, Producer
Co-productions are like a marriage. The relationship requires great and constant communication, adaptability, openness to compromise, and deep-seated commitment, as you will be spending many years together. With that awareness, you need to get into this type of business structure mindfully, choosing a partner you believe in and with whom you can weather the many ups and downs of animation production. Like any relationship, some co-productions are smooth sailing and others are rough; sometimes a separation is inevitable, and others are salvageable as problems are solved and reconciliation is reached. Here is the story of one co-production that started off rough, stopped breathing completely at one point, and then came back to life better than ever.
We had gotten the green light to start production on a well-known brand for a television series. I was responsible for the development of the property in addition to identifying a co-production partner, structuring the deal and managing the co-production itself. It made sense to seek a French partner on many levels. First, the property itself was French and popular in Europe, which could drive higher license fees from some French territories and better broadcast support in that region. Furthermore, this arrangement would facilitate shared risk between the two studios as well as the opportunity to secure additional financing from France. To that end, we found a perfect partner. We thought this particular studio would be an excellent partner for several reasons, including past experience with some of the principals, proven animation quality, and a respectable track record in delivering episodic television. After many conversations, we all agreed it was the right relationship to pursue. The next step was to establish our two companies as treaty co-producers. This means that the relationship would be recognized as an official co-production between two companies in two regions whose governments have signed a co-production treaty, thereby enabling the shared production to be considered local content in both countries—much along the lines of an international marriage license, if such a thing were to exist.
Once the agreements were in place, we launched our efforts in a positive and positively organized way, dividing up work by outlining a clear production pipeline of shared responsibilities between the two studios. We were well into pre-production in some respects—writing scripts, designing characters and testing the production pipeline—when the challenges emerged. Although we were happy with the materials, we continually had problems securing approvals from another rights holder on the project, essentially getting pushback from all angles. This lack of agreement affected key elements from a macro to a micro standpoint, halting progress on everything from overall art direction to storyline and scripts, character eye shapes, and proportions. The stress level and tension began to rise as decisions and approvals needed to move much faster in order for us to stay on budget and schedule—both of which were very tight—for this series. And though we did our best to try to sort out what was wrong, time and again, nothing felt right and there was no compromising.
As both studios had invested a significant amount of time and resources in the project and committed to making this a success, we decided to push forward, hoping that we just needed to ramp up and build momentum and maybe that would solve our troubles. We tried for a while, but to no avail. It seemed as if nothing could move forward, leaving us at a standstill. We had the unfortunate realization that something more drastic was necessary to solve our dilemma—it was time to separate. Putting money aside, our company made a very difficult decision: we chose to shut down production rather than keep it going. We could not afford to produce something that no one would be happy with, especially as the property was one we controlled and needed to ensure remained intact.
As you can imagine, rolling this out to our partner was very difficult. We had an upset co-producer who had the right to be upset. We had to deal with the financial impact on their studio and make good on our commitments, keeping in mind that our handling of the situation would determine whether we would ever work with this studio again. Next, we had a big number to write off and time lost that could never be recuperated—a painful pill to swallow but necessary medicine to accept and process. Third, we owned a property and we did not know whether we would be able to restart it. And on top of it all, we were depressed—it was the first time we had ever been defeated, having given something our best shot but still not able to make it work.
But this story has a happy ending. The shutdown allowed us time to rethink some of the elements of the show. It resulted in the shuffling of some key crewmembers on or off the project, which gave the relationship a new perspective and attitude. A number of in-person meetings between the two studios further rebuilt the relationship a la “marriage encounter” seminars, and the project was relaunched with great momentum.
Each party came back to the table with a renewed energy that included a stronger creatively aligned approach to the series and a renewed respect for what value each entity brought to the project.
Looking back on this experience, I believe it was a very positive one, as we learned a lot. Here are the key points that I would like to share so that maybe you can avoid some of this hardship in your co-production efforts:
1.Don’t rush into production. Really. Don’t rush into production. Before you start, make sure everyone is on the same page creatively and process-wise. You need to bank some scripts, create your key designs, and make sure that you have the approvals you need to in order to proceed into the fast pace and daily grind of series production.
2.Get buy-in or consensus—even before you need approval. Pushing for an approval that people are not on board for is much tougher than building consensus early on in the creative process.
3.Work hard to get the right team together and keep churning through until you have the right key players involved. Don’t be afraid to bring new team members into the mix and push out those that are not working.
4.Focus on moving forward and the future potential; don’t let individual egos or desires get in the way of the bigger picture.
The key to making the marriage of co-production work is realizing going into it what exactly you are in for and reminding yourself of these early choices and decisions along the way. Producing animation episodic television is not for the faint of heart. Be brave. Be strong. Keep your head about you—for better or for worse. In the end, the relationship is worth all the effort!
Design and Art direction
Next to having a solid story, the visual style of the project is the most important area for the producer to focus on. Because every element in an animated project needs to be designed and created by artists before it can be built or animated, it is crucial to allocate adequate time and money to seek out the ideal talent. The strength of the show’s design not only helps sell it, but also entices other artists to join the team.
The “look” or design of a show is created through both line drawings and color artwork. The style of a show can vary from cartoony to realistic to highly stylized. The project’s target audience also greatly affects the art direction: appealing to a preschool viewer requires quite a different artistic approach versus aiming for a prime-time adult viewer. It is the job of the production designer and/or art director to follow the director’s guidelines and to both lead and supervise the development of the stylistic choices for the project. On some projects, there are no strict differences between the roles of a production designer and an art director. On features, the distinction is typically that the production designer establishes the actual look of the film by creating character and location designs. This job is usually completed after the design of these elements is complete, although it may continue in a supervisory role through the model building phases on a CG production. The art director’s role, on the other hand, is to take the design and apply it to film—that is, taking the location design and creating layouts. The art director also works with color stylists and surfacing artists in order to devise a color palette for the project. Depending on the production budget and its format, the art director may work with a handful of artists or have dedicated crews working on each element, such as character design, background painting, color modeling, character and set modeling, and surfacing. On a CG project, the visual effects supervisor also plays an important part in establishing the overall look and feel of the film, partnering with the art director and/or production designer. They are jointly involved in facilitating the modeling and surfacing efforts, and they also oversee the look development stage, wherein early lighting tests are generated to ensure that the established concept look is being properly emulated in CG.
The design phase of a project can be its most exciting stage. It is the time to invent a new world and create characters that fit the part. If budget allows, the director, producer, production designer, art director, and key department supervisors should travel to the location where the story takes place (if such a place exists other than in the imagination). The purpose of this research trip is to explore and develop a more intimate understanding of the environment depicted in the show. By shooting videos and taking photographs, the artistic team attempts to capture the reality from which they create the imaginary world. On projects with limited budgets, the Internet is an invaluable resource, but the producer should also make certain that enough funds are allocated for the acquisition of reference material so that the artists have access to books and DVDs for further inspiration. The production management team takes this material and logs it into the tracking system, making it available for the applicable shots and immediately accessible for the artists as reference.
In order to create the animated world, three design categories must be developed: characters, props, and locations/environments. Characters are divided into two sections: main and incidental. The primary actors in the story are called “main” and the secondary actors are described as “incidental.” Props are objects that interact with characters and animate or move, such as a vehicle. Locations/environments are the actual places or sets in which a scene takes place. As with characters, both props and locations may also be given greater or lesser priority in design and build efforts, based upon how much they interact with characters or their overall significance within the story.
From the onset, it is essential for the director and the producer to be in sync as to what kind of artwork best suits the project. One important issue that should be addressed at this stage involves the show’s aesthetic requirements versus its budgetary limitations. For example, factors that should be of primary concern in digital 2D are setups in which a character is rotating while the camera is moving at the same time, or the use of a plaid pattern. On CG projects, the producer should be mindful of the number of realistic furred or feathered characters in his or her project, plus general interpenetration and render issues related to character design and look complexity. This is the stage at which the producer must assess whether the additional time taken by these artistic choices merits the extra money and talent required. Ultimately, will the telling of the story be flawed if these steps are simplified? Both the producer and director should reach a consensus in answering these questions.
Once the script is thoroughly vetted for complexity analysis based on the selected artistic approach, a list of needed assets is created. This list notes the main designs for characters, props, locations, and effects (if applicable), which—once designed and approved—are organized into the visual style guide and model packs. The visual style guide encompasses all design elements; the model pack denotes artwork that is needed only for a specific sequence or television episode. Designs are then created based upon this comprehensive list of assets needed.
The Visual Style Guide
Once the style of the project has been nailed down during development, a visual style guide is produced. This guide is created to convey basic design information to the entire crew on a production and to ensure the overall consistency of the project. Although it can be time-consuming and costly to create a comprehensive style guide, its completeness will greatly enhance the project’s production value. The more information artists have, the better they can delve into the imaginary world and bring out the best the story has to offer. This guide is also informative to a project’s ancillary efforts, providing accurate reference to those creating video games, consumer products, and marketing materials, for example.
The visual style guide can be incredibly detailed or have just a few items. The producer and director work together to choose the items to be designed based on the story needs and budget limitations. It is consequential for the producer to establish with the director the approximate amount of reuse or recycling of drawings or assets expected on the production. In features, the rule of thumb for locations, for example, is 30 percent reuse whenever possible. However, it all depends on the story. If, for example, the characters are on a journey traveling from one land to another, it may not be possible to reuse locations. The producer therefore must devote sufficient funds for the creation of locations/environments or sets. This is a perfect example of why the producer and director need to communicate well and share the same vision for the project.
Figure 8-1 Character poses of Luna.

Character Designs
Visual development artists first develop character designs, and these designs can be created with line art, digital renders, or a combination of the two media. This work is then further refined by the work of character designers and supervising animators, who help finalize designs and then craft further character details in order to facilitate consistent animation. These detail pieces may include mouth charts, hand charts, key poses, and special costumes for each character.
The style guide typically includes a series of model sheets that cover the following areas for character design:
- Character poses (front, back, side/profile, and three-quarter views; see Figures 8-1 and 8-2 for partial examples)
- Character in action
- Face shapes and expressions (surprised, elated, angry, and so on; see Figures 8-3, 8-4, and 8-5)
- Character lineup showing the scale of all characters in relation to each other (see Figures 8-6)
- Character’s orthographic construction (basic shapes showing structure and details of the character’s body parts)
- Mouth chart (close-up of the character’s mouth as it forms different sounds)
- Hand chart (key positions to show how the hand maneuvers for digital 2D use)
Figure 8-2 Character poses of Silky.


Figure 8-3 Face shapes for Luna.

Figure 8-4 Face shapes for Silky as a moth.
Some projects also find it beneficial to make physical models of the main characters, called maquettes, to be used as aides for animators and modelers (if applicable). In CG productions, working with clay sculptures first can help the modelers envision how to properly translate more graphic designs into CG models in a relatively quick and cost effective way.
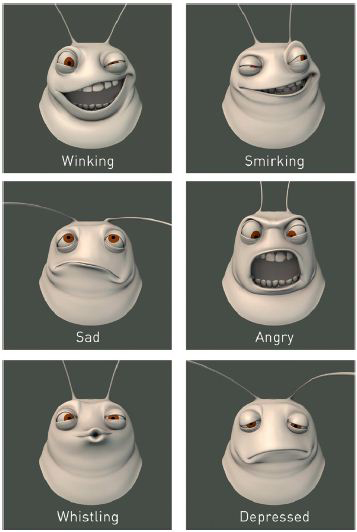
Figure 8-5 Facial expressions for Silky as a caterpillar.
Location Designs
Location designs, or sets, are created by the production designer and/or a location designer. These can be designed traditionally with pencil and paper, or created digitally, or a combination of both techniques. The style guide typically includes the following items for location designs:

Figure 8-6 Character size comparison.

Figure 8-7 Location design.
- Exterior shots (including establishing shots as well as close-ups; see Figure 8-7)
- Interior shots
- Reverse-angle shots
- Scale reference (to show relationship to characters)
- A “schematic map” of the overall setting or environment
Some projects also find it beneficial to make practical models of key locations early in pre-production to be used as aides in cinematography and digital modeling (if applicable).
Prop Designs
These non-character objects (such as vehicles, weapons, and furniture) are created by a prop designer. Once again, this work can be achieved via line art or digital renders. The style guide covers the following areas for props:
- Front, back, and interior (if applicable)
- Construction (if the prop has complex elements; see Figure 8-8)
- Size comparison to character(s) and/or background layout (see Figure 8-9)
- Guidelines on how the prop works (if it is a complicated device)
Effects Design
Pending the requirements of the script and the budget, there may or may not be an effects design component in the visual style guide. For projects that are outsourced, it is always useful to include references for how elements such as fire, dust, smoke, and so on should be treated. (See Chapter 9, ‘Production,’ for more details on effects.) Figure 8-10) is an example of effects design reference for the glow in Luna.

Figure 8-8 Prop design.

Figure 8-9 Set and character comparison.

Figure 8-10 Glow effect design.

Figure 8-11 Lighting keys.

Color Script and Lighting Keys
The art director maps out the palette for an animated project by creating a color script for a feature, or color keys for a shorter project. Essentially thumbnail representations of key shots and moments in the story, the color script establishes the hues, tones, and ultimately, the mood of the imaginary world. This information is used by color designers, background painters, surfacers, and lighters as guides to instruct their work.
Black-and-white sketches—often referred to as lighting keys or a lighting script—may also be created to further inform lighting efforts through use of tone and shadow. Figures 8-11 and 8-12 are examples of lighting keys and a lighting script for Luna.
Color Design
Under the guidance of the art director, characters and props are colored by color stylists using 2D software or look development artists in CG. In the case of a character design, the color of the costume, skin, and hair color is tested in different environments (interiors, exteriors) under different lighting scenarios (day, night) before it is set, and some digital paint systems allow for the creation of various palettes per character to accommodate easy switching from one color scenario to another. The creation of a character color lineup is important to see how all the characters relate to each other and to assist in the establishment of visual themes (for example, all villains may be in tones of purples and browns, while the protagonist wears brighter colors).
Model Pack
After the overall visual style guide is created, more detailed model packages are generated on a per-sequence basis for longform projects or a per-episode basis for television. These packages include additional design details as needed for main characters, incidental characters, props, and locations specific to the particular sequence or episode. As in the visual style guide, the degree to which designs are fleshed out depends on their importance to the story and the available budget. In some cases, there may be only a front and back design for certain characters, though other more prominent or complex characters would require additional drawings, including more detailed body poses to express a certain key physical trait or action; movement illustrations for hands, hair, and clothing; and a wider range of emotional expressions.
The production manager or an assigned APM/PDM is responsible for prioritizing the order of design and building assignments and tracking the progress of the artwork created. They manage the design schedule for the artists, making sure that the assignments are being delivered on time and are promptly reviewed by the department supervisor and/or director for notes. Potential revisions should always be anticipated when planning; however, when the director asks for changes or additions beyond the anticipated scope, the production manager or APM/PDM evaluates its impact on the schedule and informs the producer. Every time there is a revision to the script, the design list and model package is updated to reflect these changes on characters, props, and locations. If the model pack has been distributed, all newly revised designs need to be replaced in the model pack and production tracking database. This process has been made more efficient on productions that can update the model pack online and automatically alert all artists who can be potentially affected by the design revision. In television, generally speaking, these packs are ‘locked’ and aren’t changed once the subcontractor has started working on the project. Although it is highly advisable to complete all visual development prior to start of production, designs tend to evolve alongside production on feature projects. For this reason, the producer must budget and schedule for the design elements accordingly, ensuring that designs are ready and final in enough time to commence asset production or, in the case of traditional 2D, the start of layout and animation; if not, production can be affected.
Asset Production
The traditional animator draws out poses to bring a character to life; in contrast, on digital 2D and CG productions, the animator relies upon the use and manipulation of assets in order to create a performance.
2D Asset Production
Creating assets in the digital 2D realm includes the following steps:
- Design/color
- Symbolizing
- Rigging
Design/Color
The first step in creating a 2D asset requires a cleaned-up line drawing that has been scanned into the production pipeline. Under the guidance of the art director, the color stylist assigns and applies color to the line art in preparation for symbolizing the model.
Symbolizing
The best way to think of how a character is symbolized is to imagine a paper cutout puppet and how each part is broken out into separate pieces (such as arms, hands, body, legs, etc.) and then assembled in order to animate the character.
As each individual piece is digitally traced and saved for reuse, it becomes a symbol and must be labeled and categorized appropriately in the project’s library for the animator’s easy access. A typical character asset might consist of 20 or more of these symbols, one for each movable body part. It is typical for this task to be completed by an assistant animator or a character library builder.
Integral to a successful library and management of assets on a digital 2D project is a clear and coherent labeling system. Depending on the style of animation and how the production pipeline is set up, the library build can start with a character’s five-point turns, showing him or her in key poses (front, 3/4 front, profile, 3/4 back, and back). This approach is suitable for the type of animation that is highly limited and is set up to rely heavily on reuse of assets. On productions with a minimal budget, the library is also likely to include stock props and effects.
Rigging
In order for the artist to generate animation, he or she must control and manipulate the assets. This is accomplished through rigging the models whereby the symbols are combined to form the complete character and their pivot points are selected and adjusted for the desired movement.
CG Asset Production
The general steps involved in the asset production process are:
- Modeling
- Rigging/articulation
- Surfacing and look development
- Research and development (if applicable)
Each of these steps are best undertaken with the support of knowledgeable technical directors and CG supervisors who are familiar with the overall creative goals of the project, the technical micro details of each phase, and the macro view of how the entire production pipeline functions. A key consideration at this early stage is control of the amount of simulation (such as hair and cloth) required by a design and its testing.
Modeling
Using the information provided in the visual style guide as reference, modelers build the characters, environments, and props within the CG pipeline.
There are a number of ways to build an asset in CG: digitizing a 2D design that is then modified as it is given volume and dimension; starting with basic 3D geometric shapes, also referred to as polygons, which can be fused together to create the initial model; or scanning a maquette as the starting point for a wire frame model. Whatever method of building that is utilized, a single modeler (or possibly a team of modelers) can take portions of the model and refine them at the same time. Once all of the sections have been completed, one modeler assembles them and cleans up the joining sections to create one homogeneous piece. This piece often looks like a wireframe sculpture (see Figures 8-13 and 8-14) that is then ‘skinned’ to give it a more solid look, almost as if it is sculpted out of gray clay (see Figures 8-15 and 8-16, and find a more in-depth look on the Luna case study website as denoted by the ![]() symbol). This skin is the foundation upon which the surfacing process takes place further down the asset production line.
symbol). This skin is the foundation upon which the surfacing process takes place further down the asset production line.
A proxy model (a less detailed ‘stand-in’ version of a model) can sometimes be created quickly and used to allow pre-vis work to begin while final model building, rigging, and surfacing are still in progress. These temporary models are generally quite limited in their capabilities and must be replaced with fully functional rigs by the time animators need to work within a shot.

Figure 8-13 Wireframe for Luna.

Figure 8-14 Wireframe for Silky.
Rigging/Articulation
Rigging or articulation is the process in which a character or prop model is given inner structure—much like a skeleton and tendons—and controls that allow for it to move around as directed by a character animator or an effects animator. After the model is rigged, when one part is moved, the rest of the model moves accordingly. The rigging team provides animation controls that are extremely detailed in their function, and yet userfriendly for the animators. To that end, the riggers collaborate closely with the animators, testing characters with a variety of full-body calisthenics and facial exercises to make sure the rigging provides them with the desired movements. At times, these tests will also reveal that a particular model may need reworking— for example, the jowls on a character may be too loose to be animated in an appealing way, or the stomach may be too large to manage when a character bends over. Once the model notes are addressed, it is returned to rigging for further development and testing. After rigging is complete, the model/rig is ready to undergo surfacing. See Figure 8-17 for an example of rigging test poses from Luna.

Figure 8-15 Skinned geometry for Luna.
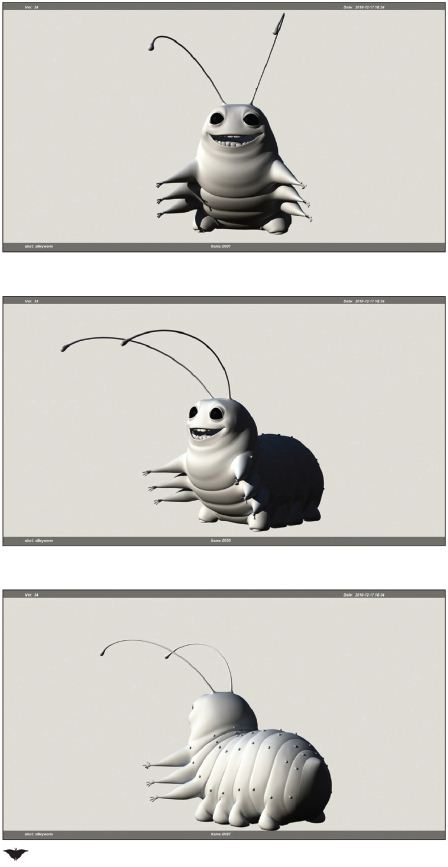
Figure 8-16 Skinned geometry for Silky.
Surfacing and Look Development
All CG character models, environments, and props need to undergo surfacing in order to appear to have the furry, shiny, wooden, plastic, metal, or other look required by art direction. The surface treatment of a model is referred to as texture. This stage of asset production is undertaken by the look development team and is in some ways similar to traditional background painting and digital color styling. When creating textures, the main thing to establish is how to combine light and color to get the desired look. A few questions to ask when developing a texture include: Is the model opaque or translucent? Does it reflect light and/or emit light? If so, to what degree? How dark are the shadows on the surface? The answers to these sorts of questions allow the texture artist to head in the right direction.
Figure 8-17 Rigging test for Silky.

During production, the look development team, overseen by the visual effects supervisor, collaborates closely with the art director to address the surfacing needs. Depending on the complexity of the surface, it can be a very lengthy process before the final texture is developed and approved. Ample lighting tests should be run to ensure that the textures remain intact under the variety of lighting conditions called for in the project. For instance, does Rudolph the Red-Nosed Reindeer’s nose look red in both night and daytime lighting conditions? Likewise, animation tests need to be run on characters and props to see if surfacing holds up when in action: for example, it is important to know that feathers or fur still look good on an animal when it moves, or that a finish on a vehicle is not distracting when it is put in motion. Models must have fully established surfacing before character finaling, lighting, and shot finaling work can commence. See Figures 8-18 and 8-19 as examples of look development work from Luna.
Once the surfacing is complete, the model is considered final until it undergoes the rigor of production during which modifications may be necessary. Again, this is a step for which strong technical direction support is a necessity.
Figure 8-18 Look development: Silky as a caterpillar.


Figure 8-19 Look development: Silky as a moth.
Research and Development
It is ideal to launch research and development efforts on CG assets that are crucial to a production yet may provide particular technical complexities along the way. Examples of such elements include the behavior of Rapunzel’s hair in Disney’s Tangled or the rigging construct of the raining hamburgers in Sony’s Cloudy with a Chance of Meatballs. Even outside of the asset production pipeline, effects work may require early research and development, especially if a weather, water, or explosion effect is prominent within the project. For instance, the water in Disney/Pixar’s Finding Nemo and the fire destruction involved in DreamWorks’ How to Train Your Dragon were both extremely important to create and manage well. Although it may be challenging to allocate money and manpower to these efforts early in production, the ultimate cost savings of getting them right from the start is considerable.
The Voice Track
The right choice of actors during casting, combined with a great performance during the recording, are two of the most critical steps in the production process. Because the voice track serves as a guideline and a source of inspiration for the animators, if it’s weak, not even the best animators can produce good performances. The animation, timing, and overall success of the project therefore hinge on the quality of the voice track.
Casting
Casting is the process by which actors are chosen to play parts on the project. It is the producer’s job to determine the casting expectations of the buyer/executive, seller (or creator), and director in order to drive the process in the right direction from the start. When stars are attached, their names can be used as marketing tools. It therefore needs to be established early on whether the project can afford well-known actors and wants to pursue them. Prior to the start of casting, it must be decided whether the production is going to be union or non-union. If the show is nonunion, casting choices can be limited. Most professional actors are union members and are prohibited by SAG or any other acting union from working on non-union shows.
Casting begins when a casting director is hired onto a project. Large studios usually have their own in-house casting department. Smaller studios tend to hire a casting director on a freelance basis. It is the producer’s job to share with the casting director the amount of money and time allotted for casting sessions (auditions), the rehearsal of the script, and the recording of the voice track. The casting director then works with the producer, director, and creative executives to come up with a list of potential talent to audition. A brainstorming session takes place, at which everyone suggests ideas for talent based on the characters to be cast. At these sessions, reference artwork is helpful for inspiration. Following the creators’ and/or directors’ prerequisites for the voice talents, the casting director begins the search for actors.
Once a casting list has been made, the casting director uses the script, to prepare a character breakdown for each role, and selects audition materials for all voices to be cast. The next step is to either contact his or her roster of agents or log onto established voice-over websites to upload the audition materials and character breakdowns. Using the website as a resource, the casting director can select the agencies that are to participate in the auditions and request a specific talent they represent, or allow the agencies to disseminate the auditions details to their talent pool as they see fit. Once the agencies have completed their in-house selection process, they submit their picks to the casting director. This pre-screening process gives the casting director a sense of whether the talent selected so far is on the right track without having to spend the time and money for a studio audition. He or she culls the auditions and flags his or her top selections for the producer to listen to. The producer and the director then narrow the list and have the casting director set up auditions in a studio.
In cases in which “star” talent is being considered for a role, the casting director has the careful balancing act of timing when this information gets communicated to the agents. Some star talent will not audition for animation. This talent is referred to as “offer only.” As a result, if a phone call is made to the agent and the actor is interested, the creative team must be willing to green-light the actor without hearing him or her. Most experienced casting directors know who will and will not read for them. In such cases, the casting director can pull previous audio recordings together for the producer, buyer, and director to listen to for reference. Everyone including the casting director, voice director (if applicable), buyer/executive, director, and producer should be completely in sync in terms of who they want to go after and what strategies they will use to get the actor to sign on. If budget allows, it is good to create an animation test of the character in question by using a few lines of past audio work from the star talent being considered. This effort can have dual benefits: it allows the producer and aforementioned casting decision team to see whether the voice really complements the character design; if it does, such a “teaser piece” can make the offer all the more appealing to the star talent being pursued.
In order to prepare talent for an audition, specific material should be sent to them before the casting session and should be made available on the actual day of the session. For a large project, a casting coordinator may be hired to help the casting director. It is the casting coordinator’s duty to schedule talent for auditions (a typical audition slot for animation is 5 to 10 minutes of record time for the actor), process any necessary paperwork (including union forms and confidentiality agreements such as a nondisclosure agreement, or NDA), and prepare the following materials:
- Sides: portions of the script specific to a character that best reflect their personality. These sides are read by the actors and recorded during the casting session. The casting director, voice director, or producer usually chooses the sides.
- Character description: all information pertinent to the role such as the character’s gender, age, overall personality, and vocal quality. Character designs may also be included as part of this package.
- General information sheet: the call time, location, and parking instructions for the recording facility.
The casting session takes place in a recording studio. Generally, the producer, director, and casting director attend these sessions. Though the project director usually conducts the talent in these sessions, there may also be a separate voice director hired to direct and communicate with the talent, as some animation directors are not comfortable playing this role. For clarity, in this book, the individual responsible for directing the actors in sessions is referred to as the voice director. The voice director has the actors read their sides individually or with other actors playing opposite parts. Working with the casting director, the producer is responsible for keeping the session moving on schedule, allowing for extensions with certain actors and changes throughout the day when people drop out or arrive late.
After the director and/or producer select the preferred performances or “circle takes,” the chosen lines are edited onto a final listening compilation. Selected takes, along with a list of talent recorded, are given to key team members such as the buyer/executive for review. Each person listens to the takes, makes notes, and ranks his or her choices. The casting director gets everyone’s feedback and sets up callbacks. The purpose of callbacks is to rerecord the talent in order to finalize casting. The original list is trimmed down significantly for these sessions. It is important to note that if you have a third callback for the same actor, SAG rules state that the producer has to pay for this and any additional sessions. If none of the voices fit the part, further casting efforts may be necessary. The final choice of talent is a multi-faceted consideration. Actors are chosen based on vocal quality, ability to bring the character to life, star power, versatility, availability, and how their rate works within the project’s budget. In those cases in which there is a tie between actors for a part, the buyer or the creative executive usually makes the final casting decision.
Whereas standard fees are generally discussed between casting directors and agents prior to auditions, some negotiations are necessary once casting decisions have been made. These negotiations would pertain to union actors paid above scale or non-union actors paid above the flat rate. The discussions regarding fees are generally conducted by business affairs in concert with the producer and creative executive/buyer. In case there is any visual likeness to the actor in the design of the character they are playing—which sometimes happens with star talent—the design needs to be legally cleared in advance. Other issues to be agreed upon for star talent are fees, size and placement of credit, and publicity. In the case of musicals, the topic of singing needs to be discussed. If the talent cannot sing, another voice will be used to perform the songs. If the talent can sing, there will be a different rate paid, and the details of soundtrack royalties must be addressed. The business affairs person negotiates with the star talent’s representative regarding the actor’s willingness to conduct interviews and his or her availability for other promotional purposes. Generally, star talent is paid a fee to take part in promoting the project.
Rehearsal
Before going into the recording booth, it is ideal to have a table read or rehearsal with all the actors. At first glance, setting aside funds for a rehearsal may seem excessive, but this practice has proven to be very beneficial. Actors are almost always appreciative of rehearsal time. Realistically, it may be impossible to insert additional time and money in the production of episodic television or to try to assemble star talent for a table read, but it has been done, especially for prime-time shows. A table read allows the cast an opportunity to read through the entire script in one day. This exercise enables the actors to have a better grasp of their own part in relation to the other roles. They also learn how the various characters in the story are being interpreted. If the show is a comedy, the actors can benefit from playing off of each other during rehearsal, which often leads to better, more effective delivery and timing. At the same time, they get input from the director, producer, and any executives, thereby improving their performance. Based on the success of the table read, the producer and director may choose to record several actors at the same time in order to benefit from the ensemble acting.
After the rehearsal, actors tend to nail their lines on the first or second take, saving the production a substantial amount of recording studio time and money. Another important advantage to a rehearsal is for the director and producer to ascertain which parts of the script require rewrites. It is far more efficient to get the revisions incorporated into the recording script rather than try to set up additional recording dates or try to fix the problems in ADR. (For more information on ADR, see Chapter 10, “Post-production.”) It should be noted, however, that some directors prefer spontaneity and do not request a rehearsal. This form of recording—without rehearsal—is called a “cold reading.” In this approach, directors like to see how the actors handle their part initially and then give notes. It is up to the producer to confer with the director and decide what procedure works best for the production.
Session Preparation
Once the rehearsal and recording dates are established, the appropriate facilities must be set up. If star talent is selected, one of the following individuals may be responsible for contacting the agents and booking his or her time: the creative executive, the producer, the casting director, or the post-production supervisor. Typically, however, the casting director and/or his or her coordinator continue to do the scheduling. On non-union projects, booking is handled with the actors directly. If it is a union project and children are being recorded, a welfare worker or teacher must be hired to attend the session. It is this person’s job to manage how the children are treated and to be available to help them with any necessary schoolwork. Upon scheduling the talent for union projects, the person responsible for handling bookings must contact the union to check that the actor is in good standing (meaning that all union fees are paid). On SAG projects, this process is called “station 12.” When an actor is not cleared, he or she is not allowed to work. It is up to the producer to contact the actor’s agent and straighten out the problem before the recording session. If the actor works without being cleared, the producer will be fined.
Prior to the rehearsal and recording session, the actor should receive the following materials far enough in advance to allow him or her time to prepare. This advance delivery may not always be possible due to last-minute script changes, but it is something to aim for.
- Recording script: This script reflects the dialogue lines only. If possible, it is important to include any “wallas” (specials sounds such as grunts or heavy breathing) within the recording script to ensure that all vocalizations are recorded for the character.
- Production script: The final approved script which is inclusive of all descriptions, scene direction, and dialogue helps the actor better understand the context of his or her performance.
- Paperwork: Includes contracts; documents such as a SAG Information Sheet (if the project is union, SAG paperwork must be used and can be purchased through the union); I-9s; W-4s; a general information sheet listing date, time, location, and parking information; and the producer’s, casting director’s, and agent’s telephone numbers in case of emergency.
- Artwork: Character designs and any other applicable reference, such as key locations in which the actor’s scenes take place.
- Story reel/animatic: The story reel/animatic is included to show the actor where and how the action in the scene is staged, if recording from a storyboard.
- Reference for the section being recorded: When, for example, a new set of lines has been inserted and the animation for the earlier shots has been completed, the actors can benefit from seeing how their new lines will fit into the previous section. This inclusion is also helpful when the new lines need to play off other actors’ previously recorded work.
Recording
Before the recording session, the person responsible for coordinating the session communicates to the facility the number of actors attending and the recording booth setup requested (such as the number of microphones), as well as any other special needs. On the day of the recording session, extra sets of materials should be provided along with a sign-in sheet. This sheet is used to keep a record of the time spent by the actors in case overtime needs to be calculated. In most cases, it is best to get all of the contract paperwork filled out before the session starts.
There are two types of recordings: scratch (or temporary) dialogue and production dialogue. These sessions take place throughout the production. With a makeshift recording studio set up in the editorial department, scratch dialogue is typically recorded using staff members such as animators, the editorial team, and the directors. On features, this type of voice track is generated when a storyboard sequence is initially approved and ready for the reel. The editor cuts the temporary dialogue with the digitized story sketches to create a story reel. The purpose of this track is to experiment with the story, dialogue, and timing before finalizing any of it. This method helps keep recording costs to a minimum until the sequence is approved. Once the sequence is approved, a production dialogue recording session can be scheduled to have the professional actors read the lines. Keeping track of temporary dialogue, production dialogue, and the subsequent revisions can be an enormously demanding task and one that the producer delegates to the editorial APM/PDM or a recording/script coordinator, who works closely with the editor or assistant editor to organize the production’s needs.
As a rule, on projects with higher budgets such as features, the star talent is recorded individually and may be called upon to read new lines or revised lines as many as four to six times. An ongoing challenge for the producer is juggling the actor’s availability, the production needs, and the budget. It is not uncommon for the director and producer to fly to another city where an actor may be working on location. If there are budget or time limitations, it is possible to digitally patch two recording studios together and record the performance long distance. It is always helpful to have the animation lead who will be animating the character that is being recorded present at the session. Watching the actor perform their lines can inspire the animator, and he or she in turn may be able to provide the actor with more insight into the character they are voicing.
A key factor to a successful recording session is clear direction. The voice director should be very familiar with the script and prepared with thoughts and notes prior to the session. The producer should also establish what scope of work is expected to be accomplished, who will be giving notes to the actors (directors, producers, supervising animators, and/or editors), and how communication of notes to the actors will be handled. This understanding can be important in keeping the recording session from spinning out of control and going into overtime. Although careful planning is important, always keep in mind that you cannot predict what will take place and must therefore be flexible and prepared for anything.
In some cases, actors are filmed while they’re in the recording booth. This footage is used as reference for the animators and possibly for promotional purposes. To avoid any misunderstandings, it is important that the talent is informed in advance through their agents that there will be video or photography shot while recording the voice tracks. This setup may predicate the additional paperwork or perhaps the need for a hair/makeup session to be attached to the recording session.
During the session, the recording engineer records the lines. An assistant engineer or a production staff member such as the recording/script coordinator or editorial APM/PDM tracks the lines recorded and marks the circle takes or the preferred performances. On some projects, these takes are edited together and returned to the production. There are two ways to edit the initial track. The first is called “normal pause,” whereby four frames are placed equally between each line of dialogue. The other system is called “natural pause editing.” In this system, the natural breaks are kept between lines, and if lines are overlapped, they are left that way. Audio files of the session are typically distributed to the director, producer, and the buyer/executive for review. On features, all digital files are sent to the editorial department with clear demarcations as to the select takes as well as any chosen alternate lines; from these, the editor builds the story reel under the guidance of the director.
Storyboarding
It is every filmmaker’s goal to come up with an innovative way of telling his or her story. In animation, it all begins with the storyboard. After all, it is the first time the words are taken from the script and translated into images. The storyboard artist’s job is to draw panels that illustrate scenes depicting the characters, their action, and their environment. At this stage of the game, there is a full range of possibilities open to the director—he or she is starting with a blank slate.
Allotting adequate time for storyboarding is key to success. By ensuring that enough time is provided for this step, the producer gives the director and the artists the opportunity to nail down the story and improve it as much as possible. The more time spent on fixing script problems in this stage, the better. In fact, in an ideal world, production does not start until the majority—if not all—of the boarding is completed and approved. Because the storyboarding phase is the last comparatively inexpensive portion of production, it is one of the best places to allocate resources to avoid potential problems down the line. If, for example, the story is not entertaining or the logic has holes in it, this is the time to fix such issues. In these cases, production should be halted, if possible, or at least slowed down so that writing issues can be addressed before spending further monies. Unfortunately, many shows get into situations in which the deadline to start production and/or the lack of funds forces this phase to be rushed. The result is that story issues left unresolved at this point haunt the entire production. To quote a veteran storyboard artist, “Somehow there is never enough time to do it right, but there is always time to do it over.”
Getting Started
Before the director can hand out an assignment to the storyboard artist, the following items must be in order:
- The script
- The voice track (if applicable at this stage; typical for television)
- Character models
- Environment designs
- Prop designs
- Office space and supplies, ranging from digital tablets (if the artist works in-house) to a secure FTP site for artists who work remotely
- Standardized page and panel setups
- Sample completed storyboard panels illustrating the show’s style and complexity level (if applicable)
- Secure online file sharing, production tracking, and archiving system (for more details see Chapter 11, “Tracking Production”)
On features, the director initially divides the script into sequences to hand out to artists. Through the storyboarding process, each sequence is further broken down into shots that become the individual units that go through the production pipeline and are then assembled to make the final project. The location where the action takes place and the time of day are typically the factors that the director uses to delineate a sequence. On a 22-minute show, for example, it is common to have two artists working for six weeks. Due to time and money limitations, once the artist gets guidance from the director, he or she focuses effort on making the story work and doesn’t take many departures from the script. It is essential for television storyboard artists to have access to the voice track in order to start their assignment. The recording of the entire episode is edited into a radio play that the board artists use in order to enact the performance by the voice-over talent. Closely following how the lines of dialogue have been delivered, they add poses, facial expressions, and gestures that become acting guidelines for the production team. On these types of shows, storyboard artists also take on the role of editors and cinematographers. Based on their understanding of the director’s vision, they determine how the show should be cut by the way they depict the scene, asking such questions as, “Can the action be covered in a single master shot or are there many cuts?” They also create the template for the look of the project via how they choose to set up camera angles and how the characters are framed and composed within the shot.
The primary goal for the storyboard artist is, simply put, to tell the story. In long format, the script often plays second fiddle to the storyboard. Instead of the script being closely followed, it provides a frame of reference that the artist can use and improve upon. On an 85-minute project, the storyboarding staff can have anywhere between nine to eighteen months to complete their task. There will be ongoing changes throughout production as feedback is provided from buyers, test screenings, and so on; however, the lion’s share of work is complete at this stage. Often when there is only a treatment or a description of a particular event, the storyboard artist is given the material in order to explore a theme and come up with possible paths to be followed by the script. As the feature storyboards evolve, the script is revised to match the latest set of boards. (See Chapter 5, “The Development Process,” for more information on the relationship between feature storyboarding and the script.)
Depending on how a production is set up, both features and television productions can have a head of story (or story supervisor) who functions as a liaison between the director and the artists. He or she attends editorial sessions and must provide a keen sense of the director’s vision and lays a foundation for communicating revision needs to the story team. The head of story also manages the workflow through his or her department with the aid of an APM/PDM or a coordinator. On feature productions, the story goes through many variations; it is the role of the story APM/PDM to keep track of the creative notes. The head of story and APM/PDM jointly meet with their crew on a weekly basis to discuss the overall status of the script and talk about the work in progress. Using the tracking system as the production hub, it is critical that the APM/PDM keep the notes current and make that information available to the crew as expeditiously as possible.
When a sequence is ready for storyboarding, the director and/or head of story assigns it to the appropriate board artist (depending on the project, this might be someone who works well with drawing action adventure or someone who has a knack for timing and illustrating comedy). Another approach is to have a group of artists work together on the same sequence. The artists are each assigned a story beat to work out. After artists finish their sections, they are pitched to the group for comments. Their panels are either approved for viewing by the director or sent back for revisions.
Because the storyboarding procedure is the cornerstone of any production, it is vital to establish a few ground rules. It should be noted that before starting storyboarding, the size of the panels must be standardized. The ratio used for high-definition television series is 1.77:1. For direct-to-DVD projects that are intended for limited theatrical release and for feature films, the standard ratio is 1.85:1. For projects that opt to use a widescreen format, the ratio is 2.39:1. These ratios are captured in Figure 8-20.

Figure 8-20 Aspect ratio comparison.
For television projects, sample storyboard pages should be created so that all artists use the same setup. It is common to have three panels per page and to allocate space underneath each panel for dialogue and action. When a storyboard artist uses software set up for storyboarding on a digital tablet, the template is already set up to accommodate this information. On series productions, it is advisable to distribute an approved storyboard sample to the artists as a tool to express a consistency of style for the show and to standardize the amount of detail expected on each panel. The model storyboard also has other benefits. One important advantage is for the artist to be able to gauge his or her assignment in correlation with its due date. The sample storyboard enables everyone to see the final goal and to have realistic expectations of the show’s requirements.
The Three Stages of Storyboarding
Over the years, this three-step system has proven both costeffective and highly conducive to good storytelling. However, not all productions can afford the time necessary for the board to go through all the phases listed in the following sections. As noted earlier, it should be emphasized that the more time spent honing the story at this stage, the better the foundation for the production.
Thumbnails
The creation of “thumbnail” size images is a quick way for an artist to map out his or her sequence, as shown in Figure 8-21. A thumbnail is a form of shorthand drawing that has numerous benefits. One benefit is that artists can make sure they are in sync with the director. Because the images are so small, the artist is able to fit many panels on one page, thereby enabling the director to see how the action flows in one fluid look. It is an early opportunity for the director to see whether what he or she had envisioned actually works. Because the drawing of thumbnails is relatively quick, the director may ask the artist to come up with a few different approaches. By requesting alternative drawings, the director takes advantage of the storyboard artist’s expertise and may potentially come upon a version that works even better than what he or she had in mind.
Rough Pass
After the director views the thumbnails, changes are usually made to the drawings that may involve new character placement and camera angles. The next version of storyboards that is created while implementing these changes is referred to as the rough pass (Figure 8-22). The panels used for the rough pass are substantially larger than the thumbnails, enabling the artists to flesh out more details of the characters, their action, and their environment. This version of the board is much easier to read for the non-artist. The characters are more “on model” and the backgrounds are easier to decipher. Artists that use digital tablets can access the voice-over recording and can line up their artwork to the respective audio files.

Figure 8-21 Thumbnail storyboards.

Figure 8-22 Rough storyboards.

Figure 8-22 (Continued).
On television projects, once the storyboard is approved at this stage, it is sufficient to be sent directly to the editorial department (via digital files or scanned files) to create the initial story reel. Story reels of the rough pass go to the producer and the buyer/executive for notes. At this checkpoint, the storyboards are often revised to serve creative notes. These changes typically require deletion of some panels and drawing of new ones. Once the revisions are completed, the board is ready for the cleanup phase. The cleaned-up version of the board is also reviewed by the legal department for any potential concerns, such as trademark infringements or copyrighted material that requires clearance. Additionally, the storyboard is checked as to whether it adheres to broadcast standards and practices. Broadcast standards and practices (BS&P) monitor the storyboard for any items that deviate from television regulations, such as showing passengers in a car who are not wearing seatbelts.
On feature projects, the artist uses the rough pass of the board to pitch the sequence to the director, the producer, the writer, and sometimes the buyer/executive. Storyboard artists who work remotely and are not able to do an in-person pitch can create their own digital pitch complete with their voice (if there’s no scratch recording), sound effects, and music using software that enables them to record the content on their screen and save it as a QuickTime movie that can then be sent as an email. After the board has been pitched, story notes are generated and the artist incorporates them into the next pass on the sequence. Because revisions require additional passes, both the budget and the schedule should be taken into consideration in terms of time allotment for storyboard fixes. If there are no changes (which is rarely the case!) the storyboard is ready to move to the next phase: cleanup.
Depending on the story, schedule, budget, and process, a CG project may skip the cleanup phase outlined next and move directly into pre-vis phase. In such a case, the director handpicks select panels for cleanup to depict the emotion of the story clearly. (See the upcoming section “Pre-visualization.”)
Although some studios do not involve the producer until the storyboard has been completed through the cleanup stage, it is advantageous for the producer to be included before too many weeks have been spent on boarding a sequence. Since the producer is viewing the sequence for the first time, he or she can act as a test audience for the director and the artist. During the storyboard pitch, it can be immediately apparent to “fresh eyes” what areas read well and what sections may require additional work. The producer views and offers feedback based on the following objectives:
- Does the story structure work?
- Do we care about the characters?
- Will it fulfill the buyer/executive’s expectations?
- How complex is the sequence? Are there ways to tell the same story with simpler shots without compromising the director’s vision?
- If this sequence requires revisions or a complete overhaul, how will this affect the budget and the schedule?
Cleanup Storyboard
In this last stage, the panels are fully rendered to spell out all the necessary details of the shots as presented in Figure 8-23. This stage is important on shows that are sent to subcontracting studios because in some cases, particularly in lower-budget digital 2D shows, the storyboard panels are substituted for layouts. If this is the case, the cleaner the storyboards in terms of staging, composition, and camera directions, the more likely you are to be happy with the work you get back from the subcontracting studio.

Figure 8-23 Cleanup storyboards.

Figure 8-23 (Continued).
On television productions, it is often customary to have a cleanup or revisionist storyboard artist complete this version of the board. Since the original storyboard artist has already pinned down all the necessary story information, it is cheaper to hire a cleanup artist to do the final detail work. Meanwhile, the original storyboard artist is freed up to work on another episode. By working on boards that have been drawn up to this stage, the cleanup artist learns the thinking process and drawing skills necessary for boarding. In time, they are able to take on assignments as full-fledged storyboard artists. This method of schooling or mentoring within the studio is common and ultimately helps the producer build a strong team.
The storyboards for television series function as the blueprint for the production team and therefore must include specific details in order to facilitate their efficient integration into the production pipeline. These details include matching the dialogue with the panel(s), the studio name, the project title, the production number, the episode number, the page number, and the name of the artist(s). This information is necessary to keep the boards organized and to help the production team and especially the subcontracting studio track the artwork and know whom they should contact if questions arise.
On features, at some studios, when the sequence is ready for a final pass, the story APM/PDM sets up a meeting for the key stakeholders, which can include the director, producer, head of story, the writer, and in some cases, the buyer/executive. At this meeting, the artist pitches the sequence to the selected staff members. After the artist has finished the pitch, if there are any additional notes, they are addressed, and once the sequence is approved, it is ready for turnover to the editorial department, where the story reel is built. Another way of working is for the cleanup boards to go directly into story reel/animatic and for reviews and notes to be given in this form.
During an editorial turnover pitch, the director or story artist that boarded the sequence pitches the sequence to the editor and editorial team. The editorial team takes note of the action and the pacing of the sequence, along with any other directorial notes on how this sequence should be cut, such as camera moves, dissolves, and so on. Other key crewmembers that should attend editorial turnovers include the art director, the visual effects supervisor, and the production manager, for an early look at what needs to flow through the production pipeline. Before handing them off to editorial, the images need to be properly labeled with the artist’s name, chronological sequence, and panel numbers.
On projects that use subcontracting studios, once the storyboard is final and cleaned up, the director reviews it again and adds any necessary directorial notes as annotations on the animatic files prior to shipping. These notes include any information with regards to acting, staging, and so on. A designated production person also goes through the storyboards to check for new designs. Often the storyboard artists create new characters, locations, or props as dictated by the script. Depending on how much detail is missing from the new design on the storyboard, it may require its own model sheets.
It is also very useful to create a color board for the subcontracting studio’s reference. The purpose of the color board is to function as an art direction guideline, showing the time of the day or the shot’s emotional intent, for example. In some cases, depending how detailed it is, this version of the storyboard can even be used instead of creating color or lighting keys. Once the board has been signed off by the director, it is sent to the continuity checker along with all the other materials for review and production set up.
Building the Story Reel/Animatic
The most popular method of timing in animation is through the creation of what is called a story reel, also referred to as an animatic. The digital process of timing storyboards for an animatic begins with approved storyboard panels, either clean or rough, which are uploaded into the editing system. The audio track is also brought into the system, whether it is scratch vocals or final voice recordings. The track is then assembled and placed under the appropriate storyboard panels. By combining these two elements, the editor starts building the animatic by moving around the dialogue and timing out the action. If the editorial work causes significant timing or action changes the storyboard artist will need to generate new drawings.
The animatic functions as the blueprint for the project. The director has the opportunity to focus on the timing and the pacing of the shots with both the picture and the dialogue track. If the storyboard is not working, the director can delete and/or add new panels. He or she can also easily check for hookup problems. For projects that are outsourced, the animatic is key in closing the gap between the two production studios, as it clearly lays out what the director is planning for the show. Much of the success of animation is dependent on how it’s timed. Because many of the artists working on the show do not necessarily speak English, the animatic allows them to see and hear how each shot is cut and paced and ultimately, how it works as a whole.
For projects animated in-house, the animatic is a living record of the show, which is always in a state of flux. Each shot goes through a metamorphosis as it progresses down the production pipeline. Starting as storyboard panels, the shot’s first transformation takes place when it is sent through pre-vis and/or animation. As more and more shots are animated, the project begins to come to life when still frames are replaced by animation. It is important to note that sound also plays a large part in the development of the animatic. It is common to build a sound effects and music temp track alongside the creation of the animatic in order to help facilitate the telling of the story by underscoring key moments in addition to developing the overall sound direction for the project. The temp track is a necessary device for sound designers, composers, and dialogue editors because it functions as their guideline during post-production. (See Chapter 10, “Post-production,” for more details on the soundtrack.)
Pre-Visualization
After the rough storyboard has been signed off on, the process of pre-visualization can begin on CG projects. Pre-vis is the stage at which the 2D drawings are used as guidelines to create and explore the 3D space in a CG world. This process should be considered the next step in the storytelling phase as opposed to a technical phase, as it enables the pre-vis artists and directors to take advantage of the actual space within which the characters are “acting.” Pre-visualization provides much more creative flexibility when it comes to the use of the camera. It is also a very effective step from a production standpoint in that it enables the team to identify what assets actually need to be produced when camera placement is determined early on. See Figure 8-24 for an example of pre-vis panels from Luna.
The process generally uses proxy models, or low-resolution, simplified versions of geometry for the characters, sets, and props (if applicable). A pre-vis artist might create these elements or be provided with them by a proxy modeler. The director will do a handoff to discuss the intent of the sequence or shot. The artist will then place the characters accordingly on the set, with limited movement (i.e., sliding a character across a room versus animating his or her steps) and setting cameras to tell the story as creatively and cohesively as possible. Acting as cinematographers, it is important that the director check in with the pre-vis team on a regular basis to ensure that the project is aligned with his or her vision.
Figure 8-24 Pre-visualization for Luna.

Pre-visualization is particularly helpful when trying to conceptualize complicated camerawork. Action-packed fight or chase sequences can be enhanced with dynamic staging and camera work that can be worked out in this relatively inexpensive step. Pre-vis artists will often take this step to the next level, using cinematic tools such as lighting and even temporary effects to enhance the storytelling process.
The challenge at this stage is that most proxy models do not have the ability to portray any emotion. Artists therefore need to keep this in mind when staging sequences, knowing that the story needs to be told in a way that enables the viewer to take a leap of faith in regard to the emotional intent. In some cases, it may be possible to sketch faces over the top of the proxy models so that any key information as to what a character is thinking is clarified, especially if it is a critical moment.
If the project is due to be released in a stereoscopic (3D) medium, the story animatic and the pre-vis phases are key opportunities to identify shots that can maximize the “3D experience” for the audience. Pre-vis is also a good stage to start watching that the action does not break the frame line in what are intended to be big “reaching out” moments, because out-of-screen elements need to remain free of the frame line at all times within such shots. (For more insight into utilizing the stereoscopic medium, see the sidebar “Stereoscopic Filmmaking at 20,000 Feet” in Chapter 9.)
In 2D pipelines, a less flexible version of this step takes place in the first phase of production in what is known as the rough layout process.
Executive Screenings
During pre-production is when the buyer/executive can experience how the words in the script have been transformed into visuals and how the project is shaping up before animation is started. Although the animatic has many advantages, it can create a danger zone for the producer if the buyer/executive reviewing it is not made aware of its purpose and the nature of animation timing. Looking at an animatic when it is made up of storyboard panels or pre-visualized shots, especially in a rough form, can be very misleading for a viewer who is not familiar with the animation process. As previously noted, each shot is shown on the animatic for the estimated length of time that it will require for its animation, but for an individual who is not aware of this fact, the animatic can be—for lack of a better word—boring. However, the addition of camera movements and temp sound track can be very beneficial in fleshing out the intent of the action in the shots.
Slugging/Animation Timing
After any necessary revisions are addressed on the animatic—meaning that panels are rearranged, deleted, or added, and dialogue is shifted, deleted, or replaced—some production pipelines (particularly 2D shows) call for “slugging” the updated story panels. The slugging process documents for the animators the timing that is used in the final animatic. The origins for the term “slugging” date back to the days when old-fashioned printers were used for typesetting. The space between the words was described as a “slug.” In animation, the pause created on the soundtrack to accommodate the action is called a “slug.”
The animation timer paces the timing of a shot in order to create the desired effect. Before the onset of digital technology, a stopwatch was the sole method used to estimate the length of a shot. The animation timer would start the watch and act out the action drawn on the board, either just imagining it or actually moving around to determine the timing of the shot. The amount of time that elapsed between the start and finish of the action was accounted for and calculated into feet and frames or seconds and frames. The animation timer would then put the timing or the slug below the appropriate storyboard panel in order to guide the next steps of the process, layout, and animation.
Editing programs in which animatics are built inherently provide timing information. With that said, this timing may not always be fully accurate and will therefore need the expertise of an animation timer. For example, a character’s walk cycle may take longer in animation than was estimated in the storyboard panels. Another issue to keep in mind is whether the shot will have to be opened up to account for stereoscopic requirements. For example, the eye typically needs more time to adjust and the brain more time to read stereoscopic shots than traditional cutting often provides.
Upon completion of this conforming process, the director reviews the board with the animation timer to add other key directorial information, such as camera moves, effects information, or key dramatic points to emphasize on a particular character. Concurrently, the editor outputs the dialogue track for a track reader to use in processing the next step of pre-production: the drafting of exposure sheets. If a subcontracting studio is involved, a continuity checker should cross-reference this information with other materials being shipped to be sure that all elements are consistent and included in the package.
Exposure Sheets
In some pipelines, when the timing of an episode or a sequence is completed, exposure sheets or dope sheets are produced. These documents operate as the map for what is going to happen in each shot and include frame-by-frame descriptions of every detail of the story. The following information is provided by exposure sheets:
- The shot number and timing
- Shot description
- The name of the animator
- The act number or sequence number
- The sheet number
- A description of action
- The dialogue column
- Mouth chart information (if applicable)
- Columns for levels of art
- A description of visual effects
- Camera notes
- The production number
Figure 8-25, shows a sample exposure sheet. There are several aspects to the production of an exposure sheet. Initially, the producer has blank exposure sheets printed with the name of the project and any key information (such as the production number) that should be repeated on each page. Depending on the size of the project, thousands of sheets may be required. Next, the sheets and the dialogue track are handed to a track reader.
Track reading is the process of phonetically transposing the entire dialogue track frame-by-frame onto the exposure sheets. Listening to the dialogue track, the track reader places the words for all speaking characters into their correct frame on the exposure sheet. Each row on the exposure sheet represents a single frame, with typically 80 frames per page. After the number of feet and frames or seconds and frames are delineated, the exposure sheets for the sequence or episode can then be separated so that individual shots can independently move down the production line. The completed exposure sheet provides the animator with a framework as to where the shot starts and stops and what is its duration in correlation with the dialogue. (For more information on this topic, see Chapter 9, “Production.”) When animating to music, the beats on the click track are transposed onto the exposure sheet so that the animator can time the animation to the beat. (See description later in this chapter.)
On productions that are outsourced, exposure sheets are sent to the animation timer (also referred to as the sheet timer) for detailed direction. The animation timer, with guidance from the director, notes what will need to take place in the shot. Using the storyboard along with the audio track as a reference, they further define and clarify what action needs to be animated by the subcontracting studio. Other information is included, such as camera movements and special effects, when applicable. Finetuning the details written on the slugged storyboard, the animation timer is now able to write out the acting notes next to the actual frames. The timer can plus the sheets with drawings that illustrate and pose out action or emotions, or he or she may use actual panels taken from the storyboard.

Figure 8-25 Sample exposure sheet (Courtesy of Cartoon Colour Company).
For CG shows, paper-based exposure sheets may not be used. The directorial information included in the exposure sheet is instead made available in a digital format as part of the animation file. These notes are typically a direct reflection of shots in the story reel/animatic or the pre-vis reel. Whatever the method used, it is crucial at this stage to not take any piece of information or direction for granted. The more details that are spelled out, the higher the chances are of the show fulfilling its artistic goals. For example, on a traditional 2D show, if there is wind effect in the shot, the animation timer must make certain that every character or object that comes into contact with the wind is animated appropriately. Until the wind stops or there is a cut from an exterior shot to an interior shot, the wind effect must be exposed on the sheets. Every nuance added will greatly enhance the final product. The animation direction therefore also covers such detailed information as how the characters articulate words and move their body parts down to the smallest details, such as eye blinks.
Because it is not always possible for the director to hand out the show and explain the timing in person, it is important that an experienced animation timer produce the sheets. Because exposure sheets are often the sole means of communication the director has with the animators on the project, the information must be concise, clear, and legible; otherwise, the show will more than likely require numerous retakes.
As mentioned previously, a mouth chart for all key characters is added to the model pack when working with non-English-speaking animators. The purpose of the mouth chart is to show how the character’s mouth looks pronouncing different sounds. The applicable mouths are symbolized by letters and are noted on the exposure sheet next to the dialogue. This frame-by-frame direction by the animation timer enables the artist in the subcontracting studio to follow the director’s vision even though they are thousands of miles and often an entire language apart. Comedy or a comic moment for example, is something that can get lost in the translation. This system helps the artists fulfill the project’s objectives.
On a number of digital 2D television productions, although it is well-established that the final delivery of the show is to be 11 or 22 minutes, the timing of the shots may be purposefully not exact, thereby allowing the animator more flexibility. In this setup, no exposure sheets are generated to accompany the episode. The storyboards are used instead of layout panels and character animation is drafted directly over the storyboard panel. The dialogue track and the temp sound effects provide a reference for action, but the final length of each shot is determined by the animator.
Preparing a Shipment: Checking and Route Sheets
All materials must be checked before they are shipped or placed on an FTP site for the subcontracting studio. Ideally, the director is very involved, reviewing all content including the final board before sending the show to the animation house. The storyboard must be conformed to the final approved animatic before shipment to the subcontractor. The continuity checker reviews the production elements for any missing materials or information. He or she crosschecks the model pack(s), the animatic, the dialogue tracks, and the exposure sheets (when applicable) in order to make sure that everything is clearly laid out and easy to understand. If elements are missing or artwork requires revision, the continuity checker works with the director to rectify the problem before the shipment can take place.
In the process of putting the shipment together, the checker fills out a route sheet so that both the domestic studio and the subcontracting studio have a detailed record of the material sent and the individuals responsible for the content. The following information is noted on a route sheet:
- The studio name
- The production title
- The episode number/sequence number
- The names of the director, color stylist, and continuity checker
- A breakdown of shot numbers, shot footage/timing, shot description, time of day, and effects information
Upon the completion of these steps, the material is ready for the subcontracting studio. (For a list of items necessary for a shipment, see Chapter 7, “The Production Team.”)
Songs
Pre-production is the stage at which song sequences must be established, as a great deal of work involving many entities needs to happen over the course of a show. There are both creative and commercial reasons why the inclusion of songs can greatly enhance a project. To some, the combination of animation and music is almost a higher art form. Additionally, many attribute the global success of animation to its use of songs—the combination of the two can transcend language and cultural barriers. Songs can also play a key part in moving the narrative of a project forward, especially when they are cohesively intertwined with the story. Frequently, a song is used as a device to cover the passage of time. Another purpose is the revelation of important information as to characters’ motivations, such as their wish to win back their true love or to take over the world.
From a commercial perspective, songs add another dimension to the marketability of a project. If popular performers are cast to write the project’s songs and/or sing them, the soundtrack is bound to result in additional revenues. At the same time, an audience that may not be interested in seeing an animated project may reconsider their position when they learn that their favorite artist has participated in its creation. There have also been a few projects on which the film itself has had a fairly short run in the theaters, but the soundtrack has continued to have a life of its own.
Songs should first be discussed when the script is in early development. Right from the start, it is necessary to establish how many songs will be needed, where they will be placed, and what genre(s) of music will best suit the project. Questions to answer include: Will there be a gamut of different types of songs, such as ballads, showstoppers, or anthems? What will be the purpose of each song? Because the production of songs can be very costly, it is crucial that all key players share the same vision, particularly how the artistic requirements correlate to the budget and the schedule. Once all of these issues are decided, the producer and/or music executive at the studio can start making contacts with agents representing songwriters and composers. On some productions, music supervisors may be hired on a freelance basis to play this role. Using their contacts, they pursue well-known artists to create a commercially viable soundtrack. As noted before, involving musical celebrities almost guarantees the project a certain amount of media attention, and it can be inspiring to the artists working on the production as well. If the budget does not allow for a big-name performer, the producer or the music supervisor asks for demo reels from agents in order to identify and cast the appropriate talent for the project. The next step is to make a final selection. As soon as the musical talent is chosen, and it has been established that they are interested in the project, the process of negotiations begins. (For more information on how contracts are negotiated, see Chapter 4, “The Core Team.”)
Upon completion of the contractual discussions, the director, the producer, the songwriter, and the composer start working together. Clarity of vision is essential at this stage. The more the songwriter and the composer are made aware of what specific goals are to be accomplished by the songs, the better. It is also important to inform them of production requirements and make sure that they have all the material needed in order to meet all deadlines, including executive and legal reviews.
Ideally, the songs are the first sequences of the project to be readied for production. There are a number of reasons for prioritizing these sequences. Externally, songs can be used as sales and advertising tools by ancillary groups such as marketing and publicity. Internally, sequences with songs can require more artistic effort than non-musical sequences. An example is a dance number for which it may be necessary to hire a choreographer and set up a live action shoot to film the dancers for reference. Because production can’t get started on these shots until the video reference has been completed, it is important to focus on this type of sequence as early as possible. Often, the director may want to have a lead animator and crew animate an entire song sequence. Under these circumstances, the song needs to be recorded as soon as possible so that the artists can work on the shots without creating a production bottleneck. In terms of complexity, typical song sequences require fairly elaborate artwork. Unless these shots are given ample time in production, there may be too many creative compromises.
From the production standpoint, a positive aspect to song sequences is that timing can’t be altered because the seconds and frames for each shot is tied to the music. The fact that the timing is solid potentially allows the sequence to go through the pipeline at a quicker pace. The drawback to song sequences is that depending on the way they hook up with each other, animators may not be able to work on an assigned shot until the shot before it has been animated. Furthermore, the necessity of hookups can diminish the number of shots that can be worked on simultaneously.
In order to get the production started on song sequences, as soon as they are approved, a click track and temp music are recorded. The click track is a timing device. It is a recording of the beat to which the animation is matched. This beat is transposed onto the exposure sheets for animation. In post-production, the digital file of this recording is provided for the conductor, sound effects designer, and the voice talent for reference. While listening to the recording, they are able to match their work to the film. The temp music, as referenced by the name, is a piece of recording that is used as a substitute until the final music is composed and recorded. After the click track and the temp music have been completed, the director is able to lock the sequence for production.
The series of steps necessary for song production start with selecting and casting the vocal talent. After they have been recorded using the click track, the next stage is to spot the music to the locked picture. This stage of the process requires the producer and the director to discuss the project’s final musical and orchestration arrangement with the composer. The composer then writes the music and records it under the producer’s and the director’s supervision. The last stage for song production is the final mix in which the music recording is combined with the picture in order to deliver the completed show. (See Chapter 10, “Post-production,” for more information on this topic.)
Title Sequence and End Credits
For television shows, a separate title sequence is produced and is placed at the front of each episode. The purpose of the title sequence is to introduce the content of the show and the main characters, and—most important—to entice the viewer into watching the program. The title sequence should therefore be considered a marketing tool used to promote the series. For this reason, most producers typically spend a significant amount of money on it in order to make sure that it successfully fulfills its mission.
The title sequence goes through the same production steps as a television show, albeit on a much smaller scale. Depending on the buyer/executive’s requirements, a title sequence can range in length from 30 to 60 seconds. Once a concept has been selected, a storyboard is created and reviewed. When it is signed off on, the title sequence continues through the pre-production process. If dialogue is needed, a recording session is held. To save money, it may be recorded as a part of a recording session for one of the episodes.
For the producer, the production of the title sequence presents a unique opportunity to test out a new studio. Subcontracting studios are always eager to prove their abilities on the title sequence in the hopes of obtaining future contracts. In comparison to risking a whole series at a very low cost, producers can evaluate what quality of animation the studio is capable of creating and check out how business is handled.
If your budget is tight, another option is to make the title sequence a part of the overall deal. In many cases, a subcontracting studio may be willing to do the title sequence at minimal charge in order to win the contract.
In a perfect world, the title sequence should be completed through post-production prior to the actual episodes reaching this stage. Taking the title sequence through post-production is another great opportunity for the producer to select the right team. It tests out the various facilities and identifies any potential problems before the bulk of the work begins to flow. It is also a chance to decide on the music and sound direction of the series and explore a variety of options. Once the title sequence is finalized, it is added to the element reel. (See Chapter 10, “Post-production,” for further details on this topic.)
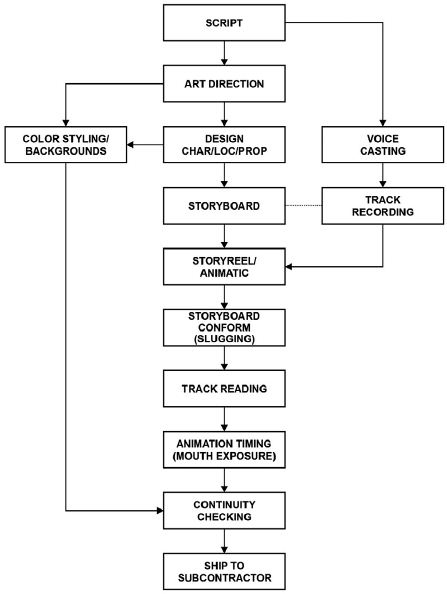
Figure 8-26 Pre-production process: traditional 2D television production.
Figure 8-26 shows the basic steps for pre-production on a traditional 2D television series.