
17. Importing Assets
In This Chapter
Using Image Trace to Convert Raster Images to Vector Artwork
Importing Photoshop (.psd) Files
Illustrator recognizes all common vector and raster file formats, allowing you to easily incorporate other artwork and images into your document’s design.
Placing Files
Using the Place commands to import artwork provides the most functionality and support when importing documents.
Place a linked file
Do the following (Figure 17.1):
Choose File > Place to open the dialog box and select the file.
Select the Link option.
Click Place.
In the document window, position the cursor where you want to place the upper-left corner of the file.
Click to place the file.

FIGURE 17.1 Placing a linked image file
Tip
Linked placed images display a crosshatch when selected.
Tip
Illustrator also lets you choose and place multiple files one at a time using Shift or Command/Control to select them in the dialog box. The cursor will display how many files are loaded and will place them sequentially as you click in the document window.
Tip
You can also place a linked file by dragging it from your computer’s desktop window onto the Illustrator document window.
Place an embedded file
Do the following (Figure 17.2):
Choose File > Place to open the dialog box and select the file.
Deselect the Link option.
Click Place.
In the document window, position the cursor where you want to place the upper-left corner of the file.
Click to place the file.

FIGURE 17.2 Placing an embedded image file
Tip
You can also add embedded elements by using the Copy/Cut and Paste commands or by pressing Shift as you drag it from your computer’s desktop window onto the Illustrator document window.
Open an image file as an Illustrator document
When you open an image file directly in Illustrator, the image is placed as an embedded file using the most recently chosen Illustrator artboard dimensions (Figure 17.3).

FIGURE 17.3 Opening an image file in Illustrator
To open an image file from the Home screen, do any of the following:
Click the Open button and then navigate to select the image file.
Click one of the options under Your Work and select the image file.
Click an image file listed under the Recent section.
To open an image file from the Application frame, do any of the following:
Choose File > Open and navigate to the image file.
Choose File > Open Recent Files and select a recently opened image file from the context menu.
Managing Placed Files
The Links panel (Figure 17.4) provides access to, and information about, all the placed artwork files in your document.

FIGURE 17.4
A. Panel menu B. Linked file C. Embedded file D. Selected file E. Modified linked file F. Show Link Info G. Relink from CC Libraries H. Relink I. Go to Link J. Update Link K. Edit Original or Edit in Photoshop
The Object Type and Links sections of the Control panel (Figure 17.5) let you manage the settings for a selected placed artwork file.

FIGURE 17.5 The Object Type (Linked File) and Link section of the Control panel for the selected file
Open the Links panel
Do either of the following:
Choose Window > Links.
Click the underlined Object Type name in the Control panel (Figure 17.5).
View a placed file’s information
Do the following (Figure 17.6):
Click the Show Link Info button at the bottom of the Links panel.

FIGURE 17.6 Displaying a selected file’s link information
Tip
Basic link commands are also available in the Quick Actions section of the Properties panel.
View a placed file’s metadata
Metadata is additional information (copyright information, descriptions, etc.) that can be added to the source file.
Do the following:
Choose Link File Info from the Links panel menu.
Embed a linked file
With the linked file selected, do any of the following:
Click Embed in the Links section of the Control panel.
Click Embed in the Quick Actions section of the Properties panel.
Choose Embed Image(s) from the Links panel menu.
Link an embedded file
With the embedded file selected, do the following:
Click Unembed in the Control or Properties panel, or choose Unembed from the Links panel menu.
In the Unembed dialog box, choose a file format and then save the file to the desired location.
Update a modified linked file
If the source file has been modified after placing it in your document (E in Figure 17.4), do either of the following in the Links panel:
Click the Update Link button (I in Figure 17.4).
Choose Update Link from the panel menu.
Tip
Illustrator will also alert you with a warning dialog box when a file has been modified outside of Illustrator, allowing you to update it by clicking Yes.
Replace a placed file
With the file to be replaced selected, do any of the following (Figure 17.7):
Choose File > Place and with the replacement file chosen, select the Replace option.
In the Links panel, click the Relink button (H in Figure 17.4) or choose Relink from the panel menu to select a replacement file from the dialog box.
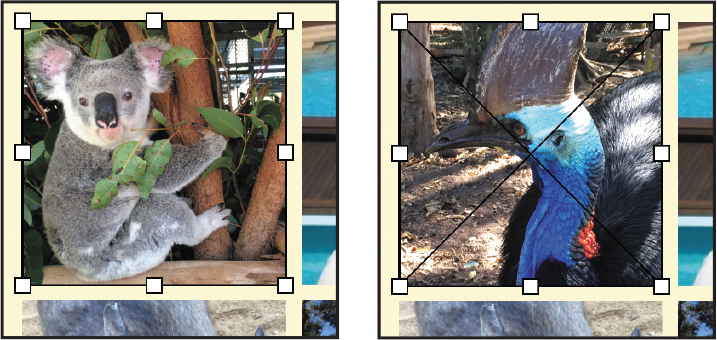
FIGURE 17.7 Replacing an embedded image file with a different linked file
Modify a linked source file
Do any of the following
In the Links panel, click the Edit Original button (K in Figure 17.4) or choose Edit Original from the panel menu.
In the Control or Properties panel, click Edit Original.
Tip
If you have Photoshop installed, linked image files will display Edit in Photoshop instead of Edit Original. More information is available in the “Importing Photoshop (.psd) Files” section of this chapter.
Using Image Trace to Convert Raster Images to Vector Artwork
The Image Trace panel (Figure 17.8) lets you easily convert digital or scanned images and drawings into vector artwork, using either presets or a robust collection of customizable settings.
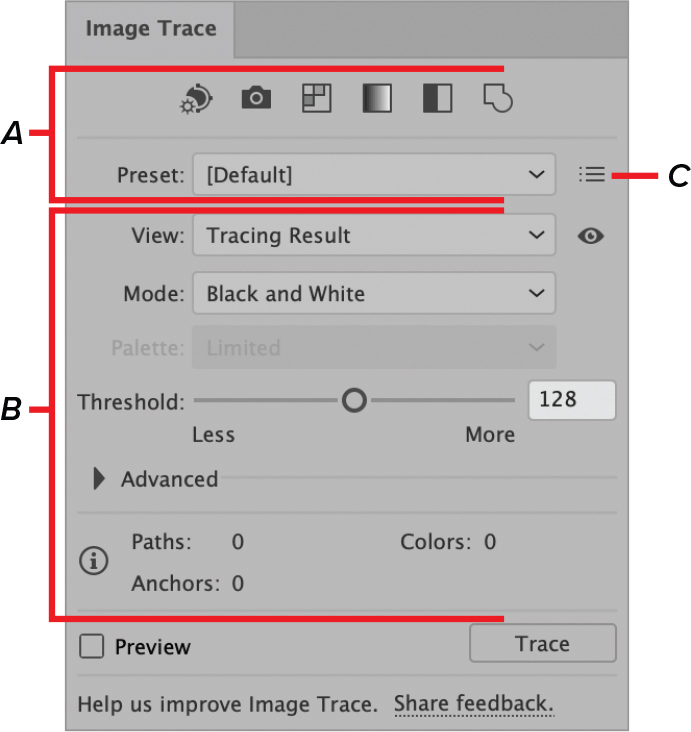
FIGURE 17.8
A. Preset buttons and menu B. Customizable settings C. Manage Presets button
Apply Image Trace using a preset
With the image selected, do either of the following (Figure 17.9):
In the Image Trace panel, click a preset button or choose a setting from the Preset menu.
In the Control panel, choose a preset from the Image Trace menu button (Figure 17.10).

FIGURE 17.9 Examples of Image Trace presets

FIGURE 17.10 Preset options in the Image Trace menu button
Access the Image Trace panel
Do either of the following:
Choose Window > Image Trace.
Switch to the Tracing workspace and then select the Image Trace panel tab.
Apply Image Trace using customized options
With the image selected and the Image Trace panel active, do any of the following:
Choose a View to determine how the traced object is displayed.
Choose a Mode to determine the color mode for the tracing result.
If a color mode is selected, choose a Palette option for generating the tracing.
Dive deeper by investigating additional options under the Advanced button.
Apply Image Trace using the default (black and white) setting
With the image selected, do either of the following:
Choose Object > Image Trace > Make.
Click the Image Trace button in either the Control or Properties panel.
Save customized tracing settings as a preset
With the customized settings active in the Image Trace panel, do the following:
In the Preset section, click the Manage Presets button (C in Figure 17.8) and choose Save as New Preset.
In the Save Image Trace Preset dialog box, enter a name and click OK.
![]() VIDEO 17.1
VIDEO 17.1
Working with placed images and Image Trace
Display the traced outlines
Do the following:
Under View in the Image Trace panel, choose an outline display option (Figure 17.11).

FIGURE 17.11 Traced outline views
Convert the tracing results to paths
Converting the tracing results is the important final step in letting you work with them as vector objects.
With the result selected, do the following:
Click Expand in the Control or Properties panel, or choose Object > Image Trace > Expand.
Ungroup the paths by clicking Ungroup in the Properties panel or choosing Object > Ungroup.
Importing Photoshop (.psd) Files
When you open or place an embedded Photoshop file into Illustrator, you have the option of preserving many of Photoshop’s features, including layers, text, and paths (Figure 17.12).

FIGURE 17.12 Preserving the Photoshop layer structure in Illustrator
Access the Photoshop Import Options dialog box
Do either of the following:
Place the .psd file as embedded (Link deselected) with Show Options selected (Figure 17.13).
Open the .psd file in Illustrator (Figure 17.14).

FIGURE 17.13 Photoshop file placed in Illustrator with text selected

FIGURE 17.14 Photoshop file opened in Illustrator with text selected
Importing Acrobat (.pdf) Files
Illustrator lets you determine which pages of a PDF document are imported when you open or place them. Placing a file lets you choose a single page, while opening a PDF file provides the option to choose multiple pages that open on their own artboards.
Place a PDF file using page options
Do the following:
When placing the PDF file, select Show Options in the dialog box and then click Place.
In the Place PDF dialog box, choose the source you want to Crop To and which PDF page to place (Figure 17.15).
Click OK.

FIGURE 17.15 Selecting a PDF page to place
Open a PDF file using page options
Select the file to open in Illustrator, and then in the PDF Import Options dialog box, do any of the following (Figure 17.16):
View the page thumbnails using the navigational tools.
Choose which pages to open using the Range options.
Open every page by selecting All.
Open the pages as linked files by selecting Import PDF pages as links for optimal performance.

FIGURE 17.16 Choosing a range of pages to open in their own artboards
Importing Text Documents
Illustrator supports importing most Microsoft Word (.doc and .docx) formats, as well as Rich Text Format (.rtf) and plain text (.txt).
Open a text document in Illustrator
Do the following (Figure 17.17):
Choose File > Open.
In the Open File dialog box, select the text document and click Open.
(Optional) If you are opening a Word document, select the settings you want to customize, and then click OK.

FIGURE 17.17 Opening a Microsoft Word document in Illustrator
Tip
For more information about work with text, see Chapter 11, “Adding and Customizing Text.”
Place a text document in Illustrator
Do the following:
Choose File > Place.
In the Place File dialog box, select the text document and click Open.
(Optional) If you are opening a Word document, select the settings you want to customize, and then click OK.
Tip
Placed text documents can only be embedded, not linked.