
11. Adding and Customizing Text
In This Chapter
Customizing Character Settings
Customizing Paragraph Settings
Using Character and Paragraph Styles
Illustrator provides powerful features for adding customized text to your artwork. Type can be transformed from simple text to eye-catching visual elements.
Adding Text
Illustrator provides three methods for adding horizontal or vertical text to your artwork: point, area (text frames), and type on a path (Figure 11.1).

FIGURE 11.1 The Type tools group in the Essentials Classic toolbar
Tip
Point text flows in one line from the point until you press Return or Enter. It also scales differently than area text.
Add point text
Do the following (Figure 11.2):
Select the Type or Vertical Type tool.
Click where you want the text to begin.
Enter the text.
Either deselect the text by clicking away from it or select the text by clicking the Selection tool.
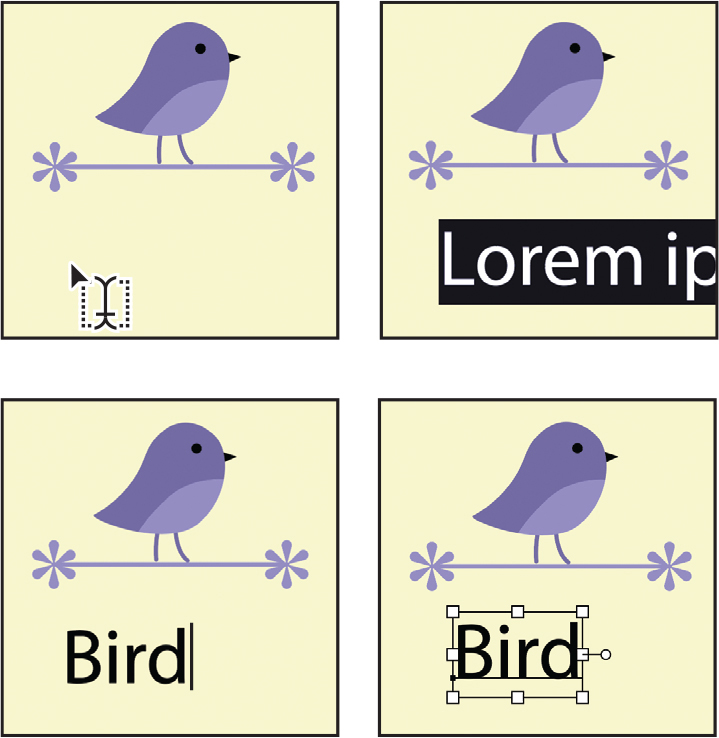
FIGURE 11.2 Adding point text
Tip
By default when using the Type tool or Vertical Type tool, Illustrator adds placeholder text before you beginning entering text.
Tip
To learn about the Touch Type tool, see “Formatting Character Settings” in this chapter.
Add area text
Do the following (Figure 11.3):
Select the Type or Vertical Type tool.
Click+drag diagonally to define the text boundaries.
Enter the text.
Either deselect the text by clicking away from it or select the text by clicking the Selection tool.

FIGURE 11.3 Adding area text
Adjust area text fitting
If the defined boundary is too small or overly large to accommodate the text, do either of the following:
Adjust the dimensions by dragging the bounding box anchors.
Double-click the middle handle at the bottom of bounding box to fit the length of the frame to the text (Figure 11.4).

FIGURE 11.4 Double-clicking the bottom area text handle to fit the frame to accommodate the text
Tip
To learn more about text flow and accommodating overset text, see “Managing Text Content” in this chapter.
Convert area text to point text
Do the following (Figure 11.5):
Double-click the middle handle on the right side of the bounding box.

FIGURE 11.5 Double-clicking an area text frame handle on the right to convert it to point text
Convert point text to area text
Do the following:
Double-click the middle handle on the right side of the bounding box.
Add area text using a shape as the boundary
Do the following (Figure 11.6):
Select either the Type, Vertical Type, Area Type, or Vertical Area Type tool.
Click anywhere on the shape’s edge.
Enter the text.
Either deselect the text by clicking away from it or select the text by clicking the Selection tool.
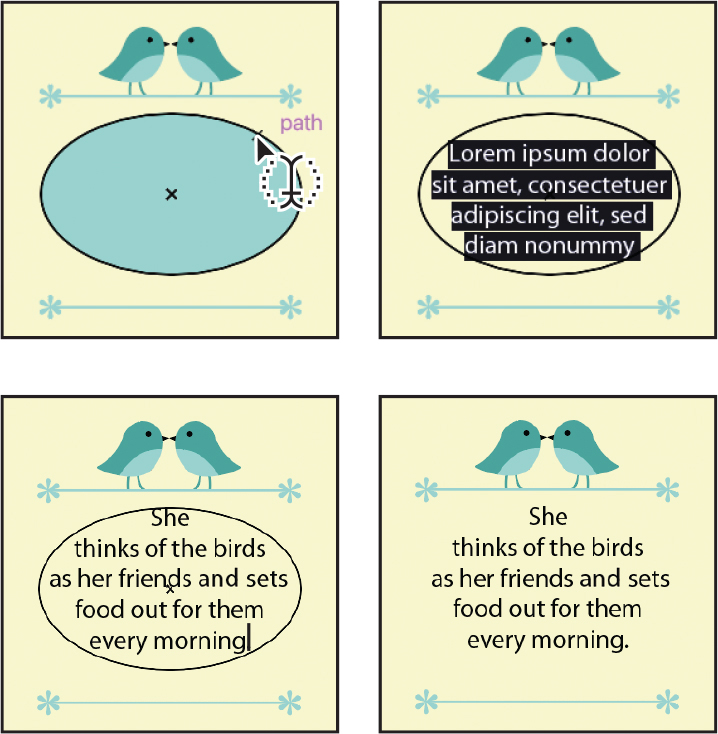
FIGURE 11.6 Adding area text using a shape as the boundary and the result
Tip
To define a new line of point or area text, simply press Enter or Return.
Add text to an open path
Do the following (Figure 11.7):
Select either the Type, Vertical Type, Type on a Path, or Vertical Type on a Path tool.
Click on the path’s edge where you want the text to start.
Enter the text.
Either deselect the text by clicking away from it or select the text by clicking the Selection tool.

FIGURE 11.7 Adding text to an open path
Add text to a closed path or shape
Do the following:
Select the Type on a Path or Vertical Type on a Path tool.
Click anywhere on the shape’s edge.
Enter the text.
Either deselect the text by clicking away from it or select the text by clicking the Selection tool.
Manually adjust the type position along the path
Do the following (Figure 11.8):
Select the text using the Selection tool.
Click+drag either the middle bracket or one of the end brackets along the path.

FIGURE 11.8 Adjusting the text path by dragging the middle bracket
Flip the type on path position
Do the following (Figure 11.9):
Select the text object using the Selection tool.
Click+drag the middle bracket across the path.

FIGURE 11.9 Flipping the type on path position
Apply a path attribute to the text
With the text path selected, do the following:
Choose Type > Type on a Path > [attribute name] (Figure 11.10).

FIGURE 11.10 Type on a Path effects
Adjust the type on path vertical alignment
With the text path selected, do the following:
Either double-click the Type on a Path tool or choose Type > Type on Path > Type on a Path Options.
In the Type on a Path Options dialog box, select an Align to Path option (Figure 11.11)
Click OK to apply the change (Figure 11.12).

FIGURE 11.11 Selecting an Align to Path option
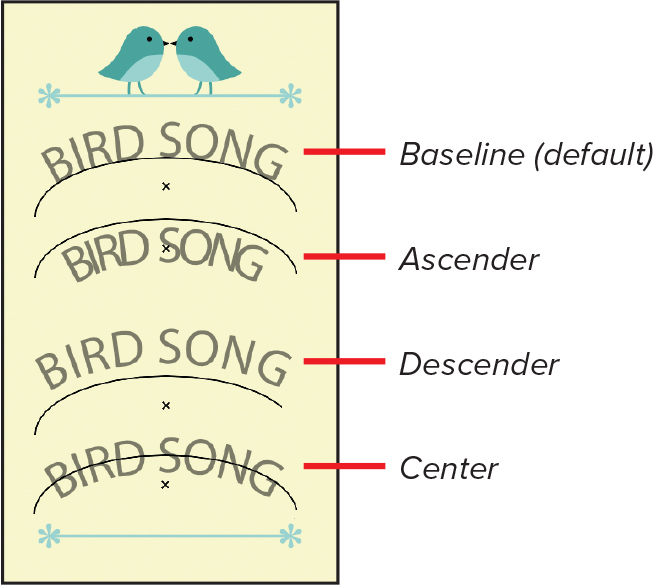
FIGURE 11.12 Align to Path options applied
![]() VIDEO 11.1
VIDEO 11.1
Working with Type tools
Choosing Fonts
Illustrator allows you to easily select and preview your available fonts and provides quick access for downloading additional ones.
Access the Character panel
Font and other typographic settings are available in the Character panel. To access the panel, do any of the following:
Choose Window > Type > Character to open the panel independently (Figure 11.13).
With text selected, click the word Character in the Control panel (Figure 11.14).
With text selected, in the Properties panel under Character, click the More Options button (Figure 11.15).

FIGURE 11.13 The Character panel


FIGURE 11.14 Clicking the word Character in the Control panel to access the Character panel

FIGURE 11.15 Clicking the More Options button in the Properties panel to access the Character panel
Tip
Fonts can also be chosen using Type > Font > [font name].
Select a font family
With the text or text object selected, do the following (Figure 11.16):
In either the Character, Control, or Properties panel, click the Font Family pulldown menu button.
Select a new font from the menu.

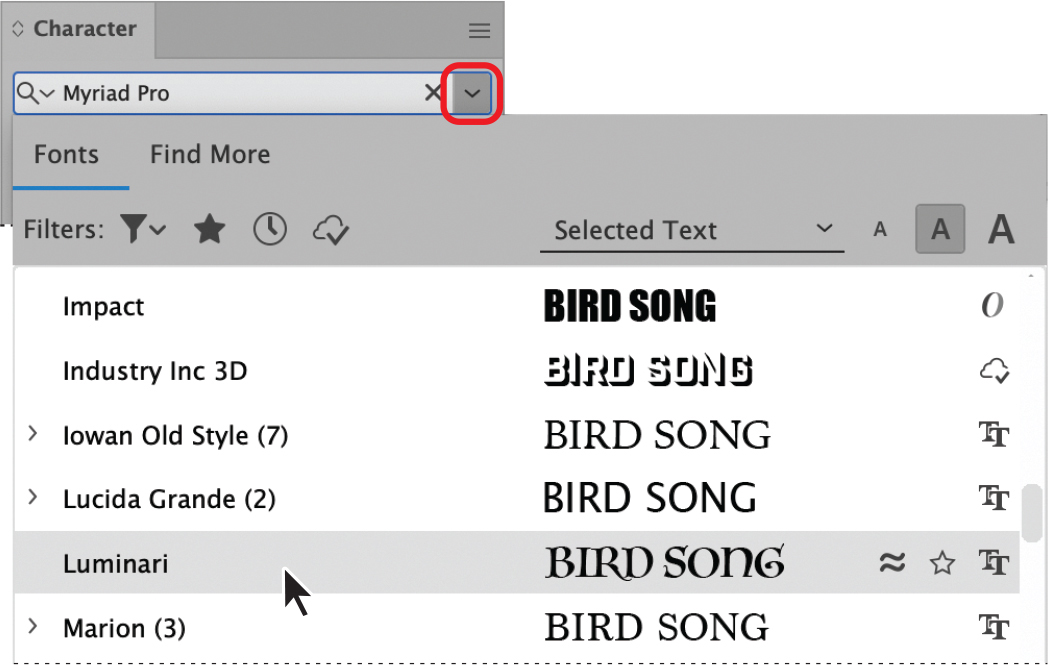
FIGURE 11.16 Selecting a font from the Font Family menu
Tip
If you know the name of the font, you can also type it in the Font Family field.
Tip
The font families displayed depend on which fonts you have on your system and which filters you’ve applied.
Narrow font search options
In the Filters section of the Font Family menu, do any of the following (Figure 11.17):
Click the Filter Fonts by Classification button and then select the classification and property options you want to include (Figure 11.18).
Click the Show Favorite Fonts button to display only the fonts you’ve selected as favorites.

FIGURE 11.17
A. Filter Fonts by Classification B. Show Favorite Fonts C. Show Recently Added D. Show Activated Fonts

FIGURE 11.18 Selecting classification and properties options to filter the font options (left) and the result (above)
Tip
See Figure 11.20 for an example of adding a font to favorites.
Click the Show Recently Added button to limit the number of fonts displayed to only the most recently added (by default, ten).
Click the Show Activated Fonts button to display only fonts activated from the Adobe Fonts library.
Find similar fonts
Do the following (Figure 11.19):
Hover over a font and then click the Show Similar Fonts icon.

FIGURE 11.19 Clicking to show fonts similar to Arial Black
Add font to favorites
Do the following (Figure 11.20):
Hover over the selected font and then click the Add to Favorites icon.

FIGURE 11.20 Clicking to add Luminari font to favorites
Apply a font style
With the text or text object selected, do the following (Figure 11.21):
In either the Character, Control, or Properties panel, click the Set the Font Style menu button.
Select a new style from the pulldown menu.
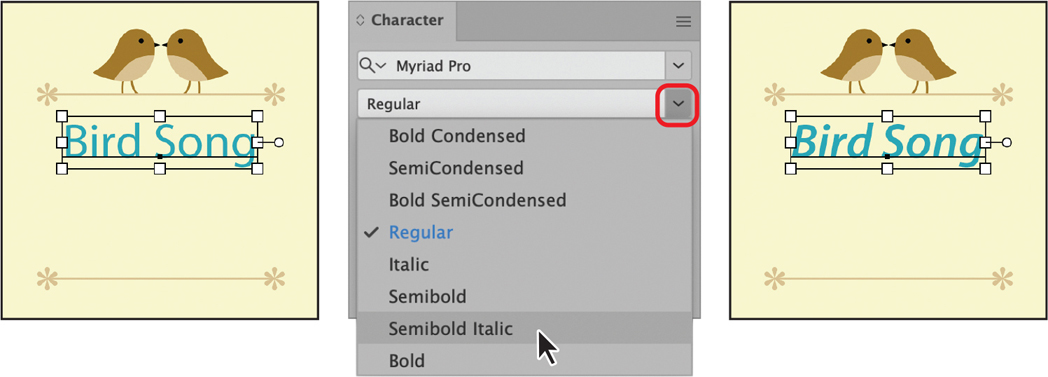
FIGURE 11.21 Selecting a font style from the menu
Modify variable fonts
With the variable font text or text object selected, do the following (Figure 11.22):
In either the Character, Control, or Properties panel, click the Variable Font button.
Either use the sliders or enter new values to adjust the settings

FIGURE 11.22 Adjusting the variable font value settings
Tip
To learn more about variable fonts, see the “About Font Types” sidebar in this chapter.
Customizing Character Settings
Illustrator provides numerous options for customizing text character settings.
Adjust the font size
To adjust the size of the text, do the following:
Select the text using either the Type or Selection tool.
In either the Character, Control, or Properties panel, adjust the size by clicking the Font Size (A in Figure 11.23) menu button and selecting a new size or entering a new value in the field.

FIGURE 11.23
A. Font Size B. Kerning C. Leading D. Tracking
Tip
Font size can also be changed by choosing Type > Size > [font size].
Adjust the kerning
To adjust the spacing between two characters, do the following (Figure 11.24):
With the Type tool active, click between the two characters.
In either the Character, Control, or Properties panel, adjust the distance by clicking the Kerning (B in Figure 11.23) menu button and selecting a new distance or entering a new distance in the field.

FIGURE 11.24 Clicking between two characters using the Text tool and the result after increasing the kerning to 200
Tip
The Selection tool selects the text object. The Type tool can select a single character or a range.
Adjust the leading
To adjust the spacing between lines of text, do the following:
Select the text using either the Type or Selection tool.
In either the Character, Control, or Properties panel, adjust the spacing by clicking the Leading (C in Figure 11.23) menu button and selecting a new spacing or entering a new value in the field.
Adjust the tracking
To adjust the spacing between selectedcharacters, do the following:
Select the text using either the Type or Selection tool.
In either the Character, Control, or Properties panel, adjust the spacing by clicking the Tracking (D in Figure 11.23) menu button and selecting a new spacing or entering a new value in the field.
Adjust the scale
To adjust the vertical or horizontal scale of the characters using the Character panel (A and C in Figure 11.25), do the following (Figure 11.26):
Select the text using either the Type or Selection tool.
In the Character panel, adjust the scale by clicking either the Vertical Scale or Horizontal Scale menu button and selecting a new percentage or entering a new percentage in the field.
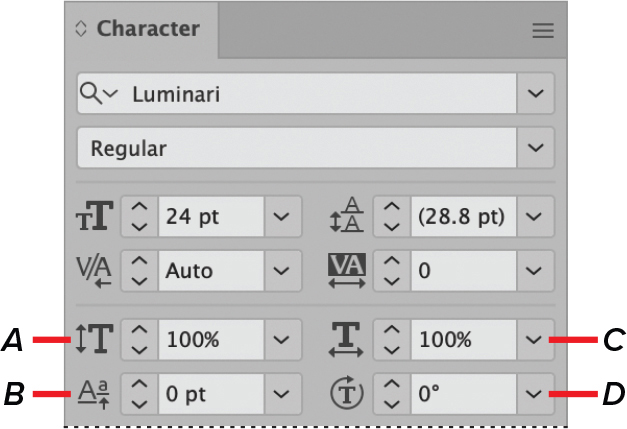
FIGURE 11.25
A. Vertical Scale B. Baseline Shift C. Horizontal Scale D. Character Rotation
Adjust the baseline shift
To move characters up or down relative to the surrounding text baseline using the Character panel (B in Figure 11.25), do the following (Figure 11.27):
Select the characters using the Type tool.
In the Character panel, adjust the position by clicking the Baseline Shift menu button and selecting a new amount or entering a new amount in the field.

FIGURE 11.26 Increasing the horizontal scale of a selected character

FIGURE 11.27 Shifting a selected character above the baseline
Tip
Positive numbers shift the characters above the baseline, and negative numbers shift the characters below the baseline.
Change the rotation of a character
To individually rotate selected characters using the Character panel (D in Figure 11.25), do the following (Figure 11.28):
Select the characters using the Type tool.
In the Character panel, adjust the rotation by clicking the Character Rotation menu button and selecting a new amount or entering a new amount in the field.

FIGURE 11.28 Rotating a selected character counterclockwise
Tip
Negative numbers rotate the characters clockwise, and positive numbers rotate the characters counterclockwise.
Tip
If all the character setting options are not visible, choose Show Options from the panel menu to display them.
Tip
Scaling, superscript, and subscript baseline shift percentages can be modified in File > Document Setup > Type.
Apply text treatments
To apply a text treatment to selected characters using the Character panel (Figure 11.29), do any of the following (Figure 11.30):
Select All Caps to capitalize every selected character.
Select Small Caps to assign small capitalization to selected lowercase characters.
Select Superscript to shift the baseline up and decrease the scale of the selected characters.
Select Subscript to shift the baseline down and decrease the scale of the selected characters.
Select Underline to apply a line below the selected characters.
Select Strikethrough to apply a line through the selected characters.

FIGURE 11.29
A. All Caps B. Small Caps C. Superscript D. Subscript E. Underline F. Strikethrough

FIGURE 11.30 Applying text treatments
Using the Touch Type tool
To isolate and modify individual characters using the Touch Type tool, do the following (Figure 11.31):
Select the Touch Type tool (inside the Type tool group in Essentials Classic).
Click the character you want to modify and then use the bounding boxes to reposition, scale, and/or rotate the character.

FIGURE 11.31 Transforming a character using the Touch Type tool
Customizing Paragraph Settings
Access the Paragraph panel
Alignment, justification, distance between paragraphs, and indentation settings are available in the Paragraph panel (Figure 11.32). To access the panel, do either of the following:
Choose Window > Type > Paragraph to open the panel independently.
With text selected, click the word Paragraph in the Control panel (Figure 11.33).
With text selected, in the Properties panel under Paragraph, click the More Options button (Figure 11.34).

FIGURE 11.32 The Paragraph panel

FIGURE 11.33 Clicking the word Paragraph in the Control panel to access the Paragraph panel for a selected type object

FIGURE 11.34 Clicking the More Options button in the Properties panel to access the Paragraph panel
Adjust the alignment
To set the horizontal positioning of the selected paragraph lines, do the following (Figure 11.35):
Select an Align option in the Paragraph panel.

FIGURE 11.35 Align options highlighted with Align Center selected
Adjust the justification
Justified paragraphs align to both the left and right edges of the text frame. To determine how the last line is positioned, do either of the following:
Select a Justify option in the Paragraph panel to set the alignment (left, center, right, or full) (Figure 11.36).
To more specifically set justification options, in the Paragraph panel menu, choose Justification to open the dialog box and customize the settings (Figure 11.37).

FIGURE 11.36 Justify options highlighted with Justify with Last Line Aligned Center selected

FIGURE 11.37 The Justification dialog box
Apply indentations using the Paragraph panel
To modify the amount of space between the selected paragraph and its vertical boundaries, do either of the following:
Select or enter a new value in the Left Indent or Right Indent settings to indent the entire paragraph (Figure 11.38).
Select or enter a new value in the First-Line Left Indent settings to indent only the first line of the paragraph (Figure 11.39).

FIGURE 11.38 Setting the left paragraph text indent

FIGURE 11.39 Setting the first-line paragraph text indent
Determine the space between paragraphs
With the text selected, do either of the following:
In the Paragraph panel, select or enter a new value in the Space Before option.
In the Paragraph panel, select or enter a new value in the Space After option (Figure 11.40).

FIGURE 11.40 Setting the Space Before amount
Tip
If the language menu is not visible in the Character panel, choose Show Options from the panel menu to display it.
Set hyphenation options
To determine how lines and words break for selected text, do any of the following:
Choose a language in the Character panel to determine how words are divided (Figure 11.41).
Select or deselect the Hyphenate option in the Paragraph panel (Figure 11.42).
To more specifically set the hyphenation options, choose Hyphenation from the Paragraph panel menu to open the dialog box and customize the settings (Figure 11.43).

FIGURE 11.41 The Language option menu in the Character panel

FIGURE 11.42 The Hyphenate option selected in the Paragraph panel
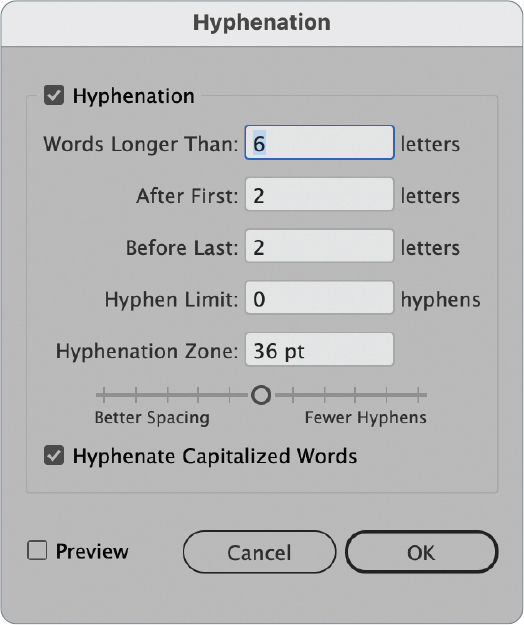
FIGURE 11.43 The Hyphenation dialog box
Adjust area type positioning
To specify the vertical position of the selected area type within its frame, do the following:
Select an option in the Area Type section of either the Control or Properties panel (Figure 11.44).

FIGURE 11.44 Changing an area type’s vertical positioning and the result
![]() VIDEO 11.2
VIDEO 11.2
Working with character and paragraph settings
Modify area type options
The Area Type Options dialog box provides additional formatting options for selected text, such as number of columns and gutter size. To open the dialog box, do either of the following (Figure 11.45):
Click the words Area Type in the Control panel.
In the Area Type section of the Properties panel, click More Options.

FIGURE 11.45 Opening the Area Type Options dialog box and increasing the number of columns
Working with Tabs
The Tabs panel (Figure 11.46) lets you set indents and add tab stops.

FIGURE 11.46
A. Left-Justified tab B. Center-Justified tab C. Right-Justified tab D. Decimal-Justified tab E. Left Indent marker F. First-Line Indent marker G. Position Panel Above Text button
Align the Tabs panel to text
With the text selected, do the following:
Click the Position Panel Above Text button (G in Figure 11.46).
Apply first-line indentations
With the text selected, do either of the following:
Drag the First-Line Indent marker to the right (Figure 11.47).
Select the First-Line Indent marker and enter a positive value in the X field.
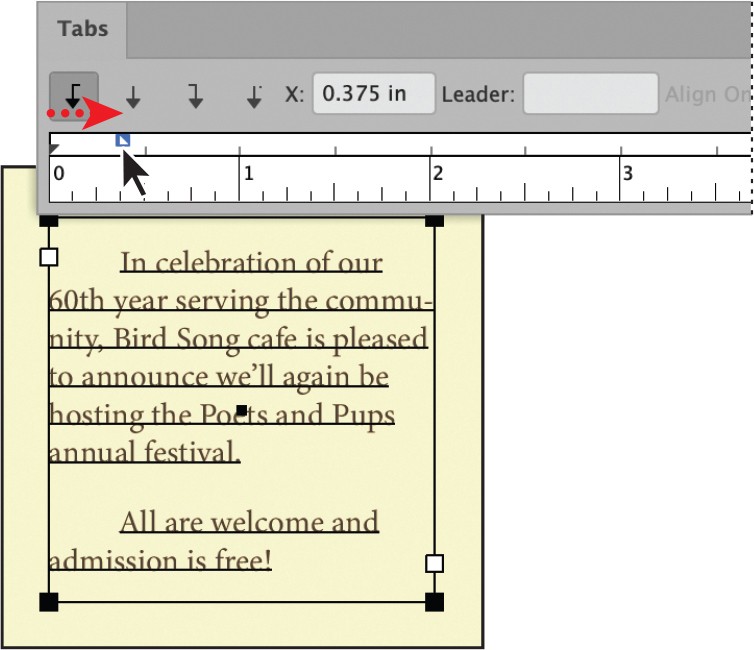
FIGURE 11.47 Dragging the First-Line Indent marker to indent the first line of the selected paragraphs
Tip
To access the Tabs panel, choose Window > Type > Tabs
Apply hanging indentations
With the text selected, do either of the following:
Drag the Left Indent marker to the right (Figure 11.48).
Select the Left Indent marker and enter a positive value in the X field.

FIGURE 11.48 Dragging the Left Indent marker to indent the selected paragraphs but not the first line
Tip
If you need the Tabs panel to display a longer ruler, click+drag the lower corner of the panel to resize it.
Apply tab stops to text
Do any of the following (Figure 11.49):
Using the Type tool, click the text where you want to insert the tab stop and press Tab.
In the Tabs panel, select a tab justification button.
In the Tabs panel, either click along the ruler or enter an X value to add the tab stop.

FIGURE 11.49 Adding a Right-Justified tab to the selected text and inserting tab stops in the lines
Apply leaders to tab stops
With the text and tab stop selected, do the following (Figure 11.50):
In the Leader field, enter one to eight characters and then press Enter or Return.

FIGURE 11.50 Adding a leader to a tab stop
Tip
Periods and spaces are common leader characters.
![]() VIDEO 11.3
VIDEO 11.3
Using the Tabs panel
Using Character and Paragraph Styles
If you repeatedly use certain format attributes, the Character Styles and Paragraph Styles panels let you save text attributes to help maintain consistency and work efficiently.
Create a character or paragraph style
With the formatted characters selected, do either of the following:
Click the New Style button to add the new style using the default name.
Choose New Character Style or New Paragraph Style from the panel menu then enter a name in the dialog box and click OK (Figure 11.51).

FIGURE 11.51 Creating a new character style from selected text
Tip
To access the Character Styles or Paragraph Styles panel, choose Window > Type > Character Styles or Paragraph Styles. By default, they are grouped together.
Apply a character or paragraph style
Do the following (Figure 11.52):
Using the Type tool, select the characters or paragraph for applying the style.
In the Character Styles or Paragraph Styles panel, click the style.

FIGURE 11.52 Applying a character style to selected text
Tip
If you use the New Style button, you can rename the new style by double-clicking the name.
Modify a character or paragraph style
Do the following (Figure 11.53):
In the Character Styles or Paragraph Styles panel, select the style.
Double-click the style you want to modify.
Customize the settings as needed and then click OK.

FIGURE 11.53 Modifying a character style’s character fill color
Tip
Styles can also be customized in the New Character Style and New Paragraph Style dialog boxes. When you modify a style, the formatting of any text with that style applied is updated.
Working with Special Characters
Illustrator provides several tools for adding special characters to your text.
Tip
Glyph options are font-dependent.
Insert a glyph
Do the following (Figure 11.54):
Using the Type tool, click the text where you want to insert the glyph.
In the Glyphs panel, double-click a glyph to insert it.

FIGURE 11.54 Inserting a glyph using the Glyphs panel
Replace an individual character using the Glyphs panel
Do the following (Figure 11.56):
Using the Type tool, select the character.
In the Glyphs panel, double-click a glyph to replace the selected character.

FIGURE 11.55 Selecting an alternative glyph character using the on-canvas menu

FIGURE 11.56 Replacing a character using the Glyphs panel
Tip
To access the Glyphs panel, choose Window > Type > Glyphs.
Replace an individual character with glyphs using the in-context menu
Do the following (Figure 11.55):
Using the Type tool, select the character.
Select an alternative glyph from the in-context menu that appears automatically.
Applying OpenType formats
Do the following:
Using the Type or Selection tool, select the text assigned the OpenType font you want to customize.
In the OpenType panel (Figure 11.57), choose the rules you want to apply to the glyphs.
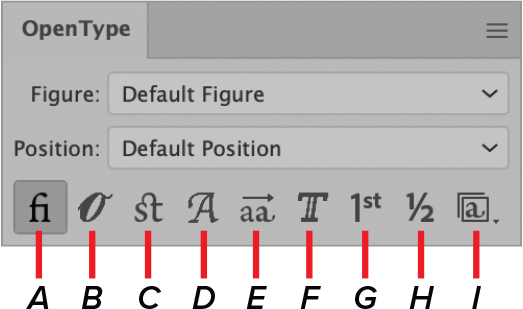
FIGURE 11.57
A. Standard Ligatures B. Contextual Alternates C. Discretionary Ligatures D. Swash E. Stylistic Alternate F. Titling Alternates G. Ordinals H. Fractions I. Stylistic Sets
Insert special, white space, and break characters using the Type menu
Do the following:
Using the Type tool, click the text where you want to insert the character.
From the Type menu, choose one of the following:
Insert Special Character to select symbols, hyphens, dashes, and quotation marks (Figure 11.58).
Insert WhiteSpace Character to select specifically proportioned space characters (Figure 11.59).
Insert Break Character > Forced Line Break to insert a new line without beginning a new paragraph.

FIGURE 11.58 Choosing Insert Special Character from the Type menu

FIGURE 11.59 Choosing Insert WhiteSpace Character from the Type menu
Tip
To access the OpenType panel, choose Window > Type > OpenType.
Managing Text Content
Illustrator provides numerous tools for managing text content, including importing text, finding words, and accommodating text flow.
Import text as a new file
Do the following (Figure 11.60):
Choose File > Open.
In the Open File dialog box, select the text document and click Open.
(Optional) If you are opening a Word document, select the settings you want to customize and then click OK.
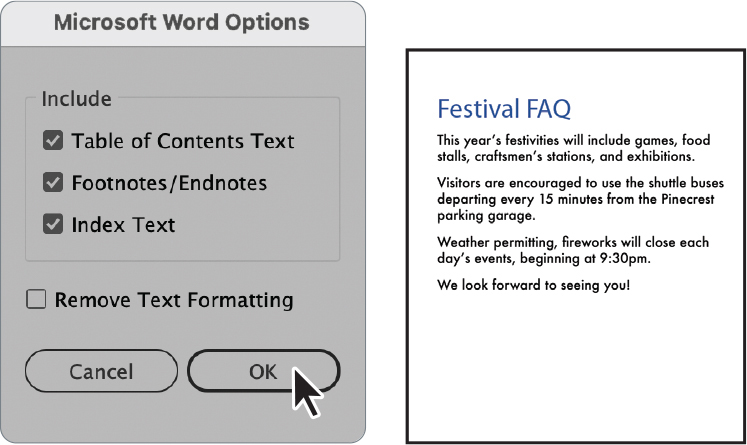
FIGURE 11.60 A Microsoft Word document opened in Illustrator
Import text into an existing file
Do the following (Figure 11.61):
Choose File > Place.
In the Place File dialog box, select the text document and click Open.
(Optional) If you are opening a Word document, select the settings you want to customize and then click OK.
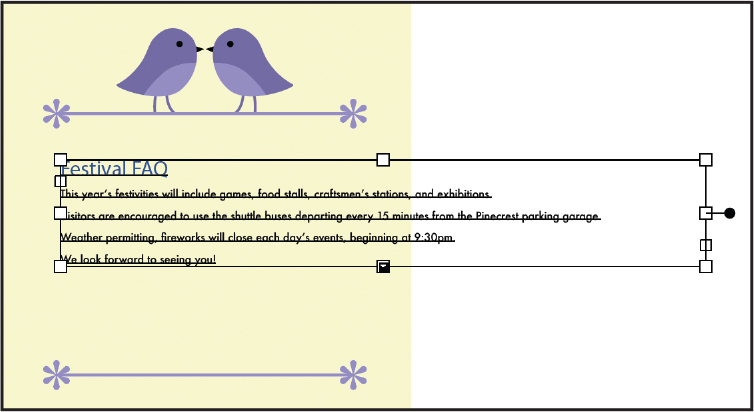
FIGURE 11.61 A Microsoft Word document placed into an existing Illustrator file
Export text as text document
Do the following:
Using the Type tool, select the text.
Choose File > Export As.
For Format, choose Text Format (TXT).
Enter a name for the file.
Click Export (macOS) or Save (Windows).
In the dialog box, select the Platform and Encoding methods; then click Export (Figure 11.62).

FIGURE 11.62 Selecting the platform and encoding methods for exported text
Tip
Illustrator supports importing most Microsoft Word (.doc and .docx) formats, as well as Rich Text Format (.rtf) and plain text (.txt).
Search for text
To search for and replace text, do the following (Figure 11.63):
Choose Edit > Find and Replace.
In the dialog box, enter the text to search for in the Find field.
Click the Find button to search for and select the text.
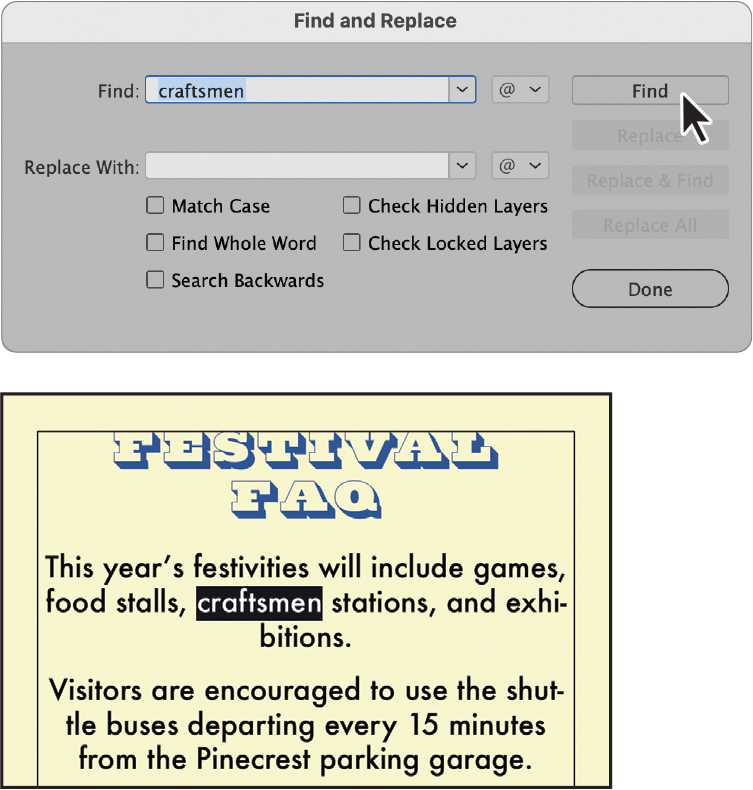
FIGURE 11.63 Searching for a word
Replace text
Do the following (Figure 11.64):
In the Find and Replace dialog box, enter the replacement text in the Replace field.
(Optional) Refine the search and replacement parameters by selecting any of the appropriate options.
Click any of the following:
Replace to replace only the selected found word.
Replace & Find to replace the found word and continue searching.
Replace All to replace all instances of the found word in the file.
Click Done.

FIGURE 11.64 Replacing a word and the result
Resize overset text frames
Overset refers to text that does not fit inside its boundaries. This is indicated by a red box with a plus sign in the lower-right corner (Figure 11.65).
To resize an overset text frame, do either of the following:
Drag the bounding box anchors to resize the text (Figure 11.66).
Double-click the middle handle at the bottom of the bounding box to fit the length of the frame to the text.

FIGURE 11.65 Example of overset text

FIGURE 11.66 Resizing a text frame to accommodate overset text
Thread text
Threading refers to adding linked frames to accommodate the extra text.
To thread overset text, do the following (Figure 11.67):
Double-click the overset text icon.
Click or click+drag to add the threaded text frame.
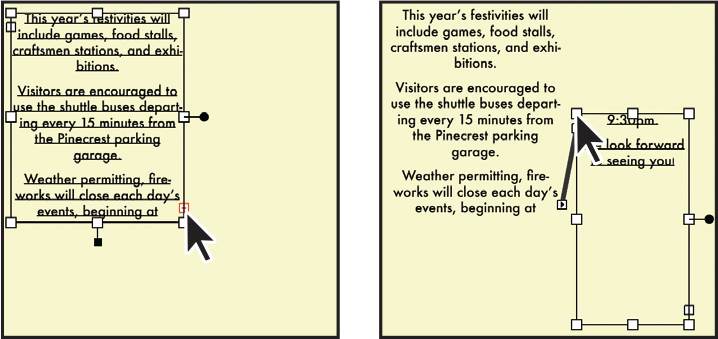
FIGURE 11.67 Adding a threaded text frame to accommodate overset text
Convert type to outlines
Converting text to paths (outlines) is helpful when sharing a file with someone who will not have the required fonts or when making edits to the text shapes.
To convert selected text to compound paths, do the following (Figure 11.68):
Choose Type > Create Outlines.
(Optional) To edit the paths, release groups and compound paths by choosing the following:
Object > Ungroup
Object > Compound Paths > Release

FIGURE 11.68 Converting text to paths
Tip
Once you convert your type to outlines, you will lose the ability to make any text editing or formatting changes, so make sure you have done all those modifications beforehand.