
16. Managing Appearance Attributes
In This Chapter
The Properties and Appearance panels help you modify artwork appearance attributes easily. Saving applied attributes as graphic styles lets you apply them to other elements efficiently.
Modifying Applied Effects Using the Properties Panel
In addition to fill and stroke, the Properties panel lets you access singularly applied effects. However, accessing multiple applied effects must be done using the Appearance panel.
Use the Properties panel to modify or delete an effect
With the objects selected and the Properties panel active, do any of the following:
Click the effect name to open the corresponding dialog box or panel to edit the effect (Figure 16.1).
Click the Delete Effect icon next to the effect name to remove the effect (Figure 16.2).
If a circle with the letter “i” icon is visible (Figure 16.3), this means that there are multiple effects applied to the selection. Open the Appearance panel to modify or delete them.

FIGURE 16.1 Clicking an applied effect name to modify its settings

FIGURE 16.2 Removing an applied effect

FIGURE 16.3 A selected group with multiple effects applied
Tip
Once applied, effects cannot be edited by choosing them from the Effect menu or fx button. Using the Effect menu or fx button will apply a duplicate of the effect to the selection.
Using the Appearance Panel
The Appearance panel (Figure 16.4) uses a hierarchical structure to help you view and modify a selection’s applied attributes and effects.

FIGURE 16.4
A. Panel menu B. Add New Stroke C. Add New Fill D. Add New Effect E. Clear Appearance F. Duplicate Selected Item G. Delete Selected Item
Access the Appearance panel
Do either of the following:
Click the More (...) button in the Appearance section of the Properties panel (Figure 16.5).
Choose Window > Appearance.

FIGURE 16.5 Clicking More button to open the Appearance panelfrom the Properties panel
View additional applied attributes
If the selection contains groups or multiple layers, the Appearance panel displays a Contents row, rather than all of the selection’s attributes.
In the Appearance panel, do the following (Figure 16.6):
Double-click the Contents row to view the additional attributes.
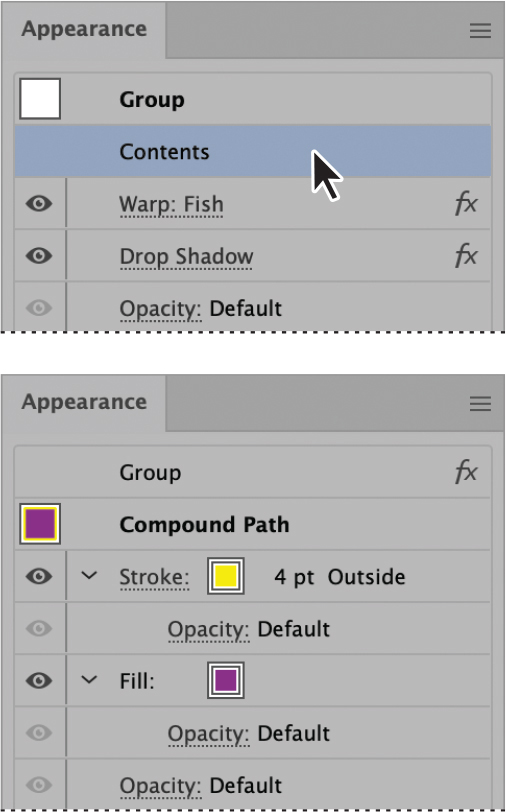
FIGURE 16.6 Viewing additional attributes in the Appearance panel
Tip
To view the applied effects again, click the top-level row.
Use the Appearance panel to modify an applied attribute or effect
With the objects selected and the Appearance panel active, do any of the following:
Click the underlined effect or attribute name to open the corresponding dialog box or panel.
Double-click the effect or attribute row to open the corresponding dialog box or panel.
Show or hide an attribute or effect
In the Appearance panel, do the following (Figure 16.7):
Click the eye icon for the item.

FIGURE 16.7 Hiding an applied effect
Use the Appearance panel to delete an applied attribute or effect
With the objects selected and the Appearance panel active, do any of the following:
Click to select the effect or attribute.
Click the Delete Selected Item icon (G in Figure 16.4) or choose Remove Item from the panel menu.
Remove all appearance attributes or effects
With the objects selected and the Appearance panel active, do either of the following:
Click the Clear Appearance button (Figure 16.8).
Choose Clear Appearance from the panel menu.

FIGURE 16.8 Removing applied effects from a group
Tip
If you want to also remove all the fill and stroke attributes from the selection, access them by double-clicking the Contents row.
Add an attribute or effect
With the effect or attribute selected that you want to place the new effect or attribute above, in the Appearance panel, do any of the following:
Apply a new stroke by clicking the Add New Stroke button (B in Figure 16.4) or choosing Add New Stroke from the panel menu (Figure 16.9).
Apply a new fill by clicking the Add New Fill button (C in Figure 16.4) or choosing Add New Fill from the panel menu.
Apply a new effect by clicking the Add New Effect button (D in Figure 16.4) or choosing Add New Effect from the panel menu.

FIGURE 16.9 Adding and customizing a new stroke attribute between the existing stroke and fill
Reorganize attributes or effects
In the Appearance panel, with the effect or attribute you want to move selected, do the following (Figure 16.10):
Click+drag the item to the desired location.

FIGURE 16.10 Moving a new stroke above the original one
![]() VIDEO 16.1
VIDEO 16.1
Working with the Appearance panel
Working with Graphic Styles
The Graphic Styles panel (Figure 16.11) lets you quickly apply attributes to objects or save them for use with other elements.

FIGURE 16.11
A. Default Graphic Style B. Applied Graphic Style C. Panel menu D. Graphic Styles Libraries menu E. Break Link to Graphic Style F. New Graphic Style G. Delete Graphic Style
Access the Graphic Styles panel
Do either of the following:
Choose Window > Graphic Styles.
In the Essentials Classic workspace, click the Graphic Styles thumbnail (Figure 16.12).

FIGURE 16.12 Opening the Graphic Styles panel from its thumbnail
Apply a graphic style
With the objects you want to apply the graphic style to selected, do the following:
In the Graphic Styles panel, click the style thumbnail.
Remove an applied graphic style
With the objects you want to remove the graphic style from selected, do either of the following:
In the Graphic Styles panel, click the Default Graphic Style thumbnail (A in Figure 16.11) to apply a black stroke and white fill.
In the Appearance panel, click the Clear Appearance button (Figure 16.13) to delete all attributes and effects, making it invisible.

FIGURE 16.13 Using the Appearance panel to remove an applied graphic style from an object
Delete a graphic style from the panel
With the style thumbnail selected in the Graphic Styles panel, do either of the following:
Click the Delete Graphic Style button (G in Figure 16.11).
Choose Delete Graphic Style from the panel menu.
Create a graphic style
With the object you want to create the graphic style from selected, do the following:
In the Appearance panel, choose whether you want to create the style from the applied effects or attributes (under Contents).
In the Graphic Styles panel, do either of the following:
Click the New Graphic Style button (F in Figure 16.11) to add the attributes as an unnamed style.
Choose New Graphic Style from the panel menu, and then use the Graphic Style Options dialog box to enter a Style Name (Figure 16.14).

FIGURE 16.14 Creating a new named graphic style
Tip
When you break a selection’s link to a graphic style, it retains all the applied style attributes except those you modify.
Rename a graphic style
In the Graphic Styles panel, do either of the following to open the Graphic Style Options dialog box and rename the style:
Double-click the style thumbnail.
Select the style thumbnail, and then choose Graphic Style Options from the panel menu.
Tip
When organizing graphic styles, make sure no objects are selected so you do not inadvertently apply a style to them.
Break an applied link to a graphic style
With the objects with the applied style selected, do either of the following:
In the Graphic Styles panel, click the Break Link to Graphic Style button (E in Figure 16.11) or choose Break Link to Graphic Style from the panel menu.
Change any of the selection’s appearance attributes (fill, stroke, effect, etc.).
Tip
When you create a graphic style from a selection’s attributes, it is automatically applied in the Appearance panel as well.
Using Graphic Style Libraries
Graphic Style Libraries contain collections of preset graphic styles that open in their own panels.
Open a graphic style library
Do either of the following:
In the Graphic Styles panel, choose a library by clicking the Graphic Styles Libraries button (Figure 16.15) or by choosing Open Graphic Style Library from the panel menu.
Choose Window > Graphic Style Libraries > [library name].

FIGURE 16.15 Opening a graphic style library using the Graphic Styles Libraries menu
Add a library’s graphic style to the Graphic Styles panel
Do either of the following:
With the style thumbnail selected in its library panel, drag it into the Graphic Styles panel, or choose Add to Graphic Styles from the panel menu.
Apply the style to an object to automatically add it to the Graphic Styles panel.
Tip
Graphic style library panel items can be applied and arranged, but cannot be modified or deleted.
Create a graphic style library
In the Graphic Styles panel, do the following:
Organize the graphic styles as needed.
Choose Save Graphic Styles from the Graphic Styles Libraries button menu, or choose Save Graphic Style Library from the panel menu.
Tip
Saving the library file to the default location allows it to appear under the User Defined submenu of the Graphic Style Libraries menu.
![]() VIDEO 16.2
VIDEO 16.2
Working with graphic styles