
1. The Basics
In This Chapter
Adobe Illustrator is the industry standard for creating vector-based illustrations.
While Illustrator was originally used for simple elements such as logos and icons, its robust features and user-friendly interface have evolved to provide the ability to create rich and complex designs.
The Illustrator Interface
The Illustrator interface is designed for an intuitive and user-friendly experience.
Home screen overview
Starting Illustrator directly (without opening an Illustrator file) takes you to the Home screen (Figure 1.1), which provides a variety of tools and resources for getting you started.

FIGURE 1.1
A. Back to Application Frame button B. Presets for new documents C. Cloud storage status D. Search button E. What’s New button F. Display Recent Files by List or Preview toggles
Tip
To learn about starting Illustrator, see the “Launching Illustrator” section in this chapter.
Tip
To learn more about workspaces, see the “Customizing Workspaces” section in Chapter 2.
Application frame overview
The Illustrator application frame (Figure 1.2) is a customizable interface that lets you easily access and configure a variety of tools and panels to help create and modify your artwork.
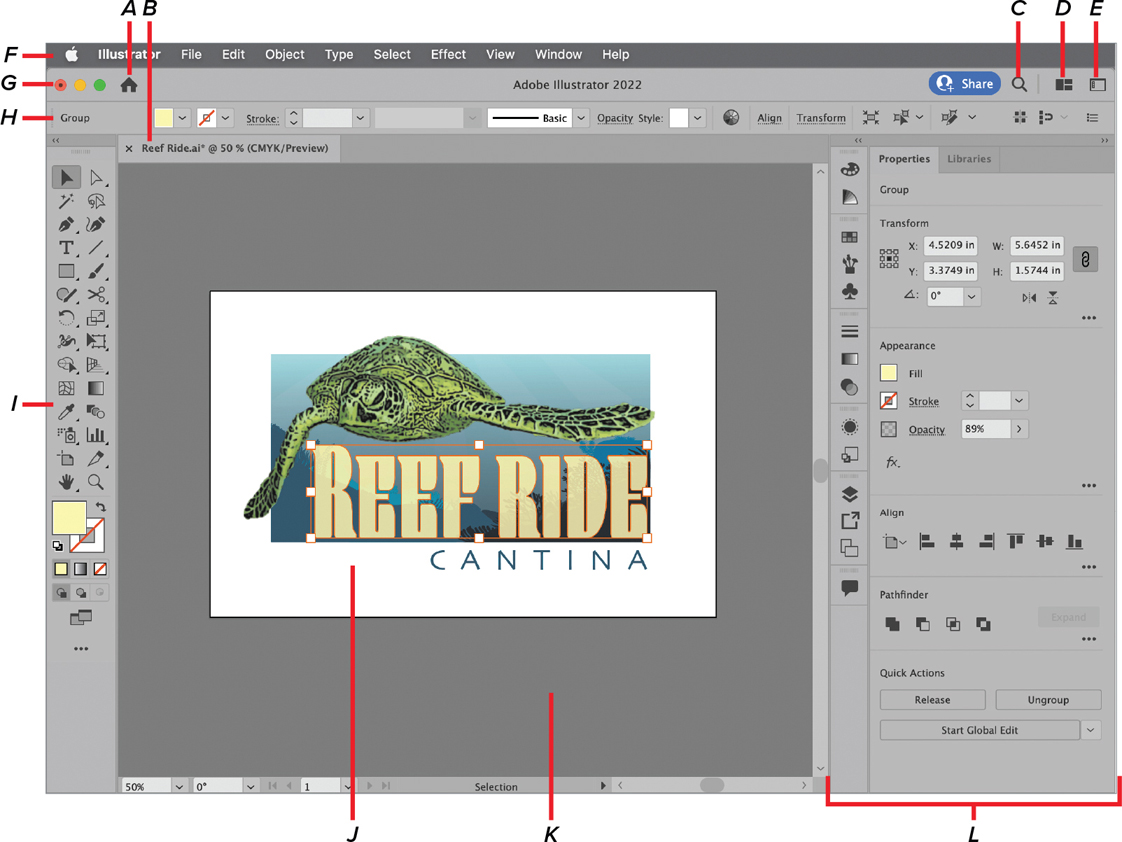
FIGURE 1.2
A. Return to Home Screen button B. Document window tab C. Learn button D. Arrange Documents button E. Workspace menu F. Menu bar G. Application bar H. Control panel I. Toolbar J. Artboard K. Pasteboard L. Panels section
The appearance of the application frame depends on which workspace is active. This book focuses primarily on the Essentials Classic workspace.
Launching Illustrator
Illustrator can be launched either directly or by opening an Illustrator (.ai) file.
Start the application
Do any of the following:
Click the Adobe Illustrator 2022 icon on your desktop dock (macOS) or Start screen (Windows).
Locate the Adobe Illustrator 2022 application folder and double-click the application icon (Figure 1.3).

FIGURE 1.3 Double-clicking the application in the Adobe Illustrator 2022 folder to launch it
Double-click an Illustrator (.ai) file (Figure 1.4).

FIGURE 1.4 Double-clicking an Adobe Illustrator (.ai) file to launch the application
Tip
Depending on your system, file icons may display as either the application type or a thumbnail of the document.
Learning about Illustrator
The Discover panel (Figure 1.5) is a new feature that provides quick integrated access to a variety of learning resources.

FIGURE 1.5 The Discovery panel displaying the main menu, Tutorials, and What’s New sections
Open the Discover panel from the Home screen
Do the following:
Click Learn in the left panel and then select a tutorial.
Click the What’s New button (E in Figure 1.1) to display information about new features in the application and how to use them.
Open the Discover panel from the application frame
Do any of the following:
Choose Help > Illustrator Help to display the main menu.
Choose Help > Tutorials to display the in-app Tutorials section.
Choose Help > What’s New to display information about new features in the application and how to use them.
Click the Search button (C in Figure 1.2).
Tip
Clicking the Home button in the upper right of the Tutorials and What’s New sections takes you to the main menu.
Opening an Existing File
There are numerous ways to open a file.
Open a file from the Home screen
Do any of the following:
Click the Open button, and then navigate to select the file (Figure 1.6).

FIGURE 1.6 Clicking the Open button in the Home screen
Click one of the options under Files and select the file.
Click a file listed under the Recent section.
Open a file from the application frame
Do any of the following:
Choose File > Open and navigate to the desired file.
Choose File > Open Recent Files and select a recently opened file from the context menu.
Choose File > Browse in Bridge to launch Adobe Bridge and select a file using that application (Figure 1.7).

FIGURE 1.7 Using Adobe Bridge to select a file to open in Illustrator
Creating a New File
New files can be created from the Home screen or within the application.
Create a file from the Home screen
Do any of the following:
Click New File to open the New Document dialog box.
Click a preset to create and automatically open a new document in the application frame (Figure 1.8).

FIGURE 1.8 Clicking a preset in the Home screen to create and open a new document in the application frame
Click More Presets to open the New Document dialog box.
Create a file from the application frame
Do any of the following:
Choose File > New to open the New Document dialog box.
Choose File > New from Template and select the appropriate template file.
Tip
Document settings can be changed after the file is created in the Document Setup dialog box (File > Document Setup).
Use presets in the New Document dialog box to create a document
Do the following:
At the top of the dialog box, select a category tab (Figure 1.9).

FIGURE 1.9 The New Document dialog box with customized settings applied to a preset
Select one of the presets below the corresponding category.
Click Create.
Tip
The Saved category tab contains templates downloaded from Adobe Stock.
Tip
The Templates section contains downloadable templates from Adobe Stock.
Tip
When you customize a preset, the new settings are stored on the Recent category tab.
![]() VIDEO 1.1
VIDEO 1.1
Creating a new customized document
Customize presets for a new document
On the right side of the New Document dialog box, do any of the following:
Enter a name for the document.
Use the Width and Height fields to specify the artboard size.
Select the unit of measurement from the context menu.
Select portrait or landscape for the Orientation.
Increase or reduce the number of Artboards.
Specify the Bleed positions for each edge of the artboard.
Select the appropriate Color Mode for your project.
Tip
By default, Illustrator automatically selects the appropriate color mode for printed (CMYK) or digital (RGB) outputs. To learn more about color modes, see Chapter 4.
Customize the resolution of any Raster Effects applied to the document.
Select the appropriate Preview Mode for viewing your artwork:
Default displays all art as vector and in full color.
Pixel simulates how the art will appear if rasterized.
Overprint simulates how the art will appear when printed.
Working with Templates
Templates are useful when creating multiple documents that share similar components (dimensions, color modes, etc.).
Open an application-provided template file
Illustrator provides some industry-standard template files (.ait) with the application. Selecting a template opens a copy of the file as a blank, unsaved Illustrator document.
Choose File > New from Template.
In the dialog box, open the Blank Templates folder located under:
Adobe Illustrator 2022 / Cool Extras / en_US / Templates
Select the appropriate file and then click New (Figure 1.11).
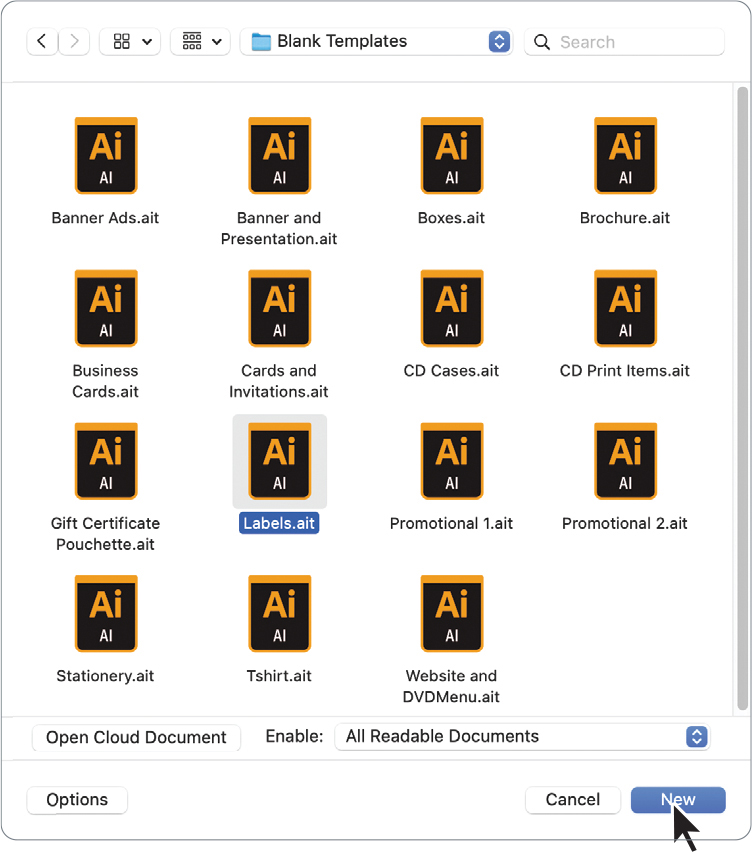
FIGURE 1.11 Selecting a template provided with the Illustrator application
Create a template from an existing file
When you create a template using an existing document, all the artwork and application settings are retained when you open a copy as an .ai file.
Customize the document so it displays as you want it to when opened.
Choose File > Save as Template.
Assign a name and location for the template file in the Save As dialog box.
Click Save to complete saving the file as a template.