

Every widget that is placed on a form must be given an appropriate size and position. Qt provides several classes that lay out widgets on a form: QHBoxLayout, QVBoxLayout, QGridLayout, and QStackedLayout. These classes are so convenient and easy to use that almost every Qt developer uses them, either directly in source code or through Qt Designer.
Another reason to use Qt’s layout classes is that they ensure that forms adapt automatically to different fonts, languages, and platforms. If the user changes the system’s font settings, the application’s forms will respond immediately, resizing themselves if necessary. And if you translate the application’s user interface to other languages, the layout classes take into consideration the widgets’ translated contents to avoid text truncation.
Other classes that perform layout management include QSplitter, QScrollArea, QMainWindow, and QMdiArea. All of these classes provide a flexible layout that the user can manipulate. For example, QSplitter provides a splitter bar that the user can drag to resize widgets, and QMdiArea offers support for MDI (multiple document interface), a means of showing many documents simultaneously within an application’s main window. Because they are often used as alternatives to the layout classes proper, we cover them in this chapter.
There are three basic ways of managing the layout of child widgets on a form: absolute positioning, manual layout, and layout managers. We will look at each of these approaches in turn, using the Find File dialog shown in Figure 6.1 as our example.
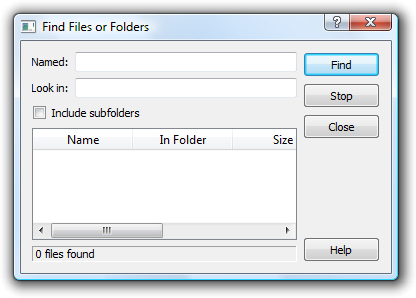
Absolute positioning is the crudest way of laying out widgets. It is achieved by assigning hard-coded sizes and positions to the form’s child widgets and a fixed size to the form. Here’s what the FindFileDialog constructor looks like using absolute positioning:
FindFileDialog::FindFileDialog(QWidget *parent)
    : QDialog(parent)
{
    ...
    namedLabel->setGeometry(9, 9, 50, 25);
    namedLineEdit->setGeometry(65, 9, 200, 25);
    lookInLabel->setGeometry(9, 40, 50, 25);
    lookInLineEdit->setGeometry(65, 40, 200, 25);
    subfoldersCheckBox->setGeometry(9, 71, 256, 23);
    tableWidget->setGeometry(9, 100, 256, 100);
    messageLabel->setGeometry(9, 206, 256, 25);
    findButton->setGeometry(271, 9, 85, 32);
    stopButton->setGeometry(271, 47, 85, 32);
    closeButton->setGeometry(271, 84, 85, 32);
    helpButton->setGeometry(271, 199, 85, 32);

    setWindowTitle(tr("Find Files or Folders"));
    setFixedSize(365, 240);
}
Absolute positioning has many disadvantages:
The user cannot resize the window.
Some text may be truncated if the user chooses an unusually large font or if the application is translated into another language.
The widgets might have inappropriate sizes for some styles.
The positions and sizes must be calculated manually. This is tedious and error-prone, and makes maintenance painful.
An alternative to absolute positioning is manual layout. With manual layout, the widgets are still given absolute positions, but their sizes are made proportional to the size of the window rather than being entirely hard-coded. This can be achieved by reimplementing the form’s resizeEvent() function to set its child widgets’ geometries:
FindFileDialog::FindFileDialog(QWidget *parent)
    : QDialog(parent)
{
    ...
    setMinimumSize(265, 190);
    resize(365, 240);
}

void FindFileDialog::resizeEvent(QResizeEvent * /* event */)
{
    int extraWidth = width() - minimumWidth();
    int extraHeight = height() - minimumHeight();

    namedLabel->setGeometry(9, 9, 50, 25);
    namedLineEdit->setGeometry(65, 9, 100 + extraWidth, 25);
    lookInLabel->setGeometry(9, 40, 50, 25);
    lookInLineEdit->setGeometry(65, 40, 100 + extraWidth, 25);
    subfoldersCheckBox->setGeometry(9, 71, 156 + extraWidth, 23);

    tableWidget->setGeometry(9, 100, 156 + extraWidth,
                             50 + extraHeight);
    messageLabel->setGeometry(9, 156 + extraHeight, 156 + extraWidth,
                              25);
    findButton->setGeometry(171 + extraWidth, 9, 85, 32);
    stopButton->setGeometry(171 + extraWidth, 47, 85, 32);
    closeButton->setGeometry(171 + extraWidth, 84, 85, 32);
    helpButton->setGeometry(171 + extraWidth, 149 + extraHeight, 85,
                            32);
}
In the FindFileDialog constructor, we set the form’s minimum size to 265 × 190 and the initial size to 365 × 240. In the resizeEvent() handler, we give any extra space to the widgets that we want to grow. This ensures that the form scales smoothly when the user resizes it.
Just like absolute positioning, manual layout requires a lot of hard-coded constants to be calculated by the programmer. Writing code like this is tiresome, especially if the design changes. And there is still the risk of text truncation. We can avoid this risk by taking account of the child widgets’ size hints, but that would complicate the code even further.
The most convenient solution for laying out widgets on a form is to use Qt’s layout managers. The layout managers provide sensible defaults for every type of widget and take into account each widget’s size hint, which in turn typically depends on the widget’s font, style, and contents. Layout managers also respect minimum and maximum sizes, and automatically adjust the layout in response to font changes, content changes, and window resizing. A resizable version of the Find File dialog is shown in Figure 6.2.

The three most important layout managers are QHBoxLayout, QVBoxLayout, and QGridLayout. These classes are derived from QLayout, which provides the basic framework for layouts. All three classes are fully supported by Qt Designer and can also be used directly in code.
Here’s the FindFileDialog code using layout managers:
FindFileDialog::FindFileDialog(QWidget *parent)
    : QDialog(parent)
{
    ...
    QGridLayout *leftLayout = new QGridLayout;
    leftLayout->addWidget(namedLabel, 0, 0);
    leftLayout->addWidget(namedLineEdit, 0, 1);
    leftLayout->addWidget(lookInLabel, 1, 0);
    leftLayout->addWidget(lookInLineEdit, 1, 1);
    leftLayout->addWidget(subfoldersCheckBox, 2, 0, 1, 2);
    leftLayout->addWidget(tableWidget, 3, 0, 1, 2);
    leftLayout->addWidget(messageLabel, 4, 0, 1, 2);

    QVBoxLayout *rightLayout = new QVBoxLayout;
    rightLayout->addWidget(findButton);
    rightLayout->addWidget(stopButton);
    rightLayout->addWidget(closeButton);
    rightLayout->addStretch();
    rightLayout->addWidget(helpButton);

    QHBoxLayout *mainLayout = new QHBoxLayout;
    mainLayout->addLayout(leftLayout);
    mainLayout->addLayout(rightLayout);
    setLayout(mainLayout);

    setWindowTitle(tr("Find Files or Folders"));
}
The layout is handled by one QHBoxLayout, one QGridLayout, and one QVBoxLayout. The QGridLayout on the left and the QVBoxLayout on the right are placed side by side by the outer QHBoxLayout. The margin around the dialog and the spacing between the child widgets are set to default values based on the current widget style; they can be changed using QLayout::setContentsMargins() and QLayout::setSpacing().

The same dialog could be created visually in Qt Designer by placing the child widgets in their approximate positions; selecting those that need to be laid out together; and clicking Form|Lay Out Horizontally, Form|Lay Out Vertically, or Form|Lay Out in a Grid. We used this approach in Chapter 2 for creating the Spreadsheet application’s Go to Cell and Sort dialogs.
Using QHBoxLayout and QVBoxLayout is fairly straightforward, but using QGridLayout is a bit more involved. QGridLayout works on a two-dimensional grid of cells. The QLabel in the top-left corner of the layout is at position (0, 0), and the corresponding QLineEdit is at position (0, 1). The QCheckBox spans two columns; it occupies the cells in positions (2, 0) and (2, 1). The QTreeWidget and the QLabel beneath it also span two columns. The calls to QGridLayout::addWidget() have the following syntax:
layout->addWidget(widget, row, column, rowSpan, columnSpan);
Here, widget is the child widget to insert into the layout, (row, column) is the top-left cell occupied by the widget, rowSpan is the number of rows occupied by the widget, and columnSpan is the number of columns occupied by the widget. If omitted, the rowSpan and columnSpan arguments default to 1.
The addStretch() call tells the vertical layout manager to consume space at that point in the layout. By adding a stretch item, we have told the layout manager to put any excess space between the Close button and the Help button. In Qt Designer, we can achieve the same effect by inserting a spacer. Spacers appear in Qt Designer as blue “springs”.
Using layout managers provides additional benefits to those we have discussed so far. If we add a widget to a layout or remove a widget from a layout, the layout will automatically adapt to the new situation. The same applies if we call hide() or show() on a child widget. If a child widget’s size hint changes, the layout will be automatically redone, taking into account the new size hint. Also, layout managers automatically set a minimum size for the form as a whole, based on the form’s child widgets’ minimum sizes and size hints.
In the examples presented so far, we have simply put widgets into layouts and used spacer items (stretches) to consume any excess space. In some cases, this isn’t sufficient to make the layout look exactly the way we want. In these situations, we can adjust the layout by changing the size policies and size hints of the widgets being laid out.
A widget’s size policy tells the layout system how it should stretch or shrink. Qt provides sensible default size policies for all its built-in widgets, but since no single default can account for every possible layout, it is still common for developers to change the size policies for one or two widgets on a form. A QSizePolicy has both a horizontal and a vertical component. Here are the most useful values:
Fixedmeans that the widget cannot grow or shrink. The widget always stays at the size of its size hint.Minimummeans that the widget’s size hint is its minimum size. The widget cannot shrink below the size hint, but it can grow to fill available space if necessary.Maximummeans that the widget’s size hint is its maximum size. The widget can be shrunk to its minimum size hint.Preferredmeans that the widget’s size hint is its preferred size, but that the widget can still shrink or grow if necessary.Expandingmeans that the widget can shrink or grow and that it is especially willing to grow.
Figure 6.4 summarizes the meaning of the different size policies, using a QLabel showing the text “Some Text” as an example.

In the figure, Preferred and Expanding are depicted the same way. So, what is the difference? When a form that contains both Preferred and Expanding widgets is resized, extra space is given to the Expanding widgets, while the Preferred widgets stay at their size hint.
There are two other size policies: MinimumExpanding and Ignored. The former was necessary in a few rare cases in older versions of Qt, but it isn’t useful anymore; the preferred approach is to use Expanding and reimplement minimumSizeHint() appropriately. The latter is similar to Expanding, except that it ignores the widget’s size hint and minimum size hint.
In addition to the size policy’s horizontal and vertical components, the QSizePolicy class stores a horizontal and a vertical stretch factor. These stretch factors can be used to indicate that different child widgets should grow at different rates when the form expands. For example, if we have a QTreeWidget above a QTextEdit and we want the QTextEdit to be twice as tall as the QTreeWidget, we can set the QTextEdit’s vertical stretch factor to 2 and the QTreeWidget’s vertical stretch factor to 1.
Yet another way of influencing a layout is to set a minimum size, a maximum size, or a fixed size on the child widgets. The layout manager will respect these constraints when laying out the widgets. And if this isn’t sufficient, we can always derive from the child widget’s class and reimplement sizeHint() to obtain the size hint we need.
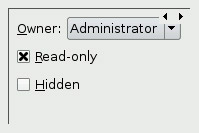
The QStackedLayout class lays out a set of child widgets, or “pages”, and shows only one at a time, hiding the others from the user. The QStackedLayout itself is invisible and provides no intrinsic means for the user to change the page. The small arrows and the dark gray frame in Figure 6.5 are provided by Qt Designer to make the layout easier to design with. For convenience, Qt also includes QStackedWidget, which provides a QWidget with a built-in QStackedLayout.
The pages are numbered from 0. To make a specific child widget visible, we can call setCurrentIndex() with a page number. The page number for a child widget is available using indexOf().
The Preferences dialog shown in Figure 6.6 is an example that uses QStackedLayout. The dialog consists of a QListWidget on the left and a QStackedLayout on the right. Each item in the QListWidget corresponds to a different page in the QStackedLayout. Here’s the relevant code from the dialog’s constructor:
PreferenceDialog::PreferenceDialog(QWidget *parent)
    : QDialog(parent)
{
    ...
    listWidget = new QListWidget;
    listWidget->addItem(tr("Appearance"));
    listWidget->addItem(tr("Web Browser"));
    listWidget->addItem(tr("Mail & News"));
    listWidget->addItem(tr("Advanced"));

    stackedLayout = new QStackedLayout;
    stackedLayout->addWidget(appearancePage);
    stackedLayout->addWidget(webBrowserPage);
    stackedLayout->addWidget(mailAndNewsPage);
    stackedLayout->addWidget(advancedPage);
    connect(listWidget, SIGNAL(currentRowChanged(int)),
            stackedLayout, SLOT(setCurrentIndex(int)));
    ...
    listWidget->setCurrentRow(0);
}
We create a QListWidget and populate it with the page names. Then we create a QStackedLayout and call addWidget() for each page. We connect the list widget’s currentRowChanged(int) signal to the stacked layout’s setCurrentIndex(int) to implement the page switching and call setCurrentRow() on the list widget at the end of the constructor to start on page 0.
Forms such as this are also very easy to create using Qt Designer:
Create a new form based on one of the “Dialog” templates or on the “Widget” template.
Add a
QListWidgetand aQStackedWidgetto the form.Fill each page with child widgets and layouts.
(To create a new page, right-click and choose Insert Page; to switch pages, click the tiny left or right arrow located at the top right of the
QStackedWidget.)Lay out the widgets side by side using a horizontal layout.
Connect the list widget’s
currentRowChanged(int)signal to the stacked widget’ssetCurrentIndex(int)slot.Set the value of the list widget’s
currentRowproperty to 0.
Since we have implemented page switching using predefined signals and slots, the dialog will exhibit the correct behavior when previewed in Qt Designer.
For cases where the number of pages is small and likely to remain small, a simpler alternative to using a QStackedWidget and QListWidget is to use a QTabWidget.
A QSplitter is a widget that contains other widgets. The widgets in a splitter are separated by splitter handles. Users can change the sizes of a splitter’s child widgets by dragging the handles. Splitters can often be used as an alternative to layout managers, to give more control to the user.
The child widgets of a QSplitter are automatically placed side by side (or one below the other) in the order in which they are created, with splitter bars between adjacent widgets. Here’s the code for creating the window depicted in Figure 6.7:
int main(int argc, char *argv[])
{
    QApplication app(argc, argv);

    QTextEdit *editor1 = new QTextEdit;
    QTextEdit *editor2 = new QTextEdit;
    QTextEdit *editor3 = new QTextEdit;

    QSplitter splitter(Qt::Horizontal);
    splitter.addWidget(editor1);
    splitter.addWidget(editor2);
    splitter.addWidget(editor3);
    ...
    splitter.show();
    return app.exec();
}
The example consists of three QTextEdits laid out horizontally by a QSplitter widget—this is shown schematically in Figure 6.8. Unlike layout managers, which simply lay out a form’s child widgets and have no visual representation, QSplitter is derived from QWidget and can be used like any other widget.

Complex layouts can be achieved by nesting horizontal and vertical QSplitters. For example, the Mail Client application shown in Figure 6.9, consists of a horizontal QSplitter that contains a vertical QSplitter on its right side. The layout is shown schematically in Figure 6.10.


Here’s the code in the constructor of the Mail Client application’s QMainWindow subclass:
MailClient::MailClient()
{
    ...
    rightSplitter = new QSplitter(Qt::Vertical);
    rightSplitter->addWidget(messagesTreeWidget);
    rightSplitter->addWidget(textEdit);
    rightSplitter->setStretchFactor(1, 1);

    mainSplitter = new QSplitter(Qt::Horizontal);
    mainSplitter->addWidget(foldersTreeWidget);
    mainSplitter->addWidget(rightSplitter);
    mainSplitter->setStretchFactor(1, 1);
    setCentralWidget(mainSplitter);

    setWindowTitle(tr("Mail Client"));
    readSettings();
}
After creating the three widgets that we want to display, we create a vertical splitter, rightSplitter, and add the two widgets we want on the right. Then we create a horizontal splitter, mainSplitter, and add the widget we want it to display on the left and rightSplitter whose widgets we want shown on the right. We make mainSplitter the QMainWindow’s central widget.
When the user resizes a window, QSplitter normally distributes the space so that the relative sizes of the child widgets stay the same. In the Mail Client example, we don’t want this behavior; instead, we want the QTreeWidget and the QTableWidget to keep their sizes and we want to give any extra space to the QTextEdit. This is achieved by the two setStretchFactor() calls. The first argument is the 0-based index of the splitter’s child widget, and the second argument is the stretch factor we want to set; the default is 0.
The first setStretchFactor() call is on rightSplitter, and it sets the widget at position 1 (textEdit) to have a stretch factor of 1. The second setStretchFactor() call is on mainSplitter, and it sets the widget at position 1 (rightSplitter) to have a stretch factor of 1. This ensures that the textEdit will get any additional space that is available.
When the application is started, QSplitter gives the child widgets appropriate sizes based on their initial sizes (or based on their size hint if no initial size is specified). We can move the splitter handles programmatically by calling QSplitter::setSizes(). The QSplitter class also provides a means of saving and restoring its state the next time the application is run. Here’s the writeSettings() function that saves the Mail Client’s settings:
void MailClient::writeSettings()
{
    QSettings settings("Software Inc.", "Mail Client");

    settings.beginGroup("mainWindow");
    settings.setValue("geometry", saveGeometry());
    settings.setValue("mainSplitter", mainSplitter->saveState());
    settings.setValue("rightSplitter", rightSplitter->saveState());
    settings.endGroup();
}
Here’s the corresponding readSettings() function:
void MailClient::readSettings()
{
    QSettings settings("Software Inc.", "Mail Client");

    settings.beginGroup("mainWindow");
    restoreGeometry(settings.value("geometry").toByteArray());
    mainSplitter->restoreState(
            settings.value("mainSplitter").toByteArray());
    rightSplitter->restoreState(
            settings.value("rightSplitter").toByteArray());
    settings.endGroup();
}
Qt Designer fully supports QSplitter. To put widgets into a splitter, place the child widgets approximately in their desired positions, select them, and click Form|Lay Out Horizontally in Splitter or Form|Lay Out Vertically in Splitter.
The QScrollArea class provides a scrollable viewport and two scroll bars. If we want to add scroll bars to a widget, it is much simpler to use a QScrollArea than to instantiate our own QScrollBars and implement the scrolling functionality ourselves.
The way to use QScrollArea is to call setWidget() with the widget to which we want to add scroll bars. QScrollArea automatically reparents the widget to make it a child of the viewport (accessible through QScrollArea::viewport()) if it isn’t already. For example, if we want scroll bars around the IconEditor widget we developed in Chapter 5 (as shown in Figure 6.11), we can write this:
int main(int argc, char *argv[])
{
    QApplication app(argc, argv);
    IconEditor *iconEditor = new IconEditor;
    iconEditor->setIconImage(QImage(":/images/mouse.png"));

    QScrollArea scrollArea;
    scrollArea.setWidget(iconEditor);
    scrollArea.viewport()->setBackgroundRole(QPalette::Dark);
    scrollArea.viewport()->setAutoFillBackground(true);
    scrollArea.setWindowTitle(QObject::tr("Icon Editor"));

    scrollArea.show();
    return app.exec();
}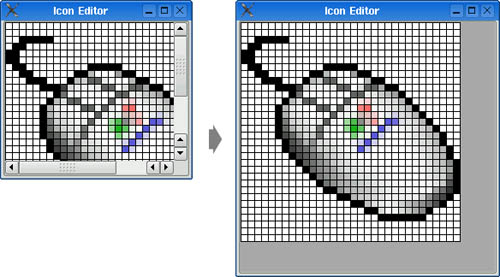
The QScrollArea (shown schematically in Figure 6.12) presents the widget at its current size or uses the size hint if the widget hasn’t been resized yet. By calling setWidgetResizable(true), we can tell QScrollArea to automatically resize the widget to take advantage of any extra space beyond its size hint.

By default, the scroll bars are displayed only when the viewport is smaller than the child widget. We can force the scroll bars to always be shown by setting scroll bar policies:
scrollArea.setHorizontalScrollBarPolicy(Qt::ScrollBarAlwaysOn);
scrollArea.setVerticalScrollBarPolicy(Qt::ScrollBarAlwaysOn);
QScrollArea inherits much of its functionality from QAbstractScrollArea. Classes such as QTextEdit and QAbstractItemView (the base class of Qt’s item view classes) derive from QAbstractScrollArea, so we don’t need to wrap them in a QScrollArea to get scroll bars.
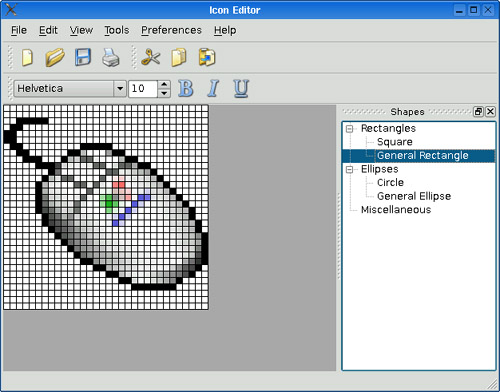
Dock windows are windows that can be docked inside a QMainWindow or floated as independent windows. QMainWindow provides four dock window areas: one above, one below, one to the left, and one to the right of the central widget. Applications such as Microsoft Visual Studio and Qt Linguist make extensive use of dock windows to provide a very flexible user interface. In Qt, dock windows are instances of QDockWidget. Figure 6.13 shows a Qt application with toolbars and a dock window.
Every dock window has its own title bar, even when it is docked. Users can move dock windows from one dock area to another by dragging the title bar. They can also detach a dock window from an area and let the dock window float as an independent window by dragging the dock window outside of any dock area. Free-floating dock windows are always “on top” of their main window. Users can close a QDockWidget by clicking the close button in the window’s title bar. Any combination of these features can be disabled by calling QDockWidget::setFeatures().
In earlier versions of Qt, toolbars were treated like dock windows and shared the same dock areas. Starting with Qt 4, toolbars occupy their own areas around the central widget (as shown in Figure 6.14) and can’t be undocked. If a floating toolbar is required, we can simply put it inside a QDockWidget.

The corners indicated with dotted lines can belong to either of their two adjoining dock areas. For example, we could make the top-left corner belong to the left dock area by calling QMainWindow::setCorner(Qt::TopLeftCorner, Qt::LeftDockWidgetArea).
The following code snippet shows how to wrap an existing widget (in this case, a QTreeWidget) in a QDockWidget and insert it into the right dock area:
    QDockWidget *shapesDockWidget = new QDockWidget(tr("Shapes"));
    shapesDockWidget->setObjectName("shapesDockWidget");
    shapesDockWidget->setWidget(treeWidget);
    shapesDockWidget->setAllowedAreas(Qt::LeftDockWidgetArea
                                         | Qt::RightDockWidgetArea);
    addDockWidget(Qt::RightDockWidgetArea, shapesDockWidget);
The setAllowedAreas() call specifies constraints on which dock areas can accept the dock window. Here, we only allow the user to drag the dock window into the left and right dock areas, where there is enough vertical space for it to be displayed sensibly. If no allowed areas are explicitly set, the user can drag the dock window to any of the four areas.
Every QObject can be given an “object name”. This name can be useful when debugging and is used by some test tools. Normally we do not bother to give widgets object names, but when we create dock windows and toolbars, doing so is necessary if we want to use QMainWindow::saveState() and QMainWindow::restoreState() to save and restore the dock window and toolbar geometries and states.
Here’s how to create a toolbar containing a QComboBox, a QSpinBox, and a few QToolButtons from a QMainWindow subclass’s constructor:
    QToolBar *fontToolBar = new QToolBar(tr("Font"));
    fontToolBar->setObjectName("fontToolBar");
    fontToolBar->addWidget(familyComboBox);
    fontToolBar->addWidget(sizeSpinBox);
    fontToolBar->addAction(boldAction);
    fontToolBar->addAction(italicAction);
    fontToolBar->addAction(underlineAction);
    fontToolBar->setAllowedAreas(Qt::TopToolBarArea
                                 | Qt::BottomToolBarArea);
    addToolBar(fontToolBar);
If we want to save the position of all the dock windows and toolbars so that we can restore them the next time the application is run, we can write code that is similar to the code we used to save a QSplitter’s state, using QMainWindow’s saveState() and restoreState() functions:
void MainWindow::writeSettings()
{
    QSettings settings("Software Inc.", "Icon Editor");

    settings.beginGroup("mainWindow");
    settings.setValue("geometry", saveGeometry());
    settings.setValue("state", saveState());
    settings.endGroup();
}

void MainWindow::readSettings()
{
    QSettings settings("Software Inc.", "Icon Editor");

    settings.beginGroup("mainWindow");
    restoreGeometry(settings.value("geometry").toByteArray());
    restoreState(settings.value("state").toByteArray());
    settings.endGroup();
}
Finally, QMainWindow provides a context menu that lists all the dock windows and toolbars. This menu is shown in Figure 6.15. The user can close and restore dock windows and hide and restore toolbars using this menu.
Applications that provide multiple documents within the main window’s central area are called multiple document interface applications, or MDI applications. In Qt, an MDI application is created by using the QMdiArea class as the central widget and by making each document window a QMdiArea subwindow.
It is conventional for MDI applications to provide a Window menu that includes some commands for managing both the windows and the list of windows. The active window is identified with a checkmark. The user can make any window active by clicking its entry in the Window menu.
In this section, we will develop the MDI Editor application shown in Figure 6.16 to demonstrate how to create an MDI application and how to implement its Window menu. All the application’s menus are shown in Figure 6.17.


The application consists of two classes: MainWindow and Editor. The code is supplied with the book’s examples, and since most of it is the same or similar to the Spreadsheet application from Part I, we will present only the MDI-relevant code.
Let’s start with the MainWindow class.
MainWindow::MainWindow()
{
    mdiArea = new QMdiArea;
    setCentralWidget(mdiArea);
    connect(mdiArea, SIGNAL(subWindowActivated(QMdiSubWindow*)),
            this, SLOT(updateActions()));

    createActions();
    createMenus();
    createToolBars();
    createStatusBar();

    setWindowIcon(QPixmap(":/images/icon.png"));
    setWindowTitle(tr("MDI Editor"));
    QTimer::singleShot(0, this, SLOT(loadFiles()));
}
In the MainWindow constructor, we create a QMdiArea widget and make it the central widget. We connect the QMdiArea’s subWindowActivated() signal to the slot we will use to keep the window menu up-to-date, and where we ensure that actions are enabled or disabled depending on the application’s state.
At the end of the constructor, we set a single-shot timer with a 0-millisecond interval to call the loadFiles() function. Such timers time out as soon as the event loop is idle. In practice, this means that the constructor will finish, and then after the main window has been shown, loadFiles() will be called. If we did not do this and there were a lot of large files to load, the constructor would not finish until all the files were loaded, and meanwhile, the user would not see anything on-screen and might think that the application had failed to start.
void MainWindow::loadFiles()
{
    QStringList args = QApplication::arguments();
    args.removeFirst();
    if (!args.isEmpty()) {
        foreach (QString arg, args)
            openFile(arg);
        mdiArea->cascadeSubWindows();
    } else {
        newFile();
    }
    mdiArea->activateNextSubWindow();
}
If the user started the application with one or more file names on the command line, this function attempts to load each file and at the end cascades the subwindows so that the user can easily see them. Qt-specific command-line options, such as -style and -font, are automatically removed from the argument list by the QApplication constructor. So, if we write
mdieditor -style motif readme.txt
on the command line, QApplication::arguments() returns a QStringList containing two items (“mdieditor” and “readme.txt”), and the MDI Editor application starts up with the document readme.txt.
If no file is specified on the command line, a single new empty editor subwindow is created so that the user can start typing straight away. The call to activateNextSubWindow() means that an editor window is given the focus, and ensures that the updateActions() function is called to update the Window menu and enable and disable actions according to the application’s state.
void MainWindow::newFile()
{
    Editor *editor = new Editor;
    editor->newFile();
    addEditor(editor);
}
The newFile() slot corresponds to the File|New menu option. It creates an Editor widget and passes it on to the addEditor() private function.
void MainWindow::open()
{
    Editor *editor = Editor::open(this);
    if (editor)
    addEditor(editor);
}
The open() function corresponds to File|Open. It calls the static Editor::open() function, which pops up a file dialog. If the user chooses a file, a new Editor is created, the file’s text is read in, and if the read is successful, a pointer to the Editor is returned. If the user cancels the file dialog, or if the reading fails, a null pointer is returned and the user is notified of the error. It makes more sense to implement the file operations in the Editor class than in the MainWindow class, because each Editor needs to maintain its own independent state.
void MainWindow::addEditor(Editor *editor)
{
    connect(editor, SIGNAL(copyAvailable(bool)),
            cutAction, SLOT(setEnabled(bool)));
    connect(editor, SIGNAL(copyAvailable(bool)),
            copyAction, SLOT(setEnabled(bool)));

    QMdiSubWindow *subWindow = mdiArea->addSubWindow(editor);
    windowMenu->addAction(editor->windowMenuAction());
    windowActionGroup->addAction(editor->windowMenuAction());
    subWindow->show();
}
The addEditor() private function is called from newFile() and open() to complete the initialization of a new Editor widget. It starts by establishing two signal–slot connections. These connections ensure that Edit|Cut and Edit|Copy are enabled or disabled depending on whether there is any selected text.
Because we are using MDI, it is possible that multiple Editor widgets will be in use. This is a concern since we are only interested in responding to the copyAvailable(bool) signal from the active Editor window, not from the others. But these signals can only ever be emitted by the active window, so this isn’t a problem in practice.
The QMdiArea::addSubWindow() function creates a new QMdiSubWindow, puts the widget it is passed as a parameter inside the subwindow, and returns the subwindow. Next, we create a QAction representing the window to the Window menu. The action is provided by the Editor class, which we will cover in a moment. We also add the action to a QActionGroup object. The QActionGroup ensures that only one Window menu item is checked at a time. Finally, we call show() on the new QMdiSubWindow to make it visible.
void MainWindow::save()
{
    if (activeEditor())
        activeEditor()->save();
}
The save() slot calls Editor::save() on the active editor, if there is one. Again, the code that performs the real work is located in the Editor class.
Editor *MainWindow::activeEditor()
{
    QMdiSubWindow *subWindow = mdiArea->activeSubWindow();
    if (subWindow)
        return qobject_cast<Editor *>(subWindow->widget());
    return 0;
}
The activeEditor() private function returns the widget held inside the active subwindow as an Editor pointer, or a null pointer if there isn’t an active subwindow.
void MainWindow::cut()
{
    if (activeEditor())
        activeEditor()->cut();
}
The cut() slot calls Editor::cut() on the active editor. We don’t show the copy() and paste() slots because they follow the same pattern.
void MainWindow::updateActions()
{
    bool hasEditor = (activeEditor() != 0);
    bool hasSelection = activeEditor()
                        && activeEditor()->textCursor().hasSelection();

    saveAction->setEnabled(hasEditor);
    saveAsAction->setEnabled(hasEditor);
    cutAction->setEnabled(hasSelection);
    copyAction->setEnabled(hasSelection);
    pasteAction->setEnabled(hasEditor);
    closeAction->setEnabled(hasEditor);
    closeAllAction->setEnabled(hasEditor);
    tileAction->setEnabled(hasEditor);
    cascadeAction->setEnabled(hasEditor);
    nextAction->setEnabled(hasEditor);
    previousAction->setEnabled(hasEditor);
    separatorAction->setVisible(hasEditor);

    if (activeEditor())
        activeEditor()->windowMenuAction()->setChecked(true);
}
The subWindowActivated() signal is emitted every time a new subwindow becomes activated, and when the last subwindow is closed (in which case, its parameter is a null pointer). This signal is connected to the updateActions() slot.
Most menu options make sense only if there is an active window, so we disable them if there isn’t one. At the end, we call setChecked() on the QAction representing the active window. Thanks to the QActionGroup, we don’t need to explicitly uncheck the previously active window.
void MainWindow::createMenus()
{
    ...
    windowMenu = menuBar()->addMenu(tr("&Window"));
    windowMenu->addAction(closeAction);
    windowMenu->addAction(closeAllAction);
    windowMenu->addSeparator();
    windowMenu->addAction(tileAction);
    windowMenu->addAction(cascadeAction);
    windowMenu->addSeparator();
    windowMenu->addAction(nextAction);
    windowMenu->addAction(previousAction);
    windowMenu->addAction(separatorAction);
    ...
}
The createMenus() private function populates the Window menu with actions. All the actions are typical of such menus and are easily implemented using QMdiArea’s closeActiveSubWindow(), closeAllSubWindows(), tileSubWindows(), and cascadeSubWindows() slots. Every time the user opens a new window, it is added to the Window menu’s list of actions. (This is done in the addEditor() function that we saw on page 160.) When the user closes an editor window, its action in the Window menu is deleted (since the action is owned by the editor window), and so the action is automatically removed from the Window menu.
void MainWindow::closeEvent(QCloseEvent *event)
{
    mdiArea->closeAllSubWindows();
    if (!mdiArea->subWindowList().isEmpty()) {
        event->ignore();
    } else {
        event->accept();
    }
}
The closeEvent() function is reimplemented to close all subwindows, causing each subwindow to receive a close event. If one of the subwindows “ignores” its close event (because the user canceled an “unsaved changes” message box), we ignore the close event for the MainWindow; otherwise, we accept it, resulting in Qt closing the entire application. If we didn’t reimplement closeEvent() in MainWindow, the user would not be given the opportunity to save unsaved changes.
We have now finished our review of MainWindow, so we can move on to the Editor implementation. The Editor class represents one subwindow. It is derived from QTextEdit, which provides the text editing functionality. In a real-world application, if a code editing component is required, we might also consider using Scintilla, available for Qt as QScintilla from http://www.riverbankcomputing.co.uk/qscintilla/.
Just as any Qt widget can be used as a stand-alone window, any Qt widget can be put inside a QMdiSubWindow and used as a subwindow in an MDI area.
Here’s the class definition:
class Editor : public QTextEdit
{
    Q_OBJECT

public:
    Editor(QWidget *parent = 0);

    void newFile();
    bool save();
    bool saveAs();
    QSize sizeHint() const;
    QAction *windowMenuAction() const { return action; }

    static Editor *open(QWidget *parent = 0);
    static Editor *openFile(const QString &fileName,
                            QWidget *parent = 0);

protected:
    void closeEvent(QCloseEvent *event);

private slots:
    void documentWasModified();

private:
    bool okToContinue();
    bool saveFile(const QString &fileName);
    void setCurrentFile(const QString &fileName);
    bool readFile(const QString &fileName);
    bool writeFile(const QString &fileName);
    QString strippedName(const QString &fullFileName);

    QString curFile;
    bool isUntitled;
    QAction *action;
};
Four of the private functions that were in the Spreadsheet application’s MainWindow class (p. 59) are also present in the Editor class: okToContinue(), saveFile(), setCurrentFile(), and strippedName().
Editor::Editor(QWidget *parent)
    : QTextEdit(parent)
{
    action = new QAction(this);
    action->setCheckable(true);
    connect(action, SIGNAL(triggered()), this, SLOT(show()));
    connect(action, SIGNAL(triggered()), this, SLOT(setFocus()));

    isUntitled = true;

    connect(document(), SIGNAL(contentsChanged()),
            this, SLOT(documentWasModified()));

    setWindowIcon(QPixmap(":/images/document.png"));
    setWindowTitle("[*]");
    setAttribute(Qt::WA_DeleteOnClose);
}
First, we create a QAction representing the editor in the application’s Window menu and connect that action to the show() and setFocus() slots.
Since we allow users to create any number of editor windows, we must make some provision for naming them so that they can be distinguished before they have been saved for the first time. One common way of handling this is to allocate names that include a number (e.g., document1.txt). We use the isUntitled variable to distinguish between names supplied by the user and names we have created programmatically.
We connect the text document’s contentsChanged() signal to the private documentWasModified() slot. This slot simply calls setWindowModified(true).
Finally, we set the Qt::WA_DeleteOnClose attribute to prevent memory leaks when the user closes an Editor window.
void Editor::newFile()
{
    static int documentNumber = 1;

    curFile = tr("document%1.txt").arg(documentNumber);
    setWindowTitle(curFile + "[*]");
    action->setText(curFile);
    isUntitled = true;
    ++documentNumber;
}
The newFile() function generates a name like document1.txt for the new document. The code belongs in newFile(), rather than the constructor, because we don’t want to consume numbers when we call open() to open an existing document in a newly created Editor. Since documentNumber is declared static, it is shared across all Editor instances.
The “[*]” marker in the window title is a place marker for where we want the asterisk to appear when the file has unsaved changes on platforms other than Mac OS X. On Mac OS X, unsaved documents have a dot in their window’s close button. We covered this place marker in Chapter 3 (p. 61).
In addition to creating new files, users often want to open existing files, picked from either a file dialog or a list such as a recently opened files list. Two static functions are provided to support these uses: open() for choosing a file name from the file system, and openFile() to create an Editor and to read into it the contents of a specified file.
Editor *Editor::open(QWidget *parent)
{
    QString fileName =
            QFileDialog::getOpenFileName(parent, tr("Open"), ".");
    if (fileName.isEmpty())
        return 0;

    return openFile(fileName, parent);
}
The static open() function pops up a file dialog through which the user can choose a file. If a file is chosen, openFile() is called to create an Editor and to read in the file’s contents.
Editor *Editor::openFile(const QString &fileName, QWidget *parent)
{
    Editor *editor = new Editor(parent);

    if (editor->readFile(fileName)) {
        editor->setCurrentFile(fileName);
        return editor;
    } else {
        delete editor;
        return 0;
    }
}
This static function begins by creating a new Editor widget, and then attempts to read in the specified file. If the read is successful, the Editor is returned; otherwise, the user is informed of the problem (in readFile()), the editor is deleted, and a null pointer is returned.
bool Editor::save()
{
    if (isUntitled) {
        return saveAs();
    } else {
        return saveFile(curFile);
    }
}
The save() function uses the isUntitled variable to determine whether it should call saveFile() or saveAs().
void Editor::closeEvent(QCloseEvent *event)
{
    if (okToContinue()) {
        event->accept();
    } else {
        event->ignore();
    }
}
The closeEvent() function is reimplemented to allow the user to save unsaved changes. The logic is coded in the okToContinue() function, which pops up a message box that asks, “Do you want to save your changes?” If okToContinue() returns true, we accept the close event; otherwise, we “ignore” it and leave the window unaffected by it.
void Editor::setCurrentFile(const QString &fileName)
{
    curFile = fileName;
    isUntitled = false;
    action->setText(strippedName(curFile));
    document()->setModified(false);
    setWindowTitle(strippedName(curFile) + "[*]");
    setWindowModified(false);
}
The setCurrentFile() function is called from openFile() and saveFile() to update the curFile and isUntitled variables, to set the window title and action text, and to set the document’s “modified” flag to false. Whenever the user modifies the text in the editor, the underlying QTextDocument emits the contentsChanged() signal and sets its internal “modified” flag to true.
QSize Editor::sizeHint() const
{
    return QSize(72 * fontMetrics().width('x'),
                 25 * fontMetrics().lineSpacing());
}
Finally, the sizeHint() function returns a size based on the width of the letter ‘x’ and the height of a text line. QMdiArea uses the size hint to give an initial size to the window.
MDI is one way of handling multiple documents simultaneously. On Mac OS X, the preferred approach is to use multiple top-level windows. We covered this approach in the “Multiple Documents” section of Chapter 3.