

This chapter will teach you how to create main windows using Qt. By the end, you will be able to build an application’s entire user interface, complete with menus, toolbars, a status bar, and as many dialogs as the application requires.
An application’s main window provides the framework upon which the application’s user interface is built. The main window for the Spreadsheet application shown in Figure 3.1 will form the basis of this chapter. The Spreadsheet application makes use of the Find, Go to Cell, and Sort dialogs that we created in Chapter 2.
Behind most GUI applications lies a body of code that provides the underlying functionality—for example, code to read and write files or to process the data presented in the user interface. In Chapter 4, we will see how to implement such functionality, again using the Spreadsheet application as our example.
An application’s main window is created by subclassing QMainWindow. Many of the techniques we saw in Chapter 2 for creating dialogs are also relevant for creating main windows, since both QDialog and QMainWindow are derived from QWidget.
Main windows can be created using Qt Designer, but in this chapter we will do everything in code to demonstrate how it’s done. If you prefer the more visual approach, see the “Creating Main Windows in Qt Designer” chapter in Qt Designer’s online manual.
The source code for the Spreadsheet application’s main window is spread across mainwindow.h and mainwindow.cpp. Let’s start with the header file:
#ifndef MAINWINDOW_H
#define MAINWINDOW_H

#include <QMainWindow>

class QAction;
class QLabel;
class FindDialog;
class Spreadsheet;

class MainWindow : public QMainWindow
{
    Q_OBJECT

public:
    MainWindow();

protected:
    void closeEvent(QCloseEvent *event);
We define the class MainWindow as a subclass of QMainWindow. It contains the Q_OBJECT macro since it provides its own signals and slots.
The closeEvent() function is a virtual function in QWidget that is automatically called when the user closes the window. It is reimplemented in MainWindow so that we can ask the user the standard question “Do you want to save your changes?” and to save user preferences to disk.
private slots:
    void newFile();
    void open();
    bool save();
    bool saveAs();
    void find();
    void goToCell();
    void sort();
    void about();
Some menu options, such as File|New and Help|About, are implemented as private slots in MainWindow. Most slots have void as their return value, but save() and saveAs() return a bool. The return value is ignored when a slot is executed in response to a signal, but when we call a slot as a function the return value is available to us just as it is when we call any ordinary C++ function.
    void openRecentFile();
    void updateStatusBar();
    void spreadsheetModified();

private:
    void createActions();
    void createMenus();
    void createContextMenu();
    void createToolBars();
    void createStatusBar();
    void readSettings();
    void writeSettings();
    bool okToContinue();
    bool loadFile(const QString &fileName);
    bool saveFile(const QString &fileName);
    void setCurrentFile(const QString &fileName);
    void updateRecentFileActions();
    QString strippedName(const QString &fullFileName);
The main window needs some more private slots and several private functions to support the user interface.
    Spreadsheet *spreadsheet;
    FindDialog *findDialog;
    QLabel *locationLabel;
    QLabel *formulaLabel;
    QStringList recentFiles;
    QString curFile;

    enum { MaxRecentFiles = 5 };
    QAction *recentFileActions[MaxRecentFiles];
    QAction *separatorAction;

    QMenu *fileMenu;
    QMenu *editMenu;
    ...
    QToolBar *fileToolBar;
    QToolBar *editToolBar;
    QAction *newAction;
    QAction *openAction;
    ...
    QAction *aboutQtAction;
};

#endif
In addition to its private slots and private functions, MainWindow also has lots of private variables. We will explain all of these as we use them.
We will now review the implementation:
#include <QtGui>

#include "finddialog.h"
#include "gotocelldialog.h"
#include "mainwindow.h"
#include "sortdialog.h"
#include "spreadsheet.h"
We include the <QtGui> header file, which contains the definition of all the Qt classes used in our subclass. We also include some custom header files, notably finddialog.h, gotocelldialog.h, and sortdialog.h from Chapter 2.
MainWindow::MainWindow()
{
    spreadsheet = new Spreadsheet;
    setCentralWidget(spreadsheet);

    createActions();
    createMenus();
    createContextMenu();
    createToolBars();
    createStatusBar();

    readSettings();

    findDialog = 0;

    setWindowIcon(QIcon(":/images/icon.png"));
    setCurrentFile("");
}
In the constructor, we begin by creating a Spreadsheet widget and setting it to be the main window’s central widget. The central widget occupies the middle of the main window (see Figure 3.2). The Spreadsheet class is a QTableWidget subclass with some spreadsheet capabilities, such as support for spreadsheet formulas. We will implement it in Chapter 4.
We call the private functions createActions(), createMenus(), createContextMenu(), createToolBars(), and createStatusBar() to set up the rest of the main window. We also call the private function readSettings() to read the application’s stored settings.
We initialize the findDialog pointer to be a null pointer. The first time MainWindow::find() is called, we will create the FindDialog object.
At the end of the constructor, we set the window’s icon to icon.png, a PNG file. Qt supports many image formats, including BMP, GIF, JPEG, PNG, PNM, SVG, TIFF, XBM, and XPM. Calling QWidget::setWindowIcon() sets the icon shown in the top-left corner of the window. Unfortunately, there is no platform-independent way of setting the application icon that appears on the desktop. Platform-specific procedures are explained at http://doc.trolltech.com/4.3/appicon.html.
GUI applications generally use many images. There are several methods for providing images to the application. The most common are the following:
Storing images in files and loading them at run-time.
Including XPM files in the source code. (This works because XPM files are also valid C++ files.)
Using Qt’s resource mechanism.
Here we use Qt’s resource mechanism because it is more convenient than loading files at run-time, and it works with any supported file format. We have chosen to store the images in the source tree in a subdirectory called images.
To make use of Qt’s resource system, we must create a resource file and add a line to the .pro file that identifies the resource file. In this example, we have called the resource file spreadsheet.qrc, so we put the following line in the .pro file:
RESOURCES = spreadsheet.qrc
The resource file itself uses a simple XML format. Here’s an extract from the one we have used:
<RCC>
<qresource>
    <file>images/icon.png</file>
    ...
    <file>images/gotocell.png</file>
</qresource>
</RCC>
Resource files are compiled into the application’s executable, so they can’t get lost. When we refer to resources, we use the path prefix :/ (colon slash), which is why the icon is specified as :/images/icon.png. Resources can be any kind of file (not just images), and we can use them in most places where Qt expects a file name. We cover them in more detail in Chapter 12.
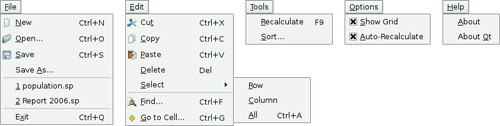
Most modern GUI applications provide menus, context menus, and toolbars. The menus enable users to explore the application and learn how to do new things, while the context menus and toolbars provide quick access to frequently used functionality. Figure 3.3 shows the Spreadsheet application’s menus.
Qt simplifies the programming of menus and toolbars through its action concept. An action is an item that can be added to any number of menus and toolbars. Creating menus and toolbars in Qt involves these steps:
Create and set up the actions.
Create menus and populate them with the actions.
Create toolbars and populate them with the actions.
In the Spreadsheet application, actions are created in createActions():
void MainWindow::createActions()
{
    newAction = new QAction(tr("&New"), this);
    newAction->setIcon(QIcon(":/images/new.png"));
    newAction->setShortcut(QKeySequence::New);
    newAction->setStatusTip(tr("Create a new spreadsheet file"));
    connect(newAction, SIGNAL(triggered()), this, SLOT(newFile()));
The New action has an accelerator (New), a parent (the main window), an icon, a shortcut key, and a status tip. Most window systems have standardized keyboard shortcuts for certain actions. For example, the New action has a shortcut of Ctrl+N on Windows, KDE, and GNOME, and Command+N on Mac OS X. By using the appropriate QKeySequence::StandardKey enum value, we ensure that Qt will provide the correct shortcuts for the platform on which the application is running.
We connect the action’s triggered() signal to the main window’s private newFile() slot, which we will implement in the next section. This connection ensures that when the user chooses the File|New menu item, clicks the New toolbar button, or presses Ctrl+N, the newFile() slot is called.
The Open, Save, and Save As actions are very similar to the New action, so we will skip directly to the “recently opened files” part of the File menu:
    ...
    for (int i = 0; i < MaxRecentFiles; ++i) {
        recentFileActions[i] = new QAction(this);
        recentFileActions[i]->setVisible(false);
        connect(recentFileActions[i], SIGNAL(triggered()),
                this, SLOT(openRecentFile()));
    }
We populate the recentFileActions array with actions. Each action is hidden and connected to the openRecentFile() slot. Later on, we will see how the recent file actions are made visible and used.
    exitAction = new QAction(tr("E&xit"), this);
    exitAction->setShortcut(tr("Ctrl+Q"));
    exitAction->setStatusTip(tr("Exit the application"));
    connect(exitAction, SIGNAL(triggered()), this, SLOT(close()));
The Exit action is slightly different from the ones we have seen so far. There is no standardized key sequence for terminating an application, so here we specify the key sequence explicitly. Another difference is that we connect to the window’s close() slot, which is provided by Qt.
We can now skip to the Select All action:
    ...
    selectAllAction = new QAction(tr("&All"), this);
    selectAllAction->setShortcut(QKeySequence::SelectAll);
    selectAllAction->setStatusTip(tr("Select all the cells in the "
                                    "spreadsheet"));
    connect(selectAllAction, SIGNAL(triggered()),
            spreadsheet, SLOT(selectAll()));
The selectAll() slot is provided by one of QTableWidget’s ancestors, QAbstractItemView, so we do not have to implement it ourselves.
Let’s skip further to the Show Grid action in the Options menu:
    ...
    showGridAction = new QAction(tr("&Show Grid"), this);
    showGridAction->setCheckable(true);
    showGridAction->setChecked(spreadsheet->showGrid());
    showGridAction->setStatusTip(tr("Show or hide the spreadsheet's "
                                       "grid"));
    connect(showGridAction, SIGNAL(toggled(bool)),
            spreadsheet, SLOT(setShowGrid(bool)));
Show Grid is a checkable action. Checkable actions are rendered with a check-mark in the menu and implemented as toggle buttons in the toolbar. When the action is turned on, the Spreadsheet component displays a grid. We initialize the action with the default for the Spreadsheet component so that they are synchronized at startup. Then we connect the Show Grid action’s toggled(bool) signal to the Spreadsheet component’s setShowGrid(bool) slot, which it inherits from QTableWidget. Once this action is added to a menu or toolbar, the user can toggle the grid on and off.
The Show Grid and Auto-Recalculate actions are independent checkable actions. Qt also supports mutually exclusive actions through the QActionGroup class.
    ...
    aboutQtAction = new QAction(tr("About &Qt"), this);
    aboutQtAction->setStatusTip(tr("Show the Qt library's About box"));
    connect(aboutQtAction, SIGNAL(triggered()), qApp, SLOT(aboutQt()));
}
For the About Qt action, we use the QApplication object’s aboutQt() slot, accessible through the qApp global variable. This pops up the dialog shown in Figure 3.4.

Now that we have created the actions, we can move on to building a menu system containing them:
void MainWindow::createMenus()
{
    fileMenu = menuBar()->addMenu(tr("&File"));
    fileMenu->addAction(newAction);
    fileMenu->addAction(openAction);
    fileMenu->addAction(saveAction);
    fileMenu->addAction(saveAsAction);
    separatorAction = fileMenu->addSeparator();
    for (int i = 0; i < MaxRecentFiles; ++i)
        fileMenu->addAction(recentFileActions[i]);
    fileMenu->addSeparator();
    fileMenu->addAction(exitAction);
In Qt, menus are instances of QMenu. The addMenu() function creates a QMenu widget with the specified text and adds it to the menu bar. The QMainWindow::menuBar() function returns a pointer to a QMenuBar. The menu bar is created the first time menuBar() is called.
We start by creating the File menu and then add the New, Open, Save, and Save As actions to it. We insert a separator to visually group closely related items together. We use a for loop to add the (initially hidden) actions from the recentFileActions array, and then add the exitAction action at the end.
We have kept a pointer to one of the separators. This will allow us to hide the separator (if there are no recent files) or to show it, since we do not want to show two separators with nothing in between.
    editMenu = menuBar()->addMenu(tr("&Edit"));
    editMenu->addAction(cutAction);
    editMenu->addAction(copyAction);
    editMenu->addAction(pasteAction);
    editMenu->addAction(deleteAction);

    selectSubMenu = editMenu->addMenu(tr("&Select"));
    selectSubMenu->addAction(selectRowAction);
    selectSubMenu->addAction(selectColumnAction);
    selectSubMenu->addAction(selectAllAction);

    editMenu->addSeparator();
    editMenu->addAction(findAction);
    editMenu->addAction(goToCellAction);
Now we create the Edit menu, adding actions with QMenu::addAction() as we did for the File menu, and adding the submenu with QMenu::addMenu() at the position where we want it to appear. The submenu, like the menu it belongs to, is a QMenu.
    toolsMenu = menuBar()->addMenu(tr("&Tools"));
    toolsMenu->addAction(recalculateAction);
    toolsMenu->addAction(sortAction);

    optionsMenu = menuBar()->addMenu(tr("&Options"));
    optionsMenu->addAction(showGridAction);
    optionsMenu->addAction(autoRecalcAction);

    menuBar()->addSeparator();

    helpMenu = menuBar()->addMenu(tr("&Help"));
    helpMenu->addAction(aboutAction);
    helpMenu->addAction(aboutQtAction);
}
We create the Tools, Options, and Help menus in a similar fashion. We insert a separator between the Options and Help menus. In Motif and CDE styles, the separator pushes the Help menu to the right; in other styles, the separator is ignored. Figure 3.5 shows both cases.

void MainWindow::createContextMenu()
{
spreadsheet->addAction(cutAction);
spreadsheet->addAction(copyAction);
spreadsheet->addAction(pasteAction);
spreadsheet->setContextMenuPolicy(Qt::ActionsContextMenu);
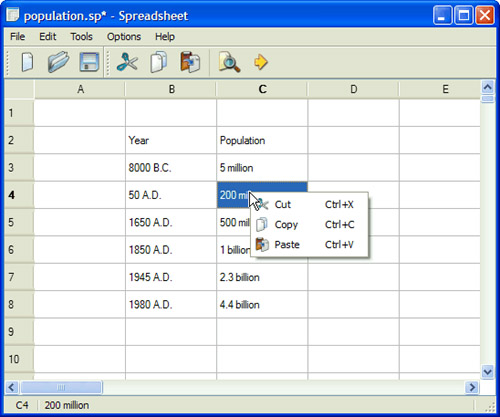
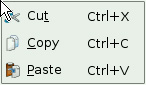
}Any Qt widget can have a list of QActions associated with it. To provide a context menu for the application, we add the desired actions to the Spreadsheet widget and set that widget’s context menu policy to show a context menu with these actions. Context menus are invoked by right-clicking a widget or by pressing a platform-specific key. The Spreadsheet’s context menu is shown in Figure 3.6.
A more sophisticated way of providing context menus is to reimplement the QWidget::contextMenuEvent() function, create a QMenu widget, populate it with the desired actions, and call exec() on it.
void MainWindow::createToolBars()
{
    fileToolBar = addToolBar(tr("&File"));
    fileToolBar->addAction(newAction);
    fileToolBar->addAction(openAction);
    fileToolBar->addAction(saveAction);

    editToolBar = addToolBar(tr("&Edit"));
    editToolBar->addAction(cutAction);
    editToolBar->addAction(copyAction);
    editToolBar->addAction(pasteAction);
    editToolBar->addSeparator();
    editToolBar->addAction(findAction);
    editToolBar->addAction(goToCellAction);
}
Creating toolbars is very similar to creating menus. We create a File toolbar and an Edit toolbar. Just like a menu, a toolbar can have separators, as Figure 3.7 shows.
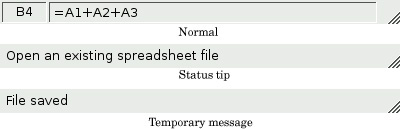
With the menus and toolbars complete, we are ready to tackle the Spreadsheet application’s status bar. In its normal state, the status bar contains two indicators: the current cell’s location and the current cell’s formula. The status bar is also used to display status tips and other temporary messages. Figure 3.8 shows the status bar in each state.
The MainWindow constructor calls createStatusBar() to set up the status bar:
void MainWindow::createStatusBar()
{
    locationLabel = new QLabel(" W999 ");
    locationLabel->setAlignment(Qt::AlignHCenter);
    locationLabel->setMinimumSize(locationLabel->sizeHint());

    formulaLabel = new QLabel;
    formulaLabel->setIndent(3);

    statusBar()->addWidget(locationLabel);
    statusBar()->addWidget(formulaLabel, 1);

    connect(spreadsheet, SIGNAL(currentCellChanged(int, int, int, int)),
            this, SLOT(updateStatusBar()));
    connect(spreadsheet, SIGNAL(modified()),
            this, SLOT(spreadsheetModified()));
    updateStatusBar();
}
The QMainWindow::statusBar() function returns a pointer to the status bar. (The status bar is created the first time statusBar() is called.) The status indicators are simply QLabels whose text we change whenever necessary. We have added an indent to the formulaLabel so that the text shown in it is offset slightly from the left edge. When the QLabels are added to the status bar, they are automatically reparented to make them children of the status bar.
Figure 3.8 shows that the two labels have different space requirements. The cell location indicator requires very little space, and when the window is resized, any extra space should go to the cell formula indicator on the right. This is achieved by specifying a stretch factor of 1 in the formula label’s QStatusBar::addWidget() call. The location indicator has the default stretch factor of 0, meaning that it prefers not to be stretched.
When QStatusBar lays out indicator widgets, it tries to respect each widget’s ideal size as given by QWidget::sizeHint() and then stretches any stretchable widgets to fill the available space. A widget’s ideal size is itself dependent on the widget’s contents and varies as we change the contents. To avoid constant resizing of the location indicator, we set its minimum size to be wide enough to contain the largest possible text (“W999”), with a little extra space. We also set its alignment to Qt::AlignHCenter to horizontally center the text.
Near the end of the function, we connect two of Spreadsheet’s signals to two of MainWindow’s slots: updateStatusBar() and spreadsheetModified().
void MainWindow::updateStatusBar()
{
    locationLabel->setText(spreadsheet->currentLocation());
    formulaLabel->setText(spreadsheet->currentFormula());
}
The updateStatusBar() slot updates the cell location and the cell formula indicators. It is called whenever the user moves the cell cursor to a new cell. The slot is also used as an ordinary function at the end of createStatusBar() to initialize the indicators. This is necessary because Spreadsheet doesn’t emit the currentCellChanged() signal at startup.
void MainWindow::spreadsheetModified()
{
    setWindowModified(true);
    updateStatusBar();
}
The spreadsheetModified() slot sets the windowModified property to true, updating the title bar. The function also updates the location and formula indicators so that they reflect the current state of affairs.
In this section, we will implement the slots and private functions necessary to make the File menu options work and to manage the recently opened files list.
void MainWindow::newFile()
{
    if (okToContinue()) {
        spreadsheet->clear();
        setCurrentFile("");
    }
}
The newFile() slot is called when the user clicks the File|New menu option or clicks the New toolbar button. The okToContinue() private function pops up the “Do you want to save your changes?” dialog shown in Figure 3.9, if there are unsaved changes. It returns true if the user chooses either Yes or No (saving the document on Yes), and it returns false if the user chooses Cancel. The Spreadsheet::clear() function clears all the spreadsheet’s cells and formulas. The setCurrentFile() private function updates the window title to indicate that an untitled document is being edited, in addition to setting the curFile private variable and updating the recently opened files list.

bool MainWindow::okToContinue()
{
    if (isWindowModified()) {
        int r = QMessageBox::warning(this, tr("Spreadsheet"),
                        tr("The document has been modified.
"
                           "Do you want to save your changes?"),
                        QMessageBox::Yes | QMessageBox::No
                        | QMessageBox::Cancel);
        if (r == QMessageBox::Yes) {
            return save();
        } else if (r == QMessageBox::Cancel) {
            return false;
        }
    }
    return true;
}
In okToContinue(), we check the state of the windowModified property. If it is true, we display the message box shown in Figure 3.9. The message box has a Yes, a No, and a Cancel button.
QMessageBox provides many standard buttons, and automatically tries to make one button the default (activated when the user presses Enter), and one the escape (activated when the user presses Esc). It is also possible to choose particular buttons as the default and escape buttons, and also to customize the button texts.
The call to warning() may look a bit intimidating at first sight, but the general syntax is straightforward:
QMessageBox::warning(parent, title, message, buttons);
In addition to warning(), QMessageBox also provides information(), question(), and critical(), each of which has its own particular icon. The icons are shown in Figure 3.10.

void MainWindow::open()
{
    if (okToContinue()) {
        QString fileName = QFileDialog::getOpenFileName(this,
                                   tr("Open Spreadsheet"), ".",
                                   tr("Spreadsheet files (*.sp)"));
        if (!fileName.isEmpty())
            loadFile(fileName);
    }
}
The open() slot corresponds to File|Open. Like newFile(), it first calls okToContinue() to handle any unsaved changes. Then it uses the static convenience function QFileDialog::getOpenFileName() to obtain a new file name from the user. The function pops up a file dialog, lets the user choose a file, and returns the file name—or an empty string if the user clicked Cancel.
The first argument to QFileDialog::getOpenFileName() is the parent widget. The parent–child relationship doesn’t mean the same thing for dialogs as for other widgets. A dialog is always a window in its own right, but if it has a parent, it is centered on top of the parent by default. A child dialog also shares its parent’s taskbar entry.
The second argument is the title the dialog should use. The third argument tells it which directory it should start from, in our case the current directory.
The fourth argument specifies the file filters. A file filter consists of a descriptive text and a wildcard pattern. Had we supported comma-separated values files and Lotus 1-2-3 files in addition to Spreadsheet’s native file format, we would have used the following filter:
tr("Spreadsheet files (*.sp)
"
   "Comma-separated values files (*.csv)
"
   "Lotus 1-2-3 files (*.wk1 *.wks)")
The loadFile() private function was called in open() to load the file. We make it an independent function because we will need the same functionality to load recently opened files:
bool MainWindow::loadFile(const QString &fileName)
{
    if (!spreadsheet->readFile(fileName)) {
        statusBar()->showMessage(tr("Loading canceled"), 2000);
        return false;
    }

    setCurrentFile(fileName);
    statusBar()->showMessage(tr("File loaded"), 2000);
    return true;
}
We use Spreadsheet::readFile() to read the file from disk. If loading is successful, we call setCurrentFile() to update the window title; otherwise, Spreadsheet::readFile() will have already notified the user of the problem through a message box. In general, it is good practice to let the lower-level components issue error messages, since they can provide the precise details of what went wrong.
In both cases, we display a message in the status bar for two seconds (2000 milliseconds) to keep the user informed about what the application is doing.
bool MainWindow::save()
{
    if (curFile.isEmpty()) {
        return saveAs();
    } else {
        return saveFile(curFile);
    }
}
bool MainWindow::saveFile(const QString &fileName)
{
    if (!spreadsheet->writeFile(fileName)) {
        statusBar()->showMessage(tr("Saving canceled"), 2000);
        return false;
    }

    setCurrentFile(fileName);
    statusBar()->showMessage(tr("File saved"), 2000);
    return true;
}
The save() slot corresponds to File|Save. If the file already has a name because it was opened before or has already been saved, save() calls saveFile() with that name; otherwise, it simply calls saveAs().
bool MainWindow::saveAs()
{
    QString fileName = QFileDialog::getSaveFileName(this,
                               tr("Save Spreadsheet"), ".",
                               tr("Spreadsheet files (*.sp)"));
    if (fileName.isEmpty())
        return false;
    return saveFile(fileName);
}
The saveAs() slot corresponds to File|Save As. We call QFileDialog::getSaveFileName() to obtain a file name from the user. If the user clicks Cancel, we return false, which is propagated up to its caller (save() or okToContinue()).
If the file already exists, the getSaveFileName() function will ask the user to confirm that they want to overwrite. This behavior can be changed by passing QFileDialog::DontConfirmOverwrite as an additional argument to getSaveFileName().
void MainWindow::closeEvent(QCloseEvent *event)
{
    if (okToContinue()) {
        writeSettings();
        event->accept();
    } else {
        event->ignore();
    }
}
When the user clicks File|Exit or clicks the close button in the window’s title bar, the QWidget::close() slot is called. This sends a “close” event to the widget. By reimplementing QWidget::closeEvent(), we can intercept attempts to close the main window and decide whether we want the window to actually close or not.
If there are unsaved changes and the user chooses Cancel, we “ignore” the event and leave the window unaffected by it. In the normal case, we accept the event, resulting in Qt hiding the window. We also call the private function writeSettings() to save the application’s current settings.
When the last window is closed, the application terminates. If needed, we can disable this behavior by setting QApplication’s quitOnLastWindowClosed property to false, in which case the application keeps running until we call QApplication::quit().
void MainWindow::setCurrentFile(const QString &fileName)
{
    curFile = fileName;
    setWindowModified(false);
    QString shownName = tr("Untitled");
    if (!curFile.isEmpty()) {
        shownName = strippedName(curFile);
        recentFiles.removeAll(curFile);
        recentFiles.prepend(curFile);
        updateRecentFileActions();
    }

    setWindowTitle(tr("%1[*] - %2").arg(shownName)
                                   .arg(tr("Spreadsheet")));
}
QString MainWindow::strippedName(const QString &fullFileName)
{
    return QFileInfo(fullFileName).fileName();
}
In setCurrentFile(), we set the curFile private variable that stores the name of the file being edited. Before we show the file name in the title bar, we remove the file’s path with strippedName() to make it more user-friendly.
Every QWidget has a windowModified property that should be set to true if the window’s document has unsaved changes, and to false otherwise. On Mac OS X, unsaved documents are indicated by a dot in the close button of the window’s title bar; on other platforms, they are indicated by an asterisk following the file name. Qt takes care of this behavior automatically, as long as we keep the windowModified property up-to-date and place the marker “[*]” in the window title where we want the asterisk to appear when it is required.
The text we passed to the setWindowTitle() function was
tr("%1[*] - %2").arg(shownName)
                .arg(tr("Spreadsheet"))
The QString::arg() function replaces the lowest-numbered “%n” parameter with its argument and returns the resulting %n parameter with its argument and returns the resulting string. In this case, arg() is used with two “%n” parameters. The first call to arg() replaces “%1”; the second call replaces “%2”. If the file name is “budget.sp” and no translation file is loaded, the resulting string would be “budget.sp[*] - Spreadsheet”. It would have been easier to write
setWindowTitle(shownName + tr("[*] - Spreadsheet"));but using arg() provides more flexibility for human translators.
If there is a file name, we update recentFiles, the application’s recently opened files list. We call removeAll() to remove any occurrences of the file name in the list, to avoid duplicates; then we call prepend() to add the file name as the first item. After updating the list, we call the private function updateRecentFileActions() to update the entries in the File menu.
void MainWindow::updateRecentFileActions()
{
    QMutableStringListIterator i(recentFiles);
    while (i.hasNext()) {
        if (!QFile::exists(i.next()))
            i.remove();
    }

    for (int j = 0; j < MaxRecentFiles; ++j) {
        if (j < recentFiles.count()) {
            QString text = tr("&%1 %2")
                           .arg(j + 1)
                           .arg(strippedName(recentFiles[j]));
            recentFileActions[j]->setText(text);
            recentFileActions[j]->setData(recentFiles[j]);
            recentFileActions[j]->setVisible(true);
        } else {
            recentFileActions[j]->setVisible(false);
        }
    }
    separatorAction->setVisible(!recentFiles.isEmpty());
}
We begin by removing any files that no longer exist using a Java-style iterator. Some files might have been used in a previous session, but have since been deleted. The recentFiles variable is of type QStringList (list of QStrings). Chapter 11 explains container classes such as QStringList in detail, showing how they relate to the C++ Standard Template Library (STL), and the use of Qt’s Java-style iterator classes.
We then go through the list of files again, this time using array-style indexing. For each file, we create a string consisting of an ampersand, a digit (j + 1), a space, and the file name (without its path). We set the corresponding action to use this text. For example, if the first file was C:My Documents ab04.sp, the first action’s text would be “&1 tab04.sp”. Figure 3.11 shows the correspondence between the recentFileActions array and the resulting menu.

Every action can have an associated “data” item of type QVariant. The QVariant type can hold values of many C++ and Qt types; we cover it in Chapter 11. Here, we store the full name of the file in the action’s “data” item so that we can easily retrieve it later. We also set the action to be visible.
If there are more file actions than recent files, we simply hide the extra actions. Finally, if there is at least one recent file, we set the separator to be visible.
void MainWindow::openRecentFile()
{
    if (okToContinue()) {
        QAction *action = qobject_cast<QAction *>(sender());
        if (action)
            loadFile(action->data().toString());
    }
}
When the user chooses a recent file, the openRecentFile() slot is called. The okToContinue() function is used in case there are any unsaved changes, and provided the user did not cancel, we find out which particular action invoked the slot using QObject::sender().
The qobject_cast<T>() function performs a dynamic cast based on the meta-information generated by moc, Qt’s meta-object compiler. It returns a pointer of the requested QObject subclass, or 0 if the object cannot be cast to that type. Unlike the Standard C++ dynamic_cast<T>(), Qt’s qobject_cast<T>() works correctly across dynamic library boundaries. In our example, we use qobject_cast<T>() to cast a QObject pointer to a QAction pointer. If the cast is successful (it should be), we call loadFile() with the full file name that we extract from the action’s data.
Incidentally, since we know that the sender is a QAction, the program would still work if we used static_cast<T>() or a traditional C-style cast instead. Refer to the “Type Conversions” section of Appendix D for an overview of the different C++ casts.
In this section, we will explain how to use dialogs in Qt—how to create and initialize them, run them, and respond to choices made by the user interacting with them. We will make use of the Find, Go to Cell, and Sort dialogs that we created in Chapter 2. We will also create a simple About box.
We will begin with the Find dialog shown in Figure 3.12. Since we want the user to be able to switch between the main Spreadsheet window and the Find dialog at will, the Find dialog must be modeless. A modeless window is one that runs independently of any other windows in the application.

When modeless dialogs are created, they normally have their signals connected to slots that respond to the user’s interactions.
void MainWindow::find()
{
    if (!findDialog) {
        findDialog = new FindDialog(this);
        connect(findDialog, SIGNAL(findNext(const QString &,
                                            Qt::CaseSensitivity)),
                spreadsheet, SLOT(findNext(const QString &,
                                           Qt::CaseSensitivity)));
        connect(findDialog, SIGNAL(findPrevious(const QString &,
                                                Qt::CaseSensitivity)),
                spreadsheet, SLOT(findPrevious(const QString &,
                                               Qt::CaseSensitivity)));
    }

    findDialog->show();
    findDialog->raise();
    findDialog->activateWindow();
}
The Find dialog is a window that enables the user to search for text in the spreadsheet. The find() slot is called when the user clicks Edit|Find to pop up the Find dialog. At that point, several scenarios are possible:
This is the first time the user has invoked the Find dialog.
The Find dialog was invoked before, but the user closed it.
The Find dialog was invoked before and is still visible.
If the Find dialog doesn’t already exist, we create it and connect its findNext() and findPrevious() signals to the corresponding Spreadsheet slots. We could also have created the dialog in the MainWindow constructor, but delaying its creation makes application startup faster. Also, if the dialog is never used, it is never created, saving both time and memory.
Then we call show(), raise(), and activateWindow() to ensure that the window is visible, on top of the others, and active. A call to show() alone is sufficient to make a hidden window visible, on top, and active, but the Find dialog may be invoked when it is already visible. In that case, show() does nothing and we must call raise() and activateWindow() to make the window on top and active. An alternative would have been to write
if (findDialog->isHidden()) {
    findDialog->show();
} else {
    findDialog->raise();
    findDialog->activateWindow();
}
but this is the programming equivalent of looking both ways before crossing a one-way street.
We will now look at the Go to Cell dialog shown in Figure 3.13. We want the user to pop it up, use it, and close it without being able to switch to any other window in the application. This means that the Go to Cell dialog must be modal. A modal window is a window that pops up when invoked and blocks the application, preventing any other processing or interactions from taking place until the window is closed. The file dialogs and message boxes we used earlier were modal.

A dialog is modeless if it’s invoked using show() (unless we call setModal() beforehand to make it modal); it is modal if it’s invoked using exec().
void MainWindow::goToCell()
{
    GoToCellDialog dialog(this);
    if (dialog.exec()) {
        QString str = dialog.lineEdit->text().toUpper();
        spreadsheet->setCurrentCell(str.mid(1).toInt() - 1,
                                    str[0].unicode() - 'A'),
    }
}
The QDialog::exec() function returns a true value (QDialog::Accepted) if the dialog is accepted, and a false value (QDialog::Rejected) otherwise. Recall that when we created the Go to Cell dialog using Qt Designer in Chapter 2, we connected OK to accept() and Cancel to reject(). If the user chooses OK, we set the current cell to the value in the line editor.
The QTableWidget::setCurrentCell() function expects two arguments:a row index and a column index. In the Spreadsheet application, cell A1 is cell (0, 0) and cell B27 is cell (26, 1). To obtain the row index from the QString returned by QLineEdit::text(), we extract the row number using QString::mid() (which returns a substring from the start position to the end of the string), convert it to an int using QString::toInt(), and subtract 1. For the column number, we subtract the numeric value of ‘A’ from the numeric value of the string’s uppercased first character. We know that the string will have the correct format because the QRegExpValidator we created for the dialog allows the OK button to be enabled only if we have a letter followed by up to three digits.
The goToCell() function differs from all the code seen so far in that it creates a widget (a GoToCellDialog) as a variable on the stack. At the cost of one extra line, we could just as easily have used new and delete:
void MainWindow::goToCell()
{
    GoToCellDialog *dialog = new GoToCellDialog(this);
    if (dialog->exec()) {
        QString str = dialog->lineEdit->text().toUpper();
        spreadsheet->setCurrentCell(str.mid(1).toInt() - 1,
                                    str[0].unicode() - 'A'),
    }
    delete dialog;
}
Creating modal dialogs (and context menus) on the stack is a common programming pattern since we usually don’t need the dialog (or menu) after we have used it, and it will automatically be destroyed at the end of the enclosing scope.
We will now turn to the Sort dialog. The Sort dialog is a modal dialog that allows the user to sort the currently selected area by the columns they specify. Figure 3.14 shows an example of sorting, with column B as the primary sort key and column A as the secondary sort key (both ascending).

void MainWindow::sort()
{
    SortDialog dialog(this);
    QTableWidgetSelectionRange range = spreadsheet->selectedRange();
    dialog.setColumnRange('A' + range.leftColumn(),
                          'A' + range.rightColumn());
    if (dialog.exec()) {
        SpreadsheetCompare compare;
        compare.keys[0] =
              dialog.primaryColumnCombo->currentIndex();
        compare.keys[1] =
              dialog.secondaryColumnCombo->currentIndex() - 1;
        compare.keys[2] =
              dialog.tertiaryColumnCombo->currentIndex() - 1;
        compare.ascending[0] =
              (dialog.primaryOrderCombo->currentIndex() == 0);
        compare.ascending[1] =
              (dialog.secondaryOrderCombo->currentIndex() == 0);
        compare.ascending[2] =
              (dialog.tertiaryOrderCombo->currentIndex() == 0);
        spreadsheet->sort(compare);
    }
}
The code in sort() follows a similar pattern to that used for goToCell():
We create the dialog on the stack and initialize it.
We pop up the dialog using
exec().If the user clicks OK, we extract the values entered by the user from the dialog’s widgets and make use of them.
The setColumnRange() call sets the columns available for sorting to the columns that are selected. For example, using the selection shown in Figure 3.14, range.leftColumn() would yield 0, giving ‘A’ + 0 = ‘A’, and range.rightColumn() would yield 2, giving ‘A’ + 2 = ‘C’.
The compare object stores the primary, secondary, and tertiary sort keys and their sort orders. (We will see the definition of the SpreadsheetCompare class in the next chapter.) The object is used by Spreadsheet::sort() to compare two rows. The keys array stores the column numbers of the keys. For example, if the selection extends from C2 to E5, column C has position 0. The ascending array stores the order associated with each key as a bool. QComboBox::currentIndex() returns the index of the currently selected item, starting at 0. For the secondary and tertiary keys, we subtract one from the current item to account for the “None” item.
The sort() function does the job, but it is a bit fragile. It assumes that the Sort dialog is implemented in a particular way, with comboboxes and “None” items. This means that if we redesign the Sort dialog, we may also need to rewrite this code. While this approach is adequate for a dialog that is called only from one place, it opens the door to maintenance nightmares if the dialog is used in several places.
A more robust approach is to make the SortDialog class smarter by having it create a SpreadsheetCompare object itself, which can then be accessed by its caller. This simplifies MainWindow::sort() significantly:
void MainWindow::sort()
{
    SortDialog dialog(this);
    QTableWidgetSelectionRange range = spreadsheet->selectedRange();
    dialog.setColumnRange('A' + range.leftColumn(),
                          'A' + range.rightColumn());

    if (dialog.exec())
        spreadsheet->performSort(dialog.comparisonObject());
}
This approach leads to loosely coupled components and is almost always the right choice for dialogs that will be called from more than one place.
A more radical approach would be to pass a pointer to the Spreadsheet object when initializing the SortDialog object and to allow the dialog to operate directly on the Spreadsheet. This makes the SortDialog much less general, since it will work only on a certain type of widget, but it simplifies the code even further by eliminating the SortDialog::setColumnRange() function. The MainWindow::sort() function then becomes
void MainWindow::sort()
{
    SortDialog dialog(this);
    dialog.setSpreadsheet(spreadsheet);
    dialog.exec();
}
This approach mirrors the first: Instead of the caller needing intimate knowledge of the dialog, the dialog needs intimate knowledge of the data structures supplied by the caller. This approach may be useful where the dialog needs to apply changes live. But just as the caller code is fragile using the first approach, this third approach breaks if the data structures change.
Some developers choose just one approach to using dialogs and stick with that. This has the benefit of familiarity and simplicity since all their dialog usages follow the same pattern, but it also misses the benefits of the approaches that are not used. Ideally, the approach to use should be decided on a per-dialog basis.
We will round off this section with the About box. We could create a custom dialog like we did for the Find dialog or the Go to Cell dialog to present the information about the application, but since most About boxes are highly stylized, Qt provides a simpler solution.
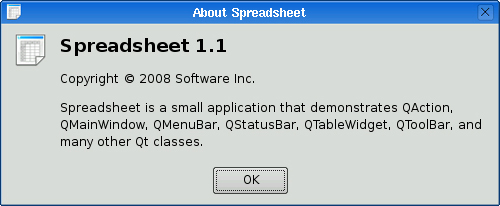
void MainWindow::about()
{
QMessageBox::about(this, tr("About Spreadsheet"),
tr("<h2>Spreadsheet 1.1</h2>"
"<p>Copyright © 2008 Software Inc."
"<p>Spreadsheet is a small application that "
"demonstrates QAction, QMainWindow, QMenuBar, "
"QStatusBar, QTableWidget, QToolBar, and many other "
"Qt classes."));
}The About box is obtained by calling QMessageBox::about(), a static convenience function. The function is very similar to QMessageBox::warning(), except that it uses the parent window’s icon instead of the standard “warning” icon. The resulting dialog is shown in Figure 3.15.
So far, we have used several convenience static functions from both QMessageBox and QFileDialog. These functions create a dialog, initialize it, and call exec() on it. It is also possible, although less convenient, to create a QMessageBox or a QFileDialog widget like any other widget and explicitly call exec(), or even show(), on it.
In the MainWindow constructor, we called readSettings() to load the application’s stored settings. Similarly, in closeEvent(), we called writeSettings() to save the settings. These two functions are the last MainWindow member functions that need to be implemented.
void MainWindow::writeSettings()
{
    QSettings settings("Software Inc.", "Spreadsheet");

    settings.setValue("geometry", saveGeometry());
    settings.setValue("recentFiles", recentFiles);
    settings.setValue("showGrid", showGridAction->isChecked());
    settings.setValue("autoRecalc", autoRecalcAction->isChecked());
}
The writeSettings() function saves the main window’s geometry (position and size), the list of recently opened files, and the Show Grid and Auto-Recalculate options.
By default, QSettings stores the application’s settings in platform-specific locations. On Windows, it uses the system registry; on Unix, it stores the data in text files; on Mac OS X, it uses the Core Foundation Preferences API.
The constructor arguments specify the organization’s name and the application’s name. This information is used in a platform-specific way to find a location for the settings.
QSettings stores settings as key–value pairs. The key is similar to a file system path. Subkeys can be specified using a path-like syntax (e.g., findDialog/matchCase) or using beginGroup() and endGroup():
settings.beginGroup("findDialog");
settings.setValue("matchCase", caseCheckBox->isChecked());
settings.setValue("searchBackward", backwardCheckBox->isChecked());
settings.endGroup();
The value can be an int, a bool, a double, a QString, a QStringList, or any other type supported by QVariant, including registered custom types.
void MainWindow::readSettings()
{
    QSettings settings("Software Inc.", "Spreadsheet");

    restoreGeometry(settings.value("geometry").toByteArray());

    recentFiles = settings.value("recentFiles").toStringList();
    updateRecentFileActions();

    bool showGrid = settings.value("showGrid", true).toBool();
    showGridAction->setChecked(showGrid);

    bool autoRecalc = settings.value("autoRecalc", true).toBool();
    autoRecalcAction->setChecked(autoRecalc);
}
The readSettings() function loads the settings that were saved by writeSettings(). The second argument to the value() function specifies a default value, in case there are no settings available. The default values are used the first time the application is run. Since no second argument is given for geometry or for the recent files list, the window will have an arbitrary but reasonable size and position, and the recent files list will be an empty list on the first run.
The arrangement we opted for in MainWindow, with all the QSettings-related code in readSettings() and writeSettings(), is just one of many possible approaches. A QSettings object can be created to query or modify some setting at any time during the execution of the application and from anywhere in the code.
We have now completed the Spreadsheet’s MainWindow implementation. In the following sections, we will discuss how the Spreadsheet application can be modified to handle multiple documents and how to implement a splash screen. We will complete its functionality, including handling formulas and sorting, in the next chapter.
We are now ready to code the Spreadsheet application’s main() function:
#include <QApplication>

#include "mainwindow.h"

int main(int argc, char *argv[])
{
    QApplication app(argc, argv);
    MainWindow mainWin;
    mainWin.show();
    return app.exec();
}
This main() function is a little bit different from those we have written so far: We have created the MainWindow instance as a variable on the stack instead of using new. The MainWindow instance is then automatically destroyed when the function terminates.
With the main() function just shown, the Spreadsheet application provides a single main window and can handle only one document at a time. If we want to edit multiple documents at the same time, we could start multiple instances of the Spreadsheet application. But this isn’t as convenient for users as having a single instance of the application providing multiple main windows, just as one instance of a web browser can provide multiple browser windows simultaneously.
We will modify the Spreadsheet application so that it can handle multiple documents. First, we need a slightly different File menu:
File|New creates a new main window with an empty document, instead of reusing the existing main window.
File|Close closes the current main window.
File|Exit closes all windows.
In the original version of the File menu, there was no Close option because that would have been the same as Exit. The new File menu is shown in Figure 3.16.

This is the new main() function:
int main(int argc, char *argv[])
{
    QApplication app(argc, argv);
    MainWindow *mainWin = new MainWindow;
    mainWin->show();
    return app.exec();
}
With multiple windows, it now makes sense to create MainWindow with new, because then we can use delete on a main window when we have finished with it to save memory.
This is the new MainWindow::newFile() slot:
void MainWindow::newFile()
{
    MainWindow *mainWin = new MainWindow;
    mainWin->show();
}
We simply create a new MainWindow instance. It may seem odd that we don’t keep any pointer to the new window, but that isn’t a problem since Qt keeps track of all the windows for us.
These are the actions for Close and Exit:
void MainWindow::createActions()
{
    ...
    closeAction = new QAction(tr("&Close"), this);
    closeAction->setShortcut(QKeySequence::Close);
    closeAction->setStatusTip(tr("Close this window"));
    connect(closeAction, SIGNAL(triggered()), this, SLOT(close()));

    exitAction = new QAction(tr("E&xit"), this);
    exitAction->setShortcut(tr("Ctrl+Q"));
    exitAction->setStatusTip(tr("Exit the application"));
    connect(exitAction, SIGNAL(triggered()),
            qApp, SLOT(closeAllWindows()));
    ...
}
The QApplication::closeAllWindows() slot closes all of the application’s windows, unless one of them rejects the close event. This is exactly the behavior we need here. We don’t have to worry about unsaved changes because that’s handled in MainWindow::closeEvent() whenever a window is closed.
It looks as though we have finished making the application capable of handling multiple windows. Unfortunately, a hidden problem is lurking: If the user keeps creating and closing main windows, the machine might eventually run out of memory. This is because we keep creating MainWindow widgets in newFile() but we never delete them. When the user closes a main window, the default behavior is to hide it, so it still remains in memory. With many main windows, this can be a problem.
The solution is to set the Qt::WA_DeleteOnClose attribute in the constructor:
MainWindow::MainWindow()
{
    ...
    setAttribute(Qt::WA_DeleteOnClose);
    ...
}
This tells Qt to delete the window when it is closed. The Qt::WA_DeleteOnClose attribute is one of many flags that can be set on a QWidget to influence its behavior.
Memory leaking isn’t the only problem that we must deal with. Our original application design included an implied assumption that we would have only one main window. With multiple windows, each main window has its own recently opened files list and its own options. Clearly, the recently opened files list should be global to the whole application. We can achieve this quite easily by declaring the recentFiles variable static so that only one instance of it exists for the whole application. But then we must ensure that wherever we called updateRecentFileActions() to update the File menu, we must call it on all main windows. Here’s the code to achieve this:
foreach (QWidget *win, QApplication::topLevelWidgets()) {
    if (MainWindow *mainWin = qobject_cast<MainWindow *>(win))
        mainWin->updateRecentFileActions();
}
The code uses Qt’s foreach construct (explained in Chapter 11) to iterate over all the application’s windows and calls updateRecentFileActions() on all widgets of type MainWindow. Similar code can be used for synchronizing the Show Grid and Auto-Recalculate options, or to make sure that the same file isn’t loaded twice.
Applications that provide one document per main window are said to be SDI (single document interface) applications. A common alternative on Windows is MDI (multiple document interface), where the application has a single main window that manages multiple document windows within its central area. Qt can be used to create both SDI and MDI applications on all its supported platforms. Figure 3.17 shows the Spreadsheet application using both approaches. We explain MDI in Chapter 6.

Many applications present a splash screen at startup, such as the one shown in Figure 3.18. Some developers use a splash screen to disguise a slow startup, while others do it to satisfy their marketing departments. Adding a splash screen to Qt applications is very easy using the QSplashScreen class.

The QSplashScreen class shows an image before the main window appears. It can also write messages on the image to inform the user about the progress of the application’s initialization process. Typically, the splash screen code is located in main(), before the call to QApplication::exec().
Next is an example main() function that uses QSplashScreen to present a splash screen in an application that loads modules and establishes network connections at startup.
int main(int argc, char *argv[])
{
    QApplication app(argc, argv);

    QSplashScreen *splash = new QSplashScreen;
    splash->setPixmap(QPixmap(":/images/splash.png"));
    splash->show();

    Qt::Alignment topRight = Qt::AlignRight | Qt::AlignTop;
    splash->showMessage(QObject::tr("Setting up the main window..."),
                           topRight, Qt::white);
    MainWindow mainWin;

    splash->showMessage(QObject::tr("Loading modules..."),
                           topRight, Qt::white);
    loadModules();

    splash->showMessage(QObject::tr("Establishing connections..."),
                           topRight, Qt::white);
    establishConnections();

    mainWin.show();
    splash->finish(&mainWin);
    delete splash;

    return app.exec();
}
We have now completed the Spreadsheet application’s user interface. In the next chapter, we will complete the application by implementing the core spreadsheet functionality.