Lotus Connections is an enterprise social software suite of tools that can be used to address various common business challenges, such as finding expertise, sharing information effectively, and enabling teams to work together. The challenges Lotus Connections helps to solve are not new to businesses. Over the past several decades, companies have searched for ways to improve collaboration among their workers. Many trends in collaboration tools have been tried and tested. Some technologies (such as email) have stayed with companies, while other trends have been replaced or have fizzled out.
Social software brings a new element to the collaborative tools landscape that is not about the technology or the tools themselves but rather how people use them. Although first emerging as consumer technologies, public profiles, blogs, and social bookmarks all have a common element of sharing from the ground up. This appeals to users who gain value from these tools and share information they find valuable. While new forms of sharing emerged on the consumer side, enterprises quickly saw their value and began applying these technologies to everyday work practices.
Lotus Connections provides social tools to employees and can even create external communities for their customers and partners. It consists of several social tools packaged together in an integrated suite:
Profiles is a web-based company directory that displays basic contact information, job title, divisions, and geographies for every person. In addition, Profiles shows corporate structure, skills, background information, and photographs and is searchable by any of these fields.
Communities are a place where groups of people with similar interests can gather. When in the community, members can exchange information and ideas.
Blogs provide a voice for people to express their ideas and have discussions despite organizational silos or time zone differences.
Dogear is a social bookmarking service that allows Internet and intranet pages to be saved for future reference and shared with the company.
Activities is aimed at helping individuals and groups organize their work, no matter which or how many tools they use.
Home Page is the place that brings all of this information together.
For more information about Lotus Connections features, see Chapter 2, “Introducing Lotus Connections 2.0.”
In this chapter, we’ll examine how a typical user might use Lotus Connections, incorporating its many components and features into the daily work routine.
Heather is a new employee at Renovations Inc. On her first day, she goes to orientation and fills out the standard new employee forms. She is urged at the end of the orientation session to fill out her profile on the intranet and get acquainted with the collaboration tools that are available. When Heather goes to her desk, she opens the intranet site to learn about what she can do with the tools available.
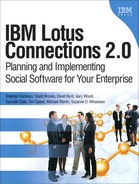
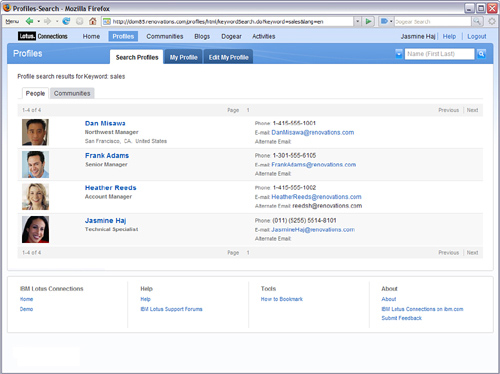
First, Heather heads into the Profiles section of Lotus Connections. Here, she can search for a person based on information she might know about them, including name, phone number, or email address (see Figure 6.1). Or she can search based on a keyword or skill. A profile search looks at the information available in the About Me, Background, Tag, and even Contact Information sections for the right match. She runs a search on people who went to her college and finds Jasmine. From here, Heather can chat with Jasmine, tag her, add her as a colleague, or view some of Jasmine’s contributions in her communities, blog, social bookmarks, or activities.
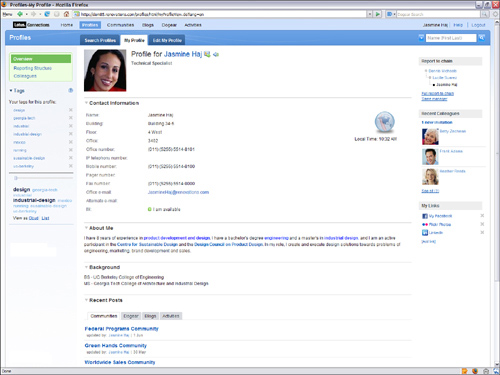
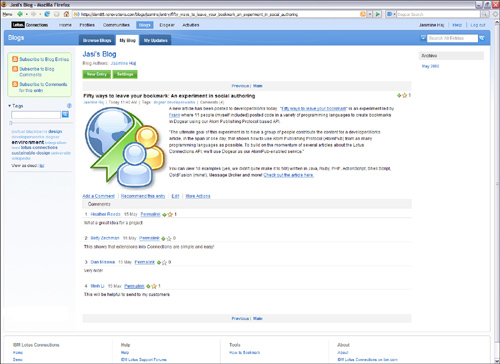
Heather wants to learn more about what Jasmine does at Renovations, so she decides to check out her blog. Here Heather learns that Jasmine is interested in technology and social software. Heather can view the conversations that people have based on what Jasmine writes about. People from all over Renovations discuss topics in blogs no matter what department or geography they are in. Using tags, Heather can navigate around the blogs to learn about the topics people in Renovations are discussing the most, and even join in the conversation herself (see Figure 6.2).
Now Heather decides to check out what Jasmine is sharing in her social bookmarks. Here people in Renovations can share their bookmarks of interest with others, whether they are from the Renovations intranet or from the Internet. Heather can view what the most bookmarked sites are in the popular view or see what the most commonly used tags are in the tag cloud. Since Heather is a new employee, Dogear is a great tool to help her keep all the intranet resources mentioned to her in orientation in order. She adds several bookmarks to Dogear around human resources, useful links, and benefits information. For those sites that she does not want to share with the general audience at Renovations, she makes those links private for only her view (see Figure 6.3).

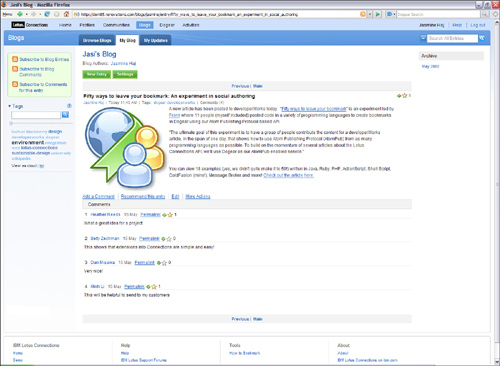
Now that Heather has used some of the social software tools available to her, she wants to join in the conversations and work with other people. One way she can do this is to find communities of interest to her. She goes to the Communities area and browses them based on their tags and their popularity. She can also look for communities based on keywords. In the community, people have discussions, share bookmarks and feeds, and can collaboratively author wiki pages. One community she finds matches her interest in environmental issues, so she simply clicks Join to be added to the members for that community (see Figure 6.4).
One of Heather’s first assignments at Renovations is to help with an environmental impact assessment they are conducting at the company to see where they should be cutting back on waste and improving energy usage. Heather’s boss added her to an activity in which she and several others will be working on this assessment. In this activity, all the relevant emails, chats, files, and information is stored for the team to use to do their assessment. They use the activity to organize the information they need and plan the impact report they will all be building. After the report is complete, they can mark the activity complete as well, keeping it in their completed list for future reference (see Figure 6.5).

One of the benefits of Lotus Connections is that it can be used from various tools instead of (or in addition to) the web interface. Lotus Connections provides a set of plug-ins to environments such as Lotus Notes, Microsoft Outlook, WebSphere Portal, Microsoft Office, and more so that Heather can access relevant social data when she needs it from wherever she is. Organizations like Renovations can create extensions into their own environment using the Lotus Connections API. For example, they can add Lotus Connections data to their intranet search results or create plug-ins to custom applications.
The Profiles feature is a person directory that provides access to information about people, how to get in contact with them, their background, what they are interested in, and what they work on. It has powerful enterprise data integration that allows you to pull several sources of enterprise data into the profile fields. It also provides areas for easy-to-update user-generated content, as well as allows you to build a social network by inviting people to connect as your colleague in Lotus Connections.
When you enter the Profiles section of Lotus Connections, you are brought to a search page that allows you to run a search based on a name or keyword. Figure 6.6 shows a sample Profiles search page. A keyword search looks at the About Me, Background, and Tag information in a profile to determine a match. If you select advanced search options below the input box, you will also be able to search on specific attributes of the profile, for example, email address, phone number, location, and more.

The search results page will show you a snapshot business card of the matching results, showing their names, positions, locations, phone number, and email address. You will also see a tab showing communities that matched your search terms (see Figure 6.7). This search shows related Community results as well, on the Communities tab.
Hovering over a name in any Lotus Connections view will cause the pop-up business card to appear (see Figure 6.8). This business card is used throughout Lotus Connections and can even be used in external applications, for example, on the Renovation intranet. It provides links to all the Lotus Connections tools that the individual might be sharing so that you can quickly see the person’s bookmarks, blog, or other information. A snapshot of contact information is provided in the business card, and with integration with Lotus Sametime, you can also see the person’s online status and custom status message. Actions are provided in the business card as well, so you can send this person an email, chat with her if she is online, add her to your colleagues, or even call her if voice services are enabled with Sametime. You will also see a similar card when hovering over Community names as well that allows people to quickly learn about a Community and join it. For example, in the search result page shown in Figure 6.7, related Community results are displayed and the business card for each Community appears when you hover over it.

Selecting a person will take you to that person’s profile page. The profile presents various information about a person, from his contact information to his interests to his colleagues. Starting at the top of the profile is the person’s photo, his name (also business card enabled), and up to two icons. The first icon allows you to download a v-card to add to your own address book. The second is optional and provides an audio clip of the person saying his name properly. This can be added by the profile owner in the Edit My Profile section, which also offers instructions on how to record the audio. Below that first line of information is selected contact information. In Figure 6.9, we see the person’s job title.

Below the first section of the profile is the Contact Information section. This part of the profile is most often connected to back-end data sources that provide the information listed in the profile. Companies can choose which fields they would like to display, and if the fields they want to use are not part of the standard defaults, they can add their own custom fields to the profile. Every field can point to a different back-end source if necessary. Common sources include corporate LDAP directories and databases, but custom sources can also be used. Companies can determine which fields they want to populate using a back-end source, and which fields they would like the profile owner to fill in. They can also choose to synchronize the data in either direction, meaning they can select which employee-generated fields will write to the data source, which fields are not editable by the employee, and which field values will be determined only by the back-end source. This synchronization can be run on a schedule as determined by the company. In the Contact Information section, you will also see the person’s online awareness through integration with Lotus Sametime and the time in her local time zone.
Below that section are two generally user-generated sections of information: the About Me and Background sections. The profile owner can choose what she would like to share about herself in these areas. Typically, current and past projects, biographies, areas of interest, education, and descriptions of jobs are expressed in these areas. The profile owner can simply edit this information using rich text, allowing her to highlight text, embed links, and add images if desired. This information is used along with tags, discussed later, in profiles keyword searches.
The last section in the middle of the profile is the Recent Posts section. Here is where you are able to discover a person’s contributions to the other social software provided in Lotus Connections. You can see the Communities he recently updated, the social bookmarks he recently posted (not including private bookmarks), recent blog entries he has authored, and recent activities he has contributed to that you have access to see. This gives you a well-rounded view of not only his self-described interests but also his current areas of focus.
The columns on the left and right side of the profile contain widgets. These widgets can be customized depending on your organization’s needs. Starting in the left column, you see the Tags widget. Tags are keywords used, in this case, to describe a profile. Users can tag themselves, showing skills or interests they would associate to their own profiles. Organizations can also enable social tagging, allowing people to tag others. For example, in the screenshot shown in Figure 6.9, we have tagged Jasmine with keywords such as “design” and “running” so that we can easily find her again based on the terms we want to associate to her. A common use case is to tag someone with a keyword that describes the context under which you met, for example, at a conference or customer engagement. You can pivot between a list view and a tag cloud view, both showing the number of times a tag was used on the person’s profile.
In the right column are several other widgets. The Report to Chain widget shows two levels of management above the employee, and it provides links to view the full chain all the way to the top of the organization, as well as a view to see people reporting to the same manager (which is helpful if you are looking for someone on the same team as that person). Clicking any of those views will take you to a full page showing the hierarchy. This page is also accessible on the left-hand navigation of the profile under “Reporting Structure.”
The next widget is the Recent Colleagues widget. This is used to build networks and also to deliver information from your network to your home page, which is discussed toward the end of this chapter. This widget shows to whom the person has most recently become connected. To connect to someone, simply click Invite to My Colleagues when browsing the person’s profile. This link will show up on any profile you are not connected to under the name and next to the photo. You will be able to send a custom message with your invitation. To establish a new colleague, the recipient of your invitation needs to accept the invite. After this is done, the person will be added as a colleague. You can click See All under the list of recent colleagues to see the full list of your colleagues, or you can click the Colleagues link on the left of the profile. The full list will allow you to remove colleagues and will also allow you to view outstanding invitations. If you have any outstanding invitations, you can accept them or ignore them from that view.
The last widget on the page is the My Links widget. Here you can add any number of web links that you want to associate to your profile. Certain site icons will appear when you add links. Frequent links include external social software sites, popular articles or resources, and links to photos.
Profiles are highly customizable. We already discussed how organizations can customize the Contact Information section of the profile. Organizations can also create profile types to determine what contact information and widgets, as well as widget placement, should be used. For example, a profile type for regular employees might include name, office address, email, reporting structure, and other fields. Another profile type for interns can also be created. This type might remove the reporting widget and replace it with a custom-made intern application widget. The Contact Information section for an intern type might choose to include College/University and Project in addition to or instead of information displayed there for a regular employee. Profile types can determine where widgets should appear and what fields to hide or show, and even determine the use of the third-party widgets.
Keeping the profile up-to-date is simple and fast. Clicking on Edit My Profile will bring you to the area where you can modify contact information, edit your background, change your photo, and add a name pronunciation file (see Figure 6.10). On the Contact Information tab, any fields you are authorized to edit will be editable. On the About Me tab, you can use the rich text editing tools shown in Figure 6.10 to add or edit your About Me and Background fields. The Photo and Pronunciation tabs allow you to upload files for those fields. You can edit as much as you want and simply save your changes.

Communities are an area for people with a common skill or interest to join together and share information, meet, and discuss. Community subjects can range from an area of focus at work, for example, sales communities or customer communities, to interest groups, such as the environmental community or the runners community. Typically communities are open and public, although they can be private or moderated. Communities can often be a gateway to access experts in an area, pose questions, or organize regular meetings.
One of the first actions you might take in Lotus Connections is finding Communities that you are interested in joining. Going to the main Communities page is one way to find out what you should join. On this page (see Figure 6.11), you can view the names of the communities, their descriptions, how many members they have, who the last person to update them was and when, and see the tags used to describe the community.

You can view the most recently updated communities in this view. You can also view the most popular communities (which typically have the most members and most activity) using the link on the left-hand side. You can also view the communities alphabetically. Below those links is a tag cloud that allows you to browse based on the most commonly used tags in communities. In the figure we can see that Programs is a popular tag. Clicking on a tag will filter the list based on the keyword selected and even update the tag cloud to show related tags. From this page, you can also view your own communities in the My Communities tab or use the search in the upper-right corner to find communities based on a keyword.
After you find a community you are interested in, select that community. In the upper-right corner of the Communities home page, you can click a button to join the Community. If you are already a member (see Figure 6.12), you will see a button that says Leave Community. If the community is totally open, you can join immediately and will appear in the membership list right away. If the community is moderated, your request to join will be accepted or denied by the owner of the community. If the community is completely private, you will not have seen it in the list to begin with, and only owners can add you to private communities. If you decide that you no longer want to be part of a community, you can leave by clicking the Leave Community button that replaced the join button you saw earlier.

When you join a community, you are added to the membership list. The full list is available when you click the Members link in the left-hand navigation area. In this view, the owner(s) of the community will appear toward the top, and the rest of the members will appear in alphabetical order. To post information into the community, you need to be a member.
A discussion forum is included to allow members of the community to post topics and hold a discussion on that topic area. The most recent topics are shown on the Communities home page, and clicking on Forum in the left-hand navigation takes you to the full list of topics. Clicking on any topic shows you the discussion thread or the recent posts view, depending on your preference. Discussions can include rich text, embedded images, or links.
Bookmarks can also be added to a community by members. When browsing a page on the web that you think would be relevant to your community, you can use a browser extension that will capture the URL and title for the page, and allow you to add tags and post into a select community. More about this tool is available in the section “Posting a Bookmark.” You can also add bookmarks directly from the bookmark page in the community. Simply click Bookmarks in the left-hand navigation, and you will see an Add Bookmark button in the list. Here you can add the URL, name, description, and tags. In either bookmarking option, you also have the choice of adding the bookmark to the important bookmarks section. This area is shown in the right-hand column of the community as highlighted web resources for quick access.
Another resource you can share in a community is a feed. You can add RSS or Atom feeds to a community and use the embedded feed reader to view the content of the feed. This is a great way to allow the community members to share blogs, news, or sources the community can stay on top of. To add a feed, first go to the feeds section by clicking Feeds in the left-hand navigation area. Click on the button Add Feed to add the link to the feed, a title, a description, and tags. Then, to view the content of the feed, click the Show Details link on the feed, and you will see the most recent entries. You can expand the entries to show the entry content, including images and video if embedded (see Figure 6.13).

In addition to the feed reader view, the communities produce feeds as well. You can subscribe to changes in all types of content (forum, bookmarks, membership, and more) and monitor your favorite communities in your own feed reader, as each of these community views produces a standard Atom feed.
You can also send email to an entire community. Simply click the Mail Community button in the upper-right corner and a form will appear in which you can compose a rich text email to send. You also have the option of sending the mail from your mail client. All members of the community will receive an email with the community name in the subject line.
Administrators can enable Confluence and Socialtext wikis to be used with Lotus Connections. Figure 6.14 shows an example of this. Using the integration with Confluence and Socialtext, community owners will have the option of creating a related wiki space when creating their community.

This space allows the community members to collaboratively author content in the wiki and have that content appear right inside the main Communities page. Members can easily navigate to the wiki from the community to do their editing.
Communities can also be extended with Lotus Quickr (in the Lotus Connections 2.0.1 release) and Lotus Sametime Advanced. Lotus Quickr allows community owners to create a related Quickr team place where members can upload files and collaboratively author in a wiki. Sametime Advanced gives community members group chat capabilities, allowing them to send Broadcast Chat to an entire community, ask for expertise in a Skill Tap, and send out a poll in the Poll Cast. Group chat transcripts can be added into the discussion forum for the community members who were not online at the time.
It is very easy for Lotus Connections users to create a community. From the All Communities view, you can simply click the Start a Community button, and a form will appear (see Figure 6.15). All that is required is a community name and a privacy level. As the owner, you should select the community privacy relevant to your needs. The first option offered means anyone can view the information in the community and can join it. In order to post content, they need to join. The second option means you will be notified when a new member requests to join, and you will have the ability to accept or reject them. Anyone with access to a community can view the content added in these first two options. The third option is a completely private community in which no one can view the content or the community itself unless a community owner specifically adds them to the community. Private communities do not appear in the All Communities listing; to see them you must look at the My Communities list. They are identified as private with a key icon, and moderated communities are identified with a star icon.
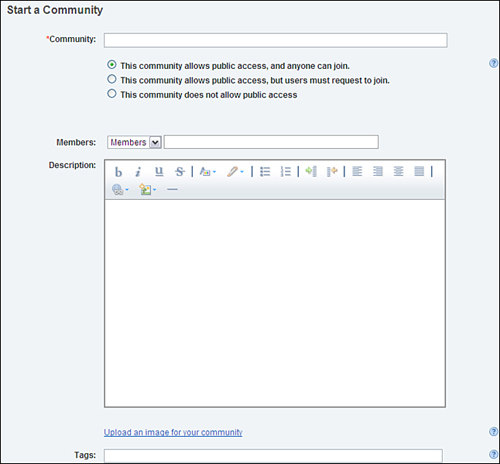
After you select a privacy option, you can immediately add members to the community. You can add them in as the role of member or owner from here as well. Typeahead will make it easy for you to find people based on their name. Next, you can add a rich text description of the community and upload an image for identifying your community. Finally, you can add tags for the community. If third-party applications have been enabled by your administrator (for example, a Confluence or Socialtext wiki or Lotus Quickr), those options will appear as optional tools you can add.
The Lotus Connections Activities feature provides an area where people can collaborate around a given task or objective in a way that allows them to work freely, reflecting the work they are doing rather than the tools they are using. Often, tools and structures are provided to help guide how people work, but those tools and structures can quickly become out-of-date, or they might not truly reflect the work that group is trying to accomplish. For example, imagine that you are working with a few colleagues to create a customer service program. There might be formal guidelines on such programs, but they might not cover all the areas you need to consider. As you work with your team to identify the issues you need to address, you uncover new aspects of the program you will need to accommodate. This type of collaborative work often gets accomplished using many emails with several versions of attachments and CC lists that might not include all the right people. Rather than trying to organize tasks like these in email, activities integrate with your email and other everyday tools to provide an area that truly reflects what you are trying to accomplish.
One of the main benefits of using activities to get your work done is that when you have completed a task, you can use it over and over again and share it with others to reuse. You can even create reusable starting points. These are referred to as templates, and you can start a new activity from a template and modify it as you see fit as you go along in your work. For example, let’s say in your role you frequently plan client meetings. Perhaps there is a set of tasks that you do for every meeting: invite the customer, request meeting space, build a presentation, and more. You can track these different actions in a template and create a new activity for every customer meeting, bringing into that activity the presentation outline you suggested, the database for meeting space, and a sample invitation for a customer.
You can see an overview of your current activities, recent posts within them, and to-dos across all your activities from the Activity Dashboard (see Figure 6.16) The dashboard provides a list of your most recently updated activities, who updated them, and when they were updated. For each activity, when you click on the text More, you can view the activity’s description and prioritize it as high, medium, normal, or tuned out, which removes it from your main dashboard page. You can also sort this list based on recently updated activities or by the date the activity is due.

On the left of the dashboard are the Start an Activity button and the main filters you can use to view activities. Completed Activities shows activities you have worked on in the past that were marked complete. Tuned Out Activities are those you might have been added to that you no longer want to see in your main list. Trash contains activities that you have marked for deletion. Below that section is the prioritized activities section, which allows you to show only your high- or medium-priority activities. If there are public activities, those will appear here along with another filter option. Public activities are activities in which the membership list is not limited to a specific group but rather is open for anyone to participate in. Other filtering options include tags and people. Since every activity can be tagged, you can use the tags to filter your activity view. You can also pick a person in the people list and view the activities you have in common.
On the right-hand column of the dashboard, you will see a running list of recent posts to your activities, links to access them, and the names of people who updated them with the date and time the update was made.
There is a To Do List tab at the top of the dashboard that shows you a list of the to-dos that have been assigned to you or created by you across all your activities. They will also show you the dates the to-do is due, and if it is overdue, the date will appear in red. This snapshot of to-dos can also be added to your Lotus Notes 8.5 calendar using the Activities calendar overlay so that you can view when your to-dos are due.
The last tab available is the Templates tab, which lists all the templates available in your organization. You can create a new template from this view, mark a template as a favorite, and filter the template list based on favorites, tags, and people.
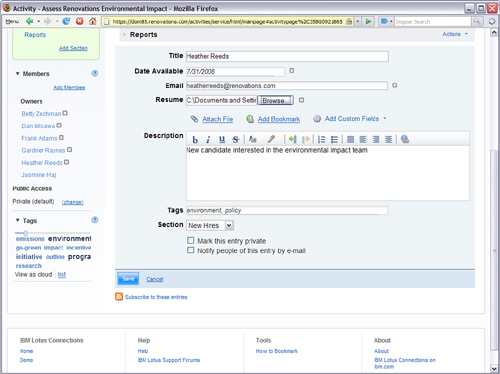
Inside an activity, you can add information to share with members of the activity. You can either create a list of information or organize the information into sections. In Figure 6.17, you see the main content sections of the activity. You can expand or contract each section and add or remove new sections, if you are an owner of the activity, by clicking the Add Section button. Within the sections are lists of content that is being shared. Content can be as simple as a title and description of information or it can be highly complex. You can also add in emails and instant messages to activities, files, links, or to-dos.

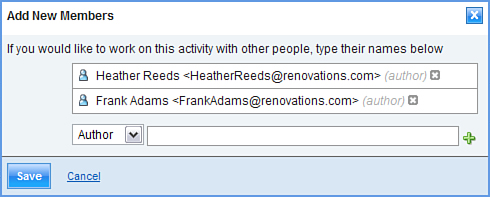
On the left-hand side of an activity, you can see the different views of an activity, including recent updates, the to-do list, trash, and sections. You can view members and add new members into the owner, author, or reader view, as shown in Figure 6.18. You can also change the activity from private to public access. Finally, you can filter the activity based on tags used to describe content in the activity.
By default, when you add a new entry to an activity, you are asked to provide a title, a description, and tags, and assign a section for the entry. You can add more than the default fields ask for and even change the names of the fields. You can add a date field, which will allow you to select a date from a calendar. You can add a person field, which will allow you to select people from the company directory and show their profile business card when their names are hovered over. You can also add a plain text field and allow the value to be anything, shown in Figure 6.19 as email. Additionally, you add in files of any type and bookmarks. If you would like to change the name of a field, you can simply click on the field and change the name. After you have added a set of fields that represent the item you are adding to the activity, you can add a rich text description, add tags to describe the entry, and choose a section for the entry to reside in. The last options allow you to make the entry private for you only, useful when you are drafting entries, and notify other people of the entry by email, selecting members of the activity you want to notify. When you click Save, this will add the new entry type to the activity. At any time, you can edit your entry by clicking the plus sign next to the entry in the activity view and clicking Edit.
For every entry, you can add comments, to-dos, and more. For entries whose format you want to reuse, you can save the entry as an entry template, giving the entry type a name and an icon to associate to it. When you do that, the new entry type is added to the Add Entry button drop-down list.
You can also add emails, instant messages, and to-dos to an activity. Emails can be added from Lotus Notes and Microsoft Outlook using plug-ins to the email clients. The Notes plug-in allows you to drag and drop email into the Activities sidebar, which also gives you full access to your activities and actions associated to your activities. You can read more about this plug-in from the last section of this chapter, “Using Lotus Connections from Your Everyday Tools.” In Microsoft Outlook, you can simply select an email and add that to an activity, selecting the activity you want to add it to.
Lotus Sametime chats can be added to activities as well. With the plug-in for Lotus Sametime, when you open a chat with someone, you will have additional options to add a chat to an activity, create a new activity to add the chat to, or find activities you and the person chatting have in common. Broadcast chats using Lotus Sametime Advanced can also be added to an activity.
You can add to-dos to an activity by clicking the Add To Do Item button next to the Add Entry button. You can also add to-dos as children of entries by clicking on an entry and adding the to-do item.
Although you can add files to your activities, through integration with Lotus Quickr, you can choose to store your files in a Quickr library instead of within Activities. This integration allows you to develop your content within an activity and then easily publish the results to a Quickr Library.
You can prioritize an activity from the dashboard (as shown earlier) or inside the activity. Inside an activity, you will see two buttons in the upper-right corner of the activity depending on your access rights (see Figure 6.20). One button allows you to mark an activity complete. This button appears only if you are the owner of the activity. The other button, titled More Actions, allows you to set the priority on the activity, tune it out, copy the entire activity to a new activity where you are the owner and can add members, copy the activity as a new template to be shared within the organization, and edit entry templates. If you are the owner of the activity, you also can add related activities so that they are quickly accessible from the activity. This will not synchronize membership, so members of one activity might not have access to another activity.

As mentioned earlier, you can access your organization’s list of activity templates from your activity dashboard. Each template can include everything an activity can contain—custom entries, files, URLs, people, messages, chats, emails, to-dos. When saved as a template, this information becomes available to whoever wants to borrow from the template. Figure 6.21 is an example of an activity template.

In Figure 6.21, we see a template for planning a customer briefing. Clicking the button below the title will start a new activity with this template as the framework. As the owner, you can add and remove sections and entries in the activity as needed. You can create templates from scratch or you can create them from an existing activity.
Dogear is the name of the Lotus Connections social bookmarking service. Social bookmarks allow you to store and manage all your bookmarks in one location, whether they are Internet or intranet bookmarks. By saving all your bookmarks to Dogear, you have one place to go to view all your bookmarks, and you can put as many tags on them as you would like to help you more easily retrieve them later. When you save a bookmark to Dogear, you can choose to make it public or private. If you make it public, others can see what bookmarks you find most useful. As a whole, we can better understand what people within our companies find most useful, sites that are read most widely, and topic areas that are currently most popular. Since social bookmarks are used for intranet sites as well, they can also be used to help aide intranet search results, showing the most frequently bookmarked sites associated to searches in your company.
You can post a bookmark to Dogear, communities, activities, and even your blog from a website while browsing. Under the tools section of Lotus Connections (found at the bottom of every Lotus Connections page), you will see a How to Bookmark link. This link takes you to a page where you can install the bookmarklet for the browser you use. This bookmarklet lets you add a button to your browser to simply add the current page to Lotus Connections. When you click the button, the New Bookmark form (see Figure 6.22) appears.
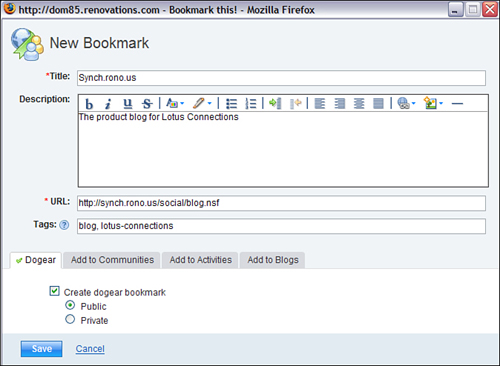
The new bookmark form provides a title and URL for you based on the page you are bookmarking. It might add a description as well if one is available for that page. You can add tags to the bookmark, and you will see suggested tags and the most used tags from the tags in your organization already. You can also choose whether you want the bookmark to be public or private. If you do not want to add the bookmark to Dogear, simply deselect the Create Dogear Bookmark check box. You can add the bookmark to communities, activities, and blogs instead of or in addition to Dogear. The form is customized based on the communities and activities you have access to, as well as whether you have a blog. If you do have a blog, you can add the URL and a new blog entry right from the form.
You can view the bookmarks most recently added to Dogear in the All Bookmarks view (see Figure 6.23). Alternatively, you can sort this view by popularity by clicking the Popularity link at the top of the list. Each bookmark shows who added it, the number of times it has been added to Dogear, the date it was last added, and the tags that were used to describe it the last time it was bookmarked. Clicking Show Details will allow you to copy a bookmark to your own, notify other people of a bookmark they might be interested in, add the bookmark directly to another Lotus Connections service, or flag the URL as broken. Besides the All Bookmarks view, you can also view popular bookmarks or just your own bookmarks (including private ones).

On the right-hand side, you will see the most frequently visited bookmarks. On the left, you will see the tag cloud for Dogear, showing frequent bookmarks as larger and darker in color. As in all the services, you can use the tag slider to filter down the tag cloud to only the most frequently used tags. You can also see the most active Dogear users and filter based on their bookmarks. When you filter based on a tag, person, or combination, you will see related tags and people that are contextual to the list you are currently viewing. For example, if we were looking at Heather’s bookmarks tagged with “software,” we would see additional tags and people related to those terms.
If you want to follow a particular person or tag, you can add them to your watchlist and receive notifications when new bookmarks are added. For example, if you like Heather’s bookmarks, you can watchlist her. If you like only her bookmarks tagged with software, you can add that combination to your watchlist. If you want to get updates on all bookmarks tagged with software, you can add that tag to your watchlist. To add a person or tag to your watchlist, filter by the tag cloud or the person and click “Add to Watchlist” (see Figure 6.24). Now when you go to the My Updates view, all bookmarks you have watched will appear.
Also in the Updates view are notifications you have received or sent. For every bookmark you come across in Dogear, you can send a notification and a custom message to someone who you think would be interested in that link. All the notifications you have sent and received, while sent using email, are also stored here so that you can access them later.
From the My Bookmarks list, you can manage your bookmarks. For example, you can select a set of your bookmarks and add tags, replace tags, or delete the bookmarks. You can take group actions such as making a set of bookmarks public or private (see Figure 6.25).
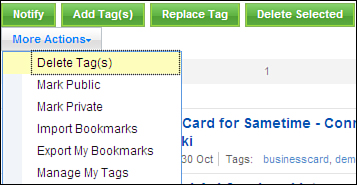
You can import bookmarks from your browser as well. To do so, go to your browser; select File, Export Bookmarks; and specify a filename. You can then import the bookmarks using this option, choosing all bookmarks or a selection, and adding tags to them. You can also export bookmarks, specifying public, private, intranet, or Internet bookmarks to export. Finally, you can manage your tags by searching and replacing tags from here or deleting a specific tag.
Blogs allow you to engage in conversations with people no matter what department they are in, where they are located, or what they work on. It is a great way to get people to discuss topics that matter to them and engage the community for feedback. You can author a blog independently or with other people and customize your blog using themes. Blog entries and comments can be rated to surface the most recommended content (see Figure 6.26).

The Browse Blogs home page (shown in Figure 6.26) allows you to view the most recent blog entries posted and sort them based on date, title, number of recommendations, number of comments, or number of visits. For each entry listed, you will see the author, the date the entry was posted, the number of comments and visit, and the number of recommendations.
On the left-hand side, you will see filters that show the latest blog entries, all entries in alphabetical order, and blog entries you have recommended. You will also be able to subscribe to entries and comments from here, in your favorite feed reader or by adding them directly into a community feed. You can also navigate the blogs based on tags used to describe the content, filtering the list based on the tag you select.
On the right-hand side, you can view featured blog entries, which are selected based on how much activity they have through visits, comments, and recommendations. You will also see the lists of most recommended, most commented, and most visited entries. All of these help you identify which blog entries you might want to read based on what other people are finding interesting.
From the blog home page, you will see buttons that allow you to create a new blog or a new entry. To create a blog, click the Start a Blog button. You will be asked to provide a title and description for your blog.
You also can manage other settings for your blog. You can add authors to your blog, change the theme by selecting from a list of available themes, moderate comments, or add your own customizations to your blog.
In addition to managing blog settings, you can also manage blog entries. At any time, you can edit previously posted blog entries, change tags or text, edit or delete comments, and manage files you have uploaded for use in the blog.
From the blog home page, you can create a new entry by clicking the New Entry button. You can create new entries using the rich text editor in blogs, which allows you to add images, add links, and format text. You can also upload files from your blog such as images or documents to make those available to readers. To create a comment, simply select an entry and add a comment (see Figure 6.27). You can also add rich text to your comments.
You can rate blog entries simply by clicking the green plus sign next to the star on the entry in the entry view. You can also rate comments in the same manner. If you are not logged in or have already rated an item, the green plus sign will disappear. Hovering over the star will show a list of who has rated the item.
Under More Actions, you can notify the administrator if the content being shared in the blog entry is inappropriate. This will allow the administrator to take the proper actions if indeed the content should be removed.
The Home Page is the area in Lotus Connections that brings together all its components and features, allowing you to stay on top of your network, keep abreast of updates to your interest areas, and search throughout all the services. In the Home Page, information that is specific to you appears, enabling you to skim over the recent updates to Lotus Connections and preview information.
The Home Page (shown in Figure 6.28) is based on a set of customizable widgets. To add a widget onto your Home Page, simply drag the widget from the right-hand palette and drop it into the location you desire. Lotus Connections comes with a default widget for every service, and additional widgets can be added by administrators to custom applications or popular Internet widgets and gadgets. Each widget provides an overview of information from the service it is showing, as well as a few actions. You can remove a widget by clicking the × icon in the upper-right corner of the widget. Other icons there allow you to refresh the widget, move it, get help, or modify settings. (For more on widgets, consult Chapter 10, “Plug-ins and Widgets.”)
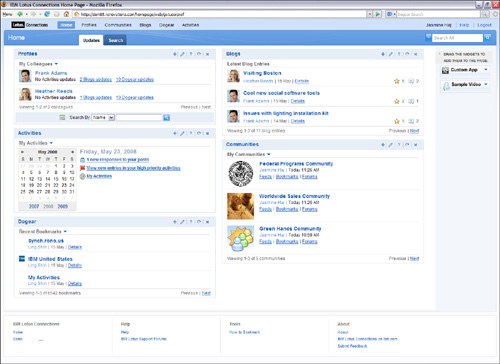
The Profiles widget gives you two options for what to display in the widget. You can show your own profile, which will show your business card and photo. You can also show your colleagues (as displayed in Figure 6.28), giving you quick access to their most recently updated Lotus Connections information. For example, if you select Heather’s blog updates in Figure 6.28, you will see a pop-up preview of the blog entry. You can also do quick searches in Profiles on names or tags from this widget, and the results appear right inside the widget. Clicking the settings (pencil) icon in this widget will enable you to choose how many colleagues to show by default in your colleagues view and how many search results to display.
The Communities widget shows you a list of recently updated communities, either from all public communities or from your list of communities. You can use the drop-down arrow to toggle. If you want to view the recent postings, click on the Feeds, Bookmarks, or Forum links to see the latest entries. The settings for this widget allow you to select the number of communities you want to appear in your list.
The Blogs widget shows you the most recent blog entries posted along with the number of ratings and comments. Clicking on details will show you the blog entry, tags, and rich text. Settings will allow you to select the number of blog entries to show.
The Dogear widget allows you to toggle between most recent bookmarks, your bookmarks, your watchlist, or the most popular bookmarks, showing the poster and date for each. Details will show you who else has posted the bookmark. Settings will allow you to select the number of bookmarks to show.
The Activities widget shows a calendar, highlighting any dates you have to-dos due. If you click a date, you will see the to-do item appear as a pop-up. You will also see the number of responses to your postings, new entries in your high-priority activities, and a list of all your activities, allowing you to navigate to specific activities. The Settings option allows you to select how many of your activities to display in recent entries, all the way from yesterday to last month, as well as the number of public activities to show.
Global search allows you to search across Lotus Connections, in addition to the individual searches each application provides. Global search is available from the Home Page in the Search tab (see Figure 6.29).

With global search, you can search on a keyword and select all or some of the Lotus Connections applications you want to search. The results appear in an aggregated view. You can filter the list of search results based on the content types that the search yielded (bookmarks, activities, and so on). You can also view what type of information the results contain, based on the icon showing whether it is a bookmark, an activity, a community, or something else.
The search results also provide a tag cloud to show related tags from across Lotus Connections. The tag cloud allows you to filter the list as well, scoping to a finite set of results. In addition, the most active people are listed, showing you potential experts to whom you can reach out, based on the information you are looking for.
Although Lotus Connections provides a rich web experience, you can access and use the services of Lotus Connections from your everyday tools. By providing many access points to Lotus Connections, you can work with social software where you want to and help promote adoption.
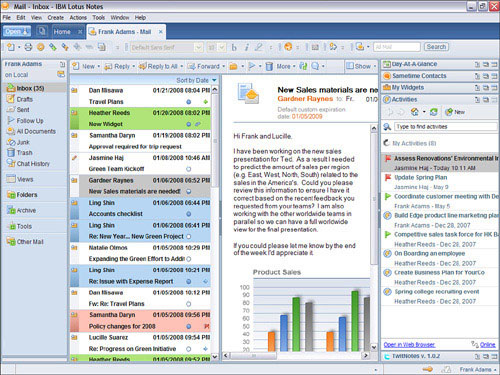
You can use Lotus Connections within your Lotus Notes email client. With the Activities sidebar in Lotus Notes 8 and later, you can drag and drop emails directly into an activity (see Figure 6.30). You can view all your activities, add new entries to them, add to-dos, and comment on entries all from the sidebar. You can prioritize activities as well. A major feature for Notes 8.5 and higher is that you can take your Activities offline, accessing even the uploaded files offline.
For earlier versions of Lotus Notes, you can install the Lotus Notes toolbar extension. This allows you to add emails to an activity by highlighting the email and clicking the Add to Activity button in the toolbar.
You can also add Notes documents and databases to Dogear and look up profiles in Notes using the toolbar extension.
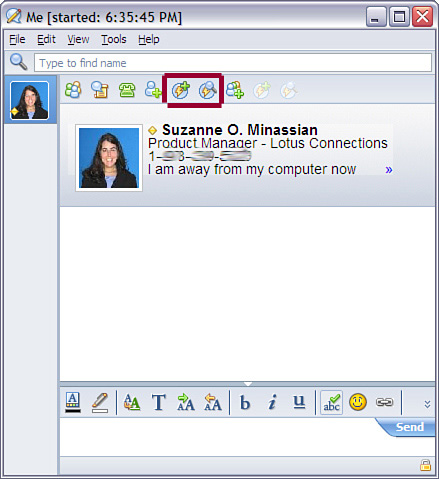
Often, critical information gets shared in chats. With the Lotus Connections plug-in for Lotus Sametime, you can save chats to your activities, enabling others to use the information you have shared in a chat. When you install the plug-in, you will see an icon at the top of your chats that will allow you to save your chat to an activity, depicted as a thunderbolt with a plus sign.
Selecting that icon will allow you to add the chat to your existing activities or create a new activity. When it is added to Lotus Connections, the Sametime chat dialog icon is used to depict that the entry in the activity was originally a chat (see Figure 6.31).
You can also start and add Broadcast Chats from Lotus Sametime Advanced in Lotus Connections communities. To add a chat, simply click the communities icon in the chat window, shown as three-person icons with a green plus sign, and select the community you want to save the chat to. This adds the chat to the discussion forum as a new topic.
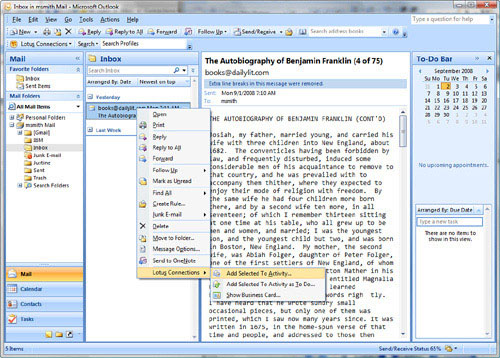
You can also access Lotus Connections from Microsoft Outlook (see Figure 6.32). After installing the plug-in for Outlook, you can select emails and add them to an activity, add them as an activity to-do, or show the business card for a selected person, provided they are listed in Lotus Connections.
A plug-in is available for Microsoft Office that allows you to work with Lotus Connections from Microsoft Word, Excel, and PowerPoint (see Figure 6.33).

After installing the plug-in, you will see a new toolbar in Word, Excel, and PowerPoint. In Word, you will have the option of adding the document you are working on into an activity. You can also select a list of text in the document and add the list as a series of to-do items in an activity, in which each line of text would be created as a new to-do. You can also add the document as a new blog entry or highlight a name to search profiles. If you are in Excel or PowerPoint, you will not be able to add the document to your blog or create a to-do list.
From Windows Explorer, you can right-click a file and add it to activities.
Lotus Connections provides a rich set of social software capabilities. From user profiles to powerful communities to sharing bookmarks, feeds, blog entries, and more, Lotus Connections is a well-rounded set of social and collaboration tools. It is based on the principles of being open, allowing it to integrate with third-party tools or homegrown applications. Lotus Connections provides a rich user experience, but it does not limit you to a single experience. With Lotus Connections, you can access social data when and where you need it.