Lotus Connections provides many different interfaces for administration, each with its own unique characteristics. An administrator can (and sometimes needs to) use a different interface depending on the purpose. For example, an administrator might use the WebSphere administrative console to modify security role mappings but could not use it to manage the Home Page search. The search would need to be managed through the wsadmin scripts and the Home Page configuration file.
This chapter discusses the different interfaces available to the Lotus Connections 2.0 administrator, and when each should be used. It also discusses some common administration tasks, including customizing the look and feel of Lotus Connections, collecting statistics, and troubleshooting Lotus Connections issues.
The main interfaces for administration available in Lotus Connections are web, command line, and configuration file. The web-based interfaces include the WebSphere, Blogs, and Home Page administration consoles. The main advantages of using the web-based consoles are their intuitive interfaces and wide level of access. Accessing the command-line interface, via wsadmin scripts, allows you to automate repetitive tasks. The web-based console requires only valid credentials. Also, configuring WAS (WebSphere Application Server) is faster and easier through the web administrative console than through any other means because most of the configurable parameters are available in one place.
The command-line interface, as opposed to the other interfaces, is the best way for administrators to programmatically configure Lotus Connections. This allows you to update key pieces of information, such as external unique identifiers for the features, as well as to manage Lotus Connections tasks, such as the Home Page search. For example, to force an index creation for Home Page global search, you have to utilize the command-line interface.
The final interface is through the modification of feature-specific configuration files. These XML-based files are located on the WAS servers and are used to control some of the key functionality for Lotus Connections features. Some functionality for the different features can be set only through updating these configuration files.
To carry out certain tasks, such as modifying the look and feel of Lotus Connections or collecting statistics, an administrator has to know which interface will work best for his or her needs. For collecting statistics, the wsadmin script commands can be used locally to capture the metrics and store them for analysis, whereas the web is better for quickly reviewing the information from a browser. Even modifying the UI could require a change to the configuration files, such as updating the layout of the fields in a profile.
The web interface is one many administrators will utilize due to its ease of use. This category includes the WebSphere, Blogs, and Home Page administration consoles. The WAS administration console is one of the most utilized of all three because it allows the configuration of key parameters, such as security role mappings, tracing activation, and SSL certificate management, all from one interface. This console is heavily utilized during the installation and configuration of Lotus Connections, and therefore in the administration and maintenance as well.
The Blogs and Home Page administration consoles are feature-specific user interfaces. Access to these consoles can be used to monitor inappropriate content, modify feature-wide settings, and customize the feature for users.
The WAS administrative console can be used to carry out several important administrative tasks, such as Lotus Connections feature role manager, enabling tracing, and JVM management. Some of the most important ones are discussed here.
Each Lotus Connections feature has predefined roles that can (and in some cases must) be utilized to configure security. Each role can be mapped to certain users and/or groups in the LDAP configured in the federated repositories. Also, each role can be mapped to the Everyone or All Authenticated settings:
Everyone will allow anyone to access the resource protected by the role; that is, there is no security.
All Authenticated will force the users specified in the role to authenticate before accessing the resource protected by the role.
The Lotus Connections features utilize these roles in different ways, and the behavior is different among all six services. All six Lotus Connections features also allow the configuration of the following four roles:
Person is used to provide authentication for the feature for every user. By default, this is set to All Authenticated. If desired, this role can be mapped to certain users/groups to restrict access to the feature.
Everyone is set to Everyone and should not be changed. This is used internally by Lotus Connections for mapping to all users.
Reader is used to allow read access to the feature, but not the ability to modify or add content. By default, this is set to Everyone for Blogs, Dogear, Communities, and Profiles to allow anonymous access. If this role is set to All Authenticated, it will prevent anonymous access and force all users to log in to the feature, as is the case for Activities and Home Page.
Search-admin is utilized by the Home Page global search feature to aggregate all Lotus Connections data (both secured and unsecured). This data is then indexed and accessible via the Home Page search functionality. The user account specified here is used to aggregate the data from the specific feature. This role is not available for the Home Page feature. Never set this role to Everyone or All Authenticated, because that would allow those users to access all data for the specific feature.
Two of the features (Home Page and Blogs) also have the Admin role. This role provides access to feature-specific administration functionality. For Blogs, the user/group mapped to this role will have access to the Blogs administrator interface. For Home Page, the user will have access to the Home Page administrator interface. Communities and Profiles also have this role, but currently do not utilize it. Figure 7.1 illustrates how security roles map to users and groups.

The Home Page administrative console provides functionality to configure the widgets available to all users. This includes adding, removing, and editing widgets. For example, if the administrator wanted to hide the Activities widget, he or she would disable the widget from this console. Figure 7.2 shows the information that can be edited for the existing Communities widget. Most of the information is grayed out because this is an out-of-the box widget. When a new widget is being added, however, the same dialog would be displayed with all fields editable. Note that in order to have access to this console, the user(s) must be added manually to the Administrator role as described previously.

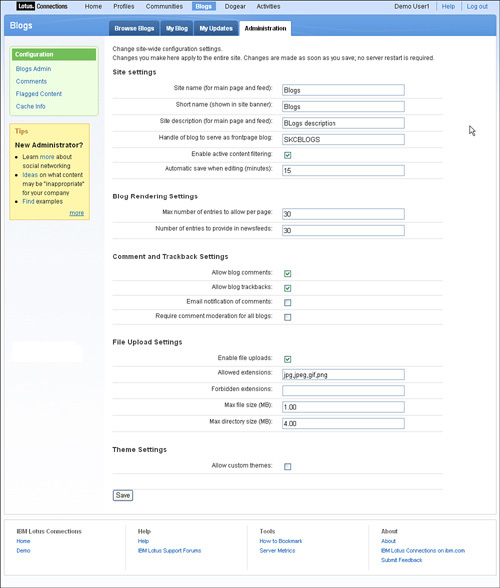
The Blogs administrative console provides the only functionality to administer Blogs settings as well as individual users’ blogs, because there are no equivalent commands via wsadmin scripts. The Blogs administrator will rely on this to monitor the content in users’ blogs. As Figure 7.3 shows, the landing page for the administrative console presents options for managing global Blogs properties. These include limiting the number of entries to display per page and the maximum file size of uploaded attachments. The administrator also has the option to modify any specific user’s blog, including modifying specific entries, comments, and so on. Through this console, an administrator can also handle flagged content by deleting or editing the content directly.
The model behind the JMX administrative utilities has two main components: configuration files and administrative commands. Modification of the configuration file allows changes in the behavior of specific features, such as disabling features. These changes usually require a restart of the specific feature for the changes to be picked up. Administrative commands, however, usually have instantaneous effects on the behavior of the features, such as the commands used to update external IDs for members of features, like Activities. These commands are also used to assist in the editing of some configuration file properties. As this section illustrates, these two components are not mutually exclusive, but in fact complement each other. Knowing both aspects and the functionality available in each is key to effectively administrating a Lotus Connections infrastructure.
This administration interface is command-line based and allows administrators to programmatically alter the behavior of Lotus Connections. At the heart are commands made available via Jython scripts. These scripts are executed in the wsadmin client, a command-line utility for executing scripts on WebSphere. The real power of this interface is the capability to easily incorporate the exposed commands into existing administration scripts and batch files. Also, the JMX scripts provide the only way to carry out some actions, such as forcing the indexing for Home Page search, syncing member lists with LDAP, and even validating configuration files. To correctly take advantage of the wsadmin scripts, the administrator should have cursory knowledge of programming and the wsadmin client. One point to note is that wsadmin provides support for JACL, but Lotus Connections does not provide script support for it.
To launch the wsadmin client, execute the following steps:
Launch a command prompt and navigate to your WAS bin directory.
For a standard deployment, use this:
<WAS_HOME>/profiles/<profile_name>/bin
For a network deployment, use this:
<WAS_HOME>/profiles/<DMGR>/bin
To launch the wsadmin client, run the command
wsadmin -lang jython -user <admin_id> -password <admin_password>
-port <SOAP_connector_port>
where
<admin_id>is the WAS admin id used to administer the server.<admin_password>is the WAS admin id password.<SOAP_connector_port>is the WAS SOAP port.
Each Lotus Connections feature (except Blogs) has its own XML-based configuration file on the WAS servers. This file contains editable parameters that directly affect the behavior of the feature. Some of the editable parameters include modifying the Home Page search indexing schedule, the Profile fields’ layout, and even the proxy information for Communities.
Five Lotus Connections features have a corresponding configuration file. This file contains basic parameters used to customize the behavior of the feature and is stored in XML format. As such, administrators should exercise caution when modifying these files as invalid syntax can lead to the feature failing to start, or other adverse effects. It is recommended instead to use the provided Jython scripts that contain functions used to modify the various parameters stored in each file. When working through the wsadmin and these scripts, the configuration file is validated as being well formed before saving, preventing any issues with malformed XML. This is done through a process in which the administrator has to check out/check in the configuration file. These scripts, with a .py extension, as well as their corresponding configuration files, are noted here:
Activities—.
activitiesAdmin.py(oa-config.xml)Blogs—. Does not have a configuration file; all config parameters are stored in the database
Profiles—.
profilesAdmin.py(profiles-config.xml)Communities—.
communitiesAdmin.py(communities-config.xml)Home Page—.
homepageAdmin.py(homepage-config.xml)Dogear—.
dogearAdmin.py(dogear-config-cell.xml)Lotus Connections Configuration—.
connectionsConfig.py(LotusConnections-config.xml)
The last file listed contains some configuration parameters that apply to all six services. For a standalone deployment, they can be found at:
<WAS_HOME>profiles<profile_name>configcells<cell_name>Lotus
Connections-config
and for a network deployment, they can be found at:
<WAS_HOME>profiles<DMGR>configcells<cell_name>
LotusConnections-config
To view/modify a configuration file, you have to check it out, as described in the following steps. First, you have to launch the feature-specific administration script, which will give you access to the functions for viewing/editing the configuration file. After the command for checking out the file is executed, a request is made via the Web to pull down the configuration file(s). For some features, such as Activities, checking out the configuration file will also pull down additional files, such as oa-jobs.xml. Here are the steps to take:
Launch the wsadmin client.
Use the following command to execute the script for the feature you want to configure.
For a standalone deployment, use this:
execfile("<feature_config_file_name>")For a network deployment, you have to specify the node to access the script on:
execfile("<WAS_HOME>/profiles/<DMGR>/config/bin_lc_admin/
 <feature_config_file_name>")
In a network deployment, you will be asked to select the server to connect to. After selecting the server (or executing the command in a standalone deployment), you should see a message indicating that the script has been successfully loaded. The choice of server is important because you want to take utilization into account. If Blogs is running on three servers (server1, server2, server3), the admin can decide which server to select based on load, hardware constraints, and so on. The following example shows the execution of the script.
wsadmin>execfile("activitiesAdmin.py")
Connecting to
WebSphere:name=ActivityService,cell=win2003eeNode01Cell,nod
e=win2003eeNode01,process=Activities
Activities Administration initialized
Now we are ready to check out the configuration file using the following command:
<service_name>.checkOutConfig(<working_directory>,
 <cell_name>, <node_name>)
In this command,
<service_name>is the service corresponding to the specific feature we are working with. These are the different values:<working_directory>is the directory where the XML and XSD files for the feature are copied and stored while being edited.<cell_name>is the cell name where the Lotus Connections feature is installed.<node_name>is the node name where the Lotus Connections feature is installed. This is used only for the Dogear feature.
Here is a sample command for checking out the Dogear configuration file. Note that we use “\” to escape the “” and all three values are enclosed in quotes.
  DogearNodeConfig.checkOutConfig("C:\temp",
  "win2003eeNode01Cell", "win2003eeNode01")
After you are done modifying the file, you have to check it in for the changes to take effect. Use the following command to check in the configuration file. Note that the checkout does not reserve the file, so if the changes need to be discarded, simply do not check in the file.
<service_name>.checkInConfig()The script will validate the XML and display a message when successful:
wsadmin>ActivitiesConfigService.checkInConfig()
Using configuration arguments :
        workingDirectory: C:	emp
        cellName: win2003eeNode01Cell
        nodeName: None
        serverName: None
Loading schema file for validation: /C:/temp/oa-config.xsd
C:	emp/oa-config.xml is valid
Loading schema file for validation:
/C:/temp/job_scheduling_data_1_5.xsd
C:	emp/oa-jobs.xml is valid
Activities configuration files successfully checked inThe common Lotus Connections properties are accessible via the connectionsConfig.py script. Check out the configuration files using the steps in the section “Checking Out/Checking In Configuration Files.” To view the current configuration, execute the following command. This will dump out the current values of all Lotus Connections attributes stored in this configuration file.
LCConfigService.showConfig()
To update a specific attribute, use the command
LCConfigService.updateConfig(<attribute_name>,<value>)
where <attribute_name> and <value> are replaced with the valid attribute name and corresponding value. So a sample execution of this command could be the following, which disables the Activities feature:
LCConfigService.updateConfig("activities.enabled","false")Table 7.1 shows the attributes that are editable via the connectionsConfig.py script. Notice that not all entries can be updated via the config scripts.
Table 7.1. Attributes Editable via connectionsConfig.py
Attribute | Description |
|---|---|
| Web address from which to access the Activities feature over HTTP. |
| Specifies whether the ability to access the Activities feature over HTTP is enabled. The property accepts a Boolean value; the options are |
| Web address from which to access the Activities feature over secure HTTP (HTTPS). |
| Specifies whether the ability to access the Activities feature over secure HTTP is enabled. The property accepts a Boolean value; the options are |
| Web address from which to access the Blogs feature over HTTP. |
| Specifies whether the ability to access the Blogs feature over HTTP is enabled. The property accepts a Boolean value; the options are |
| Web address from which to access the Blogs feature over secure HTTP (HTTPS). |
| Specifies whether the ability to access the Blogs feature over secure HTTP is enabled. The property accepts a Boolean value; the options are |
| Web address from which to access the Communities feature over HTTP. |
| Specifies whether the ability to access the Communities feature over HTTP is enabled. The property accepts a Boolean value; the options are |
| Web address from which to access the Communities feature over secure HTTP (HTTPS). |
| Specifies whether the ability to access the Communities feature over secure HTTP is enabled. The property accepts a Boolean value; the options are |
Web address from which to access the Dogear feature over HTTP. | |
| Specifies whether the ability to access the Dogear feature over HTTP is enabled. The property accepts a Boolean value; the options are |
| Web address from which to access the Dogear feature over secure HTTP (HTTPS). |
| Specifies whether the ability to access the Dogear feature over secure HTTP is enabled. The property accepts a Boolean value; the options are |
| Web address from which to access the Home Page feature over HTTP. |
| Specifies whether the ability to access the Home Page feature over HTTP is enabled. The property accepts a Boolean value; the options are |
| Web address from which to access the Home Page feature over secure HTTP (HTTPS). |
| Specifies whether the ability to access the Home Page feature over secure HTTP is enabled. The property accepts a Boolean value; the options are |
| Web address from which to access the business card service over HTTP. |
| Specifies whether the ability to access the business card over HTTP is enabled. The property accepts a Boolean value; the options are |
| Web address from which to access the business card service over secure HTTP (HTTPS). |
| Specifies whether the ability to access the business card over secure HTTP is enabled. The property accepts a Boolean value; the options are |
| Web address from which to access the Profiles feature over HTTP. |
| Specifies whether the ability to access the Profiles feature over HTTP is enabled. The property accepts a Boolean value; the options are |
Web address from which to access the Profiles feature over secure HTTP (HTTPS). | |
| Specifies whether the ability to access the Profiles feature over secure HTTP is enabled. The property accepts a Boolean value; the options are |
| Web address from which the Sametime Links resources, which support the display of presence awareness information in Lotus Connections, can be accessed over HTTP. |
| Specifies whether the ability to connect to the Sametime Links resources over HTTP is enabled. The property accepts a Boolean value; the options are |
| Web address from which the Sametime Links resources, which support the display of presence awareness information in Lotus Connections, can be accessed over secure HTTP (HTTPS). |
| Specifies whether the ability to connect to the Sametime Links resources over secure HTTP is enabled. The property accepts a Boolean value; the options are |
| Specifies whether the ability to access the Sametime Links resources anonymously is enabled. The property accepts a Boolean value; the options are |
| Specifies the content of the cache-control header of the navigation bar. The directives defined in RFC 2616 are supported. See the following external website for details: http://www.w3.org/Protocols/rfc2616/rfc2616-sec14.html. The default value is These directives are defined as detailed here: For
|
| Web address of the cascading style sheet that is defining the formatting of the navigation bar. |
| Web address of the |
| Web address of the |
| Web address of the images directory in which the navigation bar images are stored. |
| Specifies whether other features can work with user groups defined by users of the Communities feature. Communities must be installed and Communities Membership Search must be enabled during the installation before you can set this property to |
| Web address from which to access the Communities directory service extension. Specify the web address using the syntax |
| Specifies whether other features can retrieve user and groups information from the Profiles feature instead of the LDAP server. Profiles must be installed and People Search must be enabled during the installation before you can set this property to |
| Web address from which to access the Profiles directory service extension. Specify the web address using the syntax |
This section discusses the Activities attributes and properties that are configurable through the Activities administration script. We will discuss some of the attributes in more detail in the sections that follow. To modify the properties, simply follow these steps:
Launch the Activities administration script via the wsadmin client.
Check out the Activities configuration files.
To view the configuration, enter this:
ActivitiesConfigService.showConfig()
To update an attribute, enter this:
ActivitiesConfigService.updateConfig(<attribute_name>,<value>)
Check in the Activities configuration files. Table 7.2 shows the editable attributes in the Activities configuration file.
Table 7.2. Editable Attributes in the Activities Configuration File
Description
activeContentFilter.enabledWhen this is enabled, it prevents the addition of active content (JavaScript, for example) in any text input field. This property accepts a Boolean value; the options are
trueandfalse. Note: Disabling this filter introduces vulnerability to cross-site scripting (XSS) and other types of malicious attacks.clusterScheduler.enabledWhen this is enabled, Activities scheduled tasks configured for the cluster scheduler will run. This property accepts a Boolean value; the options are
trueandfalse.jobs.30MinStats.schedulerDetermines the scheduler that runs the task which saves Activities’ statistics to disk every 30 minutes. This property accepts a String value; the options are
localandcluster.jobs.30MinStats.trigger.cronExpressionDetermines the frequency with which one of the two scheduled tasks that saves Activities’ statistics to disk runs. This property accepts a Chronological expression.
jobs.AutoComplete.autoCompletionPeriodDetermines the time period in days that an activity must be inactive before it is automatically completed. This property accepts an Integer value.
jobs.AutoComplete.prenotificationDetermines whether an activity owner is notified by email prior to an inactive activity being automatically completed. This property accepts a Boolean value; the options are
trueandfalse.jobs.AutoComplete.schedulerDetermines the scheduler that runs the task which automatically completes inactive activities. This property accepts a String value; the options are
localandcluster.jobs.AutoComplete.trigger.cronExpressionDetermines the frequency with which the task that automatically completes inactive activities runs. This property accepts a Chronological expression.
jobs.DailyStats.schedulerDetermines the scheduler that runs the task which saves Activities’ statistics to disk once a day. This property accepts a String value; the options are
localandcluster.jobs.DailyStats.trigger.cronExpressionDetermines the frequency with which one of the two scheduled tasks that saves Activities’ statistics to disk runs. This property accepts a Chronological expression.
jobs.DatabaseRuntimeStats.schedulerDetermines the scheduler that runs the task which periodically collects database statistics. This property accepts a String value; the options are
localandcluster.jobs.DatabaseRuntimeStats.trigger.cronExpressionDetermines the frequency with which the task that periodically collects database statistics runs. This property accepts a Chronological expression.
jobs.TrashAutoPurge.daysRetentionDetermines the number of days that data must have been deleted before being purged from the system. This property accepts an Integer value.
jobs.TrashAutoPurge.schedulerDetermines the scheduler that runs the task that purges Activities data from the system. This property accepts a String value; the options are
localandcluster.jobs.TrashAutoPurge.trigger.cronExpressionDetermines the frequency with which the task that purges Activities data from the system runs. This property accepts a Chronological expression.
localScheduler.enabledWhen this is enabled, scheduled tasks that are configured for the local scheduler run. This property accepts a Boolean value; the options are
trueandfalse.objectStore.idThis property cannot be modified by the Administrator using the
ActivitiesConfigService.updateConfigcommand. It is configured initially during installation, and its value is displayed using theActivitiesConfigService.showConfigcommand. This property displays a String value; the options arefilesystemanddomino.objectStore.maxConcurrentDownloadsDetermines the number of threads that are simultaneously dedicated to servicing file download requests in the Activities server. This property accepts an Integer value.
In many cases, administrators have to manage the growth of the number of activities in their Lotus Connections environment. If the growth is not monitored, this has the potential of wasting large amounts of disk space. Administrators can utilize the configuration attributes given previously, as well as some functions built into the Activities administration script, to help reclaim this disk space. To fully understand the use of the functions and attributes, we must look at the three phases an activity goes through.
In the beginning, when an activity is created, it is referred to as “active.” Users are accessing the activity regularly. After the activity is completed, the owner marks it “complete,” causing it to disappear from their dashboard and placing it in the Completed view. The activities will remain in this view until they are either deleted or reactivated. When deleted, the activity is placed into the Trash view. This indicates that it is ready to be permanently removed from the system by the scheduler or manually by the administrator.
This process works well if users are conscientious, but can fail otherwise. Administrators therefore have the ability to use the scheduler in auto-completing any activities that have been unused for a certain period and to even send an email to the owner before completing the activity. These attributes are located in Table 7.2 and have the syntax jobs.AutoComplete.*. The activities will then remain in the Completed view until the owner or administrator deletes them. When in the Trash view, the administrator can use the scheduler again to automatically purge (permanently remove) activities from the system. The scheduler can be configured to handle this through the attributes listed in Table 7.2 that have the syntax jobs.TrashAutoPurge.*.
Most of the attributes listed in Table 7.2 involve utilizing the Activities scheduler. For any task, auto-purge or auto-complete, the scheduler always needs two pieces of information:
The first piece of information is the type of scheduler to use for the task. This value can be
localorcluster. The local scheduler is better suited for use in standalone deployments. This will force the scheduler to run the task on the local server. For network deployments the cluster scheduler is a better option. This will allow the scheduler to determine which server is best suited to carry out the task in the cluster. Despite the misleading name, it is best to always use theclusteroption because it will work in both standalone and network deployments. The one instance usinglocalmakes more sense for the stats job, which you want to run on every server. Another option is to specify the specific server to run the task—for example,cell01 ode01server01.The second is the frequency of execution which defines how often the task will run. This is represented as a chronological expression, such as
0 15 10 L *. This expression indicates that the task will run at 10:15 AM on the last day of every month. This website provides more details on how this expression is formed: http://www.opensymphony.com/quartz/api/org/quartz/CronTrigger.html.
Modifications to the scheduler, such as through the attributes mentioned previously, cause changes in the file oa-jobs.xml. This file is located at:
<WAS_HOME>profiles<profile_name>configcells<cell_name>Lotus
Connections-configextern
The file oa-jobs.xml lists the available jobs. Following is a sample entry for the auto-complete job. As we can see from the XML shown next, the name of the job is ActivityAutoCompleteJob, it is assigned to the cluster scheduler, it will remove activities over 90 days old, and it will notify users before the activity is auto-completed.
<job-detail>
            <name>ActivityAutoCompleteJob</name>
            <group>OpenActivities</group>
            <description>Automatically mark unmodified activities
as completed</description>
            <job-
class>com.ibm.openactivities.jobs.AutoCompleteJob</job-class>
            <job-data-map allows-transient-data="true">
                <entry>
                    <key>AssignToScheduler</key>
                    <value>cluster</value>
                </entry>               <entry>
                    <!— Activities not modified in this many days
will be marked complete —>
                    <key>autoCompletionPeriod</key>
                    <value>90</value>
                </entry>               <entry>
                    <!— Disable email notifications of future
auto completions by setting this to false —>
                    <key>prenotification</key>
                    <value>true</value>
                </entry>            </job-data-map>
</job-detail>This section discusses the Communities attributes and properties that are configurable through the Communities administration script. A table of the editable attributes is presented in Table 7.3 and is accessible using the wsadmin client. To modify the file, follow these simple steps:
Launch the Communities administration script via the wsadmin client.
Check out the Communities configuration file.
To view the configuration, enter this:
CommunitiesConfigService.showConfig()
To update an attribute, enter this:
CommunitiesConfigService.updateConfig(<attribute_name>,<value>)
Check in the Communities configuration file. Table 7.3 shows the editable attributes in the Communities configuration file.
Table 7.3. Editable Attributes in the Communities Configuration File
Description | |
|---|---|
| When enabled, this property prevents the addition of active content (JavaScript) in any text input field. This property takes a Boolean value: |
| This property determines maximum size in characters of a community description. This property takes an Integer value. |
| This property enables indexing to occur. This property takes a Boolean value: |
| At startup, this property sets the time in minutes that Communities waits before starting to index. The default is |
| This property determines the time in minutes between index updates. The default value is |
| This property determines the maximum number of community members displayed on a member page. The default value is |
| This property determines the maximum number of updates displayed in the update panel. The default value is |
| This property determines the maximum number of communities displayed on a page. The default value is |
One of the most popular features of the Communities feature is the ability to pull feeds into a community. This allows members to bring internal and external information directly into the community. By default, however, Communities will not allow authenticated feeds, only unauthenticated, or anonymous, feeds. There are settings that can be modified, however, to make certain feed sources trusted, thereby allowing the feed to be added to a community. These sources can be other Lotus Connections services or even external feeds.
To make these feeds trusted, we need to edit proxy-config.xml. This file is located in:
<WAS_HOME>profiles<profile_name>configcells<cell_name>Lotus
Connections-config
To modify the prox-config.xml file, we actually have to use the LCConfigService, which is provided via the connectionsConfig.py administration script:
Launch the Lotus Connections administration script via the wsadmin client.
Check out the proxy configuration files using the following command:
LCConfigService.checkOutProxyConfig("C:\temp","win2003eeNode01
Cell")
The
prox-config.xmlfile is copied to the local directory. Make a backup in case you have to back out your changes.Initially, all URLs not matched will not be forwarded on to Communities. This statement at the bottom of the file results in the
GET,POST,PUT, andDELETEoperations being proxied to any URL (url="*") while not allowing the remote site to prompt for credentials (allowAuthRequest="false").<proxy:policy url="*" acf="none" allowAuthRequest="false"> <proxy:actions> <proxy:method>GET</proxy:method> <proxy:method>POST</proxy:method> <proxy:method>PUT</proxy:method> <proxy:method>DELETE</proxy:method> </proxy:actions> <proxy:cookies/> <proxy:headers/> </proxy:policy>Add in new proxy policies to allow your feed URLs to pass through to Communities. For example, the following change will allow the Dogear feeds to reach Communities. The
allowAuthRequest="true"is important because this allows the authorization requests to be returned to the user. Also, passing the JSESSIONID and four headers to the target server is important to make sure that the URLs matching the pattern are forwarded to the target server: Communities.<proxy:policy url="*/dogear/*" acf="none" allowAuthRequest="true"> <proxy:actions> <proxy:method>GET</proxy:method> <proxy:method>POST</proxy:method> <proxy:method>PUT</proxy:method> <proxy:method>DELETE</proxy:method> </proxy:actions> <proxy:cookies> <proxy:cookie>JSESSIONID</proxy:cookie> <proxy:cookie>LtpaToken</proxy:cookie> <proxy:cookie>LtpaToken2</proxy:cookie> </proxy:cookies> <proxy:headers> <proxy:header>User-Agent</proxy:header> <proxy:header>Accept*</proxy:header> <proxy:header>Content*</proxy:header> <proxy:header>Authorization*</proxy:header> </proxy:headers> </proxy:policy>Make sure that the new proxy URL patterns precede the URL pattern in step 4. This will prevent any untrusted URL from being forwarded.
Check in the Lotus Connections proxy configuration files:
LCConfigService.checkInProxyConfig("C:\temp","win2003eeNode01
Cell")
This section discusses the Profiles attributes and properties that are configurable through the Profiles administration script. A list of the editable attributes is presented in Table 7.4 and is accessible using the wsadmin client. To modify the properties, follow these steps:
Launch the Profiles administration script via the wsadmin client.
Check out the Profiles configuration file.
To view the configuration, enter this:
ProfilesConfigService.showConfig()
To update an attribute, enter this:
ProfilesConfigService.updateConfig(<attribute_name>,<value>)
Check in the Profiles configuration file. Table 7.4 shows the editable attributes in the Profiles configuration file.
Table 7.4. Editable Attributes in the Profiles Configuration File
Attribute
Description
activeContentFilter.enabledEnables/disables filtering for active content of text entered into the About Me and Background text input fields. This property takes a Boolean value:
trueorfalse. The value must be formatted in lowercase.Enables indexing to occur. When set to
false, indexer is disabled. This property takes a Boolean value:trueorfalse. The value must be formatted in lowercase.indexingTask.startDelayThe time in minutes that Profiles should wait after the Profiles feature starts to first index. By default, this property is set to
1minute. This property takes an Integer value.indexingTask.taskIntervalThe time in minutes between index update tasks. The default value is
720minutes (12 hours). This property takes an Integer value.organizationalStructure.enabledIndicates if the organizational structure information (report-to chain, and so on) should display. This property takes a Boolean value:
trueorfalse. The value must be formatted in lowercase.miniReportsToChainCache.enabledEnables or disables the mini reports-to chain cache. This property takes a Boolean value:
trueorfalse. The value must be formatted in lowercase.miniReportsToChainCache.sizeThe number of employee entries expected in the cache. Profiles uses this information to efficiently initialize and load the cache. This property takes an Integer value.
miniReportsToChainCache.refreshTimeHH:MM. Determines the time of day in 24-hour time format that Profiles should perform the first scheduled reload of the cache.
miniReportsToChainCache.refreshIntervalTime in minutes between cache reloads. This property takes an Integer value.
miniReportsToChainCache.startDelayTime in minutes that Profiles should wait after starting before loading the mini-cache for the first time. This property takes an Integer value.
fullReportsToChainCache.enabledEnables or disables the full reports-to chain cache. This property takes a Boolean value:
trueorfalse. The value must be formatted in lowercase.fullReportsToChainCache.ceouidUID. The corporate directory user ID of the person who displays at the top of the organizational structure.
fullReportsToChainCache.sizeThe number of employee entries that should be loaded into the cache. This property takes an Integer value.
fullReportsToChainCache.refreshTimeHH:MM. Determines the time of day in 24-hour time format that Profiles performs the first scheduled reloading of the cache.
fullReportsToChainCache.refreshIntervalTime in minutes between cache reload operations. This property takes an Integer value.
fullReportsToChainCache.startDelayTime in minutes that Profiles should wait after starting loading the cache for the first time. This property takes an Integer value.
search.maxRowsToReturnDetermines the maximum number of rows returned by a search operation. This property takes an Integer value.
search.pageSizeDetermines the number of returned rows to place on a results page. This property takes an Integer value.
search.firstNameSearchEnabledDetermines whether search by first name only is enabled. This property is disabled by default. Note: Enabling this setting negatively impacts the performance of the Search By, Name function available in the Profiles user interface. This property takes a Boolean value.
statistics.filePathPath of the statistics file. If this path is relative, it is assumed to be relative to the WebSphere Application Server profile. Absolute paths are also accepted. This property takes a String value.
statistics.fileNameName of the statistics file. This name is used as the base filename. The actual name of the saved file has the format
<statisticsFileName>_<timestamp>.log. This property takes a String value.
This section discusses updating the Home Page configuration file using the Home Page administration script. Specifically, it deals with creating tasks that are required for global search to function. This section focuses on utilizing administrative commands to make the changes to the configuration file. The commands can be bypassed, however, if the administrator decides to modify the file directly. This is completely acceptable because the check-in process will validate the file.
One of the most valuable features of Home Page is the ability to search data from the other five Lotus Connections features. This is accomplished by aggregating the various Lotus Connections features’ indexes and creating one central index where all the data can be searched. For the data to be collected, two important things have to happen:
Tasks need to be created to crawl the indexed data for the other features. These tasks are defined in the Home Page configuration file.
Each feature needs to have its index created and constantly updated to reflect the latest data.
To update the Home Page configuration file with the tasks, we can utilize the wsadmin client and the Home Page administration script:
Launch the Home Page administration script via the wsadmin client.
Check out the Home Page configuration file.
Apply updates using commands below.
Check in the Profiles configuration file.
The following commands will allow an administrator to create the necessary indexing tasks:
HomepageCellConfig.addTask(taskName, taskInterval, taskStartBy, connectionsServices)is used to create a new scheduled task to index the feature data. To define the task correctly, the function takes the name for the tasktaskNameand the Lotus Connections services this task will be run againstconnectionsServices.HomepageCellConfig.deleteTask(taskName)is used to delete a task specified bytaskName.HomepageCellConfig.listTasks()is used to list the tasks currently scheduled on the Home Page server.HomepageCellConfig.setSeedlistPageSize(pageSize)is used to set the seed list page size. This value determines the number of entries requested for each seed list request. The recommended value is500.
This section discusses the Dogear attributes and properties that are configurable through the Dogear administration script. A list of the editable attributes is presented in Table 7.5 and is accessible using the wsadmin client. To modify the properties, follow these steps:
Launch the Dogear administration script via the wsadmin client.
Check out the Dogear configuration file.
To view the configuration, enter this:
DogearCellConfig.showConfig()
To update an attribute, enter this:
DogearCellConfig.updateConfig(<attribute_name>,<value>)
Check in the Dogear configuration file. Table 7.5 shows the editable attributes in the Dogear configuration file.
Table 7.5. Editable Attributes in the Dogear Configuration File
Description
activeContentFilter.enabledEnables/disables the active content filter for the rich text descriptions on bookmarks. The default value is
trueand can be set tofalseif you don’t want to filter active content. Note: Disabling the active content filter is not recommended because it will allow end users to create rich text descriptions with malicious scripts that might be executed when other users visit Dogear.linkThresholds.sinceWhen.popularLinksDetermines the age (in days) a link may be to get included in the popular link algorithm. This value is used in conjunction with the other popular link settings to determine what bookmarks are included on the Popular bookmarks tab. Smaller values result in better performance. The default is
30days.linkThresholds.maxInclude.popularLinksProvides a maximum number of links that will get included in the popular link algorithm. If there are more links that are eligible to be included based on the other settings, the algorithm will take the most recent links that fall within this cap. This is to ensure consistent performance over peak times. The default value is
2000links.linkThresholds.sinceWhen.inboxLinksDetermines age (in days) a link may be to get included in a user’s watchlist. Smaller values will result in better performance. The default is
20days.tagThresholds.sinceWhen.activeTagsDetermines age (in days) a link may be to have its tags included in the Active Tag cloud shown on the All and Popular bookmark views. This value is used in conjunction with the other active tag threshold settings to determine what is included in the tag cloud. Smaller values will result in better performance. The default is
30days.tagThresholds.minCount.activeTagsProvides a minimum number of occurrences for a tag within the active time window for it to show in the Active Tag cloud. Tags that occur less than this threshold within the active time window will not show in the Active Tag cloud on the All and Popular bookmark views. This value is used in conjunction with the other active tag threshold settings to determine what is included in the tag cloud. The default is
1tag.tagThresholds.maxInclude.activeTagsProvides a maximum number of tags that will get included in the active tag algorithm. If there are more tags that are eligible to be included in this calculation based on the other settings, the algorithm will take the most recent tags that fall within this cap. This is to ensure consistent performance over peak times. The default value is
4000tags.personThresholds.sinceWhen.activePersonDetermines age (in days) a bookmark may be to have the associated person included in the active person list on the All and Popular bookmark views. This value is used in conjunction with the other active person threshold settings to determine who is included in the active person list. Smaller values will result in better performance. The default is
30days.personThresholds.minCount.activePersonProvides a minimum number of bookmarks a user must have within the active time window to be considered for the active person list. People who have fewer bookmarks than this threshold will not be included in the list on the All and Popular bookmark views. This value is used in conjunction with the other active person threshold settings to determine who is included in the active person list. The default is
5bookmarks.personThresholds.maxInclude.activePersonProvides a maximum number of bookmarks (and the associated people) that are included in the active person list algorithm. If more entries are eligible to be included in this calculation based on the other settings, the algorithm will take the people associated with the most recent links that fall within this cap. This is to ensure consistent performance over peak times. The default value is
1500bookmarks.
The Blogs feature does not utilize a configuration file in the same manner as the other features do. Most of the Blogs settings are set in the database and are configurable through the Blogs administrative console. This section, however, discusses one important feature of Blogs that is configurable only through a specific configuration file. The functionality we will be updating is adding/deleting/editing of categories for the Flag Inappropriate Content feature of Blogs. This feature allows users to flag content (comments and posts) as inappropriate. When content is flagged as inappropriate, a category needs to be selected. These categories are mapped to email addresses for reviewers, which will cause them to receive an email about the inappropriate content when their category is selected. The following describes how to create new categories to assign the content and to add reviewers who are immediately notified of the flagged content. To make the changes, we need to edit the content-review.config.xml file, which is located at:
<WAS_HOME>profiles<profile_name>configcells<cell_name>Lotus
Connections-config
Note that unlike the other features, this configuration file is used only for handling the categories for inappropriate content in Blogs.
Categories take on the following format in the configuration file. The following example will create a category with id “009” and with a description “Confidential Information.” When a user marks content in Blogs as inappropriate, they will be able to select this category. When they do, an email will be sent to [email protected] and [email protected].
<content-category>
   <id>009</id>
   <description xml:lang="en-US">Confidential
Information</description>
   <reviewer>
      <email>[email protected]</email>
   </reviewer>
   <reviewer>
      <email>[email protected]</email>
   </reviewer>
</content-category>The administration script also allows access to some administrative functions not accessible via another interface. In the previous sections, we talked about updating and managing the configuration files for the different features. This section discusses certain commands available to the administrator for effecting feature behavior. The commands listed depend upon the administrator having basic Java programming knowledge, because the values are passed around in common JAVA data structures: hashtables, vectors, lists, arrays.
The following subsections cover some useful commands for Activities that are available through the administration script.
The following commands will fetch and update member information based on the input. For the fetch commands, the member information is returned in a hashtable (or a vector of hashtables when multiple members are represented). The return values themselves can be stored in local variables and reused in other administrative commands. For the update commands, no value is returned. Here are a few key points to remember:
A member id is a unique key generated by Activities and mapped to all activities the member is a part of.
A member refers to a single individual, or group, that belongs to a specific activity.
An Ext id originates in an external system, usually LDAP, and is used to map the member back to that LDAP entry.
The list of commands include the following:
MemberService.fetchMemberByEmail(java.lang.String mail)gets a member (only individual) by looking up the email address.MemberService.fetchMemberById(java.lang.String id)gets a member (individuals or groups) by looking up their Activities member id.MemberService.fetchMemberByName(java.lang.String name)gets a member (individuals or groups) by looking up the name.MemberService.fetchMembers(java.lang.String filter)returns a set of members (individuals or groups) whose names match the filter provided. The return value is stored in a vector of hashtables.MemberService.syncAllMemberExtIds()is used to resync the Ext ids to LDAP, such as when an individual (or group) is removed and added back into the LDAP. This is probably one of the most important commands for Activities, because an Ext id being out of sync with LDAP will prevent the user from accessing his activities. To see what was updated, you can view theSystemOut.logfile.MemberService.syncMemberExtId(key)is used to resync a single member’s (individual or group) Ext id with LDAP. The input(key)can be either the individual’s email address or the group’s name.MemberService.updateMember(java.util.Hashtable pb)updates a member’s information using the supplied hashtable. The member is found by using the member id stored in the hashtable. This command cannot be used to update the Ext or member ids.MemberService.updateMemberExtId(java.lang.String oldId, java.lang.String newId)is used to update a member’s Ext id (oldId) to a new Ext id (newId).
An example of using the fetch member command is shown here:
MemberService.fetchMemberByEmail("[email protected]")
{memberId=B92GC0A84B82599579FB610E8A0795000000, displayName=Demo
User1, staticProfile=false,externalId=1207f6df-8282-42f5-83f4-
d33b23a594b9, [email protected], memberType=person}The following commands will retrieve and delete activities based on the command and required input. Here are a few points to remember:
An activity id is a key generated when the activity is created. It is a unique identifier for the activity and is used for tracking purposes.
The activities are returned as a vector of hashtables.
The commands are as listed here:
ActivityService.fetchActivities()is used to retrieve information on all activities on the system and will not return activities found in the Trash view. If there are a lot of activities in the system, this could be a resource-intensive operation.ActivityService.deleteActivities (java.util.Vector activities)is used to delete activities; that is, move them to the Trash view. The input is a vector of activities, such as the one returned by any of the functions for fetching activities. If an empty vector is returned, the operation was successful; otherwise, every hashtable in the vector represents an activity that could not be deleted.ActivityService.fetchActivitiesByMember(java.util.Hashtable member)is used to retrieve a list of activities that a specific member is a part of. The member in question is defined by the hashtable input (member).ActivityService.fetchActivitiesByOwner(java.util.Hashtable member)is used to retrieve a list of activities that a specific member is an owner of.ActivityService.fetchActivitiesCreatedByMember(java.util.Hashtable member)is used to retrieve a list of activities that a specific member created.ActivityService.fetchCompletedActivities()returns the activities found in the completed view. Depending on the number of completed activities, this could be a resource-intensive operation.ActivityService.fetchDeletedActivities()returns the activities found in the Trash view. Depending on the number of deleted activities, this could be a resource-intensive operation.
The following command will help filter activities returned from previous commands:
ListService.filterActivitiesByName(inList, toMatch)returns the activities in the vectorinListthat match to the regex filter intoMatch.
Since the data making up an activity is stored in two locations, a relational database and local disk structure, moving activities from one system to another becomes challenging. This process can be simplified by using the export and import administrative commands provided next. The export commands will export the activities into zip files, with one activity per zip file, which contain a manifest of the activity and all its data. The Import command can import these zip files back into the database and local file structure, essentially re-creating the activity.
ArchiveService.exportActivities(java.lang.String directory, java.util.Vector activities)is used to export the activities to a local disk structure specified by directory. It takes as input the vector of activities (represented as hashtables) to export.ArchiveService.importActivities(java.lang.String directory, java.util.Vector activities)is used to import the activities specified by the input activities. It looks for the actual activity data, zip files, on the local disk specified bydirectory.
There are also some helper functions that can be used to examine the activities after they have been exported:
ArchiveService.fetchActivities(java.lang.String directory)is used to return the activities that have been exported.ArchiveService.fetchActivitiesByMember(java.lang.String directory, java.util.Hashtable member)is used to return the activities that have been exported and that are accessible by the member specified in the hashtable input member.ArchiveService.fetchActivitiesByOwner(java.lang.String directory, java.util.Hashtable member)is used to return the activities that have been exported and that are owned by the member specified in the hashtable input member.ArchiveService.fetchActivitiesCreatedByMember(java.lang.String directory, java.util.Hashtable member)is used to return the activities that have been exported and that were created by the member specified in the hashtable input member.
Activities provides several commands used for working with activities in the Trash view:
TrashCollectionService.fetchTrash()is used to retrieve the activities in the Trash view. This is returned as a vector of hashtables.TrashCollectionService.purgeTrash(java.util.Vector trashVector)is used to permanently remove activities from the Trash view. The activities to remove are specified in the vector of hashtablestrashVector.TrashCollectionService.undeleteTrash(java.util.Vector trashVector)is used to restore activities from the Trash view. The activities to restore are specified in the vector of hashtablestrashVector. This function returns a vector of hashtables representing the activities that could not be restored. A blank vector indicates success.
Here is an example that ties together some of the administration commands shown previously. We first get the completed activities, and then filter down to find those with the SKCcorp included in the name, such as SKCcorpActivity. We then export those activities to C:exportdir and delete the activities by moving to the Trash view. We then go in and purge those activities to reclaim the space:
compAct=ActivitiesService.fetchCompletedActivities()

reducedSet=ListService.filterActivitiesByName(compAct,
".*SKCcorp.*")

ArchiveService.exportActivities("C:\exportdir", reducedSet)

ActivitiesService.deleteActivities(reducedSet)

TrashCollectionService.purgeTrash(reducedSet)There are several commands that can be used to work directly with the Activities scheduler, as listed next. The Activities scheduler can be either the local or the cluster scheduler.
Scheduler.start(java.lang.String schedulerName)starts the scheduler specified byschedulerName, which can have the valuesclusterorlocal. This applies for all cases below where a name is needed for the scheduler.Scheduler.stop(java.lang.String schedulerName)stops the scheduler specified byschedulerName.Scheduler.isRunning(java.lang.String schedulerName)verifies whether the specified scheduler is currently running.Scheduler.listJobs(java.lang.String schedulerName)lists the jobs assigned to the specified scheduler. The list is returned as an array.Scheduler.pauseJob(java.lang.String schedulerName java.lang.String jobName)pauses the job on the specified scheduler(schedulerName)as denoted in the stringjobName.This will actually prevent the scheduler from executing a new run for the job until the job is resumed. The status of the job (pause) is returned as a string when this function is called.Scheduler.purgeJobs(java.lang.String schedulerName)removes all jobs from the scheduler specified inschedulerName.Scheduler.resumeJob(java.lang.String schedulerName java.lang.String jobName)resumes a paused job specified byjobNameon the specified scheduler (schedulerName). This will allow the scheduler to execute a new run for the job. The status of the job (resume) is returned as a string when this function is called.
The following subsections cover some useful commands of the many that are available through the administration script.
The following commands allow the administrator to modify certain elements of a community: name, description, bookmarks, discussion forums, and tags. The key areas where inappropriate content can be a problem are the bookmarks and discussion forums. The community name needed for each command is not case-sensitive.
CommunitiesService.updateCommunityName(communityName, newName)is used to update the community’s name to a new name. The settingcommunityNamemust match exactly the name of the community, and both input parameters should be wrapped in quotes.CommunitiesService.updateCommunityDescription(communityName, newDescription)is used to overwrite the description of the community with the value innewDescription. The community to update is specified by the inputcommunityName. This parameter must match the community name exactly for the command to work. Again, both values must be wrapped in quotes.CommunitiesService.removeReferencesByUri(communityName, referenceURIs)is used to remove bookmarks (URIs) from a community. For input, this command takes the community name (communityName) and a string containing the bookmarks to remove (referenceURIs). The format for the string of bookmarks is very specific and the next example shows how to use this command.
The following command will create a string variable with the two URLs we want to remove. This variable is passed to the removeReferencesByUri command, which removes the URLs from the community named test feed.
wsadmin>URLsToRemove=["http://www.cnn.com","http://www.badwebsite.
com"]
wsadmin>CommunitiesService.removeReferencesByUri("test feed",
URLsToRemove)
removeReferencesByUri request processed
CommunitiesService.removeTagsFromCommunity(communityName, tagNames)is used to remove tags from a community. For input, this command takes the community name (communityName) and a string containing the tags to remove (tagNames). The format for the string of tags is a comma-delimited list of strings. Each string is enclosed in quotes, and the entire list is enclosed in square brackets.
The following commands allow the administrator to manage the members of communities, as well as to create communities programmatically. The community name needed for each command is not case-sensitive.
CommunitiesService.addMembersToCommunity(communityName, memberRole, emailAddresses)is used to add members to a community (communityName) with a certain level of access (memberRole). The settingmemberRoleis an integer:0represents member access,1represents owner access. The users are specified in a list of email addresses. The following example demonstrates adding user “Demo User1” to the activitytest feedas a member:wsadmin>usersToAdd=["[email protected]"] wsadmin>CommunitiesService.addMembersToCommunity("test feed",0,usersToAdd)
CommunitiesService.updateMemberId("[email]")is used to update theDIRECTORY_UUIDattribute for a single user from the LDAP. The user is specified by her email address. This attribute comes from the unique identifier in LDAP and is used to map the user back to her entry in LDAP. If theDIRECTORY_UUIDstored gets out of sync with LDAP, this can result in the user not being able to see, or work with, her communities.CommunitiesService.updateAllMemberIds()is used to update theDIRECTORY_UUIDattribute for all users with LDAP.CommunitiesService.createCommunity(communityName, ownerName, member-Role, dsmlFile)is used to create a new community (communityName). The value specified inownerNameis the email address of the owner/creator of the community. ThedsmlFileinput provides the filename for a DSML file containing the email addresses for the members to add to the community. Each member in this file is added with the level of access specified by the inputmemberRole.
In many cases, administrators need to retrieve the list of communities based on certain criteria, such as all communities created by a specific user, those with a specific name, or even those that match a regular expression.
The next three commands will return community information in the form of a hash map, which has a structure that looks like the following:
CommunitiesService.fetchAllComm()is used to return a vector of hash maps of all communities. Note that this could be a resource-intensive operation depending on the size of your deployment.CommunitiesService.fetchCommByMember(String email)is used to return a vector of hash maps of all communities created by a single user. The user is specified using his email address (email).CommunitiesService.fetchCommByName(String name)is used to return a hash map of the single community. The community is specified by its name (name).
In the case where a vector of communities is returned, we can further filter that list using regular expressions. The following commands demonstrate this capability. They take as arguments the list of communities, which is a vector of hash maps representing the communities, and the filter, which is a string.
CommunitiesListService.filterListByName(List list, String filter)is used to filter the list of communities (list) using the regular expression stored infilter. This will attempt to match the regular expression to the names of the communities. The following example will filter the list of communities inlist1and return the community specified by the value in “ID Value”:CommunitiesListService.filterListByName(list1, "ID Value")
CommunitiesListService.filterListByType(List list, String filter)is used to filter the list of communities (list) based on the type specified in the input (filter). This can take one of three values (public,private,publicInviteOnly).CommunitiesListService.filterListById(List list, String filter)is used to filter the list of communities (list) using the community ID stored infilter. The community ID is generated dynamically when a community is first created, and uniquely identifies the community among all others.
The following example demonstrates running this command to find all private communities that “Demo User2” is a part of. The first command gets all the communities that “Demo User2” is a part of, and the filterListByType filters the list to show only those that are private.
wsadmin>communities=CommunitiesService.fetchCommByMember
("[email protected]")
wsadmin>CommunitiesListService.filterListByType(communities,
"private")Another area where inappropriate content can manifest itself is in the discussion forums. The Communities administration script provides commands that allow the administrator to edit discussion topics. This includes retrieving all the discussion topics in a community, retrieving discussion topics created by a user, and deleting selected discussion topics. The following commands demonstrate this capability:
CommForumTopicService.fetchTopics(HashMap community)is used to return all the topics in a community that are specified by the input community. The topics are returned in the form of a vector of hash maps, each one representing a discussion forum topic.CommForumTopicService.fetchTopicsCreatedByMember(String email, HashMap community)is the same asfetchTopics, but will return only those topics created by the member with input email address (email).CommForumTopicService.deleteTopics(Vector topics)is used to delete topics from a community. The discussion forum topics are passed in the variable topics and are removed from their respective communities.
The following subsections cover some useful commands of the many that are available through the Profiles administration script.
The following commands allow the administrator to remove inappropriate content in three sections of a user’s profile: Background, About Me, and Photo:
ProfilesService.updateExperience(user_email_addr, "new content for background")is used to change/remove the text in the background field for a specific user. The user is identified by email address (user_email_addr) and the background field is updated with the new text.ProfilesService.updateDescription(user_email_addr, "new content for about me field")is used to change/remove the text in the about me field for a specific user. The user is identified by email address (user_email_addr) and the about me field is updated with the new text.ProfilesService.deletePhoto(user_email_addr)is used to remove the photo from a user’s profiles. The user is identified by email address (user_email_addr) and the function is successful only if the user has uploaded a photo.
To help increase performance, Profiles utilizes an in-memory cache to handle the mini and full report-to chain structures. These structures comprise the organizational structure displayed in a user’s profile. If the caches are disabled, the organizational structure displays much more slowly. Changes to the organizational structure do not take place instantly, such as when the manager of a user is updated. The cache is refreshed in intervals defined in the Profiles configuration file.
The mini report-to cache populates the mini report-to chain on the right of the business card in Profiles. This contains the management hierarchy for the specific user with only the name for each person in the hierarchy listed. The full report-to cache populates the full report-to chain, which contains the management hierarchy for the specific user wherein each person in the hierarchy has the matching picture and business card info. The cache is per profiles service, so in a cluster of Profiles servers, it would exist on all servers. The commands covered in the text that follows will allow an administrator to manage the caches directly by enabling, disabling, or reloading them.
ProfilesService.enableMiniReportsToCache(startDelay, interval, scheduledTime)is used to enable the mini report to cache. This takes the delay in minutes to wait before enabling the cache (startDelay), number of minutes between refreshing the cache (interval), and the scheduled time, in HH:MM format, to refresh the cache daily (scheduledTime).ProfilesService.disableMiniReportsToCache()is used to disable the cache.ProfilesService.reloadMiniReportsToCache()is used to reload, or refresh, the cache from the Profiles database. This command will fail if the cache is disabled.ProfilesService.enableFullReportsToCache(startDelay, interval, schedTime)is used to enable the full report to cache. This takes the delay in minutes to wait before enabling the cache (startDelay), number of minutes between refreshing the cache (interval), and the scheduled time, in HH:MM format, to refresh the cache daily (scheduledTime).ProfilesService.disableFullReportsToCache()is used to disable the cache.ProfilesService.reloadFullReportsToCache()is used to reload, or refresh, the cache from the Profiles database. This command will fail if the cache is disabled.
The following subsections cover some useful commands of the many that are available through the administration script.
Sometimes, when an index gets corrupted, an administrator needs to force index re-creation. The Home Page administration script provides some commands to help in managing the indexes, including index deletion and refresh:
HomepageSearchService.deleteIndex()is used to delete the Home Page search index.HomepageSearchService.indexNow(featuresToIndex)is used to immediately kick off a task that will index the services 30 seconds after being called. This task will run against the features specified in the input parameter featuresToIndex. For example, to index the Activities feature, simply use the string “activities.”HomepageSearchService.refreshTasks()is used to reload the tasks from the Home Page configuration file. This will update the tasks with any changes that might havetaken place inthe file.
As with many of the other Lotus Connections features, Home Page provides commands to keep the unique ID synchronized with LDAP. If the ID stored in Home Page is out of sync with the one in LDAP (such as when a user is deleted and added again), the user will not be able to access the Home Page dashboard. These are the relevant commands:
HomepagePersonService.updateAllMemberIds()is used to update all the IDs in the Home Page table. This command will use the associated email addresses for all the members to query LDAP for the updated ID information.HomepagePersonService.updateMemberId(emailAddress)is used to update a single member’s ID using his email address (emailAddress) as an identifier.
The following subsections cover some useful commands of the many that are available through the administration script.
The following commands provide administrators a way to remove links (bookmarks); for instance, when they contain inappropriate content. This can be done by specifying bookmarks directly by their UID (unique ID for the bookmark), or by specifying the URL and the user who created the bookmark.
LinkService.deleteLinkByUID(bookmarkUID)is used to delete a specific bookmark by specifying its UID (bookmarkUID). The UID for the bookmark can found within the Dogear database or via the web UI. From the Web, you can copy the link location to find the bookmark. For example, the value after the link is the bookmark UID: http://<servername>/dogear/click?link=31CG091E0E950D160D81B1E1EADF2200326F.LinkService.deleteLinkByPersonURL(emailAddress, URL)is used to delete a bookmark by specifying the member who created it and the address for the bookmark(URL). The member is specified by passing in her email address (emailAddress).
Each Lotus Connections feature has a built-in metrics collections engine. To view these statistics, a user can access them via the following URLs:
Blogs: http://<servername.com:port>/blogs/roller-ui/servermetrics.do
Activities: http://<servername.com:port>/activities/service/html/servermetrics
Profiles: http://<servername.com:port>/profiles/html/servermetrics.do
Home Page: http://<servername.com:port>/homepage/web/servermetrics
Dogear: http://<servername.com:port>/dogear/toolbox/servermetrics
Communities: http://<servername.com:port>/communities/service/html/servermetrics
Tables 7.6 through 7.11 contain the different metrics available for the Lotus Connections features. The first column lists the metric name to use in accessing it through the wsadmin console. The second column lists the metric name as seen on the web. The final column provides a brief description of the metric.
Table 7.6. Profiles Metrics—Metrics Available with Profiles
WSADMIN | Web | Description |
|---|---|---|
| Employees | The total number of employees in the profiles database |
| Employees with a background supplied | The number of employees in the profiles database who have supplied background details in their profile |
| Employees with a picture supplied | The number of employees in the profiles database who have provided a picture as part of their profile |
| Employees with pronunciation supplied | The number of employees in the profiles database who have uploaded a pronunciation file to their profile |
Table 7.6 lists the metrics available with the Profiles feature.
Table 7.7 lists the metrics available with the Blogs feature.
Table 7.7. Metrics Available with Blogs
WSADMIN | Web | Description |
|---|---|---|
| Total number of blogs published | Number of published blogs |
| Total number of group blogs | Number of group blogs |
| Total number of bloggers | Number of bloggers |
| Total number of comments | Number of comments on blogs |
| Total number of tags | Number of tags created by bloggers |
| Number of users commenting today | Number of users commenting on a blog today |
| Entries | Number of entries |
| New entries today | Number of new entries made today |
| Number of users commenting this week | Number of users commenting this week |
| Number of comments today | Number of new comments today |
| Number of users this week | Number of distinct users this week |
| Number of users today | Number of distinct users today |
| Active blogs (10 entries or more) | Number of active blogs judged by the number of entries |
Table 7.8 lists the metrics available with the Communities feature.
Table 7.8. Metrics Available with Communities
WSADMIN | Web | Description |
|---|---|---|
| Public communities | Number of public communities. |
| Public invite only communities | Number of public communities where membership is by invitation only. |
| Private communities | Number of private communities. |
| Communities | Number of all communities (public, public invite, and private). |
| Distinct owners | Number of people who are owners of one or more communities. |
| Distinct members | Number of people who are members of one or more communities. This number helps you determine how many people are regular community members versus owners. |
Table 7.9 lists the metrics available with the Home Page feature.
Table 7.9. Metrics Available with Home Page
WSADMIN | Web | Description |
|---|---|---|
| Total number of unique users | Total number of unique users who have accessed the Home Page feature |
| Total number of deployed widgets | Total number of widgets deployed in the Home Page |
| Total number of enabled widgets | Total number of widgets currently enabled and available to users on the Home Page |
| Total number of visitors in the past 24 hours | Total number of unique visitors to the Home Page in the past 24 hours |
| Total number of visitors in the past hour | Total number of unique visitors to the Home Page in the past hour |
Table 7.10 lists the metrics available with the Dogear feature.
Table 7.10. Metrics Available with Dogear
WSADMIN | Web | Description |
|---|---|---|
| Total number of bookmarks | Number of bookmarks, including private and public, on the system |
| Total number of tags | Number of tags on the system |
| Total number of unique tags | Number of unique tags on the system |
| Average tags per bookmark | Average number of tags per bookmark |
| Total number of watchlisted items | Number of watchlisted items |
| Number of users with watchlists | Number of users with watchlists |
| Number of users with a bookmark | Number of users with at least one bookmark |
| Average bookmarks per users | Average number of bookmarks per user |
| Average bookmarks per top user | Average number of bookmarks for top 10% of users who have bookmarks |
| Percent of public bookmarks | Percent of bookmarks that are public |
| Number of unique URLs | Number of unique URLs on the system |
Table 7.11 lists the metrics available with the Activities feature.
Table 7.11. Metrics Available with Activities
Metric | Description |
|---|---|
| Number of activities in the database. |
| Number of activity entries (for example, standard entries, to-do items) in the database. |
| Number of activity members in the database. |
| Maximum number of simultaneous requests processed by the Activities feature since the feature was started. |
| Current number of events waiting to be processed. |
| Number of users who have accessed the Activities feature within the past five minutes. |
| Maximum number of users who have accessed the Activities feature within a five-minute window since the feature was started. |
| Number of fatal errors reported by the Activities feature since the feature was started. |
| Number of nonfatal errors reported by the Activities feature since the feature was started. |
| Number of warnings reported by the Activities feature since the feature was started. |
| Number of viruses removed from content by the virus scanning software configured for the Activities feature since the feature was started. If virus scanning is not enabled, zeros (0) are collected for this statistic. |
| Number of instances of active content removed by the Activities feature since the feature was started. If active content filtering is not enabled for Activities, zeros (0) are collected for this statistic. |
| Average time to complete a database request. |
| Average time to complete a service request. |
| Average time to complete a directory lookup request. |
| Average time to deposit mail to the SMTP server. If SMTP is not enabled, zeros (0) are collected for this statistic. |
| Average time to purge an activity or activity entry from the trash. |
| Number of database requests made since the feature was started. |
| Number of service requests made since the feature was started. |
| Number of directory lookups made since the feature was started. |
| Number of SMTP requests made since the feature was started. If SMTP is not enabled, zeros (0) are collected for this statistic. |
| Number of activities or activity entries purged from the trash since the feature was started. |
| Number of bytes added to the content store by uploaded files. |
| Number of files uploaded to Activities since the feature was started. |
| Number of files downloaded from Activities since the feature was started. |
| Number of files removed from Activities since the feature was started. |
Using the wsadmin client, an administrator can access the metrics listed previously. The commands themselves are the same, but the service name changes. The metrics service names for the features are listed here:
Activities:
ActivityMetricsServiceBlogs:
BlogsMetricsServiceProfiles:
ProfilesMetricsServiceHome Page:
HomepageMetricServiceDogear:
DogearMetricsServiceCommunities:
CommunitiesMetricsService,CommForumMetricsService
For each feature, you will need to launch the wsadmin client and execute the corresponding configuration file before using these commands:
<
FeatureMetricService>.fetchMetric(metricName) is used to retrieve the value for one metric, specified bymetricName.<
FeatureMetricService>.fetchMetrics()is used to retrieve the values of all metrics.<
FeatureMetricService>.saveMetricToFile(filename,number,metricName) is used to save metric values to a file. This takes the file to write to (filename), the maximum number of values to store (number), and the metric to write to the file (metricName). The input number specifies the maximum number of entries to store in the file. If this is set to10, the 11th entry to the file will cause the oldest to be overwritten. ThemetricNamecontains the name of the metric we want to write to disk. If the string"all"is used, it will attempt to write all metrics to the file.
The navigation bar in Lotus Connections is the light blue bar across the top of all Lotus Connections pages. This is shown in Figure 7.4. The main components are, from left to right, the Lotus Connections logo, the six feature links, the logged-in username, a link for the Help menu, and a logout/login link. In many cases, customers want to customize this navigation bar to contain their logo or add links. This section discusses how to make these changes.

Updating the Lotus Connections logo requires five steps.
Place the new logo in a common images directory, such as on your IBM HTTP server. For example,
<IHS_HOME>ConnectionsNavimagesSo if your image is named
SKCLogo.gif, the URL to your new image would be this:http://<IHS_server_name>/ConnectionsNav/images/SKCLogo.gifCopy the
header.htmlfile into the common directory, such as this:<IHS_HOME>ConnectionsNavheader.htmlYou can find a copy of this file in any feature. For Profiles, you would find it here:
http://<server_name>/profiles/nav/templates/header.htmlUpdate the
header.htmlfile to include the new logo. Within the file, the following line defines the properties of the logo, including the location:<img id="lotusLogo" alt="Lotus Connections" src="{{default images}}/logo.gif" />We need to update the preceding line to point to our new image by changing the
srcattribute. If our new image is namedSKClogo.gif, the change looks like this:src="{{images}}/SKClogo.gif"Note that we changed the directory to be
{{images}}because that is where we placed the logo. We will also change the alternate text:alt="SKC Corporation"
Now we update the
style.header.urlandstyle.images.urlconfiguration property in the Lotus Connections Configuration script. First we have to check out the Lotus Connections Configuration file using the wsadmin console. Then we enable thestyle.enabledproperty, as shown next. This will activate the override for the different style properties (such as the header and images URLs to use for the navigation bar).LCConfigService.updateConfig("style.enabled", "true")Now we can set the header and images URLs:
LCConfigService.updateConfig ("style.header.url",
"http://<IHS_server_name>/ConnectionsNav/header.html")
LCConfigService.updateConfig ("style.images.url",
"http://<IHS_server_name>/ConnectionsNav/images")
We can check in the configuration file and restart the application server to see our changes.
Lotus Connections provides the ability to add links to the navigation bar. These links are placed directly after the feature links. Look for the following section of HTML:
<ul class="lotusInlinelist lotusLinks">
    {{application links: li }}
</ul>
The {{application links: li }} section is dynamically replaced by the links to the features. The following changes to this HTML will add a link to the company website next to the feature links:
<ul class="lotusInlinelist lotusLinks">
    {{application links: li }}
    <li><a href="http://www.skc.com"></a></li>
</ul>
After you’ve made the preceding changes to header.html, the resulting web page looks as shown in Figure 7.5.

As you can see, Lotus Connections provides many administrative interfaces: web based, command-line based, and through editing configuration files. The web-based interface includes the WAS, Blogs, and Home Page console. The most utilized of the three is the WAS administrative console, which allows access to some core Lotus Connections functionality, such as administering the J2EE resources and environment. The command-line-based interface is best used for accessing the configuration files and executing administrative commands that modify Lotus Connections’ properties immediately. This interface is also involved in updating the local configuration files, which is the last interface. These files contain properties picked up at server startup, including profile fields layout, search indexing task management, and so on. No one method will work for all cases, and in fact for many scenarios an administrator needs to use multiple interfaces in order to be successful. For example, to manage the Home Page search feature, an administrator needs to update the local configuration file to add the indexing task and the Home Page commands to force index creation. By utilizing all three interfaces, an administrator can properly manage any Lotus Connections environment.