
In Chapter 8, “Extending Lotus Connections to Other Applications,” we discussed leveraging plug-ins to integrate Lotus Connections’ functionality into other products, such as Sametime, Notes, and Microsoft Outlook. This chapter will covers the hosting of plug-ins and the concept of widgets. The plug-ins we will discuss are those found in the IBM Lotus Connections Catalog (http://catalog.lotus.com/wps/portal/lotusconnections) and are Eclipse-based plug-ins used in the Notes 8.x standard client and Sametime 7.5.1 and higher.
Widgets are an important feature of Lotus Connections and display various pieces of information, both Lotus Connections based and external. The Home Page feature of Lotus Connections leverages prebuilt widgets that can serve up data from all other features (Dogear, Communities, Activities, Profiles, and Blogs). The Profiles feature also utilizes widgets (Report to Chain, My Colleagues, and My Links). In both cases, the existing out-of-the-box widgets can be modified, and new widgets can be added as well.
In this chapter, we will discuss the management of widgets, including hosting, modifying, and uploading them into Lotus Connections (Profiles and Home Page). We will also discuss briefly the iWidget framework and show how to create simple and advanced “Hello World” widgets for the Home Page.
In the Eclipse framework, the basic unit of functionality is the plug-in. A plug-in is a compact unit that can be loaded into an Eclipse-based client, added to an application, and then run. It is not suited for distribution, however, because it is generally too small to serve any real purpose. A plug-in will contain a manifest, named MANIFEST.MF, which lists the properties of the plug-in. In reality, we really want to work with features, which are collections of plug-ins that represent a larger set of functionality.
Features can almost be thought of as bundles for plug-ins, helping with the installation and updates. With the plug-ins being encapsulated into a feature, it can be downloaded as one unit instead of multiple plug-ins. Also, when updating the feature, users only have to refresh any plug-ins that were changed, instead of downloading all of them again. This can be accomplished because features group plug-ins together, but the plug-ins themselves are installed separately. Each feature contains a file named feature.xml that lists the required plug-ins for the feature, similar to the plug-in manifest.
To handle the installation and maintenance of features, the Eclipse framework utilizes update sites. An update site ties together features and their corresponding plug-ins, and allows them to be provisioned to an Eclipse-based client. The update site provides a site.xml file that lists the features available for download, and an Eclipse client will use that information in the installation process. For the features to be available, they must be hosted on a web server.
When creating your own plug-ins, you can use the Eclipse framework to create the plug-in, feature, and update site projects. This will allow you to build, manage, and deploy plug-ins directly to a web server of your choosing. Setting up an update site for existing features, however, requires a less complex process.
To host an externally developed feature, we don’t need to utilize the Eclipse projects. For example, let’s look at the Lotus Connections 2.0 Plug-in for Sametime. Even though this is referred to as a plug-in, it is in fact a set of three different features, as we will see shortly. For the sake of clarity, we will refer to this download as a package. This package integrates functionality from Activities, Profiles, and Communities directly into the Sametime client. When you download the package, you will notice that it has three elements in the structure: features, plug-ins, and site.xml.
Features are jar files that logically group together plug-ins under a single feature name. With the Sametime plug-in, there are three features included: Activities, Profiles, and Communities integration. For the Activities feature, we can examine the feature.xml to see which plug-ins it actually requires. The file can be found in the jar file com.ibm.socnet.client.uim.activities.feature_2.0.0.20080711-0000.jar. Here, we can see that this feature requires one plug-in (com.ibm.socnet.client.oa.uim) and two additional features (com.ibm.socnet.client.uim.feature and com.ibm.socnet.client.oa.uim.service.feature):
<feature id="com.ibm.socnet.client.uim.activities.feature"
label="%featureName" provider-name="%providerName"
version="2.0.0.20080711-0000">

   <description>
      %description
   </description>

   <copyright>
      %copyright
   </copyright>

   <license>
      %license
   </license>

   <includes id="com.ibm.socnet.client.uim.feature"
version="2.0.0.20080711-0000"/>

   <includes id="com.ibm.socnet.client.oa.uim.service.feature"
version="2.0.0.20080711-0000"/>

   <plugin download-size="144" id="com.ibm.socnet.client.oa.uim"
install-size="144" unpack="false" version="2.0.0.20080711-0000"/>

</feature>
Plug-ins are jar files containing the actual binaries used to implement the features. Following is a snippet from the MANIFEST.MF for the com.ibm.socnet.client.oa.uim plug-in. The Require-Bundle declaration indicates those plug-ins necessary for this plug-in to function—for example, com.ibm.socnet.client.oa.uim.service.
Manifest-Version: 1.0
Bundle-Name: %str.bundleName
Bundle-Activator: com.ibm.socnet.client.oa.uim.Activator
Created-By: 2.3 (IBM Corporation)
Ant-Version: Apache Ant 1.7.0
Bundle-Vendor: %str.bundleVendor
Bundle-ManifestVersion: 2
Bundle-Localization: plugin
Bundle-SymbolicName: com.ibm.socnet.client.oa.uim;singleton:=true
Require-Bundle:
org.eclipse.ui,org.eclipse.core.runtime,com.ibm.collaboration.real
time.chatwindow,com.ibm.collaboration.realtime.chat.logging,com.
ibm.collaboration.realtime.people,com.ibm.rcp.realtime.livenames,
com.ibm.collaboration.realtime.directory,com.ibm.socnet.client.
base.perftran,com.ibm.socnet.client.oa.uim.service,com.ibm.
collaboration.realtime.community,com.ibm.socnet.client.base,com.
ibm.collaboration. realtime.messages,com.ibm.collaboration.
realtime.ui,com.ibm.collaboration.realtime.policy,com.ibm.
openactivities.api
Bundle-Version: 2.0.0.20080711-0000
Eclipse-LazyStart: true
site.xml is an XML file that provides the listing of the features available for download and installation. The application installer within Notes and Sametime will refer to this file to detect which features to install. The site.xml file we will use in this example is listed here:
<?xml version="1.0" encoding="UTF-8"?>
<site>

<feature id="com.ibm.socnet.client.uim.activities.feature"
patch="false"
url="features/com.ibm.socnet.client.uim.activities.feature_2.0.0.2
0080711-0000.jar" version="2.0.0.20080711-0000">

<category name="Lotus Connections" />
     </feature>

<feature id="com.ibm.socnet.client.uim.com.feature" patch="false"
url="features/com.ibm.socnet.client.uim.com.feature_2.0.0.20080711
-0000.jar" version="2.0.0.20080711-0000">
            <category name="Lotus Connections" />
      </feature>

<feature id="com.ibm.socnet.client.uim.profiles.feature"
patch="false"
url="features/com.ibm.socnet.client.uim.profiles.feature_2.0.0.200
80711-0000.jar" version="2.0.0.20080711-0000">
<category name="Lotus Connections" />
      </feature>

<category-def label="Lotus Connections" name="Lotus Connections">
            <description>Lotus Connections</description>
      </category-def>
</site>
To host this package, we need to simply place it on a web server. In this case, we will use the IBM HTTP server for hosting, specifically placing the three components in the C:IBMHTTPServerhtdocsen_USSametimeConnectionsPlugin directory. To install the plug-in, do the following:
Select Tools, Plug-ins, Install Plug-ins from the Sametime menu.
Select Search for New Features to Install and then click Next.
Click New Remote Site, which brings up a dialog box like the one shown in Figure 10.1. Enter a name for the site, as well as the URL, and click OK.
Click Finish. You should now see the features available on the update site selected (see Figure 10.2). Note that the version numbers in the figure match the version numbers from the
site.xml.


In this case, let’s install only the Activities and Communities features. After installing them, we can examine the actual features that were installed as a result. Navigate to Tools, Plug-ins, Manage Plug-ins. Figure 10.3 shows the newly installed features. (To uninstall a feature, simply right-click on the feature and select Uninstall.)

This section discusses how to manage and administer widgets within the Home Page and Profiles features. This includes existing widgets that ship with the product and also custom widgets.
To administer the widgets for the Home Page feature, you need administrator access. This access is granted through the Feature Security Mappings in the WAS administrative console. The admin role should be mapped to the designated admin user or group in the LDAP. The admin user/group can access the administration console from the Home Page feature. Here they can modify existing widgets and add new widgets.
To upload a new widget, the administrator can click the Add Another Widget button. Figure 10.4 illustrates the required fields to upload a custom widget.
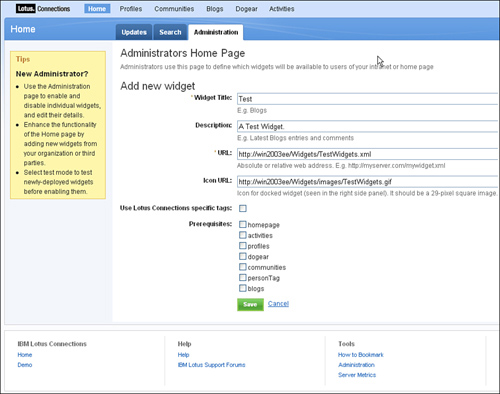
These fields are required when uploading a custom widget:
Widget Title—. This is the title that will be displayed on the Home Page dashboard for the widget.
Description—. This field gives the description of the widget.
URL—. This is a URL pointing to the XML that defines the widget.
Icon URL—. This is a URL pointing to the icon to be used for the widget on the Home Page dashboard.
Use Lotus Connections Specific Tags—. This setting specifies whether the widget deployment descriptor uses specific Lotus Connections tags to define the Lotus Connections services URLs. For example, if you wanted to use a Lotus Connections path variable, such as {
homepage}, you would need this check box marked.Prerequisites—. If this widget relies on existing Lotus Connections feature(s), the appropriate box should be checked off. If that feature is not installed, the custom widget will not be displayed on the dashboard.
After the widget is uploaded, it is also added to the back-end database. Figure 10.5 is a snapshot of the WIDGET table. This shows the default widgets that come with Lotus Connections.

The following are descriptions of the different fields in the table:
Widget_ID is a unique ID assigned to the widget after it is uploaded.
Widget_Title is the title of the widget.
Widget_Text is the text description of the widget.
Widget_URL is the URL to the widget’s XML file.
Widget_Icon is the URL to the widget’s icon file.
Widget_Enabled, when set to
1, indicates that the widget is enabled, and0indicates that it is disabled.Widget_URL is the URL to the widget’s XML file.
Widget_System, when set to
1, indicates that the widget is a Lotus Connections widget, and0indicates that it is a custom widget.Widget_Homepage_Specific, when set to
1, indicates that this widget is used only in the Home Page feature, and0indicates that it could be used in other Lotus Connections features.
Note: Although administrators control the widgets available on the Home Page, users are able to control which widgets are active and how the Home Page is laid out.
The profiles page of a user contains multiple widgets that come with Lotus Connections, such as the My Colleagues, My Links, and Report to Chain widgets. Certain properties of these widgets are editable and new widgets can even be added. The widget definitions exist in the profiles-config.xml file. Since Profiles supports multiple profile types, there can also be multiple widget definitions per profile type.
Before we can modify the profiles-config.xml, we have to check out the file. To do so, first launch the wsadmin client:
Launch a command prompt and navigate to your WAS
bindirectory.For a standard deployment, use this:
<WAS_HOME>/profiles/<profile_name>/bin
For a network deployment, use this:
<WAS_HOME>/profiles/<DMGR>/bin
To launch the wsadmin client, run the command
wsadmin -lang jython -user <admin_id> -password <admin_password>
-port <SOAP_Connector_port>
where
<
admin_id> is the WAS admin id used to administer the server.<
admin_password> is the WAS admin id password.<
SOAP_connector_port> is the WAS SOAP port of the Application Server where Profiles was installed.Launch the Profiles service.
For a standalone deployment, execute this:
execfile("profilesAdmin.py")For a network deployment, you have to specify the node to access the script on:
execfile("<WAS_HOME>/profiles/<DMGR>/config/bin_lc_admin/profile
sAdmin.py")
Execute the following command to check out the file, which will place a copy of it in
C: emp:ProfilesConfigService.checkOutConfig("C:\temp", "win2003eeNode01Cell", "win2003eeNode01")After we are done modifying the file, we check it in via
ProfilesConfigService.checkInConfig().
The definition of the widgets includes the location of the widgets’ XML files and the widgets defId. This ID should be unique to the widget definitions defined for the specific profile type. Here is an example of the widget definitions that come with Lotus Connections:
<definitions>
<widgetDef defId="reportStructure"
url="{profilesContextRoot}/widget-catalog/report-chain.xml">
<configData>
<attr key="numberOfNameToDisplay" value="4" />
</configData>
</widgetDef>
<widgetDef defId="multiFeedReader"
url="{profilesContextRoot}/widget-catalog/multifeedreader.xml">
<configData>
<attr key="communityResourceId" value="communityResourceId"/>
<attr key="communityFeedUrl"
value="{communitiesSvcRef}/service/atom/communities/all?email=
{email}&ps=5"/>
<attr key="dogearResourceId" value="dogearResourceId"/>
<attr key="dogearFeedUrl"
value="{dogearSvcRef}/atom?email={email}&sort=date&
sortOrder=desc&ps=5&showFavIcon=true{appLangParam}"/>
<attr key="blogsResourceId" value="blogsResourceId"/>
<attr key="blogsFeedUrl" value="{blogsSvcRef}/roller-
ui/feed/{email}?order=asc&maxresults=5&sortby=0"/>
<attr key="activitiesResourceId"
value="activitiesResourceId"/>
<attr key="activitiesFeedUrl"
value="{activitiesSvcRef}/service/atom2/activities?public=only&
;email={email}&authenticate=no&ps=5"/>
</configData>
</widgetDef>
<widgetDef defId="friends" url="{profilesContextRoot}/widget-
catalog/friends.xml" fullPageView="true"
showFullPageViewLinkInNavBar="true"
navBarResourceBundleId="friendsFullPageTitle"/>
<widgetDef defId="linkRoll" url="{profilesContextRoot}/widget-
catalog/linkroll.xml"/>
<widgetDef defId="socialTags" url="{profilesContextRoot}/widget-
catalog/tags.xml" helpBodyResourceBundleId="socialTagsHelpBody"/>
<widgetDef defId="structTags" url="{profilesContextRoot}/widget-
catalog/structure-tag.xml"/>
</definitions>Within the <widgetDef> tag, only two attributes are required, defId and url. The defId attribute is the unique ID for the widget in Profiles. The url attribute indicates the path (absolute or relative) to the XML file containing the widget’s description. Every widget is represented by an XML file, and in a later section, we will dive into the details of that file. Some of the widgets mentioned earlier, such as the Report to Chain (defId = reportStructure) and Recent Posts section (defId = multiFeedReader), utilize a <configData> section to pass additional information to the widgets. For example, the Report to Chain passes in the number of names to display in the reporting hierarchy for the user. To add in our own simple widget, we have to place a widget definition in the section listed previously so that Profiles can find our widget. The definition is shown here in which url is being mapped to the XML file containing the widget description:
<widgetDef defId="HelloWorld"
url="http://win2003ee/HelloWorld.xml"/>
Now that we have our widgets included, we need to specify where to render them on the Profiles page. The layout of the widgets on the page is also controlled through the profiles-config.xml. The following section illustrates how this is accomplished:
<layout profileType="default">


<page pageId="profilesView">
    <widgetInstance uiLocation="col3" defIdRef="reportStructure"/>
    <widgetInstance uiLocation="col3" defIdRef="friends"/>

    <widgetInstance uiLocation="col3" defIdRef="linkRoll"/>

    <widgetInstance uiLocation="col1" defIdRef="socialTags"/>

    <widgetInstance uiLocation="col2" defIdRef="multiFeedReader"/>

</page>

<page pageId="reportingStructureView"/>

<page pageId="editProfileView"/>

<page pageId="searchResultView"/>

<page pageId="fullPageWidgetView"/>

</layout>
From the preceding XML snippet, we can see that the widgets are configured so that they appear only in the profilesView page, that is, the main profile page for every user. If desired, we could also configure them to appear in the profile edit view, search results view, and so on. The actual locations for the widgets are defined in the widgetInstance tags shown previously. This tag tells Profiles the location for the widget (defined by uiLocation) and the widget to use (defined by defIdRef). Note that defIdRef matches with defId. There are three columns on the page where widgets can exist. Within a column, the system renders widgets based on the sequence in which they are listed in the file. For example, in the preceding code the Report to Chain, My Colleagues, and My Links widgets are all in the third column and are placed in the order in which they are defined (Report to Chain, My Colleagues, and then My Links). Figure 10.6 displays the different columns that can be used.

Let’s assume that we created a new widget and want to display it in the first column under the existing Tags widget. To do this, we add the following line to the profiles-config.xml file:
<widgetInstance uiLocation="col1" defIdRef="HelloWorld"/>
This section covers the basic principles behind the Lotus Connections widgets. We will discuss the iWidget 1.0 framework (http://www-10.lotus.com/ldd/mashupswiki.nsf/dx/iwidget-spec-v1.0.pdf/$file/iwidget-spec-v1.0.pdf) briefly to highlight some important points as they relate to widgets within Lotus Connections. We will also show how to create simple and advanced widgets, and also how to include them in the Home Page as well as Profiles.
An iWidget is a mini browser component that provides visualization to the user, or a logical service to a page. The main purpose for the Home Page widgets, for example, is data visualization to the user. In this capacity, they are essentially extending a server-side component, that is, the specific Lotus Connections feature.
To create the most basic widget, there are only a few necessary components, as the following XML snippet shows:
<iw:iwidget name="helloWorld"
xmlns:iw="http://www.ibm.com/xmlns/prod/iWidget">
<iw:content mode="view">
<![CDATA[
<div>
<div id="helloWorld">Hello World!</div>
</div>
]]>
</iw:content>

</iw:iwidget>
The preceding XML descriptor starts with the iwidget tag and specifies the name as helloWorld. The iWidget element can contain multiple elements to define the look and feel of the widget, as well as controlling the data sources. In this case, however, we are using only the content element. This will contain the basic HTML that is to be displayed when the widget loads, which will be the "Hello World!" string. Since we are not defining our own layout, the widget will inherit the layout defined by the page’s CSS. Also, in this case, we are passing the attribute mode=view in the content element. This tells the widget the type of markup to generate for the user. Some different options include these:
view—. Normal user markup
edit—. Markup used for editing the widget’s contents
help—. Markup for providing help to the user on how to use the widget
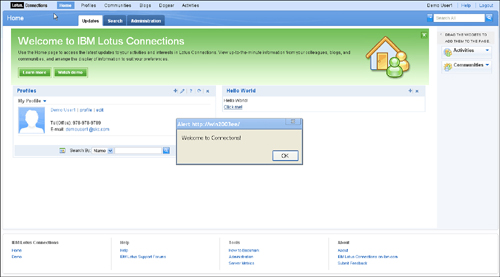
To demonstrate how the widget will look in the home page, we need to upload the widget. To do this, we must first host the widget (the XML file containing the previous snippet) on an HTTP server. For this example, we host the widget on an IBM HTTP server, and point to that location when uploading the widget. Figure 10.7 shows how the widget is rendered on the home page after it’s uploaded.

To add the Hello World widget to Profiles, we would put the following bolded snippets into the Profiles-config.xml:
<definitions>
 . . .
<widgetDef defId="HelloWorld"
url="http://win2003ee/HelloWorld.xml"/>
 . . .
</definitions>

<layout profileType="default">
<page pageId="profilesView">
<widgetInstance uiLocation="col3" defIdRef="reportStructure"/>
    <widgetInstance uiLocation="col3" defIdRef="friends"/>
    <widgetInstance uiLocation="col3" defIdRef="linkRoll"/>
    <widgetInstance uiLocation="col1" defIdRef="socialTags"/>
    <widgetInstance uiLocation="col1" defIdRef="HelloWorld"/>
    <widgetInstance uiLocation="col2" defIdRef="multiFeedReader"/>
</page>
. . .
</layout>
Figure 10.8 shows what this would look like.

The previous example showed how to create a very basic widget that served up some HTML. To do anything more complex, you have to write some JavaScript to make the widget more interactive. Instead of rewriting functionality in every widget through <SCRIPT> tags, you can instead include entire JavaScript files. The following snippet shows the changes we made to include the JavaScript resource, as well as the content of the JavaScript file. Note that we are using the uri attribute of the resource element to include the JavaScript, which is a slightly different implementation from that used in the iWidget 1.0 specification. The JavaScript will be loaded dynamically; therefore, the client browser must be able to find the file referenced in the uri attribute.
HelloWorld.xml


<iw:iwidget name="helloWorld"
xmlns:iw="http://www.ibm.com/xmlns/prod/iWidget">
<iw:resource uri="/HelloWorld/HelloWorldFunction.js" />
<iw:content mode="view">
  <![CDATA[
  <div>
     <div id="helloWorld">Hello World!</div>
     <a href="javascript:void(0);" onClick="showMessage();">
           Click me!
     </a>
  </div>
  ]]>
</iw:content>
</iw:iwidget>

HelloWorldFunction.js

function showMessage() {
var msg = "Welcome to Connections.";
alert(msg);
}
The HelloWorldFunction.js file lives under the HelloWorld directory, as noted in the preceding code. To show the changes, refresh the Home Page feature in the browser. You should see the alert box when you click the Click Me! link (see Figure 10.9).
The widgets that come with Lotus Connections utilize dojo technology to allow the widgets to be more interactive. For example, the dojo framework implements a powerful event management system. A developer can tie any DOM object to a specific function, and even notify one function when another is triggered. To create a basic dojo-based widget, you need to follow a few steps. The basic idea is to create an iWidget for rendering and displaying the widget, and then using that framework to display the dojo widget inside.
First, create the XML file that stores the definition for the iWidget, just as we did before. Next, insert the dojo widget into the iWidget to have it display in the Lotus Connections feature, such as Home Page. The XML file will be named dojoWidget.xml. This file is very similar to the iWidget descriptor we created earlier, except we are now using two new attributes:
iScope—. This attribute points to a class that is instantiated when the widget is rendered on the web page. The class itself is defined in an external JavaScript file, which we will define shortly.
iContext—. When the iWidget is rendered, and the class instantiated, a property named
iContextis attached to that object. We can use this property to access a lot of iWidget functionality, such as retrieving an element on the page or retrieving events.
Also note that the internal div element with id="dojoWidget" will be the location where we insert our dojo widget:
<iw:iwidget name="dojoWidget"
xmlns:iw="http://www.ibm.com/xmlns/prod/iWidget"
iScope="dojoWidget.dojoWidgetLoader">
    <iw:resource uri="/dojoWidget/dojoWidgetBootStrap.js" />

    <iw:itemSet id="defaultParams">
        <iw:item id="mappingRemoteUrl"
value="http://www.dojoWidget.com"/>
    </iw:itemSet>

    <iw:content mode="view">
        <![CDATA[
        <div id="_IWID_root">
            <div id="dojoWidget"></div>
        </div>
        ]]>
     </iw:content>
</iw:iwidget>
Two additional JavaScript files are necessary. The first is dojoWidgetBootStrap.js. This file is loaded when the iWidget is rendered. This JavaScript file will register the namespace for the dojo widget (dojoWidget) as well as the location for any of the dojo widget’s files (/dojoWidget). The second line in the file will then load the dojoWidgetLoader class, which does the main work for rendering the dojo widget:
dojo.registerModulePath('dojoWidget','/dojoWidget');
dojo.require("dojoWidget.dojoWidgetLoader");
The second JavaScript file is dojoWidgetLoader.js. This contains the class used to instantiate the iWidget (dojoWidgetLoader). The first line loads the class, in case it has not yet been loaded by another iWidget on this page. Note that the class name matches the scope attribute from our earlier iWidget descriptor. The dojo.declare is defining the class; in this case, we are defining only the onLoad function. When the iWidget is rendered, the onLoad function is called. This function uses the iContext property to retrieve a handle to the div element defined in dojoWidget.xml. We access the element and write out some HTML, which is then displayed in the iWidget:
dojo.provide("dojoWidget.dojoWidgetLoader");


dojo.declare("dojoWidget.dojoWidgetLoader",null,{

    onLoad: function() {
        var testDiv = this.iContext.getElementById("dojoWidget");
        testDiv.innerHTML="Test Dojo Widget Loaded!";
    }
});
After the widget is loaded into Home Page, the widget displays as shown in Figure 10.10.

This chapter shows how plug-ins and widgets can extend the capabilities of Lotus Connections, by importing new functionality through widgets, or by extending functionality to other products, such as the Lotus Connections plug-ins for Sametime. When hosting plug-ins, the standard approach is to first group them together as features. An update site relies on site.xml, which lists the features available for download and installation. A web server hosts all three components (features, plug-ins, and site.xml) for users to access. Developers use widgets to bring new functionality into Lotus Connections, such as Home Page and Profiles. Lotus Connections utilizes the iWidget framework to render and manage widgets, and as we have seen, we can also leverage dojo to create more interactive widgets. Even though Lotus Connections 2.0 does not support all the pieces of the iWidget framework, there is still sufficient functionality available to create very useful widgets.