Configuring the Interfaces
The first order of business is to configure the interfaces. To do this, you click the Configuration button on the menu bar in the upper left and then navigate to Configuration > Device Setup > Interfaces, as shown in Figure 16-5.

Currently, we have one logical Layer 3 interface. It is interface VLAN 1, and it has been given the name of management with a security level of 0 and all of the eight switch ports belong to this VLAN as access ports by default. (This was done from the CLI setup script.) To create new switched virtual interfaces (the Layer 3 interfaces), you just click Add and specify the information for each of the interfaces one at a time. Figure 16-6 shows an example of this.
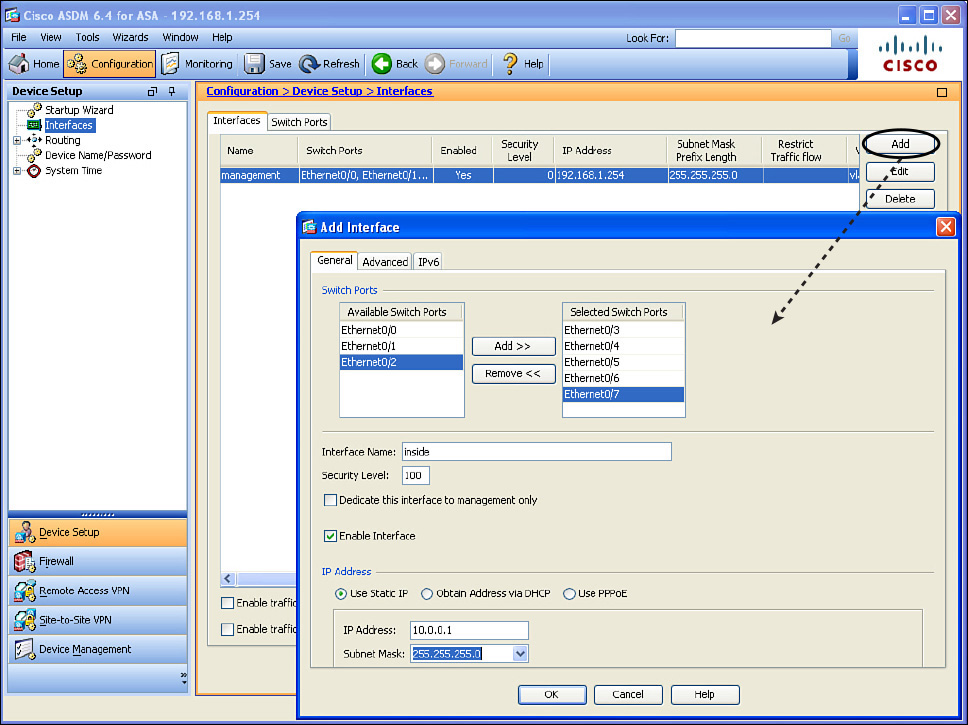
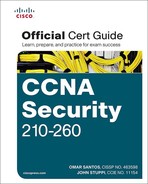
Figure 16-6 shows creating a logical Layer 3 interface named inside, with a security level of 100 (which is pretty standard for your interface connected to your internal network). I also associated five of the ports that I intend to use for connecting internal users and devices as belonging to this new VLAN. By default, this creates a new VLAN using a VLAN number that does not currently exist on this firewall. If you click the Advanced tab, you can specify the exact number of the VLAN you want, as shown in Figure 16-7.

In this example, I use the VLAN number 2 for the inside. From this window, you can also specify the maximum transmission unit (MTU), and some information that could be used for high-availability failover. You can also specify that traffic from this VLAN should never be forwarded to another interface, which can be selected from the drop-down list in the Block Traffic section.
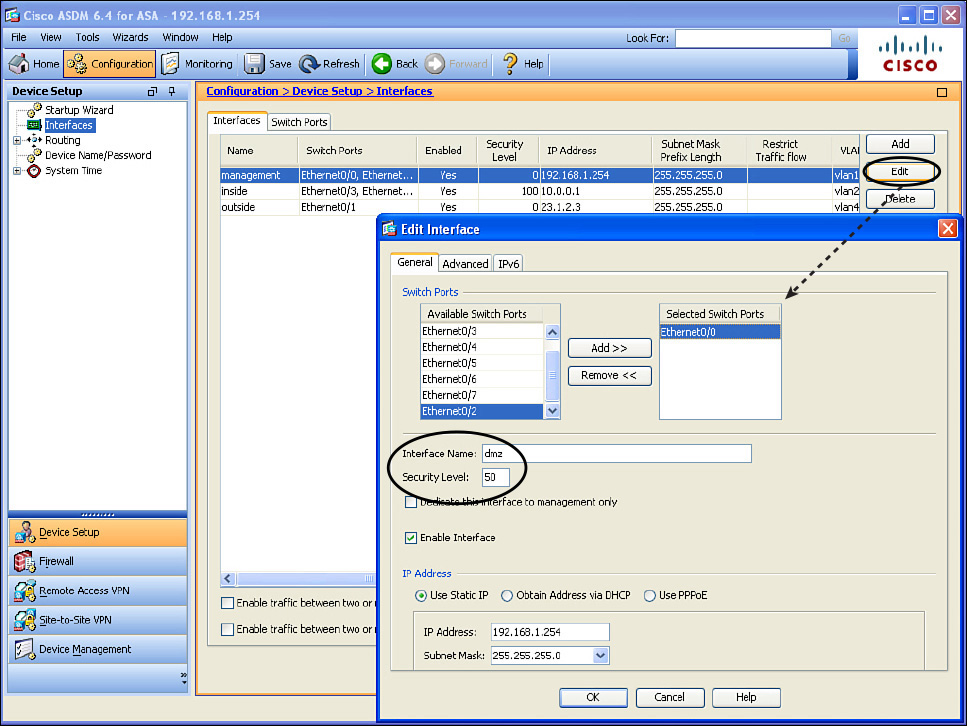
The number of named interfaces you are allowed to use is governed by the license on the ASA. After you have configured your interfaces, you can apply the changes by clicking the Apply button (see Figure 16-8).

The Summary page includes the name of the interface, which switch ports are associated with that logical interface, the security level, IP address, VLAN number, and more. If the information does not fit on one page, scrolling to the right will reveal the rest of the columns.
Earlier, we talked about the defaults related to an ASA not being willing to forward traffic between two interfaces if those two interfaces are both at the same security level. We also discussed that the ASA does not like to route a packet out the exact same interface that the packet came in on. To modify both these behaviors, you can place a check mark in each of the check boxes near the bottom of the screen shown in Figure 16-8.
The number of named interfaces that you can create is controlled by the license on the ASA. In our scenario, I want to have an inside interface, an outside interface, and a DMZ interface, so I reconfigure the name and security level of the current interface named management and use it as a DMZ interface, as shown in Figure 16-9.
Changing the name of the interface does not change the security posture, but it makes sense to name the interfaces so that when you see them you will know where they connect. In addition, changing the security level (in our example to 50) is important because this interface has a higher security level than the outside but a lower security level than the inside. We could have changed the security level to any number between 1 and 99, inclusive, and achieved the same results. To implement these changes, you click the OK button to dismiss the pop-up windows, and click the Apply button to implement the changes on the ASA. In the process of making these changes, you may receive warnings from ASDM indicating that changing interface parameters, including security levels, may cause loss of connectivity (especially if you are disabling an interface that you are currently using to communicate with the ASA).
Because you are likely to run into this issue, you need to be aware of one more tweak for this configuration. On the Advanced tab shown in Figure 16-7, indicate that you are willing to block traffic from one of your interfaces so that it cannot be forwarded to another specific interface. An upgraded Plus license allows for three full-functioning interfaces. Figure 16-10 shows some restrictions in place in the Restrict Traffic Flow column. This figure shows restricting traffic from the outside to the inside. (This is an example only; in production, this configuration would not work too well for your users who are trying to get replies from servers on the outside.) I will not be leaving the restriction in place.
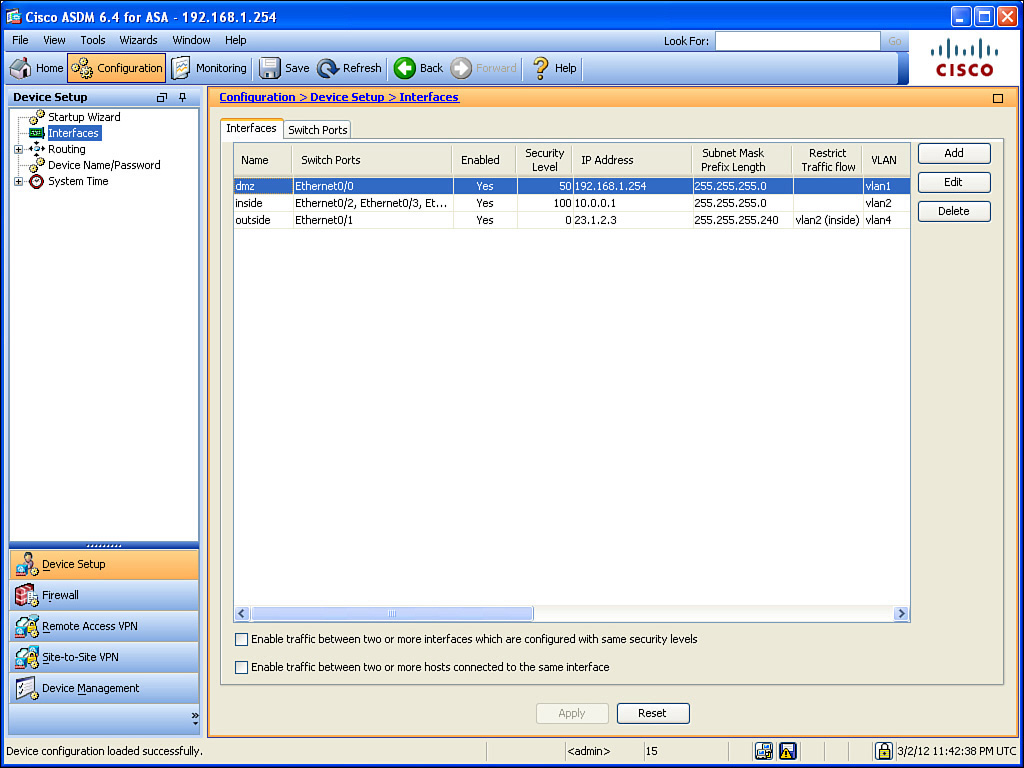
Figure 16-10 shows the final configuration.
From the CLI, you can implement these same changes using the commands shown in Example 16-4.
Example 16-4 Implementing Additional Firewall Interfaces
ASA1(config)# configure terminal
ASA1(config)#
! Configure the logical Switched Virtual Interface (SVI, it is the Layer 3
! interface)
ASA1(config)# interface Vlan1
! Bring it out of shutdown state
ASA1(config-if)# no shutdown
! Add an optional description
ASA1(config-if)# description Connect to the dmz
! Give the interface a name
ASA1(config-if)# nameif dmz
! Give the interface a security level
ASA1(config-if)# security-level 50
! Give the interface an IP address
ASA1(config-if)# ip address 192.168.1.254 255.255.255.0
ASA1(config-if)# exit
! Repeat this process for the other interfaces
ASA1(config)# interface Vlan2
ASA1(config-if)# no shutdown
ASA1(config-if)# description Connects to my private network
ASA1(config-if)# nameif inside
ASA1(config-if)# security-level 100
ASA1(config-if)# ip address 10.0.0.1 255.255.255.0
ASA1(config-if)# exit
ASA1(config)#
ASA1(config)# interface Vlan4
ASA1(config-if)# no shutdown
ASA1(config-if)# description Connects to the Internet
ASA1(config-if)# no forward interface Vlan2
ASA1(config-if)# nameif outside
ASA1(config-if)# security-level 0
ASA1(config-if)# ip address 23.1.2.3 255.255.255.240
ASA1(config-if)# exit
ASA1(config)#
! Assign the access ports of the built in switch to the VLANs that you
! want them to belong to, repeat for all switch ports you intend to use.
ASA1(config)# interface Ethernet0/1
ASA1(config-if)# switchport access vlan 4
ASA1(config-if)# exit
ASA1(config)#)
ASA1(config)# interface Ethernet0/2
ASA1(config-if)# switchport access vlan 2
ASA1(config-if)# exit
ASA1(config)#
ASA1(config)# interface Ethernet0/3
ASA1(config-if)# switchport access vlan 2
ASA1(config-if)# exit
ASA1(config)#
ASA1(config)# interface Ethernet0/4
ASA1(config-if)# switchport access vlan 2
ASA1(config-if)# exit
ASA1(config)#
ASA1(config)# interface Ethernet0/5
ASA1(config-if)# switchport access vlan 2
ASA1(config-if)# exit
ASA1(config)#
ASA1(config)# interface Ethernet0/6
ASA1(config-if)# switchport access vlan 2
ASA1(config-if)# exit
ASA1(config)#
ASA1(config)# interface Ethernet0/7
ASA1(config-if)# switchport access vlan 2
ASA1(config-if)# exit
! To verify your work:
ASA1(config)# show run interface
! Note the E0/0 is assigned to VLAN 1 (the dmz interface) and because the
! default is for a port to be assigned to VLAN 1, there is no specific
! configuration that shows up in the interface belonging to VLAN 1
interface Ethernet0/0
!
! The rest of the ports are assigned to non-default VLANs, so they show up
! with the VLAN assignment in their configuration.
interface Ethernet0/1
switchport access vlan 4
!
interface Ethernet0/2
switchport access vlan 2
!
interface Ethernet0/3
switchport access vlan 2
!
interface Ethernet0/4
switchport access vlan 2
!
interface Ethernet0/5
switchport access vlan 2
!
interface Ethernet0/6
switchport access vlan 2
!
interface Ethernet0/7
switchport access vlan 2
!
interface Vlan1
description Connect to the dmz portion of my network
nameif dmz
security-level 50
ip address 192.168.1.254 255.255.255.0
!
interface Vlan2
description Connects to my private network
nameif inside
security-level 100
ip address 10.0.0.1 255.255.255.0
!
interface Vlan4
description Connects to the Internet
no forward interface Vlan2
nameif outside
security-level 0
ip address 23.1.2.3 255.255.255.240
ASA1(config)#
For the physical connectivity, you would use a patch cable from the appropriate port on the built-in eight-port switch to either a DMZ device, an inside device, or to the outside network device. For example, our server on the DMZ is connected with a patch cable to port 0/0 on the ASA. An inside host could be connected to any of the ports between 0/2 through 0/7 because all of those ports have been assigned to VLAN 2 (VLAN 2 is where the inside logical interface [the SVI] of the ASA is configured).