Easier Method for Installing Both Root and Identity Certificates
An easier option than manually installing the root certificate file is to use SCEP and install the root certificate, generate a new key pair, and request your identity certificate all using SCEP.
For this, you could begin in the Identity Certificate area in ASDM. Click Add, assign a name you want to associate with the new CA, and then click the Add a New Identity Certificate radio button. From here, if you want to use a brand new key pair in conjunction with this CA (that will be putting your public key into your digital certificate), click New (next to the key pair option), assign the key pair a name and the size of the key to use, and then click the Generate Now button, as shown in Figure 5-8.

After you click Generate Now, a public-private key pair is generated and the public key portion of it is sent to the CA as part of the SCEP certificate request process. The equivalent CLI command that could be used to generate the new key pair is shown in Example 5-4.
Example 5-4 Generating a New Key Pair
Keith-asa1(config)# crypto key generate rsa label My-Key-Pair modulus 2048 noconfirm
After the key pair is generated, and before clicking the Add Certificate button, you can specify the details of the CA server and how to reach that CA server by clicking the Advanced button, as shown in Figure 5-9.

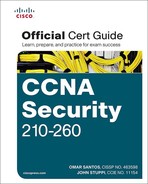
Using the options presented by the Advanced button, you can specify the enrollment mode of SCEP and the IP address of the CA server that supports SCEP, as shown in Figure 5-10.
Once the enrollment method and IP address are configured, click the OK button, and then click the Add Certificate button.
Example 5-5 shows the equivalent CLI commands to authenticate and enroll with a new CA via SCEP.
Example 5-5 Authenticating and Enrolling with a New CA via SCEP
! Create the name that you want the ASA to reference the CA by
Keith-asa1(config)# crypto ca trustpoint New-CA-to-Use
! Specify which key-pair will be used for the public portion that will go
! into the digital certificate. Below the new key pair we created is specified.
Keith-asa1(config-ca-trustpoint)# keypair New-Key-Pair
! Specify what the certificate may be used for. (Both SSL and IPsec)
Keith-asa1(config-ca-trustpoint)# id-usage ssl-ipsec
! Specify whether or not the fully qualified domain name (fqdn) will be
! required
! Keith-asa1(config-ca-trustpoint)# no fqdn
! Specify the x.500 common name (CN)
Keith-asa1(config-ca-trustpoint)# subject-name CN=ciscoasa
! Specify where the CA server can be reached. HTTP must be running on the
! CA server.
Keith-asa1(config-ca-trustpoint)# enrollment url http://192.168.1.105
Keith-asa1(config-ca-trustpoint)# exit
! Retrieve and install the root certificate. The "nointeractive" won't
! prompt the user for additional information.
Keith-asa1(config)# crypto ca authenticate New-CA-to-Use nointeractive
! Request and install the identity certificate from the CA. The "noconfirm"
! will avoid prompting the user for additional confirmation messages.
Keith-asa1(config)# crypto ca enroll New-CA-to-Use noconfirm
If the SCEP-capable CA server is reachable, and configured correctly, a success message appears, as shown in Figure 5-11.

To see the details of the new certificate, highlight the certificate and click Show Details (see Figure 5-12).

Notice the details that are found in most digital certificates, including serial number, CRL, and the validity dates.
Note
The serial number on a certificate from a public PKI server is much longer than the one issued by my internal CA server used in my lab.
We have discussed the concepts of using PKI, and also taken a look at an example using an ASA. To make sure you understand all components of PKI, review Table 5-3.
