17. Recording Liabilities
What You’ll Do
Record Payroll Tax Accruals Without a QuickBooks Payroll Subscription
Account for Deposits or Retainers
Use the QuickBooks Loan Manager
Introduction
The term liabilities refers to your company’s debts. QuickBooks groups liabilities into four types of accounts:
![]() Accounts payable—These are the bills you owe currently.
Accounts payable—These are the bills you owe currently.
![]() Credit card—This is the balance due on company credit cards.
Credit card—This is the balance due on company credit cards.
![]() Other current liabilities—This represents payroll owed to employees, taxes payable, advances, deposits, subscriptions your customers have paid, loans from shareholders, and other debt you expect to pay back within one year.
Other current liabilities—This represents payroll owed to employees, taxes payable, advances, deposits, subscriptions your customers have paid, loans from shareholders, and other debt you expect to pay back within one year.
![]() Long-term liabilities These are debts that won’t be paid back within the year.
Long-term liabilities These are debts that won’t be paid back within the year.
Some liabilities are paid quickly. Utilities, for example, are paid each month, and new bills come in to take their place. Other liabilities linger; mortgages stretch out over decades. Credit card balances, although constantly refreshed, might never seem to go away.
Companies are required to report their liabilities on financial statements so investors and lenders have a clearer picture of the value of the company.


Managing Accounts Payable
Amounts you owe your vendors, including subcontractors, are grouped under the heading of accounts payable. Most companies pay off their accounts payables in 30–60 days. Amazingly, new payables are always ready to take the place of the ones you pay! When entering a payable in QuickBooks, you are required to enter at least the name of the vendor, the amount of the debt, and the account to which the payable is expensed. If you take the time to enter payment terms, QuickBooks provides you with a reminder of when the debt is due.
![]() Select Reports, Vendors & Payables; then select A/P Aging Summary.
Select Reports, Vendors & Payables; then select A/P Aging Summary.

![]() Examine the report to see how much your company owes each vendor and how long overdue the payments are. Note that amounts you owe for inventory items are included in this report if you enabled the QuickBooks inventory feature.
Examine the report to see how much your company owes each vendor and how long overdue the payments are. Note that amounts you owe for inventory items are included in this report if you enabled the QuickBooks inventory feature.
![]() Change the interval for each column of the report if the default 30-day interval is not the information you want to see.
Change the interval for each column of the report if the default 30-day interval is not the information you want to see.
![]() Change the limit of 90 days if you need to see the specific intervals for payables older than 90 days.
Change the limit of 90 days if you need to see the specific intervals for payables older than 90 days.
![]() Double-click any amount to view a Quick-Zoom report showing all the bills that make up that amount.
Double-click any amount to view a Quick-Zoom report showing all the bills that make up that amount.

![]() Double-click any bill amount on the Quick-Zoom report to see the actual bill (not shown).
Double-click any bill amount on the Quick-Zoom report to see the actual bill (not shown).
![]() Press Esc to close each window, or click the X in the upper-right corner of each window.
Press Esc to close each window, or click the X in the upper-right corner of each window.
See Also
See “Using Reminders” on page 224 for information on the reminders QuickBooks uses to inform you of due dates for paying bills.
Recording Payroll Tax Accruals Without a QuickBooks Payroll Subscription
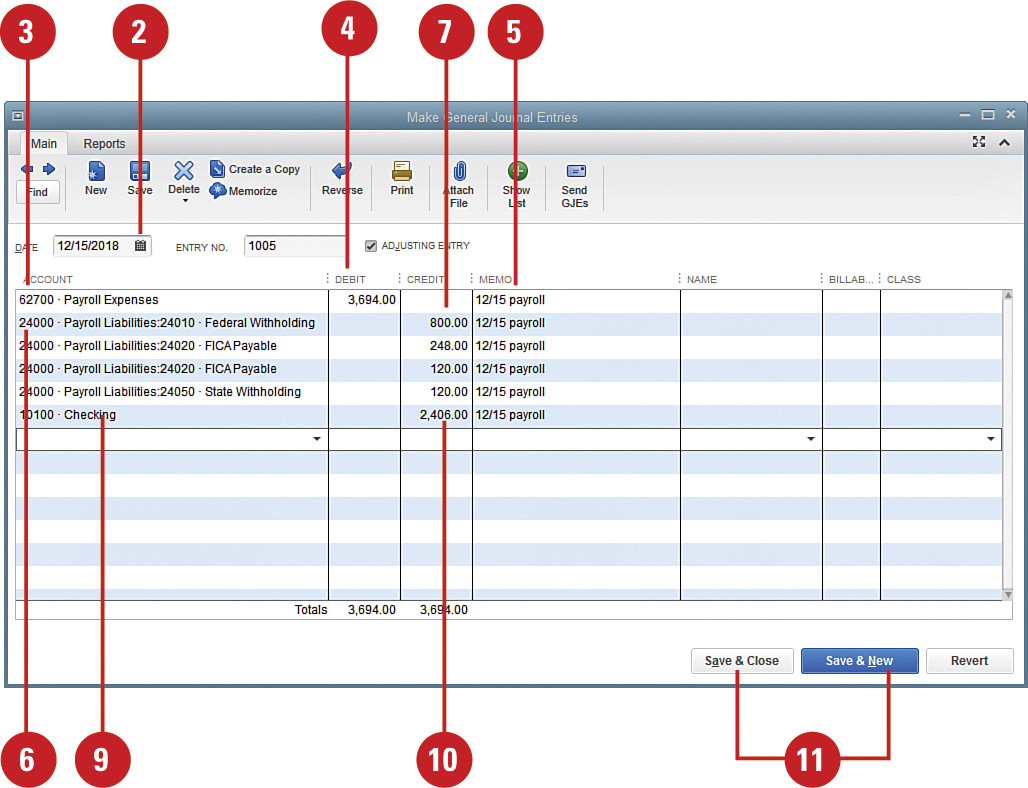
The taxes you withhold from your employees must be turned over to the government, and, as an employer, you must pay additional payroll taxes such as the employer’s share of Social Security, Medicare, and unemployment taxes. Although these amounts are owed to the government when you issue paychecks, the amounts might not be due immediately. When your company owes payroll taxes, you have to create liability payroll items and accounts (such as State Unemployment) to record the taxes that are due. If you use QuickBooks to calculate your payroll, the liabilities are recorded automatically during the payroll setup. If you use an outside payroll service that debits your cash account for the payroll, you need to record your payroll and payroll tax accruals yourself, as shown here.
![]() Select Company, Make General Journal Entries. You might see an information window telling you about the automatic journal entry numbering feature. Click OK to close this window.
Select Company, Make General Journal Entries. You might see an information window telling you about the automatic journal entry numbering feature. Click OK to close this window.
![]() Enter the date of the payroll, which might be different from the date that automatically displays.
Enter the date of the payroll, which might be different from the date that automatically displays.
![]() Enter the payroll expense account.
Enter the payroll expense account.
![]() Enter the gross payroll expense (total salaries and wages before withholdings) as a debit.
Enter the gross payroll expense (total salaries and wages before withholdings) as a debit.
![]() Enter a brief memo.
Enter a brief memo.
![]() Enter the first tax liability account—for example, enter Payroll Liabilities:Federal Withholding.
Enter the first tax liability account—for example, enter Payroll Liabilities:Federal Withholding.
![]() Enter the amount of tax liability as a credit.
Enter the amount of tax liability as a credit.
![]() Repeat Steps 6 and 7 until all your tax liabilities have been entered.
Repeat Steps 6 and 7 until all your tax liabilities have been entered.
![]() Enter the cash account from which the payroll is paid.
Enter the cash account from which the payroll is paid.
![]() Verify the net payroll expense (the amount of payroll actually paid out to employees after withholdings) as a credit. This amount is automatically calculated by QuickBooks and should agree with your records.
Verify the net payroll expense (the amount of payroll actually paid out to employees after withholdings) as a credit. This amount is automatically calculated by QuickBooks and should agree with your records.
![]() Save the journal entry.
Save the journal entry.
Did You Know?
QuickBooks can enter payroll automatically. Although a journal entry like the one shown in this task or a check to your payroll provider is necessary if you outsource your payroll services, all these entries are made automatically if you use one of the QuickBooks payroll subscription offerings.
The payroll tax works similarly if you write a check for payroll services. If you write a check to your payroll service provider instead of having the net payroll amount withdrawn from your cash account, you record the same expenses and liabilities as in the previous task’s journal entry, without the entry for your bank account—that amount is recorded in the amount of the check.
Setting Up Credit Card Accounts
You can set up a credit card as a separate liability account in QuickBooks. The account can be a subaccount of another liability account, or it can stand alone as a separate item on your balance sheet. Each month, as you make credit card charges, you increase the balance of your credit card liability. When you make payments on the account, you decrease the liability balance. QuickBooks provides the opportunity to reconcile your credit card account every month, just as you do your bank account.
Set Up a Credit Card Account
![]() Press Ctrl+A to open the Chart of Accounts list.
Press Ctrl+A to open the Chart of Accounts list.
![]() Press Ctrl+N to open the Add New Account window.
Press Ctrl+N to open the Add New Account window.
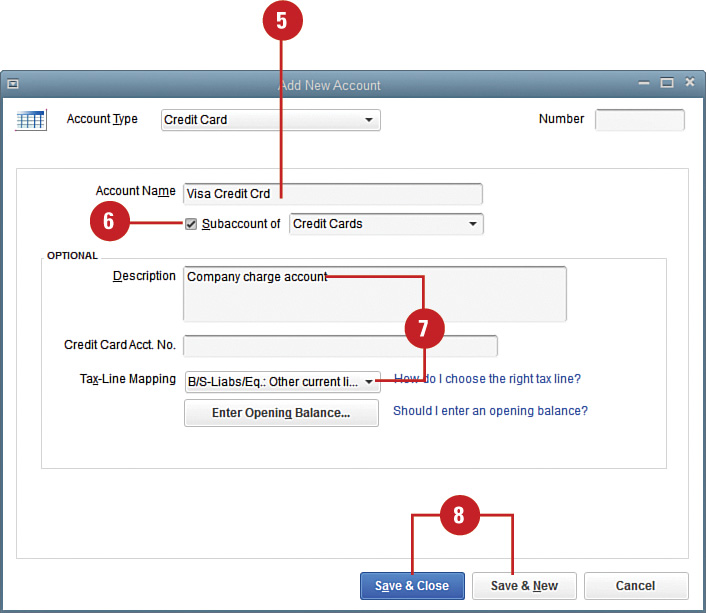
![]() Select Credit Card for the Type.
Select Credit Card for the Type.
![]() Click Continue.
Click Continue.
![]() Enter the name for this credit card account.
Enter the name for this credit card account.
![]() Indicate whether you want this account to be a subaccount of another liability account.
Indicate whether you want this account to be a subaccount of another liability account.
![]() Enter optional description, credit card number, tax line, and opening balance information.
Enter optional description, credit card number, tax line, and opening balance information.
![]() Save the new account.
Save the new account.
Did You Know?
It’s your choice when you enter credit card charges. You can record charges as they are incurred or record them all at once when the monthly statement arrives. The best accounting practice, however, is to enter charges as they are incurred.
You might be able to download your credit card charges. Some credit card vendors allow their users to automatically download transactions directly into QuickBooks. After setting up your credit card in QuickBooks, contact the credit card company to see whether it has a cooperative online arrangement with QuickBooks. If it does, ask the company to send the information you need to sign up for this service. Then set up the online credit card account just as you would an online bank account (see “Activating Online Services with Your Financial Institution” in Chapter 11, “Using the QuickBooks Online Features”).
![]() Indicate which credit card you used for this charge.
Indicate which credit card you used for this charge.
![]() Enter the name of the vendor from whom you made the purchase.
Enter the name of the vendor from whom you made the purchase.
![]() Enter the date of the purchase.
Enter the date of the purchase.
![]() Leave the Amount field set to zero. (Don’t make any changes in this field as it will be automatically filled as mentioned in Step 7.)
Leave the Amount field set to zero. (Don’t make any changes in this field as it will be automatically filled as mentioned in Step 7.)
![]() Enter the account in which the purchase should be recorded.
Enter the account in which the purchase should be recorded.
![]() Enter the amount of the purchase. The amount you enter in the expense area of the form is automatically entered in the Amount section mentioned in Step 5.
Enter the amount of the purchase. The amount you enter in the expense area of the form is automatically entered in the Amount section mentioned in Step 5.
![]() Enter an optional description of the expense.
Enter an optional description of the expense.
![]() Repeat Steps 6 and 7 to enter any additional purchases made in this transaction.
Repeat Steps 6 and 7 to enter any additional purchases made in this transaction.
![]() Save the form.
Save the form.

Timesaver
You can also click the Reconcile button in the Banking area on the Home page.
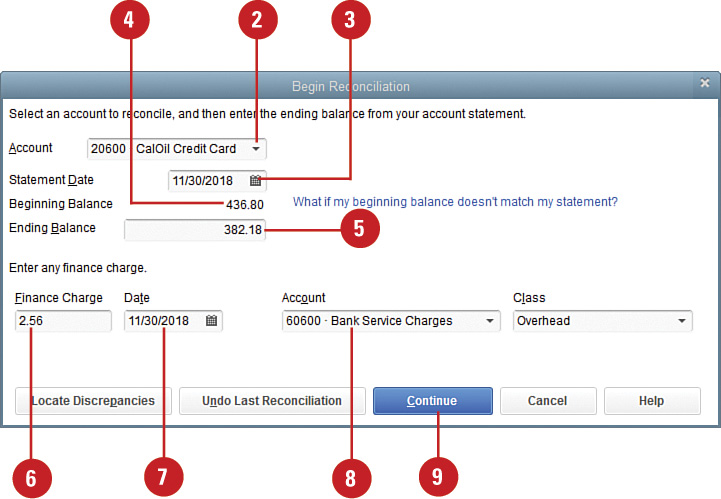
![]() Enter the credit card for which you have received a statement.
Enter the credit card for which you have received a statement.
![]() Enter the date of the statement.
Enter the date of the statement.
![]() Verify the Beginning Balance.
Verify the Beginning Balance.
![]() Enter the ending balance that displays on your statement.
Enter the ending balance that displays on your statement.
![]() Enter any finance charge that displays on the statement.
Enter any finance charge that displays on the statement.
![]() Enter the date on which the finance charge was assessed.
Enter the date on which the finance charge was assessed.
![]() Verify the account to which the finance charge should be recorded and class if using class tracking.
Verify the account to which the finance charge should be recorded and class if using class tracking.
![]() Click Continue.
Click Continue.
Did You Know?
You can enter missing charges without closing the reconciliation window. If you forgot to enter some charges and want to do so before finishing your reconciliation, open the Enter Credit Card Charges window and enter your charges. They appear in your reconciliation window as soon as you enter them.
![]() Check off all the entries that appear on your credit card statement. These entries are drawn from transactions you entered into your QuickBooks file as payments or using the Enter Credit Card Charges form.
Check off all the entries that appear on your credit card statement. These entries are drawn from transactions you entered into your QuickBooks file as payments or using the Enter Credit Card Charges form.
![]() Optionally, click Highlight Marked to make it easier to see those transactions that are not marked as cleared.
Optionally, click Highlight Marked to make it easier to see those transactions that are not marked as cleared.
![]() Click Reconcile Now to complete the reconciliation.
Click Reconcile Now to complete the reconciliation.

Did You Know?
You can leave the reconciliation and finish later. If you begin your reconciliation and then realize you don’t have time to finish the job, click the Leave button. Your work is saved, and you can begin again right where you left off.
![]() The Reconcile Adjustment window displays if a difference exists between the statement balance and the sum of the items you checked off in Step 10. Click Return to Reconcile to return to the reconciliation if you want to identify the difference.
The Reconcile Adjustment window displays if a difference exists between the statement balance and the sum of the items you checked off in Step 10. Click Return to Reconcile to return to the reconciliation if you want to identify the difference.
![]() Click Leave Reconcile if you want to leave the reconciliation for now and come back later.
Click Leave Reconcile if you want to leave the reconciliation for now and come back later.
![]() Click Enter Adjustment to enter an adjustment for the unreconciled amount. Note: The adjustment is recorded as an expense in the Reconciliation Discrepancies account.
Click Enter Adjustment to enter an adjustment for the unreconciled amount. Note: The adjustment is recorded as an expense in the Reconciliation Discrepancies account.

![]() Select whether you want to issue a check or record the credit card bill as a payable (not shown).
Select whether you want to issue a check or record the credit card bill as a payable (not shown).
![]() Click OK.
Click OK.

![]() Select the type(s) of reconciliation report you want to produce.
Select the type(s) of reconciliation report you want to produce.
![]() Click Display to display the report(s) onscreen.
Click Display to display the report(s) onscreen.
![]() Click Print to print a paper copy of the report(s).
Click Print to print a paper copy of the report(s).

![]() QuickBooks creates a check if you requested payment by check. Verify the information on the check, and indicate whether it is to be printed or paid online. (Your bank might charge a fee for online payment service.)
QuickBooks creates a check if you requested payment by check. Verify the information on the check, and indicate whether it is to be printed or paid online. (Your bank might charge a fee for online payment service.)
![]() Save the check.
Save the check.

Accounting for Deposits or Retainers
Depending on the type of business your company engages in, you might receive advances, deposits, or retainers from your customers or clients. Although this money has been paid to you, it is for future services and has not yet been earned. Therefore, instead of recording the money as income, the payments should be recorded as liabilities. After you perform the services and earn the money, you transfer the liability to an income account, shown here.
![]() Select Company, Make General Journal Entries.
Select Company, Make General Journal Entries.
![]() Verify that the correct date displays.
Verify that the correct date displays.
![]() Enter the liability account where you record your deposits.
Enter the liability account where you record your deposits.
![]() Enter the amount you are ready to transfer to income. This entry should be a debit.
Enter the amount you are ready to transfer to income. This entry should be a debit.
![]() Enter an optional memo.
Enter an optional memo.
![]() Enter the customer or client who made the deposit.
Enter the customer or client who made the deposit.
![]() Enter the income account where you record the money you earned for this job.
Enter the income account where you record the money you earned for this job.
![]() Enter the amount of the deposit or retainer in the Credit column.
Enter the amount of the deposit or retainer in the Credit column.
![]() Save the entry.
Save the entry.

See Also
See “Receiving Advances, Retainers, and Down Payments” on page 137 for information on the proper method for recording the receipt of a deposit or retainer.
Did You Know?
You can refer to customers and jobs in journal entries without having the amount flow through to a customer invoice. The only time a journal entry amount flows through to a customer invoice is if the entry is made to an expense account. Customer and job references on non-expense account lines are information-only entries.
You can record down payments on customer invoices. An alternative to recording down payments with journal entries that go straight to the liability account is to set up down payments as Other Charge items, with the related account being a liability account. You can record down payments on an invoice form using the Other Charge item on the invoice. Because the Other Charge item is not related to an income account, your income records are not affected, but by recording the down payment as an Other Charge item, you can spot the amount on a Sales by Item report.
If you enter a name on the first line of a journal entry, that name is assigned to all lines. An alternative is to use an account for journal entries on the first line and leave the other columns blank. This avoids potential problems and provides a convenient location to review journal entries entered.
Recording Loans
When you borrow money, you must record as an asset the receipt of cash or the item purchased on credit, and you must record the liability that offsets that asset. If the loan will be paid in full within a year, it is a current liability. If the payback period is longer than a year, it’s a long-term liability. (Some companies record the entire loan in the long-term part of the balance sheet. Others record the loan in two parts, reflecting both liability portions.) This example shows how to set up a long-term loan.
![]() Press Ctrl+A to open the Chart of Accounts list.
Press Ctrl+A to open the Chart of Accounts list.
![]() Press Ctrl+N to open the Add New Account window.
Press Ctrl+N to open the Add New Account window.
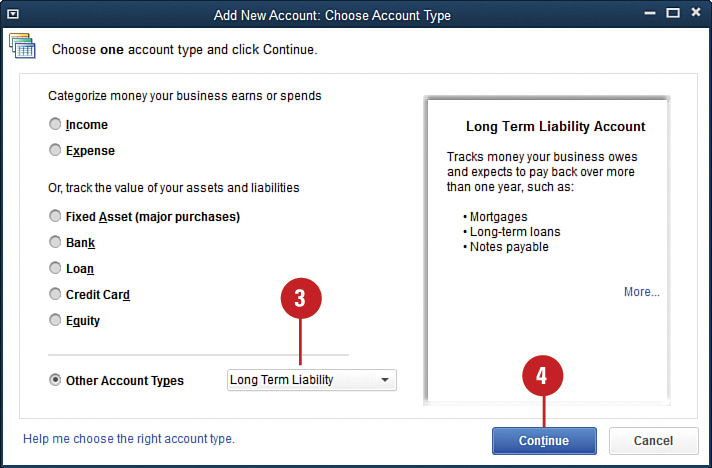
![]() Select Long Term Liability as the account type.
Select Long Term Liability as the account type.
![]() Click Continue.
Click Continue.
![]() Enter a name for the loan. This appears on your balance sheet, so choose the name carefully.
Enter a name for the loan. This appears on your balance sheet, so choose the name carefully.
![]() Indicate whether this is to be classified as a subaccount.
Indicate whether this is to be classified as a subaccount.
![]() Enter an optional description for the loan.
Enter an optional description for the loan.
![]() Enter an optional account number and tax line for the loan.
Enter an optional account number and tax line for the loan.
![]() Click the Enter Opening Balance button if the loan was already in place at your company’s start date; enter the loan amount and starting date in the fields provided. For new loans, you enter the balance when you receive the loan, so you can skip this step.
Click the Enter Opening Balance button if the loan was already in place at your company’s start date; enter the loan amount and starting date in the fields provided. For new loans, you enter the balance when you receive the loan, so you can skip this step.
![]() Click one of the Save options.
Click one of the Save options.

See Also
See “Making Bank Deposits” in Chapter 4, “Invoicing and Collecting Income,” for more information about depositing money that your company receives.
Using the QuickBooks Loan Manager
The QuickBooks Loan Manager makes entering loan payments simple. Enter basic information about your loan, including the starting date, interest rate, number of payments you will make, and amount you will pay; QuickBooks takes care of calculating how much of each payment is principal and interest. When it’s time to make a payment, open the Loan Manager and click the Set Up Payment button to initiate a payment with the interest and principal recorded correctly.
![]() Select Banking, Loan Manager.
Select Banking, Loan Manager.
![]() Click the Add a Loan button.
Click the Add a Loan button.

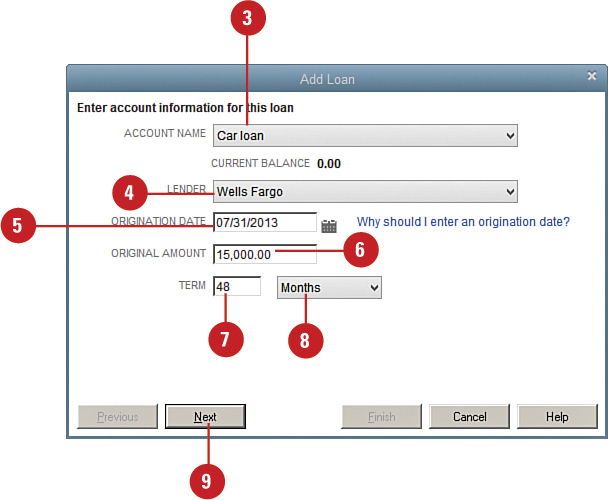
![]() Enter the liability account where the loan balance is recorded.
Enter the liability account where the loan balance is recorded.
![]() Enter the name of the lender.
Enter the name of the lender.
![]() Enter the date on which the loan was initiated.
Enter the date on which the loan was initiated.
![]() Enter the principal balance.
Enter the principal balance.
![]() Enter the number of payments you will make.
Enter the number of payments you will make.
![]() Enter the frequency with which you will make payments
Enter the frequency with which you will make payments
![]() Click Next.
Click Next.
Did You Know?
Escrow payments increase the amount of the loan payments. Mortgages are the most common type of loan that includes escrow payments. Escrow payments are payments made to a separate fund that is held by the lending institution and used to pay such items as property taxes and insurance.
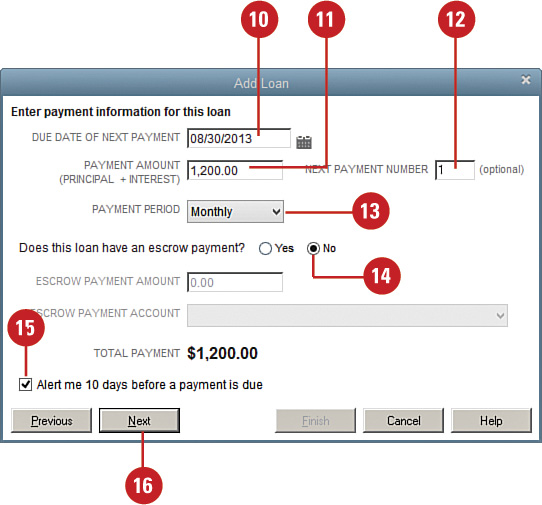
![]() Enter the due date of the next payment.
Enter the due date of the next payment.
![]() Enter the payment amount.
Enter the payment amount.
![]() Enter the number of the next payment.
Enter the number of the next payment.
![]() Enter the payment frequency.
Enter the payment frequency.
![]() Enter escrow payment information if applicable.
Enter escrow payment information if applicable.
![]() Check this box if you want a 10-day advance warning of the payment due date.
Check this box if you want a 10-day advance warning of the payment due date.
![]() Click Next.
Click Next.
![]() Enter the interest rate.
Enter the interest rate.
![]() Enter the frequency with which interest is compounded.
Enter the frequency with which interest is compounded.
![]() Enter the account from which payments will be drawn.
Enter the account from which payments will be drawn.
![]() Enter the account in which interest expense should be recorded.
Enter the account in which interest expense should be recorded.
![]() Enter the account in which any bank fees or service charges should be recorded.
Enter the account in which any bank fees or service charges should be recorded.
![]() Click Finish.
Click Finish.

![]() Click the Payment Schedule tab to see a detailed list of how your payments will be recorded.
Click the Payment Schedule tab to see a detailed list of how your payments will be recorded.
![]() Click Set Up Payment to open the check window and issue a payment for this loan. QuickBooks fills out the check with the proper interest and principal disbursement.
Click Set Up Payment to open the check window and issue a payment for this loan. QuickBooks fills out the check with the proper interest and principal disbursement.

Recording Loan Payments
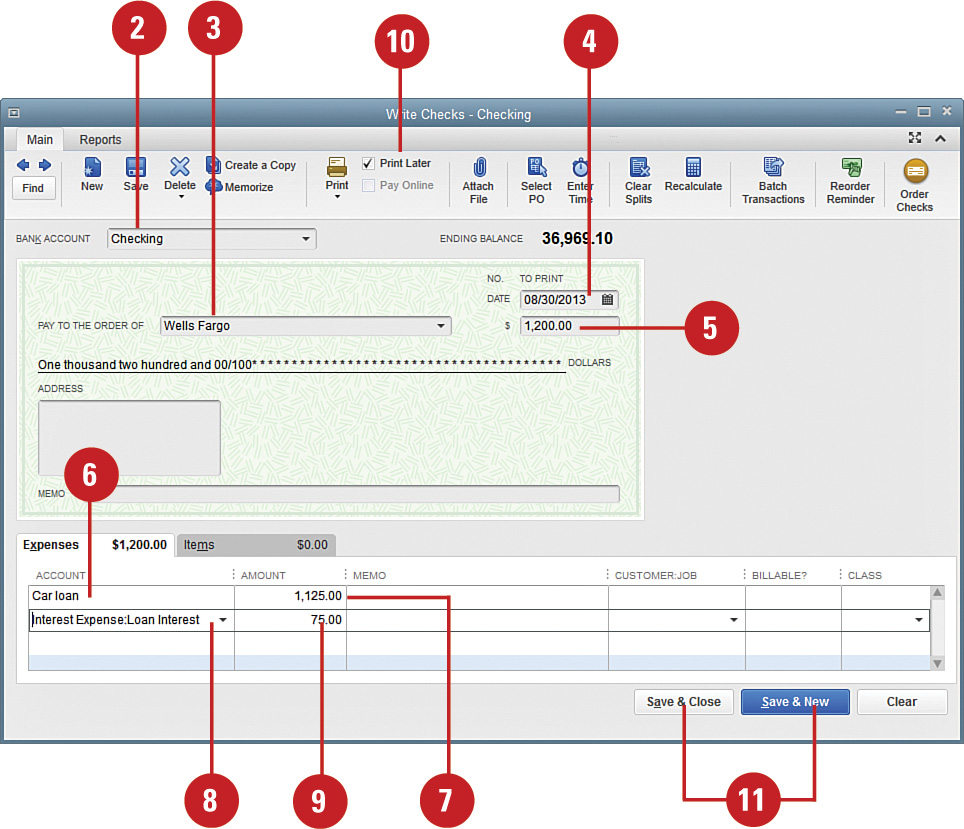
If you receive a monthly statement from your lender that breaks down interest and principal payments, you can skip using the Loan Manager and just enter the principal and interest information when you write your check. When you make payments on your loan, write a check to the lender, noting both parts of the payment. See the “Calculating Interest” sidebar for information on calculating interest.
![]() Click the Write Checks icon in the Banking section on the Home page.
Click the Write Checks icon in the Banking section on the Home page.
Timesaver
You can quickly open the Write Checks window by pressing Ctrl+W.
![]() Verify the account from which the payment will be drawn.
Verify the account from which the payment will be drawn.
![]() Enter the payee.
Enter the payee.
![]() Enter the date of the payment.
Enter the date of the payment.
![]() Enter the amount of the payment.
Enter the amount of the payment.
![]() Enter the loan liability account.
Enter the loan liability account.
![]() Enter the amount of the payment that will reduce the loan balance.
Enter the amount of the payment that will reduce the loan balance.
![]() Enter the expense account where you record interest paid by your company.
Enter the expense account where you record interest paid by your company.
![]() Verify the amount that QuickBooks calculated for interest (the difference between the check total and the amount in Step 7).
Verify the amount that QuickBooks calculated for interest (the difference between the check total and the amount in Step 7).
![]() Select whether this is to be an online payment or a check is to be printed.
Select whether this is to be an online payment or a check is to be printed.
![]() Save the check.
Save the check.