
2. Setting Up and Using Payroll Features
What You’ll Do
Set Payroll and Employee Preferences
Set Up Employee Payroll Information
Set Up Sick and Vacation Benefits
Prepare and Pay Payroll Liabilities
Create Employer Payroll Reports
Report Payroll Taxes with Form 941
Pay Federal Unemployment Compensation Taxes with Form 940
Set Up Independent Contractors for 1099 Forms
Introduction
As an employer, it is your job to keep track of and pay salaries and wages to your employees and contractor fees to your subcontractors. Although paying payroll and contractor fees can be time consuming and tedious when done on paper and with a calculator, with QuickBooks, the process is quick and the record keeping is excellent.
You can produce all the federal payroll tax forms you need, right in QuickBooks, including the following:
![]() Form 941—Employer’s Quarterly Federal Tax Return
Form 941—Employer’s Quarterly Federal Tax Return
![]() Form 943—Employer’s Annual Federal Tax Return for Agricultural Employees
Form 943—Employer’s Annual Federal Tax Return for Agricultural Employees
![]() Form 944—Employer’s Annual Federal Tax Return
Form 944—Employer’s Annual Federal Tax Return
![]() Form 940—Employer’s Annual Federal Unemployment (FUTA) Tax Return
Form 940—Employer’s Annual Federal Unemployment (FUTA) Tax Return
![]() Form W-2—Wage and Tax Statement
Form W-2—Wage and Tax Statement
![]() Form W-3—Transmittal of Wage and Tax Statements
Form W-3—Transmittal of Wage and Tax Statements
![]() Form 1099—Information Returns
Form 1099—Information Returns
![]() Form 1096—Annual Summary and Transmittal of U.S. Information Returns
Form 1096—Annual Summary and Transmittal of U.S. Information Returns
Depending on the payroll option you choose, you can print any of the tax forms or have Intuit prepare them for you (see the “Choosing from the Various QuickBooks Payroll Options” sidebar on page 25).
In addition, QuickBooks provides the ability to set up payroll deductions for 401(k) plans, health insurance, health savings accounts, employee reimbursements, flexible spending plans, and dozens of other deductions.
Finally, you can produce payroll reports that summarize all your employee payroll activity and company payroll expenses and liabilities.
Setting Payroll and Employee Preferences
If you use QuickBooks to produce your payroll, there are settings you can configure, the most obvious of which is turning on your access to the payroll features. On the payroll Preferences screen, you can also indicate printing options and reporting options, and you can create some default settings for your employees.
Set Up Payroll Preferences
![]() Select Edit, Preferences.
Select Edit, Preferences.
![]() Click Payroll & Employees.
Click Payroll & Employees.
![]() Click the Company Preferences tab.
Click the Company Preferences tab.
![]() Click the Full Payroll option if you use any of the QuickBooks payroll service options to calculate or issue paychecks.
Click the Full Payroll option if you use any of the QuickBooks payroll service options to calculate or issue paychecks.
![]() Click No Payroll if you don’t have a payroll or you use an outside service.
Click No Payroll if you don’t have a payroll or you use an outside service.
![]() Click Online Payroll if you use the Online QuickBooks payroll service option to calculate or issue paychecks.
Click Online Payroll if you use the Online QuickBooks payroll service option to calculate or issue paychecks.
![]() Check the Copy Earnings Details From Previous Paycheck, Recall Quantity Field on Paychecks, and Recall Hour Field on Paychecks boxes to have QuickBooks carry forward information from prior paychecks relating to amounts based on quantities.
Check the Copy Earnings Details From Previous Paycheck, Recall Quantity Field on Paychecks, and Recall Hour Field on Paychecks boxes to have QuickBooks carry forward information from prior paychecks relating to amounts based on quantities.
![]() Check the Job Costing, Class and Item Tracking for Paycheck Expenses box to report payroll taxes by customer job, class, or type of service.
Check the Job Costing, Class and Item Tracking for Paycheck Expenses box to report payroll taxes by customer job, class, or type of service.
![]() Choose a sort option for Display Employee List By.
Choose a sort option for Display Employee List By.
![]() Check Mark New Employees as Sales Reps to instruct QuickBooks to add all new employees to your sales rep list.
Check Mark New Employees as Sales Reps to instruct QuickBooks to add all new employees to your sales rep list.
![]() Check the Display Employee Social Security Numbers in Headers on Reports box to have employee Social Security numbers appear in report headers.
Check the Display Employee Social Security Numbers in Headers on Reports box to have employee Social Security numbers appear in report headers.

QuickBooks Online—Did You Know?
Payroll Options for QuickBooks Online users include QuickBooks Online Payroll if you want to do it yourself or Intuit Full Service Payroll if you want Intuit to handle payroll for you. Both payroll options are integrated with QuickBooks Online.
Set Up Employee Preferences
![]() With the Payroll & Employees Preferences window still open, click the Employee Defaults button to set up employee default preferences.
With the Payroll & Employees Preferences window still open, click the Employee Defaults button to set up employee default preferences.

![]() Enter the name of the earnings item (such as Salary or Regular Pay) that normally should appear on each paycheck. Note that if you haven’t set up these payroll items in advance, you are prompted to do so.
Enter the name of the earnings item (such as Salary or Regular Pay) that normally should appear on each paycheck. Note that if you haven’t set up these payroll items in advance, you are prompted to do so.
![]() If every employee earns the same amount, enter an amount under Hourly/Annual Rate. Otherwise, leave this field blank because later you will enter a unique amount for each employee.
If every employee earns the same amount, enter an amount under Hourly/Annual Rate. Otherwise, leave this field blank because later you will enter a unique amount for each employee.
![]() If you want to use a Payroll Schedule, choose an option from the drop-down list or click Add New to create a new schedule.
If you want to use a Payroll Schedule, choose an option from the drop-down list or click Add New to create a new schedule.
![]() If you do not use the Payroll Schedule feature, choose an option in the Pay Frequency field for your pay periods. (The Pay Frequency is filled in automatically if you use the Payroll Schedule.)
If you do not use the Payroll Schedule feature, choose an option in the Pay Frequency field for your pay periods. (The Pay Frequency is filled in automatically if you use the Payroll Schedule.)
![]() If you want to assign every employee to the same Class, choose a Class. Otherwise, leave this field blank because later you can enter a unique class for each employee.
If you want to assign every employee to the same Class, choose a Class. Otherwise, leave this field blank because later you can enter a unique class for each employee.
![]() If you have previously selected the preference to track time, check Use Time Data to Create Paychecks, and you can use information from the QuickBooks Timer or time sheets to calculate paychecks.
If you have previously selected the preference to track time, check Use Time Data to Create Paychecks, and you can use information from the QuickBooks Timer or time sheets to calculate paychecks.
![]() Enter items that appear on all or most paychecks in the Item Name field, such as deductions for health insurance or retirement contributions.
Enter items that appear on all or most paychecks in the Item Name field, such as deductions for health insurance or retirement contributions.
![]() Enter amounts only if the deduction amounts are the same for each employee or most employees. Otherwise, leave the Amount field blank because later you will enter unique amounts for employees.
Enter amounts only if the deduction amounts are the same for each employee or most employees. Otherwise, leave the Amount field blank because later you will enter unique amounts for employees.
![]() Enter an annual Limit if applicable.
Enter an annual Limit if applicable.
![]() Click OK.
Click OK.
![]() Click OK on the main Preferences window.
Click OK on the main Preferences window.

Did You Know?
The Payroll Schedule feature enables you to set up a schedule for processing your payroll so that your employees are paid on a particular day. You indicate the frequency with which you pay your employees and the days or dates on which you want them to receive their payments, and QuickBooks determines a processing schedule that incorporates weekends and federal holidays.
See Also
See Chapter 9, “Tracking Time,” for more information on the automatic time-tracking features that are available to QuickBooks Pro users.
Setting Up Employees
For each employee in your organization, certain pieces of information must be included in the payroll system. To process paychecks and prepare tax documents for your employees, you need to record the correct name, address, and Social Security number of each employee. In addition, QuickBooks gives you an opportunity to keep track of personal employee information, such as telephone and fax numbers, an email address, and the date of hire, all in one convenient location.
Enter Employee Personal Information
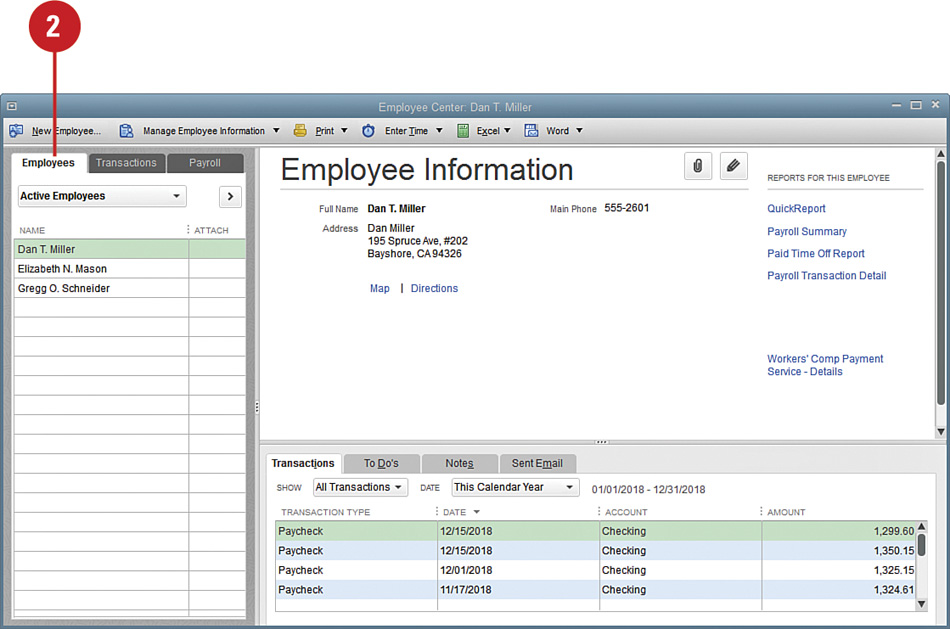
![]() Click the Employee Center button on the QuickBooks toolbar or select Employees, Employee Center (not shown).
Click the Employee Center button on the QuickBooks toolbar or select Employees, Employee Center (not shown).
![]() Click the Employees tab.
Click the Employees tab.
![]() Press Ctrl+N to open the New Employee window.
Press Ctrl+N to open the New Employee window.
![]() Make sure the Personal tab is selected.
Make sure the Personal tab is selected.
![]() Enter the employee’s title and name.
Enter the employee’s title and name.
![]() Enter the way in which the employee’s name should appear on paychecks. (QuickBooks enters the same name you typed in Step 5, but you can change this if necessary.)
Enter the way in which the employee’s name should appear on paychecks. (QuickBooks enters the same name you typed in Step 5, but you can change this if necessary.)
![]() Enter the employee’s information in the Social Security No., Gender, and Date of Birth fields.
Enter the employee’s information in the Social Security No., Gender, and Date of Birth fields.

Did You Know?
You can enter additional information in the New Employee window, such as an employee number. On the next page, QuickBooks gives you the opportunity to compile many other pieces of information for your employees all in one place.
Enter Employee Address and Additional Information
![]() Click the Address & Contact tab in the New Employee window.
Click the Address & Contact tab in the New Employee window.
![]() Enter the employee’s contact information, including address and telephone number, in the Home Address area.
Enter the employee’s contact information, including address and telephone number, in the Home Address area.
![]() Enter any other contact information you have for this employee, such as a main phone, email, mobile, and website.
Enter any other contact information you have for this employee, such as a main phone, email, mobile, and website.

![]() Click the Additional Info tab.
Click the Additional Info tab.
![]() Enter an employee ID number, if applicable, in the Account No. field.
Enter an employee ID number, if applicable, in the Account No. field.
![]() Choose a Billing Rate Level for this employee, if applicable.
Choose a Billing Rate Level for this employee, if applicable.
![]() Enter other information for this employee in the Custom Fields area.
Enter other information for this employee in the Custom Fields area.

![]() Click OK.
Click OK.
![]() Click Leave As Is in the vacation/sick time dialog (not shown) if you are not yet ready to set up payroll information. Otherwise, click Set Up Now and continue to the next task.
Click Leave As Is in the vacation/sick time dialog (not shown) if you are not yet ready to set up payroll information. Otherwise, click Set Up Now and continue to the next task.
Did You Know?
You can add custom fields for your employees. QuickBooks provides the opportunity to customize the setup screens for customers, vendors, and employees. Click the Define Fields button on the Additional Info tab and then add your own fields to the list and check whether you want these fields available for your customer, vendor, and employee setups.
Did You Know?
You can use the QuickBooks Billing Rate Level feature to set billing rates for different types of jobs and employees. You can choose a fixed hourly rate for this employee or select a different rate for the different types of jobs offered by your company. Assign an employee to a billing rate level, and then his time will be billed at the appropriate rate for whatever job he is performing.
Setting Up Employee Payroll Information
After you enter the specific personal information about an employee, it’s time to enter the payroll information for the employee. Here you enter the amount of salary or hourly wage the employee earns, as well as any deductions, other than taxes, that you withhold from the employee’s paycheck.
![]() If you clicked Set Up Now in the previous task, you can skip to Step 5. If you closed the New Employee window after the previous task, open the Employee Center and click the Employees tab to view the list of your employees.
If you clicked Set Up Now in the previous task, you can skip to Step 5. If you closed the New Employee window after the previous task, open the Employee Center and click the Employees tab to view the list of your employees.
![]() Click the name of the employee for whom you want to set up payroll information.
Click the name of the employee for whom you want to set up payroll information.

![]() Press Ctrl+E to edit the employee information.
Press Ctrl+E to edit the employee information.
![]() Click the Payroll Info tab.
Click the Payroll Info tab.
![]() Enter the annual salary or hourly rate this employee receives.
Enter the annual salary or hourly rate this employee receives.
![]() In the Payroll Schedule or Pay Frequency fields, indicate the schedule used by your company.
In the Payroll Schedule or Pay Frequency fields, indicate the schedule used by your company.
![]() Enter any deductions that are regularly taken from this employee’s pay in the Additions, Deductions, and Company Contributions area. Deduction amounts are automatically entered as negative amounts.
Enter any deductions that are regularly taken from this employee’s pay in the Additions, Deductions, and Company Contributions area. Deduction amounts are automatically entered as negative amounts.

![]() Continue to the next task to enter payroll tax information for this employee.
Continue to the next task to enter payroll tax information for this employee.
Setting Up Employee Payroll Taxes
After you set up the basic personal and payroll information for an employee, you need to enter information about payroll taxes. Your employees each fill out a W-4 form (Employee’s Withholding Allowance Certificate) and a comparable state tax information form, providing information about marital status, dependents, and more.
Set Up Federal Payroll Tax Information
![]() If the Edit Employee or New Employee window is still open on your screen, you can skip to Step 6. Otherwise, open the Employee Center to view the Employees list.
If the Edit Employee or New Employee window is still open on your screen, you can skip to Step 6. Otherwise, open the Employee Center to view the Employees list.
![]() Click the name of the employee for whom you want to set up payroll tax information.
Click the name of the employee for whom you want to set up payroll tax information.
![]() Press Ctrl+E to edit the employee information.
Press Ctrl+E to edit the employee information.
![]() Select the Payroll Info tab.
Select the Payroll Info tab.
![]() Click the Taxes button.
Click the Taxes button.

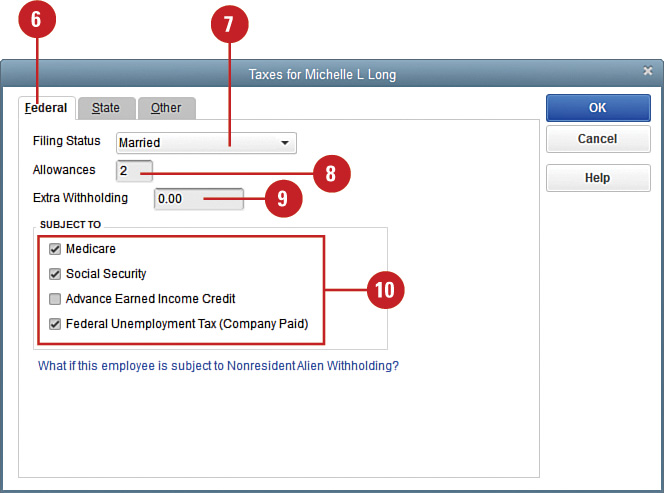
![]() Make sure the Federal tab is selected.
Make sure the Federal tab is selected.
![]() Make a selection from the Filing Status list for this employee, based on W-4 information.
Make a selection from the Filing Status list for this employee, based on W-4 information.
![]() In the Allowances field, enter the number of allowances the employee is claiming, based on W-4 information.
In the Allowances field, enter the number of allowances the employee is claiming, based on W-4 information.
![]() In the Extra Withholding field, indicate whether the employee has requested extra tax withholdings on the W-4 form.
In the Extra Withholding field, indicate whether the employee has requested extra tax withholdings on the W-4 form.
![]() Check all federal withholding options that apply to this employee.
Check all federal withholding options that apply to this employee.
![]() Enter the state in which the employee works.
Enter the state in which the employee works.
![]() Enter the state for which you will withhold taxes. Typically, the employee fills out a form similar to the federal W-4 form for the state in which he works.
Enter the state for which you will withhold taxes. Typically, the employee fills out a form similar to the federal W-4 form for the state in which he works.
![]() Enter the number of allowances the employee is claiming, based on information supplied by the employee.
Enter the number of allowances the employee is claiming, based on information supplied by the employee.
![]() Enter any additional required state information for this employee.
Enter any additional required state information for this employee.
![]() If the employee is subject to local taxes, click the Other tab and fill out any required information.
If the employee is subject to local taxes, click the Other tab and fill out any required information.
![]() Click OK.
Click OK.

Did You Know?
You can get a blank copy of the W-4 form on the Internet. The Internal Revenue Service makes the W-4 form available for printing. Go to http://www.irs.gov/pub/irs-pdf/fw4.pdf for a copy of the current year Form W-4, Employee’s Withholding Allowance Certificate. Note: The IRS doesn’t make forms for the next year available online until near the end of each calendar year.
Did You Know?
Other tax information might be required. If QuickBooks is aware of any state or local tax issues pertaining to the state in which this employee works, you see a reminder window that tells you how to enter other required information.
State tax information can be entered in Payroll Preferences. Choose Edit, Preferences, click the Payroll & Employees option, and then choose Company Preferences. Click Employee Defaults, then Taxes and State to set state tax preferences.
Note: Even in states with no state income tax, the state portion must be completed or else the state unemployment tax will not calculate correctly.
Setting Up Sick and Vacation Benefits
QuickBooks enables you to track allowable sick time and vacation time for your employees. You can keep track of the amount of time to which each employee is entitled, the amount of time each employee actually uses, and the expiration or carryover of that time.
Set Up Sick Benefits
![]() Follow Steps 1–4 of the task “Set Up Federal Payroll Tax Information” on page 31.
Follow Steps 1–4 of the task “Set Up Federal Payroll Tax Information” on page 31.
![]() Click the Sick/Vacation button.
Click the Sick/Vacation button.

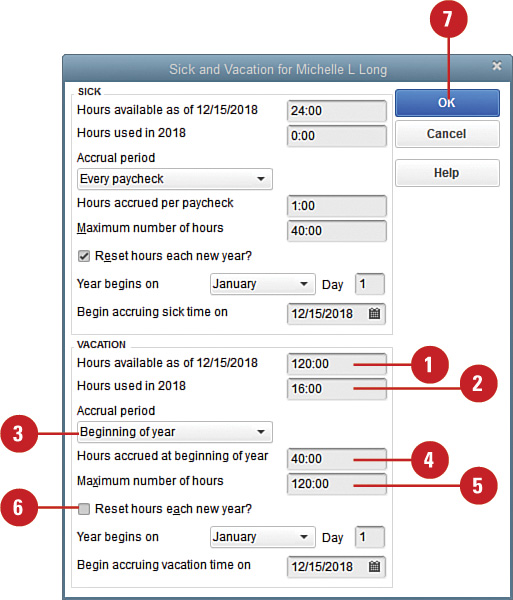
![]() Enter the number of hours of sick time available to this employee as of the beginning of the current year.
Enter the number of hours of sick time available to this employee as of the beginning of the current year.
![]() Enter the number of hours of sick time the employee has used so far this year.
Enter the number of hours of sick time the employee has used so far this year.
![]() Enter the method your company uses for accruing sick time—is it an annual accrual, a per-paycheck accrual, or a per-pay hour accrual?
Enter the method your company uses for accruing sick time—is it an annual accrual, a per-paycheck accrual, or a per-pay hour accrual?
![]() Based on your choice in the previous step, enter the amount of sick time accrued for each accrual period.
Based on your choice in the previous step, enter the amount of sick time accrued for each accrual period.
![]() Enter the maximum number of hours of sick time that can be made available to this employee.
Enter the maximum number of hours of sick time that can be made available to this employee.
![]() Check Reset Hours Each New Year if the sick time accrual is to be reset to zero at the beginning of each year.
Check Reset Hours Each New Year if the sick time accrual is to be reset to zero at the beginning of each year.

Set Up Vacation Benefits
![]() Enter the number of vacation hours available to this employee at the beginning of the current year.
Enter the number of vacation hours available to this employee at the beginning of the current year.
![]() Enter the number of vacation hours this employee has used so far this year.
Enter the number of vacation hours this employee has used so far this year.
![]() Enter the method your company uses for accruing vacation time.
Enter the method your company uses for accruing vacation time.
![]() Based on your choice in the previous step, enter the amount of vacation time accrued for each accrual period.
Based on your choice in the previous step, enter the amount of vacation time accrued for each accrual period.
![]() Enter the maximum number of vacation hours your company allows an employee to accrue.
Enter the maximum number of vacation hours your company allows an employee to accrue.
![]() Check Reset Hours Each New Year if the vacation time accrual is to be reset to 0 at the beginning of each year.
Check Reset Hours Each New Year if the vacation time accrual is to be reset to 0 at the beginning of each year.
![]() Click OK.
Click OK.
Determining Year-to-Date Payroll Tax-Related Liabilities
![]() Federal income tax withheld
Federal income tax withheld
![]() FICA withheld (Social Security tax)
FICA withheld (Social Security tax)
![]() Medicare tax withheld
Medicare tax withheld
![]() State income tax withheld
State income tax withheld
![]() Employer share of FICA (Social Security tax)
Employer share of FICA (Social Security tax)
![]() Employer share of Medicare tax
Employer share of Medicare tax
![]() Federal unemployment tax
Federal unemployment tax
![]() State unemployment tax
State unemployment tax
Entering Year-to-Date Payroll Amounts
![]() Total wages paid, including salaries, hourly wages, overtime payments, bonuses, and any other earnings from employment.
Total wages paid, including salaries, hourly wages, overtime payments, bonuses, and any other earnings from employment.
![]() All federal taxes paid or withheld, including federal income tax, Social Security tax, and Medicare.
All federal taxes paid or withheld, including federal income tax, Social Security tax, and Medicare.
![]() All state and local taxes paid or withheld, including state income tax, local income tax, and any other state and local taxes incumbent upon the employee.
All state and local taxes paid or withheld, including state income tax, local income tax, and any other state and local taxes incumbent upon the employee.
![]() All other deductions withheld from employees and also those paid for by the employer, including such benefits as health insurance, retirement contributions, and any other benefit payments.
All other deductions withheld from employees and also those paid for by the employer, including such benefits as health insurance, retirement contributions, and any other benefit payments.
Did You Know?
Want a quick and painless method to set up your payroll when starting to use QuickBooks payroll after the first of a year? From the Employees menu, select Payroll Setup. Simply work through the steps one-by-one, and in no time, you will have your payroll set up, easily entering your historical payroll totals.
Setting Up Payroll Deductions
Employers deduct a variety of amounts from employee pay. In addition to payroll taxes, there can be deductions for contributions to a disability plan, health insurance plan, 401(k) plan, fundraising organization such as United Way, cafeteria benefit plan, and more. The process for setting up each of these items is similar. This example shows the procedure for setting up a payroll deduction for contributions to a 401(k) plan.
Set Up Payroll Deductions
![]() Select Lists, Payroll Item List.
Select Lists, Payroll Item List.
Timesaver
You can also click the Payroll Items icon in the Payroll Center.
![]() Click the Payroll Item button and select New.
Click the Payroll Item button and select New.

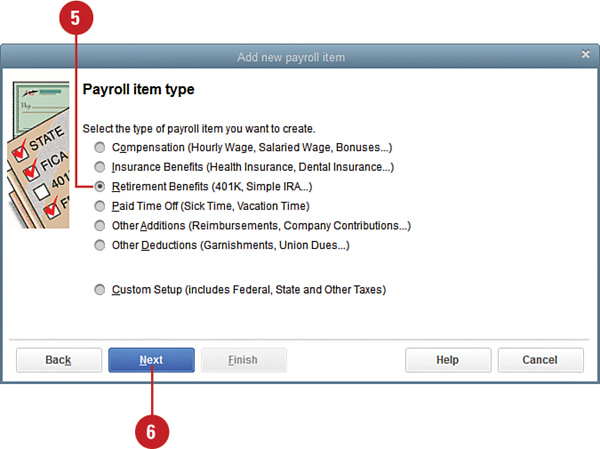
![]() Choose your preferred method of setup. EZ Setup is recommended and has been chosen here.
Choose your preferred method of setup. EZ Setup is recommended and has been chosen here.
![]() Click Next.
Click Next.

![]() Check the circle next to Retirement Benefits (401K, Simple IRA).
Check the circle next to Retirement Benefits (401K, Simple IRA).
![]() Click Next.
Click Next.
![]() Check the box for 401(k) (most common).
Check the box for 401(k) (most common).
![]() Click Next.
Click Next.

![]() Enter the name of the agency or company to whom you pay this liability in the Payee (vendor) field.
Enter the name of the agency or company to whom you pay this liability in the Payee (vendor) field.
![]() Enter the account number this agency or company has assigned to you in the Account # field.
Enter the account number this agency or company has assigned to you in the Account # field.
![]() Enter the frequency and date on which you expect to make payments to fund this 401(k) plan.
Enter the frequency and date on which you expect to make payments to fund this 401(k) plan.
![]() Click Next.
Click Next.

![]() Click Finish to complete the setup of your 401(k) plan.
Click Finish to complete the setup of your 401(k) plan.

Did You Know?
QuickBooks allows you to designate employees, vendors, and others as sales reps. You can then associate sales with the reps responsible for those sales, for purposes of paying commissions or tracking their performances.
Add a new sales rep by opening the Sales Rep list. Choose Lists, Customer & Vendor Profile Lists, Sales Rep List. Press Ctrl+N to open the New Sales Rep window. Enter the name of the rep, the initials you use to track this rep, and the type of rep (employee, vendor, or other).
When you create an invoice, there is a Rep field where you can choose the sales rep responsible for the sale.
Produce reports showing the performance of your sales reps by choosing Reports, Sales, Sales by Rep Summary (to see the total sales made by each sales rep), or Sales by Rep Detail (to see each sale made by each sales rep).
Paying Employees
If you’ve worked through the tasks in this chapter so far, you’ve set up all the information necessary for producing paychecks. Now you’re ready to produce some actual paychecks! If you use the QuickBooks Scheduled Payroll feature, you can pay all your employees at once. If you prefer to handpick the employees to be paid, see “Select Employees for Special Payroll Preparation” later in the chapter. You can use the Scheduled Payroll for your normal payroll checks and use the Special Payroll for issuing bonus checks.
![]() Select Employees, Pay Employees, Scheduled Payroll.
Select Employees, Pay Employees, Scheduled Payroll.
Timesaver
Another way to initiate a payroll is to open the Employee Center and click the Payroll tab.
![]() Click the Start Scheduled Payroll button.
Click the Start Scheduled Payroll button.

![]() Verify the date in the Pay Period Ends field.
Verify the date in the Pay Period Ends field.
![]() Verify the date in the Check Date field.
Verify the date in the Check Date field.
![]() Verify the cash account in the Bank Account field, on which the paychecks are to be drawn.
Verify the cash account in the Bank Account field, on which the paychecks are to be drawn.
![]() Enter or correct any gross amounts or times for employees.
Enter or correct any gross amounts or times for employees.
![]() Click an employee’s name to open the Preview Paycheck window where you can review and make changes to all income and deduction items for the selected employee.
Click an employee’s name to open the Preview Paycheck window where you can review and make changes to all income and deduction items for the selected employee.
![]() Click Save & Close to close the Preview Paycheck window.
Click Save & Close to close the Preview Paycheck window.
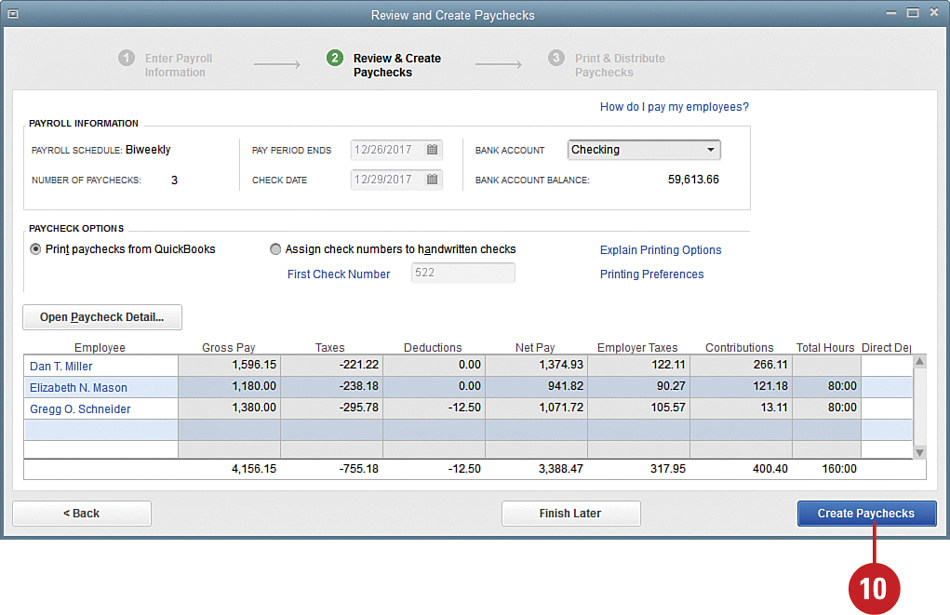
![]() Click Continue when all employee information is correct.
Click Continue when all employee information is correct.


![]() Click Create Paychecks when the Review and Create Paychecks window appears.
Click Create Paychecks when the Review and Create Paychecks window appears.
See Also
See “Printing Paychecks” later in this chapter to learn more about how to properly complete this task.
Select Employees for Special Payroll Preparation
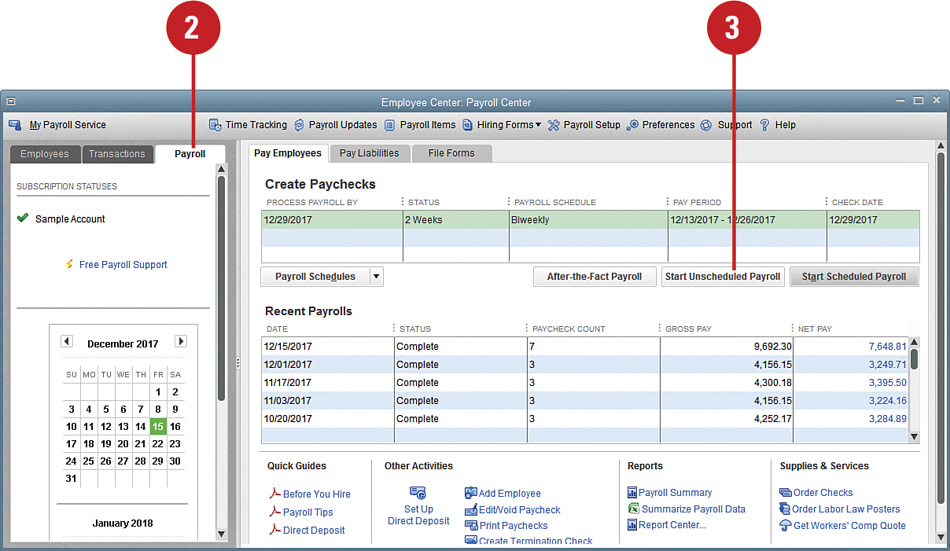
![]() Click the Employee Center button on the QuickBooks toolbar or select Employees, Employee Center.
Click the Employee Center button on the QuickBooks toolbar or select Employees, Employee Center.
![]() Click the Payroll tab.
Click the Payroll tab.
![]() Click Start Unscheduled Payroll if you want to edit paychecks for individual employees.
Click Start Unscheduled Payroll if you want to edit paychecks for individual employees.
Timesaver
You can also choose Employees, Pay Employees, Unscheduled Payroll, or Termination Check from the menu.
![]() Enter the ending date for this pay period.
Enter the ending date for this pay period.
![]() Enter the date on which the checks will be issued.
Enter the date on which the checks will be issued.
![]() Verify the account from which funds should be drawn.
Verify the account from which funds should be drawn.
![]() Click to check each employee who will be paid.
Click to check each employee who will be paid.
![]() Click the Continue button. Each check appears for your approval.
Click the Continue button. Each check appears for your approval.

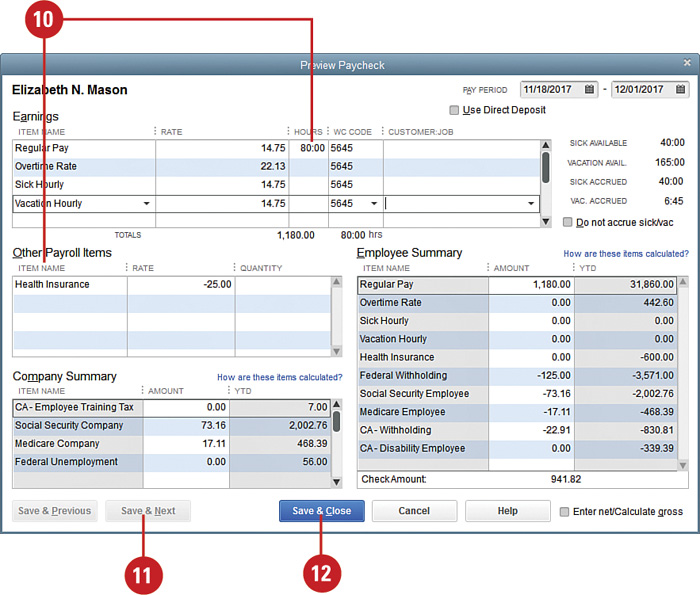
![]() Click Open Paycheck Detail to display detailed information about the selected paycheck.
Click Open Paycheck Detail to display detailed information about the selected paycheck.

![]() On the individual check summary, enter current period payroll information and make any necessary changes to deductions, withholdings, and employer contributions.
On the individual check summary, enter current period payroll information and make any necessary changes to deductions, withholdings, and employer contributions.
![]() Click Save & Next if you checked more than one employee. The payroll form for the next selected employee appears.
Click Save & Next if you checked more than one employee. The payroll form for the next selected employee appears.
![]() Click Save & Close when you’ve entered all payroll information.
Click Save & Close when you’ve entered all payroll information.
![]() When you’ve completed the payroll record for the last employee, you are returned to the Review and Create Paychecks window. Click Create Paychecks (not shown).
When you’ve completed the payroll record for the last employee, you are returned to the Review and Create Paychecks window. Click Create Paychecks (not shown).
![]() Click Print Paychecks if you plan to print paychecks from your QuickBooks program. Click Print Pay Stubs if you write your checks by hand or if you use direct deposit.
Click Print Paychecks if you plan to print paychecks from your QuickBooks program. Click Print Pay Stubs if you write your checks by hand or if you use direct deposit.

![]() Check all paychecks you want to print, and then click OK, or select the pay stubs you want to print, and then click Print (not shown).
Check all paychecks you want to print, and then click OK, or select the pay stubs you want to print, and then click Print (not shown).
Did You Know?
You can make entries or changes only in white areas of the Preview Paycheck window. The gray areas are computed by QuickBooks and reflect year-to-date totals.
Payroll deductions must be brought up-to-date. If you’re entering historical payroll information, don’t forget to include payroll deduction amounts in your historical entries.
Printing Paychecks
Usually the tasks of preparing and printing paychecks are done at different times, if for no other reason than the fact that you need to change the paper in your printer to payroll check forms. When you’re ready to print your payroll (and the proper forms are in your printer!), use the following instructions to guide you.
![]() When you’re ready to print checks, select File, Print Forms and then select Paychecks.
When you’re ready to print checks, select File, Print Forms and then select Paychecks.
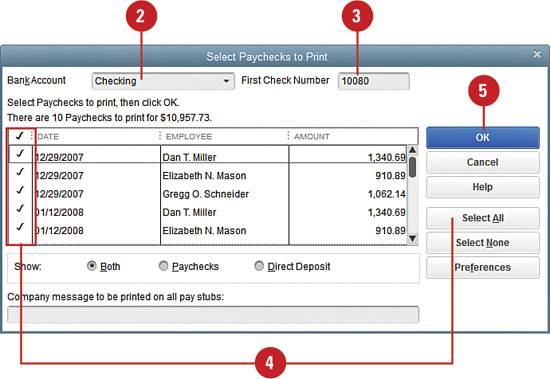
![]() In the window that displays, verify the account from which the payroll is drawn.
In the window that displays, verify the account from which the payroll is drawn.
![]() Verify the starting check number for the paychecks.
Verify the starting check number for the paychecks.
![]() Click Select All or place a check mark next to each paycheck you want to print.
Click Select All or place a check mark next to each paycheck you want to print.
![]() Click OK to open the Print Checks dialog.
Click OK to open the Print Checks dialog.
![]() In the Print Checks window, verify the printer and the check form (and make sure you have loaded the check forms into your printer!).
In the Print Checks window, verify the printer and the check form (and make sure you have loaded the check forms into your printer!).
![]() Click Print.
Click Print.

See Also
You can save time by not printing your payroll checks by having your employees’ paychecks directly deposited into their bank accounts. See the next section for more information.
Using Direct Deposit
After your company is set up to use a direct deposit service for paychecks, executing the directly deposited paychecks is a simple process. You indicate on each employee’s payroll screen whether that employee uses direct deposit, and the rest is left to the electronic transfer genies. This task assumes that the employee’s bank information has already been set up as described in the upcoming sidebar “How Does Direct Deposit Work?”
![]() Activate direct deposit by choosing Employees, My Payroll Service, Activate Direct Deposit.
Activate direct deposit by choosing Employees, My Payroll Service, Activate Direct Deposit.
![]() To assign direct deposit to an employee, open the Employee Center and click the Employees tab.
To assign direct deposit to an employee, open the Employee Center and click the Employees tab.
![]() Double-click the name of an employee who wants to receive direct deposit.
Double-click the name of an employee who wants to receive direct deposit.
![]() Click the Payroll Info tab.
Click the Payroll Info tab.
![]() Click the Direct Deposit button.
Click the Direct Deposit button.
![]() Click the Use Direct Deposit button (not shown).
Click the Use Direct Deposit button (not shown).
![]() Indicate whether the money is to be deposited into one account or two (not shown).
Indicate whether the money is to be deposited into one account or two (not shown).
![]() Enter account number(s) and bank routing numbers (not shown).
Enter account number(s) and bank routing numbers (not shown).
![]() If two accounts are chosen, enter the amount to be deposited in the first account. The remainder will be deposited in the second account (not shown).
If two accounts are chosen, enter the amount to be deposited in the first account. The remainder will be deposited in the second account (not shown).
![]() Click OK to close the Direct Deposit window (not shown).
Click OK to close the Direct Deposit window (not shown).
![]() Click OK to close the Edit Employee window.
Click OK to close the Edit Employee window.

Did You Know?
The choice for direct deposit is reversible. You can remove the direct deposit option by editing the employee information as described previously, clicking the Direct Deposit button, and removing the direct deposit information.
See Also
See “How Does Direct Deposit Work?” in this chapter for detailed information about setting up a direct deposit service.
Preparing and Paying Payroll Liabilities
The previous sections in this chapter provide easy-to-follow instructions for setting up your employees so you can pay them in a timely manner—indeed, a very important task.
Another task is just as important—to remit to state and federal agencies the payroll taxes withheld and those payroll tax costs that the company incurs with each payroll.
Making these payroll payments accurately and timely can help your company avoid expensive late fees and penalties for errors or late filings.
QuickBooks takes all the worry from you by providing an easy-to-use, accurate Pay Scheduled Liabilities workflow detailed in this section.
Edit Tax Payment Due Dates/Methods
![]() Open the Employee Center by clicking the icon with the same name or selecting it from the Employee menu.
Open the Employee Center by clicking the icon with the same name or selecting it from the Employee menu.
![]() Click the Payroll tab and the Pay Liabilities tab.
Click the Payroll tab and the Pay Liabilities tab.
![]() In the Pay Liabilities pane, select Manage Payment Methods to start the Payroll Setup Wizard.
In the Pay Liabilities pane, select Manage Payment Methods to start the Payroll Setup Wizard.

![]() Click Continue to go the Schedule Payments window (not shown).
Click Continue to go the Schedule Payments window (not shown).
![]() From the QuickBooks Payroll Setup dialog, select the scheduled payment and then click the Edit button.
From the QuickBooks Payroll Setup dialog, select the scheduled payment and then click the Edit button.

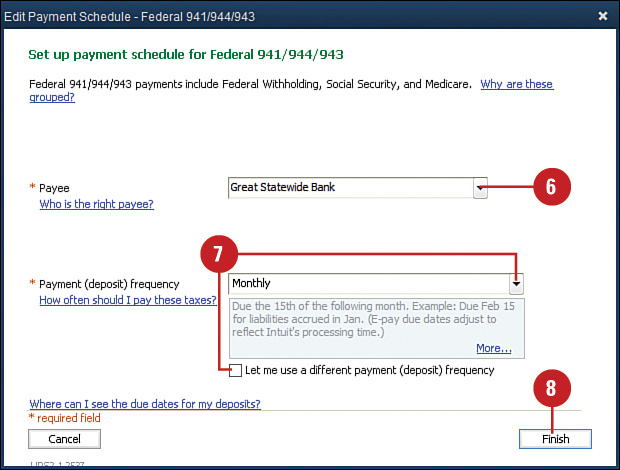
![]() In the Edit Payment Schedule window, complete the Payee field by selecting from the drop-down list the vendor you remit the payment to, or type in the agency name if it is not already on your vendor list.
In the Edit Payment Schedule window, complete the Payee field by selecting from the drop-down list the vendor you remit the payment to, or type in the agency name if it is not already on your vendor list.
![]() From the Payment drop-down menu, select from one of the predefined time schedules or click Let Me Use a Different Payment (Deposit) Frequency to see more options to meet your specific needs.
From the Payment drop-down menu, select from one of the predefined time schedules or click Let Me Use a Different Payment (Deposit) Frequency to see more options to meet your specific needs.
![]() Click Finish to be returned to the QuickBooks Payroll Setup dialog. Select another payroll tax item or click Finish Later to be returned to the Employee Center (not shown).
Click Finish to be returned to the QuickBooks Payroll Setup dialog. Select another payroll tax item or click Finish Later to be returned to the Employee Center (not shown).
Did You Know?
Want to avoid worrying about your payroll? Consider signing up for Intuit’s Full Service Payroll. With a Full Service Payroll subscription, you just enter the hours and let Intuit handle the rest. Full Service Payroll is a worry-free solution for your payroll processing needs. For more information, go to http://payroll.intuit.com.
Pay Payroll Liabilities
![]() Open the Payroll Center from the Employees menu or from the Home page and click the Payroll and Payroll Liabilities tabs.
Open the Payroll Center from the Employees menu or from the Home page and click the Payroll and Payroll Liabilities tabs.
![]() Select a payment in the Pay Liabilities window. Click the View/Pay button.
Select a payment in the Pay Liabilities window. Click the View/Pay button.

![]() When the Liability Payment form opens, it is already completed for you! Simply click Save & Close if you are printing the check.
When the Liability Payment form opens, it is already completed for you! Simply click Save & Close if you are printing the check.
![]() If your business has signed up for e-Pay, click the e-Payment radio button, and QuickBooks processes your payment to the IRS directly.
If your business has signed up for e-Pay, click the e-Payment radio button, and QuickBooks processes your payment to the IRS directly.

![]() From the Payment Summary Screen, you can Print Checks or Print Summary as needed.
From the Payment Summary Screen, you can Print Checks or Print Summary as needed.

Did You Know?
You can make paying your payroll liabilities even easier with e-Pay. With e-Pay, you prepare the payment in your QuickBooks data and then transmit your payment directly to the IRS or your state Department of Revenue (Internet connection required). To find out more about e-Pay, click the How Do I e-Pay link on the Liability Payment form created previously in Step 3.
Creating Employer Payroll Reports
QuickBooks provides a variety of payroll reports to meet your needs. You can generate a payroll report on each employee, create a summary of your payroll deductions, summarize your entire payroll, show year-to-date tax liabilities, and more. This example demonstrates how to create a payroll summary report and a year-to-date payroll tax report.
View a Payroll Summary Report
![]() Click Reports, Employees & Payroll; then click Payroll Summary from the menu.
Click Reports, Employees & Payroll; then click Payroll Summary from the menu.
![]() Select the range of dates you want to cover in your report.
Select the range of dates you want to cover in your report.
![]() If necessary, click the Refresh button to update the report.
If necessary, click the Refresh button to update the report.
![]() Drag the bottom scrollbar to the right to view payroll information for all your employees.
Drag the bottom scrollbar to the right to view payroll information for all your employees.

View Year-to-Date Payroll Liabilities
![]() Select Reports, Employees and Payroll, Payroll Liability Balances.
Select Reports, Employees and Payroll, Payroll Liability Balances.
![]() Verify the dates for review. By default, it is the current calendar year through the end of the last month. Change the dates as needed. Tip: If you have older dated payroll liabilities not paid, you should leave the From date blank and select the proper To date. The report then displays all payroll liabilities due.
Verify the dates for review. By default, it is the current calendar year through the end of the last month. Change the dates as needed. Tip: If you have older dated payroll liabilities not paid, you should leave the From date blank and select the proper To date. The report then displays all payroll liabilities due.
![]() Change Columns to Total Only (or month) as needed.
Change Columns to Total Only (or month) as needed.

Reporting Payroll Taxes with Form 941
Form 941 is a quarterly payroll tax form on which you report federal income tax withheld, as well as Social Security and Medicare tax. Because these taxes are based on the total wages you paid your employees, and because all this information is already available if you use QuickBooks for processing your payroll, preparing this form is easy.
Prepare Form 941
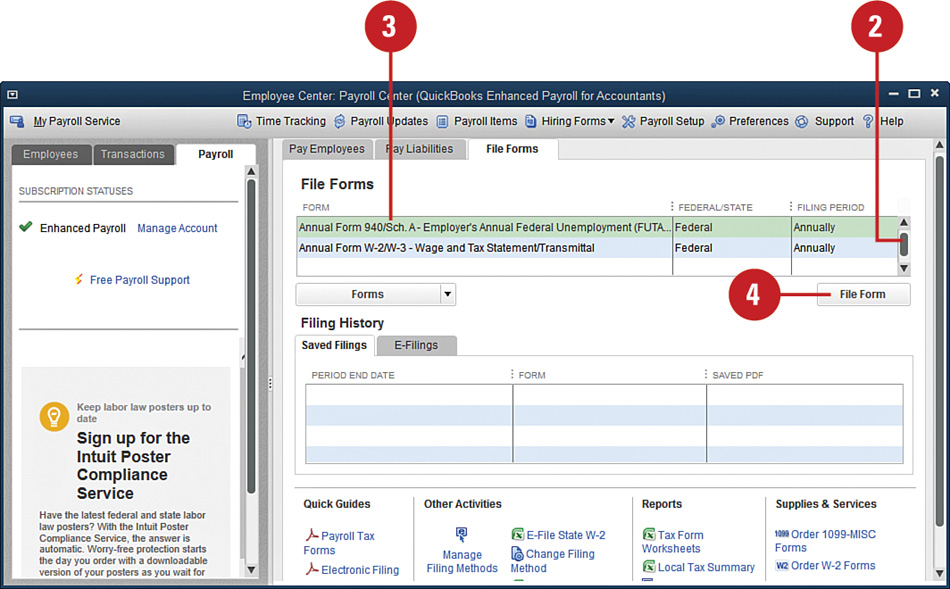
![]() From the Employees menu, select Payroll Tax Forms & W-2s, Process Payroll Forms.
From the Employees menu, select Payroll Tax Forms & W-2s, Process Payroll Forms.
Timesaver
You can also click the File Forms tab on the Payroll tab in the Payroll Center.
![]() Under File Forms, select the form to file and click on File Form.
Under File Forms, select the form to file and click on File Form.

![]() Verify that the filing period is correct.
Verify that the filing period is correct.
![]() Verify that the Quarter Ending date is correct.
Verify that the Quarter Ending date is correct.
![]() Click OK.
Click OK.

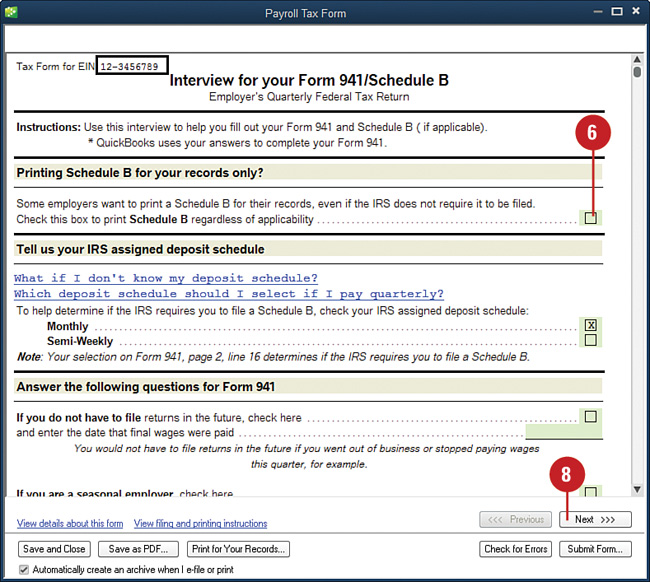
![]() Check the appropriate box to indicate whether you are required to prepare Schedule B.
Check the appropriate box to indicate whether you are required to prepare Schedule B.
![]() Review the other questions on the form and provide answers where appropriate.
Review the other questions on the form and provide answers where appropriate.
![]() Click Next.
Click Next.
![]() Verify the number of employees who were on your payroll on the 12th day of the current quarter for which you are preparing this form.
Verify the number of employees who were on your payroll on the 12th day of the current quarter for which you are preparing this form.
![]() On the next screens (not shown), verify that the numbers calculated by QuickBooks are correct. If the numbers are not correct, fix the problems in QuickBooks and then return to the 941 form to verify that it is correct.
On the next screens (not shown), verify that the numbers calculated by QuickBooks are correct. If the numbers are not correct, fix the problems in QuickBooks and then return to the 941 form to verify that it is correct.
![]() Click Next.
Click Next.

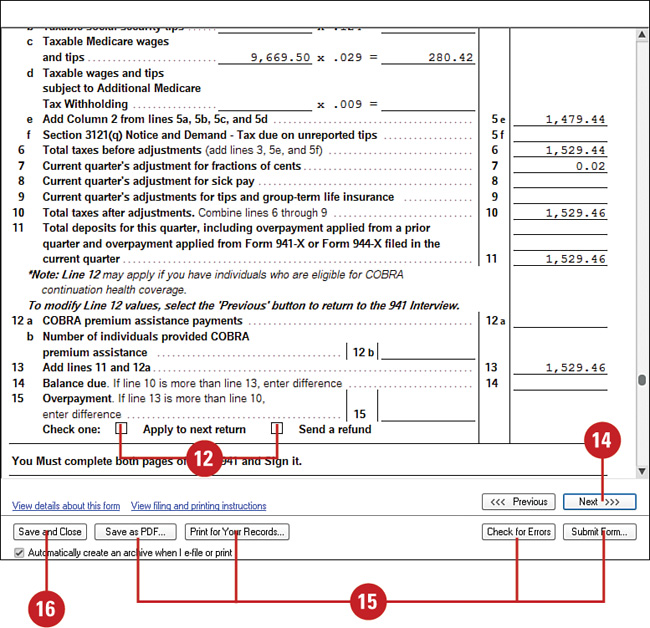
![]() If there is an overpayment, check the appropriate box to indicate whether you want the overpayment credited to the next return or refunded.
If there is an overpayment, check the appropriate box to indicate whether you want the overpayment credited to the next return or refunded.
![]() Verify the amounts on Schedule B if you are required to prepare this form (not shown).
Verify the amounts on Schedule B if you are required to prepare this form (not shown).
![]() Click Next if you want to view filing and printing instructions.
Click Next if you want to view filing and printing instructions.
![]() Click the appropriate box to perform one of these tasks:
Click the appropriate box to perform one of these tasks:
![]() Save As PDF—Saves your form and protects it in a PDF format. The form can then be viewed in Adobe Reader.
Save As PDF—Saves your form and protects it in a PDF format. The form can then be viewed in Adobe Reader.
![]() Print for Your Records—Sends your form(s) to the printer.
Print for Your Records—Sends your form(s) to the printer.
![]() Check for Errors—Verifies that all the necessary information is on the form.
Check for Errors—Verifies that all the necessary information is on the form.
![]() Submit Form—Reminds you to print a copy for your records and provides you with an opportunity to e-file your form, if you have signed up for this service.
Submit Form—Reminds you to print a copy for your records and provides you with an opportunity to e-file your form, if you have signed up for this service.
![]() Click Save and Close when you are finished with the form.
Click Save and Close when you are finished with the form.
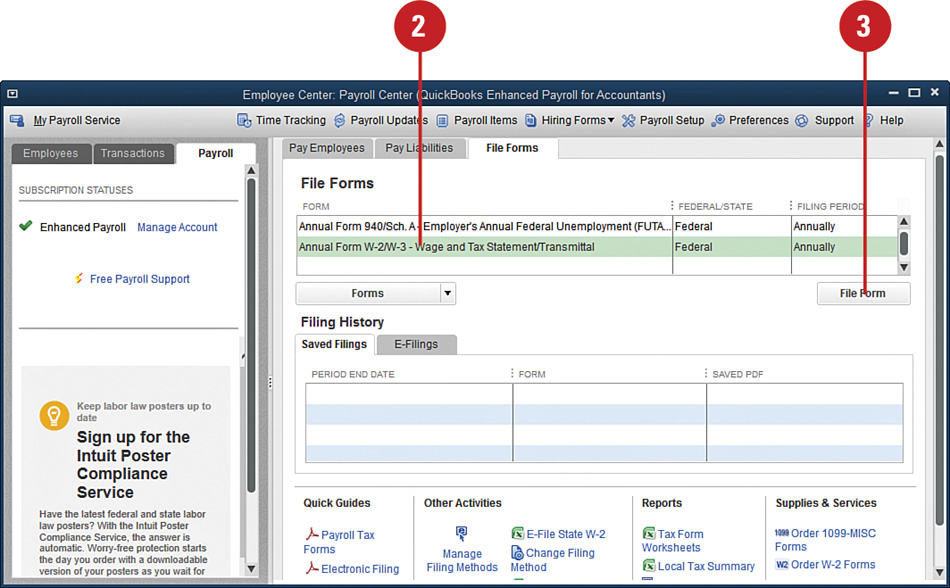
Paying Federal Unemployment Compensation Taxes with Form 940
Throughout the year, you might be required to make deposits of federal unemployment compensation tax. Once a year, you are required to file a federal Form 940 reporting your annual unemployment compensation tax liability, and at that time, you must arrange to pay any amount previously unpaid. QuickBooks can prepare this form for you to print, sign, and mail.
Pay Federal Unemployment Compensation Taxes with Form 940
![]() Select Payroll Tax Forms & W-2s, Process Payroll Forms from the Employees menu.
Select Payroll Tax Forms & W-2s, Process Payroll Forms from the Employees menu.
![]() Scroll to see the Forms available.
Scroll to see the Forms available.
![]() Click Annual Form 940/Sch. A.
Click Annual Form 940/Sch. A.
![]() Click File Form.
Click File Form.
![]() Verify the filing year.
Verify the filing year.
![]() Click OK.
Click OK.

![]() On the 940 interview screen, check boxes to answer questions that apply to your company.
On the 940 interview screen, check boxes to answer questions that apply to your company.
![]() Click Next.
Click Next.

![]() Check the boxes to answer the questions at the top of the Form 940.
Check the boxes to answer the questions at the top of the Form 940.
![]() Scroll through the Form 940 and verify that the calculations are correct.
Scroll through the Form 940 and verify that the calculations are correct.
![]() If there is an overpayment, check the appropriate box to indicate whether you want the overpayment credited to your next return or refunded to you (not shown).
If there is an overpayment, check the appropriate box to indicate whether you want the overpayment credited to your next return or refunded to you (not shown).
![]() Click Next to view the filing instructions.
Click Next to view the filing instructions.
![]() Click the appropriate box to perform one of the tasks described next:
Click the appropriate box to perform one of the tasks described next:
![]() Save As PDF—Saves your form and protects it in a PDF format. The form can then be viewed in Adobe Reader.
Save As PDF—Saves your form and protects it in a PDF format. The form can then be viewed in Adobe Reader.
![]() Print for Your Records—Sends your form(s) to the printer.
Print for Your Records—Sends your form(s) to the printer.
![]() Check for Errors—Verifies that all the necessary information is on the form.
Check for Errors—Verifies that all the necessary information is on the form.
![]() Submit Form—Reminds you to print a copy for your records and provides you with an opportunity to e-file your form, if you have signed up for this service.
Submit Form—Reminds you to print a copy for your records and provides you with an opportunity to e-file your form, if you have signed up for this service.
![]() Click Save and Close when you are finished with the form.
Click Save and Close when you are finished with the form.

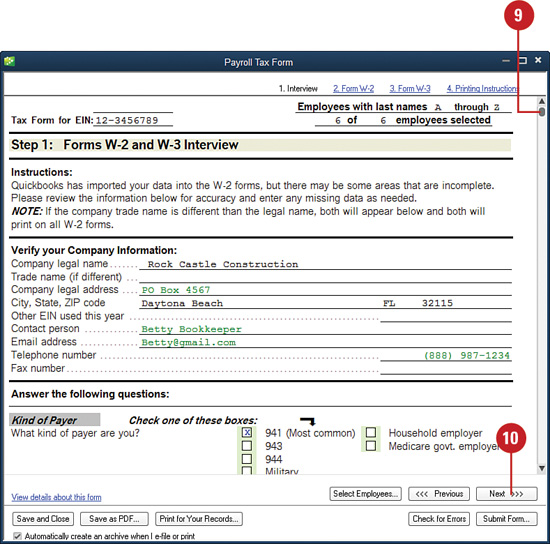
Preparing W-2/W-3 Forms
Each January, all employers are required to provide employees with a Form W-2, Wage & Tax Report, summarizing the prior year’s wages and withholding. You can prepare the W-2 form in QuickBooks and print from QuickBooks directly onto government-supplied W-2 forms, or you can choose to print on plain paper.
The W-3 form is a summary page that shows the totals of salaries and withholdings from all your W-2 forms. You can produce this form in QuickBooks only after you’ve completed your company’s W-2 forms. Most companies submit the forms electronically. However, if you submit your W-2 forms to the federal government by mail, you need to include a W-3 form as a cover sheet.
![]() Select Payroll Tax Forms & W-2s, Process Payroll Forms on the Employees menu.
Select Payroll Tax Forms & W-2s, Process Payroll Forms on the Employees menu.
![]() Click Annual Form W-2/W-3.
Click Annual Form W-2/W-3.
![]() Click File Form.
Click File Form.
![]() Choose whether you are preparing W-2s for All Employees or a partial, alphabetical list.
Choose whether you are preparing W-2s for All Employees or a partial, alphabetical list.
![]() Indicate the year for which you are preparing W-2 forms.
Indicate the year for which you are preparing W-2 forms.
![]() Click OK.
Click OK.

![]() Click a check mark to the left of each employee who is to receive a W-2 form, or click the Mark All button to check everyone’s name.
Click a check mark to the left of each employee who is to receive a W-2 form, or click the Mark All button to check everyone’s name.
![]() Click the Review/Edit button to return to the Forms W-2 and W-3 Interview.
Click the Review/Edit button to return to the Forms W-2 and W-3 Interview.

![]() Scroll and review the information and questions, making corrections if needed.
Scroll and review the information and questions, making corrections if needed.
![]() Click Next.
Click Next.
![]() Scroll and review each W-2 form. If any errors appear, return to the QuickBooks program and make corrections; then return to these forms and review.
Scroll and review each W-2 form. If any errors appear, return to the QuickBooks program and make corrections; then return to these forms and review.
![]() Click Next to proceed to the next W-2 form for review. Continue to review all W-2s and Form W-3 clicking Next as needed.
Click Next to proceed to the next W-2 form for review. Continue to review all W-2s and Form W-3 clicking Next as needed.
![]() Click the appropriate box to perform one of the tasks described next:
Click the appropriate box to perform one of the tasks described next:
![]() Save As PDF—Saves your form and protects it in a PDF format. The form can then be viewed in Adobe Reader.
Save As PDF—Saves your form and protects it in a PDF format. The form can then be viewed in Adobe Reader.
![]() Print for Your Records—Sends your form(s) to the printer.
Print for Your Records—Sends your form(s) to the printer.
![]() Check for Errors—Verifies that all the necessary information is on the form.
Check for Errors—Verifies that all the necessary information is on the form.
![]() Submit Form—Reminds you to print a copy for your records and provides you with an opportunity to e-file your form if you have signed up for this service.
Submit Form—Reminds you to print a copy for your records and provides you with an opportunity to e-file your form if you have signed up for this service.
![]() Click Save and Close when you are finished with the form.
Click Save and Close when you are finished with the form.

Setting Up Independent Contractors for 1099 Forms
Do you hire vendors to perform services for your company and pay them without deducting payroll taxes? If so, QuickBooks can help you prepare and print 1099 forms for your vendors.
![]() Click the Vendors icon on the toolbar; then click the Vendors tab to display the Vendor List.
Click the Vendors icon on the toolbar; then click the Vendors tab to display the Vendor List.
![]() Double-click a vendor to whom you think you need to issue a 1099 form (or press Ctrl+N to set up a new vendor).
Double-click a vendor to whom you think you need to issue a 1099 form (or press Ctrl+N to set up a new vendor).

![]() Click the Tax Settings tab.
Click the Tax Settings tab.
![]() Enter a Tax ID number or Social Security number for the vendor.
Enter a Tax ID number or Social Security number for the vendor.
![]() Check this box to indicate that the vendor is eligible for a 1099 form.
Check this box to indicate that the vendor is eligible for a 1099 form.
![]() Click OK.
Click OK.

See Also
See the sidebar, “Employees Versus Independent Contractors,” to determine whether a service provider to your company should be an employee or paid as a vendor who is subject to receiving a 1099-MISC Income form at the end of the calendar year.
Did You Know?
The requirements for filing 1099-MISC forms have changed in recent years. Make sure you comply with the latest requirements to avoid penalties. Go to IRS.gov for details or consult with your accountant or tax professional.
Setting 1099 Preferences
You are required to issue 1099 forms to certain contractors and vendors. To track 1099 information for the contractors you pay, and to have QuickBooks determine who qualifies for a 1099 form, you must turn on the preferences for 1099s.
![]() Select Preferences from the Edit menu (not shown).
Select Preferences from the Edit menu (not shown).
![]() Click Tax: 1099.
Click Tax: 1099.
![]() Click the Company Preferences tab.
Click the Company Preferences tab.
![]() Click the Yes radio button for Do You File 1099-MISC Forms?
Click the Yes radio button for Do You File 1099-MISC Forms?
![]() Click Click Here to map your accounts to boxes on Form 1099-MISC.
Click Click Here to map your accounts to boxes on Form 1099-MISC.

![]() Select Show All Accounts from the drop-down menu.
Select Show All Accounts from the drop-down menu.
![]() Map the accounts used for payments to 1099 vendors to indicate how they should appear on Form 1099-MISC (usually Box 7: Nonemployee Compensation). Although, you can select other 1099 categories, only the information for Box 7: Nonemployee Compensation prints on the Form 1099-MISC.
Map the accounts used for payments to 1099 vendors to indicate how they should appear on Form 1099-MISC (usually Box 7: Nonemployee Compensation). Although, you can select other 1099 categories, only the information for Box 7: Nonemployee Compensation prints on the Form 1099-MISC.
![]() Click Save & Close.
Click Save & Close.

Issuing 1099 Forms
You are required to supply certain independent contractors and businesses with 1099 forms. If your company plans to issue 1099 forms, the forms must be mailed to recipients by January 31 of the following year. For example, fees paid to an independent contractor in 2013 must be reported by January 31, 2014 QuickBooks prints the 1099 information on your government-supplied 1099 forms.
![]() Select Print/Efile 1099s, 1099 Wizard from the Vendors menu.
Select Print/Efile 1099s, 1099 Wizard from the Vendors menu.
![]() Click the Get Started button (click other buttons to review 1099 reports).
Click the Get Started button (click other buttons to review 1099 reports).

![]() Verify which vendors should receive forms. Uncheck any vendors that don’t require 1099 forms or click Select All.
Verify which vendors should receive forms. Uncheck any vendors that don’t require 1099 forms or click Select All.
![]() Click Continue.
Click Continue.

![]() Verify vendors’ information for completeness and accuracy. To make changes, double-click the field to edit it, and your changes are saved in QuickBooks.
Verify vendors’ information for completeness and accuracy. To make changes, double-click the field to edit it, and your changes are saved in QuickBooks.
![]() Click Continue.
Click Continue.

![]() Review the account mappings and make changes if needed. Click Continue.
Review the account mappings and make changes if needed. Click Continue.

![]() Click View Included Payments or Excluded Payments to review payments to vendors that may be excluded (payments by credit card, debit card, gift card, or PayPal) from 1099 reporting.
Click View Included Payments or Excluded Payments to review payments to vendors that may be excluded (payments by credit card, debit card, gift card, or PayPal) from 1099 reporting.
![]() Click Continue.
Click Continue.

![]() Review the Confirm 1099 entries information for accuracy and click Back if needed for corrections or click Continue (not shown).
Review the Confirm 1099 entries information for accuracy and click Back if needed for corrections or click Continue (not shown).
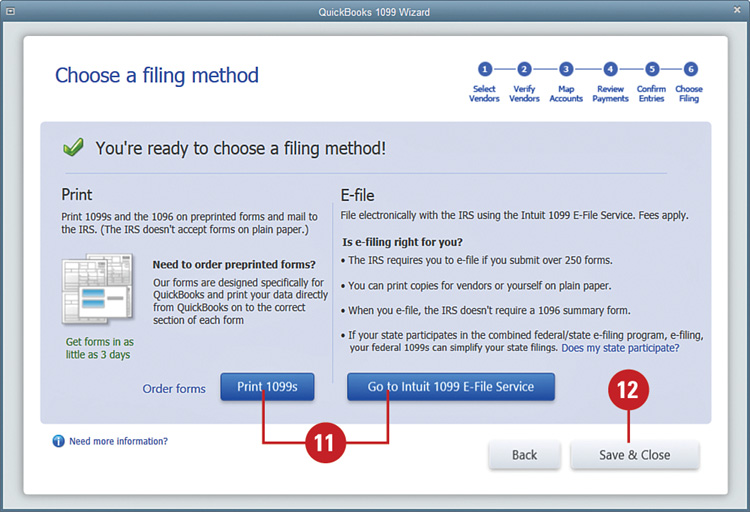
![]() Choose your preferred filing method and click Print 1099s or Go to Intuit 1099 E-File Service. Note: If you want to print the 1099s, you need to purchase the preprinted forms. If you want to use Intuit’s E-file service, there is a fee.
Choose your preferred filing method and click Print 1099s or Go to Intuit 1099 E-File Service. Note: If you want to print the 1099s, you need to purchase the preprinted forms. If you want to use Intuit’s E-file service, there is a fee.
![]() Click Save & Close.
Click Save & Close.
Outsourcing Payroll
If you use QuickBooks to process your payroll, all the payroll expenses and payroll tax liabilities are already entered in your company’s financial records. If, instead, you hire an outside service to produce your payroll, you must enter the payroll expense in your QuickBooks file.
Record Payroll Expense and Payroll Liabilities
![]() Select Make General Journal Entries from the Company menu.
Select Make General Journal Entries from the Company menu.
![]() Enter the date of the payroll.
Enter the date of the payroll.
![]() Enter an optional journal entry number or accept the number QuickBooks has assigned to this entry.
Enter an optional journal entry number or accept the number QuickBooks has assigned to this entry.
![]() Enter the name of the payroll expense account.
Enter the name of the payroll expense account.
![]() Enter as a debit the total amount of the gross payroll and related payroll expenses.
Enter as a debit the total amount of the gross payroll and related payroll expenses.
![]() Enter a brief description of this transaction. The description you enter is automatically copied to each line of the journal entry.
Enter a brief description of this transaction. The description you enter is automatically copied to each line of the journal entry.
![]() Enter the cash account that will be affected by this payroll.
Enter the cash account that will be affected by this payroll.
![]() QuickBooks automatically calculates the remainder of the journal entry and enters it as a credit for the net amount of the payroll. Verify that this amount agrees with your calculations.
QuickBooks automatically calculates the remainder of the journal entry and enters it as a credit for the net amount of the payroll. Verify that this amount agrees with your calculations.

![]() Click one of the Save options (not shown).
Click one of the Save options (not shown).