
11. Using Bank Feeds and Online Banking
What You’ll Do
Quick Add Transactions to QuickBooks
Add More Details to Transactions
Automatically Assign Names and Accounts
Assign Transactions to Open Vendor Bills
Transfer Money Between Accounts
Get Reports of Online Transactions
Introduction
Statistics show that more individuals are now participating in online banking activities. Banks and credit card institutions are making their online services easier to access and more cost effective, and the confidence in the security of online financial transactions is increasing. QuickBooks provides a user-friendly interface with your bank or credit card, enabling you to download your transactions via bank feeds for easy matching and reconciliation, examine recent bank transactions, transfer money between two online accounts, and pay bills online.
You don’t have to use all the online services offered by your financial institution. Checking balances and transferring funds are typically free services, but many banks charge a monthly fee or per-transaction fee for bill payment services (direct connect). You should weigh this fee against the cost of postage and paper supplies and the time you save to determine whether the service is worthwhile to you.
If your bank or credit card institution does not provide online services and you want to use these features, you can open a new account with a bank or credit card institution that does provide these services. Opening an account for the purpose of using online services doesn’t necessarily mean you have to sever ties with your original financial institution, however. For banking, you can use one bank for online services and keep another for savings and loan services.
Choosing Bank Feeds Mode
Over the years, QuickBooks has added functionality to the process of downloading financial institution transactions directly into your QuickBooks data. QuickBooks 2014 has even more flexibility with Bank Feeds. QuickBooks users have the option to choose between two different methods of viewing the information that is downloaded into QuickBooks. The new Express Mode is the default, but you can switch to Classic (Register) Mode in the preferences. Try both methods; see which one works best for you.
![]() Go to Edit, Preferences and Select Checking.
Go to Edit, Preferences and Select Checking.
![]() Click the Company Preferences tab.
Click the Company Preferences tab.
![]() In the Bank Feeds section, choose either Express Mode or Classic Mode (Register Mode).
In the Bank Feeds section, choose either Express Mode or Classic Mode (Register Mode).
![]() If you select Express Mode, click the Create Rules Automatically or Always Ask Before Creating a Rule box as appropriate.
If you select Express Mode, click the Create Rules Automatically or Always Ask Before Creating a Rule box as appropriate.
![]() Click OK.
Click OK.

Did You Know?
The remaining examples on banking feeds use Express Mode. You can switch between modes at any time. However, renaming rules you create in Express Mode are not available in Classic Mode, and aliases you create in Classic Mode are not available in Express Mode.
Did You Know?
QuickBooks Online uses the Express Mode of bank feeds, too. Working with Bank Feeds and importing transactions is similar in QuickBooks Online. However, the bank feed is automatic in QuickBooks Online. Every night any new transactions are automatically downloaded into QuickBooks Online.
Signing Up with Your Bank for Online Services
1. First, determine whether your existing bank provides online services for QuickBooks. You can do this by calling the bank or by viewing the QuickBooks list of QuickBooks-friendly online institutions. You can view the Financial Institutions Directory by selecting the Banking menu and then selecting Bank Feeds, Participating Financial Institutions. If your bank or credit card is on the list, click the link to your financial institution to find out more about which options are available to you.
2. To see what your options are, begin using the Bank Feeds setup (see “Activating Bank Feeds” in this chapter). You encounter the following choices:
![]() Direct Connect provides you with the ability to download transactions and to initiate transactions or transfers from within QuickBooks. Banks usually charge a monthly fee with Direct Connect. You need to enroll or sign up with your bank. Be aware that it may take several days to get it authorized and set up with your bank or financial institution.
Direct Connect provides you with the ability to download transactions and to initiate transactions or transfers from within QuickBooks. Banks usually charge a monthly fee with Direct Connect. You need to enroll or sign up with your bank. Be aware that it may take several days to get it authorized and set up with your bank or financial institution.
![]() Manual import (or Web Connect) allows you to manually download and import transactions into QuickBooks.
Manual import (or Web Connect) allows you to manually download and import transactions into QuickBooks.
![]() If your bank does not provide Bank Feeds, you can change your bank to a QuickBooks-friendly bank or simply sign up for QuickBooks Bill Pay Service instead. Select the Banking, Bank Feeds, Learn About Online Bill Payment menu for more information (an Internet connection is required).
If your bank does not provide Bank Feeds, you can change your bank to a QuickBooks-friendly bank or simply sign up for QuickBooks Bill Pay Service instead. Select the Banking, Bank Feeds, Learn About Online Bill Payment menu for more information (an Internet connection is required).
![]() If you decide to switch banks to one that works online with QuickBooks, submit your online application and wait for account information to be sent to you.
If you decide to switch banks to one that works online with QuickBooks, submit your online application and wait for account information to be sent to you.
Important
If you are considering changing banks simply for online access, think twice. Even in the electronic age, some important banking and lending decisions are still based on rapport. If you’ve taken the time to get to know your banking officer, loan managers, and so on, don’t cavalierly sever those relationships. Check with your home bank first and find out whether it has plans to offer online services in the near future. Mention that you use QuickBooks and want to tie in your QuickBooks accounts with your bank. You might find out that your bank is about to start offering the very services you need.
Activating Bank Feeds
The first step in using Bank Feeds services is getting access to a bank that provides the services you need. After you open a bank account and establish online privileges, you’re ready to put QuickBooks to work. With an Internet connection, you can access your bank account directly from your QuickBooks program. These steps show you how to initiate the QuickBooks Bank Feeds feature.
![]() Select Banking, Bank Feeds, Set Up Bank Feed for Account.
Select Banking, Bank Feeds, Set Up Bank Feed for Account.
![]() Enter your bank’s name.
Enter your bank’s name.
![]() Click Next if needed to locate your bank or financial institution and click to select your bank.
Click Next if needed to locate your bank or financial institution and click to select your bank.
![]() Alternatively, click your bank if it is listed under the popular banks on the right.
Alternatively, click your bank if it is listed under the popular banks on the right.

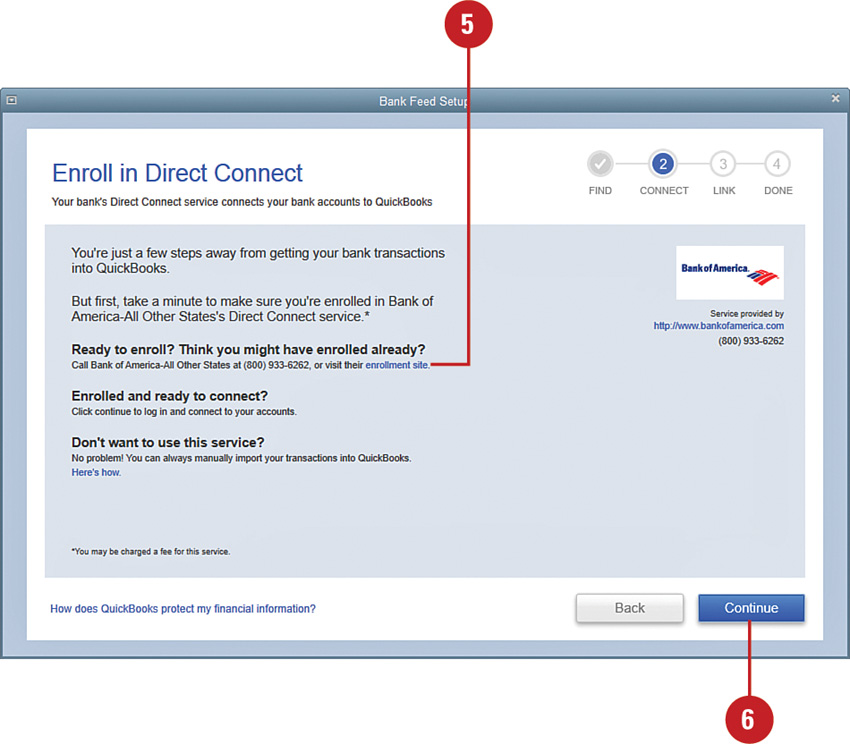
![]() If your bank offers Direct Connect, you see the Enroll in Direct Connect screen. If you need to enroll, click the Enrollment Site link.
If your bank offers Direct Connect, you see the Enroll in Direct Connect screen. If you need to enroll, click the Enrollment Site link.
![]() If you’re already enrolled and ready to connect, click Continue.
If you’re already enrolled and ready to connect, click Continue.
Did You Know?
If your bank does not offer Direct Connect, you see details on how to manually import your transactions (known as Web Connect) into QuickBooks. (See the section “Manually Importing Transactions” in this chapter.)
![]() If you’re already set up for Direct Connect with your bank, enter your ID and Passcode or Pin.
If you’re already set up for Direct Connect with your bank, enter your ID and Passcode or Pin.
![]() Click Connect and continue to link the account to QuickBooks.
Click Connect and continue to link the account to QuickBooks.

![]() You see a list of your bank accounts. On the right, click to select the appropriate account to import transactions into QuickBooks (not shown).
You see a list of your bank accounts. On the right, click to select the appropriate account to import transactions into QuickBooks (not shown).
Did You Know?
You can also download your credit card transactions directly into your QuickBooks data file. If you have a business credit card, you can also choose to download these transactions as well as banking transactions.
![]() Bank 24/7—You no longer have to worry about when the bank is open. You can bank any time of the day or night when you bank online. Stay warm, dry, and comfortable by banking from your desktop at a time that fits your schedule instead of working around the bank’s schedule.
Bank 24/7—You no longer have to worry about when the bank is open. You can bank any time of the day or night when you bank online. Stay warm, dry, and comfortable by banking from your desktop at a time that fits your schedule instead of working around the bank’s schedule.
![]() No waiting in line—How often do you go to the bank and feel like you could read the entire newspaper while you wait in line? Forget about lines. You can conduct your banking transactions immediately when you bank online. It’s as if you had your own private teller, waiting patiently to process your transactions.
No waiting in line—How often do you go to the bank and feel like you could read the entire newspaper while you wait in line? Forget about lines. You can conduct your banking transactions immediately when you bank online. It’s as if you had your own private teller, waiting patiently to process your transactions.
![]() See the whole picture—When you conduct a transaction at the teller window of your bank, you get a receipt for that transaction. That’s all. When you bank online, you see every transaction that has passed through your account in the current banking cycle, and you see the balances in all your accounts.
See the whole picture—When you conduct a transaction at the teller window of your bank, you get a receipt for that transaction. That’s all. When you bank online, you see every transaction that has passed through your account in the current banking cycle, and you see the balances in all your accounts.
![]() Comparison shop for a bank—With the advent of Bank Feeds, many banks have begun offering accounts online. You don’t even have to live in the same town as these banks to have an account there. Although examining bank balances and transferring funds are usually free services, there are other online services you can explore—bill paying, for example—for which some banks charge a fee. Shop around for a bank that provides the services you want at the price you want to pay.
Comparison shop for a bank—With the advent of Bank Feeds, many banks have begun offering accounts online. You don’t even have to live in the same town as these banks to have an account there. Although examining bank balances and transferring funds are usually free services, there are other online services you can explore—bill paying, for example—for which some banks charge a fee. Shop around for a bank that provides the services you want at the price you want to pay.
![]() Maintain accurate records—Take advantage of the fact that you can check your bank balance anytime, day or night, to ensure that your own records in QuickBooks are accurate and up-to-date.
Maintain accurate records—Take advantage of the fact that you can check your bank balance anytime, day or night, to ensure that your own records in QuickBooks are accurate and up-to-date.
Retrieving Online Transactions
After you activate a bank feed, you can download your bank or credit card transactions that have recently cleared your financial institution.
![]() Select Banking, Bank Feeds and choose Bank Feeds Center (not shown).
Select Banking, Bank Feeds and choose Bank Feeds Center (not shown).
![]() Click the bank account from the list of bank accounts to select it.
Click the bank account from the list of bank accounts to select it.
![]() Notice the balance per the bank and per QuickBooks.
Notice the balance per the bank and per QuickBooks.
![]() Click the Refresh icon or the drop-down arrow to select to sync this account or all for this bank.
Click the Refresh icon or the drop-down arrow to select to sync this account or all for this bank.

![]() When prompted, enter your password to download the transactions.
When prompted, enter your password to download the transactions.
![]() Click OK.
Click OK.

![]() Note the number of transactions waiting to be added to QuickBooks.
Note the number of transactions waiting to be added to QuickBooks.
Manually Importing Transactions
With Web Connect, you download transactions from your bank or financial institution and import them into QuickBooks. Web Connect is usually free and offered by most banks for business accounts (that is, it might not be available for an account set up as a personal account at the bank—even though you use the account for business).
![]() Select Banking, Bank Feeds and choose Bank Feeds Center (not shown).
Select Banking, Bank Feeds and choose Bank Feeds Center (not shown).
![]() Click the bank account from the list of bank accounts to select it.
Click the bank account from the list of bank accounts to select it.
![]() Click the Refresh icon.
Click the Refresh icon.

![]() From the web browser window that opens in QuickBooks, enter the login information to access your bank account.
From the web browser window that opens in QuickBooks, enter the login information to access your bank account.

![]() Navigate your bank’s website to download transactions (not statements) and select to download the QuickBooks (QBO) file type (not shown).
Navigate your bank’s website to download transactions (not statements) and select to download the QuickBooks (QBO) file type (not shown).
Did You Know?
Some banks do not allow you to download to QuickBooks (QBO file type). In those situations you might be able to download the file for Quicken (QFX) or Money (OFX). Then, you need to convert the file to a QBO file to import the transactions in to QuickBooks. There are third-party developers who have created a conversion tool.

![]() Select Import New Transactions Now.
Select Import New Transactions Now.
![]() Click OK.
Click OK.

![]() Alternatively, if you choose to save the file, then you need to manually import it. Click Banking, Bank Feeds, Import Web Connect File.
Alternatively, if you choose to save the file, then you need to manually import it. Click Banking, Bank Feeds, Import Web Connect File.

![]() Select the file to import and choose to use an existing QuickBooks account or create a new account.
Select the file to import and choose to use an existing QuickBooks account or create a new account.
![]() Click Continue to import the transactions.
Click Continue to import the transactions.

Quick Add Transactions to QuickBooks
You can add transactions one at a time or in batches to your QuickBooks data file. After you download or import transactions into QuickBooks, the Bank Feeds Center saves you time and enables you to work on data management instead of data entry.
![]() Open the Bank Feeds Center by selecting Banking, Bank Feeds, and choosing Bank Feeds Center.
Open the Bank Feeds Center by selecting Banking, Bank Feeds, and choosing Bank Feeds Center.
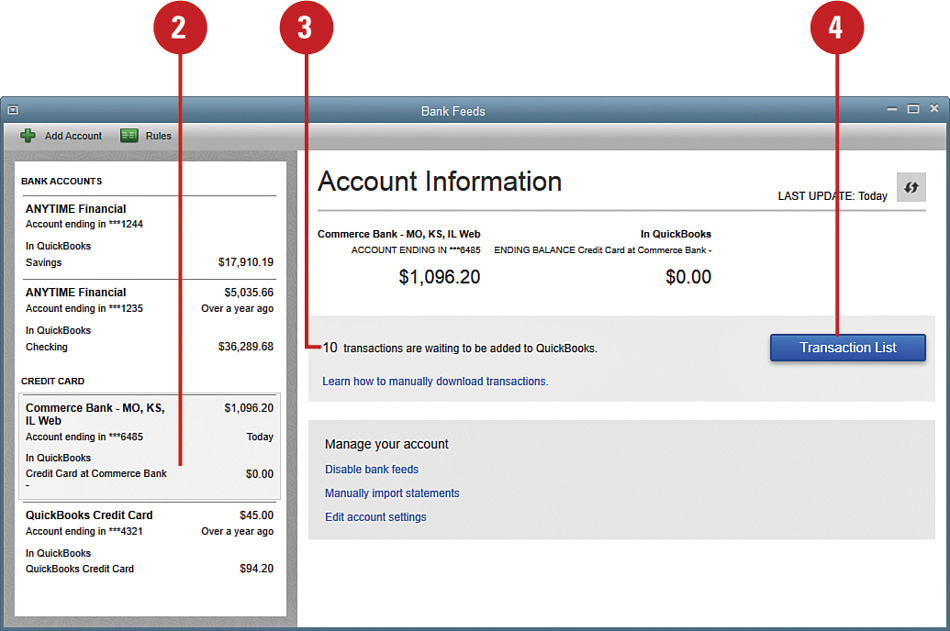
![]() Select the bank account desired (in this example it is a credit card account).
Select the bank account desired (in this example it is a credit card account).
![]() Note the number of transactions waiting to be added to QuickBooks.
Note the number of transactions waiting to be added to QuickBooks.
![]() Click Transaction List.
Click Transaction List.
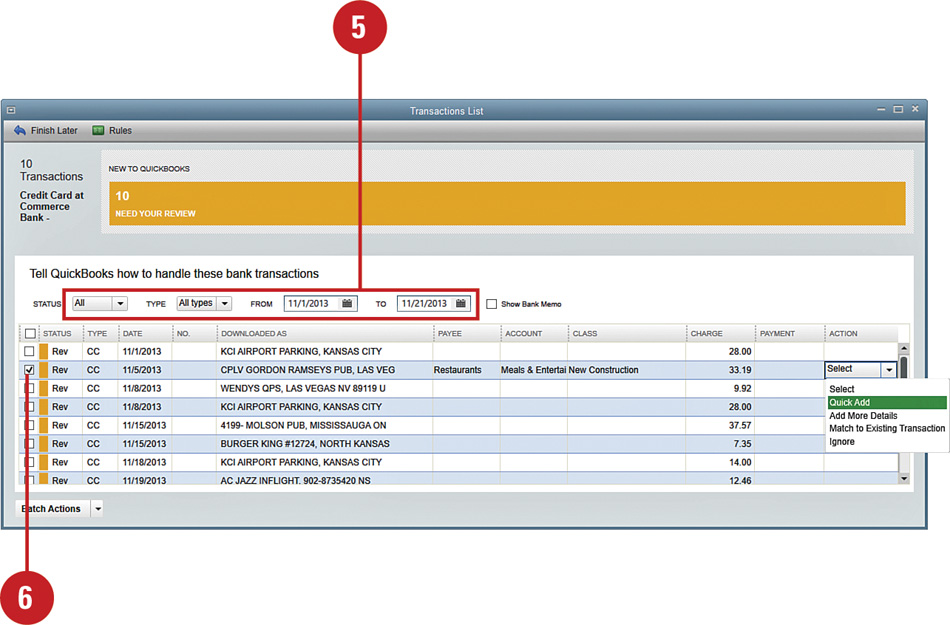
![]() Filter the transactions if desired by status, type, or dates.
Filter the transactions if desired by status, type, or dates.
![]() Click a single transaction on the left (or see the “Batch Adding Transactions” section later in this chapter).
Click a single transaction on the left (or see the “Batch Adding Transactions” section later in this chapter).
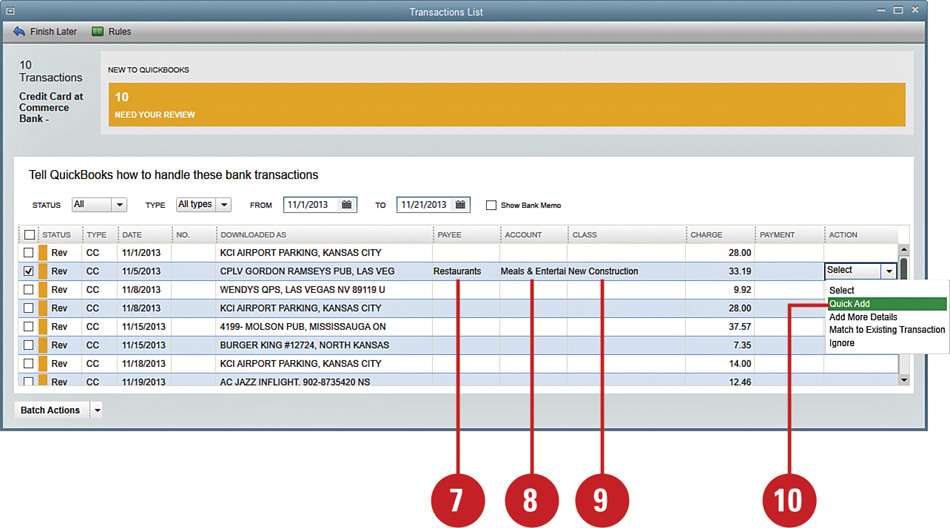
![]() The Payee field automatically populates if the QuickBooks Rules recognizes the payee. If it doesn’t populate, simply click the drop-down menu to make a selection from your QuickBooks lists (vendors, employees, customers, other names) or begin typing the name and have QuickBooks add it to your lists.
The Payee field automatically populates if the QuickBooks Rules recognizes the payee. If it doesn’t populate, simply click the drop-down menu to make a selection from your QuickBooks lists (vendors, employees, customers, other names) or begin typing the name and have QuickBooks add it to your lists.
![]() The Account field automatically populates if the QuickBooks Rules recognizes the payee from a previously downloaded transaction. If it doesn’t populate, simply begin typing the account name or click the drop-down menu to select from a list of your accounts.
The Account field automatically populates if the QuickBooks Rules recognizes the payee from a previously downloaded transaction. If it doesn’t populate, simply begin typing the account name or click the drop-down menu to select from a list of your accounts.
![]() If you have class tracking enabled, enter the class.
If you have class tracking enabled, enter the class.
![]() In the Action column, click the drop-down menu and select Quick Add.
In the Action column, click the drop-down menu and select Quick Add.
![]() If you set the preference to create rules automatically and always ask before creating a rule, then the Rule Creation window opens. Click OK.
If you set the preference to create rules automatically and always ask before creating a rule, then the Rule Creation window opens. Click OK.

Adding More Details to Transactions
If you are tracking expenses by customers or jobs or have billable or reimbursable expenses, then you need to add more details to the transactions. Open the Bank Feeds Center, select the bank account, and click Transaction List to begin this task.
![]() In the Action column, click the drop-down menu to select Add More Details for the appropriate transaction.
In the Action column, click the drop-down menu to select Add More Details for the appropriate transaction.

![]() You can accept the default date or modify as needed.
You can accept the default date or modify as needed.
![]() If no number downloaded, enter an optional Number with which to identify the transaction.
If no number downloaded, enter an optional Number with which to identify the transaction.
![]() Select or enter a name in the Payee field.
Select or enter a name in the Payee field.
![]() Edit or enter an optional Memo for the transaction in the Memo field.
Edit or enter an optional Memo for the transaction in the Memo field.
![]() In the Account field, type the account name or select one from the drop-down menu that displays when the field is selected.
In the Account field, type the account name or select one from the drop-down menu that displays when the field is selected.
![]() Accept the default amount that displays or modify if needed in the Amount field.
Accept the default amount that displays or modify if needed in the Amount field.
![]() Optionally, enter a memo about the transaction.
Optionally, enter a memo about the transaction.
![]() Assign the expense to a customer using the Customer:Job field.
Assign the expense to a customer using the Customer:Job field.
![]() Place a check mark in the Billable box if you will be using the QuickBooks Add Time and Costs feature to invoice the customer for the expense.
Place a check mark in the Billable box if you will be using the QuickBooks Add Time and Costs feature to invoice the customer for the expense.
![]() Assign a class with the Class field if you departmentalize your company’s Income Statement (and use classes for other reporting).
Assign a class with the Class field if you departmentalize your company’s Income Statement (and use classes for other reporting).

![]() Click Remove Selected to clear the line detail above.
Click Remove Selected to clear the line detail above.
![]() Click Add to QuickBooks, and the transaction is included in the QuickBooks register for that financial institution.
Click Add to QuickBooks, and the transaction is included in the QuickBooks register for that financial institution.

![]() If you set the preference to create rules automatically and always ask before creating a rule, then the bank rule window opens (not shown).
If you set the preference to create rules automatically and always ask before creating a rule, then the bank rule window opens (not shown).
Batch Adding Transactions
QuickBooks Bank Feeds or imported transactions can save data entry time by enabling you to add multiple transactions at one time in the Transactions List window. Open the Bank Feeds Center, select the bank account, and click Transactions List to begin this task.
![]() From the Transactions List, click the Downloaded As column heading to sort and group transactions together.
From the Transactions List, click the Downloaded As column heading to sort and group transactions together.
![]() In the No. field, you can add a transaction number (optional).
In the No. field, you can add a transaction number (optional).
![]() Click the Payee field to select the payee from your QuickBooks lists.
Click the Payee field to select the payee from your QuickBooks lists.
![]() Click the Account field to select the account from your QuickBooks chart of accounts.
Click the Account field to select the account from your QuickBooks chart of accounts.
![]() If you use classes, enter a class in the Class field.
If you use classes, enter a class in the Class field.
![]() To select all the transactions, place a check mark (if not already checked) in the column to the left of the transaction. If not selected, you can manually add or remove individual check marks for individual items you want to add to your financial institution register.
To select all the transactions, place a check mark (if not already checked) in the column to the left of the transaction. If not selected, you can manually add or remove individual check marks for individual items you want to add to your financial institution register.
![]() Click the drop-down menu for and select Add/Approve to add the selected transactions to your QuickBooks register for this financial institution.
Click the drop-down menu for and select Add/Approve to add the selected transactions to your QuickBooks register for this financial institution.

![]() If you set the preference to create rules automatically and always ask before creating a rule, then the bank rule window opens (not shown).
If you set the preference to create rules automatically and always ask before creating a rule, then the bank rule window opens (not shown).
Automatically Assigning Names and Accounts
Renaming rules automate and standardize the name and account you want assigned to downloaded transactions. Rules can be created automatically and managing the rules is relatively easy. Plus, as you use bank feeds or imported transactions more, the rules automate most of the transactions, which requires less effort on your part.
Renaming rules are useful because your financial institution may assign a transaction number in addition to the downloaded payee name. For example, you purchase mobile phone services from Verizon Wireless. When the transaction is downloaded, the vendor name is “Verizon wireless - <transaction code or location>.” You want QuickBooks to ignore the transaction code and assign it to the proper vendor (in this example, Verizon Wireless without a store number or code). Thus, a renaming rule is created that begins with, ends with, contains, or exactly matches the downloaded transaction (and uses the vendor name of Verizon Wireless and posts it to the proper expense account automatically).
Follow these steps to modify the renaming rules created automatically by accepting transactions into QuickBooks from Bank Feeds or imported transactions.
![]() Click Rules from the top-left corner of the Bank Feeds Center to open the Rules List.
Click Rules from the top-left corner of the Bank Feeds Center to open the Rules List.
![]() Click the name for which you are modifying the renaming rule from the list on the left.
Click the name for which you are modifying the renaming rule from the list on the left.
![]() Click the drop-down menu to select Edit Rule.
Click the drop-down menu to select Edit Rule.

![]() Select the Description drop-down menu and choose from the Contains, Starts With, Ends With, Matches Exactly, or Does Not Contain options.
Select the Description drop-down menu and choose from the Contains, Starts With, Ends With, Matches Exactly, or Does Not Contain options.
![]() Edit the description rule as needed (contains, starts with, ends with, matches exactly, does not contain) depending on the transaction and information provided from the bank or financial institution. In this example, Burger King #12724, North Kansas was automatically created for the Contains option based on the description from the bank. We can edit it to Contains Burger King (and remove the store number and location) so the rule applies to any transaction when the description contains Burger King.
Edit the description rule as needed (contains, starts with, ends with, matches exactly, does not contain) depending on the transaction and information provided from the bank or financial institution. In this example, Burger King #12724, North Kansas was automatically created for the Contains option based on the description from the bank. We can edit it to Contains Burger King (and remove the store number and location) so the rule applies to any transaction when the description contains Burger King.
![]() Review (or edit) details for the Payee Field.
Review (or edit) details for the Payee Field.
![]() Review (or edit) details for the account to use for the transaction.
Review (or edit) details for the account to use for the transaction.
![]() Click Save to assign the renaming rule.
Click Save to assign the renaming rule.

![]() Click the dark orange color block that shows transactions changed by rules to filter for only those transactions.
Click the dark orange color block that shows transactions changed by rules to filter for only those transactions.
![]() Click the Batch Actions drop-down menu and select Add/Approve to batch add the transactions to QuickBooks.
Click the Batch Actions drop-down menu and select Add/Approve to batch add the transactions to QuickBooks.

Did You Know?
The QuickBooks Bank Feeds feature creates a renaming rule automatically when you assign the transaction to an existing QuickBooks name for the first time. You can then modify the renaming rule. In Company Preferences you can disable the auto create bank rules feature.
Assigning Transactions to Open Vendor Bills
It is possible to associate a downloaded banking transaction to an open vendor bill in QuickBooks, effectively paying the open vendor bill with the downloaded transaction. Open the Bank Feeds Center, select the bank account, and click Transactions List to begin this task.
![]() On the drop-down menu for Action for the selected transaction, click Select Bills to Mark as Paid.
On the drop-down menu for Action for the selected transaction, click Select Bills to Mark as Paid.

![]() Select the vendor from the drop-down list, or begin typing the vendor name and QuickBooks finds vendor names that match.
Select the vendor from the drop-down list, or begin typing the vendor name and QuickBooks finds vendor names that match.
![]() Accept the default date or change as needed.
Accept the default date or change as needed.
![]() Enter an optional memo in the Memo field.
Enter an optional memo in the Memo field.
![]() Enter an optional transaction number or name in the Number field if no number displays. (In this example, the check number was downloaded from the bank with the transaction.)
Enter an optional transaction number or name in the Number field if no number displays. (In this example, the check number was downloaded from the bank with the transaction.)
![]() Select Match to Existing Transaction and place a check mark next to the open bill or bills that are being paid by this downloaded transaction.
Select Match to Existing Transaction and place a check mark next to the open bill or bills that are being paid by this downloaded transaction.
![]() Click the Add to QuickBooks button to record this transaction in QuickBooks.
Click the Add to QuickBooks button to record this transaction in QuickBooks.

Did You Know?
QuickBooks may auto-match transactions. You should review the auto-matched transactions. If needed, click the drop-down menu for Action and select Not a Match to unmatch it.
Deleting Transactions
There might be occasions when you want to delete or ignore all or some of the downloaded transactions before they are entered into QuickBooks. This is especially true if this is the first time you have downloaded transactions and you want to begin recording transactions from a specific date. Open the Bank Feeds Center, select the bank account, and click Transactions List to begin this task.
![]() For one transaction, from the Action drop-down menu, select Ignore.
For one transaction, from the Action drop-down menu, select Ignore.
![]() For multiple transactions, select the transactions by checking in front of them and from the Batch Actions drop-down menu, select Ignore.
For multiple transactions, select the transactions by checking in front of them and from the Batch Actions drop-down menu, select Ignore.

![]() A confirmation prompt displays. Click Yes to permanently delete the transactions from the download.
A confirmation prompt displays. Click Yes to permanently delete the transactions from the download.
![]() Click No to be returned to the Select Items to Delete dialog box.
Click No to be returned to the Select Items to Delete dialog box.

Making Online Payments
Online bill payment from the QuickBooks Bank Feeds lets you pay your vendors electronically through QuickBooks.
After the service is enabled (your bank may charge a fee for this), you use QuickBooks to record the bills being paid and send instructions to your financial institution. Your financial institution’s payment processor makes the payments electronically or prints and mails the check for you.
![]() If you activated your online bill payment service, as discussed in the “Activating Bank Feeds” section earlier in this chapter, you have the Send Items to Your Bank section in the Bank Feeds Center.
If you activated your online bill payment service, as discussed in the “Activating Bank Feeds” section earlier in this chapter, you have the Send Items to Your Bank section in the Bank Feeds Center.
![]() Click Create New to create an online check, pay bills, or transfer funds. The transaction is sent to your financial institution for payment directly to the vendor. Alternatively, you can create transactions as usual in QuickBooks and check the box for Online Payment.
Click Create New to create an online check, pay bills, or transfer funds. The transaction is sent to your financial institution for payment directly to the vendor. Alternatively, you can create transactions as usual in QuickBooks and check the box for Online Payment.
![]() In this example, a check has been prepared. Select Pay Online. QuickBooks includes this in your Bank Feeds Center as a transaction ready to send.
In this example, a check has been prepared. Select Pay Online. QuickBooks includes this in your Bank Feeds Center as a transaction ready to send.
![]() Click Save & Close.
Click Save & Close.

![]() Click Send Items in the Bank Feeds Center window.
Click Send Items in the Bank Feeds Center window.

![]() Enter your PIN if requested (not shown).
Enter your PIN if requested (not shown).
Did You Know?
Your financial institution doesn’t offer bill pay service? Consider signing up for the Intuit QuickBooks Bill Pay Service. Select the Banking, Bank Feeds, Learn About Online Bill Payment. You can read more details and sign up for the service. It is currently offered free for 30 days (or up to 20 payments). After the trial period, it is currently priced at $15.95 a month for up to 20 payments. Then, an additional charge of $6.95 is assessed for each group of 10 bill payments.
Did You Know?
The address, telephone number, and account number are required for online vendors.
Canceling Online Payments
If you requested an online payment that your bank has not yet sent, you might still have time to change your mind. Whether you want to change the amount of the payment or cancel it entirely, you can request that the bank cancel the original payment. Note that your bank might not be able to cancel the requested payment if there is not enough time for the bank to process the request.
![]() From the Bank Feeds Center, on the Create New drop-down menu, select Cancel Payments.
From the Bank Feeds Center, on the Create New drop-down menu, select Cancel Payments.

![]() Alternatively, click on Online Checks (or Bill Payments or Transfers) waiting to be sent.
Alternatively, click on Online Checks (or Bill Payments or Transfers) waiting to be sent.

![]() In the Online Payments to Be Sent dialog, select the payment you want to cancel.
In the Online Payments to Be Sent dialog, select the payment you want to cancel.
![]() Click Cancel. The Cancel Payment prompt box displays (not shown).
Click Cancel. The Cancel Payment prompt box displays (not shown).
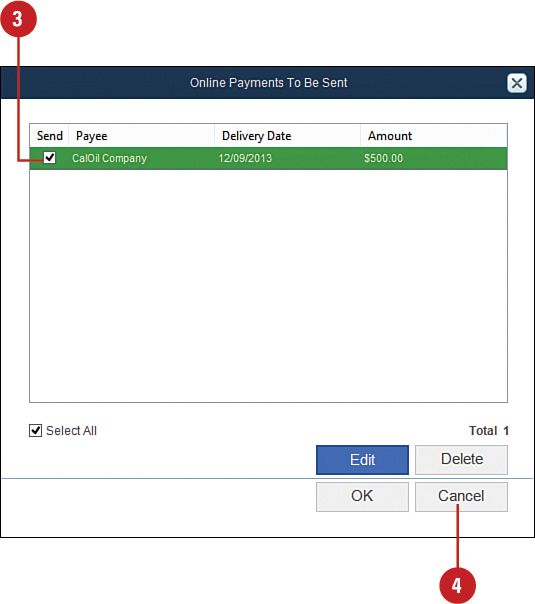
![]() Click Yes to cancel the payment (not shown).
Click Yes to cancel the payment (not shown).
Transferring Money Between Accounts
You can use the QuickBooks Bank Feeds feature to transfer funds between accounts, move excess funds from non-interest-bearing accounts into interest-bearing accounts, or transfer money from your main checking account into your payroll account without ever leaving your desk.
Request the Funds Transfer
![]() Select Transfer Funds from the Create New drop-down menu on the Bank Feeds window.
Select Transfer Funds from the Create New drop-down menu on the Bank Feeds window.

![]() Ignore the date—QuickBooks forces this date to read Next Business Day when you indicate you are making an online transfer of funds.
Ignore the date—QuickBooks forces this date to read Next Business Day when you indicate you are making an online transfer of funds.
![]() Enter or select the account from which you are transferring funds.
Enter or select the account from which you are transferring funds.
![]() Enter or select the account to which you are transferring funds.
Enter or select the account to which you are transferring funds.
![]() Enter the amount of the transfer.
Enter the amount of the transfer.
![]() Check the Online Funds Transfer box.
Check the Online Funds Transfer box.
![]() Click Save & Close to close the Transfer Funds Between Accounts dialog box. Alternatively, click Save & New to record another transfer, or click Clear to remove your entries in the data fields.
Click Save & Close to close the Transfer Funds Between Accounts dialog box. Alternatively, click Save & New to record another transfer, or click Clear to remove your entries in the data fields.

Did You Know?
Your Bank Feeds Center does not show the transfer funds link if you currently do not have two accounts enabled for online access at the same financial institution. You cannot transfer funds between different banks from your QuickBooks Bank Feeds Center.
Getting Reports of Online Transactions
You can request a report that shows all your online transactions and use this report as a confirmation of transactions that have occurred. You can also customize the report to show only items you’ve sent or items waiting to be sent.
![]() Select Reports, Custom Transaction Detail Report. The Modify Report window automatically displays.
Select Reports, Custom Transaction Detail Report. The Modify Report window automatically displays.
![]() Click the Filters tab.
Click the Filters tab.
![]() Click Online Status in the Filter list.
Click Online Status in the Filter list.
![]() Select the type of online transactions you want to see. For example, pick from transactions to send, transactions that have been sent, and so on.
Select the type of online transactions you want to see. For example, pick from transactions to send, transactions that have been sent, and so on.
![]() Click OK.
Click OK.

![]() The Custom Transaction Detail report displays with your Bank Feed transactions listed.
The Custom Transaction Detail report displays with your Bank Feed transactions listed.
