
12. Preparing Income Tax Returns
Introduction
Whether your company is a corporation, partnership, proprietorship, or not-for-profit, you need to prepare income tax returns at the end of each year. The government requires that you report a summary of your income and expenses for the year, and—although it doesn’t produce income tax returns—QuickBooks does provide all the information you need to prepare the forms yourself or have someone else prepare your tax returns using your QuickBooks data.
In this chapter, you learn how to set up your accounts so the numbers feed into the proper places on the tax reports. You see the tax reports that you can produce in QuickBooks, and you also learn how to record estimated tax payments and learn about the tax programs with which QuickBooks integrates.
Choosing the Correct Income Tax Form
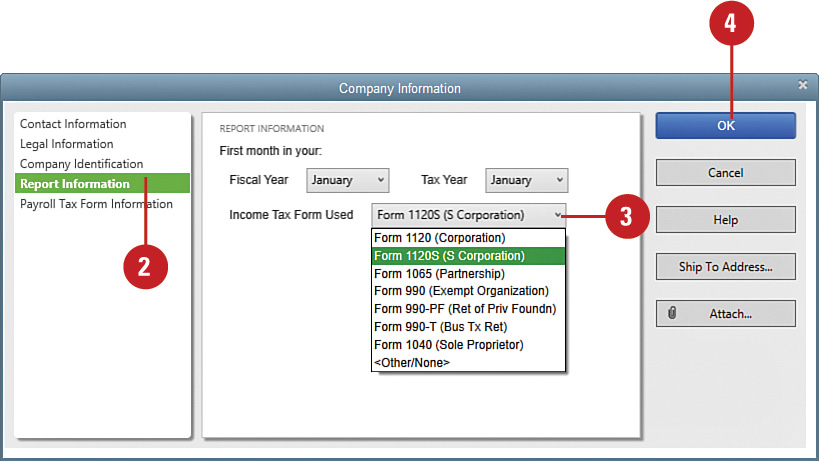
Each type of business entity is required to file a different income tax form. If you used the EasyStep Interview to set up your company in QuickBooks, you were asked to indicate which type of tax form your business files. QuickBooks uses this information to determine which type of business entity your company is. Before you can use the QuickBooks features that help you prepare your income tax return, you must have the correct business entity selected. To verify, enter, or change your company’s entity information, follow these steps.
![]() Select Company, My Company and click on the Edit icon.
Select Company, My Company and click on the Edit icon.

![]() Click Report Information.
Click Report Information.
![]() Click the drop-down arrow for Income Tax Form Used to select a tax form for this entity.
Click the drop-down arrow for Income Tax Form Used to select a tax form for this entity.
![]() Click OK.
Click OK.
Did You Know?
You will get a warning before you make the change. If you chose a tax form that differs from the form previously selected during the setup, you see a message that reads: “Income tax settings now invalid and will be deleted in all accounts. Continue?” Click Yes to proceed with the change in tax form.
Which Income Tax Form Should You Use?
![]() Form 990—Use this form if you are a tax-exempt organization. Tax-exempt organizations are usually those in the business of helping others. The IRS must give approval to your exempt status. Organizations that qualify for exempt status typically include organizations that are charitable, educational, scientific, religious, or literary. This type of organization pays income tax only on income not related to the reason for the exempt status.
Form 990—Use this form if you are a tax-exempt organization. Tax-exempt organizations are usually those in the business of helping others. The IRS must give approval to your exempt status. Organizations that qualify for exempt status typically include organizations that are charitable, educational, scientific, religious, or literary. This type of organization pays income tax only on income not related to the reason for the exempt status.
![]() Form 990-PF—Private foundations use this form. A private foundation is typically a tax-exempt entity controlled by an individual or a family. Strict rules apply to this type of tax-exempt organization.
Form 990-PF—Private foundations use this form. A private foundation is typically a tax-exempt entity controlled by an individual or a family. Strict rules apply to this type of tax-exempt organization.
![]() Form 990-T—Tax-exempt organizations that have a profitable business not related to the exempt purpose of the organization are required to report the tax information from their profitable business on this form.
Form 990-T—Tax-exempt organizations that have a profitable business not related to the exempt purpose of the organization are required to report the tax information from their profitable business on this form.
![]() Form 1040—This is the tax form used by individuals. If your business is a sole proprietorship or another type of business that is not required to file a separate business tax return, such as some limited liability corporations, your business income and expenses are reported on your 1040. Most commonly, people who report business activity on their 1040s use an accompanying Schedule C to summarize their business transactions.
Form 1040—This is the tax form used by individuals. If your business is a sole proprietorship or another type of business that is not required to file a separate business tax return, such as some limited liability corporations, your business income and expenses are reported on your 1040. Most commonly, people who report business activity on their 1040s use an accompanying Schedule C to summarize their business transactions.
![]() Form 1065—Use this form if you are a partnership. Partnerships are similar to S corporations in that your share of the company’s net income or loss is passed on to you and taxed on your individual tax return (1040). Limited liability corporations with more than one member also use a Form 1065.
Form 1065—Use this form if you are a partnership. Partnerships are similar to S corporations in that your share of the company’s net income or loss is passed on to you and taxed on your individual tax return (1040). Limited liability corporations with more than one member also use a Form 1065.
![]() Form 1120—Taxable corporations use this form to report their business activity. Corporations are taxed at their own rates and are liable for their own debts.
Form 1120—Taxable corporations use this form to report their business activity. Corporations are taxed at their own rates and are liable for their own debts.
![]() Form 1120S—Some corporations are classified as Subchapter S corporations. Instead of being taxed at corporate income tax rates, the income or loss of an S corporation is passed on to its owners, much like a partnership, and taxed on the individual tax returns.
Form 1120S—Some corporations are classified as Subchapter S corporations. Instead of being taxed at corporate income tax rates, the income or loss of an S corporation is passed on to its owners, much like a partnership, and taxed on the individual tax returns.
Assigning Tax Lines to New or Existing Accounts
If you plan to use QuickBooks to help prepare your company’s income tax forms, you must assign a tax line to each of your company’s accounts. You can assign tax lines as you set up your accounts, or you can open a Chart of Accounts report that lets you see the tax line assignment status of all of your accounts at a glance and then assign tax lines directly from the report.
![]() Click the Chart of Accounts icon on the QuickBooks Home page. If you’re editing an existing account, press Ctrl+E and skip to Step 6. If you’re creating a new account, move on to Step 2.
Click the Chart of Accounts icon on the QuickBooks Home page. If you’re editing an existing account, press Ctrl+E and skip to Step 6. If you’re creating a new account, move on to Step 2.
Timesaver
Press Ctrl+A to quickly open the Chart of Accounts.
![]() Select New from the Account menu (or press Ctrl+N). Or if you’re editing an existing account, skip to Step 6.
Select New from the Account menu (or press Ctrl+N). Or if you’re editing an existing account, skip to Step 6.

![]() Choose the type of account in the Add New Account: Choose Account Type window (not shown).
Choose the type of account in the Add New Account: Choose Account Type window (not shown).
![]() Click Continue (not shown).
Click Continue (not shown).
![]() Enter appropriate information such as Name and Description to set up your account (skip to Step 7 for new accounts).
Enter appropriate information such as Name and Description to set up your account (skip to Step 7 for new accounts).
![]() Click the drop-down list in the Tax-Line Mapping field to view the list.
Click the drop-down list in the Tax-Line Mapping field to view the list.
![]() Click the tax line that is appropriate for this account.
Click the tax line that is appropriate for this account.

![]() Click OK (not shown).
Click OK (not shown).
Did You Know?
Tax lines vary depending on the tax return you file. When you selected your company’s tax form, QuickBooks loaded the tax lines that apply to that particular form. Different companies see different tax lines on the Tax-Line Mapping drop-down list.
Using the Income Tax Reporting
The QuickBooks tax reports are designed to help you or your accountant prepare your income tax return. Review the Account Listing Report to verify the tax lines assigned to your accounts. The Income Tax Summary report displays a summary of your company’s income and expenses with one line on the report corresponding to each line of your income tax return. The Income Tax Detail report shows the complete detail of every transaction that feeds into the individual lines on your company tax return.
Create Account Listing Report
![]() Select Reports, Accountant & Taxes; then select Account Listing.
Select Reports, Accountant & Taxes; then select Account Listing.
![]() Double-click any account showing <unassigned> in the Tax Line column.
Double-click any account showing <unassigned> in the Tax Line column.

![]() Click the Tax Line Mapping drop-down list to display the available tax lines. Select the proper tax line item. (Refer to the earlier section, “Assigning Tax Lines to New or Existing Accounts.”)
Click the Tax Line Mapping drop-down list to display the available tax lines. Select the proper tax line item. (Refer to the earlier section, “Assigning Tax Lines to New or Existing Accounts.”)
![]() Click OK. Repeat the steps for any other accounts that need to have a tax line assigned.
Click OK. Repeat the steps for any other accounts that need to have a tax line assigned.
Create Income Tax Summary Report
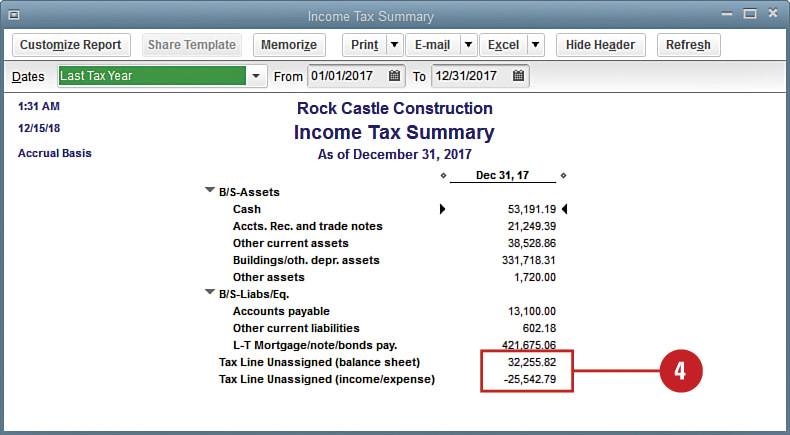
![]() Select Reports, Accountant & Taxes; then select Income Tax Summary.
Select Reports, Accountant & Taxes; then select Income Tax Summary.
![]() The Income Tax Summary report is automatically compiled based on the previous calendar year. Click in the From and To fields to change the range of dates, if necessary.
The Income Tax Summary report is automatically compiled based on the previous calendar year. Click in the From and To fields to change the range of dates, if necessary.
![]() Double-click any amount to see the detail of all the transactions that make up that amount.
Double-click any amount to see the detail of all the transactions that make up that amount.
![]() Double-click the Tax Line Unassigned items at the bottom of the Income Tax Summary report) to display the detail of items that have not yet been assigned to tax lines. If you need to assign tax lines to these items, go back to the previous task and follow the steps to assign tax lines.
Double-click the Tax Line Unassigned items at the bottom of the Income Tax Summary report) to display the detail of items that have not yet been assigned to tax lines. If you need to assign tax lines to these items, go back to the previous task and follow the steps to assign tax lines.
![]() Press Esc to close the report.
Press Esc to close the report.
![]() Change the dates in the From and To fields, if necessary.
Change the dates in the From and To fields, if necessary.
Important
Your company date information might have been entered incorrectly. The dates that appear on the tax reports are a function of the fiscal year information you entered when you set up your company. If you find you must consistently change the dates on your tax reports, open the Company Information dialog box (choose Company Information from the Company menu) and verify that the months in the lower-left corner of this box are correct.
![]() Double-click any item to see the original document.
Double-click any item to see the original document.

![]() Press Esc to close the report and any original document windows you opened.
Press Esc to close the report and any original document windows you opened.
Did You Know?
The Income Tax Detail report should be examined before you rely on the numbers in the Income Tax Summary report. Take the time to closely examine the Income Tax Detail report, studying the way in which your transactions have been classified. You are responsible for being able to explain the tax treatment of all these amounts to the IRS.
![]() First quarter—The 15th day of the 4th month of the fiscal year.
First quarter—The 15th day of the 4th month of the fiscal year.
![]() Second quarter—The 15th day of the 6th month of the fiscal year.
Second quarter—The 15th day of the 6th month of the fiscal year.
![]() Third quarter—The 15th day of the 9th month of the fiscal year.
Third quarter—The 15th day of the 9th month of the fiscal year.
![]() Fourth quarter—The 15th day of the 12th month of the fiscal year.
Fourth quarter—The 15th day of the 12th month of the fiscal year.
![]() First quarter—April 15th
First quarter—April 15th
![]() Second quarter—June 15th
Second quarter—June 15th
![]() Third quarter—September 15th
Third quarter—September 15th
![]() Fourth quarter—January 15th
Fourth quarter—January 15th


Making Estimated Tax Payments
Typically, each of your quarterly estimated payments is equal to at least 25% of the lesser of 100% of the estimated income tax for the current year or 100% of the tax shown on the corporation’s tax return for the preceding year. Use Form 8109 (call 1-800-TAX-FORM or contact your local IRS office) to accompany your tax deposits. Most people use the Electronic Federal Tax Payment System (EFTPS) to make tax deposits electronically. Contact the IRS or your accountant for more information on how to make deposits.
![]() Click the Write Checks icon on the Home page to open a new check.
Click the Write Checks icon on the Home page to open a new check.
Timesaver
Pressing Ctrl+W also takes you to the Write Checks window.
![]() Enter the date of the payment.
Enter the date of the payment.
![]() Enter the payee. Ask your accountant for instructions on how to submit your tax payments.
Enter the payee. Ask your accountant for instructions on how to submit your tax payments.
Important
Payroll taxes and income taxes are not the same! Make sure you have separate tax accounts for your income tax expenses and liabilities and that these accounts are not the same ones you use to record your payroll tax expenses and liabilities. Payroll taxes include the taxes withheld from employee paychecks and the employer’s share of taxes, such as FICA and Unemployment Compensation.
![]() Enter the amount.
Enter the amount.
![]() Enter the account name where the payment will be recorded (see the previous sidebar, “Accounting for Income Taxes”).
Enter the account name where the payment will be recorded (see the previous sidebar, “Accounting for Income Taxes”).
![]() Enter an optional description.
Enter an optional description.
![]() Save the payment.
Save the payment.

See Also
See “Scheduling Recurring Transactions” on page 216 to save time by scheduling and automating quarterly tax payments.
Did You Know?
Choose either your income tax liability or your income tax expense account for recording the tax payment. If the tax liability has already been recorded, this payment should be assigned to the liability account. If you haven’t recorded the tax liability, record the payment to the income tax expense account.
Did You Know?
Different estimated tax payment rules apply depending on the type of business. The information presented in this task describes estimated tax information for taxable corporations. Different rules apply for individuals and other types of organizations. Check with your tax professional to ensure that you are paying the correct amount of estimated tax.
Creating a Tax Return
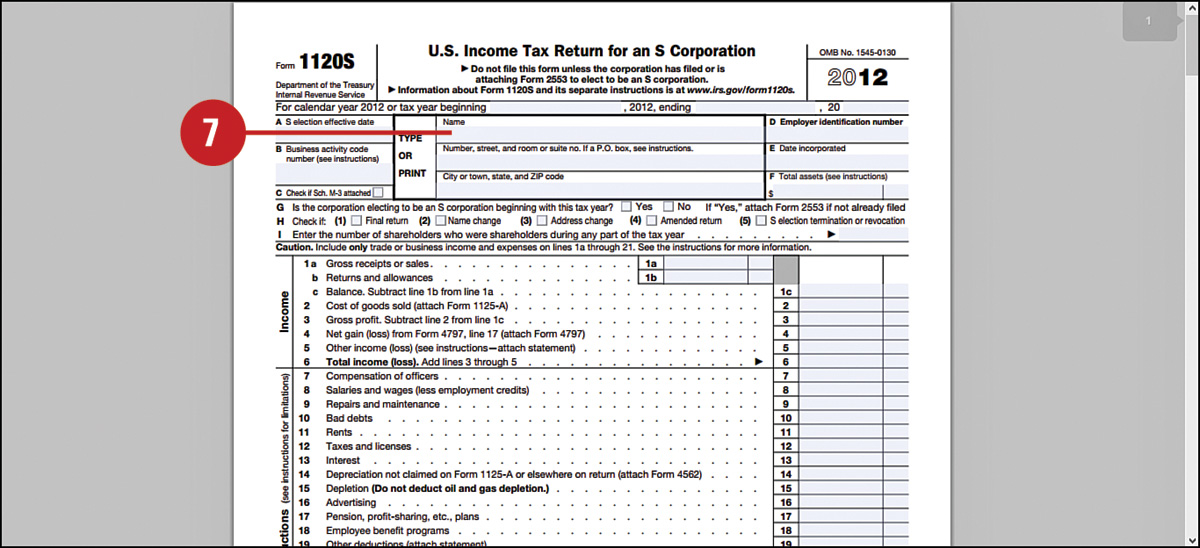
When you have all the information necessary for the preparation of your income tax return, you can find all the tax forms you need on the Internet. The IRS provides access to printable tax forms and accompanying instructions on its website, available for downloading; all the state revenue agencies provide their tax forms online as well. Determine which tax forms you need. The easiest way to do this is to look at last year’s tax return. If this is the first year for your company’s tax return, start with the main tax form for your company, as described earlier in this chapter. As you follow along and read the instructions, you will find out which other tax forms and schedules you need.
Download Federal Tax Forms
![]() Open your web browser and go to the IRS website at http://www.irs.gov.
Open your web browser and go to the IRS website at http://www.irs.gov.
![]() Click the Forms & Pubs tab.
Click the Forms & Pubs tab.
![]() Click Current Forms & Pubs.
Click Current Forms & Pubs.

![]() In the Find box, type your form number or scroll through the list to find your form.
In the Find box, type your form number or scroll through the list to find your form.
![]() Select Product Number in the drop-down next to Find.
Select Product Number in the drop-down next to Find.
![]() Click the name (in the Product Number column) of a form you want to view. The form you selected displays.
Click the name (in the Product Number column) of a form you want to view. The form you selected displays.

![]() You can view the form onscreen, enter information on the form, print it, and save it.
You can view the form onscreen, enter information on the form, print it, and save it.
Download State Tax Forms
![]() Go to the Fun with Taxes website at http://www.funwithtaxes.com.
Go to the Fun with Taxes website at http://www.funwithtaxes.com.
![]() Click the Tax Website Links on the left.
Click the Tax Website Links on the left.

![]() Click the Tax Forms link on the right under State.
Click the Tax Forms link on the right under State.
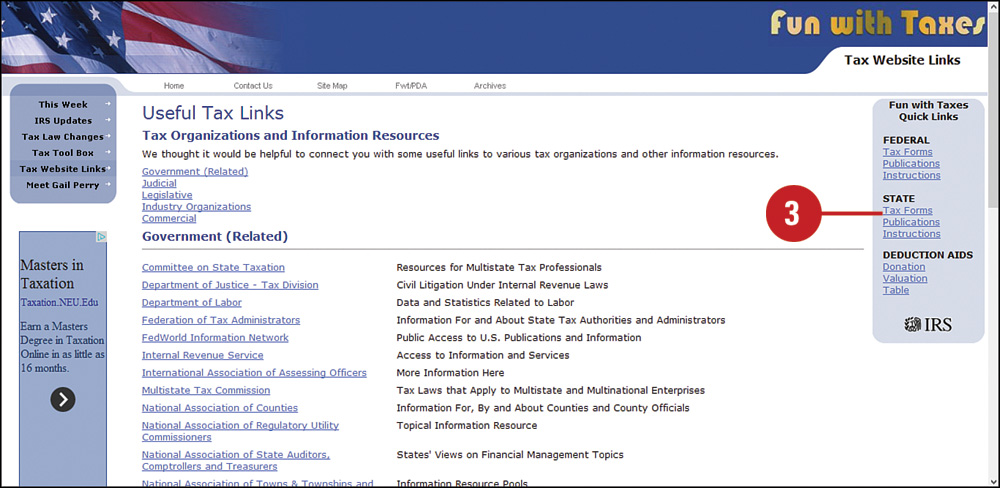
![]() Click the state for which you need tax forms. The website for that state’s revenue agency opens in a separate window.
Click the state for which you need tax forms. The website for that state’s revenue agency opens in a separate window.

Did You Know?
Each state has its own website. You can use an Internet search engine to find the revenue agency for your state. Or you can go to a website that provides links to all state revenue agencies. A site like this is especially handy if you need to file tax returns in more than one state.
![]() Penalties you pay the IRS and state revenue agencies—If you make a late tax payment, the interest portion is a tax-deductible expense, but the penalty is not.
Penalties you pay the IRS and state revenue agencies—If you make a late tax payment, the interest portion is a tax-deductible expense, but the penalty is not.
![]() Costs of tickets for traffic violations—The cost of breaking the law is not deductible.
Costs of tickets for traffic violations—The cost of breaking the law is not deductible.
![]() Start-up costs of beginning a new business—The legal fees, corporate filing fees, research costs, market surveys, and other expenses you incur to help get your business rolling can be amortized over a period of five years, or you might qualify for a deduction of up to $5,000 of these costs in the year in which they were incurred. Special rules apply when start-up costs exceed $50,000.
Start-up costs of beginning a new business—The legal fees, corporate filing fees, research costs, market surveys, and other expenses you incur to help get your business rolling can be amortized over a period of five years, or you might qualify for a deduction of up to $5,000 of these costs in the year in which they were incurred. Special rules apply when start-up costs exceed $50,000.
![]() Charitable contributions—Unless your business is incorporated, charitable contributions belong on a business owner’s Schedule A with other itemized deductions, even if the business paid the contribution.
Charitable contributions—Unless your business is incorporated, charitable contributions belong on a business owner’s Schedule A with other itemized deductions, even if the business paid the contribution.
![]() Lobbying costs—Even if lobbying results in a direct benefit to your business, the costs are not tax deductible.
Lobbying costs—Even if lobbying results in a direct benefit to your business, the costs are not tax deductible.
![]() Dues to entertainment facilities—The cost of specific entertainment events can qualify as a business deduction, but the country club dues are not deductible.
Dues to entertainment facilities—The cost of specific entertainment events can qualify as a business deduction, but the country club dues are not deductible.
![]() Appreciation in property—Assets owned by your company might increase in value over the years, but you are not taxed on that increase (at least not until you sell the assets for a profit).
Appreciation in property—Assets owned by your company might increase in value over the years, but you are not taxed on that increase (at least not until you sell the assets for a profit).