
4. Invoicing and Collecting Income
What You’ll Do
Charge (or Bill) Expenses to a Customer
Set Finance Charge Preferences
Record Cash Sales/Sales Receipts
Receive Advances, Retainers, and Down Payments
Work with the Customer and Payments Snapshot
Introduction
Having a method for recording your income is likely one of the main reasons you purchased your QuickBooks program. Here are just some of the reasons why it’s important to have an accurate record of your income transactions.
![]() You need to be able to track your company’s revenue and record income transactions so you know how well your company is performing.
You need to be able to track your company’s revenue and record income transactions so you know how well your company is performing.
![]() You need a process to separate your income into appropriate accounts so that you can produce reliable financial statements that tell you where your company’s strengths and weaknesses are.
You need a process to separate your income into appropriate accounts so that you can produce reliable financial statements that tell you where your company’s strengths and weaknesses are.
![]() You need the record-keeping ability necessary to provide your customers with an opportunity to make down payments and partial payments, and you need to have the ability to give them the right to receive refunds and credits for returned merchandise or unfulfilled obligations.
You need the record-keeping ability necessary to provide your customers with an opportunity to make down payments and partial payments, and you need to have the ability to give them the right to receive refunds and credits for returned merchandise or unfulfilled obligations.
![]() You need to properly track and record the dollar amount you deposit in your bank account.
You need to properly track and record the dollar amount you deposit in your bank account.
![]() You need the convenience of sending an email invoice to your customers.
You need the convenience of sending an email invoice to your customers.
![]() If you incur expenses on behalf of a customer, you need to be able to charge those expenses to your customer.
If you incur expenses on behalf of a customer, you need to be able to charge those expenses to your customer.
![]() You need to be able to assess finance charges for late payments.
You need to be able to assess finance charges for late payments.
All of this and more can be accomplished through the invoicing and collection services available in your QuickBooks program. This chapter explains how you can meet all your revenue-collection obligations.
Setting Customers’ Preferences
You can customize some of the standard features that apply to invoices by making adjustments in the Sales & Customers preferences screen. The types of preferences that relate to your sales operations include setting a default shipping method, setting a standard markup percent for items you purchase and resell to customers, and indicating a standard FOB (Free on Board shipping terms—for more details see the Did You Know on page 113) for your company. In addition, you indicate how you want reimbursements to be recorded in your financial records, in what order customer payments are to be applied to outstanding invoices, whether you want to be told you are about to issue a duplicate invoice number, and whether you want to use the QuickBooks Price Level feature. The QuickBooks Price Level feature enables you to easily apply discounts or price increases to items on your invoices. The settings you make here affect all your company’s invoices. Note that only a user with administrative rights can make changes to the company preferences for sales and customers.
Set Payments Preferences
![]() Select Edit, Preferences.
Select Edit, Preferences.
![]() Click Payments.
Click Payments.
![]() Click the Company Preferences tab.
Click the Company Preferences tab.
![]() Click the Learn More or Explain links to learn more about accepting online payments from customers or if you want to turn off online payments.
Click the Learn More or Explain links to learn more about accepting online payments from customers or if you want to turn off online payments.
![]() Check Automatically Apply Payments if you want QuickBooks to apply customer payments to outstanding invoices.
Check Automatically Apply Payments if you want QuickBooks to apply customer payments to outstanding invoices.
![]() Check Automatically Calculate Payments if you want to automatically calculate the amount of payments you received based on the invoices you check off on the Receive Payments list.
Check Automatically Calculate Payments if you want to automatically calculate the amount of payments you received based on the invoices you check off on the Receive Payments list.
![]() Check Use Undeposited Funds As a Default Deposit to Account to designate your undeposited funds account as the default account when recording payments that you receive.
Check Use Undeposited Funds As a Default Deposit to Account to designate your undeposited funds account as the default account when recording payments that you receive.
![]() Click OK.
Click OK.

![]() Click Sales & Customers.
Click Sales & Customers.
![]() Click the Company Preferences tab.
Click the Company Preferences tab.
![]() In the Sales Forms pane, indicate the Usual Shipping Method and Usual FOB, and place a check mark to Warn About Duplicate Invoice Numbers.
In the Sales Forms pane, indicate the Usual Shipping Method and Usual FOB, and place a check mark to Warn About Duplicate Invoice Numbers.
![]() In the Miscellaneous pane, indicate a default packing slip template.
In the Miscellaneous pane, indicate a default packing slip template.
![]() Check Enable Collections Center if you want to use the Collections Center to help track and send emails to customers with past due or almost due invoices.
Check Enable Collections Center if you want to use the Collections Center to help track and send emails to customers with past due or almost due invoices.
![]() Check Enable Price Levels to use the QuickBooks Price Levels feature for quickly adjusting amounts on sales forms by a preset percentage.
Check Enable Price Levels to use the QuickBooks Price Levels feature for quickly adjusting amounts on sales forms by a preset percentage.
![]() Check Enable Sales Orders if you want to use the sales orders feature in QuickBooks. If you check this box, you have the option of checking the box to warn about duplicate sales order numbers and to prevent the printing of zero amounts.
Check Enable Sales Orders if you want to use the sales orders feature in QuickBooks. If you check this box, you have the option of checking the box to warn about duplicate sales order numbers and to prevent the printing of zero amounts.
![]() If you have enabled sales orders, choose the templates you prefer to use for sales order packing slips and sales order pick lists.
If you have enabled sales orders, choose the templates you prefer to use for sales order packing slips and sales order pick lists.

![]() Click OK.
Click OK.
Did You Know?
FOB stands for Free on Board. FOB refers to the physical place where the ownership of an item changes hands from the vendor to the purchaser. This designation is used when discussing shipping costs and is important for determining who has the responsibility of shipping and insurance costs. “FOB Our Warehouse,” for example, means the ownership of the item transfers to the purchaser when it leaves the seller’s warehouse. The purchaser is responsible for shipping charges and insurance on the item from the time it leaves the seller’s premises.
![]() Professional invoice—Includes the following fields:* Terms, Item, Description, Quantity, Rate, and Amount.
Professional invoice—Includes the following fields:* Terms, Item, Description, Quantity, Rate, and Amount.
![]() Service invoice—Includes the following fields:* P.O. Number, Terms, Item, Quantity, Description, Rate, and Amount.
Service invoice—Includes the following fields:* P.O. Number, Terms, Item, Quantity, Description, Rate, and Amount.
![]() Product invoice—Includes the following fields:* Ship To, P.O. Number, Terms, Rep, Ship Date, Via, FOB, Quantity, Item Code, Description, Price Each, and Amount.
Product invoice—Includes the following fields:* Ship To, P.O. Number, Terms, Rep, Ship Date, Via, FOB, Quantity, Item Code, Description, Price Each, and Amount.
![]() Custom invoice—Can be customized to include any of the fields from other invoice styles and any other fields that are useful to you.
Custom invoice—Can be customized to include any of the fields from other invoice styles and any other fields that are useful to you.


![]() The invoice date is used to determine when income is recognized on the profit and loss report. For an accrual basis profit and loss, the income is based on the date of the invoice. For a cash basis profit and loss, the income is based on the date payment is received.
The invoice date is used to determine when income is recognized on the profit and loss report. For an accrual basis profit and loss, the income is based on the date of the invoice. For a cash basis profit and loss, the income is based on the date payment is received.
![]() The invoice date is coordinated with the criteria you enter in the Terms field to help QuickBooks determine when the customer payment is due.
The invoice date is coordinated with the criteria you enter in the Terms field to help QuickBooks determine when the customer payment is due.
![]() The invoice due date is considered when QuickBooks produces Accounts Receivable Aging Reports, which show overdue customer payments in increments of 30 days, 60 days, 90 days, and so on.
The invoice due date is considered when QuickBooks produces Accounts Receivable Aging Reports, which show overdue customer payments in increments of 30 days, 60 days, 90 days, and so on.
![]() The invoice date is significant when you issue statements to customers and assess finance charges. When you set Finance Charge Preferences, you must indicate whether finance charges are to be assessed based on the date of the invoice or the due date based on the terms you indicated.
The invoice date is significant when you issue statements to customers and assess finance charges. When you set Finance Charge Preferences, you must indicate whether finance charges are to be assessed based on the date of the invoice or the due date based on the terms you indicated.
![]() The invoice date combined with the payment terms you set determine when the invoice displays as overdue in your Reminders window.
The invoice date combined with the payment terms you set determine when the invoice displays as overdue in your Reminders window.
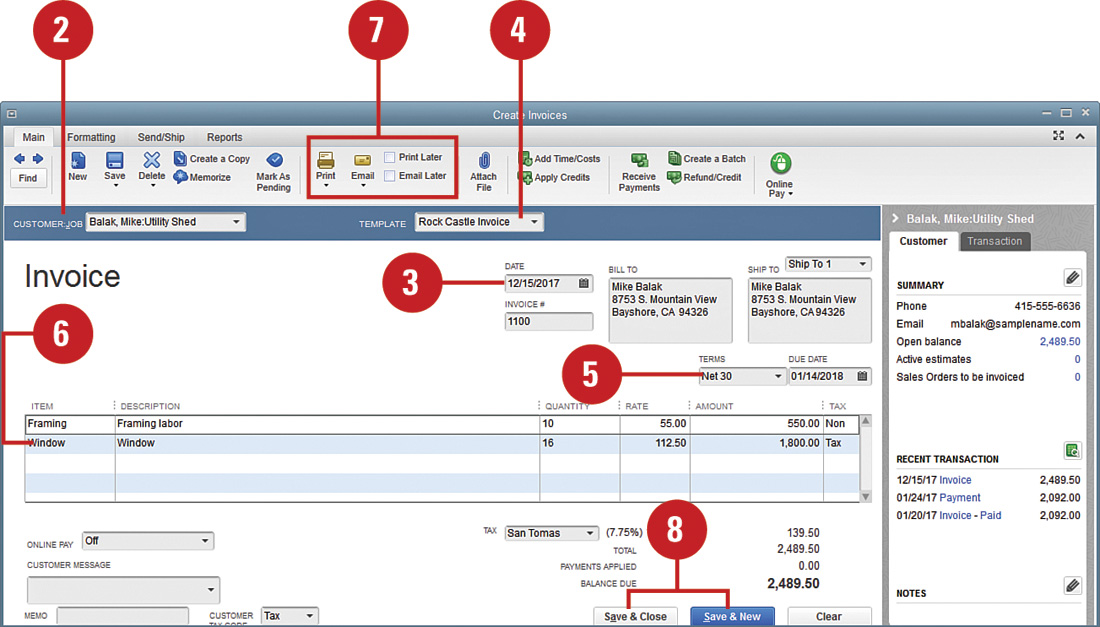
Creating an Invoice
The invoice is the basic form you use to charge your customers for goods and services. Invoices include detailed lists of all items that you charge to a customer. Several types of invoice forms are available in QuickBooks. Choose the form that best suits the type of business you do. You can use the invoice form as a document that you give or send to your customers, or you can use the form purely for internal purposes, to record sales that occur in your company.
![]() Select Customers, Create Invoices.
Select Customers, Create Invoices.
Timesaver
You can also click the Invoices icon on the Home page, or press Ctrl+I to start a new invoice.
![]() Select a customer and, if applicable, a job from the Customer:Job drop-down list.
Select a customer and, if applicable, a job from the Customer:Job drop-down list.
![]() Verify that the date is correct, making any necessary changes.
Verify that the date is correct, making any necessary changes.
![]() Click the Template drop-down menu if you want to choose a different style of invoice.
Click the Template drop-down menu if you want to choose a different style of invoice.
![]() Enter the terms that apply to this customer.
Enter the terms that apply to this customer.
![]() Enter each of the items that this customer is purchasing, along with quantities and rates. (The rates might appear automatically, depending on how the items are entered in your records.) The Amount column is automatically calculated.
Enter each of the items that this customer is purchasing, along with quantities and rates. (The rates might appear automatically, depending on how the items are entered in your records.) The Amount column is automatically calculated.
![]() Check Print or Email options or Print Later or Email Later.
Check Print or Email options or Print Later or Email Later.
![]() Select a Save option.
Select a Save option.
Did You Know?
You can customize your forms to add a professional look to all of your QuickBooks forms, and it is free! Click Formatting, Customize Design to start the easy-to-use wizard.
See Also
You enter an Invoice when you have a sale and will receive payment later. However, when you get paid at the time of sale (a cash sale), then you should enter a Sales Receipt. See “Recording Cash Sales/Sales Receipts” on page 135.
Did You Know?
You can change preference settings on invoice forms. The settings you make in the Sales & Customers Preferences dialog box affect all of your company’s invoices. However, you can override these settings, if necessary, on the actual invoices.
QuickBooks Online—Did You Know?
The process for entering sales transactions is the same in QuickBooks Online. In QuickBooks Online you can enter invoices, receive payment, sales receipts, credits, discounts, billable charges (not available in all versions of QuickBooks Online), and deposits just like in the desktop versions of QuickBooks.
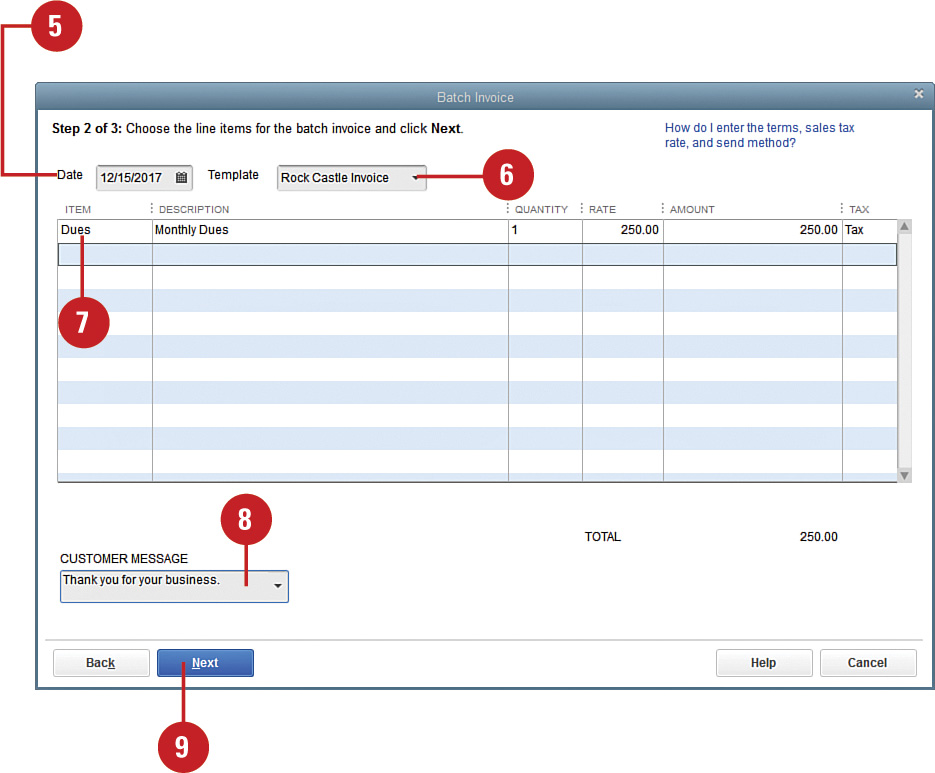
Creating Batch Invoices
Batch invoicing allows you to create the same invoice for multiple customers at the same time. This is a big time-saver for some businesses. Plus, you can create groups of customers to help with the batch invoice. For example, you can create groups of customers to be invoiced monthly, quarterly, or annually. Then, you can quickly create batch invoices for the group of customers.
![]() Select Customers, Create Batch Invoices.
Select Customers, Create Batch Invoices.
Timesaver
Batch invoicing uses information from individual customers (terms, sales tax, and send method) to create invoices. Before creating batch invoices, review the customer information for accuracy and completeness.
![]() Select the customers and, if applicable, jobs from the Customer:Job list by clicking the name (or job) and Add (or double-click the name or job).
Select the customers and, if applicable, jobs from the Customer:Job list by clicking the name (or job) and Add (or double-click the name or job).
![]() Verify the customers on the right to receive an invoice.
Verify the customers on the right to receive an invoice.
![]() Click Next.
Click Next.

![]() Enter the date of the invoices.
Enter the date of the invoices.
![]() Select the template for the invoice.
Select the template for the invoice.
![]() Enter the item (or items) to include on the invoices along with quantities and rates. (The rates might appear automatically, depending on how the items are entered in your records.) The Amount column is automatically calculated.
Enter the item (or items) to include on the invoices along with quantities and rates. (The rates might appear automatically, depending on how the items are entered in your records.) The Amount column is automatically calculated.
![]() Enter a Customer Message (optional).
Enter a Customer Message (optional).
![]() Click Next.
Click Next.
![]() Review the invoices and click Back if needed. Otherwise, click Create Invoices.
Review the invoices and click Back if needed. Otherwise, click Create Invoices.

![]() Click Print or Email as needed.
Click Print or Email as needed.
![]() Click Close.
Click Close.

Create Billing Groups
![]() Select Customers, Create Batch Invoices.
Select Customers, Create Batch Invoices.
![]() Click the Billing Group drop-down and select Add New.
Click the Billing Group drop-down and select Add New.
![]() Enter a Group Name (Monthly) and click Save.
Enter a Group Name (Monthly) and click Save.

![]() To add (or remove) a customer (or job) to this billing group, click to select the Customer (or Job) Name to select it and click Add (or Remove).
To add (or remove) a customer (or job) to this billing group, click to select the Customer (or Job) Name to select it and click Add (or Remove).
![]() Click Save Group.
Click Save Group.
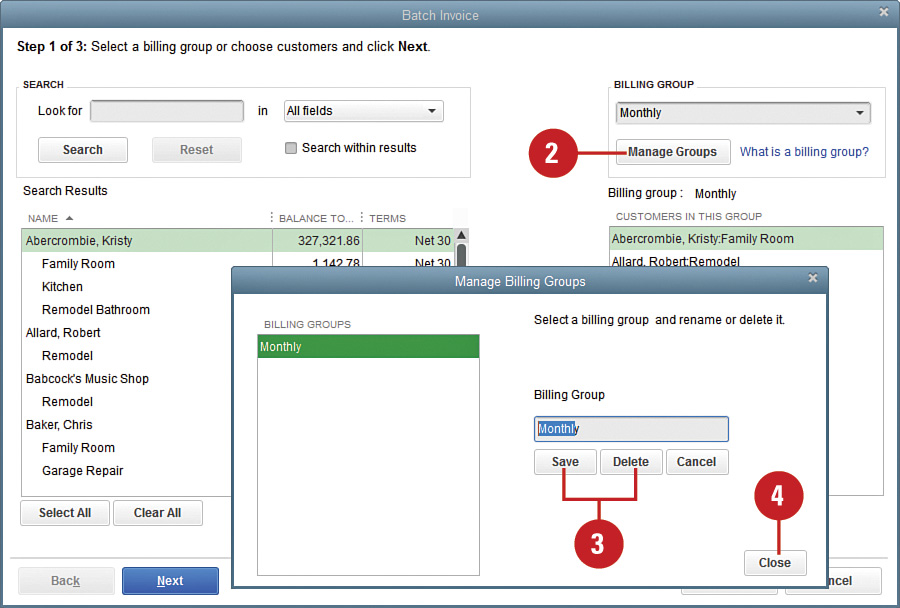
Use Billing Groups to Create Batch Invoices
![]() Select Customers, Create Batch Invoices.
Select Customers, Create Batch Invoices.
![]() Click on the Billing Group drop-down and select Monthly.
Click on the Billing Group drop-down and select Monthly.
![]() Click Next.
Click Next.

![]() Continue creating batch invoices as described in the preceding section.
Continue creating batch invoices as described in the preceding section.
![]() Click Manage Groups.
Click Manage Groups.
![]() Revise the group name and click Save or Delete to remove the group.
Revise the group name and click Save or Delete to remove the group.
![]() Click Close.
Click Close.
Previewing or Printing Invoices
When it’s time to send your invoice to a customer, it pays to first take a look at the form and double-check to make sure everything is the way you want it. After previewing the invoice, you can choose to print the form right away or save it for printing later, perhaps with a batch of other invoices.
![]() If you want to print this invoice later with a batch of invoices, as described in the next task, check the Print Later box, save your invoice, and skip the rest of this task.
If you want to print this invoice later with a batch of invoices, as described in the next task, check the Print Later box, save your invoice, and skip the rest of this task.
![]() To print this invoice now, click the drop-down arrow under the Print button on the invoice form toolbar. Select Preview if you are not yet ready to print the invoice.
To print this invoice now, click the drop-down arrow under the Print button on the invoice form toolbar. Select Preview if you are not yet ready to print the invoice.
Timesaver
You can also press Ctrl+P to print the invoice.
![]() Select Invoice to print the invoice.
Select Invoice to print the invoice.

![]() Click Print in the Print One Invoice dialog box that displays.
Click Print in the Print One Invoice dialog box that displays.

![]() Save your invoice (not shown).
Save your invoice (not shown).
See Also
See the following related topics for more information on coordinating the invoice date with various QuickBooks functions:
![]() “Setting Finance Charge Preferences,” page 130.
“Setting Finance Charge Preferences,” page 130.
![]() “Creating Payment Terms,” page 270.
“Creating Payment Terms,” page 270.
![]() “Creating a Monthly Statement,” page 131.
“Creating a Monthly Statement,” page 131.
![]() Check each invoice you want to print at this time.
Check each invoice you want to print at this time.
Important
You can save time by using the Select All and Select None buttons, and then checking or unchecking the invoices.
Important
You cannot make changes in this window. If you discover that the amount on an invoice is incorrect, you cannot enter a change here. Close the Select Invoices to Print window and open the original invoice; make your changes, and return to this window for printing.
![]() Click OK.
Click OK.
![]() Click the Print button in the Print Invoices dialog box (not shown).
Click the Print button in the Print Invoices dialog box (not shown).
Did You Know?
Memo information does not print on the invoice. You can enter comments for your own use in the Memo field of an invoice. Your customer won’t see this field on the printed invoice.
Emailing an Invoice
The most popular form of communication these days seems to be email, so why not take advantage of this medium to deliver your invoices? Email is easy, and you can get your invoice into the hands of your customer quickly. One word of warning: Make sure your customer expects the e-invoice so your message won’t get lost in the shuffle of junk that permeates email boxes. If your customer is keen on electronic communication, you might be able to encourage an electronic payment, which reduces the turnaround time on your invoice even more.
Set Email Preferences
![]() From the Edit menu, select Preferences.
From the Edit menu, select Preferences.
![]() Select Send Forms.
Select Send Forms.
![]() On the My Preferences tab, place a check mark in the Auto-check the “Email Later” box (optional).
On the My Preferences tab, place a check mark in the Auto-check the “Email Later” box (optional).
![]() Select whether to send email via Web Mail (Gmail, Yahoo!, or other email services) or QuickBooks Email (subscription required).
Select whether to send email via Web Mail (Gmail, Yahoo!, or other email services) or QuickBooks Email (subscription required).
![]() Click Add to set up email accounts.
Click Add to set up email accounts.
![]() Click OK.
Click OK.

![]() Select the Company Preferences tab.
Select the Company Preferences tab.
![]() Click the drop-down menu for Show to select the template to customize.
Click the drop-down menu for Show to select the template to customize.
![]() Select an existing template to edit or click Add Template.
Select an existing template to edit or click Add Template.
![]() Define your default salutation, subject, and generic content for your email communications.
Define your default salutation, subject, and generic content for your email communications.
![]() Click Save.
Click Save.

Indicate Email Status on an Invoice
![]() Create an invoice, or open an invoice form already created but not yet printed.
Create an invoice, or open an invoice form already created but not yet printed.
![]() Click the Email button and select Invoice from the drop-down options; alternatively, click the Email Later button.
Click the Email button and select Invoice from the drop-down options; alternatively, click the Email Later button.
![]() Click a Save option.
Click a Save option.

![]() If the customer’s email address was not entered previously, you are prompted to enter it now (not shown).
If the customer’s email address was not entered previously, you are prompted to enter it now (not shown).
![]() Click OK (not shown).
Click OK (not shown).
Did You Know?
Email addresses entered on-the-fly are saved for future use. If you are prompted to enter your customer’s email address, you only have to enter it once. Your entry is saved with this customer’s information for future use.
QuickBooks Online—Did You Know?
In QuickBooks Online, you can automatically email invoices. You can create a recurring invoice and indicate whether you want QuickBooks Online to automatically email the invoice. When you have a recurring invoice, you do not even have to log in to QuickBooks Online; the email is automatically created and emailed on the date specified.
![]() Click the drop-down arrow below the Email button and select Invoice.
Click the drop-down arrow below the Email button and select Invoice.
![]() Optionally, click the Paperclip icon to attach other documents or files to the email.
Optionally, click the Paperclip icon to attach other documents or files to the email.
![]() Select the template for the email.
Select the template for the email.
![]() Verify that the information in the email is correct or make changes or additions if necessary.
Verify that the information in the email is correct or make changes or additions if necessary.
![]() Click the Send Now button.
Click the Send Now button.
![]() Click in the first column to check off each form you want to send. Check marks appear to the left of each selected form.
Click in the first column to check off each form you want to send. Check marks appear to the left of each selected form.
![]() Click any email to be sent (on the left) to display a preview (not shown).
Click any email to be sent (on the left) to display a preview (not shown).
![]() Click the Paperclip icon to attach other documents or files to the email.
Click the Paperclip icon to attach other documents or files to the email.
![]() Change the template for the email if needed.
Change the template for the email if needed.
![]() Verify that the information in the email is correct or make changes or additions if necessary.
Verify that the information in the email is correct or make changes or additions if necessary.
![]() Click Send Now.
Click Send Now.
Did You Know?
There’s no need to save as you go. When creating a default email template, you don’t have to save your work as you switch from one letter to the next. All your templates are saved at once when you click OK.
Charging (or Billing) Expenses to a Customer
When you make a purchase on behalf of a customer, you need to designate the customer on the bill. Then, when you create an invoice for the customer, you can request that expenses be charged, as well as any other items that go on the invoice. This is commonly referred to as time and materials billing, cost plus billing, billable expenses, or reimbursable expenses or costs. You can also select a markup for the expense if you intend to sell this to your customer at a profit.
You can designate billable time to be charged to a customer as well. On the timesheet you can indicate the customer and mark the time as billable, too.
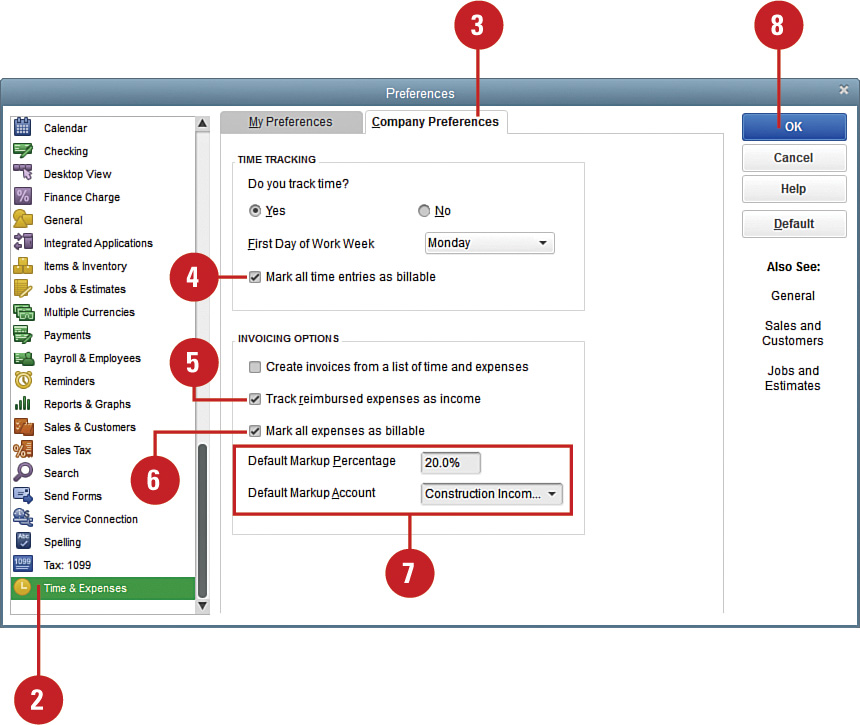
Set Up Preferences for Billable Time and Expenses
![]() Select Edit, Preferences.
Select Edit, Preferences.
![]() Click Time & Expenses.
Click Time & Expenses.
![]() Click the Company Preferences tab.
Click the Company Preferences tab.
![]() If applicable, check Mark All Time Entries as Billable.
If applicable, check Mark All Time Entries as Billable.
![]() If applicable, check the box to Track Reimbursed Expenses as Income. (Consult with your accountant for advice.)
If applicable, check the box to Track Reimbursed Expenses as Income. (Consult with your accountant for advice.)
![]() If applicable, check Mark All Expenses as Billable.
If applicable, check Mark All Expenses as Billable.
![]() Optionally, indicate a Default Markup Percentage and Account.
Optionally, indicate a Default Markup Percentage and Account.
![]() Click OK.
Click OK.
Designate the Customer When Making a Purchase
![]() Prepare a new purchase transaction (a check, bill, or credit card charge) or edit an existing transaction if needed.
Prepare a new purchase transaction (a check, bill, or credit card charge) or edit an existing transaction if needed.
![]() Enter the customer’s name and, if applicable, a job.
Enter the customer’s name and, if applicable, a job.
![]() Check the box to make it billable if you want to pass it through to the customer on an invoice.
Check the box to make it billable if you want to pass it through to the customer on an invoice.
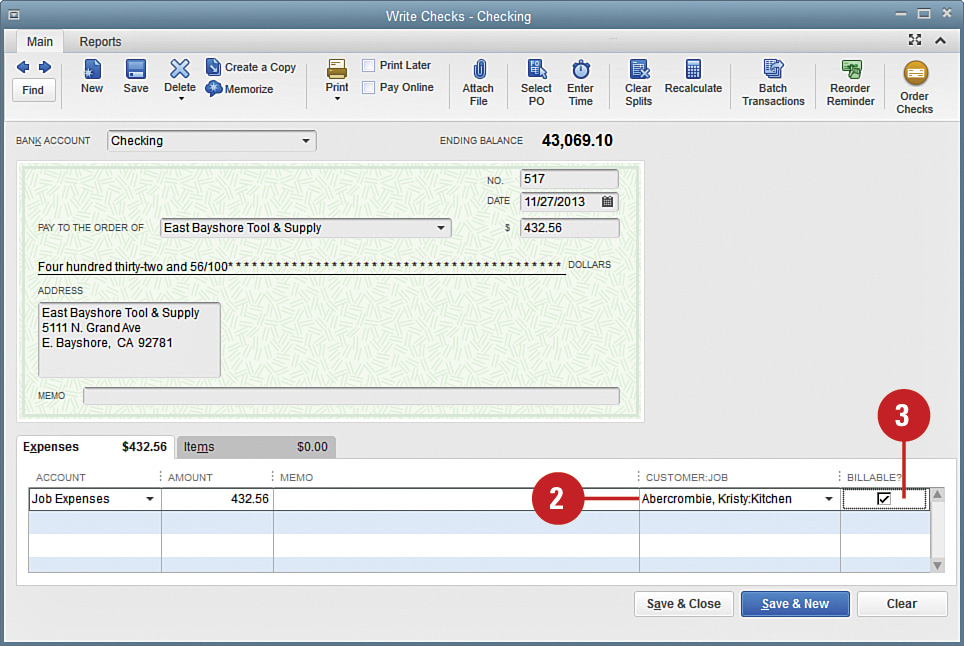
![]() Save the purchase transaction (not shown).
Save the purchase transaction (not shown).
Did You Know?
You can associate an expense with a customer without charging the customer for the expense. If you uncheck the box in the Billable field next to the customer’s name on a bill, the amount is not charged to the customer, but the expense still shows on the job profitability reports.
You can remove the markup amount from the customer invoice. If you increase the expenses charged to your customer by a markup amount, this amount displays on your customer invoice unless you check the Print Selected Time and Costs as One Invoice Item option. When you check this box, the markup still displays on your screen version of the invoice, but the printed version combines the markup with the billed expense into one amount.
![]() If the Billable Time/Costs pop-up dialog box displays, choose the Select the Outstanding Billable Time and Costs to Add to This Invoice option and then click OK. Note that you can check a box at the bottom of the dialog box if you want to make this your default choice for future invoices that have time or costs assigned to them.
If the Billable Time/Costs pop-up dialog box displays, choose the Select the Outstanding Billable Time and Costs to Add to This Invoice option and then click OK. Note that you can check a box at the bottom of the dialog box if you want to make this your default choice for future invoices that have time or costs assigned to them.
![]() If the pop-up dialog box does not appear, click the Add Time/Costs button.
If the pop-up dialog box does not appear, click the Add Time/Costs button.

![]() Click the Expenses tab.
Click the Expenses tab.
![]() Enter the markup amount or percentage, if applicable.
Enter the markup amount or percentage, if applicable.
![]() Verify the markup account to which the markup should be recorded, if applicable.
Verify the markup account to which the markup should be recorded, if applicable.
![]() Check any expense you want to include on this invoice.
Check any expense you want to include on this invoice.
![]() Indicate whether the expenses are taxable to the customer.
Indicate whether the expenses are taxable to the customer.
![]() If you are charging more than one item to the customer, and if you want all the items to appear as a single item on the customer invoice, check this box.
If you are charging more than one item to the customer, and if you want all the items to appear as a single item on the customer invoice, check this box.
![]() Click OK to place the selected expenses on the customer’s invoice.
Click OK to place the selected expenses on the customer’s invoice.

![]() Complete the invoice and save it (not shown).
Complete the invoice and save it (not shown).
Did You Know?
You can create invoices from a list of time and expenses in QuickBooks Premier, Accountant, and Enterprise Editions (it is not available in QuickBooks Pro). If you need to create a lot of invoices to customers for time and expenses, you can quickly create invoices from a list of unbilled time and expenses. To enable this feature, select Edit, Preferences, Company Preferences and check Create Invoices from a list of time and expenses.
Setting Finance Charge Preferences
Do you charge your customers a fee for late payments? If so, you can create several settings to ensure that the process of assessing finance charges is consistent and automatic. Any settings you establish here can be revised later, but you’ll save yourself time by thinking through these options and configuring the settings before you start dealing with customers who make late payments.
![]() Select Edit, Preferences.
Select Edit, Preferences.
![]() Click Finance Charge.
Click Finance Charge.
![]() Click the Company Preferences tab.
Click the Company Preferences tab.
![]() Indicate in the Annual Interest Rate field the amount of interest that your company charges for past-due customer payments.
Indicate in the Annual Interest Rate field the amount of interest that your company charges for past-due customer payments.
![]() Indicate in the Minimum Finance Charge field the amount, if any, that your company assesses on late payments.
Indicate in the Minimum Finance Charge field the amount, if any, that your company assesses on late payments.
![]() Enter the number of days in the Grace Period (days) field allowed before finance charges are assessed.
Enter the number of days in the Grace Period (days) field allowed before finance charges are assessed.
![]() Choose from the Finance Charge Account drop-down list the account you use to track finance charges.
Choose from the Finance Charge Account drop-down list the account you use to track finance charges.
![]() Check Assess Finance Charges on Overdue Finance Charges if you add previous finance charges to the balance when computing additional finance charges.
Check Assess Finance Charges on Overdue Finance Charges if you add previous finance charges to the balance when computing additional finance charges.
![]() Select an option in the Calculate Charges From section.
Select an option in the Calculate Charges From section.
![]() Check Mark Finance Charge Invoices “To Be Printed” if you want to send an invoice to customers when finance charges are assessed. If you check this box, QuickBooks automatically places the finance charge invoices in your printer queue.
Check Mark Finance Charge Invoices “To Be Printed” if you want to send an invoice to customers when finance charges are assessed. If you check this box, QuickBooks automatically places the finance charge invoices in your printer queue.
![]() Click OK.
Click OK.

Creating a Monthly Statement
It’s not unusual to have some customers who don’t pay their invoices on time. If you have customers like this, you probably want to send them a statement as a reminder that they owe you money. The monthly statement lists outstanding invoices and also provides you with an opportunity to assess a finance charge.
![]() Select Customers, Create Statements.
Select Customers, Create Statements.
Timesaver
Clicking the Statements icon on the Home page also opens the Create Statements dialog.
![]() Indicate the date that appears on the statement.
Indicate the date that appears on the statement.
![]() Choose dates in the Statement Period From fields, or choose All Open Transactions as of Statement Date to create a statement for all outstanding invoices.
Choose dates in the Statement Period From fields, or choose All Open Transactions as of Statement Date to create a statement for all outstanding invoices.
![]() Alternatively, if you choose to prepare statements for all outstanding invoices, you can check the box to limit the statements to invoices more than a designated number of days overdue.
Alternatively, if you choose to prepare statements for all outstanding invoices, you can check the box to limit the statements to invoices more than a designated number of days overdue.
![]() Select the customers who will receive statements. If you select any option other than All Customers, you can then select the specific customers who will receive statements.
Select the customers who will receive statements. If you select any option other than All Customers, you can then select the specific customers who will receive statements.

See Also
See the “Invoice Dates” sidebar on page 115 for more information on coordinating the invoice date and due date with monthly statements.
Did You Know?
You can’t save statement options. If you make selections in the statement dialog box and then click Close rather than printing or emailing your statements, the choices you made are not saved.
![]() Select a template to use for the statements from the Template drop-down list.
Select a template to use for the statements from the Template drop-down list.
![]() Choose between creating one statement per customer or one statement per job.
Choose between creating one statement per customer or one statement per job.
![]() Check Show Invoice Item Details on Statements to provide detailed information from the invoice(s) on the statement.
Check Show Invoice Item Details on Statements to provide detailed information from the invoice(s) on the statement.
![]() Choose to print statements by billing address ZIP Code.
Choose to print statements by billing address ZIP Code.
![]() Select to print the due date on transactions.
Select to print the due date on transactions.
![]() Check options under the Do Not Create Statements heading to customize the selection of which customers receive statements.
Check options under the Do Not Create Statements heading to customize the selection of which customers receive statements.
![]() Click Print or E-mail.
Click Print or E-mail.

Receiving Payments for Invoices
You’ve received a check from a customer! Now you need to record the payment and indicate that the invoice has been paid. Doing so clears your accounts receivable account and places the funds in an undeposited funds holding area in your QuickBooks file until you deposit the funds. When you actually deposit the money, the undeposited funds account is cleared and cash is increased.
![]() Select Customers, Receive Payments.
Select Customers, Receive Payments.
Timesaver
Click the Receive Payments icon on the Home page or on an invoice to go immediately to the Receive Payments dialog box.
![]() Enter the customer’s name in the Received From field.
Enter the customer’s name in the Received From field.
![]() Enter the amount received.
Enter the amount received.
![]() Confirm the date on which the payment was received.
Confirm the date on which the payment was received.
![]() Enter the payment method.
Enter the payment method.
![]() Enter the check number or other applicable reference number.
Enter the check number or other applicable reference number.
![]() Verify that the amounts are applied appropriately to the outstanding invoices by checking the invoices in order of how the payment will be applied.
Verify that the amounts are applied appropriately to the outstanding invoices by checking the invoices in order of how the payment will be applied.
![]() If the amount received is more or less than the amount owed, indicate how to handle the overpayment or underpayment.
If the amount received is more or less than the amount owed, indicate how to handle the overpayment or underpayment.
![]() Click a Save option.
Click a Save option.

Did You Know?
You can speed the processing of your customer payments by one of several new payment options offered by Intuit, including allowing customers to pay invoices online. To get more information about adding credit card processing, setting up recurring charges, adding eCheck processing, and more, go to Edit, Preferences, Payments, Company Preferences.
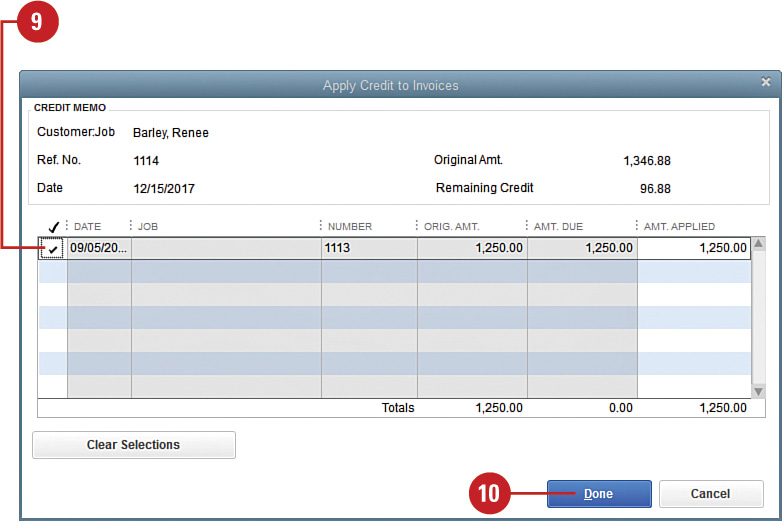
Issuing a Credit or Refund
If a customer returns an item or if for any other reason you need to issue a credit or a refund to a customer, you can do so easily. You are given room to fully describe the reason for the credit or refund, and you can indicate whether tax applies to the amount.
![]() Select Customers, Create Credit Memos/Refunds, or click the Refunds & Credits icon on the Home page.
Select Customers, Create Credit Memos/Refunds, or click the Refunds & Credits icon on the Home page.
![]() Enter the customer’s name and, if applicable, the job to which this credit or refund relates in the Customer:Job field.
Enter the customer’s name and, if applicable, the job to which this credit or refund relates in the Customer:Job field.
![]() Verify that the date is correct.
Verify that the date is correct.
![]() Enter the item for which the credit or refund is being issued.
Enter the item for which the credit or refund is being issued.
![]() Describe the reason for the credit or refund.
Describe the reason for the credit or refund.
![]() Enter the quantity and, if applicable, the rate.
Enter the quantity and, if applicable, the rate.
![]() Enter an optional customer message. If you have not used this message before, you are prompted to add the message to your message list. Click Quick Add to add the message.
Enter an optional customer message. If you have not used this message before, you are prompted to add the message to your message list. Click Quick Add to add the message.
![]() Indicate whether you want to print the credit memo or send it by email. (These two options are not mutually exclusive—you can do both if you want.)
Indicate whether you want to print the credit memo or send it by email. (These two options are not mutually exclusive—you can do both if you want.)
![]() Save the credit memo.
Save the credit memo.

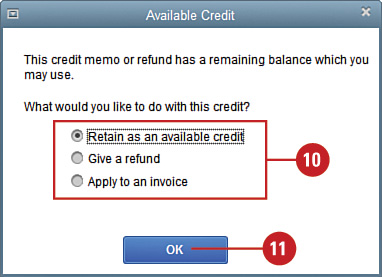
![]() In the Available Credit window, select an option to indicate how you want the credit to be treated. If you choose to apply the credit to an invoice, you see a list of open invoices for this customer, and you can select the invoice(s) on which the credit should be applied. If you choose to give a refund, the Write Checks window opens. Or you can choose to retain it as an available credit to apply to an invoice later.
In the Available Credit window, select an option to indicate how you want the credit to be treated. If you choose to apply the credit to an invoice, you see a list of open invoices for this customer, and you can select the invoice(s) on which the credit should be applied. If you choose to give a refund, the Write Checks window opens. Or you can choose to retain it as an available credit to apply to an invoice later.
![]() Click OK.
Click OK.
Did You Know?
Customer messages are saved in QuickBooks. If you enter a message in the Customer Message area, and this is the first time you’ve used that message, you are prompted to add the message to your saved messages so that you can select the message again in the future, without having to retype it. Click the down arrow in the Customer Message area to view other messages that have been saved.
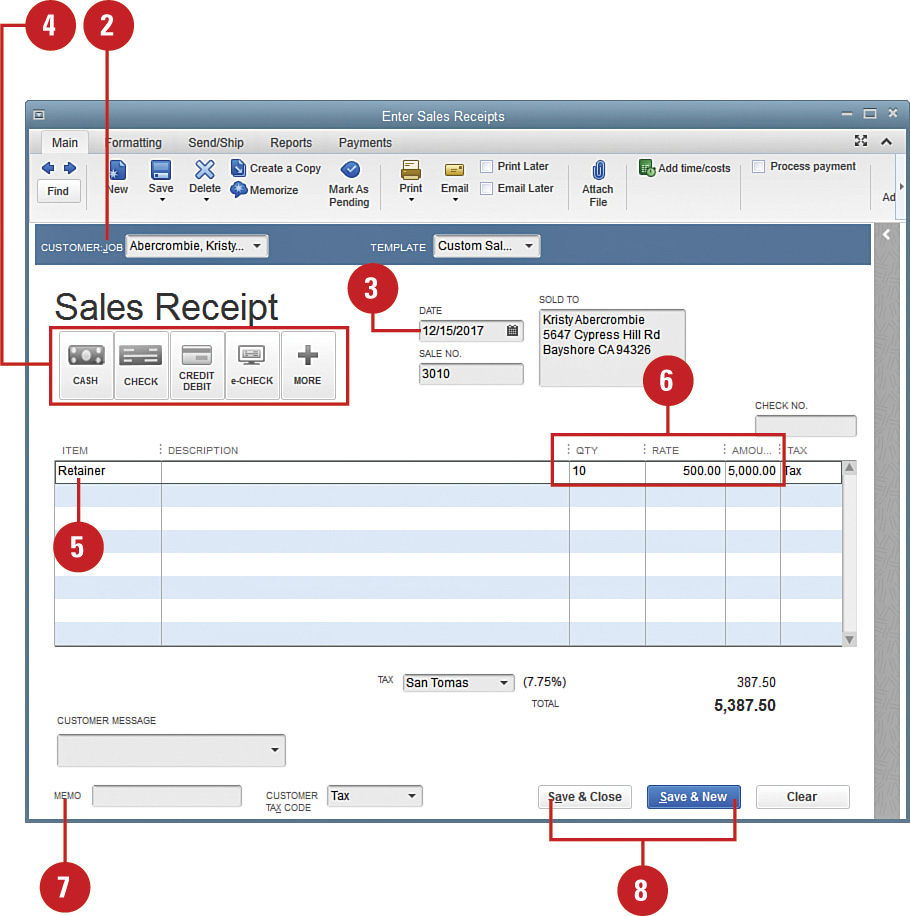
Recording Cash Sales/Sales Receipts
Companies that make cash sales need to record these sales, just as companies that issue invoices record their sales. Instead of entering an invoice and receiving payment, you enter a sales receipt. If yours is a cash business, such as a retail store, ecommerce website, restaurant, or something similar, then you might not keep the details on all of your customers in QuickBooks. For sales to anonymous customers, you can create a customer and name it something such as Daily Sales to record the sales in QuickBooks.
![]() Select Customers, Enter Sales Receipts, or click the Create Sales Receipts icon on the Home page.
Select Customers, Enter Sales Receipts, or click the Create Sales Receipts icon on the Home page.
![]() Enter a generic name for the cash customer in the Customer:Job field.
Enter a generic name for the cash customer in the Customer:Job field.
![]() Click Quick Add to add this name to your customer list if the name has not been used previously.
Click Quick Add to add this name to your customer list if the name has not been used previously.
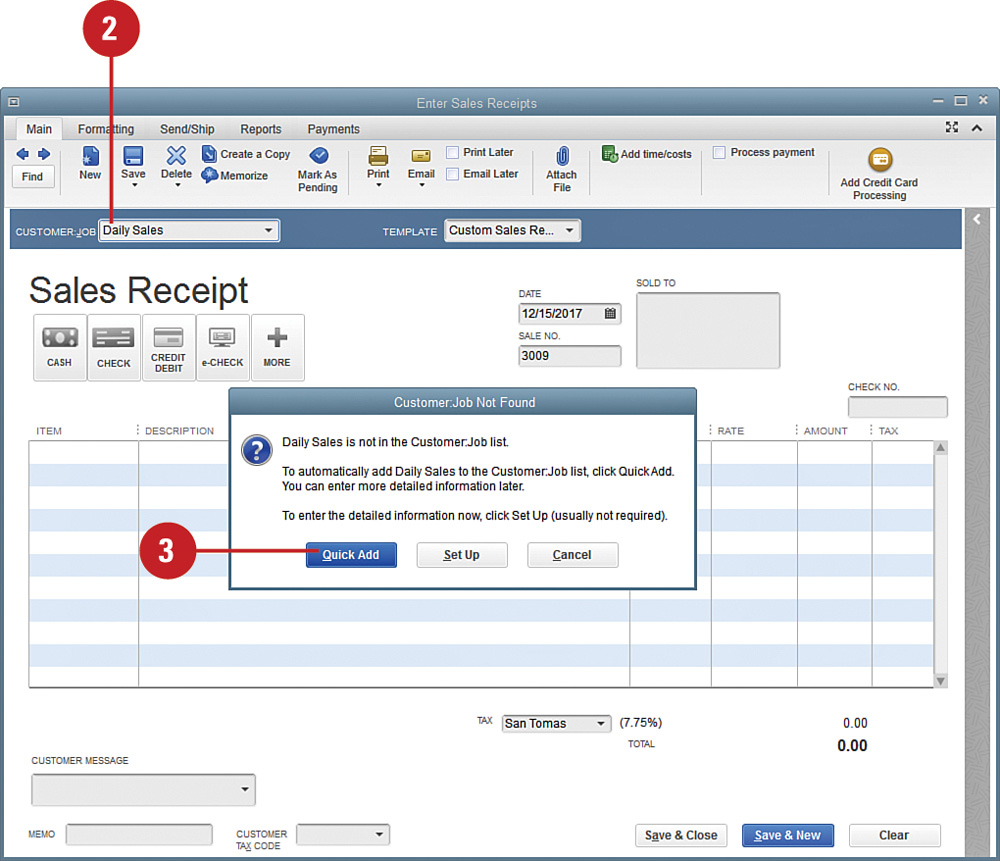
![]() Verify the date of the sale.
Verify the date of the sale.
![]() Enter the item(s) sold.
Enter the item(s) sold.
![]() Enter the quantity and rate.
Enter the quantity and rate.
![]() Indicate whether you want the invoice to be printed or emailed, or you can choose to print the invoice now by clicking the Print button at the top of the form.
Indicate whether you want the invoice to be printed or emailed, or you can choose to print the invoice now by clicking the Print button at the top of the form.
![]() Save the form.
Save the form.

Making Bank Deposits
The default in QuickBooks is for payments to be posted to undeposited funds. Then, when you make the bank deposit, you select the payments to be grouped together and deposited into the bank account. This enables you to enter individual payments received and group them into deposits to match the bank statement.
![]() Select Banking, Make Deposits, or click the Record Deposits icon on the Home page.
Select Banking, Make Deposits, or click the Record Deposits icon on the Home page.
![]() Change the payment type if you want to view a particular type of payment (such as only cash or only MasterCard and Visa).
Change the payment type if you want to view a particular type of payment (such as only cash or only MasterCard and Visa).
![]() Click the drop-down list to select how to sort payments.
Click the drop-down list to select how to sort payments.
![]() Check off each of the payments you want to deposit at this time. You can use the Select All button to check off the entire list at once.
Check off each of the payments you want to deposit at this time. You can use the Select All button to check off the entire list at once.
![]() Click OK.
Click OK.

![]() Verify the account to which the money will be deposited.
Verify the account to which the money will be deposited.
![]() Verify the date of the deposit.
Verify the date of the deposit.
![]() Verify all deposit information.
Verify all deposit information.
![]() If you intend to take cash back from the deposit, enter the account that the money should be assigned to.
If you intend to take cash back from the deposit, enter the account that the money should be assigned to.
![]() Enter an optional memo regarding the cash back.
Enter an optional memo regarding the cash back.
![]() Enter the amount of the cash back.
Enter the amount of the cash back.
![]() Click the Print button if you want to print a deposit slip or a summary of the deposit.
Click the Print button if you want to print a deposit slip or a summary of the deposit.
![]() Choose which documents you want to print.
Choose which documents you want to print.
![]() Click OK.
Click OK.
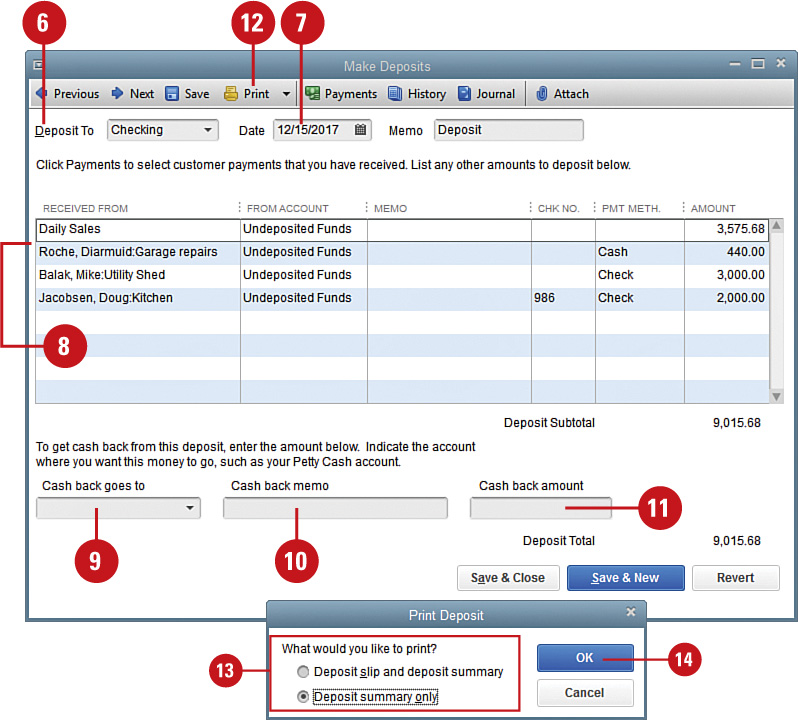
![]() Save the deposit
Save the deposit
Receiving Advances, Retainers, and Down Payments
You might require customers or clients to give you advance payments, retainers, layaway payments, or down payments on purchases of goods or services. If the payment you receive is a down payment on the purchase of goods, you can create an invoice for the goods and then record the payment as a partial payment for that invoice (see “Receiving Payments for Invoices,” earlier in this chapter).
However, if you are taking an advance payment or a retainer for goods or services that have not yet been invoiced, the procedure for recording the payment is somewhat different, as shown in this task.
![]() Select Customers, Sales Receipts.
Select Customers, Sales Receipts.
![]() Select the appropriate Customer or Job.
Select the appropriate Customer or Job.
![]() Enter the date of the deposit.
Enter the date of the deposit.
![]() Select the payment method.
Select the payment method.
![]() Enter the item for the advance, retainer, or down payment. Typically this item is mapped to a current liability account, not an income account.
Enter the item for the advance, retainer, or down payment. Typically this item is mapped to a current liability account, not an income account.
![]() Enter the quantity, rate, and amount.
Enter the quantity, rate, and amount.
![]() Enter an optional memo.
Enter an optional memo.
![]() Click to save the sales receipt.
Click to save the sales receipt.
Issuing Discounts
If you offer discounts to your customers, you can record that information on a separate Discounts & Credits screen in QuickBooks. There are three types of discounts you can issue—sales discounts that you enter on a customer’s invoice, early payment discounts recorded automatically for customers who pay within a specified time period, and companywide discounts such as when your company has a clearance sale on excess inventory items. The first two types of discounts are discussed here. Companywide discounts are discussed in the “Adjusting the Price of Inventory” section of Chapter 14, “Using Inventory Features.”
Enter a Sales Discount on an Invoice
![]() Press Ctrl+I to open an invoice and select the customer or job.
Press Ctrl+I to open an invoice and select the customer or job.
![]() Enter the items this customer is purchasing.
Enter the items this customer is purchasing.
![]() Enter a Discount item in the Item section.
Enter a Discount item in the Item section.
![]() Add a description of the discount, or revise the description that displays.
Add a description of the discount, or revise the description that displays.
![]() Enter the percent or exact amount of the discount. Enter the percent or amount as a positive number—QuickBooks automatically changes the discount to a negative for you. If you enter a percent, the discount is calculated based on the item on the line above.
Enter the percent or exact amount of the discount. Enter the percent or amount as a positive number—QuickBooks automatically changes the discount to a negative for you. If you enter a percent, the discount is calculated based on the item on the line above.
![]() Save the invoice.
Save the invoice.

Did You Know?
A discount can be applied to more than one invoice item. Use Subtotal as an invoice item if you want to subtotal two or more items above the subtotal line, and then apply the discount to the subtotal line.
Timesaver
Another way to get to the Receive Payments window is to click the Receive Payments icon in the Customers section of the Home page.
![]() Enter the customer’s name.
Enter the customer’s name.
![]() Enter the amount received.
Enter the amount received.
![]() Verify the date on which the payment is received.
Verify the date on which the payment is received.
![]() Select the payment method.
Select the payment method.
![]() Click the invoice to which you want to apply a discount.
Click the invoice to which you want to apply a discount.
![]() Click Discount and Credits to open the Discount and Credits window.
Click Discount and Credits to open the Discount and Credits window.

Did You Know?
Date of receipt can differ from date of deposit. When issuing a discount for an early payment, the date on which the payment was received is of paramount importance. QuickBooks automatically enters today’s date when you open the Receive Payments form. Make sure the date on which the payment was actually received displays on this form.
![]() Confirm the discount amount as computed by QuickBooks, and make any necessary changes.
Confirm the discount amount as computed by QuickBooks, and make any necessary changes.
![]() Verify the account to which the discount will be charged.
Verify the account to which the discount will be charged.
![]() Click Done.
Click Done.

![]() Check off the invoice(s) being paid (not shown).
Check off the invoice(s) being paid (not shown).
![]() Note that the discount has been applied to the invoice.
Note that the discount has been applied to the invoice.
![]() Click to save.
Click to save.

Did You Know?
A discount date displays next to invoices eligible for early payment discount. If the terms you assigned to an invoice make the invoice eligible for early payment discount, the date of eligibility displays in the Disc. Date column in the Receive Payments window.
Tracking Accounts Receivable
QuickBooks keeps track of all amounts owed to you by your customers. In addition, QuickBooks produces aging reports to show you how long overdue these outstanding amounts are. Examine these reports frequently so you can keep on top of your company’s collection effectiveness and so you know which customers have trouble making timely payments.
![]() Select Reports, Customers & Receivables, or click the Customers & Receivables option in the Report Center.
Select Reports, Customers & Receivables, or click the Customers & Receivables option in the Report Center.
![]() Select A/R Aging Summary to see a list of customers and the amounts owed by them.
Select A/R Aging Summary to see a list of customers and the amounts owed by them.
![]() Select A/R Aging Detail to see every invoice that is overdue.
Select A/R Aging Detail to see every invoice that is overdue.

![]() Double-click any amount on the report to see the actual invoice form (not shown).
Double-click any amount on the report to see the actual invoice form (not shown).
![]() Press Esc to close the reports.
Press Esc to close the reports.
Did You Know?
You can change the interval for the number of days on your accounts receivable reports. The default interval when displaying the accounts receivable reports is from 30 days through 90 days overdue. You can change this by entering a different number of days (for example, 60, 90, 120, and so on) in the Interval fields at the top of the report.
Using the Income Tracker
The Income Tracker makes it easy to find and work with all your transactions with customers. Using different color blocks, it shows all unbilled sales (estimates and sales orders), unpaid sales (open and overdue invoices), and paid sales (payments and sales receipts). It can serve as a dashboard for working with customers, sales, receiving payments, and collections.
![]() Select Customers, Income Tracker.
Select Customers, Income Tracker.
![]() Click a color block to see the transactions that make up that amount.
Click a color block to see the transactions that make up that amount.
![]() Use the drop-down arrows below the color blocks to filter the list by Customer:Job, Type, Status, or Date.
Use the drop-down arrows below the color blocks to filter the list by Customer:Job, Type, Status, or Date.
![]() Click Clear/Show All to see all transactions.
Click Clear/Show All to see all transactions.
Timesaver
Click a column heading to sort by that field. Click the column heading again to change the sort order (ascending or descending).
![]() Click the Action drop-down to perform an action on a particular transaction (such as convert to invoice for an estimate, receive payment for an invoice, print for an overdue invoice, and other actions relative to the transaction selected).
Click the Action drop-down to perform an action on a particular transaction (such as convert to invoice for an estimate, receive payment for an invoice, print for an overdue invoice, and other actions relative to the transaction selected).
![]() Click the Batch Actions drop-down button to perform an action on all selected transactions (batch email or print).
Click the Batch Actions drop-down button to perform an action on all selected transactions (batch email or print).

Did You Know?
Not all users may have access to the Income Tracker. Only users with access to the Sales and Accounts Receivable area or full access have access to the Income Tracker. The QuickBooks Admin user may need to edit user permissions to provide access to the Income Tracker to other users.
QuickBooks Online—Did You Know?
The Income Tracker was first available in QuickBooks Online. Instead of the Income Tracker, in QuickBooks Online it is called a Money Bar. QuickBooks Online had the Money Bar for customers first, and now there is a Money Bar for vendors, too.
Working with the Customer and Payments Snapshots
The Customer Snapshot provides a consolidated view of a customer that provides an instant glance of recent invoices and payments, sales history, items the customer buys most often, and other summary information in one convenient location.
![]() Select Company, Company Snapshot.
Select Company, Company Snapshot.
![]() Click on the Customer tab.
Click on the Customer tab.
![]() Select a customer.
Select a customer.
![]() Select the date for the Sales Summary.
Select the date for the Sales Summary.
![]() Click the down arrow (on any widget or by the customer details) to print it or save it as an image.
Click the down arrow (on any widget or by the customer details) to print it or save it as an image.
Timesaver
Click transactions or graphs to drill down to the details.
![]() Click the X to remove a widget from the Customer Snapshot.
Click the X to remove a widget from the Customer Snapshot.
![]() Click Add Content or Restore Default to add widgets back to the Company Snapshot.
Click Add Content or Restore Default to add widgets back to the Company Snapshot.
![]() Click the title bar of a widget and drag and drop it to rearrange the widgets.
Click the title bar of a widget and drag and drop it to rearrange the widgets.
![]() Click QuickReport to get a report of all invoices or payments for the selected customer.
Click QuickReport to get a report of all invoices or payments for the selected customer.
![]() Click Print to print the Customer Snapshot.
Click Print to print the Customer Snapshot.

![]() Click the Payments tab to access the Payments Snapshot.
Click the Payments tab to access the Payments Snapshot.

Timesaver
Just like in the Customer Snapshot, in the Payments Snapshot you can add, remove, print, and rearrange widgets and drill down to more details.
Did You Know?
The Payments Snapshot provides a quick view of accounts receivable information. Widgets provide quick access to receivables reports; lists of customers who owe money, recent transactions, and payment reminders; and graphs of A/R aging by period and invoice payment status. Plus there are QuickLinks to Receive Payments, Create Sales Receipts, and Credits and Refunds.
Viewing the Open Invoices Report
How much is owed to your company, and who owes it? This information is readily available on the Open Invoices report. This report shows the detail of all amounts due from every customer and job. Information on this report is grouped by customer and job.
![]() Select Reports, Customers & Receivables; then select Open Invoices from the side menu.
Select Reports, Customers & Receivables; then select Open Invoices from the side menu.

Timesaver
Another way to get to the Open Invoices report is to click the Customers & Receivables option on the Reports Center, and then select Open Invoices.
![]() Click the down arrow if you want to select a different method of sorting the report.
Click the down arrow if you want to select a different method of sorting the report.
![]() Click Print to print a paper copy of the report.
Click Print to print a paper copy of the report.
![]() Double-click any amount to see the actual invoice.
Double-click any amount to see the actual invoice.

![]() Press Esc to close the report.
Press Esc to close the report.
Did You Know?
The open invoices report is also useful for finding unapplied payments or credits. Just click each payment to edit which invoice it should be applied to.
Using the Collections Center
QuickBooks has a Collections Center to help you manage collecting payments from customers. It shows overdue and almost due invoices and enables you to quickly send email reminders to customers. You can see customer contact information and use the notes feature to document your collection efforts. First, you need to enable the Collections Center in the preferences.
![]() Click Edit, Preferences.
Click Edit, Preferences.
![]() Click Sales & Customers.
Click Sales & Customers.
![]() Click the Company Preferences tab.
Click the Company Preferences tab.
![]() Under Collections Center, check the box to Enable Collections Center.
Under Collections Center, check the box to Enable Collections Center.
![]() Click OK.
Click OK.

![]() Click on the Customers icon to open the Customer Center (not shown).
Click on the Customers icon to open the Customer Center (not shown).
![]() Click on the Customers & Jobs tab.
Click on the Customers & Jobs tab.
![]() Click on Collections Center.
Click on Collections Center.

![]() Click either the Overdue or Almost Due tab.
Click either the Overdue or Almost Due tab.
![]() Click the Notes/Warnings icon to access the note pad.
Click the Notes/Warnings icon to access the note pad.
![]() Click Select and Send Email.
Click Select and Send Email.
![]() Review and make changes if needed and then click Send.
Review and make changes if needed and then click Send.

![]() A record of the sent email shows in the Customer Center on the Sent Email tab.
A record of the sent email shows in the Customer Center on the Sent Email tab.

See Also
See “Set Email Preferences” on page 123 for more information on setting up email and customizing the email templates.
Did You Know?
You can send batch email reminders for overdue invoices from the Income Tracker too. Click the color block for Overdue invoices, select the invoices to be emailed, and click Batch Actions, Email Invoices. They also appear in the Sent Email tab of the customer.
QuickBooks Online—Did You Know?
You can send batch email reminders for overdue invoices from the Money Bar in QuickBooks Online, too. Click Overdue invoices on the Money Bar in the Customer Center, Batch Actions, Email.
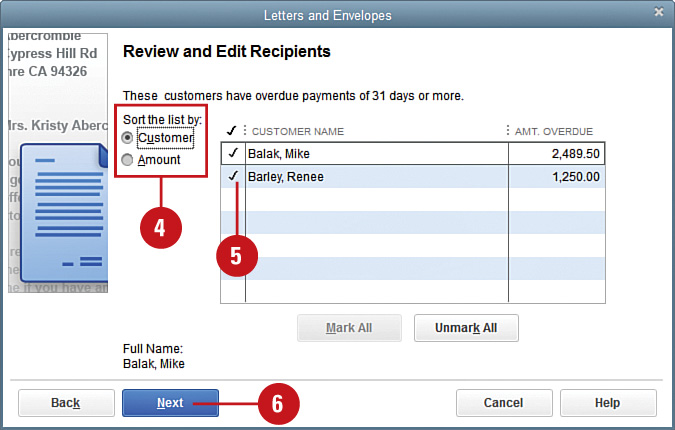
Creating a Collection Letter
Of course, you can open your word processing program and write an extemporaneous letter to the customer who owes you money. Or you can save time and use a standard form letter that is available to send to any customers who owe you money, anytime. Before printing the letters, you have the capability to customize the letters and add personal information if necessary.
![]() Select Company, Prepare Letters with Envelopes; then select the type of letter you want to create. For this example, a collection letter is selected.
Select Company, Prepare Letters with Envelopes; then select the type of letter you want to create. For this example, a collection letter is selected.

![]() Select from the various options to determine who will receive this letter.
Select from the various options to determine who will receive this letter.
![]() Click Next.
Click Next.

![]() Choose to sort your list alphabetically by customer name or by amount, lowest to highest.
Choose to sort your list alphabetically by customer name or by amount, lowest to highest.
![]() The list that displays here is the result of the selections you made in Step 2. Check off all members of the list who will receive the letter. Use the Mark All and Unmark All buttons to help with your selections.
The list that displays here is the result of the selections you made in Step 2. Check off all members of the list who will receive the letter. Use the Mark All and Unmark All buttons to help with your selections.
![]() Click Next.
Click Next.
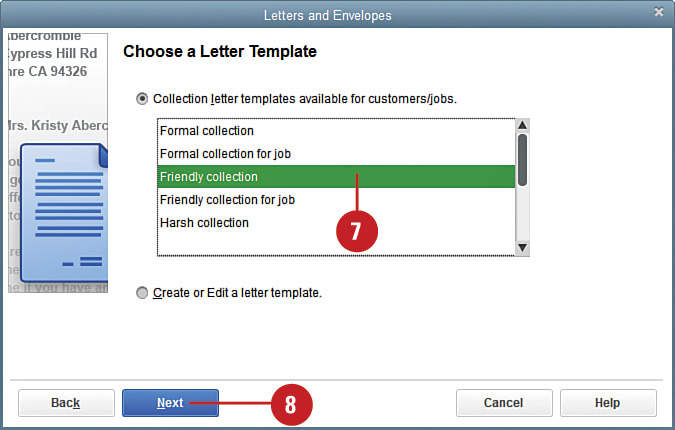
![]() Choose from a variety of available letters, or click the Create or Edit a Letter Template option to customize your mailing. If you choose to create a letter from scratch, a Microsoft Word document where you can customize your letter displays. This example uses the Friendly Collection letter template.
Choose from a variety of available letters, or click the Create or Edit a Letter Template option to customize your mailing. If you choose to create a letter from scratch, a Microsoft Word document where you can customize your letter displays. This example uses the Friendly Collection letter template.
![]() Click Next.
Click Next.
![]() Enter the name and title of the person who will sign the letters.
Enter the name and title of the person who will sign the letters.
![]() Click Next. A Microsoft Word document containing all the letters opens.
Click Next. A Microsoft Word document containing all the letters opens.

![]() Scroll through the letters to make sure they read the way you want them to. If necessary, you can add information to any letter (not shown).
Scroll through the letters to make sure they read the way you want them to. If necessary, you can add information to any letter (not shown).
![]() Select File, Print from the Word menu bar (not shown).
Select File, Print from the Word menu bar (not shown).
![]() In QuickBooks, click Next if you want to print envelopes. If you choose this option, you are asked to verify the size of the envelopes. In the Microsoft Word document that displays, click OK to print the envelopes (not shown).
In QuickBooks, click Next if you want to print envelopes. If you choose this option, you are asked to verify the size of the envelopes. In the Microsoft Word document that displays, click OK to print the envelopes (not shown).

![]() If you don’t want to print envelopes, click Cancel (not shown).
If you don’t want to print envelopes, click Cancel (not shown).
![]() In QuickBooks, click Finish to close the Letters and Envelopes window (not shown).
In QuickBooks, click Finish to close the Letters and Envelopes window (not shown).
Recording Bad Debts
Unfortunately, there will be times when a customer does not pay and you need to record a bad debt. If your company keeps records on a cash basis, you can simply void the original invoice because the income was never recognized (because you never received payment).
However, if your company keeps records on an accrual basis, you’ve already recorded income when a job is completed and invoiced, even though you haven’t yet received the payment from your customer. So when you discover that the customer isn’t going to pay, you need to offset the income you recorded with a bad debt expense.
![]() Select Customers, Create Credit Memos/Refunds.
Select Customers, Create Credit Memos/Refunds.
![]() Enter the name of the Customer:Job for whom you will record a bad debt.
Enter the name of the Customer:Job for whom you will record a bad debt.
![]() Choose the Bad Debt Item. If you do not have the item set up already, you need to click Add New to set it up. You can set it up as an Other Charge and select the account of Bad Debt Expense.
Choose the Bad Debt Item. If you do not have the item set up already, you need to click Add New to set it up. You can set it up as an Other Charge and select the account of Bad Debt Expense.
![]() Enter the amount you want to write off as a bad debt.
Enter the amount you want to write off as a bad debt.
![]() If the items on the invoice being written off were taxable, make sure to select Taxable to adjust Sales Taxes Payable.
If the items on the invoice being written off were taxable, make sure to select Taxable to adjust Sales Taxes Payable.
Did You Know?
There are other methods to write off bad debts in QuickBooks. However, using a Credit Memo as explained here adjusts sales taxes payable as well (compared to other methods that do not affect sales taxes).
![]() Click Save & Close.
Click Save & Close.

![]() Click Apply to an Invoice on the Available Credit window.
Click Apply to an Invoice on the Available Credit window.
![]() Click OK.
Click OK.

![]() Select the invoice to apply the credit and write off the invoice to bad debt expense.
Select the invoice to apply the credit and write off the invoice to bad debt expense.
![]() Click Done.
Click Done.
![]() Click the Customers icon to open the Customer Center.
Click the Customers icon to open the Customer Center.
![]() Select the customer (or job) whose check bounced.
Select the customer (or job) whose check bounced.
![]() Double-click the bounced payment to open it.
Double-click the bounced payment to open it.
![]() Click Record Bounced Check.
Click Record Bounced Check.

![]() Enter the Bank Fee charged for the bounced check.
Enter the Bank Fee charged for the bounced check.
![]() Enter the date of the charge.
Enter the date of the charge.
![]() Enter the expense account for the bank fee charged.
Enter the expense account for the bank fee charged.
![]() Enter the fee you want to charge your customer.
Enter the fee you want to charge your customer.
![]() Click Next.
Click Next.

![]() Review the entries that will be made in QuickBooks and click Finish.
Review the entries that will be made in QuickBooks and click Finish.

Working with Multiple Currencies
Today, the business economy is ever changing, and for many businesses that means reaching into the global marketplace to conduct business. If your business buys or sells its products or services in a currency other than your home currency then you will benefit from using the Multicurrency feature in QuickBooks.
To begin using Multiple Currencies in QuickBooks you first enable the feature, a task that cannot be reversed. To keep your financial records current you use the exchange rate download and home currency adjustment tools. Your home currency is the currency of the country where your business is located. Using this feature, you can report your business financials in your home-based currency as well as foreign currencies.
Enable Multiple Currency in QuickBooks
![]() From the Edit menu, select Preferences and choose the Multiple Currencies option.
From the Edit menu, select Preferences and choose the Multiple Currencies option.
![]() Select the Company Preferences tab.
Select the Company Preferences tab.
![]() Click Yes, I use more than one currency.
Click Yes, I use more than one currency.
![]() Click Yes to the warning that you are enabling multicurrency in your data file
Click Yes to the warning that you are enabling multicurrency in your data file
![]() Select your home currency from the drop-down menu options.
Select your home currency from the drop-down menu options.
![]() Click OK to close the Preferences dialog.
Click OK to close the Preferences dialog.


![]() Click OK to the warning that your company file will close and reopen with the changes made (not shown).
Click OK to the warning that your company file will close and reopen with the changes made (not shown).
Important
The preference to enable Multiple Currencies affects your financial reporting and cannot be disabled, so make sure you have made a backup of your data file prior to selecting this option. If you have an existing business, it is advisable to discuss this change with your accounting professional.
![]() Click New Customer.
Click New Customer.
![]() Type a customer name.
Type a customer name.
![]() From the Currency drop-down, select the default currency to use for this customer.
From the Currency drop-down, select the default currency to use for this customer.
![]() Enter additional customer information as needed.
Enter additional customer information as needed.
![]() Click OK.
Click OK.

![]() From the icon bar select Vendor Center (not shown).
From the icon bar select Vendor Center (not shown).
![]() Click on New Vendor (not shown).
Click on New Vendor (not shown).
![]() Type a vendor name.
Type a vendor name.
![]() From the Currency drop-down, select the default currency to use for this vendor.
From the Currency drop-down, select the default currency to use for this vendor.
![]() Enter additional vendor information as needed.
Enter additional vendor information as needed.
![]() Click OK.
Click OK.
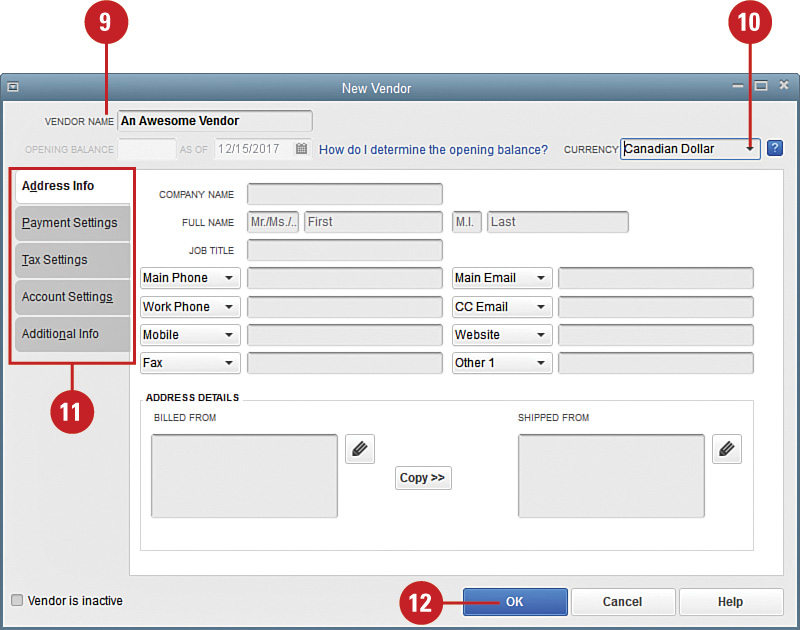
Important
You assign the default currency to your customer and vendor records so that the correct currency defaults on their respective transactions. If your customer or vendor has had transaction activity before using the multicurrency feature, you have to create a new customer or vendor record for the foreign activity.
Did You Know?
Review the “Adding Customers” and “Adding Vendors” sections in Chapter 3, “Adding or Changing Information After the Initial Company Setup,” for more information on completing the additional information.
![]() Select Currency List.
Select Currency List.
![]() If you are adding or removing a currency, click Include Inactive.
If you are adding or removing a currency, click Include Inactive.
![]() Scroll through the list of exchange currencies.
Scroll through the list of exchange currencies.
![]() Click to remove the “x” in front of a currency to make it available for use or click to add the “x” to a list item to make it inactive.
Click to remove the “x” in front of a currency to make it available for use or click to add the “x” to a list item to make it inactive.
Did You Know?
Inactive currencies do not display in drop-down lists when creating foreign transactions. However, inactive currencies, if used during a reporting period, do appear on reports. You can make an inactive currency active again at a later date.
![]() When you have finished selecting the currencies you want to work with, uncheck Include Inactive to shorten the list of currencies displayed in the list view.
When you have finished selecting the currencies you want to work with, uncheck Include Inactive to shorten the list of currencies displayed in the list view.
![]() Click the X on the top right of the Currency List to close.
Click the X on the top right of the Currency List to close.

Add Foreign Chart of Accounts
![]() From the List menu, select Chart of Accounts and choose New from the Account drop-down menu.
From the List menu, select Chart of Accounts and choose New from the Account drop-down menu.
![]() Select Bank or Credit Card from the Add New Account: Choose Account Type dialog. QuickBooks automatically creates the necessary foreign Accounts Receivable and Accounts Payable accounts when the foreign currency is used on a transaction.
Select Bank or Credit Card from the Add New Account: Choose Account Type dialog. QuickBooks automatically creates the necessary foreign Accounts Receivable and Accounts Payable accounts when the foreign currency is used on a transaction.
![]() Click Continue.
Click Continue.
![]() Type an Account Name.
Type an Account Name.
![]() Select the appropriate currency from the Currency drop-down list.
Select the appropriate currency from the Currency drop-down list.
![]() Enter the optional information as needed.
Enter the optional information as needed.
![]() Click to save.
Click to save.

Did You Know?
Currencies can be assigned to the following account types: bank, credit card, accounts receivable, and accounts payable. The currency of accounts receivable and accounts payable must match the currency of the customer/vendor used in the transaction. QuickBooks defaults to or creates the proper accounts receivable or payable account when you create your first sales or purchase transaction using that foreign currency. You must manually create any additional foreign bank or credit card accounts needed.
![]() Select Download Latest Exchange Rates. You can also access this functionality from the Currency List menu, Activities menu.
Select Download Latest Exchange Rates. You can also access this functionality from the Currency List menu, Activities menu.
![]() Click OK to the message that QuickBooks successfully updated the exchange rates for all active currencies (not shown).
Click OK to the message that QuickBooks successfully updated the exchange rates for all active currencies (not shown).
![]() You can edit the exchange rate by selecting a currency from the Currency drop-down menu and then choosing Edit Currency.
You can edit the exchange rate by selecting a currency from the Currency drop-down menu and then choosing Edit Currency.
![]() Click Change Format to modify how the currency displays; click OK to return to the Edit Currency dialog (not shown).
Click Change Format to modify how the currency displays; click OK to return to the Edit Currency dialog (not shown).
![]() Browse through the displayed calendar to select a date for the new exchange rate.
Browse through the displayed calendar to select a date for the new exchange rate.
![]() In the Exchange Rate column enter the appropriate rate.
In the Exchange Rate column enter the appropriate rate.
![]() Click OK.
Click OK.

![]() Select your foreign customer.
Select your foreign customer.
![]() The default currency Accounts Receivable account is selected.
The default currency Accounts Receivable account is selected.
Did You Know?
A unique accounts receivable account is automatically created when a foreign currency is used on sales transactions. The currency selected is defaulted from the New or Edit Customer dialog.
![]() Confirm that the date and invoice number assigned by default are correct.
Confirm that the date and invoice number assigned by default are correct.
![]() Enter the item or items being sold to the customer.
Enter the item or items being sold to the customer.
![]() The Exchange Rate as of the date assigned to the customer invoice is displayed. Accept the default exchange rate (recommended) or modify as needed.
The Exchange Rate as of the date assigned to the customer invoice is displayed. Accept the default exchange rate (recommended) or modify as needed.
![]() The Balance Due is displayed in both the home currency and the foreign currency.
The Balance Due is displayed in both the home currency and the foreign currency.
![]() Click to save.
Click to save.

![]() Click Receive Payments on the Home page to receive payments from the foreign customer (not shown).
Click Receive Payments on the Home page to receive payments from the foreign customer (not shown).
![]() QuickBooks displays the default A/R account, or you can select a different account.
QuickBooks displays the default A/R account, or you can select a different account.
![]() Enter the foreign currency amount received or change if needed.
Enter the foreign currency amount received or change if needed.
![]() Select the date the funds were received.
Select the date the funds were received.
![]() Confirm the default exchange rate for the selected date is correct, or edit if needed.
Confirm the default exchange rate for the selected date is correct, or edit if needed.
![]() Complete the remaining information (not shown).
Complete the remaining information (not shown).
![]() Verify that the calculated amount received agrees with your banking records.
Verify that the calculated amount received agrees with your banking records.
![]() Click a Save option.
Click a Save option.

![]() Select your vendor.
Select your vendor.
![]() Confirm the default currency Accounts Payable account assigned to your New or Edit vendor record.
Confirm the default currency Accounts Payable account assigned to your New or Edit vendor record.
![]() Enter the date you want to record for the vendor bill.
Enter the date you want to record for the vendor bill.
![]() Enter the vendor’s bill number in the Ref. No. field.
Enter the vendor’s bill number in the Ref. No. field.
![]() Enter the item or items being purchased from the vendor.
Enter the item or items being purchased from the vendor.
![]() The Amount Due field displays both the foreign currency and home currency cost for the exchange rate as of the bill date.
The Amount Due field displays both the foreign currency and home currency cost for the exchange rate as of the bill date.
![]() Accept the default exchange rate (recommended) or modify as needed.
Accept the default exchange rate (recommended) or modify as needed.
![]() Click a Save option.
Click a Save option.

![]() Click Pay Bills on the Home page to pay the vendor bill (not shown).
Click Pay Bills on the Home page to pay the vendor bill (not shown).
![]() Select Show All Bills, or select to show only bills due on or before a specific date.
Select Show All Bills, or select to show only bills due on or before a specific date.
![]() Select the A/P account for the foreign vendor.
Select the A/P account for the foreign vendor.
![]() Filter or sort the Pay Bills listing as desired.
Filter or sort the Pay Bills listing as desired.
![]() Select the bills to be paid.
Select the bills to be paid.
![]() Complete the remaining information (not shown).
Complete the remaining information (not shown).
![]() Verify the correct exchange rate is listed for your bill payment date. Modify as needed.
Verify the correct exchange rate is listed for your bill payment date. Modify as needed.
![]() Click Pay Selected Bills.
Click Pay Selected Bills.

See Also
For more detailed information about completing the Pay Bills process, read the “Paying Bills” section in Chapter 5, “Making Purchases and Recording Payments.”
Prepare Unrealized Gains and Losses Report
![]() To prepare an Unrealized Gains & Losses report, select Reports, Company & Financial from the menu bar.
To prepare an Unrealized Gains & Losses report, select Reports, Company & Financial from the menu bar.
![]() Select Unrealized Gains & Losses.
Select Unrealized Gains & Losses.
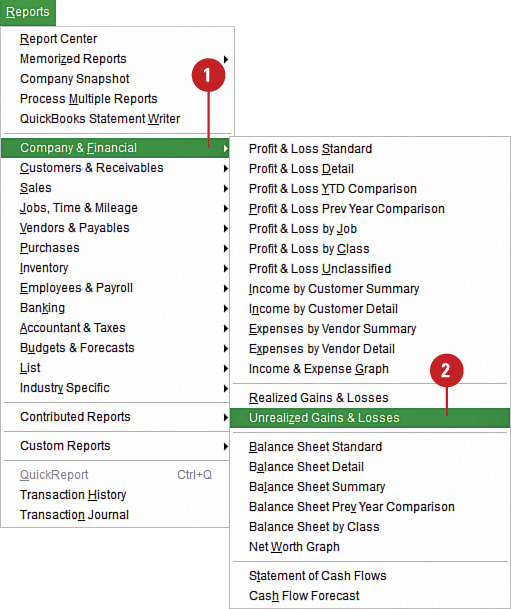
![]() In the Enter Exchange Rates dialog that displays, select the date you want to report the unrealized gains and losses for.
In the Enter Exchange Rates dialog that displays, select the date you want to report the unrealized gains and losses for.
![]() If the proper Exchange Rate does not default, enter the appropriate rate for the selected date.
If the proper Exchange Rate does not default, enter the appropriate rate for the selected date.
![]() Click Continue.
Click Continue.
Important
You can ensure that your financials are properly reported with the correct exchange rate if you make it a daily task to download or manually enter the updated exchange rates. See the previous section “Update the Foreign Exchange Rates.”
![]() The Unrealized Gains & Losses report is displayed, and for each currency with unpaid transactions, the rate used for the report is displayed.
The Unrealized Gains & Losses report is displayed, and for each currency with unpaid transactions, the rate used for the report is displayed.

Prepare Realized Gains and Losses Report
![]() To prepare a Realized Gains & Losses report, select Reports, Company & Financial from the menu bar.
To prepare a Realized Gains & Losses report, select Reports, Company & Financial from the menu bar.
![]() Select Realized Gains & Losses to display the report showing transaction details of the recognized gain or loss on the reporting transactions.
Select Realized Gains & Losses to display the report showing transaction details of the recognized gain or loss on the reporting transactions.

![]() View your Profit & Loss by selecting Reports, Company & Financial and selecting Profit & Loss Standard.
View your Profit & Loss by selecting Reports, Company & Financial and selecting Profit & Loss Standard.
![]() Change the dates if needed.
Change the dates if needed.
![]() View the Exchange Gain or Loss amount reported on the Profit & Loss and compare to the Realized Gains & Losses report prepared previously.
View the Exchange Gain or Loss amount reported on the Profit & Loss and compare to the Realized Gains & Losses report prepared previously.

Did You Know?
When you invoice your client or receive a bill from a vendor, the sales price or cost is reported in your financials at the “then current” exchange rate. However, because exchange rates fluctuate daily, your “realized” amount received or paid probably differs from what was originally reported. This accounting is known as the “realized gain or loss” and is computed by taking the difference between the original document value and the new value at the current exchange rate. QuickBooks automatically creates this entry for you! Be sure to keep the exchange rates in your data file current by following the guidelines in section “Update the Foreign Exchange Rates.”
Make a Home Currency Adjustment
![]() To restate your business financials in the home currency as of a specific date range, click Company, Manage Currency and choose the Home Currency Adjustment.
To restate your business financials in the home currency as of a specific date range, click Company, Manage Currency and choose the Home Currency Adjustment.
![]() The Home Currency Adjustment dialog displays. Select the date for which you are restating your financial statements.
The Home Currency Adjustment dialog displays. Select the date for which you are restating your financial statements.
![]() Select the currency from the drop-down menu.
Select the currency from the drop-down menu.
![]() The default exchange rate displays; modify it here if necessary.
The default exchange rate displays; modify it here if necessary.
![]() Click Calculate Adjustment.
Click Calculate Adjustment.
![]() Click Select All (recommended) or choose individual transactions to include in the Home Currency Adjustment.
Click Select All (recommended) or choose individual transactions to include in the Home Currency Adjustment.
![]() Click a Save option.
Click a Save option.
![]() QuickBooks restates your foreign Balance Sheet accounts in the value of the home currency and posts the offsetting entry to an Other Expense type account named “Exchange Gain or Loss.”
QuickBooks restates your foreign Balance Sheet accounts in the value of the home currency and posts the offsetting entry to an Other Expense type account named “Exchange Gain or Loss.”
Did You Know?
It is important when you are presenting your business financials to a banking institution or others for review that you have prepared the Home Currency Adjustment prior to preparing the necessary reports. The Home Currency Adjustment calculates any net gain or loss using the Home Currency Adjustment Exchange Rate, as if the transactions are completed and realized.