
Hour 22. Working with Film
What You’ll Learn in This Hour:
![]() How to import a piece of footage in your scene
How to import a piece of footage in your scene
![]() How to conform your animation to a tracked camera
How to conform your animation to a tracked camera
![]() What camera and render settings are needed for working with film
What camera and render settings are needed for working with film
![]() How to avoid lighting issues and other problems with film
How to avoid lighting issues and other problems with film
Maya is the de-facto standard 3D application for the film industry. As such, the tools for working with film are top notch. We have cameras with ample customization options to match real-world film, as well as render settings to make your shots seem real.
Note: Stocking Up
If you cannot create your own plates for practice, you may want to download some professionally created plates from sites such as www.istockphoto.com and www.shutterstock.com. These sites contain lens info and have good support for using their footage as plates for 3D scenes.
In this Hour, you find out how to import and adjust a filmed background, lay out your scene to work with a tracked camera, and use common settings that will get you on your way to working with film in an everyday setting.
Importing a Film Plate
To import a film plate, we import an image or image sequence as an image plane to a camera. As such, we need to create our camera that will serve as our shot camera. Follow these steps to import a moving plate to our scene:
![]() Create a new Maya scene.
Create a new Maya scene.
![]() Click on Create, Cameras, Camera.
Click on Create, Cameras, Camera.
![]() Rename this camera “shot_Cam.”
Rename this camera “shot_Cam.”
![]() Change a panel to view through this camera by clicking within a panel on Panel, Perspective, shot_Cam.
Change a panel to view through this camera by clicking within a panel on Panel, Perspective, shot_Cam.
![]() In the shot_Cam panel, click on View, Image Plane, Import Image.
In the shot_Cam panel, click on View, Image Plane, Import Image.
![]() Navigate to this Hour’s files and choose still_Plate.png.
Navigate to this Hour’s files and choose still_Plate.png.
![]() It will load into the camera and your scene should look like mine (see Figure 22.1).
It will load into the camera and your scene should look like mine (see Figure 22.1).
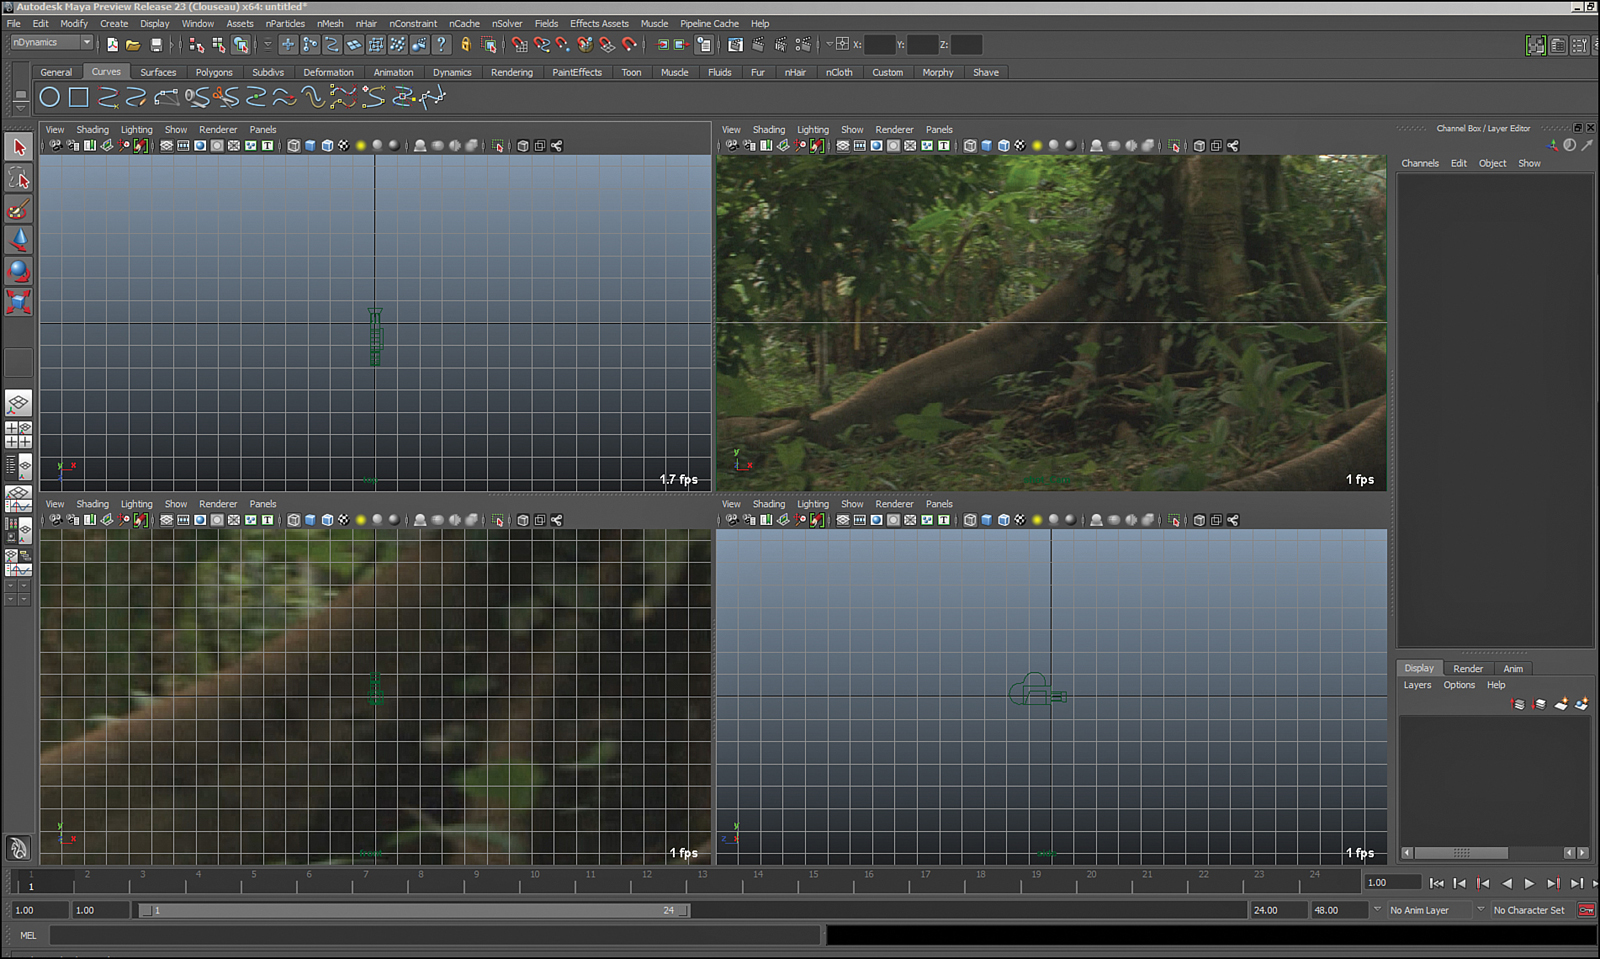
As you can see, the shot_Cam has an image plane loaded now. This is similar to how we added an image plane for modeling reference; however, we’re interested in setting up the camera to match this angle. First, let’s change a few settings on the image plane to make things easier for us to work:
![]() In the shot_Cam panel, click on View, Image Plane, Image Plane Attributes, shot_Cam, imagePlaneShape1.
In the shot_Cam panel, click on View, Image Plane, Image Plane Attributes, shot_Cam, imagePlaneShape1.
![]() This loads the Attribute Editor and the image plane’s tab.
This loads the Attribute Editor and the image plane’s tab.
![]() In the Attributes, change the display to Looking Through Camera. Seeing the image plane in all panels is distracting.
In the Attributes, change the display to Looking Through Camera. Seeing the image plane in all panels is distracting.
![]() Change the Display mode to RGB. Even though PNGs have an alpha channel, we do not need to see through the plate, so leaving Maya to calculate the alpha wastes system resources.
Change the Display mode to RGB. Even though PNGs have an alpha channel, we do not need to see through the plate, so leaving Maya to calculate the alpha wastes system resources.
![]() Scroll down to the Placement tab and change the Depth setting to 1000. This pushes the image plane far backward so that objects do not intersect it.
Scroll down to the Placement tab and change the Depth setting to 1000. This pushes the image plane far backward so that objects do not intersect it.
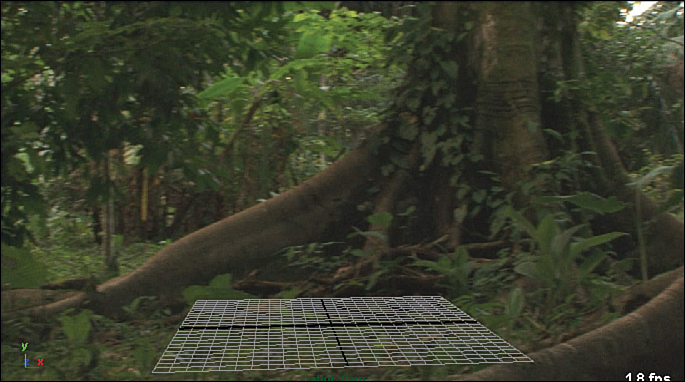
![]() In the shot_Cam panel, dolly and orbit the camera so that the grid looks like it is positioned on the forest floor, like mine does in Figure 22.2.
In the shot_Cam panel, dolly and orbit the camera so that the grid looks like it is positioned on the forest floor, like mine does in Figure 22.2.
It is also a good idea to create a very large ground plane to give yourself an idea of the horizon to further gauge the proper camera position. Follow these steps:
![]() Click Create, Polygon Primitives, Plane.
Click Create, Polygon Primitives, Plane.
![]() In the Channel Box, scale the plane to 1000 in ScaleX and ScaleZ.
In the Channel Box, scale the plane to 1000 in ScaleX and ScaleZ.
![]() Switch to wireframe mode by pressing the 4 key.
Switch to wireframe mode by pressing the 4 key.
![]() Adjust the camera one more time with an eye on the new horizon line. It should look like mine in Figure 22.3.
Adjust the camera one more time with an eye on the new horizon line. It should look like mine in Figure 22.3.
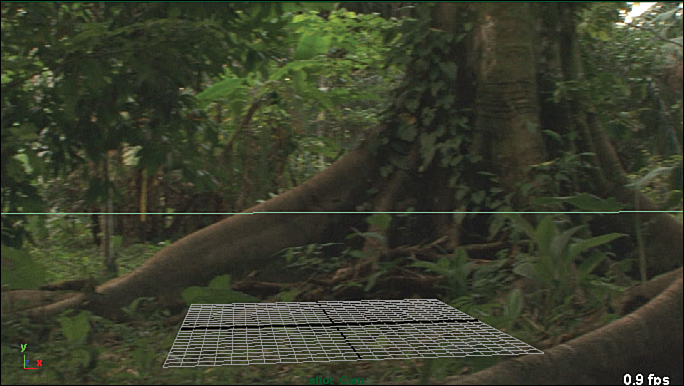
The last attribute to try to match is the focal length. Ideally, a supervisor working on set will be recording the lens information for each shot. This shot has a focal length of 50mm. I have saved this scene as still_Frame.ma.
Using a 3D Tracked Camera
Nearly every single camera used in film is dollying, panning, zooming, and so on. This movement needs to be translated into 3D movement that Maya understands before you can animate within the scene. I have included a tracked camera that we are going to use to get a little bit of practice setting up the scene as well as a moving background plate.
Setting Up the Scene
First, we need to open the tracked camera and see what kind of information is contained within the shot. Follow these instructions to get a sense of the workflow of using a tracked camera:
![]() Open tracked_Start.ma. Notice that a camera and tracking markers are placed in the scene. If your camera does not display the image plane, you will need to go into the Attribute Editor for the shot_Cam. In the image_PlaneShape1 tab, browse to the /plates/plate directory in this Hour’s files to relink the file.
Open tracked_Start.ma. Notice that a camera and tracking markers are placed in the scene. If your camera does not display the image plane, you will need to go into the Attribute Editor for the shot_Cam. In the image_PlaneShape1 tab, browse to the /plates/plate directory in this Hour’s files to relink the file.
![]() While in the Attribute Editor, change the settings to make the image plane display only “looking through camera,” like we did in the last section. Also, change the display to RGB, just like we did in the last section.
While in the Attribute Editor, change the settings to make the image plane display only “looking through camera,” like we did in the last section. Also, change the display to RGB, just like we did in the last section.
![]() In the Attribute Editor, in the shot_CamPlane1 tab, notice how Use Image Sequence is checked. This is the attribute that tells Maya to read a sequence of images for the plate.
In the Attribute Editor, in the shot_CamPlane1 tab, notice how Use Image Sequence is checked. This is the attribute that tells Maya to read a sequence of images for the plate.
Note: Sequence Numbering
Maya prefers the images in a sequence to be numbered with a period delineating the image name and then image number (for example, imageName.001.png).
![]() In the Attribute Editor, in the Image Plane Attributes section, is an attribute called Frame Cache. This is the number of frames Maya will save to memory for fast playback. The problem is, if your cache is too small, Maya will constantly change the cached frames and you will not have smooth playback. If you have at least 8GB of RAM, change this value to be 240, the number of frames in our sequence.
In the Attribute Editor, in the Image Plane Attributes section, is an attribute called Frame Cache. This is the number of frames Maya will save to memory for fast playback. The problem is, if your cache is too small, Maya will constantly change the cached frames and you will not have smooth playback. If you have at least 8GB of RAM, change this value to be 240, the number of frames in our sequence.
![]() Now we are ready to place the camera. You cannot do this by just moving the camera itself; it has keyframes on it.
Now we are ready to place the camera. You cannot do this by just moving the camera itself; it has keyframes on it.
![]() Create a locator by clicking on Create, Locator.
Create a locator by clicking on Create, Locator.
![]() Scale it up to be very large in the Persp panel, like mine in Figure 22.4.
Scale it up to be very large in the Persp panel, like mine in Figure 22.4.
![]() Select the shot_Cam and then Shift-select the locator. Switch to the Animation menu set by pressing F2. Click on Constraint, Point. Then click on Constraint, Orient.
Select the shot_Cam and then Shift-select the locator. Switch to the Animation menu set by pressing F2. Click on Constraint, Point. Then click on Constraint, Orient.
![]() In the Outliner, click the plus sign next to the locator’s node, expanding its hierarchy.
In the Outliner, click the plus sign next to the locator’s node, expanding its hierarchy.
![]() Select both the point and orient constraints in the Outliner and then press Delete. You just quickly aligned the locator to the camera object.
Select both the point and orient constraints in the Outliner and then press Delete. You just quickly aligned the locator to the camera object.
![]() In the Outliner, select the cam_Group. Ctrl-select the locator in the Outliner and press P to parent it.
In the Outliner, select the cam_Group. Ctrl-select the locator in the Outliner and press P to parent it.
![]() Select the locator and look at the Channel Box. There are minute rotations in all of the channels. We want the camera to generally be parallel to the ground because we know it was shot that way on set. Therefore, select all of the rotate channels and type in 0 to zero them.
Select the locator and look at the Channel Box. There are minute rotations in all of the channels. We want the camera to generally be parallel to the ground because we know it was shot that way on set. Therefore, select all of the rotate channels and type in 0 to zero them.
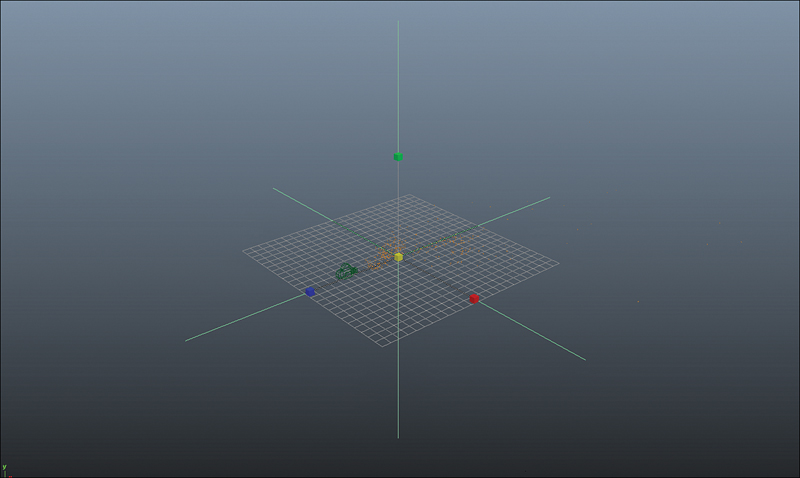
![]() Move the locator off the ground and back far enough that you can see the grid, as in Figure 22.5.
Move the locator off the ground and back far enough that you can see the grid, as in Figure 22.5.

Scene Scale
Scale is a tricky issue when it comes to tracked cameras. One of the major differences between a moving camera and a static camera is that scale does not matter with a static camera. You can simply scale your scene to make the character appear to be any size you like. Conversely, you can scale your character to fit the scale of the camera if the character rig supports it. Regardless of what method you use, the movements in the camera have a scale to them that needs to match the size of the world and hence your characters. You cannot begin to adjust this scale until you get an object into the scene:
![]() Import sam_Scale.ma into this scene by clicking File, Import.
Import sam_Scale.ma into this scene by clicking File, Import.
![]() As you can see in Figure 22.6, he is much too large.
As you can see in Figure 22.6, he is much too large.

![]() We can either scale the character up, or scale the camera down. Let’s do the latter because even though Sam scales well, it is best to leave the character alone if you can.
We can either scale the character up, or scale the camera down. Let’s do the latter because even though Sam scales well, it is best to leave the character alone if you can.
![]() Select the locator. Move the pivot of the locator to the world origin by pressing W to switch to the Move tool, holding down the D key and the X key simultaneously, and MMB clicking on the world origin.
Select the locator. Move the pivot of the locator to the world origin by pressing W to switch to the Move tool, holding down the D key and the X key simultaneously, and MMB clicking on the world origin.
![]() Now scale the locator up until Sam is about half the size he looks now. My scale is shown in Figure 22.7.
Now scale the locator up until Sam is about half the size he looks now. My scale is shown in Figure 22.7.
![]() When you are done, it’s a good idea to lock all of the channels to avoid accidental movement. Select the camera and Shift-select the locator, go into the Channel Box, LMB drag on all of the transform channels, right-click on the selected channels, and choose Lock Selected.
When you are done, it’s a good idea to lock all of the channels to avoid accidental movement. Select the camera and Shift-select the locator, go into the Channel Box, LMB drag on all of the transform channels, right-click on the selected channels, and choose Lock Selected.

![]() Because the tracking locators are a little annoying, you can select one of them, press the Up Arrow key on your keyboard to select the parent group, and then press Ctrl+H to hide the tracking locators.
Because the tracking locators are a little annoying, you can select one of them, press the Up Arrow key on your keyboard to select the parent group, and then press Ctrl+H to hide the tracking locators.
Masks
If you want a character move behind an object in the plate, you need to learn to load masks. A mask is a piece of footage that has an alpha channel determining where the image is see-through, so you can choose what objects to place in front of the character. Follow these steps to create a mask for the tree that is in the foreground:
![]() In the shot_Cam panel, click on View, Image Plane, Import Image.
In the shot_Cam panel, click on View, Image Plane, Import Image.
![]() Navigate to this Hour’s source files and find the plates/mask directory. Choose any of the .png files in that directory.
Navigate to this Hour’s source files and find the plates/mask directory. Choose any of the .png files in that directory.
![]() Check the Use Image Sequence check box in the Attribute Editor.
Check the Use Image Sequence check box in the Attribute Editor.
![]() Make sure the mask is displaying properly by changing the Color Offset attribute to white, and it should look like my scene in Figure 22.8.
Make sure the mask is displaying properly by changing the Color Offset attribute to white, and it should look like my scene in Figure 22.8.
![]() Change the display settings to Looking Through Camera, but do not change the display from RGBA—we need the alpha channel to display in order to see objects that are not masked.
Change the display settings to Looking Through Camera, but do not change the display from RGBA—we need the alpha channel to display in order to see objects that are not masked.
![]() In the Placement section of the Attribute Editor, change Depth to 1. This is so that nothing will get in between the object and the mask.
In the Placement section of the Attribute Editor, change Depth to 1. This is so that nothing will get in between the object and the mask.
![]() Return the Color Offset setting to black.
Return the Color Offset setting to black.
This mask was created in a separate program and then exported for our use in this scene. There is no automatic way within Maya to mask objects, so you will need to do some prep work on your scenes if complex masking is essential to getting your animation done. Truthfully, though, in production there is frequently not enough time to get masks perfect in time for the animation stage (compositors typically start work on a shot midway through animation).
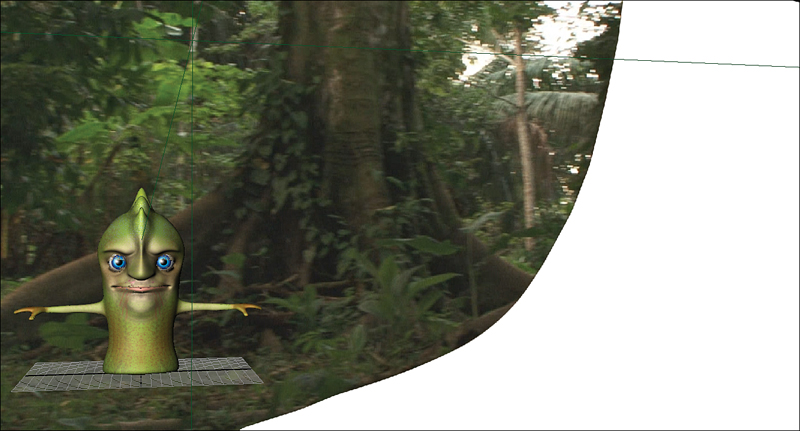
![]() Select the group sam_Geo and move him to the right of the screen until he is partially covered by the mask.
Select the group sam_Geo and move him to the right of the screen until he is partially covered by the mask.
![]() If it is working correctly, it will look like Figure 22.9.
If it is working correctly, it will look like Figure 22.9.

More Camera Settings
The following settings will further help you customize your camera to give you more render-friendly settings, and to help you match real-world cameras.
Clip Planes
Two of the settings that deal with scale are Near and Far Clip Planes. These settings adjust how close an object has to be to the camera to be rendered, and how far the object has to be to be rendered. However, the near clip setting also controls how close polygons can be to each other before they will seem to visually intersect. This is occurring right now in Figure 22.9 in Sam’s eyelids. Select the shot_Cam and go into the Attribute Editor. In the Camera Attributes, set Near Clip Plane to .1. His eyelids should fix.
Film Back and Film Gate
These settings are finally applicable to our scene. You need to know the camera’s make and model to get accurate settings to put into these attributes. These settings control how much of a lens’s viewable area actually gets captured by the image sensor or the film inside the camera. Imagine a projector showing a huge image onto a small projector screen, and the image spilling over the sides onto the wall behind. Having the wrong film back settings is similar to this. We do not need to worry about these settings as the tracking software recognized the HD video aspect ratio and estimated the film back. You can see there are many presets for Film Back, and on feature projects that use film, these can come in handy.
Common Render Settings
It is highly uncommon to render the image planes when you are working with film. It is much more likely that you will be compositing the characters and objects back into the shot using compositing software later on. Set the Display Mode to “none” in the image plane’s attributes in the Attribute Editor before rendering.
If you are using any useBackground materials to catch shadows from objects, these materials “pick up” the image planes also, so hiding them is important.
If you are using Final Gather to have bounced light in your scene, you should know that image planes do not cast and receive Final Gather points. It can be a nice trick to get your character looking more like it is actually in the scene by setting the Environment color to a “darkened average” of the colors in the plate. Our forest plate is very dark and green, so that kind of color would do. Be careful not to make it too bright or saturated.
Aspect Ratios and Resolution
The image plane will always render to fill the film gate—meaning that if you render an aspect ratio different from your image plane (and film gate), you will be missing the image plane on the top and bottom, or left and right, of your render. For instance, if your plane is 1920×1080 (1.77 aspect ratio), and you render at 500×1080, then you will have a render with the film gate compressed into the width of the available resolution. In Figure 22.10, this is exactly what happened; notice how there is blank area on the top and bottom of the image. You can gain this area back by setting a different “Fit Resolution Gate” in the Film Back settings of your camera; however, this is cumbersome and not very widely used. In all but a few cases, you will want to render at the same aspect ratio and resolution as your film.

FIGURE 22.10 The aspect ratio of your render will affect how the plate is rendered. In addition, the Fit Resolution Gate settings in the camera shape will change how the image plane renders.
Color
One extra render issue that needs to be addressed is color. Depending on the format of the plate, you will need to render in 8-bit, 16-bit, or 32-bit color. If you are working with a plate that is an 8-bit-per-channel format, such as .png or .jpg, it is overkill to render at a higher bit depth. Alternatively, if you are compositing the final image into film, you need to set your render bit depth to at least 16 bits per channel to match the color quality of film. To do that, follow these instructions:
![]() Click on Window, Rendering Editors, Render Settings.
Click on Window, Rendering Editors, Render Settings.
![]() If you are using Maya Software, in the Common tab there is a section called File Output. In the Image Format drop-down box, choose Maya 16 IFF or Tiff 16 TIF. These two formats will automatically switch the software renderer to render at that bit depth.
If you are using Maya Software, in the Common tab there is a section called File Output. In the Image Format drop-down box, choose Maya 16 IFF or Tiff 16 TIF. These two formats will automatically switch the software renderer to render at that bit depth.
![]() If you are using Mental Ray, switch to the Quality tab. At the bottom of this tab, there is a Frame Buffer section. Changing the Data Type setting to RGBA Half 4×16 or RGBA Float 4×32 will choose either 16-bit or 32-bit color, respectively. You must remember to choose a compatible output file format in the Common tab, though, or the color quality will be lost.
If you are using Mental Ray, switch to the Quality tab. At the bottom of this tab, there is a Frame Buffer section. Changing the Data Type setting to RGBA Half 4×16 or RGBA Float 4×32 will choose either 16-bit or 32-bit color, respectively. You must remember to choose a compatible output file format in the Common tab, though, or the color quality will be lost.
Bonus: Bonus Plates and Scenes
You will find this Hour’s Bonus folder has some extra plates and Maya scenes. Open these reference objects and characters into them, and practice working with scale.
Summary
Whether it is a reference image or an image sequence, applying a filmed image to your scenes is a common practice for digital artists. We begin with importing a simple still image and setting up our camera to create some animation within this scene. Some of the common camera and image plane parameters were discussed. We then looked at working with image sequences and tracked cameras. Orienting the camera and setting scene scale were demonstrated; then we imported a mask into our scene. Finally, a few of the common camera, render, and image output settings pertaining to film were discussed.
Q&A
Q. My scene has a black background when I open it. What’s wrong?
A. The file path is probably incorrect for the image plane. Set your project to this Hour’s folder, or wherever you have saved the source files that go with this chapter. The image plane may need to be reloaded after doing so.
Q. I cannot see my image plane, even though I know that importing worked. What is wrong?
A. Make sure your panel is set to display cameras. To be sure you can see image planes, in your camera’s panel, click Show, All.
Q. There are little bumps in the camera movement in the tracked camera scene. Is this normal?
A. No tracked camera is 100% perfect. Although sometimes we get very close, there might be little bumps and hitches. These are easy to stabilize when you’re compositing the scene later, so at a certain point, the artist tracking a shot will hand off the scene to animation.
Q. When I import a mask, it is behind my character. Why?
A. Sounds like you forgot to move it close to the camera so that no objects can pass between the mask and the camera. Change the Depth settings in the image plane’s attributes.
Workshop
The workshop contains quiz questions and exercises to help you solidify your understanding of the material covered. Try to answer all questions before looking at the “Answers” section that follows.
Quiz
1. How many image planes can be imported onto a camera?
2. How do you ensure you will have smooth playback when dealing with an image sequence?
3. Which is better, scaling a character to match a camera, or scaling a camera to match a character?
4. What setting must you check to make sure your mask’s alpha channel will be used?
5. Which file formats support greater than 8-bit color when rendering with Maya Software?
Exercise
Take a few photos from your personal library and load them as image planes in Maya; then set up cameras and scenes to match the footage. Next, import some characters and try to compose the shot by matching the perspective (focal length) and scene scale. Practice creating realistic compositions that you might see in a film!
Answers
1. Infinite, or as many as your machine can handle!
2. You want to set the Frame Cache attribute to a number greater than the number of images in the sequence so that Maya will store them in memory.
3. Always scale the scene to match the character, even if the character’s rig is fully scalable.
4. In the image plane’s attributes, check to make sure Display Mode is set to RGBA.
5. Maya 16IFF and Tiff16 are both 16-bit file formats, suitable for rendering images that are going to be composited into film.