
Hour 20. Applying Hair and Cloth for Realism
What You’ll Learn in This Hour:
![]() How to apply hair and fur to your models
How to apply hair and fur to your models
![]() How to make hair and fur dynamic
How to make hair and fur dynamic
![]() How to create nCloth objects and change their properties
How to create nCloth objects and change their properties
![]() Animating with hair and nCloth
Animating with hair and nCloth
To add an extra layer of realism and visual quality, you can apply hair and cloth effects to your Maya scenes. Characters seem more lifelike with dynamic hair and fur, and there is no limit to the number of effects you can achieve with Maya’s nCloth. From a simple fur to a complex hairdo, and from a tattered waving flag to a fully simulated toga, hair, and cloth pack a lot of visual punch.
Note: Dynamics and nDynamics
This book covers Maya’s legacy dynamics system in Hour 16, “Animating Using Dynamics and Simulations,” and saves nDynamics for this Hour. We wanted to cover both systems, but with so much overlap, it made sense to save nDynamics for our discussion of nCloth. Suffice it to say that all of the principles are the same between the two systems—it’s just that in Maya 2014, all of the nDynamics are integrated together, so that nMeshes, nCloths, and nParticles can all be working in the same system.
In this Hour, you will see how to apply hair and fur to your models, and then how to turn on dynamics to affect these systems. Then we will create a simple nCloth and apply some dynamics to it. Finally, we will look at our Sam model with hair and cloth applied to demonstrate the correct workflow for animating a scene with hair and cloth in it.
Applying Fur and Hair
Applying fur and hair is simplest on polygonal meshes. Create a new Maya scene and then create a polygonal sphere by clicking Create, Polygonal Primitives, Sphere.
Loading Fur
By default, the Fur plugin is not loaded. Click on Window, Settings/Preferences, Plugin Manager. In the Plugin Manager, scroll down until you find Fur.mll and check both Loaded and Auto-Load.
Applying Fur
Follow these steps to apply fur to an object:
![]() Select the pSphere you created.
Select the pSphere you created.
![]() Switch to the Rendering menu set by pressing F6.
Switch to the Rendering menu set by pressing F6.
![]() Click on Fur, Attach Description, New.
Click on Fur, Attach Description, New.
![]() A default fur will appear on the sphere you created, like in Figure 20.1.
A default fur will appear on the sphere you created, like in Figure 20.1.
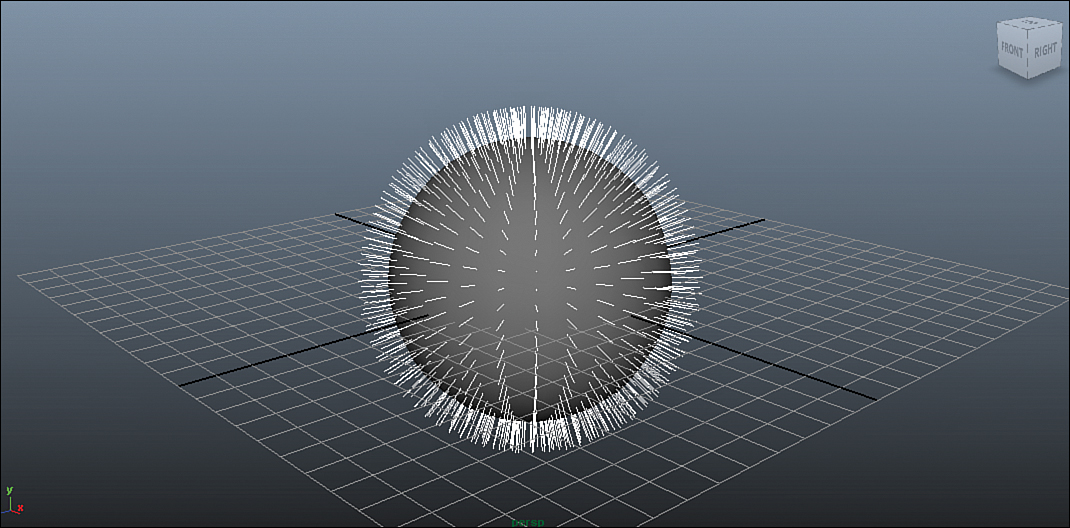
FIGURE 20.1 The default fur applied to the sphere. We will need to apply attributes to this fur to get it to look anything like real fur.
![]() Select the fur by clicking it.
Select the fur by clicking it.
![]() In the Attribute Editor (Ctrl+A), select the FurDescription1 tab.
In the Attribute Editor (Ctrl+A), select the FurDescription1 tab.
![]() Click on Presets, Duckling, Replace.
Click on Presets, Duckling, Replace.
![]() The fur now has taken on the attributes of the Duckling preset, which makes the fur pressed down against the surface of the sphere and is finer and yellow colored.
The fur now has taken on the attributes of the Duckling preset, which makes the fur pressed down against the surface of the sphere and is finer and yellow colored.
![]() Click on Render, Render Current Frame. It should resemble Figure 20.2.
Click on Render, Render Current Frame. It should resemble Figure 20.2.

FIGURE 20.2 In just a few clicks, we were able to create a fairly attractive fur on this sphere. The attributes are all customizable, so we have little limit to our imagination with fur.
Modifying Fur Attributes
Select the fur once again and take a look in the Attribute Editor at FurDescription1. Many of the attributes are self-explanatory, such as Length and Curl. A few attributes are a little tricky, such as Scraggle and Clumping, but with a little experimentation and use of the Help menu, you can wrangle these attributes to your will. Perhaps the easiest way to modify attributes is to type in values in the Attribute Editor and press Enter. However, if you would like to assign textures to the values (to have a different color on a different section of fur, for instance), you can do one of two things. First, you can drop a texture file onto almost any of the Map slots in the Details tab in the Attribute Editor. (Scroll down in FurDescription1 to the Details tab. Opening this will show all of the attributes. Opening each of these attributes will expose the Maps slots that can then be applied a texture.) Alternatively, you can use the Paint Fur Attributes tool. Click on Fur, Paint Fur Attributes Tool. In the pop-up box, choose Length as the fur attribute and then click the brush on the fur. Open the Tool Settings window by clicking Window, Settings/Preferences, Tool Settings. What will appear is the familiar painting tool settings you’ve encountered when painting Skin Weight maps or Cluster Weight maps or 3D textures. Change the settings of the brush and practice painting the fur attributes in panel. Figure 20.3 shows the result of using the scale operation and painting on the top of the sphere, effectively making a bald spot there.

FIGURE 20.3 The familiar paint tools work the same with the Paint Fur Attributes tool. Here, I’ve painted the Length attribute to a small value on the top of the sphere, making a bald spot.
Applying Hair
Applying hair is very similar to applying fur; however, Maya’s nHair is a much more powerful system than the fur system, albeit more cumbersome to set up. Follow these steps:
![]() Create a new Maya scene, and a polygon sphere in that scene.
Create a new Maya scene, and a polygon sphere in that scene.
![]() Select the sphere and then switch to nDynamics by clicking on the nDynamics menu set in the top-left corner of the Maya UI (nDynamics does not have a hotkey).
Select the sphere and then switch to nDynamics by clicking on the nDynamics menu set in the top-left corner of the Maya UI (nDynamics does not have a hotkey).
![]() Click on nHair, Create nHair.
Click on nHair, Create nHair.
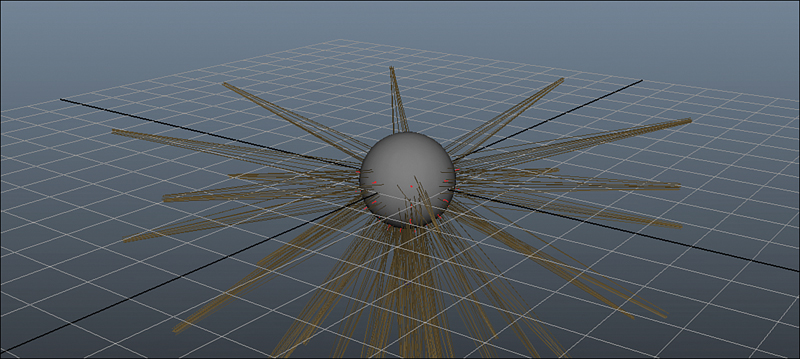
![]() A default hair system is created and applied to your sphere, as shown in Figure 20.4.
A default hair system is created and applied to your sphere, as shown in Figure 20.4.
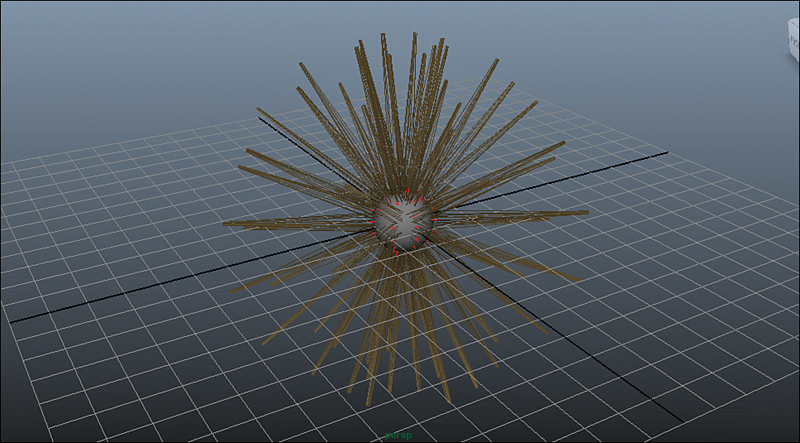
FIGURE 20.4 Although it is as easy to create as a fur system, a hair system has many more parts and offers much more control.
![]() Select the hair system by clicking on it.
Select the hair system by clicking on it.
![]() Open the Attribute Editor (Ctrl+A).
Open the Attribute Editor (Ctrl+A).
Notice that not only is there a greater number of nodes created for a hair system, but none of them have presets. This is because Maya assumes (and rightly so) that all hair systems you will ever create will need detailed and specific control curves to describe the position and shape of the hair. Whereas hair needs to be styled explicitly, fur can normally be controlled with parametric controls and maps.
Hair Attributes
Your nHair system comes with a few nodes. The transform node pfxHair1 should be ignored. The pfxHairShape1 node contains mesh output as well as information on control curves. And the hairSystemShape1 node contains global attributes for the hair system. As with the fur attributes, you should be able to experiment with these attributes and get a feel for what they do in conjunction with checking the Maya Help menu. There are more attributes, but they were created sort of “behind the scenes.” These attributes are contained by the follicles.
Follicles and Curves
A follicle is essentially a point that “emits” a hair in a hair system. It has its own attributes, many of which are identical to the hairSystemShape’s attributes, that can override the values if you so choose. In the Outliner (Window, Outliner), expand the group hairSystem1Follicles. There are dozens. Maya created these automatically for you, but the way hair actually works in Maya is a little tricky: A hairSystem contains all of the follicles that are styled and rendered according to the hairShape.
Select the follicles on the top of the sphere in the Persp pane and press Delete. Notice that the follicles and the hairs they were generating are missing now, as shown in Figure 20.5.
The hairSystem is still displaying the rest of the follicles, though. This is another major distinction between a hair system and a fur system—individual follicle control.
Let’s control the remaining follicles with curves. Follow these instructions:
![]() Click on Create, EP Curve Tool.
Click on Create, EP Curve Tool.
![]() In the side or front panel, click and create a wavy curve out of the top of the sphere, like in Figure 20.6.
In the side or front panel, click and create a wavy curve out of the top of the sphere, like in Figure 20.6.

![]() Shift-select the sphere and click on nHair, Make Select Curve Dynamic.
Shift-select the sphere and click on nHair, Make Select Curve Dynamic.
![]() Select the curve again and click on nHair, Assign Hair System, hairSystemShape1.
Select the curve again and click on nHair, Assign Hair System, hairSystemShape1.
As you can see, Maya creates a follicle and “grows” the hair along this curve. The interesting thing about using curves is you can now edit the CVs of a curve and “groom” the resultant hair. Most hair workflows start with building the general hair shape with curves and generating follicles from those curves.
Tip: Guide Curves
You can have Maya generate curves for your hairs after the hair system is created by clicking on nHair, Add Output Curves to Hair.
Creating Dynamic Hair and Fur
On their own, the Hair and Fur tools add a nice level of realism and detail to your scenes. However, to add the most sophistication possible from these tools, the hair and fur should move with the character. Next, you will learn how to turn on dynamics for hair and fur.
nHair and Dynamics
By default, all nHair is dynamic. Click Play on your hair scene and watch the hairs fall to the side of the sphere. To adjust the dynamics of a hair curve, you can adjust the Dynamic Properties tab in the Attribute Editor. Additionally, you can create Dynamics Overrides by enabling that tab in the Attribute Editor with a follicle selected. Let’s edit these dynamic properties and watch the effects:
![]() Select the hair and open the Attribute Editor.
Select the hair and open the Attribute Editor.
![]() Expand the Dynamic Properties tab.
Expand the Dynamic Properties tab.
![]() Change Bend Resistance to 200.
Change Bend Resistance to 200.
![]() Rewind the scene to frame 1 and press Play.
Rewind the scene to frame 1 and press Play.
Instead of drooping down to the sides like before, the hair now remains fairly stiff. Experiment with the other dynamic properties and see what each attribute does to the movement of the hair. I’ve saved my scene with these settings as hair_Demo.ma.
Fur and Dynamics
Fur is not dynamic by default. In fact, you have to “borrow” a hair system’s dynamics for use with a fur system. This is still very quick to achieve, however:
![]() Open fur_Dynamics.ma in this Hour’s files.
Open fur_Dynamics.ma in this Hour’s files.
![]() This scene is a basic fur attached to a sphere. Select the sphere.
This scene is a basic fur attached to a sphere. Select the sphere.
![]() Change to the nDynamics menu set by choosing it from the menu set drop-down list in the top-left corner of the Maya UI.
Change to the nDynamics menu set by choosing it from the menu set drop-down list in the top-left corner of the Maya UI.
![]() Click on nHair, Create Hair and then click the options box
Click on nHair, Create Hair and then click the options box ![]() .
.
![]() Change the Output setting to NURBS Curves and click Create Hairs.
Change the Output setting to NURBS Curves and click Create Hairs.
![]() Select the sphere and click on nMesh, Create Passive Collider.
Select the sphere and click on nMesh, Create Passive Collider.
![]() Switch to the Rendering menu set by pressing F6.
Switch to the Rendering menu set by pressing F6.
![]() Select any one of the output curves from the hairSystemShape1 in panel.
Select any one of the output curves from the hairSystemShape1 in panel.
![]() Click on Fur, Attach Hair System to Fur, hairSystemShape1.
Click on Fur, Attach Hair System to Fur, hairSystemShape1.
![]() Play back the animation.
Play back the animation.
The fur is “borrowing” the dynamics from the hair curves you created. Each hair has influence on the furs around it and moves them as the animation plays back. You also made sure the hair would not intersect the sphere by making it a passive collider as well.
nCloth and nDynamics
In Maya 2014, Autodesk has consolidated all of the dynamics of cloth, hair, and particles into the nDynamics system. This is great because artists can now create a variety of systems using all of these dynamics types that affect each other. For instance, particles can bounce off hair and land on a cloth, and tear the cloth when enough of them accumulate. Because of this consolidation, making nCloths and making objects interact with nCloths is faster than ever.
Let’s first make an object an nCloth. Open nCloth_Start.ma in this Hour’s files and follow these directions:
![]() You will see a tablecloth in the air over a ball object. Change to the nDynamics menu set by choosing it from the menu set drop-down list in the top-left corner of the Maya UI.
You will see a tablecloth in the air over a ball object. Change to the nDynamics menu set by choosing it from the menu set drop-down list in the top-left corner of the Maya UI.
![]() Select the table cloth object.
Select the table cloth object.
![]() Click on nMesh, Create nCloth.
Click on nMesh, Create nCloth.
![]() Click Play on the scene.
Click Play on the scene.
The tablecloth object falls straight downward, and goes right through the ball. This is because the ball has not been changed into an nMesh yet. All objects that are going to interact in an nDynamics simulation must be nMeshes, nParticles, nHair, and so on.
![]() Select the ball.
Select the ball.
![]() Click on nMesh, Create Passive Collider.
Click on nMesh, Create Passive Collider.
![]() Click on Window, Settings/Preferences, Preferences. Click on the Time Slider menu on the left of the Preferences window, and in the settings box that opens on the right, make sure under Playback that Playback Speed is set to “Play every frame.”
Click on Window, Settings/Preferences, Preferences. Click on the Time Slider menu on the left of the Preferences window, and in the settings box that opens on the right, make sure under Playback that Playback Speed is set to “Play every frame.”
![]() Also change Max Playback Speed to 24fps.
Also change Max Playback Speed to 24fps.
![]() Save and close this menu. Click on Play on the Timeline and watch the dynamics.
Save and close this menu. Click on Play on the Timeline and watch the dynamics.
As you can see, the tablecloth is now colliding with the ball. It falls and wraps around the ball realistically, after only a few clicks in Maya. There are many different dynamic property of nCloth, all accessible in the Attribute Editor when selecting an nCloth. The properties control things such as stretching, bending, and even how much a cloth can be pulled before tearing. You can go through the attributes and play with them, or you can load some presets and see how the attributes are set, to create your own effects in the future.
![]() Select the tablecloth, and open the Attribute Editor.
Select the tablecloth, and open the Attribute Editor.
![]() Go to the nClothShape1 tab and in the top-right corner, click on Presets, Silk, Replace.
Go to the nClothShape1 tab and in the top-right corner, click on Presets, Silk, Replace.
![]() Play back the animation.
Play back the animation.
Notice now how the cloth floats down very slowly, and only bends gently around the ball. Try to load other presets and see if you can modify their attributes to get your desired cloth type.
Attaching nCloth to Other Objects
Cloth is rarely independent in a scene; it is almost always attached to another object in some way. You’ll see now how to attach an nCloth to another object using nConstraints:
![]() Open nCloth_Flag.ma in this Hour’s files.
Open nCloth_Flag.ma in this Hour’s files.
![]() Play back the animation. You will notice the flag blows away instead of being attached to the flagpole like it should be.
Play back the animation. You will notice the flag blows away instead of being attached to the flagpole like it should be.
![]() Switch to component mode by pressing F8.
Switch to component mode by pressing F8.
![]() Select the two vertices that are on the top and bottom of the flag and closest to the flagpole, as in Figure 20.7.
Select the two vertices that are on the top and bottom of the flag and closest to the flagpole, as in Figure 20.7.

![]() Click on nConstraint, Transform.
Click on nConstraint, Transform.
![]() Play back the animation.
Play back the animation.
Notice how the flag is now behaving as if it is connected to the flagpole. You have created an nConstraint, which is a dynamic constraint using an nMesh. Simply put, the dynamicConstraint1 node that was created is almost like a controller for the vertices we chose. You can parent that object, animate, and so on, and the vertices will follow along. There are many kinds of nConstraints: attaching components to components, slide on surface, and more. You should experiment with each one to see which type works the best for your purposes.
Characters and Clothes
A huge amount of the cloth workflow that is done in CG deals with characters and clothing. You can use the exact same nConstraints as you would for any other nCloth to make sure the character’s clothing stays attached. The most common workflow for creating clothes is to duplicate the body geometry and sculpt it into shape. I’ve done that for Sam, and you can begin this section with the file sam_Cloth_Start.ma:
![]() Open sam_Cloth_Start.ma in this Hour’s files. In this file, Sam is in his default pose with a t-shirt model on, like in Figure 20.8.
Open sam_Cloth_Start.ma in this Hour’s files. In this file, Sam is in his default pose with a t-shirt model on, like in Figure 20.8.

![]() Select the t-shirt model and change to the nDynamics menu set by choosing it from the menu set drop-down list in the top-left corner of the Maya UI.
Select the t-shirt model and change to the nDynamics menu set by choosing it from the menu set drop-down list in the top-left corner of the Maya UI.
![]() Click on nMesh, Create nCloth.
Click on nMesh, Create nCloth.
![]() Click on Sam’s body geometry and click on nMesh, Create Passive Collider.
Click on Sam’s body geometry and click on nMesh, Create Passive Collider.
![]() Play back the animation.
Play back the animation.
Because Sam’s t-shirt is so close in shape to Sam’s geometry, no constraints need to be set up for it to not fall off his body in a default pose. However, we want to make sure that certain areas stay in place, so we will create an nConstraint to ensure this:
![]() Switch to component mode by pressing F8.
Switch to component mode by pressing F8.
![]() Select the vertices of the collar and the outermost ring of vertices that make up the sleeves, as in Figure 20.9.
Select the vertices of the collar and the outermost ring of vertices that make up the sleeves, as in Figure 20.9.

FIGURE 20.9 By selecting these vertices, we will be able to make a constraint that keeps the collar and sleeves in place.
![]() Press Shift and LMB click on Sam’s body geometry.
Press Shift and LMB click on Sam’s body geometry.
![]() Click on nConstraint, Point to Surface.
Click on nConstraint, Point to Surface.
![]() Play back the animation.
Play back the animation.
Now the t-shirt is really looking like it will stay in place as you animate Sam. The t-shirt body and the ends of the sleeves are free, but the collar and the base of the sleeves near the shoulder are going to move along with the surface that we constrained them to. You will need to constrain either a small part or a large part of your nCloth to your characters, depending on how the cloth is behaving and what the garment looks like. For instance, a toga should be able to mostly hang free, but a long sleeve shirt might need to be constrained in many places to avoid intersections and tears.
Animating with Hair and nCloth
For the most part, you can animate your characters like normal when they have hair and cloth applied, except for one major difference: You have to give extra time for the hair and cloth to precalculate into position before the character begins moving—meaning if your character starts a scene hanging from a ledge, you have to give Maya some “run-up” frames to calculate what the hair and cloth should look like in a start position that you choose. For this reason, many productions make sure their shots start on frame 101 instead of 1, giving FX artists 100 frames to calculate the start position of the character. Follow along to see how to do this:
![]() Open sam_Cloth_Hair_Start.ma. You will notice that Sam has his red t-shirt as well as a braided goatee. Classy.
Open sam_Cloth_Hair_Start.ma. You will notice that Sam has his red t-shirt as well as a braided goatee. Classy.
![]() To make sure that the hair and cloth calculate correctly, we need to make sure the pose is saved at frame 1. Change your selection mask to just curves by deselecting all of the other object types in the selection mask menu at the top of the Maya UI, like in Figure 20.10.
To make sure that the hair and cloth calculate correctly, we need to make sure the pose is saved at frame 1. Change your selection mask to just curves by deselecting all of the other object types in the selection mask menu at the top of the Maya UI, like in Figure 20.10.

![]() Now LMB drag a selection box around the entire character, selecting all of his controls.
Now LMB drag a selection box around the entire character, selecting all of his controls.
![]() On frame 1, press S to set a key. You have just now made sure that the character’s pose is set to default on frame 1.
On frame 1, press S to set a key. You have just now made sure that the character’s pose is set to default on frame 1.
![]() On frame 101, set an interesting start pose on Sam. Move him off of his origin, change the spine and arm poses, and do something with the head as well. It can be anything you want; mine is shown in Figure 20.11.
On frame 101, set an interesting start pose on Sam. Move him off of his origin, change the spine and arm poses, and do something with the head as well. It can be anything you want; mine is shown in Figure 20.11.
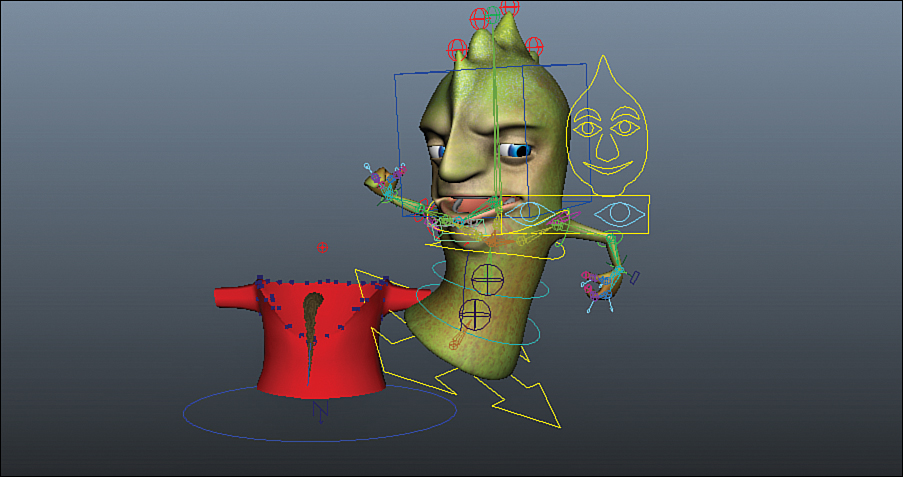
FIGURE 20.11 The pose I chose for Sam on frame 101. Notice how the clothes and hair do not move along with Sam. This is normal, because the clothes and hair need to calculate into place, which requires us to play back the animation (displaying every frame) so it has a chance to do so.
![]() Remember to set a key on your controls if you do not have AutoKey on.
Remember to set a key on your controls if you do not have AutoKey on.
![]() Rewind the scene to frame 1 and then play back the animation. (Your scene should still be playing back every frame from when we set it in the last section.)
Rewind the scene to frame 1 and then play back the animation. (Your scene should still be playing back every frame from when we set it in the last section.)
![]() Notice that the t-shirt and goatee calculate into place and are ready for the scene to begin on frame 101 now.
Notice that the t-shirt and goatee calculate into place and are ready for the scene to begin on frame 101 now.
As you can see in Figure 20.12, the nCloth and nHair calculate nicely if you give them enough time to. Because we will never be creating animation that starts from a default pose, beginning an animation scene on frame 101 is a good practice in order to allow the FX artists to have the frames they need to perform the calculations on the scene to add a lot of realism.

FIGURE 20.12 This pose looks cool! The shirt and goatee simulated nicely into place, and now the animation can start from this frame without breaking the dynamics.
![]() Video: Common Hair and Fur Settings
Video: Common Hair and Fur Settings
In this bonus video, I walk through applying fur and hair and the common presets. I also show off how to use curves to create hair follicles as well as loading hair examples into your scenes to examine them.
Summary
Adding nHair and nCloth to your scenes can be a great way to add extra realism. Indeed, characters frequently require clothing and hair or fur. To know these skills is to take another step closer to being a very well-rounded artist in Maya. We first took a look at how to apply fur and fur presets. We then created nHair and took a look at the different nodes that combine to create this amazing dynamic effect. We next investigated the dynamics that come built into nHair, and then borrowed those dynamics to make a fur system dynamic as well. Next, we explored nCloth and how to create collider objects and nConstraints. We then saw a common method for creating clothing for a character, with the t-shirt made from duplicating Sam’s geometry. Next, we applied what we discussed in the entire Hour to create dynamic hair and cloth on our Sam rig, but not before making sure that we give enough “run-up” frames for Maya to calculate the correct position of the dynamics at animation start. Cloth and Hair offer an amazing amount of cool effects with very few mouse clicks in Maya. Experiment with these effects to add interesting dynamics and realism to your scenes.
Q&A
Q. I apply a fur to an object, but it does not show up. Why?
A. Make sure you are viewing all object types in your panel. In your panel, click Show, All.
Q. I have no presets for my fur. How can I make them available?
A. Presets are available in the Attribute Editor on the furDescription tab. You are most likely looking at the FurFeedbackShape instead. Switch tabs in the Attribute Editor.
Q. When I apply hair and play back the scene, the hair flies all over the place. What’s wrong?
A. More than likely, your scene is playing back at 24fps, but Maya cannot calculate the hair that fast on your machine. Set your playback to “play every frame” by clicking on Window, Settings/Preferences, Preferences. Click on the Time Slider menu on the left of the Preferences window, and in the settings box that opens on the right, make sure under Playback that Playback Speed is set to “Play every frame.”
Q. When I apply cloth, it still intersects my character, even though I have added it as a passive collider. Why?
A. Adjust the attributes in the Collisions tab in the Attribute Editor. You may have to adjust the scale of the collisions to make sure the vertices don’t intersect.
Workshop
The workshop contains quiz questions and exercises to help you solidify your understanding of the material covered. Try to answer all questions before looking at the “Answers” section that follows.
Quiz
1. What menu set contains fur?
2. Why have hair, particles, and cloth been consolidated into a single system?
3. An object that collides with nCloth objects is called what?
4. Is Maya’s fur dynamic?
5. Why is it not a good idea to create animation on frame 1 when using a character with hair or cloth attached?
Exercise
Try to create your own wardrobe and hair for Sam. I made a simple t-shirt and a goatee, whereas you might make a hula skirt and a long ponytail. Be creative! The more you experiment and practice with hair and cloth, the more easily you’ll be able to add this extra realism to your scenes in the future.
Answers
1. The Rendering menu set contains the Fur menu.
2. Hair, cloth, and particles have been consolidated in nDynamics so they can all interact with each other.
3. A “passive collider” can collide with any nMesh.
4. Not by default. You must create an nHair and then attach the dynamic curves to the Fur to drive the fur dynamics.
5. All dynamics need to be calculated, so if you create a start pose for your animation on frame 1, you are not giving Maya any time to simulate the cloth or hair. Start from the default pose on frame 1 and then animate the character into your start pose on frame 101.