
Hour 19. Advanced Interactions Using jQuery UI Interaction Widgets
What You’ll Learn in This Hour:
![]() Implementing drag-and-drop functionality
Implementing drag-and-drop functionality
![]() Making elements and children resizable
Making elements and children resizable
![]() How to select multiple page elements using a bounding box
How to select multiple page elements using a bounding box
![]() Creating sortable tables, lists, and containers
Creating sortable tables, lists, and containers
A special set of jQuery UI widgets are intended to provide generalized interactions for various elements. These widgets allow you to make elements draggable and droppable and provide sorting, box selection, and resize functionality to elements.
The jQuery UI interaction widgets can be attached to elements to provide a rich set of predefined interactions. The following sections cover the different interaction widgets and how to implement them in your web pages.
Introducing jQuery UI Interactions
All jQuery UI interactions are based on two main components—the jQuery.widget factory and the mouse widget. The jQuery.widget factory provides the base functionality for all widgets including creation, disabling, enabling, and option settings. The mouse widget provides the base mouse interactions with the widget that captures mouse events and allows the widgets to interact with them.
Reviewing the jQuery.widget Factory
The jQuery.widget factory defines an interface that is used by all jQuery UI widgets. The options, methods, and events of the factory are available to all widgets. Table 19.1 lists the methods and events defined in the factory and available in all widgets.

You can get more information about the jQuery.widget factory at http://api.jqueryui.com/jQuery.widget/.
Understanding the Mouse Interaction Widget
The mouse interaction widget is automatically applied to all widgets. Typically, you will not need to interact with it much. However, it does expose a few options that are very useful at times. Those options are the following:
![]()
cancel—Cancels interaction for specific elements. For example, to cancel mouse interactions for elements with class="label" in the #item1, you would use
$( "#item1" ).mouse( "option", "cancel", ".label" );
![]()
delay—Delays the time after the mousedown event occurs before the interaction takes place. For example, to add a 1-second delay for mouse interactions on #item2, you would use
$( "#item2" ).mouse( "option", "delay", 1000 );
![]()
distance—Specifies the distance in pixels the mouse must travel after the mousedown event occurs before the interaction should start. For example, to set the distance to 10 pixels for mouse interactions on #item3, you would use
$( "#item3" ).mouse( "option", "distance", 10 );
Using the Drag-and-Drop Widgets
Now that you have reviewed the widget interface and the mouse interaction widget, you are ready to look at some of the most common jQuery UI widgets—the draggable and droppable widgets. These widgets are designed to work in tandem.
You can define one element to be draggable and then another to be droppable. When draggable elements are dropped on droppable widgets, you can apply JavaScript and jQuery code to provide whatever interaction for the user you would like.
Dragging Elements with the Draggable Widget
The draggable widget defines an element as draggable by holding down the mouse and moving it. This allows you to move the element to whatever position on the screen you would like.
The draggable widget will handle scrolling elements and provides several options to control the look and feel while dragging. Table 19.2 describes the more common draggable options. The following shows an example of attaching the draggable widget to an element with the cursor and opacity options:
$("#img1").draggable({cursor:"move", opacity:.5});

The draggable widget also provides the additional events so handlers can be attached to the element when dragging starts, is in progress, and stops. Table 19.3 lists the events that you can access on draggable items. The following shows an example of adding a dragstop event to apply a bounce effect when the item is dropped:
$("#drag1").draggable({cursor:"move", opacity:.5});
$("#drag1").on("dragstop", function(){$(this).effect("bounce", 1000); });

Try it Yourself: Adding Draggable Images to a Web Page
1. In Aptana, create the hour19, hour19/js, and hour18/css folders, and then add the hour19/hour1901.html, hour19/js/hour1901.js, and hour19/css/hour1901.css files. You also need to copy the images folder from the book’s website at code/hour19 to the hour19 folder in Aptana.
2. Add the code shown in Listing 19.1-html and Listing 19.1-css to the HTML and CSS files.
3. Open the hour1901.js file and add a .ready() function.
4. Add the following lines. Line 2 adds the draggable widget to #drag1 and sets the cursor to move while dragging; also, the opacity is at 50% while dragging. Line 3 adds a dragstop handler function that applies the bounce effect to the image when it is dropped.
02 $("#drag1").draggable({cursor:"move", opacity:.5});
03 $("#drag1").on("dragstop", function(){$(this).effect("bounce", 1000); });
5. Add the following lines that implement draggable on the #drag2 element. The helper option is set to "clone" so that the object stays in place while dragging; then in line 5, a dragstop event handler is added to animate changing the position from the original to the location of the helper clone. Notice that the offset is collected using the ui parameter.
04 $("#drag2").draggable({helper:"clone"});
05 $("#drag2").on("dragstop", function(e, ui){$("#drag2").animate(ui.offset); });
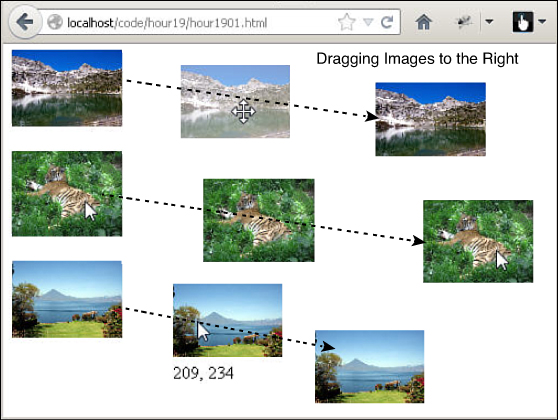
6. Add the following lines that implement draggable on the #drag3 element. This time, you implement a drag handler in line 7 that updates a paragraph element with the current mouse coordinates while dragging. The dragstop handler will clear out the position text.
06 $("#drag3").draggable();
07 $("#drag3").on("drag", function(e){
08 $(this).children("p").html(e.pageX+", "+e.pageY); });
09 $("#drag3").on("dragstop", function(e){ $(this).children("p").html(""); });
7. Save all three files and then open the HTML document in a web browser, as shown in Figure 19.1. You should be able to drag the images around and test the interactions.
LISTING 19.1-html HTML Document That Adds the Web Page.
01 <!DOCTYPE html>
02 <html>
03 <head>
04 <title>Hour 19-1</title>
05 <meta charset="utf-8" />
06 <script type="text/javascript" src="../js/jquery.min.js"></script>
07 <script type="text/javascript" src="../js/jquery-ui.min.js"></script>
08 <script type="text/javascript" src="js/hour1901.js"></script>
09 <link rel="stylesheet" type="text/css" href="../js/css/jquery-ui.min.css">
10 <link rel="stylesheet" type="text/css" href="css/hour1901.css">
11 </head>
12 <body>
13 <div id="drag1"><img id="img1" src="images/lake.jpg"></div>
14 <div id="drag2"><img id="img1" src="images/tiger.jpg"></div>
15 <div id="drag3"><img id="img1" src="images/volcano.jpg"><p></p></div>
16 </body>
17 </html>
LISTING 19.1-js jQuery and jQuery UI Implements Draggable Images
01 $(document).ready(function(){
02 $("#drag1").draggable({cursor:"move", opacity:.5});
03 $("#drag1").on("dragstop", function(){$(this).effect("bounce", 1000); });
04 $("#drag2").draggable({helper:"clone"});
05 $("#drag2").on("dragstop", function(e, ui){$("#drag2").animate(ui.offset); });
06 $("#drag3").draggable();
07 $("#drag3").on("drag", function(e){
08 $(this).children("p").html(e.pageX+", "+e.pageY); });
09 $("#drag3").on("dragstop", function(e){ $(this).children("p").html(""); });
10 });
LISTING 19.1-css CSS Code That Styles the Page
1 p {margin:0px; }
2 div {height:80px; width:100px; position:fixed; }
3 #drag2 { top:100px; }
4 #drag3 { top:200px; }
5 img { width:100px; }
Creating Drop Targets with the Droppable Widget
The droppable widget defines an element as a valid drop container usable by draggable items. This enables you to provide interactions between elements using simple mouse controls.
The droppable widget allows you to specify an accept function that can process the information about the event, such as mouse coordinates as well as the draggable item involved. Table 19.4 describes the more common droppable options. The following shows an example of attaching the droppable widget to an element and specifying the tolerance level:
$("#div1"). droppable ({tolerance:"touch"});

The droppable widget also provides the additional events so handlers can be attached to the element when dragging and dropping. Table 19.5 lists the events that you can access on droppable items. The following shows an example of adding a dropactivate event to apply a shake effect when a droppable item is activated by a drag start:
$("#drop1").droppable({tolerance:"pointer"});
$("#drop1").on("dropactivate", function(){$(this).effect("shake", 1000); });

Try it Yourself: Applying Drag and Drop to a Web Page
1. In Aptana, add the hour19/hour1902.html, hour19/js/hour1902.js, and hour19/css/hour1902.css files.
2. Add the code shown in Listing 19.2-html and Listing 19.2-css to the HTML and CSS files.
3. Open the hour1902.js file and add a .ready() function.
4. Add the following lines that add the draggable widget to #drag1, #drag2, and #drag3. Use clone for the helper setting to keep the images in place, set the cursor and the opacity. Also, you set zIndex up so that the images will show on top of other page elements, even while dragging over them.
02 $("#drag1, #drag2, #drag3").draggable(
03 {helper:"clone", cursor:"move", opacity:.7, zIndex:99});
5. Add the following lines that implement droppable on #drop1. accept is set to "img" so that only <img> elements will be accepted. In line 5, a dropover event handler is added that applies a pulsate effect to the droppable box when the draggable item is hovering over it. Also, a drop event handler is added in lines 6 and 7 that will add an <img> element to #drop1 with the same src attribute as the draggable element. A bounce effect is also added to show the user the content changed.
04 $("#drop1").droppable({accept:"img", tolerance:"fit"});
05 $("#drop1").on("dropover", function(e,ui){ $(this).effect("pulsate"); });
06 $("#drop1").on("drop", function(e,ui){
07 $(this).html($("<img></img>").attr("src", ui.draggable.attr("src")));
08 $(this).effect("bounce");
09 });
6. Add the following lines that implement droppable on #drop2. Notice that in line 10 a hoverClass is added. The class will cause the background to turn light blue when the box is hovered over by a droppable item. Also in lines 11–16, the drop handler function is implemented that adds a <div> element with the <img> and src text to #drop2.
10 $("#drop2").droppable({accept:"img", tolerance:"intersect", hoverClass:"drop-hover"});
11 $("#drop2").on("drop", function(e,ui){
12 var item = $("<div></div>");
13 item.append($("<img></img>").attr("src", ui.draggable.attr("src")));
14 item.append($("<span></span>").html(ui.draggable.attr("src")));
15 $(this).append(item);
16 });
7. Save all three files and then open the HTML document in a web browser, as shown in Figure 19.2. You should be able to drag and drop the images around and test the interactions.
LISTING 19.2-html HTML Document That Adds the Web Page
01 <!DOCTYPE html>
02 <html>
03 <head>
04 <title>Hour 19-2</title>
05 <meta charset="utf-8" />
06 <script type="text/javascript" src="../js/jquery.min.js"></script>
07 <script type="text/javascript" src="../js/jquery-ui.min.js"></script>
08 <script type="text/javascript" src="js/hour1902.js"></script>
09 <link rel="stylesheet" type="text/css" href="../js/css/jquery-ui.min.css">
10 <link rel="stylesheet" type="text/css" href="css/hour1902.css">
11 </head>
12 <body>
13 <div id="images">
14 <img id="drag1" src="images/lake.jpg" />
15 <img id="drag2" src="images/tiger.jpg" />
16 <img id="drag3" src="images/volcano.jpg" />
17 </div>
18 <div id="drop1"></div>
19 <div id="drop2"></div>
20 </body>
21 </html>

LISTING 19.2-js jQuery and jQuery UI Implements Draggable and Droppable Elements
01 $(document).ready(function(){
02 $("#drag1, #drag2, #drag3").draggable(
03 {helper:"clone", cursor:"move", opacity:.7, zIndex:99});
04 $("#drop1").droppable({accept:"img", tolerance:"fit", hoverClass:"opaque"});
05 $("#drop1").on("dropover", function(e,ui){ $(this).effect("pulsate"); });
06 $("#drop1").on("drop", function(e,ui){
07 $(this).html($("<img></img>").attr("src", ui.draggable.attr("src")));
08 $(this).effect("bounce");
09 });
10 $("#drop2").droppable({accept:"img", tolerance:"intersect",hoverClass:"drop-hover"});
11 $("#drop2").on("drop", function(e,ui){
12 var item = $("<div></div>");
13 item.append($("<img></img>").attr("src", ui.draggable.attr("src")));
14 item.append($("<span></span>").html(ui.draggable.attr("src")));
15 $(this).append(item);
16 });
17 });
LISTING 19.2-css CSS Code That Styles the Page
01 div { display:inline-block; vertical-align:top; }
02 img {width:100px; margin:0px; }
03 #images { width:100px; height:300px; }
04 #drop1, #drop2 { width:300px; min-height:150px; padding:3px;
05 border:3px ridge white; box-shadow: 5px 5px 5px #888888; margin:10px;}
06 #drop1 img { width:300px; }
07 #drop2 div{ height:80px; width:280px; padding:4px; border:2px dotted; margin-top:5px;}
08 #drop2 div img {height:80px; margin-right:10px; }
09 #drop2 div span { display:inline-block; vertical-align:top; font:16px/70px arial; }
10 .drop-hover { background-color:#BBDDFF; }
Resizing Elements Using the Resizable Widget
A frequent request for users is the capability to define the size and shape of images, lists, tables, and so on. The resizable widget provides the capability to easily resize an image with mouse controls. This allows users to resize page elements as they desire.
The resizable widget attaches several handle controls to the page elements that interact with the mouse to resize the elements. You can also resize other elements at the same time.
Table 19.6 describes the more common resizable options. The following shows an example of attaching the resizable widget to an element and specifying the aspectRatio as true:
$("#div1"). resizable ({aspectRatio:true});

The resizable widget also provides the additional events so handlers can be attached to the element when resizing. Table 19.7 lists the events that you can access on resizable items. The following shows an example of adding a resizestop event to apply a pulsate effect when a resizable item has finished being resized:
$("#resize1"). resizable ({aspectRatio:true });
$("#resize1").on("dropactivate", function(){$(this).effect("pulsate"); });

Try it Yourself: Creating Resizable Elements
1. In Aptana, add the hour19/hour1903.html, hour19/js/hour1903.js, and hour19/css/hour1903.css files.
2. Add the code shown in Listing 19.3-html and Listing 19.3-css to the HTML and CSS files.
3. Open the hour1903.js file and add a .ready() function.
4. Add the following line that will add draggable to the main <div> elements:
2 $("#resize1, #resize2, #resize3").draggable();
5. Add the following line that implements the resizable widget on #resize1. Notice that the aspectRatio is true, so it will force the aspect ratio to be constant when resizing. The alsoResize option is set to the image contained in #resize1 so that the <img> element will be resized.
3 $("#resize1").resizable({aspectRatio:true, alsoResize:"#resize1 img" });
6. Add the following line that implements resizable on #resize2. This time, aspectRatio is not set, so you can adjust the box freely, which distorts the image.
4 $("#resize2").resizable({alsoResize:"#resize2 img"});
7. Add the following lines that append a series of <p> elements to #resize3 and then add the resizable widget. You also resize the #list <div> when resizing the widget to shrink the scrollable list with the box. Also you changed the handles option to "n,s,e,w", which will allow you to resize the elements from the top, bottom, or sides, but not the corners.
5 for(var i=0; i<100; i++){ $("#list").append($("<p></p>").html("Item "+i)); }
6 $("#resize3").resizable({alsoResize:"#resize3 #list", handles:"n,s,e,w"});
8. Save all three files and then open the HTML document in a web browser, as shown in Figure 19.3. You should be able to drag and resize the elements and test the interactions.

LISTING 19.3-html HTML Document That Adds the Web Page
01 <!DOCTYPE html>
02 <html>
03 <head>
04 <title>Hour 19-3</title>
05 <meta charset="utf-8" />
06 <script type="text/javascript" src="../js/jquery.min.js"></script>
07 <script type="text/javascript" src="../js/jquery-ui.min.js"></script>
08 <script type="text/javascript" src="js/hour1903.js"></script>
09 <link rel="stylesheet" type="text/css" href="../js/css/jquery-ui.min.css">
10 <link rel="stylesheet" type="text/css" href="css/hour1903.css">
11 </head>
12 <body>
13 <div id="resize1"><img src="images/lake.jpg" /></div>
14 <div id="resize2">
15 <p>Tiger</p>
16 <img src="images/tiger.jpg" />
17 </div>
18 <div id="resize3"><div id="list"></div></div>
19 </body>
20 </html>
LISTING 19.3-js jQuery and jQuery UI Implements Resizing and Moving the Page Elements
1 $(document).ready(function(){
2 $("#resize1, #resize2, #resize3").draggable();
3 $("#resize1").resizable({aspectRatio:true, alsoResize:"#resize1 img" });
4 $("#resize2").resizable({alsoResize:"#resize2 img"});
5 for(var i=0; i<100; i++){ $("#list").append($("<p></p>").html("Item "+i)); }
6 $("#resize3").resizable({alsoResize:"#resize3 #list", handles:"n,s,e,w"});
7 });
LISTING 19.3-css CSS Code That Styles the Page
1 img { width:230px; }
2 #resize1, #resize2, #resize3 {
3 width:250px; padding:10px; display:inline-block; margin:10px;
4 border:3px ridge white; box-shadow: 5px 5px 5px #888888; vertical-align:top; }
5 p { margin:2px; border:1px dotted; text-align:center; }
6 #list { height:200px; overflow-y:auto; }
Applying the Selectable Widget
Another frequent request for users is the capability to easily select multiple items on a page using a bounding box. The selectable widget provides that functionality by allowing the user to draw a box, or “lasso,” around selectable children inside the selectable element using the mouse. Items inside the box are selected in the list.
Table 19.8 describes the more common selectable options. The following shows an example of attaching the selectable widget to an element and specifying the tolerance as fit:
$("#ul1"). selectable ({tolerance:"fit"});

The selectable widget also provides the additional events so handlers can be attached to the selectable element or its children when changing the selection. Table 19.9 lists the events that you can access on selectable items.
Each of the selectable events will pass the event object along with a ui object that will have a value for each of the events representing the selectable element. For example, the following code adds a selectableselected event to an element and then accesses the selected attribute:
$("#list1").selectable();
$("#list1").on("selectableselected ", function(e, ui){ ui.selected.effect("shake"); });

The .ui-selecting class is appended to child elements that are currently being selected. After a child element is selected, the .ui-selected class will be appended. This allows you to define some basic styles in CSS without having to add/remove classes in the selectable event handlers.
Try it Yourself: Creating Selectable Sets
1. In Aptana, add the hour19/hour1904.html, hour19/js/hour1904.js, and hour19/css/hour1904.css files.
2. Add the code shown in Listing 19.4-html and Listing 19.4-css to the HTML and CSS files. Notice in Listing 19.4-css that .ui-selected and .ui-selecting classes are added for both #set1 and #set2.
3. Open the hour1904.js file and add a .ready() function.
4. Add the following line that will populate the #set1 list:
02 for(var i=0; i<100; i++){ $("#set1").append($("<p></p>").html("Item "+i)); }
5. Add the following lines to implement selectable on #set1 along with selectablestart, selectableselecting, and selectablestop event handlers. Notice in the selectableselecting event handler that the ui.selecting.innerHTML value is used to update the list of items being selected.
03 $("#set1").selectable({filter:"p"});
04 $("#set1").on("selectablestart", function(e, ui){ $("span").html("Selecting "); });
05 $("#set1").on("selectableselecting", function(e, ui){
06 $("span").append(ui.selecting.innerHTML+", "); });
07 $("#set1").on("selectablestop", function(e, ui){
08 $("span").html("Selection Complete"); });
6. Add the following lines to implement selectable on #set2, which is a <div> full of images. Inside the selectablestop event handler, you use the .ui-selected class attribute to find the selected images. In line 12, a pulsate effect is applied to the selected images, and the <span> element is updated with the count of selected images.
09 $("#set2").selectable();
10 $("#set2").on("selectablestop", function(e, ui){
11 var selection = $("#set2 .ui-selected");
12 selection.effect("pulsate");
13 $("span").html("Selected "+ selection.length + " Photos"); });
7. Save all three files and then open the HTML document in a web browser, as shown in Figure 19.4. You should be able to drag to select items in the list as well as images.
LISTING 19.4-html HTML Document That Adds the Web Page
01 <!DOCTYPE html>
02 <html>
03 <head>
04 <title>Hour 19-4</title>
05 <meta charset="utf-8" />
06 <script type="text/javascript" src="../js/jquery.min.js"></script>
07 <script type="text/javascript" src="../js/jquery-ui.min.js"></script>
08 <script type="text/javascript" src="js/hour1904.js"></script>
09 <link rel="stylesheet" type="text/css" href="../js/css/jquery-ui.min.css">
10 <link rel="stylesheet" type="text/css" href="css/hour1904.css">
11 </head>
12 <body>
13 <span>Nothing Selected</span><br>
14 <div id="set1"></div>
15 <div id="set2">
16 <img src="images/cliff.jpg" /><img src="images/flower2.jpg" />
17 <img src="images/lake.jpg" /><img src="images/tiger.jpg" />
18 <img src="images/flower.jpg" /><img src="images/volcano.jpg" />
19 </div>
20 </body>
21 </html>

LISTING 19.4-js jQuery and jQuery UI Implements Item Selection
01 $(document).ready(function(){
02 for(var i=0; i<100; i++){ $("#set1").append($("<p></p>").html("Item "+i)); }
03 $("#set1").selectable({filter:"p"});
04 $("#set1").on("selectablestart", function(e, ui){ $("span").html("Selecting "); });
05 $("#set1").on("selectableselecting", function(e, ui){
06 $("span").append(ui.selecting.innerHTML+", "); });
07 $("#set1").on("selectablestop", function(e, ui){
08 $("span").html("Selection Complete"); });
09 $("#set2").selectable();
10 $("#set2").on("selectablestop", function(e, ui){
11 var selection = $("#set2 .ui-selected");
12 selection.effect("pulsate");
13 $("span").html("Selected "+ selection.length + " Photos"); });
14 });
LISTING 19.4-css CSS Code That Styles the Page
01 span { display:inline-block; border:1px solid; font:bold 18px/26px arial;
02 width:800px; text-align:center; margin:10px;}
03 div { display:inline-block; border:3px ridge white; vertical-align:top; margin:10px;}
04 p {border:1px dotted; margin:0px; }
05 #set1 {height:300px; width:200px; overflow-y:auto; text-align:center; }
06 #set1 .ui-selecting {
07 background-image: -moz-linear-gradient(center top , #88BBFF, #DDEEFF); }
08 #set1 .ui-selected { background-color:blue; color:white; }
09 img { height:90px; border:3px ridge white; box-shadow: 5px 5px 5px #888888;
10 margin:15px; opacity:.6; }
11 #set2 { width:500px; padding:25px; border-radius:15px; }
12 #set2 .ui-selecting{ border:5px ridge green; box-shadow: 5px 5px 5px #558822;}
13 #set2 .ui-selected{ border:5px ridge blue; box-shadow: 5px 5px 5px #225588;
14 opacity:1; }
Sorting Elements with the Sortable Widget
One of the coolest interactions provided by jQuery UI is the sortable widget. The sortable widget allows you to drag and reposition the order of HTML elements that are flowing together in a list, table, or just inside a container.
The sortable widget repositions the other elements as you drag an item. You can also link sortable containers together so that you can drag an item from one sortable container to another.
Table 19.10 describes the more common sortable options. The following shows an example of attaching a sortable widget to an element and specifying the tolerance as fit:
$("#ul1").sortable({tolerance:"fit"});

The sortable widget also provides the additional events so handlers can be attached to the sortable element or its children when sorting. Table 19.11 lists the events that you can access on selectable items.

Tip
jQuery UI will add the .ui-sortable-helper class to the helper element being sorted. You can define your own settings in the CSS for the helper class to control the look while moving the element in the sortable.
Each of the sortable events will pass the event object along with a ui object that will have the following values attached to it:
![]()
helper—jQuery object representing the helper object being dragged.
![]()
item—jQuery object representing the actual object being sorted.
![]()
offset—{top, left} object for the current offset.
![]()
originalPosition—{top, left} object for the original position.
![]()
position—{top, left} object for the current position.
![]()
sender—Sortable object that the item is being dragged from when dragging from one sortable to another.
For example, the following code connects #list1 to #list2 and then adds a sortreceived event that will add a pulsate effect on both the sender and recipient:
$("#list1").sortable({connectWith:"#list2"});
$("#list1").on("sortreceived", function(e, ui){
ui.sender.effect("pulsate");
$(this).effect("pulsate "); });
Try it Yourself: Implementing Sortable Elements
1. In Aptana, add the hour19/hour1905.html, hour19/js/hour1905.js, and hour19/css/hour1905.css files.
2. Add the code shown in Listing 19.5-html and Listing 19.5-css to the HTML and CSS files. Notice on line 13 of Listing 19.5-css that .ui-sortable-helper classes are added to style elements while sorting.
3. Open the hour1905.js file and add a .ready() function.
4. Add the images array with image name and src locations and the buildLists() function shown in lines 1–15 of Listing 19.5-js. The buildLists() function uses the array to populate the elements in #sorter1 and #sortTable.
5. Add the following line that makes #sorter1 sortable and connects it to #sorter2:
19 $("#sorter1").sortable({cursor:"move", connectWith:"#sorter2"});
6. Add the following lines that implement sortable on #sorter2 and adds the sortreceive event handler. The event handler adds a pulsate effect on both the sender and receiver when an item is added to #sorter2 from the other list.
20 $("#sorter2").sortable({cursor:"move", connectWith:"#sorter1"});
21 $("#sorter2").on("sortreceive", function(e, ui){
22 ui.sender.effect("pulsate");
23 $(this).effect("pulsate"); });
7. Add the following code to implement sortable on the #sortTable <tbody> element. Notice that the sort axis is restricted to the y direction. Also the sortupdate event handler is added that makes the sorting item pulsate when it has been moved to a new position.
24 $("#sortTable").sortable({axis:"y", cursor:"n-resize" });
25 $("#sortTable").on("sortupdate", function(e, ui){
26 ui.item.effect("pulsate"); });
8. Save all three files and then open the HTML document in a web browser, as shown in Figure 19.5. You should be able to drag elements from the div on the left to the one in the middle and back. You should also be able to reorder elements in the table.

LISTING 19.5-html HTML Document That Adds the Web Page
01 <!DOCTYPE html>
02 <html>
03 <head>
04 <title>Hour 19-5</title>
05 <meta charset="utf-8" />
06 <script type="text/javascript" src="../js/jquery.min.js"></script>
07 <script type="text/javascript" src="../js/jquery-ui.min.js"></script>
08 <script type="text/javascript" src="js/hour1905.js"></script>
09 <link rel="stylesheet" type="text/css" href="../js/css/jquery-ui.min.css">
10 <link rel="stylesheet" type="text/css" href="css/hour1905.css">
11 </head>
12 <body>
13 <div id="sorter1"></div>
14 <div id="sorter2"></div>
15 <table border=1>
16 <tbody><tr><th>Icon</th><th>Number</th><th>Name</th><th>Source</th></tr></tbody>
17 <tbody id="sortTable"></tbody>
18 </table>
19 </body>
20 </html>
LISTING 19.5-js jQuery and jQuery UI Implements Sorting
01 var images=[{src:"images/lake.jpg",name:"Lake"},{src:"images/cliff.jpg",name:"Cliff"},
02 {src:"images/flower2.jpg",name:"Violet"}, {src:"images/tiger.jpg",name:"Tiger"},
03 {src:"images/volcano.jpg",name:"Volcano"}, {src:"images/flower.jpg",name:"Flower"}];
04 function buildLists(){
05 $.each(images, function(i,item){
06 var img = $("<img></img>").attr("src", item.src);
07 var name = $("<p></p>").html(item.name);
08 $("#sorter1").append($("<div></div>").append(img, name));
09 var tr = $("<tr></tr>");
10 tr.append($("<td></td>").append($("<img></img>").attr("src", item.src)));
11 tr.append($("<td></td>").html(i));
12 tr.append($("<td></td>").html(item.name));
13 tr.append($("<td></td>").html(item.src));
14 $("#sortTable").append(tr);
15 });
16 }
17 $(document).ready(function(){
18 buildLists();
19 $("#sorter1").sortable({cursor:"move", connectWith:"#sorter2"});
20 $("#sorter2").sortable({cursor:"move", connectWith:"#sorter1"});
21 $("#sorter2").on("sortreceive", function(e, ui){
22 ui.sender.effect("pulsate");
23 $(this).effect("pulsate"); });
24 $("#sortTable").sortable({axis:"y", cursor:"n-resize", });
25 $("#sortTable").on("sortupdate", function(e, ui){
26 ui.item.effect("pulsate"); });
27 });
LISTING 19.5-css CSS Code That Styles the Page
01 #sorter1, #sorter2, table { display:inline-block;
02 width:200px; padding:10px; vertical-align:top; margin:15px; height:auto;
03 box-shadow: 5px 5px 5px #888888; border:3px ridge white; }
04 #sorter1 div, #sorter2 div { width:180px; display:inline-block; height:50px;
05 padding:5px; margin:5px; border:1px dotted;vertical-align:middle; }
06 p { float:right; margin:0px; display:inline-block; height:50px;
07 font:bold 18px/50px arial; vertical-align:top; text-align:center; }
08 img { height:50px; }
09 table { width:auto; padding:5px; }
10 tr { background-color:white; }
11 td {min-width:80px; }
12 #sortTable img { height:20px; }
13 .ui-sortable-helper { background-color:blue; color:white; opacity:.5; }
Summary
Using interaction widgets, you can easily provide some advanced features to your web pages. In this hour, you created some drag-and-drop elements by making some elements draggable and others droppable using jQuery UI draggable and droppable widgets.
Adding the selectable widget allowed you to draw a bounding box or lasso around multiple items. You used the resizable widget to make a container such as a <div> resizable. You also resized the content inside.
Finally, you learned how to implement the sortable widget to sort items in a <div> and <tbody>. Elements from sortable containers can also be dragged from one container to another.
Q&A
Q. Is it possible to create a custom interaction widget?
A. Yes. Using the jQuery UI jquery.widget factory, you can create a custom widget and provide whatever functionality in the prototype that you need.
Q. Is there a way to prevent mouse events from occurring on elements inside an item extended with a jQuery UI widget?
A. Yes. The following code cancels mouse events for items in an element #myList that have class="notSelectable":
$("#myList").mouse({ cancel:".notSelectable"});
Workshop
The workshop consists of a set of questions and answers designed to solidify your understanding of the material covered in this hour. Try to answer the questions before looking at the answers.
Quiz
1. When making an item draggable, what option should you use to keep the original in place while dragging?
2. What droppable event will be triggered when a draggable item is ready to be dropped in it?
3. True or False: It is not possible to keep a fixed ratio when using the resizable widget on an image.
4. Is there a way to limit what items are selected by the selectable widget?
Quiz Answers
1. Set helper to "clone" or another DOM object.
2. dropover
3. False. You can set the aspectRatio option to set a fixed ratio.
4. Yes. Use the filter option.
Exercises
1. Open the code in Listing 19.3 and add a resize handler for the #resize2 handler. Change the font-size attribute based on the width and height the element is resized to.
2. Open the code in Listing 19.5 and modify the #sortTable element so that it connects with #sorter2. You will need to remove the axis restriction and change the width of #sort2 to handle the additional width.