
Hour 18. Using jQuery UI Effects
What You’ll Learn in This Hour:
![]() Methods to apply effects using the jQuery UI library
Methods to apply effects using the jQuery UI library
![]() How easing effects make animation changes variable
How easing effects make animation changes variable
![]() Ways to add cool effects when hiding/showing elements
Ways to add cool effects when hiding/showing elements
![]() How to apply effects to class changes
How to apply effects to class changes
![]() Applying animation effects when repositioning elements
Applying animation effects when repositioning elements
jQuery UI provides a rich set of animation-type effects that can be applied to elements on your web pages. There are a couple of reasons why animating elements is a good thing. One is to leave the user with an impression that the website is interactive and fun to use. The second is to help users understand the visual changes that are taking place in your dynamic scripts.
In this hour, you see the improvements that jQuery UI provides in animation effects. You will be able to apply effects directly to elements, or you can apply effects when making class, visibility, or position changes.
Applying jQuery UI Effects
The purpose of this section is to introduce you to the effects that jQuery UI provides. This section discusses each of the effects and how to apply them using the .each() method. You are also introduced to the multitude of easing functions that provide a variable aspect to how values are applied during the effect animation.
Understanding jQuery UI Effects
jQuery UI effects are just animations to CSS position, size, and visibility properties. The animated changes are implemented in such a way as to create visual effects that give users a better experience.
For example, suppose a user tries to log in with an invalid password. In addition to the form validation message, you can also use jQuery UI effects to make the login button shake, which will catch the user’s attention better letting the user know the login failed. These are subtle changes to the web page, but they can have a large impact on the user experience.
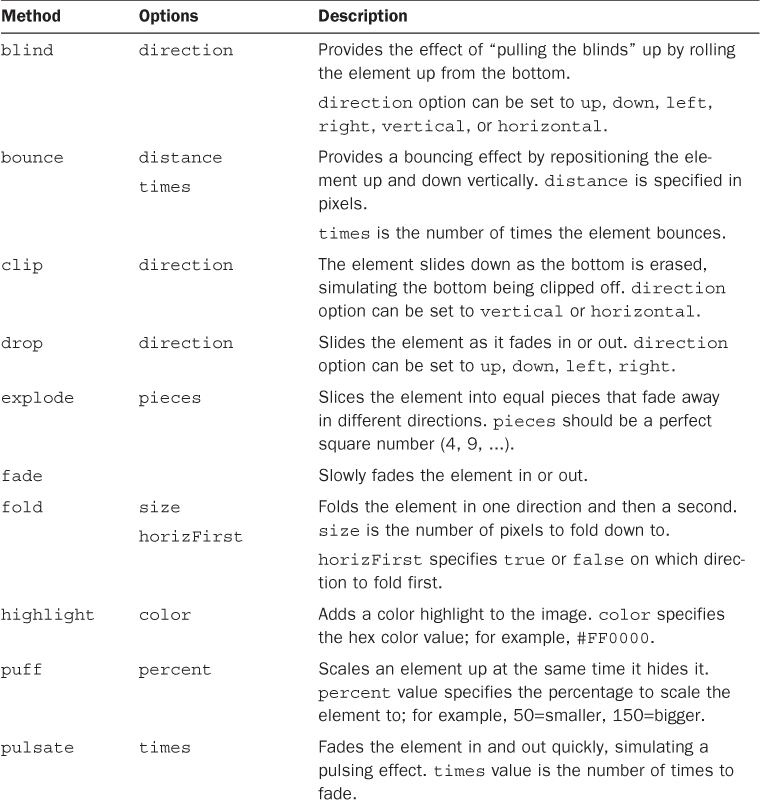
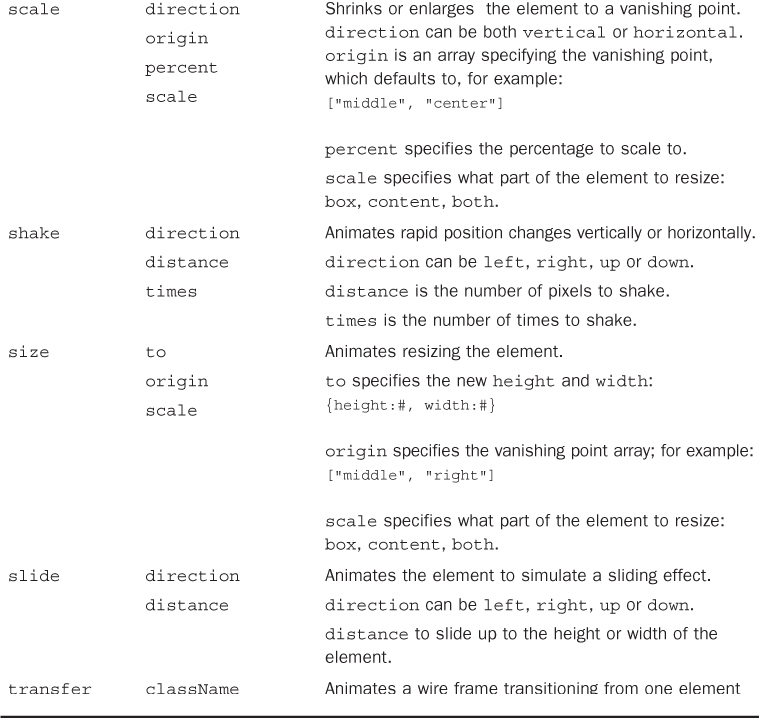
Table 18.1 lists the effects with values that can be applied to manipulate them. This should give you an idea of the effects possible with jQuery UI. You implement some of these effects later in this hour.
Setting the Effect Animation Easing
The easing function sets a value path that the effect uses when animating the effect. You have already seen the linear and swing easing in jQuery animations. jQuery UI adds a large number of new easing functions that can provide some fun animation effects.
The simplest way to illustrate how easing works is to show you the graphs published at the following location and shown in Figure 18.1. Think of the horizontal axis of the graphs as duration time, where left is 0 and the right is complete. Think of the vertical axis of the graph as how complete the transition of the effect is. For example, in a fade-out transition, the bottom would be fully opaque and the top would be fully transparent: http://api.jqueryui.com/easings/

Adding Effects to jQuery Objects
There are multiple ways to apply effects to jQuery objects. Effects can be added as a part of another transition, such as a class change or visibility change. You can also apply effects to an element using the .effect() method. The .effect() method has the following syntax:
.effect( effect [, options ] [, duration ] [, complete ] )
In the .effect() method, effect is the name of the effect and options is an object containing the option values. Table 18.1 lists the effect names and options that you can apply to each effect. The duration is specified in milliseconds, and you can add an optional complete handler function that will be executed when the effect has been applied.
The following example illustrates the full syntax of applying a size effect to an element:
("img").effect("size",
{to:{height:100, width:100}, origin:["right","top"], scale:"box"},
3000,
function(){alert("effect complete");});
Try it Yourself: Adding jQuery UI Effects
1. In Aptana, create the hour18, hour18/js, and hour18/css folders, and then add the hour18/hour1801.html, hour18/js/hour1801.js, and hour18/css/hour1801.css files. You will also need to copy the images folder from the book’s website at code/hour18 to the hour18 folder in Aptana.
2. Add the code shown in Listing 18.1-html and Listing 18.1-css to the HTML and CSS files.
3. Open the hour1801.js file and add a .ready() function.
4. Add the following click handler to #img1. The click handler applies a basic shake effect; 20 pixels in the down direction first and shake 5 times. 3000 milliseconds means the effect will take 3 seconds.
02 $("#img1").click(function(e) {
03 $(this).effect("shake", {direction:"down", distance:20, times:5}, 3000);
04 });
5. Add the following click handler to #img2. The click handler applies a scale effect in both directions to the middle, right vanishing point. The effect scales the image down to 40 percent. Also notice that the easeInBounce easing is added to adjust the flow of the animation.
05 $("#img2").click(function(e) {
06 $(this).effect("scale",
07 {direction:"both", origin:["middle", "right"], percent:40, scale:"box",
08 easing:"easeInBounce"}, 3000);
09 });
6. Add the following click handler to #img3. The click handler applies a double effect. The first effect is a slide in the downward direction for 200 pixels and the second, which slides right, is placed in the callback handler for the first effect, so it will not occur until the first effect is finished.
10 $("#img3").click(function(e) {
11 $(this).effect("slide", {direction:"down", distance:200}, 3000, function(){
12 $(this).effect("slide", {direction:"right", distance:200}, 3000);
13 });
14 });
7. Add the following click handler to #img4. The click handler applies an explode effect, breaking the image into 16 pieces and having them fade as they move apart.
15 $("#img4").click(function(e) {
16 $(this).effect("explode", {pieces:16}, 3000);
17 });
8. Save all three files and then open the HTML document in a web browser, as shown in Figure 18.2. You should see the effects as you click the images.

LISTING 18.1-html HTML Document That Adds the Web Page
01 <!DOCTYPE html>
02 <html>
03 <head>
04 <title>Hour 18-1</title>
05 <meta charset="utf-8" />
06 <script type="text/javascript" src="../js/jquery.min.js"></script>
07 <script type="text/javascript" src="../js/jquery-ui.min.js"></script>
08 <script type="text/javascript" src="js/hour1801.js"></script>
09 <link rel="stylesheet" type="text/css" href="../js/css/jquery-ui.min.css">
10 <link rel="stylesheet" type="text/css" href="css/hour1801.css">
11 </head>
12 <body>
13 <div id="frame1"><img id="img1" src="images/double.jpg"></div>
14 <div id="frame2"><img id="img2" src="images/arch.jpg"></div>
15 <div id="frame3"><img id="img3" src="images/cliff.jpg"></div>
16 <div id="frame4"><img id="img4" src="images/sunstar.jpg"></div>
17 </body>
18 </html>
LISTING 18.1-js jQuery and jQuery UI That Apply Several Effects on Images
01 $(document).ready(function(){
02 $("#img1").click(function(e) {
03 $(this).effect("shake", {direction:"down", distance:20, times:5}, 3000);
04 });
05 $("#img2").click(function(e) {
06 $(this).effect("scale",
07 {direction:"both", origin:["middle", "right"], percent:40, scale:"box",
08 easing:"easeInBounce"}, 3000);
09 });
10 $("#img3").click(function(e) {
11 $(this).effect("slide", {direction:"down", distance:200}, 3000, function(){
12 $(this).effect("slide", {direction:"right", distance:200}, 3000);
13 });
14 });
15 $("#img4").click(function(e) {
16 $(this).effect("explode", {pieces:16}, 3000);
17 });
18 });
LISTING 18.1-css CSS Code That Styles the Page
1 img { height:200px; }
2 div { height:200px; width:200px; border:1px dotted;
3 display:inline-block; position:fixed; }
4 #frame1 { top:80px; left:20px; }
5 #frame2 { top:80px; left:240px; }
6 #frame3 { top:80px; left:460px; }
7 #frame4 { top:80px; left:720px; }
Adding Effects to Class Transitions
A very important part of jQuery UI effects is the capability to animate transitions when applying classes to elements. This is done by adding a duration to the class transition function and specifying the easing function to control the animation effect. Any numerical class values that are changing will be animated each step of the class transition.
Note
Colors can be tricky; jQuery UI is not able to animate the transition from red to blue, but it can animate the transition from #FF0000 to #0000FF. If you want to animate color transitions, use the hex numerical value for them.
The following is a list of the different class transition methods that you can use to apply effects on jQuery objects by setting duration and easing values:
![]()
.addClass( className [, duration ] [, easing ] [, complete ] )—Adds the class and animates the changes to numerical class properties.
![]()
.removeClass( className [, duration ] [, easing ] [, complete ] ) )—Removes the class and animates the changes to numerical class properties.
![]()
.switchClass( removeClassName, addClassName [, duration ] [, easing ] [, complete ] ) )—First removes the removeClassName and animates the changes to numerical class properties, then adds the addClassName animating the numerical class property changes.
![]()
.toggleClass( className [, switch ] [, duration ] [, easing ] [, complete ] )—Adds the class if the object(s) do not already have it or removes it if they do. Any changes to numerical class properties will be animated based on the easing function.
Try it Yourself: Applying Easing to Class Transitions
1. In Aptana, add the hour18/hour1802.html, hour18/js/hour1802.js, and hour18/css/hour1802.css files.
2. Add the code shown in Listing 18.2-html and Listing 18.2-css to the HTML and CSS files. Notice the different class styles defined in the CSS file. These will be used to animate the class changes.
3. Now open the hour1802.js file and add the following .ready() function that implements a click handler for each of the <span> elements in the HTML document. The click handlers call the .addClass(), .removeClass(), .switchClass(), and .toggleClass() methods for the different button elements.
1 $(document).ready(function(){
2 $("#btn1").click(function(e) { $(this).addClass( "round", 2000, "easeInElastic"); });
3 $("#btn2").click(function(e) { $(this).switchClass( "active", "inactive", 2000,
4 "easeInOutElastic"); });
5 $("#btn3").click(function(e) { $(this).toggleClass( "round", 2000, "easeOutQuart"); });
6 $("#btn4").click(function(e) { $(this).removeClass( "round", 2000, "easeInCirc"); });
7 });
4. Save all three files and then open the HTML document in a web browser, as shown in Figure 18.3. You should see the animated class transitions as you click each of the buttons.

LISTING 18.2-html HTML Document That Adds the Web Page
01 <!DOCTYPE html>
02 <html>
03 <head>
04 <title>Hour 18-2</title>
05 <meta charset="utf-8" />
06 <script type="text/javascript" src="../js/jquery.min.js"></script>
07 <script type="text/javascript" src="../js/jquery-ui.min.js"></script>
08 <script type="text/javascript" src="js/hour1802.js"></script>
09 <link rel="stylesheet" type="text/css" href="../js/css/jquery-ui.min.css">
10 <link rel="stylesheet" type="text/css" href="css/hour1802.css">
11 </head>
12 <body>
13 <span id="btn1">Add Class</span><br>
14 <span id="btn2" class="active">Switch Class</span><br>
15 <span id="btn3" class="square">Toggle Class</span><br>
16 <span id="btn4" class="round">Remove Class</span><br>
17 </body>
18 </html>
LISTING 18.2-js jQuery and jQuery UI Code That Implements the Class Transitions with Animation Effects
1 $(document).ready(function(){
2 $("#btn1").click(function(e) { $(this).addClass( "round", 2000, "easeInElastic"); });
3 $("#btn2").click(function(e) { $(this).switchClass( "active", "inactive", 2000,
4 "easeInOutElastic"); });
5 $("#btn3").click(function(e) { $(this).toggleClass( "round", 2000, "easeOutQuart"); });
6 $("#btn4").click(function(e) { $(this).removeClass( "round", 2000, "easeInCirc"); });
7 });
LISTING 18.2-css CSS Code That Styles the Page
1 span { display:inline-block; height:30px; width:200px; margin-top:20px;
2 border:1px ridge; text-align:center; font:bold 20px/30px arial; }
3 .round {border-width:6px; border-radius:120px 60px; height:60px; width:320px;
4 background-color:#0000FF; color:#FFFFFF; font-size:40px; line-height:60px; }
5 .square {border-width:6px; background-color:#FF0000; color:#000000; }
6 .active {background-image: -moz-linear-gradient(center top , #B10000, #FF0000);
7 border-radius:10px 10px; border:3px outset #FF0000; }
8 .inactive {background-image: -moz-linear-gradient(center top , #B1B1B1, #FFFFFF);
9 border-radius:0px; color:#A1A1A1; }
Adding Effects to Element Visibility Transitions
Another very cool effect that you can add to your web pages with jQuery UI is visibility changes. This can be one of the most useful in allowing users to visualize what is happening, and it provides them with a chance to follow the page flow better.
Visibility effects are applied in the same manner as the .effect() function you learned earlier in this hour. You specify an effect from Table 18.1 and then set the desired options, including an easing function if you want to control the animation.
The following is a list of the different element visibility transition methods that you can add effects to using jQuery UI:
![]()
.hide( effect [, options ] [, duration ] [, complete ] )—Applies the effect with options while hiding the element.
![]()
.show( effect [, options ] [, duration ] [, complete ] )—Applies the effect with options while showing the element.
![]()
.toggle( effect [, options ] [, duration ] [, complete ] )—Either shows or hides the object based on its current visibility and applies the specified effect while doing so.
Try it Yourself: Applying Effects to jQuery Visibility Transitions
1. In Aptana, add the hour18/hour1803.html, hour18/js/hour1803.js, and hour18/css/hour1803.css files.
2. Add the code shown in Listing 18.3-html and Listing 18.3-css to the HTML and CSS files.
3. Open the hour1803.js file and add the following .ready() function that will hide the secondary menus initially:
01 $(document).ready(function(){
02 $("#showMenu, #showMenu2, #toggleMenu").hide();
...
11 })
4. Add the following click handlers for the different menu items. Notice that you use several, including fold, scale, explode, and blind. The reason is so that you can see how the effects work. On the blind effect, you set easing to easeOutBounce; this provides a simple bounce effect, as if the menu bounces at the bottom.
03 $("#show").click(function(e) { $("#showMenu").show("fold", {size:22}, 2000); });
04 $("#show2").click(function(e) { $("#showMenu2").show(
05 "scale", {origin:["top","left"]}, 2000); });
06 $("#showMenu").click(function(e) { $("#showMenu").hide("fold", {size:22}, 2000); });
07 $("#showMenu2").click(function(e) { $("#showMenu2").hide(
08 "explode", {pieces:9}, 2000); });
09 $("#toggle, #toggleMenu").click(function(e) { $("#toggleMenu").toggle("blind",
10 {direction:"up", easing:"easeOutBounce"}, 2000); });
5. Save all three files and then open the HTML document in a web browser, as shown in Figure 18.4. You should be able to select the menus and see the .show(), .hide(), and .toggle() effects working.

LISTING 18.3-html HTML Document That Adds the Web Page
01 <!DOCTYPE html>
02 <html>
03 <head>
04 <title>Hour 18-3</title>
05 <meta charset="utf-8" />
06 <script type="text/javascript" src="../js/jquery.min.js"></script>
07 <script type="text/javascript" src="../js/jquery-ui.min.js"></script>
08 <script type="text/javascript" src="js/hour1803.js"></script>
09 <link rel="stylesheet" type="text/css" href="../js/css/jquery-ui.min.css">
10 <link rel="stylesheet" type="text/css" href="css/hour1803.css">
11 </head>
12 <body>
13 <span id="show">Show Fold</span><br>
14 <span id="show2">Show Scale</span><br>
15 <span id="toggle">Toggle Blind</span><br>
16 <div id="showMenu">
17 <span>Fold 1</span><br><span>Fold 2</span><br>
18 <span>Fold 3</span><br><span>Fold 4</span><br>
19 </div>
20 <div id="showMenu2">
21 <span>Explode 1</span><br><span>Explode 2</span><br>
22 <span>Explode 3</span><br><span>Explode 4</span><br>
23 </div>
24 <div id="toggleMenu">
25 <span>Toggle 1</span><br><span>Toggle 2</span><br>
26 <span>Toggle 3</span><br><span>Toggle 4</span><br>
27 </div>
28 </body>
29 </html>
LISTING 18.3-js jQuery and jQuery UI That Implements the Visibility and Effects
01 $(document).ready(function(){
02 $("#showMenu, #showMenu2, #toggleMenu").hide();
03 $("#show").click(function(e) { $("#showMenu").show("fold", {size:22}, 2000); });
04 $("#show2").click(function(e) { $("#showMenu2").show(
05 "scale", {origin:["top","left"]}, 2000); });
06 $("#showMenu").click(function(e) { $("#showMenu").hide("fold", {size:22}, 2000); });
07 $("#showMenu2").click(function(e) { $("#showMenu2").hide(
08 "explode", {pieces:9}, 2000); });
09 $("#toggle, #toggleMenu").click(function(e) { $("#toggleMenu").toggle("blind",
10 {direction:"up", easing:"easeOutBounce"}, 2000); });
11 });
LISTING 18.3-css CSS Code That Styles the Page
1 span { display:inline-block; width:130px; border:1px ridge; text-align:center;
2 background-image: -moz-linear-gradient(center top , #B1B1B1, #FFFFFF);
3 cursor:pointer; }
4 div span{ width:120px; margin-left:10px; }
5 #showMenu { position:fixed; left:130px; top:8px;}
6 #showMenu2 { position:fixed; left:130px; top:30px;}
Try it Yourself: Adding Effects to Animations
1. In Aptana, add the hour18/hour1804.html, hour18/js/hour1804.js, and hour18/css/hour1804.css files.
2. Add the code shown in Listing 18.4-html and Listing 18.4-css to the HTML and CSS files. The <img> elements are set to fixed positioning so their movement can be animated by changing the CSS position.
3. Open the hour1804.js file and add the coords array shown in lines 1–6 of Listing 18.4-js. This array provides positioning coordinates and easing function names that will be used by the click handler.
4. The following .ready() function adds the click handler to the ball.
14 $(document).ready(function(){
15 $("#ball").click(reposition);
16 });
5. Add the following click handler reposition() code. This function will pop off a coordinate and use the values in an .animate() call that will animate moving the ball. The easing value is set using the easing attribute of the coord object. Notice that the callback handler loops back to the reposition() function. When there are no more coordinates left, an explode effect is applied to the ball.
07 function reposition(){
08 if (coords.length){
09 coord = coords.pop();
10 $(this).animate(coord, 1000, coord.easing, reposition);
11 } else{
12 $("#ball").effect("explode", {pieces:25}, 2000); }
13 }
6. Save all three files and then open the HTML document in a web browser, as shown in Figure 18.5. When you click the ball, it should move around the web page with varying speed, illustrating the easing functions. At the end, it should hit the needle and disappear.

LISTING 18.4-html HTML Document That Adds the Web Page
01 <!DOCTYPE html>
02 <html>
03 <head>
04 <title>Hour 18-4</title>
05 <meta charset="utf-8" />
06 <script type="text/javascript" src="../js/jquery.min.js"></script>
07 <script type="text/javascript" src="../js/jquery-ui.min.js"></script>
08 <script type="text/javascript" src="js/hour1804.js"></script>
09 <link rel="stylesheet" type="text/css" href="../js/css/jquery-ui.min.css">
10 <link rel="stylesheet" type="text/css" href="css/hour1804.css">
11 </head>
12 <body>
13 <img id="ball" src="images/ball.png" />
14 <img id="needle" src="images/needle.png" />
15 </body>
16 </html>
LISTING 18.4-js jQuery and jQuery UI That Implements the Reposition Effects
01 var coords = [{top:140, left:470, easing:"easeInBounce"},
02 {top:100, left:200, easing:"easeOutElastic"},
03 {top:300, left:200, easing:"easeInOutCirc"},
04 {top:20, left:300, easing:"easeInBounce"},
05 {top:10, left:10, easing:"easeOutExpo"},
06 {top:200, left:100, easing:"easeInSine"}]
07 function reposition(){
08 if (coords.length){
09 coord = coords.pop();
10 $(this).animate(coord, 1000, coord.easing, reposition);
11 } else{
12 $("#ball").effect("explode", {pieces:25}, 2000); }
13 }
14 $(document).ready(function(){
15 $("#ball").click(reposition);
16 });
LISTING 18.4-css CSS Code That Styles the Page
1 img { position:fixed; }
2 #needle { left:500px; top:100px; }
Summary
jQuery UI effects are basically animations to the CSS properties of page elements. The benefit that they provide is that rather than having the effect happen instantaneously, you can have it happen gradually. Using easing functions, you can adjust the rate that the changes occur in the animation to give elements more of an interactive feel.
Q&A
Q. Is there a way to animate changing an <img> element from one source to another so that part of both elements are visible at the same time?
A. Not directly, but there is a trick you can employ. Use two <img> elements and animate the opacity property changes at the same time. As one disappears, the other one will become visible at the same time.
Q. Is there a way to create custom easing functions?
A. Yes, you can create a custom easing function and attach it to $.easing. The function needs to accept the following parameters and return a new value based on those parameters:
![]()
tPercent—Percentage of time passed in the animation from 0.0 to 1.0.
![]()
tMS—Milliseconds since animation started.
![]()
startValue—Starting value of the property.
![]()
endValue—Ending value of the property.
![]()
tTotal—Duration of the animation.
$.easing.myCustom = function(tPercent, tMS, startValue, endValue, tTotal) {
var newValue= <your code here>>...
return newValue;
}
Workshop
The workshop consists of a set of questions and answers designed to solidify your understanding of the material covered in this hour. Try to answer the questions before looking at the answers.
Quiz
1. How do you control the amount of time the effect will take?
2. How do you define the number of pieces the explode effect will generate to 25?
3. True or False: You cannot animate changes to the border-style.
4. What effect would you use to simulate an element shrinking?
Quiz Answers
1. Setting the duration value.
2. Set the options value to {pieces:25}.
3. True. You can only animate numerical changes.
4. Scale or Size.
Exercises
1. Open the code in Listing 18.1 and change which effects are applied to the images. Try applying the pulsate, drop, and puff effects.
2. Modify the code in Listing 18.4. Add a duration attribute to each of the coordinates so that you can also adjust the duration time for each point in the ball’s animation. Add a few new points, as well. The coordinate values should look something like this:
{top:20, left:300, easing:"easeInBounce", duration:1500},