
Hour 17. Introducing jQuery UI
What You’ll Learn in This Hour:
![]() How to download and add the jQuery UI libraries
How to download and add the jQuery UI libraries
![]() How to create custom jQuery UI themes
How to create custom jQuery UI themes
![]() New functionality jQuery UI provides over jQuery alone
New functionality jQuery UI provides over jQuery alone
![]() Using jQuery UI selectors
Using jQuery UI selectors
![]() How to dynamically position UI elements using jQuery UI
How to dynamically position UI elements using jQuery UI
jQuery UI is an additional library built on top of jQuery. The purpose of jQuery UI is to provide a set of extensible interactions, effects, widgets, and themes that make it easier to incorporate professional UI elements in your web pages. In this hour, you get a chance to download and implement jQuery UI in some web pages. The purpose of this hour is to introduce you to how jQuery interacts with HTML, CSS, and JavaScript.
Getting Started with jQuery UI
jQuery UI is made up of two parts, JavaScript and CSS. The JavaScript portion of jQuery UI extends jQuery to add additional functionality specific to adding UI elements or applying effects to those elements. The CSS portion of jQuery UI styles the page elements so that developers don’t need to style the elements every time.
jQuery UI saves developers time by providing prebuilt UI elements, such as calendars and menus, with interactions, such as dragging and resizing, right out of the box. The following sections introduce you to the library; you learn how to download it and apply it to your projects.
Getting the jQuery UI Library
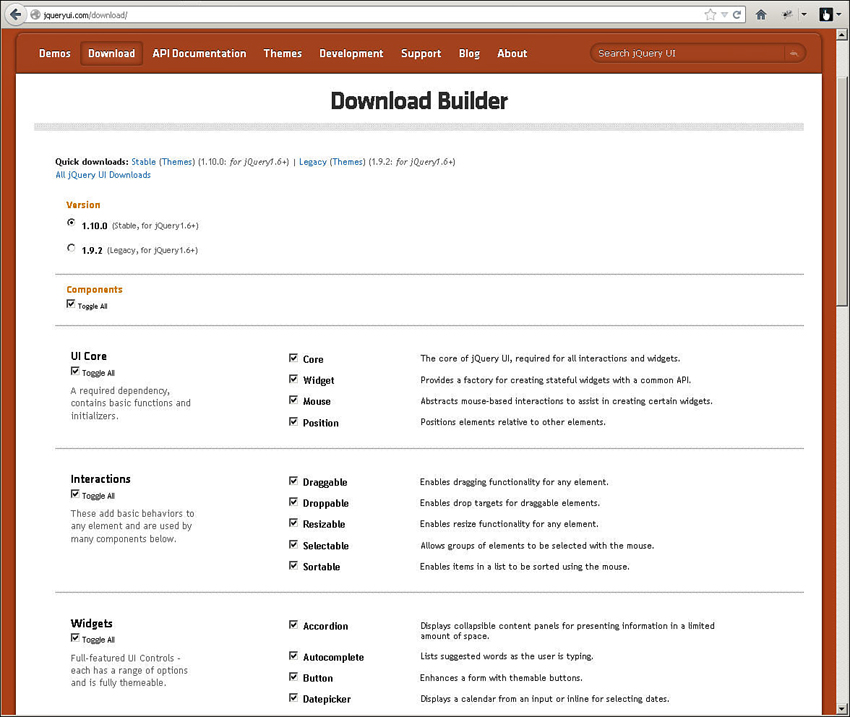
To get started with jQuery UI, you need to download the library and add it to your web pages. The jQuery library can be downloaded from the following location by selecting the options that you would like to include, shown in Figure 17.1, and clicking the Download button at the bottom. This downloads the jQuery UI files: http://jqueryui.com/download.
Using ThemeRoller
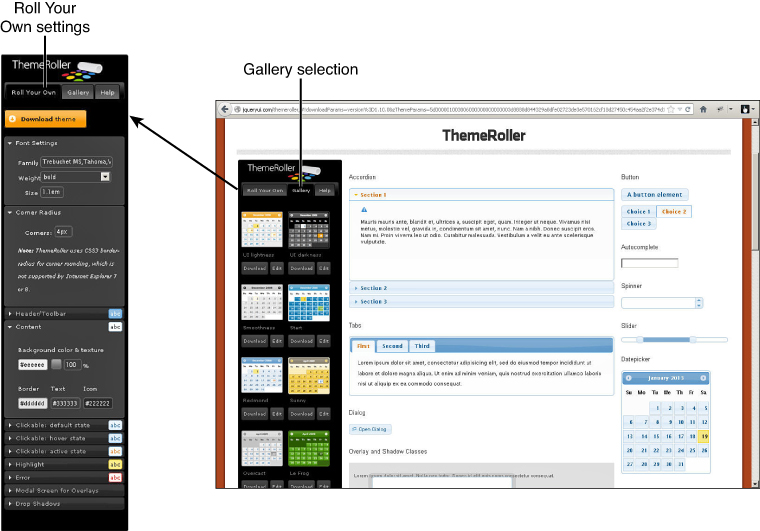
In addition to the basic jQuery UI theme, you can also use the jQuery UI ThemeRoller, shown in Figure 17.2, to select some different custom themes or even customize your own theme. A theme defines the colors, border radius, and multiple other styles applied to jQuery UI widgets and elements.
To access the jQuery UI ThemeRoller:
1. Open the following URL in your browser:
http://jqueryui.com/download/
2. Scroll down to the bottom of the download page shown in Figure 17.1 and click the Design a Custom Theme link. This brings up the ThemeRoller shown in Figure 17.2.
3. Select the Gallery tab and view the gallery of prebuilt themes shown in Figure 17.2.
4. Select the gallery that most fits your needs.
5. Select the Roll Your Own tab, also shown in Figure 17.2, and specify as many of the specific settings as you want to define.
6. Click the Download Theme button. This takes you back to the main download page.
7. Click the Download button to download the jQuery UI files.
Try it Yourself: Adding jQuery UI to Your Project
![]() js—This is the folder that will contain the jQuery UI and jQuery libraries files. These files need to be deployed so they can be loaded in your web pages.
js—This is the folder that will contain the jQuery UI and jQuery libraries files. These files need to be deployed so they can be loaded in your web pages.
![]() css—This contains the theme named folders that will house the .css files and images used by the jQuery UI library. You need to place this folder in a location where you will be able to load the .css file from your web pages.
css—This contains the theme named folders that will house the .css files and images used by the jQuery UI library. You need to place this folder in a location where you will be able to load the .css file from your web pages.
![]() development-bundle—This folder contains the full source for jQuery UI. If you are not planning to modify the jQuery UI code, you can ignore this folder.
development-bundle—This folder contains the full source for jQuery UI. If you are not planning to modify the jQuery UI code, you can ignore this folder.
1. In Aptana, create the hour17, hour17/js, and hour17/css folders, and then add the hour17/hour1701.html file. You also need to copy the images folder from the book’s website at code/hour17 to the hour17 folder in Aptana.
2. Copy the code code/js/css folder and code/js/jquery-ui.min.js file to the js/ folder in your Aptana project. jQuery UI 1.10.0 is already downloaded for you and included on the book’s website. This is the version that the examples are based on.
3. Add the code shown in Listing 17.1. This is straightforward code to validate that the jQuery UI library is installed properly.
4. Make sure that the locations specified in lines 7 and 8 for the jQuery UI library and the CSS file are correct:
07 <script type="text/javascript" src="../js/jquery-ui.min.js"></script>
08 <link rel="stylesheet" type="text/css" href="../js/css/jquery-ui.min.css">
5. Save all the files, and then open the HTML document in a web browser, as shown in Figure 17.3. You should see the date picker displayed correctly if the libraries are installed properly.

LISTING 17.1-html HTML Document That Adds the jQuery UI Libraries and Renders a Date Picker
01 <!DOCTYPE html>
02 <html>
03 <head>
04 <title>Hour 17-1</title>
05 <meta charset="utf-8" />
06 <script type="text/javascript" src="../js/jquery.min.js"></script>
07 <script type="text/javascript" src="../js/jquery-ui.min.js"></script>
08 <link rel="stylesheet" type="text/css" href="../js/css/jquery-ui.min.css">
09 <script>
10 $(document).ready(function(){
11 $( "#datepicker" ).datepicker();
12 });
13 </script>
14 </head>
15 <body>
16 <div id="datepicker"></div>
17 </body>
18 </html>
Applying jQuery UI in Your Scripts
Now that you’ve got the jQuery UI library loaded and ready to go, you can learn about some of the enhancements that jQuery UI adds over jQuery. This section covers some new functionality as well as some enhancements to the jQuery library. The meat of jQuery UI—namely, the effects, interactions, and widgets—are covered in upcoming hours.
Understanding Enhanced jQuery UI Functionality
jQuery UI is in many ways an extension of the jQuery library. To get you up to speed so that you can begin implementing jQuery UI components, the following sections discuss some of the important upgrades from jQuery.
Adding and Removing Unique IDs
jQuery UI provides a couple of additional methods to jQuery objects that allow you to easily add and remove unique IDs to a set of elements. This is especially useful when you dynamically create a bunch of new elements that you must be able to access by ID later.
To add unique IDs, use the .uniqueId() method. This method checks each element in the set and adds an id attribute if one is not present. The new ID will have a prefix of "ui-id-". If the element already has an id attribute, it is not altered.
You can later delete the unique IDs using the .removeUniqueId() method on the set. Only elements that had IDs created by .uniqueId() are affected.
For example, the following code adds id values to all <div> elements and then later removes them:
var divs = $("div").uniqueId();
...
do something
...
$("div"). removeUniqueId ();
Getting Scroll Parent
Another helpful addition in jQuery UI is the .scrollParent() method. This method searches the ancestors of the element and returns the first parent element that is scrollable. This method works only on jQuery objects that have a single element in the set.
Getting the zIndex
Another helpful addition in jQuery UI is the .zIndex() method. This method returns a numeric z-index value of the element, if it has one, or the first ancestor that does. This enables you to quickly determine the stacking placement of any item on the page.
Async Focus
jQuery UI extends the .focus(delay [. callback]) method of jQuery objects to allow for a delay before setting the focus and including a callback function that will be executed when the element does get the focus. The delay is specified in milliseconds.
This functionality has a wide range of uses, from using a timer to automatically select a form element to forcing refocus of an element. For example, the following code adds a half-second delay before setting the focus to an element #timedInput:
$("#timedInput").focus(500, function(){
$(this).val("Enter Text Now");
});
Using New Selectors in jQuery UI
One great feature of jQuery UI is the capability to extend the jQuery selectors that are already pretty extensive. These new selectors make it easier to narrow down selections specific to UI element needs. The following sections discuss each of the new selectors.
Using the :data() Selector
One of my favorite selectors in jQuery UI is the :data() selector. This selector enables you to filter elements based on a specific key that was added to elements using the .data() jQuery method. For example, the following code adds a color value to all <span>, <div>, and <p> elements, and then uses the :data() selector to set those colors on the elements:
$(p).data("color", "red");
$(span).data("color", "blue");
$(div).data("color", "green");
$(":data(color)").each(function(){
$(this).css({color:$(this).data("color")});
});
:focusable
The :focusable selector allows you to limit elements to only those that can receive focus. For example, the following statement limits the changes to only those form elements that can receive focus:
$("form:focusable").each(function(){
$(this).css({color:red});
});
:tabbable
The :tabbable selector is similar to the :focusable selector. It allows you to limit elements to only those that can be tabbed to. For example, the following statement limits the changes to only those form elements that can be tabbed to:
$("form:tabbable").each(function(){
$(this).css({color:red});
});
This filter is very useful, especially when you’re trying to exclude elements that are disabled.
Tip
Elements that have a negative tab index are :focusable but not :tabbable.
Try it Yourself: Applying jQuery UI Selectors Based on Data Values
1. In Aptana, create the hour17/hour1702.html, hour17/js/hour1702.js, and hour17/css/hour1702.css files.
2. Add the code shown in Listing 17.2-html and Listing 17.2-css to the HTML and CSS files. The following lines are used to load the jQuery UI library and CSS files:
07 <script type="text/javascript" src="../js/jquery-ui.min.js"></script>
...
09 <link rel="stylesheet" type="text/css" href="../js/css/jquery-ui.min.css">
3. Open the hour1702.js file and add a basic .ready() function.
4. Add the following three lines. These lines add the image data value to some of the <div> elements in the document.
02 $("#arch").data("image", "images/arch.jpg");
03 $("#volcano").data("image", "images/volcano.jpg");
04 $("#pyramid").data("image", "images/pyramid2.jpg");
5. Add the following click handler function that will first get all the <div> elements that have an image value and use the image value to set the src of an <img> element that gets prepended. Then the function will get all <div> elements that do not have an image value and append the generic insert.png image.
05 $("#add").click(function(){
06 $("div:data(image)").each(function(){
07 $(this).prepend($('<img></img>').attr("src", $(this).data("image")));
08 });
09 $("div:not(:data(image))").each(function(){
10 $(this).prepend($('<img></img>').attr("src", "images/insert.png"));
11 });
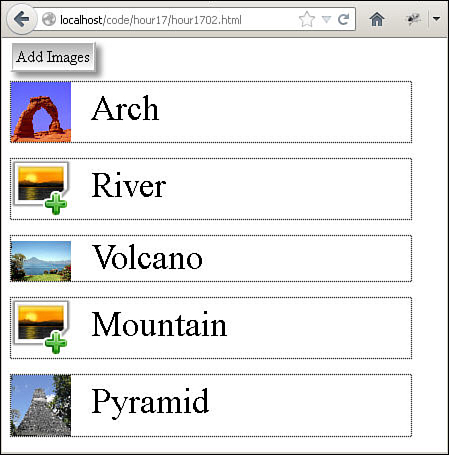
6. Save all three files and then open the HTML document in a web browser, as shown in Figure 17.4. When you click the Add Images button, you should see the images pop up for the <div> elements that had an image value and the generic image for those that do not.
LISTING 17.2-html HTML Document That Adds the Web Page
01 <!DOCTYPE html>
02 <html>
03 <head>
04 <title>Hour 17-2</title>
05 <meta charset="utf-8" />
06 <script type="text/javascript" src="../js/jquery.min.js"></script>
07 <script type="text/javascript" src="../js/jquery-ui.min.js"></script>
08 <script type="text/javascript" src="js/hour1702.js"></script>
09 <link rel="stylesheet" type="text/css" href="../js/css/jquery-ui.min.css">
10 <link rel="stylesheet" type="text/css" href="css/hour1702.css">
11 </head>
12 <body>
13 <span id="add">Add Images</span>
14 <div id="arch">Arch</div>
15 <div id="river">River</div>
16 <div id="volcano">Volcano</div>
17 <div id="mountain">Mountain</div>
18 <div id="pyramid">Pyramid</div>
19 </body>
20 </html>
LISTING 17.2-js jQuery and jQuery UI Code That Uses the :data() Selector to Select Elements
01 $(document).ready(function(){
02 $("#arch").data("image", "images/arch.jpg");
03 $("#volcano").data("image", "images/volcano.jpg");
04 $("#pyramid").data("image", "images/pyramid2.jpg");
05 $("#add").click(function(){
06 $("div:data(image)").each(function(){
07 $(this).prepend($('<img></img>').attr("src", $(this).data("image")));
08 });
09 $("div:not(:data(image))").each(function(){
10 $(this).prepend($('<img></img>').attr("src", "images/insert.png"));
11 });
12 });
13 });
LISTING 17.2-css CSS Code That Styles the Page Elements
1 img {width:60px; margin-right:20px; vertical-align:middle; }
2 div { margin-top:15px; border:1px dotted; width:400px; font-size:35px;}
3 span { background-image: -moz-linear-gradient(center top , #B1B1B1, #FFFFFF);
4 border:3px ridge white; box-shadow: 5px 5px 5px #888888; padding:3px; cursor:pointer; }
Positioning UI Elements with jQuery UI
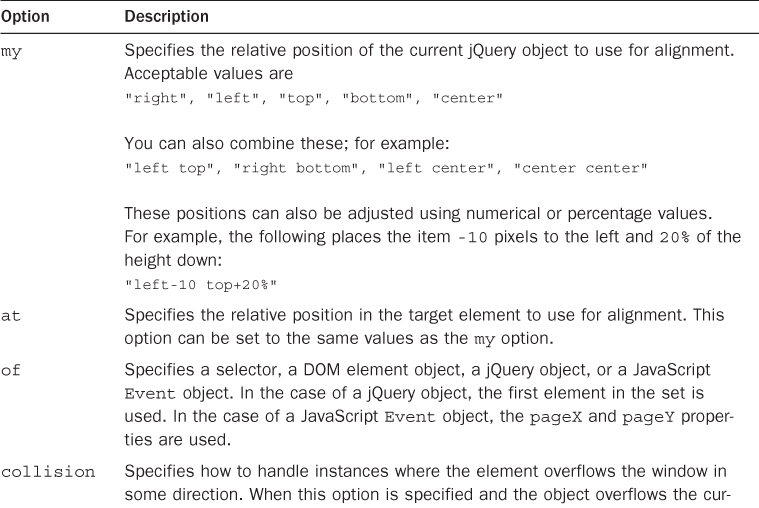
A great advantage that jQuery UI provides is the capability to position elements relative to other elements and handle collisions. This is done by extending the .position() method to allow for an options object that defines the relative positions between the jQuery element and other elements or event locations.
For example, to position an element #div1 to the right of #div2, you could use the following:
$("#div1").position("my:"left", at:"right", of:"#div2");
Pretty simple. Table 17.1 describes the options that jQuery UI provides to the .position() method.

Try it Yourself: Using jQuery UI to Position Images on a Web Page
1. In Aptana, create the hour17/hour1703.html, hour17/js/hour1703.js, and hour17/css/hour1703.css files.
2. Add the code shown in Listing 17.3-html and Listing 17.3-css to the HTML and CSS files.
3. Open the hour1703.js file and a .ready() function.
4. Inside the .ready() function, add the following lines to position #img2 at the right bottom corner of #img1, and #img3 at the right bottom corner of #img2:
2 $("#img2").position({my:"left top", at:"right bottom", of:"#img1"});
3 $("#img3").position({my:"left top", at:"right bottom", of:"#img2"});
5. Add the following mousemove event handler to reposition #img3 with the mouse movement. Notice that collision is set to "flip" within the <div> element so that the image will not be repositioned outside.
4 $("div").mousemove(function(e) {
5 $("#img4").position({ my:"left top", at:"center", of:e,
6 collision:"flip", within:"div" });
6. Save all three files and then open the HTML document in a web browser, as shown in Figure 17.5. You should see three images placed on the page, and the fourth image will track with the mouse cursor as it is moved.
LISTING 17.3-html HTML Document That Adds the Images to the Web Page
01 <!DOCTYPE html>
02 <html>
03 <head>
04 <title>Hour 17-3</title>
05 <meta charset="utf-8" />
06 <script type="text/javascript" src="../js/jquery.min.js"></script>
07 <script type="text/javascript" src="../js/jquery-ui.min.js"></script>
08 <script type="text/javascript" src="js/hour1703.js"></script>
09 <link rel="stylesheet" type="text/css" href="../js/css/jquery-ui.min.css">
10 <link rel="stylesheet" type="text/css" href="css/hour1703.css">
11 </head>
12 <body>
13 <div>
14 <img id="img1" src="images/arch.jpg">
15 <img id="img2" src="images/pyramid2.jpg">
16 <img id="img3" src="images/volcano.jpg">
17 <img id="img4" src="images/jump.jpg">
18 </div>
19 </body>
20 </html>

LISTING 17.3-js jQuery and jQuery UI That Dynamically Positions the Images
1 $(document).ready(function(){
2 $("#img2").position({my:"left top", at:"right bottom", of:"#img1"});
3 $("#img3").position({my:"left top", at:"right bottom", of:"#img2"});
4 $("div").mousemove(function(e) {
5 $("#img4").position({ my:"left top", at:"center", of:e,
6 collision:"flip", within:"div" });
7 })
8 });
LISTING 17.3-css CSS Code That Styles the Page
1 img { position: absolute; height: 130px; width:auto; }
2 div { height:500px; width:500px; border:3px ridge; }
Summary
In this hour, you downloaded and implemented jQuery UI in a few examples. You learned that jQuery UI extends jQuery with some additional functionality, such as new selectors, as well as enhances existing jQuery functionality, such as element positioning.
You implemented some examples to illustrate how to use jQuery in your web pages.
Q&A
Q. Is there anything that can be done in jQuery UI that I can’t do myself in jQuery and JavaScript?
A. No. But that’s not the point. The real point is that jQuery and jQuery UI will save you a ton of time.
Q. Can I use more than one theme at a time?
A. No, the themes will conflict with each other. You can, however, have multiple themes in different locations on your website and then dynamically adjust which .css files get loaded. This allows some users to have one theme and other users to have another.
Workshop
The workshop consists of a set of questions and answers designed to solidify your understanding of the material covered in this hour. Try to answer the questions before looking at the answers.
Quiz
1. What jQuery UI selector would you use to isolate elements that happen to have a specific data value assigned to them?
2. True or False: There is no way to get the scroll parent for an element.
3. How would you delay setting the focus on an element?
4. How can you easily reposition an element directly to the right of another element using jQuery UI?
Quiz Answers
1. :data()
2. False. You can use the .scrollParent() method to get the nearest scrolling container.
3. Use the .focus() method in jQuery UI with a delay value.
4. Use the .position() method with one element at "right" and the other "left".
Exercises
1. Open the code in Listing 17.2, and modify it to add an additional data value that specifies the color; for example, .data("color","red"). Then, when the user clicks the Add Images button, change the color of the text using .css().
2. Open the code in Listing 17.3 and modify it so that the images overlap each other as they cascade. The simplest way to do this is to add negative values to the .position() settings.