
Hour 16. Interacting with External Services, Facebook, Google, Twitter, and Flickr
What You’ll Learn in This Hour:
![]() How to implement Facebook Like and Follow buttons
How to implement Facebook Like and Follow buttons
![]() Ways to implement Facebook comments in web pages
Ways to implement Facebook comments in web pages
![]() Adding Google Maps to web pages
Adding Google Maps to web pages
![]() Dynamically controlling the pan and zoom of Google Maps
Dynamically controlling the pan and zoom of Google Maps
![]() Creating Google Map markers in JavaScript
Creating Google Map markers in JavaScript
![]() Implementing a Custom Google search
Implementing a Custom Google search
![]() Displaying Twitter elements on your web page
Displaying Twitter elements on your web page
![]() Allowing users to Tweet directly from your web page
Allowing users to Tweet directly from your web page
![]() Adding Flickr photo streams to web pages
Adding Flickr photo streams to web pages
The sole purpose of this hour is to expand your ideas of what is possible through third-party interactions on your web pages. There are a lot of great services out there that you can incorporate directly into your web pages without needing to implement them yourself.
This hour covers a few of the most common external services that get incorporated into web pages: Facebook, Twitter, Google Maps, Google Search, and Flickr. Using these external services will save you a lot of time and provide your users with a better overall experience.
Using jQuery and JavaScript to Add Facebook Social Elements to Your Web Pages
The social aspect of the Internet has been one of the biggest shifts since its inception. No longer is there a simple one-on-one interaction between a user and an Internet website. With the advancements of Facebook, you now take your friends along for the ride by sharing your experiences with them.
The main pieces this section focuses on are using Facebook controls to provide users with the capability to “like” your website, post specific pieces of your website on their walls, and make comments that appear in timelines.
There is a lot more to the Facebook SDK and the plug-ins than what is covered in this book. You might look at some additional possibilities: https://developers.facebook.com/docs/plugins/.
Adding the Facebook API Library to a Web Page
The first step in adding Facebook elements is to add the Facebook API to the web page. Facebook gives you the code snippet to add to your web pages to the API library. To see this, go to the following address, scroll down, and click the Get Code button to see the pop-up shown in Figure 16.1: https://developers.facebook.com/docs/reference/plugins/like/

Tip
If you have a Facebook developer account and an application ID, you can add the appId parameter to the library path, as shown next:
js.src = "//connect.facebook.net/en_US/all.js#xfbml=1&appId={YOUR_ID_HERE}";
If you add the appId, you can use Facebook Insights to get statistical information about the Like button clicks. You can register as a Facebook developer at the following location: https://developers.facebook.com/.
The code Facebook generates is shown next and is intended to be placed in your web page right after the <body> element:
<div id="fb-root"></div>
<script>(function(d, s, id) {
var js, fjs = d.getElementsByTagName(s)[0];
if (d.getElementById(id)) return;
js = d.createElement(s); js.id = id;
js.src = "//connect.facebook.net/en_US/all.js#xfbml=1";
fjs.parentNode.insertBefore(js, fjs);
}(document, 'script', 'facebook-jssdk'));</script>
You may prefer to work with JavaScript and jQuery code directly, so the following code is converted script that can be added in an external JS file. The converted script, shown next, does the same thing that Facebook’s script does. It adds the #fb-root element and then loads the SDK from Facebook into the web page:
function addFBsdk() {
$("body").prepend('<div id="fb-root"></div>'),
if ($("#facebook-jssdk").length == 0){
var fbSDK = document.createElement("script"); fbSDK.id = 'facebook-jssdk';
fbSDK.src = "//connect.facebook.net/en_US/all.js#xfbml=1";
$("head").get(0).appendChild(fbSDK);
}
}
$(document).ready(function(){
addFBsdk();
});
Adding a Like Button
After you have the Facebook SDK loading properly in your page, adding a Like button is a simple matter of adding a <div> element with class="fb-like". The following code shows an example of adding a Facebook Like button:
<div class="fb-like" data-send="true" data-width="450" data-show-faces="true"> </div>
The simplest method to getting the <div> code for the Facebook Like button is go to the following URL and scroll down to the Get Like Button Code section. Fill out the form to style the Like button, and then click Get Code. You can ignore the code to load the SDK because you’ve already got it in the previous section. https://developers.facebook.com/docs/reference/plugins/like/
Adding a Send Button
Adding a Send button for users to send your content to their friends is also very simple. All you need to do is add a <div> element with class="fb-send" and a data-href that specifies the URL to send. The following code shows an example of adding a Facebook Send button:
<div class="fb-send" data-href="http://dayleycreations.com"></div>
To get the code for the Facebook Send button, go to the following URL and scroll down to the Get Send Button Code section. Fill out the form to style the Send button and then click Get Code. You can ignore the code to load the SDK because you’ve already got it in the previous section. https://developers.facebook.com/docs/reference/plugins/send/
Adding a Comment Field
A Facebook comment field can be a very important part of your user’s social experience. Users can see others comments, add their own, and even post comments directly to their own Facebook page (see Figure 16.2).

Adding a Facebook comments field for users to comment on your content is also very simple. Add a <div> element with class="fb-comments" and a data-href that specifies the URL of the content. You can also set the height and number of comments to show using the data-width and data-num-posts attributes. The following code shows an example of adding a Facebook comments field:
<div class="fb-comments" data-href="http://dayleycreations.com"
data-width="470" data-num-posts="2"></div>
To get the code for the Facebook comments field, go to the following URL and scroll down to the Get Send Button Code section. Fill out the form to style the Comments field and then click Get Code. You can ignore the code to load the SDK because you’ve already got it in the previous section. https://developers.facebook.com/docs/reference/plugins/comments/
Try it Yourself: Adding Facebook Elements to Your Web Pages
1. In Aptana, create the hour16, hour16/js, and hour16/css folders, and then add the hour16/hour1601.html, hour16/js/hour1601.js, and hour16/css/hour1601.css files. You will also need to copy the images folder from the book’s website at code/hour16 to the hour16 folder in Aptana.
2. Add the code shown in Listing 16.1-html and Listing 16.1-css to the HTML and CSS files.
3. Open the hour1601.js file and add the following .ready() that will call addFBsdk() to load the Facebook SDK. It also calls the functions to add the Like, Send, and Comment elements to the website and attaches a click handler function to the left nav items to switch the src attribute of the #photo element when clicked.
30 $(document).ready(function(){
31 addFBsdk();
32 addFBlike("http://www.dayleycreations.com", $("#like"));
33 addFBsend("http://www.dayleycreations.com", $(".navItem"));
34 addFBcomment("http://www.dayleycreations.com", $("#content"));
35 $(".navItem img").click(function(){
36 $("#photo").attr("src", $(this).attr("src"));
37 });
38 });
4. Add the following addFBsdk() function. This is the code you saw earlier that is converted to jQuery from what Facebook gives you.
01 function addFBsdk() {
02 $("body").prepend('<div id="fb-root"></div>'),
03 if ($("#facebook-jssdk").length == 0){
04 var fbSDK = document.createElement("script"); fbSDK.id = 'facebook-jssdk';
05 fbSDK.src = "//connect.facebook.net/en_US/all.js#xfbml=1";
06 $("head").get(0).appendChild(fbSDK);
07 }
08 }
5. Add the creation function shown in lines 9–29 of Listing 16.1-js. These functions build the Facebook Like button, Send buttons, and Comments field dynamically. You can use the HTML code returned from Facebook, but this illustrates how to create the elements inside JavaScript and jQuery.
6. Save all three files and then open the HTML document in a web browser, as shown in Figure 16.3. You should see the Like, Send, and Comments fields added to the web page.

LISTING 16.1-html HTML Document That Adds the Web Page
01 <html>
02 <head>
03 <title>Hour 16-1</title>
04 <meta charset="utf-8" />
05 <script type="text/javascript" src="../js/jquery.min.js"></script>
06 <script type="text/javascript" src="js/hour1601.js"></script>
07 <link rel="stylesheet" type="text/css" href="css/hour1601.css" />
08 </head>
09 <body>
10 <div>
11 <div id="banner">Dayley Creations
12 <div id="like"></div>
13 </div><br>
14 <div id="leftNav">
15 <div class="navItem"><img src="images/lake.jpg" /></div>
16 <div class="navItem"><img src="images/tiger.jpg" /></div>
17 <div class="navItem"><img src="images/flower.jpg" /></div>
18 <div class="navItem"><img src="images/pool.jpg" /></div>
19 <div class="navItem"><img src="images/jungle.jpg" /></div>
20 </div>
21 <div id="content">
22 <div><img id="photo" src="images/lake.jpg" /''></div>
23 <div id="send"></div><br>
24 </div>
25 </div>
26 </body>
27 </html>
LISTING 16.1-js jQuery and JavaScript Loads the Facebook SDK and Adds the Social Elements
01 function addFBsdk() {
02 $("body").prepend('<div id="fb-root"></div>'),
03 if ($("#facebook-jssdk").length == 0){
04 var fbSDK = document.createElement("script"); fbSDK.id = 'facebook-jssdk';
05 fbSDK.src = "//connect.facebook.net/en_US/all.js#xfbml=1";
06 $("head").get(0).appendChild(fbSDK);
07 }
08 }
09 function addFBlike(href, element){
10 var like = $('<div class="fb-like"></div>'),
11 like.attr("data-href", href);
12 like.attr("data-width",400);
13 like.attr("data-layout","button_count");
14 like.attr("data-show-faces","true");
15 like.attr("data-font","arial");
16 element.append(like);
17 }
18 function addFBsend(href, element){
19 var like = $('<div class="fb-send"></div>'),
20 like.attr("data-href", href + "/" +element.children("img").attr("src"));
21 element.append(like);
22 }
23 function addFBcomment(href, element){
24 var like = $('<div class="fb-comments"></div>'),
25 like.attr("data-href", href);
26 like.attr("data-width", 400);
27 like.attr("data-num-posts", 2);
28 element.append(like);
29 }
30 $(document).ready(function(){
31 addFBsdk();
32 addFBlike("http://www.dayleycreations.com", $("#like"));
33 addFBsend("http://www.dayleycreations.com", $(".navItem"));
34 addFBcomment("http://www.dayleycreations.com", $("#content"));
35 $(".navItem img").click(function(){
36 $("#photo").attr("src", $(this).attr("src"));
37 });
38 });
LISTING 16.1-css CSS Code That Styles the Page
01 div { margin:0px; display:inline-block; float:left; text-align:center; }
02 p { margin:2px; }
03 #banner { border-radius: 15px 15px 0px 0px;
04 background-image: -moz-linear-gradient(center top , #88BBFF, #DDEEFF);
05 color:blue; height:100px; width:550px; font-size:60px; }
06 #leftNav { width:150px; }
07 .navItem { border:1px dotted; display:block; margin:3px; width:140px;}
08 .navItem img {width:80px; float:left; opacity:.5; }
09 .navItem img:hover { opacity:1; cursor:pointer; }
10 #like { float:right; margin-top:70px; margin-right:20px; }
11 #photo { width:400px; }
Adding Google Maps to Your Web Pages
An extremely important element of web pages can be a map that shows the location(s) of your business or resources. Google Maps makes it extremely easy to add maps that are interactive to your web pages.
To add Google Maps to your web pages, you will need to have an API access key. However, if you are following along with this book and using only the localhost webserver, a key is not required.
When implementing Google Maps on a nonlocal host domain, you need to go to the following location and follow the instructions to get the API key. The key is free as long as your usage remains low. https://developers.google.com/maps/documentation/javascript/tutorial
After you get a key, you will be able to use that key to load the Google Maps API using a <script> block similar to the one shown next:
<script type="text/javascript"
src="https://maps.googleapis.com/maps/api/js?key={YOUR_API_KEY}&sensor={TRUE_OR_FALSE}">
</script>
The sensor option specifies if your application uses a GPS or other type of sensor to determine the user’s location.
After the Google Maps API is loaded, you can add a map to your web page by adding a google.maps.Map object to <div> element, as shown next:
HTML code:
<div id="mapCanvas"></div>
JavaScript/jQuery Code:
var mapOptions = {
center: new google.maps.LatLng(-34.397, 150.644),
zoom: 6,
mapTypeId: google.maps.MapTypeId.SATELLITE
};
var map = new google.maps.Map($("#mapCanvas").get(0), mapOptions);
The Map() function accepts the HTML DOM element object that will contain the map as well as a mapOptions object. Table 16.1 describes the settings in the mapOptions object.

After the Map object is created, it is added to the <div> element. You can then use the Map object in JavaScript to directly control the behavior of the map. The Map object also includes events that fire when actions occur based on user interaction.
Google Map events are attached to Map objects using the following syntax:
google.maps.event.addListener(mapObject, event, function);
Google Map coordinates are specified by a google.maps.LatLng(x,y) object, where x and y define the latitude and longitude. For example:
var mapPosition = google.maps.LatLng(50.555, 1.3);
As an example, the following code attaches a center_changed event handler that sets the innerHTML of an element #coordinates with the current map center coordinates:
var map = new google.maps.Map($("#mapCanvas").get(0),
{center:new google.maps.LatLng(51,2),zoom:3,apTypeId:google.maps.MapTypeId.HYBRID });
google.maps.event.addListener(map, "center_changed", function(){
$("#coordinates").html(map.getCenter().toString());
});
Table 16.2 lists several of the methods, properties, and events that are attached to the Map object.

There is much more to the Google Maps API interface. You can find additional information at https://developers.google.com/maps/documentation/javascript/.
Try it Yourself: Adding Google Maps to a Web Page
1. In Aptana, create the hour16, hour16/js, and hour16/css folders, and then add the hour16/hour1602.html, hour16/js/hour1602.js, and hour16/css/hour1602.css files.
2. Add the code shown in Listing 16.2-html and Listing 16.2-css to the HTML and CSS files. These are basic HTML and CSS, with the exception that the following line is added before you load the page JavaScript so that the Google Maps library is loaded first.
07 <script src="http://maps.googleapis.com/maps/api/js?sensor=false"></script>
3. Open the hour1602.js file and add the .ready() shown in lines 34–39 of the Listing 16.2-js file. This function calls the addMap() init function that creates the maps on the page and then adds the event handlers to the zoom buttons and the add marker button.
4. Add the addMaps() function, shown next, to create the Map objects on the web page and add them to the mapArr array. The options for the map are coming from mapProp defined at the top in lines 3 and 4. Notice that each iteration through the loop increments the zoom value to make the maps progressively zoom in.
26 function addMaps(){
27 $(".map").each(function(){
28 var map = new google.maps.Map(this, mapProp)
29 google.maps.event.addListener(map, 'center_changed', pan);
30 mapArr.push(map);
31 mapProp.zoom += 3;
32 });
33 }
5. Add the pan() function shown next, which gets the current position of the map that is being changed using getCenter(). It then uses this position to adjust the center position of all maps.
05 function pan() {
06 var newPosition = this.getCenter();
07 if (newPosition !== position){
08 $("p").html(newPosition.toString());
09 position = newPosition;
10 for (var i=0; i<mapArr.length; i++){ mapArr[i].setCenter(position); }
11 }
12 return false;
13 }
6. Add the following zoom function that increments the current value of each of the maps using getZoom() and setZoom():
14 function zoom(value){
15 for (var i=0; i<mapArr.length; i++){ mapArr[i].setZoom(map.getZoom()+value); }
16 return false;
17 }
7. Add the following placeMarker() that creates a new google.maps.Marker() object on each of the maps based on the current center position.
18 function placeMarker(){
19 for (var i=0; i<mapArr.length; i++){
20 var markerInfo = { position: mapArr[i].getCenter(), map: mapArr[i],
21 visible:true, title:$("#markText").val() };
22 var marker = new google.maps.Marker(markerInfo);
23 }
24 return false;
25 }
8. Save all three files and then open the HTML document in a web browser, as shown in Figure 16.4. You should see the maps appear. As you pan on one, it should pan on all of them. You also should be able to use the custom Zoom button to zoom in or out on all of them. Then type some text into the text box and click the marker button; a new marker should be added to the map.
LISTING 16.2-html HTML Document That Adds the Web Page
01 <!DOCTYPE html>
02 <html>
03 <head>
04 <title>Hour 16-2</title>
05 <meta charset="utf-8" />
06 <script type="text/javascript" src="../js/jquery.min.js"></script>
07 <script src="http://maps.googleapis.com/maps/api/js?sensor=false"></script>
08 <script type="text/javascript" src="js/hour1602.js"></script>
09 <link rel="stylesheet" type="text/css" href="css/hour1602.css">
10 </head>
11 <body>
12 <div id="controls">
13 <img id="zoomin" src="images/in.png" />
14 <img id="zoomout" src="images/out.png" /><br>
15 <input id="markText" type="text" />
16 <img id="mark" src="images/marker.png" />
17 <p></p>
18 </div>
19 <div id="mainMap" class="map"></div>
20 <div id="smallMaps">
21 <div class="map"></div>
22 <div class="map"></div>
23 <div class="map"></div>
24 <div class="map"></div>
25 </div>
26 </body>
27 </html>

LISTING 16.2-js jQuery and JavaScript That Creates the Google Maps Elements and Controls Them
01 var mapArr = new Array();
02 var position;
03 var mapProp = { center:new google.maps.LatLng(51.508742,-0.120850),
04 zoom:3, mapTypeId:google.maps.MapTypeId.HYBRID };
05 function pan() {
06 var newPosition = this.getCenter();
07 if (newPosition !== position){
08 $("p").html(newPosition.toString());
09 position = newPosition;
10 for (var i=0; i<mapArr.length; i++){ mapArr[i].setCenter(position); }
11 }
12 return false;
13 }
14 function zoom(value){
15 for (var i=0; i<mapArr.length; i++){ mapArr[i].setZoom(map.getZoom()+value); }
16 return false;
17 }
18 function placeMarker(){
19 for (var i=0; i<mapArr.length; i++){
20 var markerInfo = { position: mapArr[i].getCenter(), map: mapArr[i],
21 visible:true, title:$("#markText").val() };
22 var marker = new google.maps.Marker(markerInfo);
23 }
24 return false;
25 }
26 function addMaps(){
27 $(".map").each(function(){
28 var map = new google.maps.Map(this, mapProp)
29 google.maps.event.addListener(map, 'center_changed', pan);
30 mapArr.push(map);
31 mapProp.zoom += 3;
32 });
33 }
34 $(document).ready(function(){
35 addMaps();
36 $("#zoomin").click(function(){ zoom(1);});
37 $("#zoomout").click(function(){ zoom(-1);});
38 $("#mark").click(placeMarker);
39 });
LISTING 16.2-css CSS Code That Styles the Page
1 div { display:inline-block; }
2 img { height:40px; border:3px ridge; border-radius:7px; padding:2px; }
3 .map {width:220px; height:220px; border:4px groove blue; border-radius:40px; }
4 #mainMap { width:400px; height:460px; }
5 #smallMaps { width:460px; height:460px; }
6 #controls { width:900px; }
Adding a Custom Google Search
As websites become more and more complex, the need to provide users with a way to quickly find what they are looking for becomes more critical. A simple way to do this is to add a custom Google search engine to the web page.
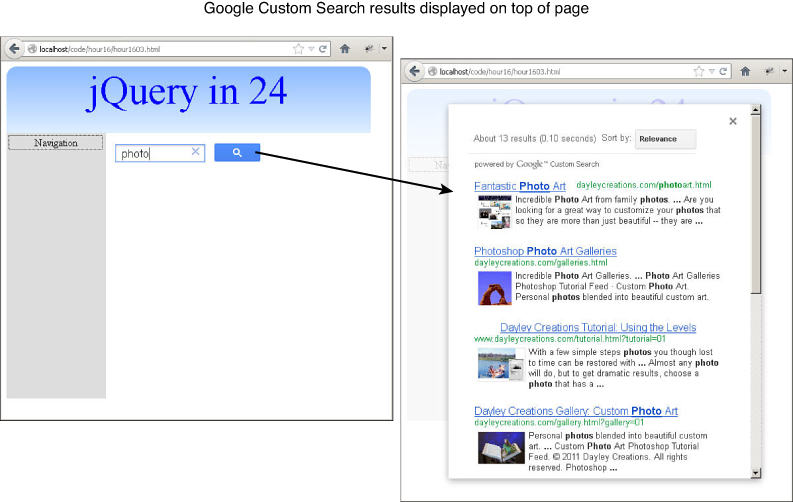
The custom Google search engine leverages the Google search technology to search your local web page. Google provides some simple controls with a text input and Search button, and then it automatically overlays the search results on top of your web page.
To get started, you will need to do the following:
1. Create a Google account if you do not already have one. An account can be created at
https://accounts.google.com/NewAccount
2. Go to the Google Custom Search page at the following address and click on a new search engine:
http://www.google.com/cse/manage/all
3. In the Sites to Search field, specify the URL(s) of your website and then give your site a name and click Create.
4. After you have created the custom engine, you will get a code snippet back similar to the following. You can use this code snippet to add the search controls to your website. You can get the custom control at any time by clicking the Get Code link in the Google Custom Search page.
<script>
(function() {
var cx = '####;
var gcse = document.createElement('script'), gcse.type = 'text/javascript';
gcse.async = true;
gcse.src = (document.location.protocol == 'https:' ? 'https:' : 'http:') +
'//www.google.com/cse/cse.js?cx=' + cx;
var s = document.getElementsByTagName('script')[0]; s.parentNode.insertBefore(gcse, s);
})();
</script>
<gcse:search></gcse:search>
This code is then placed in the actual HTML page where you want the search to appear. The code is basic JavaScript that loads the custom search engine JavaScript into a <script> element on the web page. The <gcse> tag ends up being replaced with the necessary HTML to implement the Google Custom Search by the Google API JavaScript.
Because you might prefer to work with jQuery, I’ve broken down the JavaScript from Google into a basic jQuery function shown next. This gives you more control as to when and how the search elements are added to the page:
function addCustomSearchEngine(){
var cx = "####";
var src = 'http:///www.google.com/cse/cse.js?cx=' + cx;
var search = $("<script></script");
search.attr("src", src).attr("async",true);
$("head").prepend(search);
}
Note
There are other customized options for the Google custom search engine that you can configure at the Google Custom Search page. You might prefer to turn off the ads displayed in the search results by clicking the Business Settings link. You also might want to enable searching for the entire web with a preference to your website.
The basic search is usually good enough for most applications. There is a lot more that you can do with the Google custom search engine and controls. For more information, you can visit https://developers.google.com/custom-search/v1/overview.
Try it Yourself: Adding Custom Google Search to a Web Page
1. In Aptana, create the hour16, hour16/js, and hour16/css folders, and then add the hour16/hour1603.html, hour16/js/hour1603.js, and hour16/css/hour1603.css files.
2. Add the code shown in Listing 16.3-html and Listing 16.3-css to the HTML and CSS files.
3. Open the hour1603.js file and add the following .ready() that calls the addCustomSearchEngine() function to load the Google Custom Search Engine library. It then prepends the <gcse> element to the #content element on the pages.
08 $(document).ready(function() {
09 addCustomSearchEngine();
10 $("#content").prepend("<gcse:search></gcse:search>");
11 });
4. Add the following addCustomSearchEngine() that loads the Google Search Engine library into a <script> element that gets added to <head>. You will need to fill in the value of cx from the ID that you got from Google when you created your own custom search engine:
01 function addCustomSearchEngine(){
02 var cx = "####";
03 var src = 'http:///www.google.com/cse/cse.js?cx=' + cx;
04 var search = $("<script></script");
05 search.attr("src", src).attr("async",true);
06 $("head").prepend(search);
07 }
5. Save all three files and then open the HTML document in a web browser, as shown in Figure 16.5. You should be able to search your website to find items using the new search control.
LISTING 16.3-html HTML Document That Adds the Web Page
01 <!DOCTYPE html>
02 <html>
03 <head>
04 <title>Hour 16-3</title>
05 <meta charset="utf-8" />
06 <script type="text/javascript" src="../js/jquery.min.js"></script>
07 <script type="text/javascript" src="js/hour1603.js"></script>
08 <link rel="stylesheet" type="text/css" href="css/hour1603.css">
09 </head>
10 <body>
11 <div>
12 <div id="banner">jQuery in 24</div><br>
13 <div id="leftNav"><span class="navItem">Navigation</span></div>
14 <div id="content">
15 </div>
16 </div>
17 </body>
18 </html>
LISTING 16.3-js jQuery and JavaScript Implements the Google Custom Search Code
01 function addCustomSearchEngine(){
02 var cx = "####";
03 var src = 'http:///www.google.com/cse/cse.js?cx=' + cx;
04 var search = $("<script></script");
05 search.attr("src", src).attr("async",true);
06 $("head").prepend(search);
07 }
08 $(document).ready(function() {
09 addCustomSearchEngine();
10 $("#content").prepend("<gcse:search></gcse:search>");
11 });
LISTING 16.3-css CSS Code That Styles the Page
1 div { margin:0px; display:inline-block; float:left; text-align:center; }
2 #banner { border-radius: 15px 15px 0px 0px;
3 background-image: -moz-linear-gradient(center top , #88BBFF, #DDEEFF);
4 color:blue; height:100px; width:550px; font-size:60px; }
5 #leftNav { width:150px; background-color:#DDDDDD; height:400px; }
6 .navItem { border:1px dotted; display:block; margin:3px; width:140px;}
Adding Twitter Elements to Your Web Pages
An important part of web pages today is the social interaction available. Twitter is one of the most prolific social mechanisms because of the simplicity. It is almost expected today that if a users desires, they can tweet about experiences interacting directly with websites as they are using them.
Twitter provides some great controls that are extremely easy to implement with minimal understanding of JavaScript. Specifically, you can add Tweet and Follow buttons as well as timeline displays and tweet displays. This allows you to easily incorporate Twitter elements to keep your website up to date.
Adding the Twitter JavaScript API Library
To add Twitter controls to your web page, you need to load the Twitter JavaScript API library. Twitter provides the following code snippet that is added to the beginning of the <body> element of the web page:
<script>!function(d,s,id){
var js,fjs=d.getElementsByTagName(s)[0];
if(!d.getElementById(id)){
js=d.createElement(s);
js.id=id;
js.src="//platform.twitter.com/widgets.js";
fjs.parentNode.insertBefore(js,fjs);
}
}(document,"script","twitter-wjs");</script>
You might want to use the following jQuery version:
function addTwitter(){
if ( $("#twitter-wjs").length == 0 ) {
var twitter = $("<script></script");
twitter.attr("id", "twitter-wjs");
twitter.attr("src", "https://platform.twitter.com/widgets.js");
$("head").append(twitter);
}
}
You can learn more about the Twitter API as well as adding Twitter elements at the following location:
Adding a Tweet Button
To add a Tweet button to a web page, you need to add an <a> element with the class="twitter-share-button". The Twitter JavaScript library adds the necessary interactions behind the scenes. When users click the Tweet button, it prompts them to log in if they haven’t already, and then it displays a Tweet pop-up dialog that allows the user to send the tweet about your web page.
You can specify several additional attributes listed in Table 16.3.

The following shows an example of a basic Tweet button element:
<a href="https://twitter.com/share" class="twitter-share-button"
data-url="https://dev.twitter.com" data-via="bwdayley"
data-lang="en">Tweet</a>
Adding a Follow Button
To add a Follow button to a web page, you need to add an <a> element with the class="twitter-follow-button". The Twitter JavaScript library adds the necessary interactions behind the scenes. When users click the Follow button, they are prompted to log in if they haven’t already, and then it adds the user’s Twitter account to the following list of the specified accounts in the href.
You can specify several additional attributes listed in Table 16.4.

The following shows an example of a basic Follow button element:
<a href="https://twitter.com/bwdayley" class="twitter-follow-button"
data-show-count="false" data-lang="en">Follow @bwdayley</a>
Adding Embedded Tweets
Another useful feature of the Twitter JavaScript API is the capability to embed a specific tweet in your website. This allows users visiting the website to retweet the embedded tweet for those following them.
To embed the tweet, you need to get a <blockquote> string directly from Twitter by clicking the Details link at the bottom of the tweet and then clicking the Embed This Tweet link, as shown in Figure 16.6.

The following shows a code snippet of the embedded tweet:
<blockquote class="twitter-tweet">
<p>New Update.
<a href="http://t.co/n9Pfzfsc"
title="http://dayleycreations.com">dayleycreations.com</a> via @
<a href="https://twitter.com/bwdayley">bwdayley</a>
</p>
— Brad Dayley (@bwdayley)
<a href="https://twitter.com/bwdayley/status/291618492191477761"
data-datetime="2013-01-16T18:50:41+00:00">January 16, 2013</a>
</blockquote>
<script async src="//platform.twitter.com/widgets.js" charset="utf-8"></script>
If you have already embedded the Twitter API in the web page, you can ignore the <script> element. The <blockquote> code element is added to the web page wherever you would like the embedded tweet to be rendered.
Adding Embedded Timelines
Another useful feature of the Twitter JavaScript API is the capability to embed a timeline in your website. A timeline, shown in Figure 16.7, is an interactive control that lists tweets and allows users to reply, retweet, and add favorites. This is a great feature for websites that need a good social presence because the user never needs to leave the web page.

To embed the timeline, you need to get an <a> string directly from Twitter by creating a timeline widget at the following location. Click the Create New button and then click the user timeline tab to create the widget: https://twitter.com/settings/widgets
In the bottom of the timeline widget window, you will see a text box with text similar to the following:
<a class="twitter-timeline" href="https://twitter.com/bwdayley"
data-widget-id="291668761717653506">Tweets by @bwdayley</a>
<script>!function(d,s,id){
var js,fjs=d.getElementsByTagName(s)[0];
if(!d.getElementById(id)){js=d.createElement(s);
js.id=id;js.src="//platform.twitter.com/widgets.js";
fjs.parentNode.insertBefore(js,fjs);
}
}(document,"script","twitter-wjs");</script>
If you have already embedded the Twitter API in the web page, you can ignore the <script> element. The <a> code element is added to the web page wherever you would like the embedded tweet to be rendered.
Try it Yourself: Adding Twitter Elements to a Web Page
1. In Aptana, create the hour16, hour16/js, and hour16/css folders, and then add the hour16/hour1604.html, hour16/js/hour1604.js, and hour16/css/hour1604.css files.
2. Add the code shown in Listing 16.4-html and Listing 16.4-css to the HTML and CSS files. You will end up replacing some of the code shown in the listing with your own tweet code.
3. Open the hour1604.html hour and modify the code in line 13 to include your own Twitter account.
4. Log in to Twitter and find a tweet that you would like to embed in the web page; then click Details and then Embed to get the <blockquote> code for the tweet. Replace the block code in lines 17–23 with your own block of code.
5. Go to the following location and create a new timeline widget. Get the <a> link code for the widget and replace the <a> link code in lines 26 and 27.
https://twitter.com/settings/widgets
6. Open the hour1604.js file and add the following .ready() and addTwitter() functions that will load the Twitter library code into a <script> element and add it to the <head>:
01 function addTwitter(){
02 if ( $("#twitter-wjs").length == 0 ) {
03 var twitter = $("<script></script");
04 twitter.attr("id", "twitter-wjs");
05 twitter.attr("src", "https://platform.twitter.com/widgets.js");
06 $("head").append(twitter);
07 }
08 }
...
17 $(document).ready(function() {
18 addTwitter();
19 addTweet();
20 });
7. Add the following addTweet() function that dynamically builds the Tweet button and adds it to the #tweet page element. You should replace the data-url, data-via, and data-related values with values from your own Twitter account.
09 function addTweet(){
10 var tweet = $('<a href="https://twitter.com/share" class="twitter-share-button">Tweet</a>'),
11 tweet.attr("data-url", "http://dayleycreations.com");
12 tweet.attr("data-via", "bwdayley");
13 tweet.attr("data-related", "bwdayley:Dayley Creations");
14 tweet.attr("data-lang", "en");
15 $("#tweet").append(tweet);
16 }
8. Save all three files and then open the HTML document in a web browser, as shown in Figure 16.8. You should be able to tweet, follow, and see the tweet and timeline in the window.

LISTING 16.4-html HTML Document That Adds the Web Page and Implements Many of the Twitter Elements
01 <!DOCTYPE html>
02 <html>
03 <head>
04 <title>Hour 16-4</title>
05 <meta charset="utf-8" />
06 <script type="text/javascript" src="../js/jquery.min.js"></script>
07 <script type="text/javascript" src="js/hour1604.js"></script>
08 <link rel="stylesheet" type="text/css" href="css/hour1604.css">
09 </head>
10 <body>
11 <div id="tweet" class="header"><p>Tweet Button</p></div>
12 <div class="header"><p>Follow Button</p>
13 <a href="https://twitter.com/bwdayley" class="twitter-follow-button"
14 data-show-count="true" data-lang="en">Follow @bwdayley</a>
15 </div>
16 <div class="header"><p>Display Existing Tweet</p>
17 <blockquote class="twitter-tweet"><p>Hour 13-2
18 <a href="http://t.co/n9Pfzfsc" title="http://dayleycreations.com">
19 dayleycreations.com</a>via @<a href="https://twitter.com/bwdayley">
20 bwdayley</a></p>—Brad Dayley (@bwdayley)
21 <a href="https://twitter.com/bwdayley/status/291612551190564865"
22 data-datetime="2013-01-16T18:27:04+00:00">January 16, 2013</a>
23 </blockquote>
24 </div>
25 <div class="header"><p>Display TimeLine</p>
26 <a class="twitter-timeline" href="https://twitter.com/bwdayley"
27 data-widget-id="291617670590251008">Tweets by @bwdayley</a>
28 </div>
29 </body>
30 </html>
LISTING 16.4-js jQuery and JavaScript Loads the Twitter Library and Dynamically Adds a Tweet Button
01 function addTwitter(){
02 if ( $("#twitter-wjs").length == 0 ) {
03 var twitter = $("<script></script");
04 twitter.attr("id", "twitter-wjs");
05 twitter.attr("src", "https://platform.twitter.com/widgets.js");
06 $("head").append(twitter);
07 }
08 }
09 function addTweet(){
10 var tweet = $('<a href="https://twitter.com/share" class="twitter-share-button">Tweet</a>'),
11 tweet.attr("data-url", "http://dayleycreations.com");
12 tweet.attr("data-via", "bwdayley");
13 tweet.attr("data-related", "bwdayley:Dayley Creations");
14 tweet.attr("data-lang", "en");
15 $("#tweet").append(tweet);
16 }
17 $(document).ready(function() {
18 addTwitter();
19 addTweet();
20 });
LISTING 16.4-css CSS Code That Styles the Page
1 .header {display:inline-block; border:1px solid black; border-radius:5px; margin:5px; }
2 .header p{ background-image: -moz-linear-gradient(center top , #B1B1B1, #FFFFFF);
3 margin:0px; padding:3px; text-align:center; width:500px; font-size:20px;
4 border-bottom:1px solid; }
Adding Flickr Images to Your Website
One common external service that is integrated into web pages are Flickr photo streams. Flickr provides a nice interface that provides the photo stream information in an easily consumable JSON object via a JSONP request.
It is easy to implement a Flickr stream using the jQuery AJAX request $.getJSON() to make the JSONP request. All you need to do is make the AJAX request to Flickr and specify the feed id. The following shows a couple of examples of using the Flickr API: one to get a photos_public feed and the other to get a groups_pool feed.
$.getJSON(url, "http://api.flickr.com/services/feeds/photos_public.gne?
341168865@N08&lang=en-us&format=json&jsoncallback=?");
$.getJSON(url, "http://api.flickr.com/services/feeds/groups_pool.gne?
650323@N24&lang=en-us&format=json&jsoncallback=?");
To get the id attribute for the Flickr API request, go to the following location and enter the URL of the stream, as shown in Figure 16.9:

The following shows an example of the JSON object returned by the Flickr request:
{
"title": "Uploads from Hubble Heritage",
"link": "http://www.flickr.com/photos/hubble-heritage/",
"description": "",
"modified": "2012-12-19T14:26:47Z",
"generator": "http://www.flickr.com/",
"items": [
{
"title": "Planetary Nebula NGC 5189",
"link": "http://www.flickr.com/photos/hubble-heritage/8286901075/",
"media": {"m":"http://farm9.staticflickr.com/8199/8286901075_d9f154b8dd_m.jpg"},
"date_taken": "2012-12-19T09:11:05-08:00",
"description": " <p>...</p>",
"published": "2012-12-19T14:26:47Z",
"author": "[email protected] (Hubble Heritage)",
"author_id": "34168865@N08",
"tags": "heritage v nebula mus hubble "
},
{
Try it Yourself: Adding a Flickr Stream
1. In Aptana, create the hour16, hour16/js, and hour16/css folders, and then add the hour16/hour1605.html, hour16/js/hour1605.js, and hour16/css/hour1605.css files.
2. Add the code shown in Listing 16.5-html and Listing 16.5-css to the HTML and CSS files—some basic HTML and CSS. Notice on lines 14 and 15 that an onclick handler is added that passes the type and ID of the Flickr streams:
14 <p onclick="setImages('photos_public', '34168865@N08')">Hubble</p>
15 <p onclick="setImages('groups_pool', '650323@N24')">National Geographic</p>
3. Open the hour1605.js file and add the .ready() function shown in lines 18–20.
4. Add the following setImages() function that will be called when the user clicks the left nav items. This function makes a JSONP request to Flickr to download the stream and calls the updateImages() handler function on completion.
13 function setImages(feedType, id){
14 var url = "http://api.flickr.com/services/feeds/" + feedType + ".gne?id=" + id +
15 "&lang=en-us&format=json&jsoncallback=?";
16 $.getJSON(url, updateImages);
17 }
5. Add the following updateImages() AJAX completion handler that reads the response from Flickr, updates the page header #feedName, and then iterates through the items array to create the image elements on the page.
01 function updateImages(data){
02 $("#images").children("div").remove();
03 $("#feedName").html(data.title)
04 for (i=0; i<data.items.length; i++){
05 var imageInfo =data.items[i];
06 var img = $('<img />').attr("src", (imageInfo.media.m).replace("_m.jpg", "_s.jpg"));
07 var title = $("<p></p>").html(imageInfo.title+" ");
08 var link = $("<a></a>").attr("href", imageInfo.link).append(img);
09 var div = $("<div class="item"></div>").append(link,title);
10 $("#images").append(div);
11 }
12 }
6. Save all three files and then open the HTML document in a web browser, as shown in Figure 16.10. You should be able to click the left navigation items and load both the Hubble Heritage and National Geographic Group streams.

FIGURE 16.10 Flickr feed viewer that dynamically downloads a Flickr photo stream and updates the page with the images.
LISTING 16.5-html HTML Document That Adds the Web Page
01 <!DOCTYPE html>
02 <html>
03 <head>
04 <title>Hour 16-5</title>
05 <meta charset="utf-8" />
06 <script type="text/javascript" src="../js/jquery.min.js"></script>
07 <script type="text/javascript" src="js/hour1605.js"></script>
08 <link rel="stylesheet" type="text/css" href="css/hour1605.css">
09 </head>
10 <body>
11 <div id="feedName">Select Feed</div>
12 <div>
13 <div id="leftNav">
14 <p onclick="setImages('photos_public', '34168865@N08')">Hubble</p>
15 <p onclick="setImages('groups_pool', '650323@N24')">National Geographic</p>
16 </div>
17 <div id="images">
18 </div>
19 </div>
20 </body>
21 </html>
LISTING 16.5-js jQuery and JavaScript That Interacts with Flickr
01 function updateImages(data){
02 $("#images").children("div").remove();
03 $("#feedName").html(data.title)
04 for (i=0; i<data.items.length; i++){
05 var imageInfo =data.items[i];
06 var img=$('<img />').attr("src", (imageInfo.media.m).replace("_m.jpg", "_s.jpg"));
07 var title = $("<p></p>").html(imageInfo.title+" ");
08 var link = $("<a></a>").attr("href", imageInfo.link).append(img);
09 var div = $("<div class="item"></div>").append(link,title);
10 $("#images").append(div);
11 }
12 }
13 function setImages(feedType, id){
14 var url = "http://api.flickr.com/services/feeds/" + feedType + ".gne?id=" + id +
15 "&lang=en-us&format=json&jsoncallback=?";
16 $.getJSON(url, updateImages);
17 }
18 $(document).ready(function(){
19 $("#leftNav").children("p:first").click();
20 });
LISTING 16.5-css CSS Code That Styles the Page
01 body { background-color: black;}
02 div { display:inline-block; }
03 .item {border:3px ridge white; box-shadow: 5px 5px 5px #888888; margin:10px; }
04 p, #feedName { background-image: -moz-linear-gradient(center top , #B1B1B1, #FFFFFF);
05 margin:0px; padding:3px; text-align:center; width:100px; font-size:10px;
06 border-bottom:1px solid; }
07 img { width:100px; }
08 #images { background-color:black; padding:20px; width:550px; height:480px;
09 overflow-y:scroll; border:3px groove;}
10 #leftNav { width:106px; height:440px; vertical-align:top; }
11 #leftNav p { font-size:18px; cursor:pointer; }
12 #feedName { width:700px; font-size:25px; }
Summary
In this hour, you learned how to incorporate external services into your web pages. You got a chance to add Facebook Likes and Comments. You also got to play around with adding Google Maps and dynamically controlling them. Next, you implemented some of the Twitter elements to give your web pages a better social appeal. Finally, you implemented some code to apply Flickr feeds directly into your web page.
Q&A
Q. What other external services should I look at?
A. If you are planning to implement any kind of e-commerce on your web pages, look into Checkout by Amazon. There are a lot of good tools there with a name that customers trust.
Q. You showed an example of converting the generated HTML tags from Google, Facebook, and Twitter into JavaScript and jQuery functions. Is it better to use the original scripts or convert them?
A. That is totally up to you. They make the scripts so that web developers with absolutely no JavaScript or jQuery experience can still implement them. They are a bit awkward that way, so you can revise them so you can include the code in your general site JavaScript files.
Workshop
The workshop consists of a set of questions and answers designed to solidify your understanding of the material covered in this hour. Try to answer the questions before looking at the answers.
Quiz
1. How do you define a <div> element as a Facebook Like button?
2. How do you detect that the center position of a Google Map has changed?
3. How do you specify related Twitter accounts in a Tweet element?
4. What AJAX method should you use to get the Flickr photo feeds, and why?
5. How do you get the current center position of a Google Map object?
Quiz Answers
1. Set class="fb-like".
2. Add a center_changed listener using google.maps.event.addListener().
3. Set the data-related attribute of the element to the related account.
4. .getJSON() because the Flickr feed is a JSONP request.
5. Use .getCenter().
Exercises
1. Open up the code in Listing 16.2 and modify the Google Maps example. Add a <select> element, and when the Mark button is clicked, use jQuery to add a new <option> element to the <select>. Use the .data() method to attach the coordinates of the position of the mark to the <options> jQuery object. Then, add a change event handler for the select that will set the center of the Google Maps to the position attached to the selected <option>.
2. Go to Flickr and find a new photo stream. Then go to idgettr.com and find the ID of the photo stream. Add a new left nav item to the example in Listing 16.5 that links to that photo stream. You will need to determine whether to use the photos_public or groups_pool.gne location type.
3. Go to the following URL and read through the page. Then use the web form to generate code to recommend some of the other examples in this chapter.
https://developers.facebook.com/docs/reference/plugins/recommendations/