
Hour 14. Creating Advanced Web Page Elements
What You’ll Learn in This Hour:
![]() Creating an image gallery with slider controls
Creating an image gallery with slider controls
![]() Adding sorting to table elements
Adding sorting to table elements
![]() Adding filtering to table elements
Adding filtering to table elements
![]() How to create a multitype tree view
How to create a multitype tree view
![]() How to implement custom dialogs
How to implement custom dialogs
![]() Creating visual elements using basic HTML and jQuery
Creating visual elements using basic HTML and jQuery
![]() How to use jQuery to create dynamic sparklines
How to use jQuery to create dynamic sparklines
In this hour, you have some fun creating some more advanced page elements. The purpose of this hour is to give you a chance to apply everything that you have learned so far in this book in some more advanced ways. The elements you build in this hour include an image gallery, interactive table, tree view, overlays, equalizer, and sparklines.
The following sections are written as examples that first explain some of the concepts used in the advanced elements; then you step through implementing them yourself. You will be able to apply the concepts learned in this chapter to implement a variety of types of advanced elements in your own web pages.
Adding an Image Gallery
One of the most visually interactive components of web pages are image galleries. An image is truly worth a thousand words. Images allow users to make decisions faster than any other type of visual element. The best way to apply images in allowing users to make decisions is to provide an interactive gallery.
An interactive gallery should enable users to quickly scan through several images and then easily select one to lead to the next step on the web page. Therefore, the necessary components are image thumbnails and controls. The thumbnails should be small versions of the original image that allow you to provide several options to select from at a time. Controls are whatever you apply to navigate through the thumbnails.
The most effective method of implementing an image gallery is to create a slider that contains the thumbnails with arrows that slide through the thumbnails until the user finds and clicks the desired image. Sliders are a good choice because they can be implemented in vertical or horizontal fashion to fit the design of the web page.
To implement the slider, you create a container <div> element that has a fixed size and hidden overflow, then a child <div> element that contains all the thumbnail images. The position of the child <div> can then be adjusted to reveal different sets of the images in the slider. The following section describes that process.
Try it Yourself: Adding a Slider-Based Image Gallery
1. In Aptana, create the hour14, hour14/js, hour14/css, and hour14/images folders, and then add the hour14/hour1401.html, hour14/js/hour1401.js, and hour14/css/hour1401.css files. You will also need to copy the images from the book’s website at code/hour14/images to the hour14/images folder in Aptana.
2. Add the code shown in Listing 14.1-html and Listing 14.1-css to the HTML and CSS files. The HTML code lays out a set of <div> elements that will contain the image slider, control buttons, and the displayed image. The CSS code styles the images and the <div> elements. Specifically, notice the following lines. These lines define the slide selector area with a specific width with hidden overflow, a child <div> area that contains all the image elements, and the look of the images themselves.
06 #selector { max-width:640px; height:140px; overflow-x:hidden; overflow-y:hidden; }
07 #imageSlide { position:relative; top:0px; left: 0px; height:100px; }
08 #imageSlide img {
09 height:100px; opacity:.6; vertical-align:top; margin:10px;
10 border:3px ridge white; box-shadow: 5px 5px 5px #888888; }
3. Open the hour1401.js file and add a basic .ready() function that you will use to implement all the handlers to handle the interactions.
4. Add the following lines to add mouseenter and mouseleave event handlers to the #left and #right elements to provide a hover effect.
35 $("#left").mouseenter(function(){ slide(50); });
36 $("#left").mouseleave(function(){ $("#imageSlide").stop(true); return false; });
37 $("#right").mouseenter(function(){ slide(-50); });
38 $("#right").mouseleave(function(){ $("#imageSlide").stop(true); return false; });
5. Add the following lines that will add a hover animation effect for the thumbnails in the #imageSlide element. The hover effect animates increasing the opacity and size for images that are hovered over to give the user an indication that the item is clickable and which one is selected. A click handler is also added so that when the user clicks a thumbnail, it sets the main image.
39 $("#imageSlide img").mouseenter(function(){
40 $(this).stop(true).animate({height:120, opacity:1},500); return false; });
41 $("#imageSlide img").mouseleave(function(){
42 $(this).stop(true).animate({height:100, opacity:.5},500); return false; });
43 $("#imageSlide img").click(setPhoto);
6. Add the following line that calls the click() handler on the first thumbnail image to initially select a main image:
44 $("#imageSlide img:first").click();
7. Add the following setPhoto() click handler that animates changing the main image. Notice that the code fades the image out and then back in. Also, because the aspect ratios of the images are not all the same, the aspect ratio of the thumbnail is used to determine whether to set the height or width property for the image to fit properly.
23 function setPhoto(){
24 var newPhoto = $(this).attr("src");
25 var horizontal = (minHorizontalRatio > $(this).height()/$(this).width());
26 $("#photo img").stop(true).fadeTo(500, .1, "linear", function (){
27 $("#photo img").attr("src", newPhoto); });
28 if (horizontal) { $("#photo img").css({width:600,height:"auto"}) }
29 else { $("#photo img").css({width:"auto",height:400}) }
30 $("#photo img").fadeTo(500, 1);
31 return false;
32 }
8. Add the following slide() code that handles the sliding of the thumbnail images. Basically, this code determines where the new left position of the #imageSlide element should be. When the slide is all the way to the left, the left position is 0; when it is all the way to the right, the left position is set to a negative value clear off the web page so that only the right edge of the slide is visible.
12 function slide(value){
13 var oldLeft = sliderLeft;
14 sliderLeft = sliderLeft + value;
15 if (sliderLeft >= 0) { sliderLeft = 0; }
16 if (sliderLeft <= sliderMax) { sliderLeft = sliderMax; }
17 if(oldLeft != sliderLeft) {
18 $("#imageSlide").animate({left:sliderLeft}, 300, 'linear', function(){
19 slide(value); });
20 }
21 return false;
22 }
9. Add the initialization function addImages() shown in lines 3–11 and the addImages() call in line 34 of Listing 14.1-js. This code dynamically adds a set of image elements to the #imageSlide element.
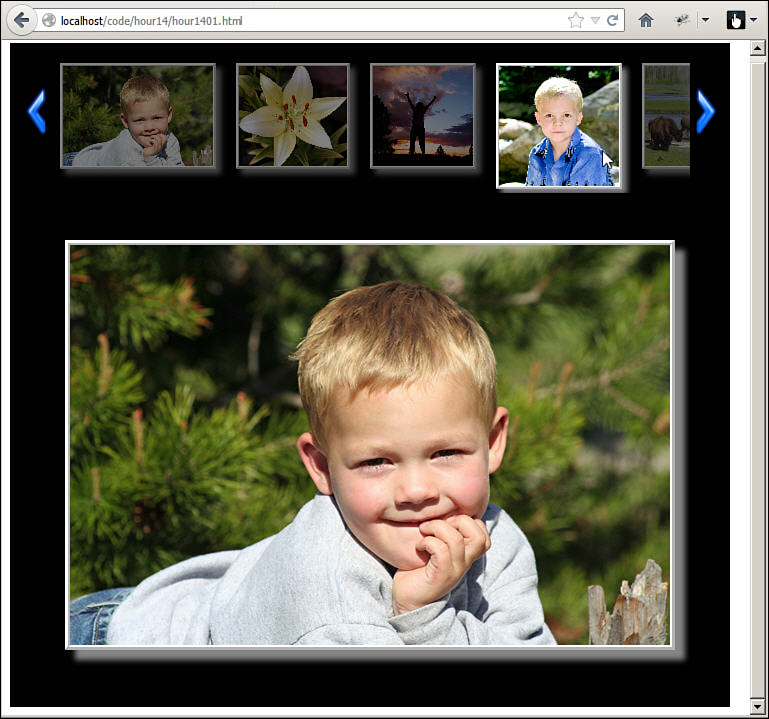
10. Save all three files and then open the HTML document in a web browser, as shown in Figure 14.1. You should see the thumbnail slider and be able to navigate through it by hovering over the arrows. When you click a thumbnail image, the main image should change.
LISTING 14.1-html HTML Document That Implements the Slider, Control, and Image Elements
01 <!DOCTYPE html>
02 <html>
03 <head>
04 <title>Hour 14-1</title>
05 <meta charset="utf-8" />
06 <script type="text/javascript" src="../js/jquery.min.js"></script>
07 <script type="text/javascript" src="js/hour1401.js"></script>
08 <link rel="stylesheet" type="text/css" href="css/hour1401.css">
09 </head>
10 <body>
11 <div id="viewer">
12 <div id="left"><img src="images/left.png" /></div>
13 <div id="selector">
14 <div id="imageSlide"></div>
15 </div>
16 <div id="right"><img src="images/right.png" /></div><br>
17 <div id="photo"><img src="" /></div>
18 </div>
19 </body>
20 </html>
LISTING 14.1-js jQuery and JavaScript Code Implements the Mouse Event Handlers for the Image Slider Controls and Thumbnails
01 var sliderMax = sliderWidth = sliderLeft = 0;
02 var minHorizontalRatio = 400/600;
03 function addImages(){
04 var images = ["boy", "flower", "sunset", "bison", "canyon", "falls", "peak"];
05 for (i in images){
06 $("#imageSlide").append('<img src="images/'+ images[i] + '.jpg" />'), }
07 $("#imageSlide img").each(function(){ sliderWidth += $(this).width() + 26; });
08 sliderWidth += 40;
09 $("#imageSlide").width(sliderWidth);
10 sliderMax = $("#selector").width() - sliderWidth;
11 }
12 function slide(value){
13 var oldLeft = sliderLeft;
14 sliderLeft = sliderLeft + value;
15 if (sliderLeft >= 0) { sliderLeft = 0; }
16 if (sliderLeft <= sliderMax) { sliderLeft = sliderMax; }
17 if(oldLeft != sliderLeft) {
18 $("#imageSlide").animate({left:sliderLeft}, 300, 'linear', function(){
19 slide(value); });
20 }
21 return false;
22 }
23 function setPhoto(){
24 var newPhoto = $(this).attr("src");
25 var horizontal = (minHorizontalRatio > $(this).height()/$(this).width());
26 $("#photo img").stop(true).fadeTo(500, .1, "linear", function (){
27 $("#photo img").attr("src", newPhoto); });
28 if (horizontal) { $("#photo img").css({width:600,height:"auto"}) }
29 else { $("#photo img").css({width:"auto",height:400}) }
30 $("#photo img").fadeTo(500, 1);
31 return false;
32 }
33 $(document).ready(function(){
34 addImages();
35 $("#left").mouseenter(function(){ slide(50); });
36 $("#left").mouseleave(function(){ $("#imageSlide").stop(true); return false; });
37 $("#right").mouseenter(function(){ slide(-50); });
38 $("#right").mouseleave(function(){ $("#imageSlide").stop(true); return false; });
39 $("#imageSlide img").mouseenter(function(){
40 $(this).stop(true).animate({height:120, opacity:1},500); return false; });
41 $("#imageSlide img").mouseleave(function(){
42 $(this).stop(true).animate({height:100, opacity:.5},500); return false; });
43 $("#imageSlide img").click(setPhoto);
44 $("#imageSlide img:first").click();
45 });
LISTING 14.1-css CSS Code That Styles the Images and Controls
01 div { display:inline-block;}
02 #viewer { background-color:black; border:10px solid black; }
03 #right, #left {width:30px; height:100px; float:left; color:white; }
04 #right { float:right; }
05 #right img, #left img { margin-top:30px; width:32px; height:56px; }
06 #selector { max-width:640px; height:140px; overflow-x:hidden; overflow-y:hidden; }
07 #imageSlide { position:relative; top:0px; left: 0px; height:100px; }
08 #imageSlide img {
09 height:100px; opacity:.6; vertical-align:top; margin:10px;
10 border:3px ridge white; box-shadow: 5px 5px 5px #888888; }
11 #photo {
12 height:500px; width:700px;
13 display:table-cell; vertical-align:middle; text-align:center;
14 }
15 #photo img { border:5px ridge white; box-shadow: 10px 10px 5px #888888;}
Implementing Tables with Sorting and Filters
Tables are basic HTML. You should already be familiar with the concepts of adding tables with rows that include one or more <th> or <td> elements that provide column values. Tables are a great way to present data that can be organized into columns or rows.
For simple amounts of data, a basic static HTML table is adequate. But, what do you do if there is a lot of data in the table? Some web pages scroll on and on with tabular data. They are a pain to navigate, and in the end it’s easier to use the web browser search capability to try to find what you are looking for.
One solution to this is to implement sorting and filtering in server-side scripts via AJAX request. Occasionally that is the best method when dealing with extremely large amounts of data stored in a database or extremely complex filtering algorithms. However, for most web pages, it is overkill and requires a bunch of slow server requests that make the web page interaction disjointed.
A much better approach is to add filtering and sorting to those large tables directly in jQuery and JavaScript. That allows the user to filter the data down to a specific set and then order by columns very quickly. The page flow is much smoother, and no external server requests are required. The following section takes you through the process of implementing column sorting and filtering to a table.
Try it Yourself: Creating an Interactive Table with Sorting and Filtering
1. In Aptana, create the hour14/hour1402.html, hour14/js/hour1402.js, and hour14/css/hour1402.css files.
2. Add the code shown in Listing 14.2-html and Listing 14.2-css to the HTML and CSS files. The HTML code defines the table and headers; the body will be added dynamically. The CSS code styles the table elements. Notice that the following lines of CSS define background images that will be used to indicate that the column is sortable, sorted ascending or sorted descending. The state of the column can then be changed by switching classes to .ascending/.descending. A search icon also is added as a background image to the <input> element to indicate its purpose:
14 input { height:20px; width: 20px; border-radius:15px; padding: 0 7px 2px 25px;
15 background:url("../images/search.png") no-repeat scroll left bottom 0 #FFFFFF;
16 background-size:20px 20px;
17 }
18 input:focus { width:100px; }
19 span { background:url("../images/sort.png") no-repeat scroll left;
20 background-size:20px 20px;
21 padding: 0 7px 2px 25px;
22 }
23 .ascending{ background:url("../images/down.png") no-repeat scroll left;
24 background-size:20px 20px;
25 }
26 .descending{ background:url("../images/up.png") no-repeat scroll left;
27 background-size:20px 20px;
28 }
3. Open the hour1402.js file and the following .ready() function that will populate the table data, and add the sorting and filter handlers to the <th> elements. Notice that you use the jQuery .data() method to store the order and indicate whether the column data type is numeric. You also need to the add the randInt() and buildData() functions shown in lines 36–46 of Listing 14.2-js that will populate the table data:
47 $(document).ready(function(){
48 buildData();
49 $("th").each(function(i) {
50 var header = $(this);
51 header.data({numeric:header.hasClass("numeric"), order:-1});
52 header.children("span").click(function(){ sortColumn(header, i); });
53 var filter = $('<input type="text" />'),
54 filter.keyup(function(){ filterColumn(filter, i); });
55 header.append(filter);
56 });
57 });
4. Add the following keyup event handler filterColumn() that will filter the column based on the text typed in the input for that column. The input and column arguments are passed to the handler in line 54. The .each() method is used to get the cell value of the specified column for each row. For numeric columns, if the value is less than the input value, the row is hidden. For string columns, the row is hidden if the string value of input is not found in the string value of the cell:
26 function filterColumn(input, column){
27 $("tbody tr").show().each(function(){
28 var header = $("th:eq("+ column +")");
29 var filterVal = input.val();
30 var rowVal = this.cells[column].innerHTML;
31 if(header.data("numeric") ){
32 if(parseFloat( filterVal ) > parseFloat( rowVal )) { $(this).hide(); }}
33 else {if(rowVal.indexOf(filterVal) < 0) { $(this).hide(); }}
34 });
35 }
5. Add the following compare() function that will accept two row elements, a and b, a column number, a numeric flag, and a sort order value. The code compares the column value of row a with row b and returns the correct sorting value based on whether the cell value is bigger, smaller, or equal.
04 function compare(a, b, column, numeric, order){
05 var aValue = a.cells[column].innerHTML;
06 var bValue = b.cells[column].innerHTML;
07 if (numeric) { aValue = parseFloat(aValue );
08 bValue = parseFloat(bValue ); }
09 if (aValue < bValue) return order;
10 if (aValue > bValue) return -order;
11 return 0;
12 }
6. Add the following click handler sortColumn() that will sort the column when the user clicks the column heading. The handler uses the compare() function to sort the table rows and then appends them back to the table in the correct order. The handler also sets the correct classes for the header and cell elements for the column.
13 function sortColumn(header, column){
14 var rows = $("tbody tr");
15 rows.sort(function(a, b){
16 return compare(a, b, column, header.data("numeric"), header.data("order"));
17 });
18 $(rows).each(function(){ $("tbody").append($(this)); });
19 header.data("order", -header.data("order"));
20 $("span").removeClass("ascending descending");
21 $("td").removeClass("sortColumn");
22 if(header.data("order") > 0) { header.children("span").addClass("ascending"); }
23 else { header.children("span").addClass("descending"); }
24 $("tbody tr td:nth-child("+ (column + 1) +")").addClass("sortColumn");
25 }
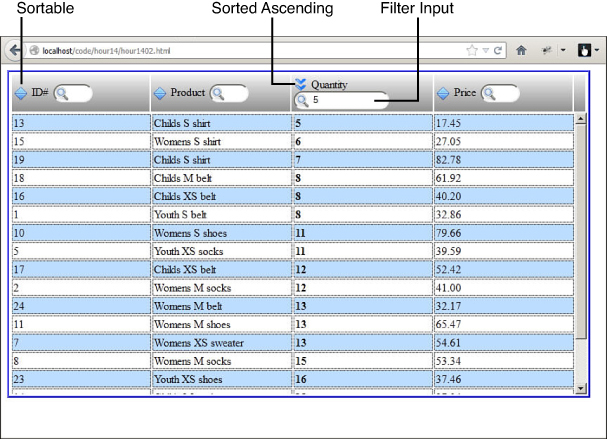
7. Save all three files and then open the HTML document in a web browser, as shown in Figure 14.2. You should be able to change the sort order for the columns and use the text inputs to filter the rows displayed.
LISTING 14.2-html HTML Document That Implements the Table Elements Used in the Example
01 <!DOCTYPE html>
02 <html>
03 <head>
04 <title>Hour 14-2</title>
05 <meta charset="utf-8" />
06 <script type="text/javascript" src="../js/jquery.min.js"></script>
07 <script type="text/javascript" src="js/hour1402.js"></script>
08 <link rel="stylesheet" type="text/css" href="css/hour1402.css">
09 </head>
10 <body>
11 <table>
12 <thead><tr>
13 <th class="numeric"><span>ID#</span></th>
14 <th ><span>Product</span></th>
15 <th class="numeric"><span>Quantity</span></th>
16 <th class="numeric"><span>Price</span></th>
17 <td class="spacer"></td>
18 </tr></thead>
19 <tbody></tbody>
20 </table>
21 </body>
22 </html>
LISTING 14.2-js jQuery and JavaScript Code Define the Interactions of the Table, Including Sorting and Filtering
01 var tArr = ["Mens", "Womens", "Youth", "Childs"];
02 var sArr = ["XL", "M", "S", "XS"];
03 var kArr = ["pants", "shirt", "shoes", "socks", "sweater", "belt"];
04 function compare(a, b, column, numeric, order){
05 var aValue = a.cells[column].innerHTML;
06 var bValue = b.cells[column].innerHTML;
07 if (numeric) { aValue = parseFloat(aValue );
08 bValue = parseFloat(bValue ); }
09 if (aValue < bValue) return order;
10 if (aValue > bValue) return -order;
11 return 0;
12 }
13 function sortColumn(header, column){
14 var rows = $("tbody tr");
15 rows.sort(function(a, b){
16 return compare(a, b, column, header.data("numeric"), header.data("order"));
17 });
18 $(rows).each(function(){ $("tbody").append($(this)); });
19 header.data("order", -header.data("order"));
20 $("span").removeClass("ascending descending");
21 $("td").removeClass("sortColumn");
22 if(header.data("order") > 0) { header.children("span").addClass("ascending"); }
23 else { header.children("span").addClass("descending"); }
24 $("tbody tr td:nth-child("+ (column + 1) +")").addClass("sortColumn");
25 }
26 function filterColumn(input, column){
27 $("tbody tr").show().each(function(){
28 var header = $("th:eq("+ column +")");
29 var filterVal = input.val();
30 var rowVal = this.cells[column].innerHTML;
31 if(header.data("numeric") ){
32 if(parseFloat( filterVal ) > parseFloat( rowVal )) { $(this).hide(); }}
33 else {if(rowVal.indexOf(filterVal) < 0) { $(this).hide(); }}
34 });
35 }
36 function randInt(max) { return Math.floor((Math.random()*max)+1); }
37 function buildData(){
38 for(var x=1;x<26;x++){
39 var row =$("<tr></tr>");
40 row.append($("<td></td>").html(x));
41 row.append($("<td></td>").html(
42 tArr[randInt(3)]+" "+sArr[randInt(3)]+" "+kArr[randInt(5)]));
43 row.append($("<td></td>").html(randInt(20)));
44 row.append($("<td></td>").html(((Math.random()*80)+5).toFixed(2)));
45 $("tbody").append(row);}
46 }
47 $(document).ready(function(){
48 buildData();
49 $("th").each(function(i) {
50 var header = $(this);
51 header.data({numeric:header.hasClass("numeric"), order:-1});
52 header.children("span").click(function(){ sortColumn(header, i); });
53 var filter = $('<input type="text" />'),
54 filter.keyup(function(){ filterColumn(filter, i); });
55 header.append(filter);
56 });
57 });
LISTING 14.2-css CSS Code That Styles the Table Elements
01 table{ border:3px ridge blue; padding:0px;}
02 thead { display:block; width:820px; text-align:left; }
03 tbody { display:block; max-height:400px; width:820px; overflow-y:scroll;}
04 th { background-image: -moz-linear-gradient(center top , #f1f1f1, #8F8F8F);
05 width:200px; height:30px; font:16px Arial Black; padding:3px;
06 }
07 .spacer { background-image: -moz-linear-gradient(center top , #f1f1f1, #8F8F8F);
08 width:15px; border:none;
09 }
10 td { width:200px; border: .5px dotted; }
11 .sortColumn { font-weight:bold; }
12 tr:nth-child(even){ background-color:#BBDDFF; }
13 img { height:26px; }
14 input { height:20px; width: 20px; border-radius:15px; padding: 0 7px 2px 25px;
15 background:url("../images/search.png") no-repeat scroll left bottom 0 #FFFFFF;
16 background-size:20px 20px;
17 }
18 input:focus { width:100px; }
19 span { background:url("../images/sort.png") no-repeat scroll left;
20 background-size:20px 20px;
21 padding: 0 7px 2px 25px;
22 }
23 .ascending{ background:url("../images/down.png") no-repeat scroll left;
24 background-size:20px 20px;
25 }
26 .descending{ background:url("../images/up.png") no-repeat scroll left;
27 background-size:20px 20px;
28 }
Creating a Tree View
A tree view can be one of the most useful components when trying to present a large number of options to users. That is why tree views are used in so many places. Virtually all users will be familiar with them to at least a certain extent because it is the most common element used by OSes when displaying files and folders.
A tree view is simple to implement in jQuery and JavaScript. A very cool thing about tree views in your web pages is that they can contain any content that you want to display. The following section takes you through the process of implementing a tree view using jQuery and JavaScript.
Try it Yourself: Adding a Dynamic Tree View with Expanding and Collapsing Branches
<div class="tree">
<span></span><label></label>
<div class="content"></div>
<div class="tree">one or more child elemnts</div>
</div>
1. In Aptana, add the hour14/hour1403.html, hour14/js/hour1403.js, and hour14/css/hour1403.css files.
2. Add the code shown in Listing 14.3-html and Listing 14.3-css to the HTML and CSS files. The code in these files is fairly basic and should be familiar to you.
3. Open the hour1403.js file and add the following .ready() function. Add the code in lines 14–34. This code is used to populate the tree with random items, including images and form elements. This is to show you that the content of each node can be totally heterogeneous.
35 $(document).ready(function(){
36 var root = addLevels($("#treeContainer"), 4);
37 root.show();
38 });
4. Add the following addItem() function that is used to add a new node to the tree view. This function accepts jQuery objects parentItem and item. The item argument is a JavaScript object with a label and content value. These are used to build up the full node and append it to the parent:
06 function addItem(parentItem, item){
07 var newItem = $('<div class="tree"></div>').hide();
08 newItem.append($("<span></span>").click(toggleItem));
09 newItem.append($("<label></label>").html(item.label));
10 newItem.append($('<div class="content"></div>').append(item.content).hide());
11 parentItem.append(newItem);
12 return newItem;
13 }
5. Add the following click handler toggleItem() that toggles the visibility of the child <div> elements when the user clicks the expand/collapse button:
01 function toggleItem(){
02 $(this).parent().children("div").toggle();
03 $(this).toggleClass("collapse");
04 return false;
05 }
6. Save all three files and then open the HTML document in a web browser, as shown in Figure 14.3. You should be able to expand and collapse levels of the tree view.

LISTING 14.3-html HTML Document That Implements the Root Tree Element
01 <!DOCTYPE html>
02 <html>
03 <head>
04 <title>Hour 14-3</title>
05 <meta charset="utf-8" />
06 <script type="text/javascript" src="../js/jquery.min.js"></script>
07 <script type="text/javascript" src="js/hour1403.js"></script>
08 <link rel="stylesheet" type="text/css" href="css/hour1403.css">
09 </head>
10 <body>
11 <div id="treeContainer"></div>
12 </body>
13 </html>
LISTING 14.3-js jQuery and JavaScript Code Populates and Controls the Expansion and Collapsing of the Tree
01 function toggleItem(){
02 $(this).parent().children("div").toggle();
03 $(this).toggleClass("collapse");
04 return false;
05 }
06 function addItem(parentItem, item){
07 var newItem = $('<div class="tree"></div>').hide();
08 newItem.append($("<span></span>").click(toggleItem));
09 newItem.append($("<label></label>").html(item.label));
10 newItem.append($('<div class="content"></div>').append(item.content).hide());
11 parentItem.append(newItem);
12 return newItem;
13 }
14 function randInt(max) { return Math.floor((Math.random()*max)); }
15 function getRandomItem(){
16 var itemTypes=["image", "input", "textarea"];
17 var images=["boy.jpg", "flower.jpg", "falls.jpg", "canyon.jpg", "sunset.jpg"];
18 var inputs=["text","checkbox", "radio"];
19 switch(itemTypes[randInt(3)]){
20 case "image":
21 var img = images[randInt(5)];
22 return {label:img, content:$('<img src="images/' + img + '" />')};
23 case "input":
24 var type = inputs[randInt(3)];
25 return {label:type, content:$('<input type="'+type+'">'+type+'</input>')};
26 case "textarea":
27 return {label:"textarea", content:$('<textarea>textarea</textarea>')};
28 }
29 }
30 function addLevels(parent, levels){
31 var element = addItem(parent, getRandomItem());
32 if( levels > 0 ){for(var x=0; x<5; x++){ addLevels( element, levels-1 ) }; }
33 return element;
34 }
35 $(document).ready(function(){
36 var root = addLevels($("#treeContainer"), 4);
37 root.show();
38 });
LISTING 14.3-css CSS Code That Styles the Form Elements
01 #treeContainer { width:300px; }
02 .tree { margin-left: 16px; border-top:.5px dotted; }
03 .content { margin-left: 48px; }
04 .tree span {
05 display:inline-block; height:24px; width:24px; margin-right:10px;
06 border-radius:8px; vertical-align:middle;
07 background:url("../images/expand.png") no-repeat scroll left top 0;
08 }
09 .tree span.collapse {
10 background:url("../images/collapse.png") no-repeat scroll left top 0;
11 }
12 img { height:50px; }
13 .tree label { font:italic 20px/20px "Arial Black";}
Using Overlay Dialogs
You have already learned how to add several types of dialogs to your web pages using JavaScript. The problem is that the built-in dialogs are extremely limited in what you can do with them. You could open a new pop-up window to get more control, but pop-up windows have their own problems, the biggest of which is that users hate them and usually disable them in their browsers.
A much better option is to create your own dialog element using jQuery and JavaScript. Implementing a dialog requires two things: an overlay element that will mask off everything that is happening behind on the web pages and a dialog component that provides the dialog interaction.
The overlay needs to have a higher z-index than the main web page elements below. The overlay should also be somewhat transparent so that the user can see the web page in the background but is unable to click any of the web page elements under the overlay.
The dialog needs to have a higher z-index than the overlay so that it is visible when the overlay is displayed. The dialog also needs to have a means of closing, which makes the dialog and overlay elements hidden. You can include anything else in the dialog that you desire to provide user interaction.
The dialog and overlay need to be in a fixed position and initially hidden. When you want to display the dialog, unhide the overlay and dialog and then hide them when you are finished displaying the dialog. The following section takes you through that process.
Try it Yourself: Adding Dynamic Dialogs Using Overlays in jQuery and JavaScript
1. In Aptana, create the hour14/hour1404.html, hour14/js/hour1404.js, and hour14/css/hour1404.css files.
2. Add the code shown in Listing 14.4-html and Listing 14.4-css to the HTML and CSS files. The HTML code implements a basic web page with two exceptions. Notice the overlay and dialog <div> elements. Those elements are not part of the main web page and will be used to simulate a pop-up dialog with only jQuery and JavaScript.
3. Open the hour1404.js file and add the following .ready() function that hides the overlay and dialog <div> elements, and then add a click handler to display them and another to update the web page and hide the dialog.
12 $(document).ready(function(){
13 $("#overlay, #dialog").hide();
14 $("span").click(function(){ $("#overlay, #dialog").show(); });
15 $("#updateB").click(update);
16 });
4. Add the following click handler update() that updates the values of the web page based on information obtained in the dialog <div>. This illustrates the interaction between the dialog and the rest of the web page:
01 function update(){
02 $("#overlay, #dialog").hide();
03 $("#title p").html($("#titleT").val());
04 $("#content").html($("#contentT").val());
05 $("#leftNav span").remove();
06 $("input:checkbox").each(function(){
07 if($(this).prop("checked")){
08 $("#leftNav").append($("<span></span>").html($(this).val()));
09 }
10 });
11 }
5. Save all three files and then open the HTML document in a web browser, as shown in Figure 14.4. You should be able to open the dialog by clicking the Update button. Update the form and then see the web page close when the Update button in the dialog is clicked.

FIGURE 14.4 Form to page manipulation illustrating how to read data from forms and use it to update other elements on the web.
LISTING 14.4-html HTML Document That Implements the Page, Overlay, and Dialog
01 <!DOCTYPE html>
02 <html>
03 <head>
04 <title>Hour 14-4</title>
05 <meta charset="utf-8" />
06 <script type="text/javascript" src="../js/jquery.min.js"></script>
07 <script type="text/javascript" src="js/hour1404.js"></script>
08 <link rel="stylesheet" type="text/css" href="css/hour1404.css">
09 </head>
10 <body>
11 <div><div id="title">
12 <span>Update Page</span><p>Title</p></div><br>
13 <div>
14 <div id="leftNav">
15 <span>Option 1</span>
16 <span>Option 2</span>
17 <span>Option 3</span>
18 <span>Option 4</span>
19 </div>
20 <div id="content">Some<br>Content</div>
21 </div></div>
22 <div id="overlay"></div>
23 <div id="dialog">
24 <p id="dialogTitle">Update Web Page</p>
25 <label>Title</label><br><input id="titleT" type="text" /><br>
26 <input type="checkbox"value="Option A">Option A</input><br>
27 <input type="checkbox"value="Option B">Option B</input><br>
28 <input type="checkbox"value="Option C">Option C</input><br>
29 <input type="checkbox"value="Option D">Option D</input><br>
30 <label>Content</label><br><textarea id="contentT"></textarea><br>
31 <span id="updateB">Update</span>
32 </div>
33 </body>
34 </html>
LISTING 14.4-js jQuery and JavaScript Code That Shows and Hides the Dialog and Updates the Web Page
01 function update(){
02 $("#overlay, #dialog").hide();
03 $("#title p").html($("#titleT").val());
04 $("#content").html($("#contentT").val());
05 $("#leftNav span").remove();
06 $("input:checkbox").each(function(){
07 if($(this).prop("checked")){
08 $("#leftNav").append($("<span></span>").html($(this).val()));
09 }
10 });
11 }
12 $(document).ready(function(){
13 $("#overlay, #dialog").hide();
14 $("span").click(function(){ $("#overlay, #dialog").show(); });
15 $("#updateB").click(update);
16 });
LISTING 14.4-css CSS Code That Styles the Page, Overlay, and Dialog Elements
01 div { margin:0px; display:inline-block; float:left; text-align:center; }
02 span { background-image: -moz-linear-gradient(center top , #f1f1f1, #8F8F8F);
03 color:black; border:3px ridge blue; font-size:20px; float:left; cursor:pointer;
04 width:150px; text-align:center;
05 }
06 p { margin:0px; }
07 #title { background-color:blue; color:white; height:80px; width:750px; font-size:60px; }
08 #leftNav{width:150px; height:400px; font-size:20px; background-color:#AACCFF; }
09 #content{ height:400px; width: 600px; font-size:40px; background-color:#EEEEEE; }
10 #overlay { position:fixed; top:10px; left:10px; height:480px; width:750px;
11 opacity:.8; background-color:white;
12 }
13 #dialog { border: 5px groove blue; text-align:left; padding:10px;
14 position:fixed; top:100px; left:200px; background-color:white;
15 }
16 #dialogTitle { text-align:center; font:20px bold;
17 background-color:blue; color:white; margin:-10px -10px 5px -10px;
18 }
19 #contentT, #titleT { border-radius: 10px; width:150px; padding:5px;
20 margin:10px; border:3px groove blue;
21 }
22 label { font:bold italic 18px "Arial Black" }
Implementing a Graphical Equalizer Display
The total purpose of this section is to help you see a method of using basic HTML elements along with dynamic jQuery and JavaScript interactions with data to provide a rich user experience with a visual indicator of what is happening with data. The data could be coming from a variety of sources, including JavaScript running on the web page or external services collected by AJAX requests.
A graphic equalizer element provides a great way to view several values at once and is something that many users are already familiar with. The following sections walk you through the process of implementing a graphical equalizer.
Try it Yourself: Creating a Dynamic Graphic Equalizer with Simple jQuery and CSS
1. In Aptana, create the hour14/hour1405.html, hour14/js/hour1405.js, and hour14/css/hour1405.css files.
2. Add the code shown in Listing 14.5-html and Listing 14.5-css to the HTML and CSS files. These files should be basic for you by now. The CSS provides class styles for the different colors used in the equalizer and then styles the look of the elements.
3. Open the hour1405.js file and add the following .ready() function that dynamically builds the equalizer by adding <div> and <span> elements:
20 $(document).ready(function(){
21 for(var i=0; i< 10; i++){
22 $("#equalizer").append($("<div></div>"));
23 }
24 $("#equalizer div").each(function (idx){
25 $(this).append($("<p></p>").html(idx));
26 for(var i=0; i< 2; i++){ $(this).append($('<span class="red"></span>')); }
27 for(var i=0; i< 2; i++){ $(this).append($('<span class="orange"></span>')); }
28 for(var i=0; i< 3; i++){ $(this).append($('<span class="yellow"></span>')); }
29 for(var i=0; i< 8; i++){ $(this).append($('<span class="green"></span>')); }
30 adjValues();
31 });
32 });
4. Add the following updateEqualizer() function that updates the opacity of the span elements so that only values below a certain level show as fully opaque. The data comes from a global array:
13 function updateEqualizer(){
14 $("span").css({opacity:.3});
15 $("#equalizer div").each(function(i){
16 $(this).children("span:gt("+ (15 - valueArr[i]) +")").css({opacity:1});
17 $(this).children("p:first").html(valueArr[i]);
18 });
19 }
5. Add the following functions that populate the global array every .5 seconds, via setTimeout(), with new data that is rendered in the equalizer by calling updateEqualizer():
01 var valueArr = [10,8,3,12,12,15,15,3,4,5];
02 function randInt(max) { return Math.floor((Math.random()*max)-3); }
03 function adjValues(){
04 for (var i=0; i<valueArr.length; i++) {
05 var adj = valueArr[i] + Math.floor((Math.random()*7)-3);
06 adj = Math.max(3, adj);
07 adj = Math.min(15, adj);
08 valueArr[i] = adj;
09 }
10 updateEqualizer();
11 setTimeout(adjValues, 500);
12 }
6. Save all three files and then open the HTML document in a web browser, as shown in Figure 14.5. You should see the graphical equalizer element updating automatically.

LISTING 14.5-html HTML Document That Implements a Web Page
01 <!DOCTYPE html>
02 <html>
03 <head>
04 <title>Hour 14-5</title>
05 <meta charset="utf-8" />
06 <script type="text/javascript" src="../js/jquery.min.js"></script>
07 <script type="text/javascript" src="js/hour1405.js"></script>
08 <link rel="stylesheet" type="text/css" href="css/hour1405.css">
09 </head>
10 <body>
11 <div id="equalizer"></div>
12 </body>
13 </html>
LISTING 14.5-js jQuery and JavaScript Code Dynamically Build and Populate the Graphical Equalizer
01 var valueArr = [10,8,3,12,12,15,15,3,4,5];
02 function randInt(max) { return Math.floor((Math.random()*max)-3); }
03 function adjValues(){
04 for (var i=0; i<valueArr.length; i++) {
05 var adj = valueArr[i] + Math.floor((Math.random()*7)-3);
06 adj = Math.max(3, adj);
07 adj = Math.min(15, adj);
08 valueArr[i] = adj;
09 }
10 updateEqualizer();
11 setTimeout(adjValues, 500);
12 }
13 function updateEqualizer(){
14 $("span").css({opacity:.3});
15 $("#equalizer div").each(function(i){
16 $(this).children("span:gt("+ (15 - valueArr[i]) +")").css({opacity:1});
17 $(this).children("p:first").html(valueArr[i]);
18 });
19 }
20 $(document).ready(function(){
21 for(var i=0; i< 10; i++){
22 $("#equalizer").append($("<div></div>"));
23 }
24 $("#equalizer div").each(function (idx){
25 $(this).append($("<p></p>").html(idx));
26 for(var i=0; i< 2; i++){ $(this).append($('<span class="red"></span>')); }
27 for(var i=0; i< 2; i++){ $(this).append($('<span class="orange"></span>')); }
28 for(var i=0; i< 3; i++){ $(this).append($('<span class="yellow"></span>')); }
29 for(var i=0; i< 8; i++){ $(this).append($('<span class="green"></span>')); }
30 adjValues();
31 });
32 });
LISTING 14.5-css CSS Code That Styles Elements to Render the Graphical Equalizer
01 #equalizer { background-color:black; color:white;
02 width:420px; height:160px; padding:20px;
03 }
04 div{ display:inline-block; width:40px; padding:1px; }
05 p{ text-align:center; margin:0px;}
06 span{ display:block; width:30px; height:7px; margin:2px; border-radius: 40%; }
07 .green{ background-color:#00FF00; }
08 .yellow{ background-color:#FFFF00; }
09 .orange{ background-color:#FFAA00; }
10 .red{ background-color:#FF0000; }
Adding Sparkline Graphics
The purpose of this section is to help you see a method of using some of the new HTML5 elements along with dynamic jQuery and JavaScript interactions with data to provide a rich user experience with a visual indicator of trending data. The data could be coming from a variety of sources, including JavaScript running on the web page or external services collected by AJAX requests.
In this section, you implement a series of sparklines. A sparkline is a mini-graph that is updated frequently with the latest values from the web server. A sparkline element provides a great way for you to see how to use the new HTML elements to provide users with a great visual indicator of data trends. The following sections walk you through the process of implementing the sparkline.
Try it Yourself: Creating Dynamic Sparklines with Simple jQuery, JavaScript, and CSS
1. In Aptana, create the hour14/hour1406.html, hour14/js/hour1406.js, and hour14/css/hour1406.css files.
2. Add the code shown in Listing 14.6-html and Listing 14.6-css to the HTML and CSS files. The HTML and CSS are fairly basic. Notice that there are just <div>, <span>, <label>, and <canvas> elements.
3. Open the hour1406.js file and add the following .ready() function that populates the data used for the sparklines and starts off the adjValues() timer function. You also need to add the adjValues() and getRandomArray() functions shown in Listing 14.6-js. These functions populate and continuously update the values used for the sparklines. Notice that the data array is stored in the <div> element using the .data() method.
33 $(document).ready(function(){
34 $("div").each(function(){ $(this).data("valueArr", getRandomArray()); });
35 adjValues();
36 });
4. Add the following function renderSpark() that uses the set of values in the data array and draws a series of lines on the canvas to create the sparkline. Line 13 is a bit of a trick; setting the width of the canvas to its current value will erase the current data on the canvas, so the last sparkline is erased before drawing the new one:
12 function renderSpark(c, lineValues){
13 c.width = c.width;
14 var xAdj = c.width/lineValues.length;
15 var ctx = c.getContext("2d");
16 ctx.fillStyle = "#000000";
17 ctx.strokeStyle = "#00ff00";
18 ctx.lineWidth = 3;
19 var x = 1;
20 ctx.moveTo(x,(c.height));
21 for (var idx in lineValues){
22 var value = parseInt(lineValues[idx]);
23 ctx.lineTo(x+xAdj, (c.height - value));
24 x += xAdj;
25 }
26 ctx.stroke();
27 }
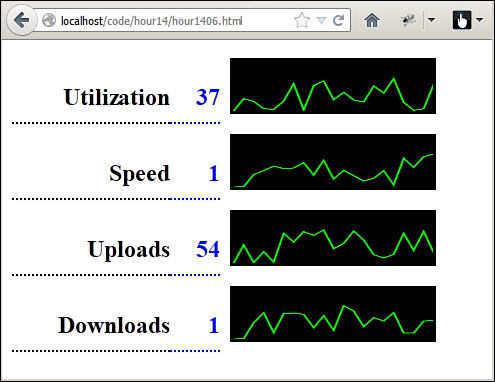
5. Save all three files and then open the HTML document in a web browser, as shown in Figure 14.6. You should see the sparklines automatically updating.
LISTING 14.6-html HTML Document That Implements Page Elements
01 <!DOCTYPE html>
02 <html>
03 <head>
04 <title>Hour 14-6</title>
05 <meta charset="utf-8" />
06 <script type="text/javascript" src="../js/jquery.min.js"></script>
07 <script type="text/javascript" src="js/hour1406.js"></script>
08 <link rel="stylesheet" type="text/css" href="css/hour1406.css">
09 </head>
10 <body>
11 <div><label>Utilization</label><span>1</span><canvas></canvas></div>
12 <div><label>Speed</label><span></span><canvas></canvas></div>
13 <div><label>Uploads</label><span></span><canvas></canvas></div>
14 <div><label>Downloads</label><span></span><canvas></canvas></div>
15 </body>
16 </html>
LISTING 14.6-js jQuery and JavaScript Code Dynamically Populates and Updates the Sparklines
01 function randInt(max) { return Math.floor((Math.random()*max)+1); }
02 function adjValues(){
03 $("div").each(function(){
04 var lineValues = $(this).data("valueArr");
05 lineValues.shift();
06 lineValues.push(randInt(100));
07 $(this).children("span").html(lineValues[0]);
08 renderSpark($(this).children("canvas").get(0), lineValues);
09 });
10 setTimeout(adjValues, 1000);
11 }
12 function renderSpark(c, lineValues){
13 c.width = c.width;
14 var xAdj = c.width/lineValues.length;
15 var ctx = c.getContext("2d");
16 ctx.fillStyle = "#000000";
17 ctx.strokeStyle = "#00ff00";
18 ctx.lineWidth = 3;
19 var x = 1;
20 ctx.moveTo(x,(c.height));
21 for (var idx in lineValues){
22 var value = parseInt(lineValues[idx]);
23 ctx.lineTo(x+xAdj, (c.height - value));
24 x += xAdj;
25 }
26 ctx.stroke();
27 }
28 function getRandomArray(){
29 var arr = new Array();
30 for(var x=0; x<20; x++){ arr.push(randInt(100)); }
31 return arr;
32 }
33 $(document).ready(function(){
34 $("div").each(function(){ $(this).data("valueArr", getRandomArray()); });
35 adjValues();
36 });
LISTING 14.6-css CSS Code That Styles the Page Elements and Sparkline
1 canvas{ height:50px; width: 200px; vertical-align:bottom;
2 border:3px solid black; background-color:black; margin:10px;
3 }
4 label, span { display:inline-block; text-align:right; width:160px;
5 font:bold 24px/50px "Arial Black"; border-bottom:2px dotted;
6 }
7 span{ width:50px; color:blue; }
Summary
In this hour, you got a chance to implement several more advanced web elements. You learned the basics of implementing image galleries, how to add sorting and filtering to a table, and how to dynamically create a tree view. You also got a chance to implement some graphical elements, such as sparklines and an equalizer display.
Q&A
Q. In your example, you populated the image slider using an array. Is that the best method?
A. Not necessarily. That was used for simplicity in the example. You can also use a static file located on the web server to get the list of files, or use an AJAX request to a server-side script that returns the list of images to display.
Q. Is it better to use a <canvas> or an <svg> element to draw chart type data such as the sparkline?
A. I used a <canvas> because it is simple to implement the changing lines. An <svg> chart would be too large to include in this book. The downside is that the canvas gets blurry if you zoom in on the web page. For the best charts, you should use <svg> so that the user can zoom in and it is still clean.
Workshop
The workshop consists of a set of questions and answers designed to solidify your understanding of the material covered in this hour. Try to answer the questions before looking at the answers.
Quiz
1. How do you use jQuery to move the slider in the image gallery?
2. Why do you use an overlay element along with the dialog when creating custom dialogs?
3. How do you make the dialog box appear on top of other elements?
Quiz Answers
1. The slider is really just a big div. To adjust the position, change the relative position using the .css() or .animate() methods.
2. The overlay keeps the user from clicking on the rest of the web page until the dialog is closed.
3. Set the z-index to a higher value.
Exercises
1. Modify the code in Listing 14.2 so that the filter for numerical columns will filter out items less than the value specified when the column is in ascending order and items greater than the value specified when the column is in descending order.
2. Modify the code in Listing 14.3 to add expand all and collapse all buttons. The buttons should expand or collapse all elements in the tree.
3. This exercise is for more advanced CSS and HTML users. In the code in Listing 14.1, modify the slider to be vertical. You will need to change positioning code to adjust the top instead of the left, move things around on the page, and do quite a number of CSS changes to get the slider to look right.