
Hour 3. Understanding Dynamic Web Page Anatomy
What You’ll Learn in This Hour:
![]() How to build a basic dynamic web page
How to build a basic dynamic web page
![]() Where to add CSS and JavaScript in web pages
Where to add CSS and JavaScript in web pages
![]() What the difference is between block and inline elements
What the difference is between block and inline elements
![]() How to add images to web pages
How to add images to web pages
![]() How to build web forms
How to build web forms
![]() How to add links to specific spots in a web page
How to add links to specific spots in a web page
![]() How to build tables into your web pages
How to build tables into your web pages
![]() What HTML5 SVG graphics can do
What HTML5 SVG graphics can do
![]() Ways to use HTML5 to prep for dynamic audio and video
Ways to use HTML5 to prep for dynamic audio and video
Throughout the rest of this book, you will use a lot of HTML, CSS, jQuery, and JavaScript. For that purpose, this hour is designed to accomplish two tasks. The first is to familiarize you, in case you are not already familiar, with some important basics of HTML so that you will be able to easily understand the examples moving forward.
The second is to help you understand how to design your HTML to make it easier to add dynamics to your web pages later using jQuery and JavaScript. Understanding how to design your HTML elements will make it easier later to add some cool effects and dynamically update data stored in lists or tables.
The following sections discuss the basics of HTML and how they relate to jQuery and JavaScript.
Using HTML/HTML5 Elements to Build a Dynamic Web Page
You have already seen some examples of HTML code in Hour 1, “Intro to Dynamic Web Programming,” and Hour 2, “Debugging jQuery and JavaScript Web Pages.” Now it’s time to delve a bit deeper in understanding the syntax and which HTML elements and attributes are important to dynamic web pages.
To properly build dynamic web pages, you need to understand the HTML syntax, some fundamental HTML elements, and how to organize and structure those elements. The following sections cover those topics.
Understanding HTML Structure
HTML documents are composed of three main parts: the <!DOCTYPE> tag, the head, and the body. Each of these parts plays a specific role in helping the browser to render the HTML document into a web page.
The <!DOCTYPE> tag must be the first statement in the HTML file and tells the browser how to read the rest of the file. Although this tag is not strictly required, it is a good idea to include it in your HTML documents. There are several forms of the <!DOCTYPE> element; a few of them are listed next:
![]() HTML5—Version used for HTML5 documents
HTML5—Version used for HTML5 documents
<!DOCTYPE html>
![]() HTML 4.01 Strict—Enforces strict compliance with the HTML 4.01 standard and will remove deprecated elements such as
HTML 4.01 Strict—Enforces strict compliance with the HTML 4.01 standard and will remove deprecated elements such as <font>.
<!DOCTYPE HTML PUBLIC "-//W3C//DTD HTML 4.01//EN" "http://www.w3.org/TR/html4/strict.dtd">
![]() HTML 4.01 Transitional—Relaxed compliance with the HTML 4.01 standard and will allow deprecated elements such as
HTML 4.01 Transitional—Relaxed compliance with the HTML 4.01 standard and will allow deprecated elements such as <font>.
<!DOCTYPE HTML PUBLIC "-//W3C//DTD HTML 4.01 Transitional//EN" "http://www.w3.org/TR/html4/loose.dtd">
The head and body components are contained in the HTML tag. The purpose of the head element is to contain elements that are used in parsing the HTML document but are not rendered inside the browser window, such as scripts and metadata. The purpose of the body tag is to contain elements that will be rendered to the browser window and viewed by the user.
The following code shows an example of the basic HTML document structure with one head element and one body element:
<!DOCTYPE html>
<html>
<head>
<meta charset="UTF-8" />
</head>
<body>
<h1>New Page</h1>
</body>
</html>
Syntax is everything when working with HTML elements. If the browser cannot parse the document correctly, the page will not be rendered correctly to the user.
Tip
Most web development IDEs and editors have built-in error checking as well as code completing for HTML syntax. These are shown in a variety of ways, from highlighted or underlined code, to warning icons inline with the code, to a list of potential problems in a different pane. Pay attention to what the IDE is trying to tell you about possible problems.
An HTML element is composed of the following three main components:
![]() Tag—The tag is enclosed in
Tag—The tag is enclosed in <> characters and tells the browser what type of HTML element to parse and render. For example, the tag for a paragraph element is <p>, the tag for an unordered list is <ul>, and the tag for a list item is <li>.
![]() Content—The content portion of the HTML element can be another HTML element, simple text, or nothing. To define what is contained inside an HTML element, a closing tag is added at the end of the content. The following example illustrates that perfectly. Notice that there are several
Content—The content portion of the HTML element can be another HTML element, simple text, or nothing. To define what is contained inside an HTML element, a closing tag is added at the end of the content. The following example illustrates that perfectly. Notice that there are several <li> elements—each with an opening tag <li>, some content, and then a closing tag </li>. The content of the <li> tags are the text in between. There is also an opening and closing <ul> and </ul> tag. The content of the <ul> element is all of the <li> elements in between.
<ul>
<li>New York, US</li>
<li>Paris, FR</li>
<li>Rome, IT</li>
<li>London, EN</li>
</ul>
![]() Attribute—Attributes provide a way of attaching additional information about the element that can be used by the browser. This information can be used to define how the element is rendered by the browser or provide a way to identify or classify the element. The following shows an example of adding an
Attribute—Attributes provide a way of attaching additional information about the element that can be used by the browser. This information can be used to define how the element is rendered by the browser or provide a way to identify or classify the element. The following shows an example of adding an align attribute to a paragraph element to tell the browser to center the text when rendering it. Notice that the attribute value is assigned using an equal sign and that the value is enclosed in double quotes.
<p align="center">This is some centered text.</p>
If the value of an attribute requires a double quote, the normal assignment of attribute="value" will not work. In these instances, you can use single quotes in the assignment. For example, attribute='some "quoted" value'.
If an element does not have an end tag, you can include the / at the end of the first tag and completely leave out the end tag. For example, both of the following are acceptable to the browser:
<p align="center"></p>
<p align="center" />
Implementing HTML Head Elements
The HTML <head> element is designed as a container for nonvisual elements of the web page. The tags in the <head> element are parsed by the browsers into the DOM, but they are not rendered to the browser window.
The following sections describe some of the more important <head> elements and how they relate to using jQuery and JavaScript.
<title>
The <title> element is supposed to be required in all HTML documents. The browser will still render the page without it, but there are many reasons to include the title element in your web pages, including that the <title> element does the following:
![]() Defines the title that is displayed in the browser toolbar/tab.
Defines the title that is displayed in the browser toolbar/tab.
![]() Provides the title that the web page is listed as when it is added to favorites.
Provides the title that the web page is listed as when it is added to favorites.
![]() Determines what is displayed as the title when the web page is displayed by search engines.
Determines what is displayed as the title when the web page is displayed by search engines.
The following code shows an example of adding a title to the web page:
<!DOCTYPE html>
<html>
<head>
<title>A Really Cool Web Page</title>
The value of the <title> element can easily be changed using jQuery and Java. For example, the code in Listing 3.1 uses JavaScript to change the title of the web page after it is loaded.
LISTING 3.1 JavaScript Code Changing the <title> Value After the Page Has Loaded
01 <!DOCTYPE html>
02 <html>
03 <head>
04 <title>A Really Cool Web Page</title>
05 <meta charset="UTF-8" />
06 <script>
07 function appendTitle(newTitle){
08 document.title += newTitle;
09 }
10 </script>
11 </head>
12 <body onload="appendTitle('... Loaded')">
13 </body>
14 </html>
Notice in Figure 3.1 that the Title in the tab has changed to read A Really Cool Web Page...Loaded.
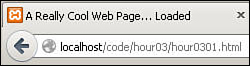
FIGURE 3.1 The JavaScript function has changed the title of the web page that is displayed in the browser tab.
<meta>
The <meta> tag has many uses. Browsers use the <meta> tags to determine things such as what character sets to use when rendering the web page. Search engine crawlers use the <meta> tags to determine the purpose of the content of the web page for better optimized searches. The best way to introduce it is to show you some examples of syntax.
The meta tag required to set the character set in HTML5 web pages is
<meta charset="UTF-8">
The <meta> tag required to set the character set in HTML4 web pages is
<meta http-equiv="content-type" content="text/html; charset=UTF-8">
The <meta> tag to define keywords for search engines is as follows, where the value of content are the keywords you want the search engine to use when finding the web page:
<meta name="keywords" content="HTML, CSS, jQuery, JavaScript">
The <meta> tag to tell the browser to refresh the web page every 60 seconds is
<meta http-equiv="refresh" content="300">
<style>
The <style> tag allows you to add CSS code directly inside the HTML document. Everything included inside the <style> tag is treated like a CSS document and is used by the browser to render the web page.
As an example of the syntax, the Listing 3.2 HTML file includes CSS to turn the background of <h1> elements black and the foreground white, as shown in Figure 3.2.
LISTING 3.2 Adding CSS to an HTML Document Using the <style> Tag
01 <html>
02 <head>
03 <meta charset="UTF-8">
04 <style type="text/css">
05 h1 {
06 background-color:black;
07 color:white;
08 }
09 </style>
10 </head>
11 <body>
12 <h1>CSS Reversed Text</h1>
13 </body>
14 </html>

<script>
The <script> tag enables you to add JavaScript code directly inside the HTML document or link to a separate external JavaScript file. If you include inline JavaScript code, everything included inside the <script> tag is treated like a JavaScript document and loaded into the browser when the HTML document is parsed. If you include a link to an external file, that file is downloaded from the web server and loaded by the browser.
When using the <script> tag, scripts are loaded in the order they are parsed. That means that any subsequent scripts that have the same variable values will overwrite the ones already loaded. When adding multiple scripts to a web page, you should be careful to not override variable and function names that you do not intend to.
For example, the HTML document in Listing 3.3 includes two <script> elements: one to load the external jQuery library and the second with a simple JavaScript and jQuery function to turn the background of <h1> elements black and the foreground white, as shown in Figure 3.3.
LISTING 3.3 Adding JavaScript and jQuery to an HTML Document Using the <script> Tag
01 <!DOCTYPE html>
02 <html>
03 <head>
04 <meta charset="UTF-8">
05 <script src="http://code.jquery.com/jquery-latest.min.js"></script>
06 <script>
07 function reverseText(){
08 $("h1").css("background-color", "black");
09 $("h1").css("color", "white");
10 }
11 </script>
12 </head>
13 <body onload="reverseText()">
14 <h1>JavaScript Reversed Text</h1>
15 </body>
16 </html>
FIGURE 3.3 This <h1> element that has had its style reversed by a JavaScript function using jQuery directly in the HTML document.
<noscript>
Although it doesn’t happen very often any more, occasionally people disable JavaScript on their web browsers. If JavaScript is disabled, any JavaScript, and consequently jQuery scripts, will not be executed. This can provide a very bad experience for users.
The <noscript> tag allows you to provide elements that will be rendered before items in the <body> element. This allows you to display warning messages or alternative forms of the page in the event that JavaScript is disabled.
The <noscript> tag supports the same child element types that the <body> tag supports. For example, the following code loads the JavaScript file if JavaScript is enabled, but if not, it adds a <h3> heading to the top of the web page that warns users that the web page will not function properly:
<head>
<script src="DynamicPage.js"></script>
<noscript>
<h3>This web page uses JavaScript but it is disabled in your browser.
The web page may not function properly.</h3>
</noscript>
</head>
<link>
The <link> tag allows you to link separate resources to the current document. For the most part, it is used for CSS files. That means that when the browser loads the HTML document, linked CSS files are downloaded from the web server and loaded as well. For example, the following head block will load two different CSS documents:
<head>
<link rel="stylesheet" type="text/css" href="styleA.css">
<link rel="stylesheet" type="text/css" href="styleB.css">
</head>
In addition to CSS files, you can link things like icons, help documents, licenses, and searches to the web page. For example, the following code links an icon that is displayed in the browser tab when the web page is loaded:
<link rel="icon" type="image/png" href="http://example.com/myicon.png">
Adding HTML Body Elements
Most of the HTML elements that are added to the body block are rendered by the browser and displayed on the screen to the user. Each of the HTML body element tags provides different options that will help you show information on the web page in a meaningful and elegant way.
In the following sections, you’ll see some specific attributes that are useful to apply to HTML elements when programming in jQuery and JavaScript. You also learn the syntax of some of the more common elements that you will see throughout the rest of the book so that the examples will be easier to follow.
Using Important Body Element Attributes
Each of the different body elements will have some attributes that are specific to the element only. However, some attributes are important and common for all elements. Those tags are the following:
![]()
id—This is a string identifier that must be unique among all elements on the web page. This is used by CSS, JavaScript, and jQuery to identify, access, and modify a specific element on the web page.
![]()
class—The class attribute allows you to specify a grouping of multiple elements. This option is used heavily with CSS stylizing to set styles such as background-color for several HTML elements at once. It is also useful in jQuery to select multiple elements based on their class value.
![]()
style—The style attribute allows you to place CSS definitions directly in the HTML code inside of the HTML object. The values in the style override all other CSS directives.
The following code illustrates the syntax to add id, class, and style attributes to HTML elements. Notice that the classes “heading” and “content” are used multiple times, but the id attribute is different for every element. Also notice that for the first heading, an additional style attribute was added to force the first heading to always be bold.
<div id="Div1">
<p id="Div1Heading" class="heading" style="font-weight:bold">Heading Text</p>
<p id ="Div1Content" class ="content">Some Content</p>
</div>
<div id="Div2">
<p id="Div2Heading" class="heading">Another Heading Text</p>
<p id ="Div2Content" class ="content">Some More Content</p>
</div>
Understanding Block Versus Inline Elements
Remember that the web page is rendered to the display screen by the browser parsing each element in the HTML document and rendering it along with any children. The difference between block and inline elements is how much room the browser gives the element.
Block elements are given the full width available to render the item in the browser. That means that any elements before will be displayed above, and elements that come after will be displayed below. <div> and <p> are examples of block elements.
Inline elements are given only enough width to display the element on the page. That means that multiple inline elements are displayed side by side in the browser as long as there is enough room. <span>, <a>, and <img> are some examples of inline elements.
The following code and the rendered version shown in Figure 3.4 illustrate the difference between block and inline tags. Notice that the <p> tags take up the full width of the browser screen, and the <span> tags take only enough space to display the text and margin.
<p>Paragraph A</p>
<p>Paragraph B</p>
<p>Paragraph C</p>
<span>Span A</span>
<span>Span B</span>
<span>Span CA</span>
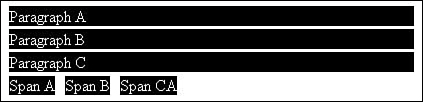
FIGURE 3.4 The block element <p> takes up the entire width, but the inline element <span> uses only the width that it needs.
Although elements are block or inline by default, you can always change them by setting the display CSS style. For example, setting a <span> display to block as follows will make it behave like a <div> element.
<span style="{display:block;}">Span Text</span>
The following is a list of values that you can set the display style to:
![]()
block—Renders the element as a block element.
![]()
inline—Renders the element as an inline element.
![]()
none—Will not render the element to the screen even though it is parsed and exists in the DOM.
You can also force items to be rendered below other items by separating them by using one of the following line break tags:
![]()
<br>—Adds a line break that causes the content after to be rendered below the current content, even if they are inline.
![]()
<hr>—Similar to <br> but also causes the browser to render a horizontal line under the current content.
These tags do not require a closing tag. For example, the following code creates a set of three <span> elements that are separated by first the <br> tag and then the <hr> tag. The rendered results are shown in Figure 3.5. Notice that <br> inserted a line break and <hr> inserted a line break and rendered a line between the content:
<span>Text on</span>
<span> Line 1</span><br>
<span>Text on Line 2</span><hr>
<span>New section on Line 3</span>
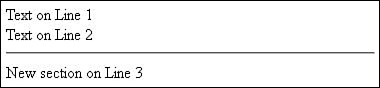
FIGURE 3.5 Using <br> adds a line break and <hr> adds a line break and renders a line between the content.
Creating Container Elements
Container elements are used for a variety of purposes, such as grouping and formatting sets of elements or text. This allows you to apply formatting and dimensions to the container and have it affect all the items within. Although just about any HTML element could be used as a container, three main ones are <p>, <div>, and <span>.
Container elements by themselves do not alter the appearance of the text or data within them. For example, the text inside all the following will render the same in the browser:
Some Text
<p>Some Text <p>
<div>Some Text </div>
<span>Some Text</span>
Try it Yourself: Using Container Elements to Group and Style
1. Start by creating a folder in your Aptana project called hour03.
2. Create a new HTML document in the hour03 folder called hour0304.html (to match the filename on the book’s website).
3. Add the appropriate <html>, <head>, and <body> tags.
4. Add the following <div> element with the class attribute set to “heading” as shown in lines 19–23. This will be the container for your heading items.
19 <div class="heading">
20 <p>Heading A</p>
21 <p>Heading B</p>
22 <p>Heading C</p>
23 </div>
5. Add the following second <div> element with the class attribute set to “content” as shown in lines 24–28. This is the container for your content items.
24 <div class="content">
25 <p>Paragraph A</p>
26 <p>Paragraph B</p>
27 <p>Paragraph C</p>
28 </div>
6. Save the file and load the following URL in the web browser to view the unformatted code, as shown in Figure 3.6:
http://localhost/code/hour03/hour0304.html
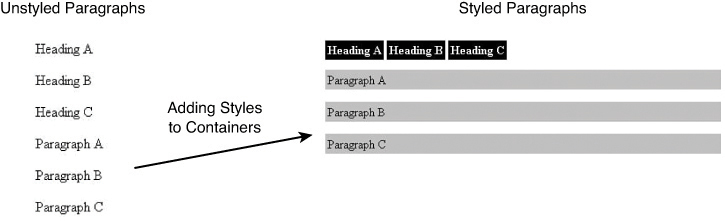
FIGURE 3.6 Using <div> container elements makes it easy to change the look and behavior of <p> elements in different areas of the web page.
7. Go back to Aptana and add a <style> tag to the header of the file.
8. Inside the <style> tag, add the following code that formats the content elements with a gray background and a bit of padding around the edges:
05 .content p{
06 background-color:#C0C0C0;
07 padding: 3px;
08 }
9. Add the following additional rule to style the header elements. This rule changes the <p> elements in the heading container to be inline, with bold white text and a black background.
09 .heading p{
10 display: inline;
11 background-color:black;
12 color: white;
13 font-weight:bold;
14 padding:3px;
15 }
10. Save the document and then reload it in the web browser. Notice in Figure 3.6 that the elements in the “heading” class <div> element are rendered as inline with a black background and white text as defined in lines 11 and 12, and the elements in the “content” class <div> element are rendered with a gray background and remain block style.
LISTING 3.4 Adding CSS to an HTML Document Using the <style> Tag
01 <html>
02 <head>
03 <meta charset="UTF-8">
04 <style type="text/css">
05 .content p{
06 background-color:#C0C0C0;
07 padding: 3px;
08 }
09 .heading p{
10 display: inline;
11 background-color:black;
12 color: white;
13 font-weight:bold;
14 padding:3px;
15 }
16 </style>
17 </head>
18 <body>
19 <div class="heading">
20 <p>Heading A</p>
21 <p>Heading B</p>
22 <p>Heading C</p>
23 </div>
24 <div class="content">
25 <p>Paragraph A</p>
26 <p>Paragraph B</p>
27 <p>Paragraph C</p>
28 </div>
29 </body>
30 </html>
You will be using the container elements heavily in JavaScript and jQuery development to group, format, and control various aspects of the dynamic web page.
Adding Link Elements
Web pages often contain a series of links to additional pages. Links are easy to add to a web page using the anchor tag <a>. The <a> tag has three purposes:
![]() Link to External Web Page—Displays a link on the web page. When the user clicks the link, the browser requests the web page in the link from the server. The following is an example of adding a link to an external web page:
Link to External Web Page—Displays a link on the web page. When the user clicks the link, the browser requests the web page in the link from the server. The following is an example of adding a link to an external web page:
<a href="http://www.dayleycreations.com/">Dayley Creations</a>
![]() Link to Location on Current Web Page—Displays a link on the web page. When the user clicks the link, the browser changes the scroll down to the location so that the anchor linked to is visible.
Link to Location on Current Web Page—Displays a link on the web page. When the user clicks the link, the browser changes the scroll down to the location so that the anchor linked to is visible.
<a href="#local link">Link to Some Text Below</a>
![]() Web Page Anchor—Adds a link inside the web page that can be directly linked to either by the current page or by another web page. To define an anchor, you need to use the
Web Page Anchor—Adds a link inside the web page that can be directly linked to either by the current page or by another web page. To define an anchor, you need to use the id attribute. For example, to add the anchor for the above link, use the following:
<a id="local_link">Page Anchor</a>
Web page anchors can be useful when using JavaScript to build the link elements. For example, you can dynamically change the url attribute of the link to control where the link takes the user.
Using Image Elements
One of the greatest aspects of web pages is the capability to display images along with other graphics and text. Images are displayed using the <img> tag.
The actual image file on the web server to display in the <img> tag is determined by the src attribute. The size of the image on the screen is determined by the height and width attributes.
The following code shows some examples of displaying an image with different sizes and whitespace, as shown in Figure 3.7. Notice that when only the height or width is specified, the image is scaled to keep the aspect ratio, but when both are specified, the image is stretched to fit the specific height and width settings:
<img src="/code/images/canyon.jpg" height="200px"/>
<img src="/code/images/canyon.jpg" width="200px"/>
<img src="/code/images/canyon.jpg" height="200px" width="200px"/>

You will also be dealing with images frequently when creating dynamic web pages using jQuery and JavaScript because they allow you to quickly resize, move, hide, and add them to the web page. This allows your images to interact with mouse actions and other input from users.
Applying List Elements
List elements allow you to group a set of items together and have the browser automatically format them with bullets or numbers. Ordered lists are created using the <ol> tag, and bulleted lists are created using the unordered list tag <ul>. Items within the list are contained in the <li> tag. For example, the following code renders to Figure 3.8:
<ul>
<li>Yellowstone</li>
<li>Yosemite</li>
<li>Glacier</li>
<li>Arches</li>
<li>Zion</li>
</ul>

Creating Table Elements
Table elements are some of the more complex HTML elements. They are used to organize other elements on the screen in a series of rows and columns. They can be used for a variety of purposes, from laying out entire web pages to a simple table of data. This section covers the basics that you need to know for this book.
Tables are constructed using a series of tags that define the table, headers, body, and cells. The following lists the various tags that can be used when constructing a table:
![]()
<table>—Acts as the container element for all other table elements and defines the overall table.
![]()
<thead>—This element is not required, but it can be useful in that it allows you to group and define the header elements in a table, or refer to the parent of header elements directly from jQuery or JavaScript via the id attribute.
![]()
<tbody>—This is also not required, but it is useful to define the overall body of the table or refer to the parent of body elements directly from jQuery or JavaScript via the id attribute.
![]()
<th>—Defines a single header cell in a table.
![]()
<td>—Defines a cell in a table.
![]()
<tr>—Defines a single row in a table. This acts as a container for either <th> and/or <td> elements or cell elements.
![]()
<caption>—Provides a container for caption content. The caption content can be either text or other HTML elements.
![]()
<colgroup>—Enables you to place one or more columns in a table into a group that can be formatted together. This is also useful if you want to access a specific set of columns from jQuery or JavaScript via the id attribute.
![]()
<col>—Specifies the column properties for a single column within a <colgroup> element.
![]()
<tfoot>—This element is not required, but it can be useful in that it allows you to group and define the footer elements in a table or refer to the parent of footer elements directly from jQuery or JavaScript via the id attribute.
In HTML4, several attributes can be set on the table elements. Many of those have been deprecated in HTML5 because they were used for formatting size, alignment, and color, which should really be done with CSS styles. The following is a list of the more important attributes that you will still need to use on table elements:
![]()
border—Specifies whether the table cells should have borders.
![]()
colspan—Specifies the number of columns a cell should span. This allows an individual <td> or <th> element to occupy more than one column in the table.
![]()
rowspan—Specifies the number of rows a cell should span. This allows an individual <td> or <th> element to occupy more than one row in the table.
![]()
headers—Added to <td> or <th> elements. Allows you to specify the id value of one or more <th> elements. This creates an association to the header element that can be accessed from jQuery and JavaScript.
Try it Yourself: Creating HTML Tables
1. Create a new HTML document in the hour03 folder called hour0305.html (to match the filename on the book’s website).
2. Add the appropriate <html>, <head>, and <body> tags.
3. Add the following <table> element with the border attribute set to 1:
06 <table border=1></table>
4. Add the following <caption> element inside the <table> element to give the table a caption:
07 <caption>Favorite U.S. National Parks</caption>
5. Create the table headers by adding the following <thead> element to the <table> element. Notice that the third <th> sets the colspan to 2 so that it will cover the last two columns, as shown in Figure 3.9.
08 <thead>
09 <th>Park</th>
10 <th>Location</th>
11 <th colspan=2>Established</th>
12 </thead>
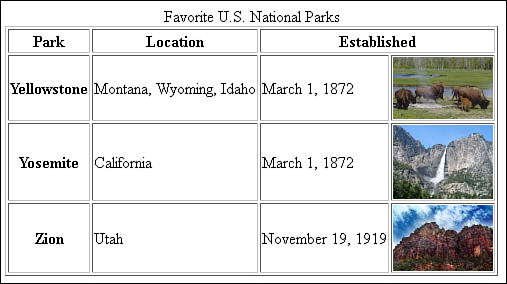
6. Add the <tr> elements shown in lines 13 through 18 of Listing 3.5. Notice in the example that follows that each of these <tr> elements contains four cells. The first cell is a row header because it uses the <th> tag. The next two cells are simple text in <td> elements, but in the fourth cell, the <td> element contains an <img> element (the .jpg files can be found on the book’s website).
13 <tr>
14 <th>Yellowstone</th>
15 <td>Montana, Wyoming, Idaho</td>
16 <td>March 1, 1872</td>
17 <td><img src="images/hour0302.jpg" width="100" />
18 </tr>
7. Save the document and open the following URL in the web browser to view the rendered results shown in Figure 3.9:
http://localhost/code/hour03/hour0305.html
LISTING 3.5 HTML Generating a Table with Headers, Rows, and Columns
01 <html>
02 <head>
03 <meta charset="UTF-8">
04 </head>
05 <body>
06 <table border=1>
07 <caption>Favorite U.S. National Parks</caption>
08 <thead>
09 <th>Park</th>
10 <th>Location</th>
11 <th colspan=2>Established</th>
12 </thead>
13 <tr>
14 <th>Yellowstone</th>
15 <td>Montana, Wyoming, Idaho</td>
16 <td>March 1, 1872</td>
17 <td><img src="images/hour0302.jpg" width="100" />
18 </tr>
19 <tr>
20 <th>Yosemite</th>
21 <td>California</td>
22 <td>March 1, 1872</td>
23 <td><img src="images/hour0303.jpg" width="100" />
24 </tr>
25 <tr>
26 <th>Zion</th>
27 <td>Utah</td>
28 <td>November 19, 1919</td>
29 <td><img src="images/hour0304.jpg" width="100" />
30 </tr>
31 </table>
32 </body>
33 </html>
Implementing Form Elements
Another extremely useful set of tags in HTML are the form tags. These tags provide the building blocks to render user input forms that enable you to gain input from the user. Browsers know how to render the form elements to display things like text boxes, buttons, and lists.
Following is a list of the more common form tags you will use in jQuery and JavaScript to create dynamic form elements:
![]()
<form>—This is the root element of the form. All other elements are contained inside.
![]()
<fieldset>—Acts as a container allowing you to group several form elements together. In HTML5, you can set the disabled attribute of the fieldset to disable it from user input. You can also use jQuery and JavaScript to access the children of the fieldset and modify them from code.
![]()
<legend>—Tells the browser to add a caption to the fieldset.
![]()
<label>—Allows you to tie a label element to an <input> element in the form by setting the for attribute to the id attribute value of the <input> element. This adds the advantage that the mouse events for the input element are also triggered for the <label>.
![]()
<input>—The input tag is really a wrapper for several types of input components. The input that is rendered by the browser will depend on the value of the type attribute. The following is a list of type elements that can be specified in the input tag: button, checkbox, color, date, datetime, email, file, hidden, image, month, number, password, radio, range, reset, search, submit, tel, text, time, url, and week.
![]()
<textarea>—Different from the other inputs, this provides a resizable area where the user can type in multiple lines of text. The cols and rows attributes define the initial size.
![]()
<select>—Acts a container for a drop-down list of items.
![]()
<option>—Used inside the <select> element to define a single item in the list. The value attribute of the selected item is also the value of the <select> element.
![]()
<button>—Defines a clickable button element. The type attribute of button tells the browser whether to use the button to submit the form, reset the values, or act as a simple input button.
The form elements have a different set of attributes that provide access to and modify the look and behavior of the element. The following are some of the more important ones:
![]()
name—This option specifies a name that can be used when submitting the form.
![]()
value—This option specifies the value of the form element. For elements such as text <input>, what you specify for value will be added as text in the rendered text box. The value attribute is also accessible via JavaScript, so you can get the value of any form element directly from JavaScript.
![]()
disabled—When this attribute is added, the element will be displayed; however, it will appear disabled so the user cannot interact with the form element. When you enable and disable elements from JavaScript or jQuery, this value is modified dynamically. The disabled attribute is a Boolean, so you do not need to include a value. The following shows an example of how to include the disabled attribute:
<input type="text" disabled />
Try it Yourself: Adding Forms to Web Pages
1. Create a new HTML document in the hour03 folder called hour0306.html (to match the filename on the book’s website).
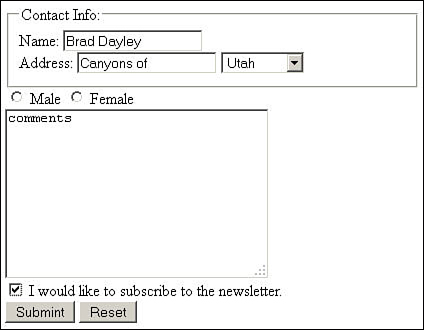
2. Add the appropriate <html>, <head>, and <body> tags.
3. Add a <form> element.
4. Inside the <form> element add the following <fieldset> to request contact info. The <fieldset> includes a <legend> element that provides a caption, two basic text <input> tags for name and address, and then a <select> element with three <option> children to provide a drop-down list of states. Figure 3.10 shows the rendered <fieldset> with a box around it and the elements.
07 <fieldset>
08 <legend>Contact Info:</legend>
09 Name: <input type="text" name="name"><br>
10 Address: <input type="text" name="name">
11 <select name="state">
12 <option value="UT">Utah</option>
13 <option value="CA">California</option>
14 <option value="NY">New York</option>
15 </select>
16 </fieldset>
5. Next add the radio buttons to select gender. Add the following <label> and <input> fields to the form. The type attribute of the <input> elements is set to radio. Also, notice that the <label> elements include a for attribute that links them to the radio <input> elements. Because the <label> is linked to the <input>, when you click the label it toggles the radio button.
17 <input id="maleRB" type="radio" name="gender" value="male">
18 <label for="maleRB">Male</label>
19 <input id="femaleRB" type="radio" name="gender" value="female">
20 <label for="femaleRB">Female</label><br>
6. Add a comments element by adding the following <textarea> element. Notice that the rows and cols attributes define the size, and we include the word “comments” initially in the text area rather than adding a label outside. The <br> tag at the end causes the following form elements to be on a new line.
21 <textarea rows="10" cols="30">comments</textarea><br>
7. Provide a check box to enable a subscription to a newsletter by adding the following <input> and <label>. The type of the <input> element is set to checkbox so the browser knows to render it as a check box. Also, the <label> element uses the for attribute so that the user can click the check box or the label to toggle it on or off.
22 <input id='newsCB' type="checkbox" name="news" value="news">
23 <label for="newsCB">
24 I would like to subscribe to the newsletter.
25 </label><br>
8. Add the following code to include two button elements: a submit button and a reset button. When the submit button is pressed, the browser submits the form. When the reset button is pressed, the values in the form are reset.
26 <button type="submit" name="SubmitButton" value="Submit">Submit</button>
27 <button type="reset" name="ResetButton" value="Reset">Reset</button>
9. Save the document and open the following URL in the web browser to view the rendered results shown in Figure 3.10:
http://localhost/code/hour03/hour0306.html
LISTING 3.6 HTML Generating a Form with Text Inputs and Selects
01 <html>
02 <head>
03 <meta charset="UTF-8">
04 </head>
05 <body>
06 <form>
07 <fieldset>
08 <legend>Contact Info:</legend>
09 Name: <input type="text" name="name"><br>
10 Address: <input type="text" name="name">
11 <select name="state">
12 <option value="UT">Utah</option>
13 <option value="CA">California</option>
14 <option value="NY">New York</option>
15 </select>
16 </fieldset>
17 <input id="maleRB" type="radio" name="gender" value="male">
18 <label for="maleRB">Male</label>
19 <input id="femaleRB" type="radio" name="gender" value="female">
20 <label for="femaleRB">Female</label><br>
21 <textarea rows="10" cols="30">comments</textarea><br>
22 <input id='newsCB' type="checkbox" name="news" value="news">
23 <label for="newsCB">
24 I would like to subscribe to the newsletter.
25 </label></br>
26 <button type="submit" name="SubmitButton" value="Submit">Submit</button>
27 <button type="reset" name="ResetButton" value="Reset">Reset</button>
28 </form>
29 </body>
30 </html>
Adding Some Advanced HTML5 Elements
HTML5 adds several more advanced elements that you can use to enhance dynamic web pages. A few of the graphic and media elements are covered in the following sections because a direct relationship exists between those and JavaScript/jQuery programming.
Using HTML5 Graphical Elements
The two main HTML5 graphical elements are <svg> and <canvas>. These two elements can be added and manipulated via jQuery and JavaScript. This allows you to dynamically change complex graphics in your web pages by drawing directly to the browser window from your scripts.
That means you can dynamically add graphical elements in the browser without needing to load files from the server.
Creating SVG Graphics in HTML5
The <svg> element allows you to add scalable vector graphics to your web pages. Scalable vector graphics are composed of a series of lines, arcs, and fills that make up paths. When rendered by the browser, these paths can produce simple to complex graphics. The advantage to using vector graphics is that they retain their crisp edges even when scaled inside the browser. They look sharper onscreen and when printed.
Adding SVG graphics can get extremely complex, so the next section gives you an idea of the HTML elements involved so that you can understand attributes and style properties. From JavaScript and jQuery, you will be able to access the properties for various reasons, such as creating and animating graphics in your web page.
Adding Basic Geometric Shapes
First, you’ll create some basic geometric shapes. The following code from Listing 3.7 creates a simple ellipse and a polygon, shown in Figure 3.11. In the <ellipse> element, you specify the center of the ellipse as cx and cy coordinates; then you specify the radius in both the horizontal and vertical directions using the rx and ry attributes. Notice that you also specify a stroke color and width, as well as the fill color. The <polygon> element is a bit different—the points attribute is set to a series of x,y coordinates separated by spaces.
08 <svg xmlns="http://www.w3.org/2000/svg" version="1.1" height="200">
09 <ellipse cx="100" cy="100" rx="80" ry="50"
10 stroke="black" stroke-width="2" fill="red" />
11 <polygon points="100,10 40,180 110,120 160,180"
12 style="fill:gold; stroke:black; stroke-width:5; fill-rule:evenodd;" />
13 </svg>

Adding Paths
Another example is using paths to draw some more complex shapes. A path is simply a collection of lines that are all connected. The lines may be straight, parabolic arcs, or Bezier curves. To create a path, add a <path> element to the <svg> element and define the d attribute. The d attribute contains a series of commands that tells the browser how to render the path on the screen. The following is a list of the more common commands:
![]()
M x,y—Specifies to move to coordinates x,y. Capital M specifies absolute coordinates; lowercase m will specify relative coordinates.
![]()
h n—Specifies to draw a horizontal line n pixels. This value can be positive or negative. Negative means left. Capital H is absolute and lowercase h is relative.
![]()
v n—Specifies to draw vertical line n pixels. This value can be positive or negative. Negative means up. Capital V is absolute and lowercase v is relative.
![]()
l x,y—Draws a line from the current coordinates to the coordinate x,y. You can specify additional sets of coordinates separated by a space to add additional line segments. Capital L is absolute and lowercase l is relative.
![]()
c x1 y1 y2 y2 x y—Draws a Bezier curve from the current coordinates to x,y using x1,y1 as a control point of the curve for the start and x2,y2 as control points for the curve. Figure 3.12 illustrates how the control points work. Capital C is absolute and lowercase c is relative.

![]()
a rx ry x-axis-rotation large-arc-flag sweep-flag x y—Draws an arc from the current coordinates to x,y. The size and orientation of the ellipse are defined by two radii rx, ry as well as the x-axis-rotation value, which specifies the angle of the x axis of the arc. The large-arc-flag and sweep-flag are set to 0 or 1 and define which part of the parabolic curve is rendered to the screen. Capital A is absolute and lowercase a is relative.
![]()
z—Close the path, which means that the last coordinate will be connected to the beginning of the path.
The following code in Listing 3.7 illustrates utilizing a couple of paths to create a disconnected pie graph, as shown in Figure 3.13. Notice that the <path> data begins with an M command to move to a specific absolute coordinate. Then an h50 command draws a line to the right 50 pixels; next, an a command draws an arc with a 50-pixel radius in both directions up 50 pixels and to the right 50 pixels. Finally, the z command closes the arc and you have the first piece of pie. The next <path> element draws the main portion of the pie in the same way.
14 <svg xmlns="http://www.w3.org/2000/svg" version="1.1" height="200">
15 <path d="M100,90 h-50 a50,50 0 1,0 50,-50 z"
16 fill="none" stroke="blue" stroke-width="1" />
17 <path d="M90,80 v-50 a50,50 0 0,0 -50,50 z"
18 fill="green" stroke="none" stroke-width="2" />
19 </svg>

In addition to using paths to create graphical elements, you can also use paths to create some cool textual effects. For example, the following code adds a path with no fill as an SVG definition in a <defs> container. The path draws a full circle using two arc segments. The id attribute is set to path1. Next, an SVG <text> element is created that defines some text.
Notice that inside the <text> element is a <textPath> element that references the path1 definition. The result is that the text is drawn on the path, as shown in Figure 3.14. I also added a path element to the <svg> tag that draws the hands using a couple of line segments.
20 <svg xmlns="http://www.w3.org/2000/svg" version="1.1" height="350">
21 <defs>
22 <path id="path1" d="M 77,210 a 1,1 0 1,1 200,0 a 1,1 0 1,1 -200,1"/>
23 </defs>
24 <text x="10" y="10" style="fill:blue;font-size:31px;">
25 <textPath xlink:href="#path1">
26 Teach Yourself jQuery and JavaScript in 24 Hours
27 </textPath>
28 </text>
29 <path d="M 175,130 v90 h60" stroke="black" stroke-width="5" fill="none"/>
30 </svg>

The SVG examples can be found in the code/hour03/hour0307.html file on the website. Using these techniques, you can create a vast amount of graphical shapes.
LISTING 3.7 JavaScript and HTML Code That Uses <svg> Elements to Create a Pie Graph and a Text Border Around a Clock
01 <!DOCTYPE html>
02 <html>
03 <head>
04 <title>Hour 3-7</title>
05 <meta charset="UTF-8" />
06 </head>
07 <body>
08 <svg xmlns="http://www.w3.org/2000/svg" version="1.1" height="200">
09 <ellipse cx="100" cy="100" rx="80" ry="50"
10 stroke="black" stroke-width="2" fill="red" />
11 <polygon points="100,10 40,180 110,120 160,180"
12 style="fill:gold; stroke:black; stroke-width:5; fill-rule:evenodd;" />
13 </svg>
14 <svg xmlns="http://www.w3.org/2000/svg" version="1.1" height="200">
15 <path d="M100,90 h-50 a50,50 0 1,0 50,-50 z"
16 fill="none" stroke="blue" stroke-width="1" />
17 <path d="M90,80 v-50 a50,50 0 0,0 -50,50 z"
18 fill="green" stroke="none" stroke-width="2" />
19 </svg>
20 <svg xmlns="http://www.w3.org/2000/svg" version="1.1" height="350">
21 <defs>
22 <path id="path1" d="M 77,210 a 1,1 0 1,1 200,0 a 1,1 0 1,1 -200,1"/>
23 </defs>
24 <text x="10" y="10" style="fill:blue;font-size:31px;">
25 <textPath xlink:href="#path1">
26 Teach Yourself jQuery and JavaScript in 24 Hours
27 </textPath>
28 </text>
29 <path d="M 175,130 v90 h60" stroke="black" stroke-width="5" fill="none"/>
30 </svg>
31 </body>
32 </html>
This section only scratched the surface of SVG. If you would like to learn more about SVG graphics in HTML5, you can check out the docs here: www.w3.org/TR/SVG/Overview.html.
Adding a Canvas for Dynamic Design
The <canvas> element also allows you to dynamically add and manipulate image-type graphics to your web pages. The canvas allows you to paint color, lines, text, and images onto an area of the browser screen from JavaScript.
The difference between <svg> elements and <canvas> elements is that rather than being a path, the graphics are stored as a pixel by pixel map where each pixel is a different color and opaqueness.
Most of the work done with <canvas> element will be done in jQuery and JavaScript scripts. In HTML, all you need to do is add the canvas element with an id that you can access from your scripts. To get an idea of the relationship between <canvas> elements and JavaScript, consider the code in Listing 3.8.
The canvas element only defines a container that can be drawn on. All the work is done in the <script> element. Inside the script, the first two lines get the myCanvas element and get a 2d context object. The context object is the graphical object that provides methods to draw on the canvas. Lines 13 and 14 set the line width and color that will be rendered by a stroke() call.
11 var c=document.getElementById("myCanvas");
12 var ctx=c.getContext("2d");
13 ctx.lineWidth="1";
14 ctx.strokeStyle="blue";
The rest of the JavaScript draws three sides of a cube onto the canvas. For each side, the beginPath() call starts a new path. Then you use createLinearGradient() and addColorStop() to create a gradient fill and set the context fill style.
17 var grd=ctx.createLinearGradient(100,50,100,5);
18 grd.addColorStop(0,"blue");
19 grd.addColorStop(1,"white");
20 ctx.fillStyle=grd;
Next, to build the cube side, begin with a moveTo() call to move to a specific coordinate in the canvas and then a series of lineTo() to add the lines. At this point, there is still nothing written to the canvas. To write the pixels to the canvas, you can use the stroke() call and/or fill() calls to draw lines and fill colors on the canvas. The results are shown in Figure 3.15.
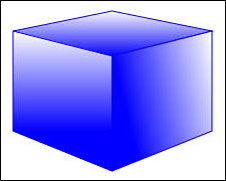
LISTING 3.8 JavaScript and HTML Code That Draws a Cube onto a <canvas> Element
01 <html>
02 <head>
03 <title>Hour 3-8</title>
04 <meta charset="UTF-8" />
05 </head>
06 <body>
07 <canvas id="myCanvas" width="300" height="300">
08 Sorry Your Browser Doesn't Support HTML5 Canvas
09 </canvas>
10 <script>
11 var c=document.getElementById("myCanvas");
12 var ctx=c.getContext("2d");
13 ctx.lineWidth="1";
14 ctx.strokeStyle="blue";
15 //top
16 ctx.beginPath();
17 var grd=ctx.createLinearGradient(100,50,100,5);
18 grd.addColorStop(0,"blue");
19 grd.addColorStop(1,"white");
20 ctx.fillStyle=grd;
21 grd.addColorStop(0,"blue");
22 ctx.moveTo(1,25);
23 ctx.lineTo(100,5);
24 ctx.lineTo(200,25);
25 ctx.lineTo(100,50);
26 ctx.fill();
27 ctx.stroke();
28 //left
29 ctx.beginPath();
30 var grd=ctx.createLinearGradient(0,125,0,25);
31 grd.addColorStop(0,"blue");
32 grd.addColorStop(1,"white");
33 ctx.fillStyle=grd;
34 ctx.moveTo(1,25);
35 ctx.lineTo(100,50);
36 ctx.lineTo(100,165);
37 ctx.lineTo(1,125);
38 ctx.lineTo(1,25);
39 ctx.fill();
40 ctx.stroke();
41 //right
42 ctx.beginPath();
43 var grd=ctx.createLinearGradient(100,50,200,25);
44 grd.addColorStop(0,"blue");
45 grd.addColorStop(1,"white");
46 ctx.fillStyle=grd;
47 ctx.moveTo(100,50);
48 ctx.lineTo(200,25);
49 ctx.lineTo(200,125);
50 ctx.lineTo(100,165);
51 ctx.fill();
52 ctx.stroke();
53 </script>
54 </body>
55 </html>
This section only scratched the surface of <canvas> elements. If you would like to learn more about canvas graphics in HTML5, you’ll find some good docs and examples here: www.w3schools.com/tags/ref_canvas.asp
Adding Media Elements
Some additional HTML5 elements that you should be aware of are the <video> and <audio> tags. These tags allow you to add media elements to web pages in the form of audio and video. Using jQuery and JavaScript, you can reference these elements and manipulate them dynamically. This allows you to change the size, notify the user when the media has loaded, or just control the playback:
The following code shows an example of the <video> and <audio> tags, and Figures 3.16 and 3.17 show the rendered components:
<video width="320" height="240" controls>
<source src="images/movie.mp4" type="video/mp4">
<source src="images/movie.ogg" type="video/ogg">
Sorry, your browser does not support the video tag.
</video>
<audio controls>
<source src="song.mp3" type="audio/mp3">
Sorry, your browser does not support the audio element.
</audio>


Summary
This hour, you learned the basics of HTML web page development. You also learned how some of the elements can be dynamically accessed via jQuery and JavaScript so that you can better design interactions into your web pages. In addition, you learned the basics necessary to design your HTML elements to support implementing CSS layouts and styling.
Several Try It Yourself walkthroughs took you step by step through adding styled containers, tables, and web forms. In subsequent hours, you use the basics learned in this hour to implement dynamic jQuery and JavaScript.
Q&A
Q. Why is there HTML5 and HTML4 and not just HTML? Which one should I use?
A. It takes web browsers some time to adopt the standards in the newer versions of HTML. Many of the HTML5 features will not work in older browsers, causing errors on the HTML pages and a very poor user experience. Because of that, HTML4 is kept as a different standard until HTML5 is fully supported on all web browsers. Which one you select to use depends on who will be viewing your web pages. If the web pages are for everyone on the Internet, you need to continue to support HTML4 until the browsers fully support HTML5. If the web pages are only for users internal to your company, and you can require a certain level of web browser, you can choose a web browser and version that fully supports HTML5 and run with the new features.
Q. Why even bother creating HTML documents with elements when you can dynamically create them from JavaScript?
A. The best paradigm to use for dynamic web pages is to build the bare bones in HTML, style them in CSS, and then add interactions with JavaScript. The reason you should use HTML documents with the full bare bones is that it is much easier to understand and adjust the structure of the web pages via HTML rather than in JavaScript. Also, if you are localizing your web pages, it is often easier to localize an HTML document in contrast to dynamic JavaScript strings.
Workshop
The workshop consists of a set of questions and answers designed to solidify your understanding of the material covered in this hour. Try to answer the questions before looking at the answers.
Quiz
1. What HTML element attribute is used to change things such as the background color and size of elements?
2. What is the <noscript> element used for?
3. What is the difference between the <canvas> and <svg> elements?
4. True or False: You cannot have an HTML page link to a location on the same page.
5. What is the difference between a block and inline HTML elements?
Quiz Answers
1. style.
2. The <noscript> allows you to display a message on the HTML page if JavaScript is not active in the user’s web browser.
3. The <canvas> element displays images as pixel-based graphics and supports images such as JPEG and PNG; <svg> supports vector-based graphics as a series of paths that remain crisp when scaled.
4. False. You can use the <a href"# syntax to link to a local anchor on the web page.
5. Block elements take up the full width of the screen so elements after them flow below, whereas multiple inline elements can be displayed on the same line because they take up only the amount of room necessary for the content within them.
Exercises
1. Extend the example in Listing 3.5 to include some additional National Parks.
2. Use the example in Listing 3.8 as a base and change the cube to a sphere by making all the top points in the path go to the same point (100,15). You will need to remove the portion that draws the top of the cube, change the moves, and remove some of the lineTo() functions.