
16. Refocusing

In This Chapter
Applying the Field Blur, Iris Blur, and Tilt-Shift filters
Applying the Lens Correction filter
Applying the Motion Blur filter
Applying the Smart Sharpen filter
Applying the Unsharp Mask filter
Photographers use focusing techniques to enhance a scene, such as a shallow depth of field to differentiate a subject from its background or blurriness to convey a sense of motion. In Photoshop, you can imitate these camera techniques, as well as correct distortion problems that arise from the inherent limitations of a camera lens.
In this chapter, you’ll blur areas with the Lens Blur filter and the new Iris Blur, Field Blur, and Tilt-Shift filters; correct distortion via the Lens Correction filter; simulate movement via the Motion Blur filter; and apply sharpening via the Sharpen tool and the Smart Sharpen and Unsharp Mask filters.
Applying the Lens Blur filter
In most photos, the foreground is naturally more in focus than the background. If your camera lets you adjust the depth of field via the aperture, or f-stop setting (in other words, it’s not a mobile device or “point-and-shoot” type of camera), you can control the degree to which your subject matter stays in focus. Objects that are outside the depth of field — either in front of it or beyond it — will be blurred. Other factors affecting the focus are the zoom setting and the type of camera lens used. With the Lens Blur filter in Photoshop, you can simulate the depth of field that is created by a camera. You will use a mask to control which areas are kept in focus and use dialog options to control the level of blurriness.
To apply the Lens Blur filter
1. Click an image layer (or duplicate the Background via Ctrl-J/Cmd-J), then click the Add Layer Mask button ![]() on the Layers panel.
on the Layers panel.
2. Keep the layer mask thumbnail selected. Choose the Gradient tool ![]() (G or Shift-G). On the Options bar, click the Linear Gradient button; also click the Gradient picker arrowhead, then click the “Black, White” preset (it’s in the default library).
(G or Shift-G). On the Options bar, click the Linear Gradient button; also click the Gradient picker arrowhead, then click the “Black, White” preset (it’s in the default library).
3. To apply the gradient to the mask, drag across the entire document window (e.g., from bottom to top, or diagonally); Shift-drag to constrain the angle.
4. Shift-click the layer mask thumbnail to disable the layer mask. It will be used by the Lens Blur filter, but you need to hide it so it doesn’t mask the layer imagery.
5. Click the layer thumbnail, then choose Filter > Blur > Lens Blur.
6. The Lens Blur dialog opens.A Check Preview, and choose a processing speed for the preview: For a large file, say, larger than 100 MB, click Faster (previewing may be slow in a large image), or for a smaller file, you can click More Accurate for a higher-quality preview.

A After Shift-dragging upward in the document with the Gradient tool (starting from the bottom of the image), we opened the Lens Blur dialog.
7. In the Depth Map area, do both of the following:
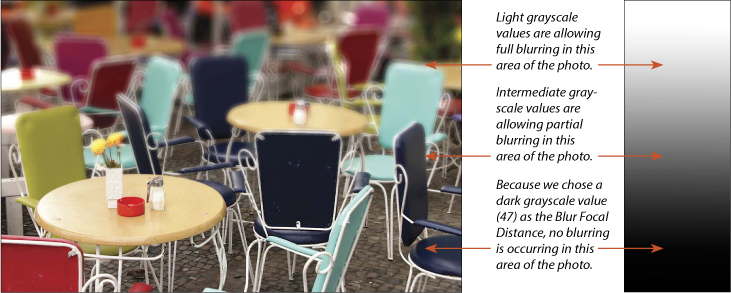
From the Source menu, choose Layer Mask as the source for the depth map. The grayscale values in the source will control which areas remain in focus. (A setting of None would blur the whole image uniformly.)
To set the Blur Focal Distance, in the preview, click the area that you want to keep in focus. You can also use the slider to specify which grayscale value (from 0, black, to 255, white) in the depth map will remain in full focus. In either case, you are choosing a grayscale value from the gradient in the layer mask. Shades lighter or darker than this value will become progressively more blurry. You’ll see the effect of this after setting the Radius in the next step.
Optional: Check Invert to swap the location where full blurriness occurs with the location where the image is in full focus.
8. In the Iris area, use the Radius value to control the intensity of the blur. This produces the most pronounced effect of all the controls in the dialog. (The other Iris sliders produce photographic-type highlights.) Keep the Shape setting on the default setting of Hexagon (6).
• At any time while choosing settings, you can uncheck, then recheck Preview to compare the original and blurred images.
9. Blurring averages the values of neighboring pixels and tends to gray out white specular highlights. In the Specular Highlights area, you can use the Brightness slider to brighten highlight areas that have become blurred and lower the Threshold slider slightly to control the tonal range that the Brightness setting affects. At 255, only pure white pixels will be brightened; at a low setting, most of the blurred areas will be affected.
10. Optional: If the original photo contained some noise (texture) that the filter smoothed too much, you can reintroduce it via the Noise: Amount slider; start with a low value. Click Distribution: Uniform (flat noise distribution) or Gaussian, and optionally check Monochromatic to add only grayscale (not color) pixels.
11. Click OK.A–B
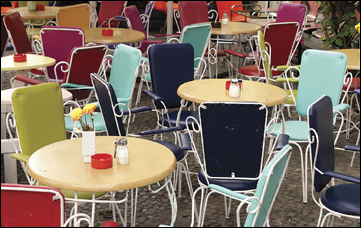
A In the original photo, both the foreground and background areas are in focus.
B Using the grayscale values in our mask, the Lens Blur filter is blurring the background of the photo. Our dialog settings are shown on the preceding page; a detail of the mask is shown at right.
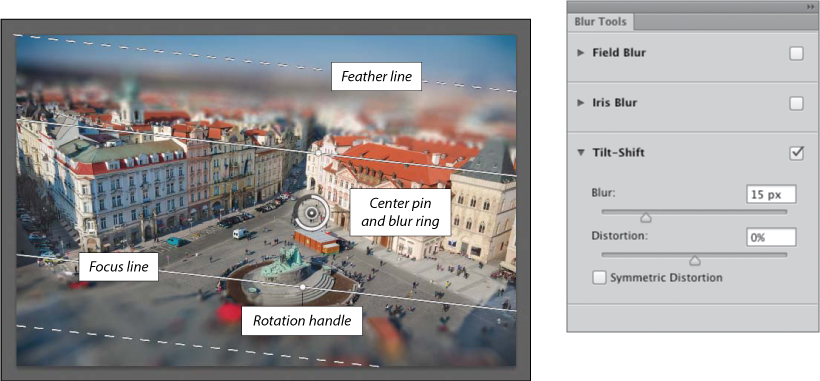
Applying the Field Blur, Iris Blur, and Tilt-Shift filters
The Field Blur, Iris Blur, and Tilt-Shift filters (collectively called the Blur Gallery) provide powerful and flexible on-image and slider controls for blurring targeted areas of an image. Note: Make sure Use Graphics Processor is checked in Preferences > Performance.
To apply the Field Blur, Iris Blur, or Tilt-Shift filter 
1. Duplicate the Background or image layer, preferably in an image that is all or mostly in focus.
2. Choose Filter > Blur > Field Blur to produce multiple blur areas, Iris Blur to blur areas around a focus ellipse, or Tilt-Shift to apply blurring in straight bands across portions of the image. (These filters can’t be applied to a Smart Object.)
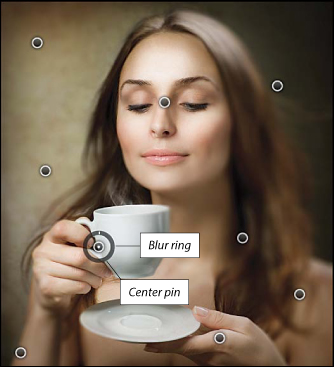
3. A default pin with controls appears in the image, and a Blur Tools panel appears in a dock on the right. On the Options bar, check Preview.
To control the degree of blurring, either adjust the Blur slider in the dock or, in the image, drag around the blur ring that surrounds the pin (add more black to the ring to reduce the blur, or add more white to the ring to increase the blur).
4. For a Field Blur, add another pin by clicking in the image, then set the Blur value to 0% (full focus) for one pin and to a higher value for the other pin (blurring). To use the full potential of this filter, add more pins, some with a Blur value of 0 and some with a Blur value greater than 0 (see the example on the next page).
For an Iris Blur, do any of the following: To adjust the diameter of the focus ellipse, drag one of the small outer round handles; to rotate the ellipse, drag outside it (double-arrow pointer); to reposition where the blurring begins, drag one of the feather handles (to move one feather handle separately, drag it while holding down Alt/Option); to change the ellipse to a rounded rectangle, drag the square Roundness knob outward (see the example on page 314).
For a Tilt-Shift Blur, do any of the following: To adjust where the blurring begins, drag either or both of the solid focus lines; to adjust the transition between the in-focus and blurred areas, drag either or both of the dashed feather lines; to rotate the focus area, drag a rotation handle to the left or right (see the example on page 315).
5. You can also do any of the following:
To add a pin, click in the image.
To reposition a pin, drag its center point. You can move a pin outside the canvas area.
To delete a pin, click its center point, then press Backspace/Delete.
To control the amount of focus within a selected ellipse for Iris Blur, or between the two feather lines for a Tilt-Shift blur, adjust the Focus setting on the Options bar.
6. To hide the on-image controls to judge the blurring effect, press and hold down H (then release).
7. Optional: To brighten the blur highlights to the point that they become abstract, colored orbs, click a pin, check the box for Bokeh, then make any of these adjustments (A–C, page 316):
To control the amount of highlight areas in the bokeh, adjust the Light Bokeh slider.
To control the amount of color variation in the bokeh, adjust the Bokeh Color slider.
To control the brightness values in which the bokeh can appear, drag the Light Range sliders. For smaller bokeh spots, position the sliders near each other at one end of the bar or the other.
For higher-quality bokeh (but slower rendering), check High Quality on the Options bar.
8. Optional: To save the blur mask that Photoshop created for the filter to an alpha channel, check Save Mask to Channels on the Options bar (see the example on page 317). To preview the mask, press and hold down M.
9. To accept your blur filter edits, press Enter/Return or click OK on the Options bar.
• To remove all the pins from the image, click the Remove All Pins button ![]() on the Options bar.
on the Options bar.
• To switch to a different filter in the Blur Tools panel, uncheck the box for the current filter, then expand the category for the desired one.
• Although you could apply more than one of the Blur Gallery filters simultaneously to the same photo, we don’t recommend doing so, because it is likely to blur the whole photo. One exception might be to add a small Field Blur ring to an area that’s in sharp focus.
The Field Blur Filter
Use the Field Blur filter when you need the most flexibility and control in blurring specific areas of an image (such as the hair, arms, and background in the photo on this page), while keeping other (more important) areas in sharp focus.
Use as many pins as you like, but be sure place a few pins with a Blur value of 0% in areas that you want to keep in focus and place other pins with a Blur value between 5% and 100% in areas that you want to blur (the blurring occurs between the high and low values).A–C You can reposition any pin individually by dragging it in the image.

A This is the original image.
B We applied the Field Blur filter using a Blur value of 0% for the pins on the woman’s face and hands to keep those areas in focus, and Blur values above 10% for the other pins.

C This is the result.
The Iris Blur Filter
The Iris Blur filter applies blurring around a focus ellipse. You can use just a single pin or click in the image to create additional ones.A–D

A This is the original image.

B We chose the Iris Blur filter. This is the default widget.
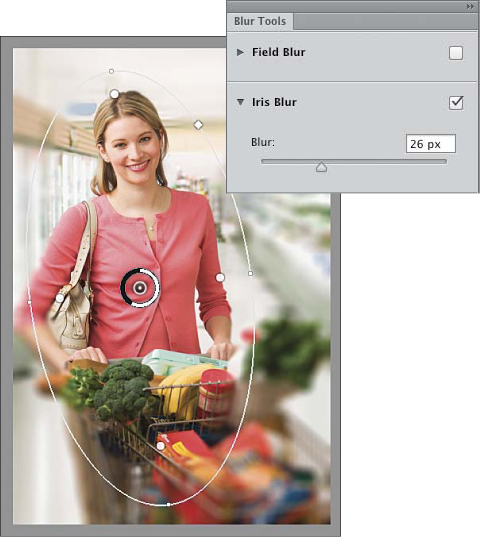
C We moved the ellipse slightly to the left by dragging the pin, elongated the ellipse, rotated it slightly to match the angle of the figure, then held down Alt/Option and dragged just the top feather handle upward to keep the woman’s face in full focus.

D In the final image, the figure and part of the shopping cart are in focus, while the background is blurred.
The Tilt-Shift Filter
The Tilt-Shift filter applies blurring in two straight bands across the image, while keeping a band in the center in focus. You can control the width of the blurred area by dragging either or both of the focus lines, adjust the amount of feathering by dragging either or both of the feather lines, or shift the whole widget to a new angle by dragging a rotation handle slightly.A–C You can also choose a negative Distortion value to distort a blurred area along imaginary lines that curve around the pin, or a positive value to distort a blurred area along lines that radiate outward from the pin. Additionally, you can check Symmetric Distortion to apply the distortion to both blur areas.

A This is the original image.
B We chose the Tilt-Shift filter settings shown at right, then rotated and dragged the feather and focus lines.

C This is the result of our applying the Tilt-Shift filter.
Bokeh
A This is the original image.

B We created multiple pins for the Field Blur filter, checked Bokeh, increased the Light Bokeh value to brighten the bokeh, increased the Bokeh Color to intensify the color saturation, and moved the Light Range sliders near each other at the right end of the bar to limit the effect to the image highlights.

C This is the final image.
Using the Mask from a Field, Iris, or Tilt-Shift Blur
As stated in step 8 on page 312, you can save the blur mask that Photoshop creates for the Field Blur, Iris Blur, or Tilt-Shift filter to an alpha channel by clicking Save Mask to Channels on the Options bar. After accepting the filter, save your document.
To use the mask, before applying an image edit (such as an adjustment layer, artistic filter, or brush strokes), hold down Ctrl/Cmd and click the alpha channel thumbnail on the Channels panel ![]() to load the mask as a selection. The selection will protect the nonblurred areas of the layer.A–D
to load the mask as a selection. The selection will protect the nonblurred areas of the layer.A–D

A When we applied the Iris Blur filter to this image, we checked Save Mask to Channel.

B We held down Ctrl/Cmd and clicked the alpha channel thumbnail to load the Blur Mask as a selection.

C We created a Color Balance adjustment layer, then moved the Yellow slider to the left to make the image slightly warmer.

D Finally, we reloaded the selection, then used a Levels adjustment to lighten the image. The mask on each adjustment layer is hiding the adjustment from the center of the image.
Applying the Lens Correction filter
The Lens Correction filter lets you correct a photo that shows signs of lens distortion, such as a building or column that tilts away from the camera (called “keystoning”), color fringes along high-contrast edges (chromatic aberration), and under- or overexposure at the edges of a photo (vignetting).
To correct lens distortion
1. Open an RGB photo.A On the Layers panel, click an image layer or duplicate the Background.

A Lens distortion from the camera caused the columns on the temple to appear as if they’re learning inward.
2. Right-click the layer to be corrected, and choose Convert to Smart Object. (The filter will be applied as a Smart Filter, so as to keep the settings editable.)
3. Choose Filter > Lens Correction (Ctrl-Shift-R/Cmd-Shift-R). At the bottom of the dialog, check Preview and uncheck Show Grid.
4. To try an automatic correction first, in the Auto Correction tab, from the menus under Search Criteria, choose your Camera Make and Camera Model (if your model isn’t listed, choose All); from the Lens Model menu, choose your lens or the closest match to it. On the list of Lens Profiles, click the nearest match to your lens.B
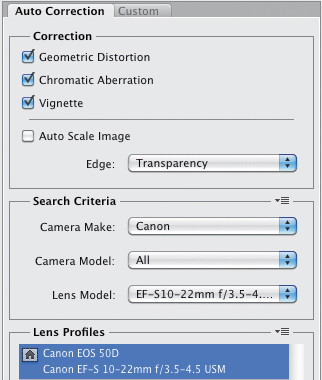
B Our selection of these settings in the Auto Correction tab of the Lens Correction dialog produced only a minor improvement.
Right-click the Lens Profile that you have chosen. If the lens setting was recorded in the camera metadata, that setting (e.g., “28mm, f/4.5, 1 m.”) will be chosen automatically. If the correct setting isn’t listed, pick a setting that is the closest match to the one that was used to capture the photo.
5. Under Correction, check the problem in the photo that needs correction: Geometric Distortion, Chromatic Aberration, or Vignette.
Check Auto Scale Image, and from the Edge menu, choose Transparency.
6. If the auto correction wasn’t fully successful, uncheck Auto Scale Image, click the Custom tab, then do any of the following:
Under Geometric Distortion, reduce the Remove Distortion value to spread the image out (to fix pincushion distortion), or increase this value to pinch the image inward (to fix barrel distortion).
Use the Chromatic Aberration sliders to correct any color fringes along high-contrast edges.
Use the Vignette sliders to correct under- or overexposure at the edges of the image.
7. To evaluate a correction for geometric distortion relative to grid lines, check Show Grid (below the preview window). You can change the grid size via the Size slider or change the grid color via the Color swatch.
8. To correct geometric distortion further, under Transform, do any of the following:
Reduce the Vertical Perspective value to widen the top of the image (A, next page), or increase it to widen the bottom. After doing this, you may need to readjust the Remove Distortion value.
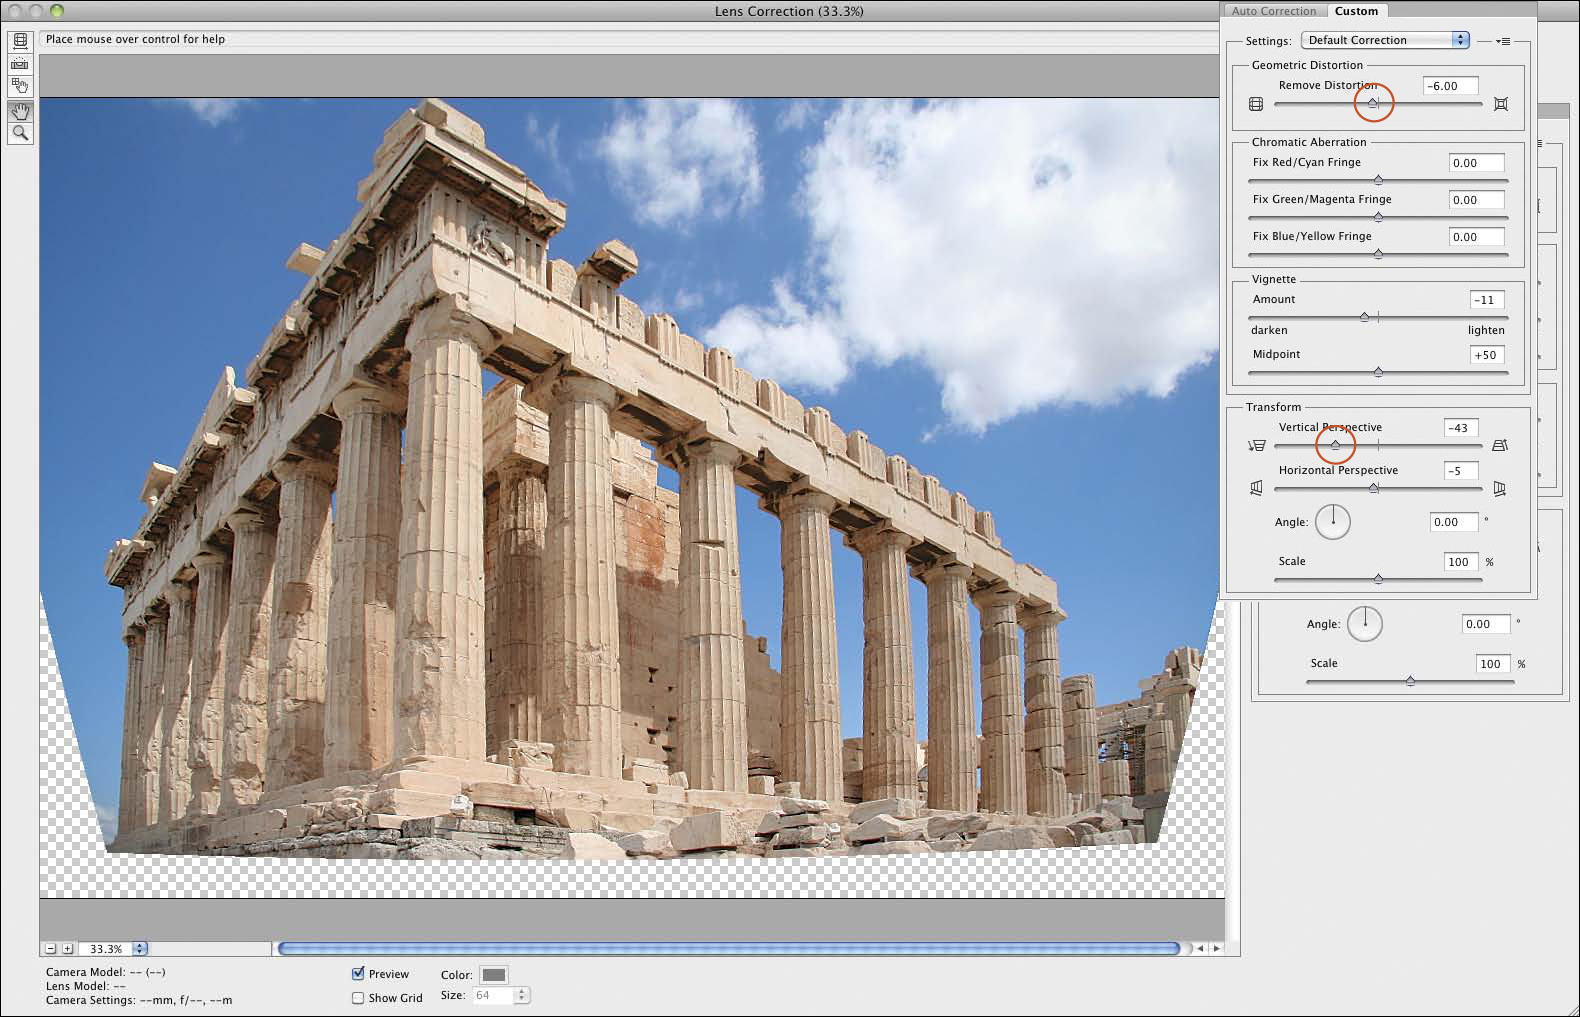
A To widen the top of the photo, in the Custom tab, we reduced the Remove Distortion value slightly and reduced the Vertical Perspective value.
Reduce the Horizontal Perspective value to widen the left edge of the image, or increase this value to widen the right edge of the image.
To rotate the image, change the Angle via the scrubby slider (it’s easier to control than the dial).
• Press P to toggle the preview off, then on.
9. Optional: In the Custom tab, change the Scale value to scale the layer imagery. Note: You can also crop the image after exiting the dialog.
10. Optional: To save your current settings as a preset, from the Manage Settings menu ![]() in the Custom tab, choose Save Settings, type a name (keep the .lcs extension and default location), then click Save; the preset can now be chosen from the Settings menu for any image. If your specific camera lens was detected and selected in step 4, you can save all the settings except the Transform settings as a preset by choosing Set Lens Default from the Manage Settings menu.
in the Custom tab, choose Save Settings, type a name (keep the .lcs extension and default location), then click Save; the preset can now be chosen from the Settings menu for any image. If your specific camera lens was detected and selected in step 4, you can save all the settings except the Transform settings as a preset by choosing Set Lens Default from the Manage Settings menu. ![]()
11. Click OK.B To change the Lens Correction settings at any time, double-click the filter listing for the Smart Object on the Layers panel.

B Now the columns look more vertical. (To fill in the transparent areas that resulted, we followed the method described in the sidebar at left.)
• From the Settings menu in the Custom tab, you can choose Previous Correction to apply the last-used settings or Default Correction to restore the default values to all the options.
Applying the Motion Blur filter
One way photographers capture the blur of motion (e.g., when shooting athletes or wildlife) is by panning the camera in the direction the subject is moving. In Photoshop, you can create an illusion of motion in an existing photo via the Motion Blur filter. In this task, you will blur the whole image by applying the filter to a Smart Object, then partially reveal the original layer by editing the filter mask.
To apply the Motion Blur filter to an area of an image
1. Click an image layer, then duplicate it by pressing Ctrl-J/Cmd-J.A

A This is the original photo.
2. Right-click the duplicate layer and choose Convert to Smart Object. (The filter will be applied as a Smart Filter, so as to keep the settings editable.)
3. Choose Filter > Blur > Motion Blur. The Motion Blur dialog opens.
4. Lower the zoom level for the preview. Choose a Distance value for the amount of blurring, choose an Angle value to apply the blur in the direction in which you think the subject was moving, then click OK.B–C

B In the Motion Blur dialog, we chose a Distance value of 64 px and set the Angle dial to match the angle of the motorcycle.

C The Motion Blur filter is applied to the whole image.
5. On the Layers panel, click the filter mask thumbnail for the Smart Filters listing.
6. Choose the Brush tool ![]() (B or Shift-B). On the Options bar, choose a Soft Round brush and an Opacity value between 50% and 80%. Choose black as the Foreground color.
(B or Shift-B). On the Options bar, choose a Soft Round brush and an Opacity value between 50% and 80%. Choose black as the Foreground color.
7. Set the brush diameter by pressing [ or ], then paint over the area of the image from which you want to hide the Motion Blur effect and to which you want to restore the original focus (A–B, next page).

A We clicked the filter mask thumbnail on the Layers panel, then applied strokes with black to hide the Motion Blur effect from the top part of the motorcyclist.

B The final results convey fast motion.
Because the brush isn’t at full opacity, you can apply more strokes to the same area to hide more of the motion blur.
If you mask too much of the Motion Blur effect, paint with white (press X) to reveal it again.
• To change the Motion Blur filter settings, double-click the Smart Filter listing on the Layers panel.
• Don’t remove the blur effect from the wheels of a moving vehicle in a photo. You want the wheels to look as if they’re in motion.
Using the Sharpen tool
When used with the Protect Detail option checked on the Options bar, the Sharpen tool enhances details without introducing noticeable artifacts. With this tool, you can sharpen areas selectively without having to use a mask. Note: To sharpen an entire image, see the remaining pages in this chapter.
To use the Sharpen tool
1. Create a new, blank layer to contain the sharpened pixels, and keep it selected.C

C The focus in this photo is soft.
2. Choose the Sharpen tool ![]() (it’s on the same flyout menu as the Blur tool).
(it’s on the same flyout menu as the Blur tool).
3. On the Options bar, choose a Strength value, and check Sample All Layers and Protect Detail.
4. Press [ or ] to adjust the brush diameter, then drag across the areas that need sharpening.D For stronger sharpening, drag again in the same area.
D With the Sharpen tool, we quickly sharpened just her eyes.
5. Optional: To reduce the overall effect of the sharpening, lower the opacity of the new layer.
Applying the Smart Sharpen filter
Most digital photos need to be sharpened, and the need increases if you change a file’s dimensions or resolution with the Resample Image option checked, convert a file to CMYK Color mode, or apply a transformation command.
To sharpen an image, you can use either the Smart Sharpen filter or the Unsharp Mask filter (the latter, despite its name, has a sharpening effect; see pages 325–326). Be aware that these filters can introduce noise to an image and therefore should be applied when you’ve finished making all your crop, transform, and Image Size changes, and image-editing, adjustment, and color correction work.
High-resolution commercial printing also causes some minor blurring due to dot gain. You can anticipate and compensate for this by sharpening the image again as you prepare it for output. With practice, you will learn how much sharpening is needed.
The Smart Sharpen filter has several unique features that you won’t find in the Unsharp Mask dialog (see the sidebar below), but both are powerful and indispensable commands. We typically use the Smart Sharpen filter for targeted sharpening and the Unsharp Mask filter for output sharpening. The main point is to remember to sharpen, period!

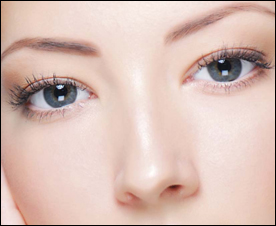
A We’ll use the Smart Sharpen filter to sharpen specific tonal areas in this blurry portrait (the resolution of this image is 300 ppi).
To apply the Smart Sharpen filter
1. Open a photo that needs sharpening.A To protect the original layer, on the Layers panel, click an image layer or the Background, then press Ctrl-J/Cmd-J to duplicate it. Right-click the duplicate layer and choose Convert to Smart Object.

A The settings we chose in the Basic panel of the Smart Sharpen dialog (shown above) successfully sharpened key details in the photo, such as the eyes and lips, but in the process, also oversharpened the skin (now the pores look too pronounced).
2. Choose Filter > Sharpen > Smart Sharpen. The Smart Sharpen dialog opens. Move it out of the way if it’s blocking your document.
• Set the zoom level for the preview to 67% or 100%. To bring a different area of the image into view, either drag in the preview or click in the document.
3. Check More Accurate to allow the filter to process the image in multiple passes, for high-quality sharpening with less distortion. This will take longer but is worth the wait.
4. From the Remove menu, choose an algorithm for the correction: Gaussian Blur is an adequate, all-purpose choice; Lens Blur sharpens details with fewer resulting halos (we prefer this option); Motion Blur is useful for correcting blurring due to slight movement of the camera or subject, but to use this option effectively, you need to enter the correct angle of movement.
5. Try an Amount value of 60–150% for the degree to which contrast will be increased, and a Radius value between 1 and 2.2 pixels (for a high-resolution image). The image should now look slightly oversharpened.A You’ll fade the effect next.
6. To control the amount of sharpening specifically in the shadow and highlight areas, click Advanced, then click the Shadow tab.B Drag in the preview to display an area of the image that contains both shadows and midtones, then make these adjustments:
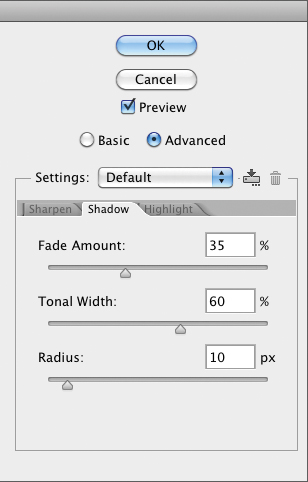
B In the Shadow tab (Advanced panel), we chose a moderate Fade Amount to soften the sharpening in the shadows (such as on the right side of her face) and a moderate Tonal Width value to fully sharpen the shadows but only partially sharpen the midtones.
Choose a Radius value (between 5 and 10) to control how many neighboring pixels will be compared to each adjusted pixel. The higher the Radius, the larger the area that Photoshop compares.
Choose a Tonal Width value to control the range of midtones that are affected by the Fade Amount. In other words, the higher the Tonal Width, the wider the range of midtones that are affected and the more gradually the sharpening fades into the shadows.
Move the Fade Amount slider until you see the desired reduction of oversharpening in the shadows. Note: If the Tonal Width value is too low, the effectiveness of this slider will be limited.
7. Click the Highlight tab.A Drag the image in the preview to display an area that contains both highlights and midtones. Adjust the Radius, Tonal Width, and Fade Amount values, as you did in the preceding step.

A Finally, in the Highlight tab of the Smart Sharpen dialog, we chose a moderate Fade Amount to soften the sharpening in the broad, flat highlight areas of skin, and we chose a moderate Tonal Width value to fully sharpen the highlights and partially sharpen the light midtones.
8. To compare the unsharpened and sharpened versions of the image, press on the dialog preview, then release. Hopefully, just the key details or features of the image are now sharp. If the whole image now looks too sharp, click the Sharpen tab and reduce the Amount value slightly.
9. Click OK.B–C

B Compare this original image to the final image shown at right.
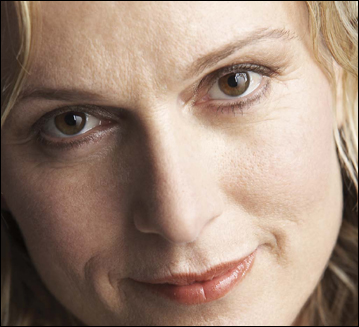
C The Smart Sharpen filter improved the clarity of the facial features without applying unflattering sharpening to the cheeks and forehead.
• To save the current settings as a preset, click the Save a Copy button ![]() in the dialog, enter a name, then click OK. Saved presets are available on the Settings menu for any image.
in the dialog, enter a name, then click OK. Saved presets are available on the Settings menu for any image.
• To modify the Smart Sharpen results, double-click the Smart Sharpen listing for the Smart Object.
Applying the Unsharp Mask filter
In order to do its job of sharpening, the Unsharp Mask filter increases the contrast between adjacent pixels. To control the level of contrast, you will choose settings for three variables: Amount, Radius, and Threshold.
To apply the Unsharp Mask filter
1. Choose a zoom level of 50–100% for your image.
2. Duplicate an image layer (Ctrl-J/Cmd-J),A then right-click the duplicate layer and choose Convert to Smart Object.

A This original 300 ppi image is slightly blurry.
3. With the Smart Object layer selected, choose Filter > Sharpen > Unsharp Mask.
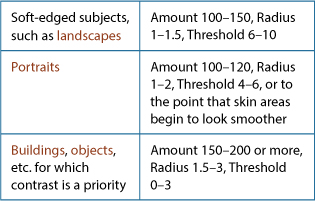
4. In the dialog, choose an Amount percentage to control how much the contrast will be increased.B For some recommended settings, see the sidebar on this page.
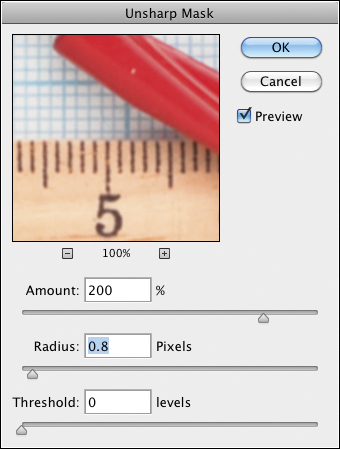
B A high Amount value and a low Radius value for the Unsharp Mask filter barely sharpened the image.
• Press P to toggle the Preview off, then on, to compare the original and sharpened images. To bring a different area of the image into view, drag in the preview or click in the document.
5. The Radius controls how many neighboring pixels around high-contrast edges the filter affects. When choosing a Radius value, you need to consider the pixel count of the image and its subject matter. The higher the pixel count, the higher the Radius value needed.C For a low-contrast image that contains large, simple objects and smooth transitions, try a high Radius of 2; for an intricate, high-contrast image that contains many sharp transitions, try a lower Radius of around 1.
C A high Radius value of 4.0, on the other hand, produced ugly halos around the numerals on the ruler and on the blue lines of the graph paper.
Note: The Amount and Radius settings are interdependent, meaning if you raise the Radius, you’ll need to lower the Amount, and vice versa.
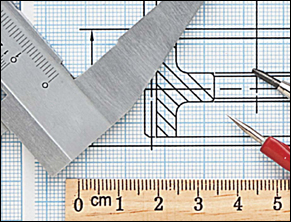
6. Choose a Threshold value to establish how different in value an area of pixels must be from an adjacent area for the filter to affect it.A Start with a Threshold value of 0 (to sharpen the entire image), then increase it gradually. At a Threshold of 5–10, high-contrast areas will be sharpened and areas of lesser contrast will be sharpened much less. When increasing the Threshold, you can also increase the Amount and Radius to sharpen the edges. A proper Threshold setting will prevent the filter from oversharpening low-contrast areas.
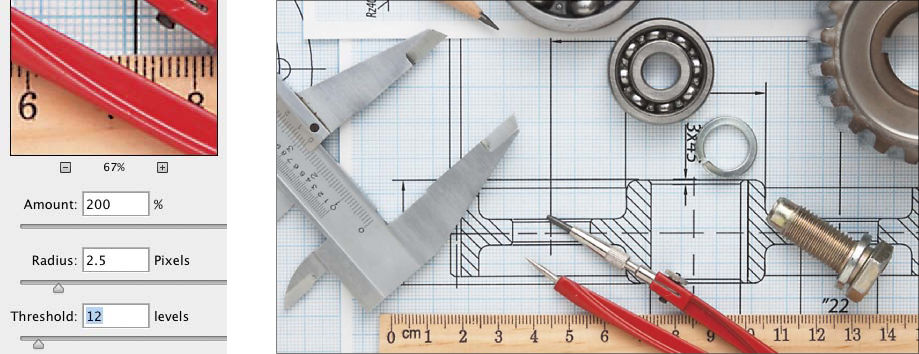
A At a high Threshold value of 12, the Unsharp Mask filter sharpened only the high-contrast edges, and the lines on the graph paper are still slightly blurry.
7. Click OK.B To adjust the filter settings at any time, double-click the Unsharp Mask listing on the Layers panel.

B A Threshold value of 0–1 properly sharpened all the edges. A low Threshold value was necessary for this image, because it contains a lot of flat surfaces, hard edges, and fine linear details.
• If the sharpening produced color halos along the edges of some of the objects, choose Luminosity as the blending mode for the Smart Object. This mode will limit the sharpening to luminosity (light and dark) values and remove it from hue and saturation (color) values.