
Lesson 15: Using Formatters and Validators
In this lesson, you will:
• Use a formatter and remove string concatenation
• Use a validator to check if data is in a valid format
• Learn to trigger validation in ActionScript
Flex provides built-in formatters and validators that enable you to display and validate user-supplied data such as dates, numbers, and currencies. Using the built-in data validators on the client side, you can make your application perform better by reducing calls to the server for validation. You can also save development time by using the built-in formatters to automate the often repetitive process of formatting data.

Validating customer information
Introducing Formatters and Validators
Flex formatters convert raw data into a customized string using predefined rules. The formatters can be used in MXML or in ActionScript and work well with data binding to simplify the display of formatted data.
Validators are used to ensure that data meets specific criteria before the application attempts to use it. This can be particularly important if you expect a user to input a number for a mathematical operation or a date for scheduling. Like formatters, validators can be used in MXML or ActionScript. They provide logical feedback on data input (valid or invalid) but also provide visual feedback in the way of red borders and error messages when input is invalid.
Formatters
A formatter is simply an ActionScript class that implements an interface called IFormatter. Some of the formatters available include:
• spark.formatters.NumberFormatter
• spark.formatters.CurrencyFormatter
• spark.formatters.DateTimeFormatter
• mx.formatters.CurrencyFormatter
• mx.formatters.DateFormatter
• mx.formatters.NumberFormatter
• mx.formatters.PhoneFormatter
• mx.formatters.ZipCodeFormatter
You may notice that there are formatters (such as Number and Currency) that exist in both the spark.formatter package and the mx.formatters package. The formatters in the spark.formatters package are newer and have exciting new features such as locale awareness (the ability to format data differently depending on where the user lives/works/uses the application). So, whenever you have the choice, we recommend you use the latest and greatest from the spark package.
Formatters manage quite a bit of complexity for you, but they are exceedingly simple to use. Here is a CurrencyFormatter defined in MXML:
<s:CurrencyFormatter id="myFormatter"
fractionalDigits="2"/>
This formatter can be applied either in ActionScript or in MXML with data binding, using the following syntax:
trace( myFormatter.format( 123.456789 ) );
//outputs USD123.46 in the United States
<s:Label text="{ myFormatter.format( someData ) }"/>
In the latter example, each time someData changes, the format() method will be called and the output displayed in the label.
Previously, you accomplished something similar using concatenation of strings. You wrote code like this:
<s:Label text="Your Cart Total: ${shoppingCart.total}"/>
This strategy has several problems. First, it becomes complicated to control variables defining how the user wants to see this currency presented. For example, if you are creating a globalized application, you’ll need to support different currency symbols, different regional uses of commas and periods, and varying degrees of precision. Second, this code assumes that the currency symbol will always appear before the number. This is certainly not the case in many countries. By using Flex formatters, these and other issues are handled for you.
Validators
Flex also has a set of Validator classes that you can use to check whether a data type is valid (for example, if the input is a number) and to ensure that the input has been formatted correctly (for example, if a date is entered in a specific format). As with Formatter classes, you can use Validator classes either as MXML tags or instantiate them in ActionScript.
Using validators, you can perform a lot of data validation in the client application, instead of waiting until data is submitted to the server. Not only does this provide a more responsive user experience, it also reduces the number of calls between the client and the server. This yields a better-performing application. Client-side validation is not a perfect solution; some types of data validation (such as security issues) are still best performed at the server. But using Validator classes at the client reduces server calls to only these use cases.
All Flex validators implement an interface named IValidator. Some of the validators available as part of the Flex framework include:
• spark.validators.NumberValidator
• spark.validators.CurrencyValidator
• mx.validators.CreditCardValidator
• mx.validators.EmailValidator
• mx.validators.NumberValidator
• mx.validators.PhoneNumberValidator
• mx.validators.SocialSecurityValidator
• mx.validators.StringValidator
• mx.validators.ZipCodeValidator
Much like the Formatter classes, the Validator classes cover a large number of use cases and conditions that you might not consider on your own. They are also split into two packages: spark.validators which contain the latest locale aware validators and the older mx.validators. Use the spark.validators if the particular item you need exists in both packages.
By using the Flex validators, you are better prepared for robust applications and internationalization requirements.
Using Formatter Classes
In this exercise, you’ll apply a CurrencyFormatter class so all the price selections are displayed as local currency in the FlexGrocer application. There are multiple places in which prices are displayed in the application, including:
• The list of grocery products displayed
• The total of the shopping cart
• The subtotal and list prices in the user’s shopping cart
• The checkout process
The CurrencyFormatter adjusts the decimal rounding, currency symbol type, and placement as well as sets the thousands separator and the negative sign.
- Open FlexGrocer.mxml.
Alternatively, if you didn’t complete the previous lesson or your code is not functioning properly, you can import the FlexGrocer.fxp project from the Lesson15/start folder. Please refer to the appendix for complete instructions on importing a project should you skip a lesson or if you have a code issue you cannot resolve.
- Within the
<s:Application>tag, add a locale attribute and set the value to en_US.<s:Application xmlns:fx="http://ns.adobe.com/mxml/2009"
xmlns:s="library://ns.adobe.com/flex/spark"
xmlns:views="views.*" xmlns:services="services.*"
xmlns:cart="cart.*"
creationComplete="handleCreationComplete(event)"
locale="en_US">By adding this attribute, you are specifying the locale of your application. A locale is a combination of a language and country code. So, in this case you are indicating that this particular application will be in English as spoken in the United States. Had you specified en_GB, the application would use English as spoken in Great Britain. Although English is spoken in both countries there are differences in spelling, units of currency, and so on. Later in this lesson, you’ll specify a locale of fr_FR, French as spoken in France to see the differences applied to your application.
- Open ShoppingView.mxml from your views package.
- Within the
<fx:Declarations>tags, add an<s:CurrencyFormatter>tag. Assign the tag anidofcurrencyand add theuseCurrencySymbolattribute with a value oftrue:<fx:Declarations>
<s:CurrencyFormatter id="currency"
useCurrencySymbol="true"/>
</fx:Declarations>
There is an
<mx:CurrencyFormatter/>and an<s:CurrencyFormatter/>in this lesson. You are going to need to pay close attention to this difference to ensure the desired outcome.The fractional digits, grouping separator, currency symbol, and many more properties can be set on the CurrencyFormatter; we have left these at their defaults. The CurrencyFormatter receives its default settings from user locale information. You also specified
userCurrencySymboloftrue, meaning that the formatter should include an appropriate currency symbol. - Locate the Label control that displays the words Your Cart Total along with a dollar sign and the shopping cart’s total. Inside the value for the
textproperty, replace the dollar sign and binding expression with a call to theformat()method of thecurrencyobject, and passshoppingCart.totalto the method, as follows:<s:Label text="Your Cart Total{ currency.format( shoppingCart.total ) }"/>
The
format()method takes the value and applies all the parameters you set on the<s:CurrencyFormatter>tag. In this case, you are using the default currency symbol (a dollar sign for the en_US locale where this book was written) and the default precision, so two digits to the right of the decimal separator will always be maintained. - Locate the
renderProductName()method.Presently, this method returns a string created by concatenating parentheses around the item’s quantity along with the product name, a dollar sign, and the item’s subtotal.
- Remove the
$from the string and pass theitem.subtotalto thecurrency.format()method before using it in the concatenation:private function renderProductName( item:ShoppingCartItem ):String {
var product:Product = item.product;
return '(' + item.quantity + ') ' + product.prodName + ' ' + currency.format(item.subtotal);
} - Save the ShoppingView class and FlexGrocer application. Run the FlexGrocer application.
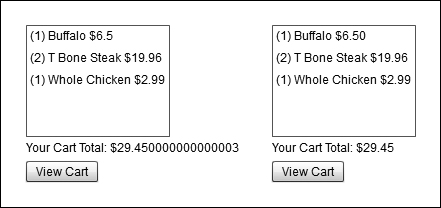
Add a few items to the cart and you’ll see that the currency formatter is now adding precision and limiting the number of decimal places to 2. Several other places in the application could use a CurrencyFormatter. You’ll handle those next.
- Open CartGrid.mxml from the components package.
- Within the
<fx:Declarations>tags, add an<s:CurrencyFormatter>tag. Assign the tag anidofcurrencyand add the useCurrencySymbol attribute with a value oftrue:<fx:Declarations>
<s:CurrencyFormatter id="currency"
useCurrencySymbol="true"/>
</fx:Declarations> - Locate the function named
renderPriceLabel(). Change thereturnstatement of the function to use theformat()method of the currency instance:private function renderPriceLabel( item:ShoppingCartItem, column:DataGridColumn ):String {
var subtotal:Number = item[ column.dataField ];
return currency.format( subtotal );
}Previously, you had to cast the subtotal as a String before concatenating with the
$. This isn’t necessary when using formatters. Theformat()method accepts an Object and internally converts it as needed. - Open Review.mxml from the views/checkout package.
- Within the
<fx:Declarations>tags, add an<s:CurrencyFormatter>tag. Assign the tag anidofcurrencyand add theuseCurrencySymbolattribute with a value oftrue. - Still inside the
<fx:Declarations>tags, add an<s:DateTimeFormatter>tag. Assign the tag anidofdf:<fx:Declarations>
<s:CurrencyFormatter id="currency"
useCurrencySymbol="true"/>
<s:DateTimeFormatter id="df"/>
</fx:Declarations> - Find the FormHeading tag for the Form displaying the Review and Checkout information. Add a new FormItem to the Form immediately after the heading with a FormItem label of Order Date:
<s:FormHeading label="Review and Checkout"/>
<s:FormItem label="Order Date">
</s:FormItem> - Inside the
<fx:Script>block, create a new private function namedgetDate(). This method will accept no arguments, and return a Date object. - Inside the
getDate()method, instantiate and return a newDateobject:private function getDate():Date {
return new Date();
}You’ll use this method to add the current date to the review page. You may remember that, in ActionScript, when a new Date object is created, it will reflect the current time.
- Inside the Order Date form item, add a new
<s:Label/>tag, set thetextproperty equal todf.format( getDate() ).<s:FormHeading label="Review and Checkout"/>
<s:FormItem label="Order Date">
<s:Label text="{df.format( getDate() )}"/>
</s:FormItem>Like the CurrencyFormatter, the DateTimeFormatter has a format method used to convert data into a String. In this case, you are using the default format specified by the user’s locale. You are passing the
format()method the date returned from yourgetDate()method. By using the date object and the formatter, you are placing an indicator of the current date and time on the form. - Find the Label instance that displays the user’s total. Pass the
shopppingCart.totalto theformat()method of thecurrencyinstance before concatenating it and assigning it to the text:<s:Label text="Total: { currency.format( shoppingCart.total ) }"/>
- Save this file.
- Open ProductItem.mxml from the components package.
- Within the
<fx:Declarations>tags, add an<s:CurrencyFormatter>tag. Assign the tag anidofcurrencyand add theuseCurrencySymbolattribute with a value oftrue. - Find the Label instance that displays the products
listPrice. Pass theproduct.listPriceto theformat()method of thecurrencyinstance before assigning it to the text.<s:Label id="price" text="{ currency.format( product.listPrice ) }"/>
- Save this file and run the application. If you add a few items to the cart and proceed through checkout, you should see formatted currencies and dates throughout.
Examining a Second Locale
In this exercise, you’ll apply a different locale to the Application and then examine the results.
- Open FlexGrocer.mxml.
- Change the locale from en_US to fr_FR in the Application tag:
<s:Application xmlns:fx="http://ns.adobe.com/mxml/2009"
xmlns:s="library://ns.adobe.com/flex/spark"
xmlns:views="views.*" xmlns:services="services.*"
creationComplete="handleCreationComplete(event)"
locale="fr_FR"> - Save and run the application.
Notice that the dollar signs have changed to euro symbols throughout the application. Further, the currency symbol now resides on the right side of the number.
- Change the locale back to en_US and save the application.
Using Validator Classes
In this exercise, you’ll use a ZipCodeValidator class to check whether a postal code is a valid U.S. zip code or Canadian postal code along with a StringValidator to ensure during the checkout process that the billing name is at least two characters long.
- Open CustomerInfo.mxml from your views/checkout package.
- Find the FormItem with the label Customer Name and set the
requiredattribute of that FormItem totrue.<s:FormItem label="Customer Name" required="true">
<s:TextInput text="@{orderInfo.billingName}"/>
</s:FormItem>Setting the
requiredattribute of a FormItem tag causes Flex to place an asterisk next to the form field when it is displayed. This is purely a visual property. By itself it does nothing to ensure the user enters data into this field. - Inside the FormItem, set the
idproperty of the TextInput tobillingName:<s:FormItem label="Customer Name" required="true">
<s:TextInput id="billingName" text="@{orderInfo.billingName}"/>
</s:FormItem>Shortly, you’ll need to refer to this TextInput by the
idto validate its input. - Find the FormItem with the label Zip and set the
requiredattribute of that FormItem totrue:<s:FormItem label="Zip" required="true">
Remember, this is purely a visual detail.
- Inside the FormItem, set the
idproperty of the TextInput tobillingZip:<s:FormItem label="Zip" required="true">
<s:TextInput id="billingZip" text="@{orderInfo.billingZip}"/>
</s:FormItem> - Inside the
<fx:Declaration>tag pair, add an<mx:ZipCodeValidator>tag. Bind thesourceproperty of the ZipCodeValidator to thebillingZipTextInput. Still in the ZipCodeValdator, specify thepropertyattribute astextand specify therequiredattribute totrue:<mx:ZipCodeValidator source="{billingZip}"
property="text"
required="true"/>The
<mx:ZipCodeValidator>validates that a string has the correct length for a five-digit zip code, a five-digit + four-digit U.S. zip code, or a Canadian postal code. Thesourceattribute indicates the control containing the data to be validated. As you’ll see, this also specifies where any error messages will appear. Thepropertyattribute indicates which property of the control you wish to validate. In this case you are indicating that thetextproperty of thebillingZipcontains the data for validation. Finally, therequiredattribute indicates that this field must be supplied. Ifrequiredwas set tofalse, a blank field would be acceptable, but if the user entered any information, it must conform to a valid zip code.If you used code completion when you added the ZipCodeValidator, the
mxnamespace was added for you at the top of this file. If you did not, be sure to add themxnamespace manually (xmlns:mx=”library://ns.adobe.com/flex/mx”). - Still inside the
<fx:Declaration>tag pair, add an<mx:StringValidator>tag. Bind thesourceproperty of the StringValidator to thebillingNameTextInput. Specify thepropertyattribute astext,therequiredattribute astrue, andminLengthas2.<mx:StringValidator source="{billingName}"
property="text"
required="true"
minLength="2"/>The
<mx:StringValidator>validates that a string falls within certain size parameters. Here you are indicating that the String must be at least a length of 2 to be valid. - Save and compile the application.
Click the Checkout button and enter some letters for the zip code in the billing information screen. When you exit the field, you should see a red highlight around the text field. When you move the pointer over the text field, you’ll see the default error message appear.
However, even if you leave these fields in error, you can still click the Proceed button to move on to the next screen. You’ll correct that next.
- Return to CustomerInfo.mxml.
You’ll now add code to prevent leaving this page until the user corrects any errors.
- Inside the
<fx:Declarations>tag pair, wrap the two validators you created above in an<fx:Array>tag with theidofvalidators.<fx:Declarations>
<!-- Place non-visual elements (e.g., services, value objects) here -->
<fx:Array id="validators">
<mx:ZipCodeValidator source="{billingZip}"
property="text"
required="true"/>
<mx:StringValidator source="{billingName}"
property="text"
required="true"
minLength="2"/>
</fx:Array>
</fx:Declarations>This code creates an array named validators. It inserts the two validator instances created into that array so that they can be referred to as a group.
- Find the
handleProceed()method.This method is called when the user clicks the Proceed button. It dispatches an event, which changes to the next view state.
- Add a new local variable named
errorsof typeArrayon the first line of this method. Assign it to the result of calling theValidator.validateAll()method, passing it thevalidatorsarray you just created.var errors:Array = Validator.validateAll( validators );
If you used code completion,
mx.validators.Validatorwill be imported for you. If not, import it now. ThevalidateAll()method is a static method of the Validator class. It is a utility method that accepts an array of validators, like the one you created in step 10. It runs each validator and aggregates any failures, meaning that this array will contain any validation errors found as a result of running each of your validators. If the array is empty, there were no validation errors. - Just below the
errorsarray declaration, create anifstatement that checks if thelengthproperty of theerrorsarray is0.if ( errors.length == 0 ) {
}Effectively, this
ifstatement checks to see if there were any validation errors. - Move the code that dispatches the
proceedevent inside theelseblock.if ( errors.length == 0 ) {
dispatchEvent( new Event( "proceed" ) );
}If there are no errors, the user will be allowed to continue.
- Save and run the application. Enter invalid data in the Zip field and attempt to proceed to the next page.

You now have a form capable of collecting valid data, informing users when that data is invalid, and preventing users from proceeding if they have not yet corrected the invalid data.
What You Have Learned
In this lesson, you have:
• Learned how to apply a formatter to incoming text (pages 362–368)
• Learned to set a locale for an application (pages 368–369)
• Learned how to apply a validator to outgoing data (pages 369–372)
• Learned to trigger validation from ActionScript (pages 371–372)