
Lesson 11: Creating and Dispatching Events
In this lesson, you will:
• Understand the benefits of loosely coupled architecture
• Dispatch events
• Declare events for a component
• Identify the need for your own event classes
• Create event subclasses
• Create and use a UserAcknowledgeEvent class
• Create and use a ProductEvent class
• Use event bubbling
• Use ProductEvent to add and remove a product
• Use the CollectionEvent to update the shopping cart total
In previous lessons, you worked with events from built-in objects, such as the clicking of a Button or the changing of a List. You may remember that different events all descend from the same Event class but can have more specific information, such as the Mouse position in the MouseEvent. As you get deeper into application development, you will often need to dispatch events that contain your own information. In this lesson, you’ll learn how to create an event object, set the metadata for the object, and dispatch it.
This lesson presents an overview of how to dispatch events within your application, and how to create new Event classes by creating a subclass of Event.

The shopping cart allows you to add and remove items.
Understanding the Benefits of Loose Coupling
At the end of Lesson 10, “Using DataGroups and Lists,” you were left without a way to add or remove items from the ShoppingCart. With your newly refactored application, the buttons for adding and removing are now inside the ProductItem class; however, the ShoppingCart for the whole application is defined within the ShoppingView class. This means that you can no longer directly call the addItem() and removeItem() methods of the ShoppingCart instance.
Technically, it would be possible to make the shoppingCart property public and still access the ShoppingCart instance from the ProductItem through an expression like this:
this.parent.parent.shoppingCart
However, such an expression can be very problematic for maintaining and debugging the application. During development, refactoring components is often desirable and sometimes essential. If you decide that the DataGroup should be inside another component, perhaps one responsible for all product display functions, the expression above may need to change as well.
Over the course of application development, one of two things tends to happen when using these types of expressions. Either you devote an increasing amount of time to maintaining the expressions as the application changes, which slows down progress and makes your day-to-day work increasingly frustrating. Or, worse yet, you stop refactoring your components even when it makes sense to do so. Maintaining the expressions becomes such a frustrating experience that you simply decide you’ll never change a specific area of code again. During active development this often leads to workarounds and suboptimal code, and can ultimately increase development time and the number of bugs.
Both of these ends have a common starting point. An expression like the one above caused ProductItem to have a dependency on ShoppingView. This means that anytime ShoppingView changes, you need to also remember to change ProductItem manually. Creating these types of interdependencies among objects in your application is called tight coupling, or making a tightly coupled application. In tightly coupled applications, objects often directly modify or access each other’s properties, creating maintenance difficulties. While there will always be some dependency between objects in an application, you need to strive to ensure that those dependencies are appropriate.
It can be both amusing and useful to think of objects using real-world analogs. In the real world, most objects are loosely coupled, which makes tightly coupled examples hyperbolic and fun.
Consider a satellite navigation system that provides directions while you drive a car. You and the navigation system exist in a loosely coupled way. When the navigation system is on, it provides events indicating whether you should turn or proceed straight. You interpret those events and, ideally, make a decision that it is safe to turn or that you want to proceed in a different direction. Ultimately, you decide whether to engage your muscles and turn the steering wheel.
In a very tightly coupled version of this same architecture, the navigation system would take control of your body, forcing your muscles to move as needed to direct you to the new location. As every person is a bit different, the navigation system would have the ability to calibrate the amount of force required per muscle for each individual person. Perhaps it would even need to know your diet or exercise schedule to monitor changes in your musculature to ensure consistent results.
The point is simply that the tightly coupled architecture often involves objects having too much information and interacting directly with the internals of other objects. Further, once you make that first concession to make something tightly coupled, you may start down a path of making more and more concessions to make your application work. A loosely coupled architecture strives to use the ideas of notification and interfaces to allow objects to manage themselves more successfully.
In application development, maintaining only appropriate coupling can lead to better code reuse, easier refactoring, and the ability to debug an application in parts as opposed to en masse.
Dispatching Events
To broadcast an event from a component, you need to use the dispatchEvent() method. This method is defined in the flash.events.EventDispatcher class. Some objects in Flex (for example, the UIComponent), descend directly from EventDispatcher and can dispatch events without any further work.
The following is the inheritance hierarchy of the UIComponent class:
mx.core.UIComponent extends
mx.core.FlexSprite extends
flash.display.Sprite extends
flash.display.DisplayObjectContainer extends
flash.display.InteractiveObject extends
flash.display.DisplayObject extends
flash.events.EventDispatcher
The dispatchEvent() method takes a single argument, which is an event object to be dispatched. When an event is dispatched, anything listening for that event is notified, and any event listeners (handlers) are executed. This offers a way to create a loosely coupled architecture.
- Import the EventLab.fxp from the Lesson11/independent folder into Flash Builder. Please refer to the appendix for complete instructions on importing a project.
- Open and run EventLab.mxml.
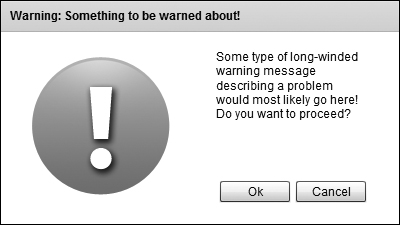
The application displays a simple warning dialog box with an image, text, and Ok and Cancel buttons. You will use this dialog box throughout this lesson, adding events and eventually making the Ok and Cancel buttons function properly.
The EventLab application contains two custom components: WarningDialog.mxml and OkayCancelGroup.mxml. These custom components are nested inside the Application, as the following diagram demonstrates:
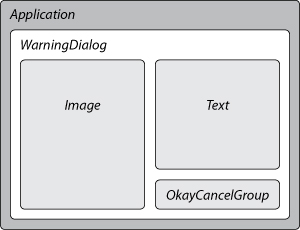
The WarningDialog is directly inside the Application. It contains an image, text about the warning, and a custom component named OkayCancelGroup. The Ok and Cancel buttons are so often reused together in an application that they have been put into a custom component for this lab.
- Close your browser and open the OkayCancelGroup.mxml class from the components package.
- Find the MXML tag for the Ok button. Inside that tag, begin typing the word click. After the third letter, Flash Builder will understand that you intend to handle the
clickevent. Press Enter, and Flash Builder will complete the wordclickand add the equal sign and quotes. Flash Builder will now prompt you to Generate Click Handler. Either click the option with your mouse or press Enter.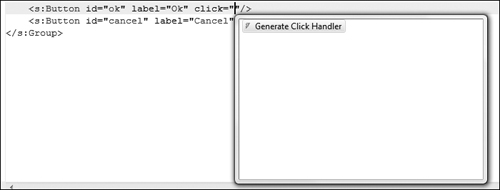
Flash Builder will generate the
<fx:Script>block along with a new function namedok_clickHandler(), which accepts a MouseEvent. - Repeat step 4 for the Cancel button. When complete, the relevant portion of your OkayCancelGroup should read as follows:
<fx:Script>
<![CDATA[
protected function ok_clickHandler(event:MouseEvent):void
{
// TODO Auto-generated method stub
}
protected function cancel_clickHandler(event:MouseEvent):void
{
// TODO Auto-generated method stub
}
]]>
</fx:Script>
<s:Button id="ok" label="Ok" click="ok_clickHandler(event)"/>
<s:Button id="cancel" label="Cancel" click="cancel_clickHandler(event)"/>Flex is a general-purpose component framework, so it dispatches general-purpose events. For example, buttons in Flex dispatch a
clickevent when they are clicked. That is a wonderful starting point, but the concept of a click doesn’t mean much in the context of your application.Ultimately, when a button is clicked, it is likely to mean something specific. In this component, when the Cancel button is clicked, it means the user wants to cancel the operation. When the Ok button is clicked, it means the user acknowledges the issue and wants to proceed.
Therefore, for the purposes of writing code that is much more legible, maintainable, and easier to debug, you often handle events like the
clickevent inside a component, and then immediately dispatch a new, more specific event that makes sense within the context of the application.Inside the
ok_clickHandler()method, delete the//TODOcomment and create a new instance of the Event object, with the typeuserAccept.var e:Event = new Event("userAccept");
This creates the new instance of the Event object, which will be dispatched to notify the remainder of the application of the user’s choice.
- Just after creating the event object, dispatch it.
this.dispatchEvent(e);
This dispatches the event so that any listening components can respond as needed.
- Repeat these steps in the
cancel_clickHandler()method, dispatching an event with the typeuserCancel.var e:Event = new Event("userCancel");
this.dispatchEvent( e ); - Save your component and open WarningDialog.mxml from the components package.
- Find the instance of the OkayCancelGroup component. Inside this tag, inform Flex that you wish to handle the
userAcceptevent with a method namedhandleAccept(), passing the event object to that method.<components:OkayCancelGroup id="okCancelGroup"
left="219" bottom="22" userAccept="handleAccept(event)"/>Note that you will not get the convenient code hinting, and Flash Builder will not be able to generate an event handler for you at this time. In fact, if you save this file presently, you will see an error in the Problems view. That is all right for now. You will examine these issues soon and fix them in the next exercise.
- Add a new method named
handleAccept()to the Script block of WarningDialog.mxml. The method will accept a single parameter namedeventof type Event.private function handleAccept( event:Event ):void {
}
You may notice that when you’re asked to create a function in this book, it’s usually private. However, when Flex creates functions for you, they are usually protected. Both private and protected functions can be accessed by code within a given class, but not by other types of objects in the system. However, when dealing with inheritance, protected functions can be used by subclasses of your objects, whereas private functions cannot. As Flash Builder doesn’t know how your functions will be used, it simply defaults to a more permissive setting.
- Save WarningDialog.mxml. Look at the Problems view and notice the error.
The Problems view is now showing an error:
Cannot resolve attribute 'userAccept' for component type components.OkayCancelGroup.
While you are dispatching an event in your OkayCancelGroup named userAccept, the Flex compiler, as of yet, is unaware of it.
For the compiler to know what userAccept means, you need to perform one additional step, adding metadata to the component that specifically declares any events the component will dispatch. This will also enable code-completion and handler generation in Flash Builder.
Declaring Events for a Component
Every component must explicitly declare the events it can dispatch. Components that are subclasses of other components can also dispatch any events that their superclasses have declared. In Flex, events are declared with metadata tags. This is done with the [Event] metadata, which is used to declare events publicly so that the MXML compiler can verify that the user did not simply make a typo. In MXML, an event declaration looks like this:
<fx:Metadata>
[Event(name="userAccept" ,type="flash.events.Event")]
</fx:Metadata>
The <fx:Metadata> tag declares that the child elements are all metadata. Next, any metadata is declared. Notice that the tags are enclosed within square brackets. Details for these tags are defined within parentheses. In this example, you can see a userAccept event declared. This event will be an instance of the flash.events.Event class. In this exercise, you will fix the error from the previous exercise by declaring a custom event for the OkayCancelGroup component.
- Open OkayCancelGroup.mxml from your components package.
- Before the
<fx:Script>block, add a metadata block to declare theuserAcceptevent.<fx:Metadata>
[Event(name="userAccept",type="flash.events.Event")]
</fx:Metadata>If the type is omitted, Flash Builder will assume it is an instance of the flash.events.Event class. While in this case it might save you a few keystrokes, it is usually best to declare the type each time you create a new Event declaration to ensure completeness and provide additional documentation.
- Directly below the first Event declaration, but inside the same metadata tag, add a second Event declaration for the
userCancelevent.<fx:Metadata>
[Event(name="userAccept",type="flash.events.Event")]
[Event(name="userCancel",type="flash.events.Event")]
</fx:Metadata>Save OkayCancelGroup.mxml. The errors should now be gone, as Flash Builder understands that this component will be dispatching the named events.
- Return to the WarningDialog.mxml file and find the OkayCancelGroup tag again.
- You will now handle the
userCancelevent. Begin typing userCancel. You will see that Flash Builder now also understands that this component dispatches theuserAcceptanduserCancelevents and offers code hinting. Choose theuserCancelevent and then choose Generate UserCancel Handler.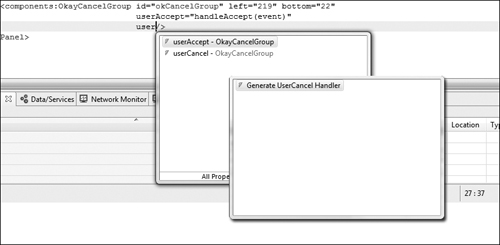
Flash Builder will add a method named
okCancelGroup_userCancelHandler()to your component. The method will accept a parameter of type Event automatically because, due to your metadata declaration, Flash Builder knows what type of event to expect. - Add a
tracestatement to thehandleAccept()method that traces the words WarningDialog: Accept to the console. - Add a
tracestatement to theokCancelGroup_userCancelHandler()method that traces the words WarningDialog: Cancel to the console. Your code should read as follows:private function handleAccept( event:Event ):void {
trace( "WarningDialog: Accept" );
}
protected function okCancelGroup_userCancelHandler(event:Event):void {
trace( "WarningDialog: Cancel" );
} - Debug your application. When you click the Ok or Cancel buttons, you should see the corresponding text traced out to the Console view.

- Terminate your debugging session and return to Flash Builder.
You now have a simple reusable component, capable of communicating with other areas of the application in a loosely coupled manner.
Identifying the Need for Custom Event Classes
In the previous exercise, events notified other parts of the application about a user action. In addition to notifications, you sometimes need to pass data with events. The flash.events.Event class supports only the properties needed for the most basic style of event, but you are always free to subclass events to make more specific types.
Passing data with events is a common practice in Flex and can be extremely beneficial. In this example, you will record a timestamp each time a user clicks Ok or Cancel. This timestamp may be used to log data later, but it’s very important that you record the exact time when the user clicks the button. To do that, you are going to create your own event class that will contain this time information.
Earlier in this lesson and others, you used the dispatchEvent() method to broadcast an event from a component. The dispatchEvent() method accepts an instance of the flash.events.Event class as its only parameter. Therefore, any events you wish to dispatch must be subclasses of this Event.
You can add any methods or properties to your event, but you are required to override one method each time you create a new Event. This method, named clone(), is responsible for creating a new event based on the properties of your original event. In other words, it creates an identical clone of it.
This method is used by the Flex framework in a number of places, including event bubbling, a concept you will understand before the end of this lesson.
Building and Using the UserAcknowledgeEvent
You are about to create an event subclass. This event will have an additional timestamp property, allowing your application to note the exact time when the button was clicked.
- Right-click the src folder of the EventLab project and create a new ActionScript class. Specify events as the Package name and UserAcknowledgeEvent as the Name of the class. Set the Superclass to flash.events.Event.

Filling out the dialog box automatically creates the skeleton of the class seen here:
package events {
import flash.events.Event;
public class UserAcknowledgeEvent extends Event {
public function UserAcknowledgeEvent(type:String, bubbles:Boolean=false, cancelable:Boolean=false) {
super(type, bubbles, cancelable);
}
}
} - Inside the class definition, create a public property named
timestampto hold a Date instance.public var timestamp:Date;
ActionScript doesn’t have a time data type. However, the Date object can store both date and time information.
- Change the constructor to accept only two parameters:
type, which is a String, andtimestamp, which is a Date. In the constructor, passtypeto the superclass and store thetimestampin the instance variable you created in step 2.public function UserAcknowledgeEvent(type:String, timestamp:Date) {
super(type);
this.timestamp = timestamp;
}Like all constructors in ActionScript 3.0, this one is public. The two arguments will be used to populate the event. The
timestampproperty will be used to hold the time when the event occurred. Thetypeproperty defines the type of action that occurred to trigger this event (for exampleuserAcceptoruserCancel). Events often accept two other optional parameters, which you just deleted. We will explore one of those optional parameters later in this lesson. - Override the
clone()method. In this method, you will return a new instance of theUserAcknowledgeevent with the same values.override public function clone():Event {
return new UserAcknowledgeEvent( type, timestamp );
}When you override a method in ActionScript 3.0, the method must be defined with exactly the same parameters and return type of the superclass and must include the
overridekeyword. Therefore, theclone()method needs to be defined as public, it must take no parameters, and it must return an instance of the Event class. Your new event is a subclass of the Event class and can therefore be returned by this method.The complete UserAcknowledge class should look like the following code block:
package events {
import flash.events.Event;
public class UserAcknowledgeEvent extends Event {
public var timestamp:Date;
public function UserAcknowledgeEvent(type:String, timestamp:Date) {
super(type);
this.timestamp = timestamp;
}
override public function clone():Event {
return new UserAcknowledgeEvent( type, timestamp );
}
}
} - Open the OkayCancelGroup.mxml file from your components package.
- Inside the
<fx:Script>block, find theok_clickHandler(). Currently the method dispatches an instance of the Event class. Change this method to instantiate a new instance of the UserAcknowledgeEvent class. PassuserAcceptas the first parameter and a new instance of the Date object as the second. Then dispatch this new event.protected function ok_clickHandler(event:MouseEvent):void {
var e:UserAcknowledgeEvent = new UserAcknowledgeEvent("userAccept", new Date() );
this.dispatchEvent( e );
}Each time you create a new Date object, it defaults to the current Date and Time. If you used the code-completion feature, an import for UserAcknowledgeEvent was added to your class automatically; otherwise, you will need to manually add the import.
import events.UserAcknowlegdeEvent;
- Repeat this process for
cancel_clickHandler(). Instantiate a new instance of the UserAcknowledgeEvent class, passinguserCancelas the first parameter and a new instance of the Date object as the second. Then dispatch this new event.protected function cancel_clickHandler(event:MouseEvent):void {
var e:UserAcknowledgeEvent = new UserAcknowledgeEvent("userCancel", new Date());
this.dispatchEvent( e );
}You are now dispatching a UserAcknowledgeEvent each time a button is clicked, however, the metadata for this class still indicates that you are dispatching generic Flash events. Change the metadata to indicate that each of these events will now dispatch an events.UserAcknowledgeEvent instance.
<fx:Metadata>
[Event(name="userAccept" ,type="events.UserAcknowledgeEvent")]
[Event(name="userCancel" ,type="events.UserAcknowledgeEvent")]
</fx:Metadata>Your OkayCancelGroup is now broadcasting UserAcknowledgeEvent instances in all cases. All your code will work properly at this point, and you can run it now to verify.
While event times are being stored, you will need to update your WarningDialog.mxml file to output this new information.
- Open the WarningDialog.mxml file from your components package.
- Find the
handleAccept()method and change the type of theeventparameter toevents.UserAcknowledgeEvent.private function handleAccept( event:UserAcknowledgeEvent ):void {
trace( "WarningDialog: Accept" )
}If you used the code-completion feature, an import for UserAcknowledgeEvent was added to your class automatically; otherwise, you will need to manually add the import.
Previously this method accepted an instance of the Event class. Remember that your UserAcknowledgeEvent is a type of Event, so this code will still work properly. However, Flex knows that the
timestampproperty does not exist in the Event class. So, to use your new timestamp, this method must be updated to the appropriate type. - Update the
tracestatement by adding a space after the word Accept and before the quotation mark. Then concatenate theevent.timestampto the end of the output.private function handleAccept( event:UserAcknowledgeEvent ):void {
trace( "WarningDialog: Accept " + event.timestamp );
} - Repeat this process for cancel, changing the event to type
UserAcknowledgeEvent, adding a space after the word Cancel and then concatenating theevent.timestampto the end of the output.protected function okCancelGroup_userCancelHandler(event:UserAcknowledgeEvent): void {
trace( "WarningDialog: Cancel " + event.timestamp );
} - Save and debug the application. It should now output the
tracestatements along with the time of each click.WarningDialog: Accept Wed Jul 28 15:59:26 GMT-0600 2010
WarningDialog: Cancel Wed Jul 28 15:59:26 GMT-0600 2010 - Terminate the debugging session.
Understanding Event Flow and Event Bubbling
There are two broad categories of classes you have worked with so far in Flex: classes that inherit from DisplayObject and classes that do not. All the Flex UI components such as Lists, Buttons, and Labels are DisplayObjects. The value objects you created, as well as classes like HTTPService, which do not have a visual display, are not DisplayObjects.
A lot of work is done in Flex to classes that appear on the screen. The Flash Player and Flex framework need to size and position them on the screen, ensure that they are created at the correct time, and eventually draw them on your monitor. Therefore Flash Player maintains a list, called the display list, of every visual component currently available to the user. So far, every time you have created a visual component, it has been added to the display list. In Lesson 14, “Implementing Navigation,” you will learn to have a little more control over when this occurs.
As a mental model, the display list can be thought of as a hierarchy, or tree. Each time something is added to the list, it is added relative to its parent. So, a partial display list for the EventLab application looks like this:

This is only a partial list, as in reality things like Buttons are actually further composed of a label and a background, and so on. Only visual elements are added to the display list, so objects without a display, like the HTTPService, will not appear on this list. This is important, because once something is on the display list, Flash Player provides additional functionality when dispatching events.
If the event target (the object dispatching the event) is not a visual element, Flash Player simply dispatches the event object directly to the designated target. For example, Flash Player dispatches the result event directly to an HTTPService component.
However, if the target is a visual element on the display list, Flash Player dispatches the event, and it travels from the outermost container (the Application container in our simplified example), down through the target component, and optionally back up to the Application container.
Event flow is a description of how that event object travels through an application. As you have seen by now, Flex applications are structured in a parent-child hierarchy, with the Application container being the top-level parent. Earlier in this lesson, you also saw that flash.events.EventDispatcher is the superclass for all components in Flex. This means that all visual objects in Flex can use events and participate in the event flow; they can all listen for an event with the addEventListener() method and dispatch their own events.
During this trip from the Application to the component that was responsible for the event (known as the target of the event) and optionally back to the Application, other components within the event’s path may listen for and act on the event. In fact, components can decide if they want to listen on the way to the object or on the way back to the Application.
The event flow is conceptually divided into three parts:
• The capture phase comprises all the components on the trip from the base application to the parent of the event’s target. In other words, everything from the application to the target, not including the target itself.
• The target phase occurs when the event reaches the target.
• The bubbling phase comprises all the components encountered on the return trip from the target back to the root application.
The following image describes a branch of an application in which a Button is contained within a Group, which is contained by a Panel, which sits in the root Application. For the context of this example, other elements in the application are moot.
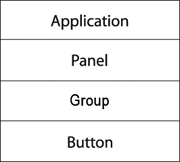
If a user clicks the Button, Flash Player dispatches an event object into the event flow. The object’s journey starts at the Application, moves down to the Panel, moves to the Group, and finally gets to the Button. The event object then “bubbles” back up to Application, moving again through the Group and Panel on its way up.

In this example, the capture phase includes the Application, Panel, and Group during the initial downward journey. The target phase comprises the time spent at the Button. The bubbling phase comprises the Group, Panel, and Application containers as they are encountered during the return trip.
All instances of the Event class have a bubbles property that indicates whether that event object will participate in the bubbling phase of the event flow. If this property is set to true, the event makes a round-trip; otherwise it ends when the target phase is complete.
All this means that an event can occur in a child component and be heard in a parent. Consider this simple example:
<?xml version="1.0" encoding="utf-8"?>
<s:Application xmlns:fx="http://ns.adobe.com/mxml/2009"
xmlns:s="library://ns.adobe.com/flex/spark"
click="showAlert(event)">
<fx:Script>
<![CDATA[
import mx.controls.Alert;
private function showAlert( event:Event ):void {
var msg:String = event.target.toString() +" clicked";
Alert.show( msg );
}
]]>
</fx:Script>
<s:Panel id="panel"
click="showAlert(event)" >
<s:Group id="group"
click="showAlert(event)" >
<s:Button id="button"
click="showAlert(event)"/>
</s:Group>
</s:Panel>
</s:Application>
In this case, there is a Button control inside a Group, inside a Panel, inside an Application. When the button is clicked, the click event of the Button control is heard from the event handler of the Button, Group, Panel, and Application, and therefore four Alert boxes pop up, all saying the following:
TestApp.ApplicationSkin2._ApplicationSkin_Group1.contentGroup.panel.PanelSkin6._PanelSkin_Group1.contents.contentGroup.group.button clicked
This string represents the entire path the event traveled in its journey to dispatch. The click event of the Button control can be captured at the Button control itself or in any of the parent containers of the Button instance. This happens because click is a bubbling event. The bubbles property of the Event class is Boolean, which indicates whether an event should bubble. By default, bubbles is set to false on newly created events (although it is preset to true for some built-in events, such as click; you can check the API docs to find this information as it pertains to any event). When you create event instances or event subclass instances, you can decide whether you want to enable bubbling for the event. If you leave the bubbling to the default false value, the event can be captured only at the source of the event (the Button control in the preceding example). However, if bubbling is set to true, the event can be captured by a parent of the dispatching component (such as the Group, Panel, and Application).
Currently, the OkayCancelGroup class dispatches an event, and that event is being used by the WarningDialog. Next you will make that event bubble so that it can be handled in the Application itself.
- Open UserAcknowledgeEvent.as from the events package.
- Locate the constructor and the call to the superclass.
public function UserAcknowledgeEvent(type:String, timestamp:Date) {
super(type);
this.timestamp = timestamp;
}The flash.events.Event constructor can accept up to three arguments. The first is the type, which you are passing presently. The second is a Boolean flag indicating whether the event should bubble, and the third is a Boolean indicating whether the event is cancelable (whether another object can cancel the event).
- Pass
trueto thebubblesargument of the superclass.public function UserAcknowledgeEvent(type:String, timestamp:Date) {
super(type, true);
this.timestamp = timestamp;
}This event will now make the return trip (bubble) from the OkayCancelGroup all the way back up to the Application.
- Open WarningDialog.mxml.
The event is now going to pass through this class on the way back to the Application. Therefore, if you choose, you can act on the event here as well.
- Add an
<fx:Metadata>tag and the appropriate event metadata to the WarningDialog indicating that this object will also dispatch auserAcceptanduserCancelevent, both of typeevents.UserAcknowledgeEvent.<?xml version="1.0" encoding="utf-8"?>
<s:Panel xmlns:fx="http://ns.adobe.com/mxml/2009"
xmlns:s="library://ns.adobe.com/flex/spark"
width="400" height="225"
xmlns:components="components.*"
title="Warning: Something to be warned about!">
<fx:Metadata>
[Event(name="userAccept",type="events.UserAcknowledgeEvent")]
[Event(name="userCancel",type="events.UserAcknowledgeEvent")]
</fx:Metadata>
<fx:Script>
...
</fx:Script>
...
</s:Panel>Feel free to copy the entire metadata block from the OkayCancelGroup if you wish to save a few keystrokes.
- Open EventLab.mxml.
You can now listen for either of these events on the WarningDialog as well as the OkayCancelGroup, as they will bubble up the display list.
- Inside the WarningDialog tag, begin typing
userAcceptanduserCancel. If the metadata in step 5 was added correctly, Flash Builder will offer you code completion and the ability to generate an event handler. Accept this offer, creating an event handler for both events.<components:WarningDialog id="warningDialog"
horizontalCenter="0" verticalCenter="0"
userAccept="warningDialog_userAcceptHandler(event)"
userCancel="warningDialog_userCancelHandler(event)"/> - Inside the
warningDialog_userAcceptHandler(), add atracestatement to output the class name, the event, and the timestamp as follows:protected function warningDialog_userAcceptHandler(event:UserAcknowledgeEvent): void {
trace( "EventLab: Accept " + event.timestamp );
} - Inside the
warningDialog_userCancelHandler(), also add atracestatement to output the class name, the event, and the timestamp as follows:protected function warningDialog_userCancelHandler(event:UserAcknowledgeEvent): void {
trace( "EventLab: Cancel " + event.timestamp );
} - Debug the EventLab application and click both the Ok and Cancel buttons.
WarningDialog: Accept Sun Feb 7 13:42:37 GMT-0600 2010
EventLab: Accept Sun Feb 7 13:42:37 GMT-0600 2010
WarningDialog: Cancel Sun Feb 7 13:42:37 GMT-0600 2010
EventLab: Cancel Sun Feb 7 13:42:37 GMT-0600 2010Notice that the
tracestatement first occurs in the WarningDialog where the event is received, followed by the EventLab. You have created a bubbling event and handled it in the application. You are now ready to fix the product addition and removal in the FlexGrocer application. - Terminate the debugging session and close the EventLab project.
You will now move back to the FlexGrocer application and apply this procedure there.
Creating and Using the ProductEvent Class
In this next exercise, you’ll create an event subclass called ProductEvent. ProductEvent will add a single property to the Event class named product, which will hold an instance of your Product value object. You will then refactor the ProductItem based on your new knowledge of events to reduce some application coupling and restore functionality.
- Open the FlexGrocer project.
Alternatively, if you didn’t complete the previous lesson or your code is not functioning properly, you can import the FlexGrocer.fxp project from the Lesson11/start folder. Please refer to the appendix for complete instructions on importing a project should you skip a lesson or if you have a code issue you cannot resolve.
- Right-click the src folder and create a new ActionScript class. Set the Package of the new class to events. Name the new class ProductEvent, and set flash.events.Event as the superclass.
The skeleton for your new class should look like this:
package events {
import flash.events.Event;
public class ProductEvent extends Event {
public function ProductEvent(type:String, bubbles:Boolean=false, cancelable:Boolean=false) {
super(type, bubbles, cancelable);
}
}
} - Create a new public property for your class, named
product, with a data typeProduct.If you use code hinting and choose the Product class from the list, the
importstatement for valueObjects.Product will be added automatically; if not, you will need to manually import the class. - Modify the constructor for your class so that it takes two arguments. The first argument will remain the
type, which is a String. The second argument is an instance of the Product class.public function ProductEvent(type:String, product:Product ) {
} - Inside the constructor, pass the type to the superclass, along with a
truefor the value of thebubblesparameter. Set your local product instance variable equal to theproductargument of the constructor.public function ProductEvent(type:String, product:Product ) {
super(type, true);
this.product = product;
} - Override the
clone()method. This method will return a new instance of the ProductEvent class with the sametypeandproduct.override public function clone():Event{
return new ProductEvent(type, product);
} - Save the ProductEvent class. The class should currently look like this:
package events {
import flash.events.Event;
import valueObjects.Product;
public class ProductEvent extends Event {
public var product:Product;
public function ProductEvent(type:String, product:Product ) {
super(type, true);
this.product = product;
}
override public function clone():Event {
return new ProductEvent( type, product );
}
}
} - Open ProductItem.mxml from your components package.
- Remove the public variable named
shoppingCart.You are no longer going to attempt to add and remove items from the shopping cart directly. Instead you will use events to inform other components of the user’s actions.
- Find the
addToCart()method. Delete all the existing contents of this method. - Inside the
addToCart()method, declare a new local variable namedeventof typeProductEvent, and set it equal to a new instance of the ProductEvent event class. For thetypeparameter of the ProductEvent constructor, pass the string addProduct. Then pass theproductargument of this method as the second constructor parameter. Finally, dispatch the event.private function addToCart( product:Product ):void {
var event:ProductEvent = new ProductEvent( "addProduct", product );
dispatchEvent( event );
}If you use code-completion, events.ProductEvent will be imported for you. If not, be sure to import it manually.
- Repeat this process for the
removeFromCart()method, passing the string removeProduct to the ProductEventtypeparameter.private function removeFromCart( product:Product ):void {
var event:ProductEvent = new ProductEvent( "removeProduct", product );
dispatchEvent( event );
} - Add an
<fx:Metadata>tag to this class. Inside it, declare that ProductItem.mxml will dispatch two events namedaddProductandremoveProduct. Indicate that both events will be of typeevents.ProductEvent.<fx:Metadata>
[Event(name="addProduct",type="events.ProductEvent")]
[Event(name="removeProduct",type="events.ProductEvent")]
</fx:Metadata> - Save this class and ensure there are no problems in the Problems view.
You are now dispatching a bubbling event from the ProductItem when the Add To Cart or Remove From Cart buttons are clicked.
Creating a ProductList Component
As you learned in previous lessons, you create a custom component in Flex whenever you need to compose new functionality. Previously, you created a DataGroup that displayed products on the screen. While you still want to use that DataGroup, you now need a DataGroup that will dispatch addProduct and removeProduct events. Anytime you make a component’s job more specific, you are talking about subclassing. In this exercise you will subclass DataGroup to make a ProductList. ProductList is a DataGroup with the extra event metadata needed by Flex.
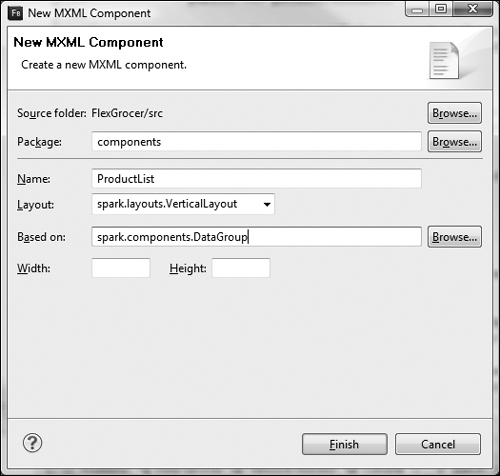
- Right-click the components package and choose New > MXML Component. Ensure the package is set to the word components and set the Name to ProductList. Set the layout to spark.layouts.VerticalLayout and the “Based on” field to spark.components.DataGroup, and clear the Width and Height fields. Click Finish.
- Set the
itemRendererproperty on the DataGroup node tocomponents.ProductItem.<?xml version="1.0" encoding="utf-8"?>
<s:DataGroup xmlns:fx="http://ns.adobe.com/mxml/2009"
xmlns:s="library://ns.adobe.com/flex/spark"
itemRenderer="components.ProductItem">
<s:layout>
<s:VerticalLayout/>
</s:layout>
<fx:Declarations>
<!-- Place non-visual elements (e.g., services, value objects) here-->
</fx:Declarations>
</s:DataGroup>The DataGroup in your ShoppingView uses components.ProductItem as an itemRenderer. This new ProductList is intended to replace that DataGroup with equivalent functionality plus events.
- Add an
<fx:Metadata>tag to this class. Inside it, declare that ProductItem.mxml will dispatch two events, namedaddProductandremoveProduct. Indicate that both events will be of typeevents.ProductEvent.<fx:Metadata>
[Event(name="addProduct",type="events.ProductEvent")]
[Event(name="removeProduct",type="events.ProductEvent")]
</fx:Metadata>This DataGroup is going to use the components.ProductItem renderer. As you declared earlier, that itemRenderer will dispatch two bubbling events:
addProductandremoveProduct. As you saw in the EventLab, when an event bubbles, you can listen for the event on any of the parent instances. In this case, you will listen for theaddProductandremoveProductevents on the ProductList. - Save the ProductList class. It should read as follows:
<?xml version="1.0" encoding="utf-8"?>
<s:DataGroup xmlns:fx="http://ns.adobe.com/mxml/2009"
xmlns:s="library://ns.adobe.com/flex/spark"
itemRenderer="components.ProductItem">
<s:layout>
<s:VerticalLayout/>
</s:layout>
<fx:Declarations>
<!-- Place non-visual elements (e.g., services, value objects) here-->
</fx:Declarations>
<fx:Metadata>
[Event(name="addProduct",type="events.ProductEvent")]
[Event(name="removeProduct",type="events.ProductEvent")]
</fx:Metadata>
</s:DataGroup>
Using the ProductList Component
You will now replace the DataGroup in your ShoppingView with your new ProductList component.
- Open the ShoppingView.mxml file and locate the DataGroup on approximately line 40.
- Directly below the DataGroup, add a ProductList component.
If you used code-completion, Flash Builder automatically added a component name space on your behalf. If you did not, you will need to add this namespace manually.
<components:ProductList/>
- Many of the properties on the DataGroup will be the same on your new ProductList. Copy the
width,height, andvisibleproperties (for both the normal and cartView state) to your ProductList tag.<components:ProductList width="100%" height="100%"
width.cartView="0" height.cartView="0"
visible.cartView="false"/> - Finally, move the
dataProviderproperty to the new ProductList and delete the DataGroup. Your new ProductList tag should look like the following code:<components:ProductList width="100%" height="100%"
width.cartView="0" height.cartView="0"
visible.cartView="false"
dataProvider="{groceryInventory}"/> - Save this file and run the application. You shouldn’t receive any errors, and the Products should display as before.
Using ProductEvent to Add and Remove a Product
An instance of the ProductEvent class is bubbling up the display list each time the AddToCart button is clicked. You are now going to listen to that event and use it to actually add the product to the cart.
- Open ShoppingView.mxml from the views package.
- Inside the Script block, add a new private method named
addProductHandler(). This function will accept a single parameter namedeventof typeProductEventand returnvoid.
In this case you are writing the event handlers manually. When Flash Builder automatically creates an event handler on your behalf, it normally names it to correspond to the control that is using the event (so, something like
productlist1_addProductHandler()if the ProductList were using it). That is fine in most cases, but this particular handler is going to be used by multiple controls, so you are naming it manually. - Still inside the Script block, add another new private method named
removeProductHandler(). This function will also accept a single parameter namedeventof type ProductEvent and returnvoid.private function addProductHandler(event:ProductEvent):void {
}
private function removeProductHandler(event:ProductEvent):void {
}If you did not use code-completion, add the import for events.ProductEvent at this time. Again, you are making these methods private, as they are not needed outside this class.
- Inside the
addProductHandler()method, create a new local variable namedsciof typeShoppingCartItem. Set this variable equal to a new instance of the ShoppingCartItem class, passing theproductproperty of your event object to its constructor.var sci:ShoppingCartItem = new ShoppingCartItem( event.product );
You already did the hard work by ensuring the event would have a reference to the clicked product available. Now you simply need to use it.
- Still inside the
addProductHandler()method, add the ShoppingCartItem instance to the shopping cart using theaddItem()method of the shoppingCart reference. Your code should look like this:private function addProductHandler(event:ProductEvent):void {
var sci:ShoppingCartItem = new ShoppingCartItem( event.product );
shoppingCart.addItem( sci );
} - Duplicate this concept inside the
removeProductHandler()method. Create a new local variable namedsciof typeShoppingCartItemand assign it a new ShoppingCartItem instance withevent.productpassed to its constructor. However, in this case, call theremoveItem()method of the shoppingCart, passing the localscivariable.private function removeProductHandler(event:ProductEvent):void {
var sci:ShoppingCartItem = new ShoppingCartItem( event.product );
shoppingCart.removeItem( sci );
}You now have two event handlers ready to add or remove products from the cart. You will now simply indicate that these two handlers should be used by your ProductList for this purpose.
- Find the ProductList tag and indicate that you will handle the ProductList’s
addProductevent with theaddProductHandler()method, passing the event object.<components:ProductList x="0" y="0" width="100%" height="100%"
width.cartView="0" height.cartView="0"
visible.cartView="false"
dataProvider="{groceryInventory}"
addProduct="addProductHandler(event)"/> - Next, indicate that you will handle the ProductList’s
removeProductevent with theremoveProductHandler()method, passing the event object.<components:ProductList x="0" y="0" width="100%" height="100%"
width.cartView="0" height.cartView="0"
visible.cartView="false"
dataProvider="{groceryInventory}"
addProduct="addProductHandler(event)"
removeProduct="removeProductHandler(event)"/> - Save this class and run the FlexGrocer application.
You should be able to add and remove products again using the buttons, but this action is now performed with events across components in a loosely coupled way.
Handling the Collection Change Event
As you already know, many Flex components and classes, some visual and some non-visual, dispatch events that can be used in your application. In this exercise, you will perform a minor refactoring of the ShoppingCart class and use one of these events to ensure that the total of your ShoppingCart class always remains correct as you add and remove items.
- Open ShoppingView.mxml from the views package.
- Find the Label tag that displays the text
Your Cart Total: $0.You will now change this Label to reflect the cart’s actual total.
- Change the Label to append the
totalproperty of the ShoppingCart instance, namedshoppingCart, directly after the currency symbol. Surround the expression that retrieves the total in curly brackets, indicating that it should be refreshed if the total changes. Your code should look like this:<s:Label text="Your Cart Total: ${shoppingCart.total}"/>
Flex will concatenate the initial portion of that string and the
totalproperty each time a change in the total is noted. However, there is still one bug in our ShoppingCart class that needs to be fixed.In Lesson 8, “Using DataBinding and Collections,” you added an implicit getter and setter to the ShoppingCartItem. Each time the ShoppingCartItem’s quantity changes, you update the subtotal for that particular item. Unfortunately, the ShoppingCart itself also has a
totalproperty. Right now, even though the subtotal for each item adjusts correctly, the ShoppingCart’s overall total is not aware of that change and will therefore not rerun thecalculateTotal()method. Effectively, this means that if you update quantities of given items through a method other than add or remove, the ShoppingCart total will not track correctly. - Open the ShoppingCart class from the cart package.
- As the last item in the class, add a new private method named
handleItemsChanged(). This method will accept a single parameter namedeventof type CollectionEvent.If you used code-completion, CollectionEvent will be imported for you. If not, import mx.events.CollectionEvent now. CollectionEvent is a special type of event broadcast from collections such as the ArrayCollection. It indicates that one of the items in the collection has changed.
- Inside the
handleItemsChanged()method, call thecalculateTotal()method of this object.private function handleItemsChanged( event:CollectionEvent ):void {
calculateTotal();
}Every time the items in the ShoppingCart change, you will respond by recalculating the total for the cart. In this way you can keep track of the changes to the total correctly.
- Find the constructor for the ShoppingCart class. As the last line of the constructor, you’ll add an event listener to the
itemsArrayCollection for theCollectionEvent.COLLECTION_CHANGEevent type. When this event occurs you want thehandleItemsChangedmethod called.items.addEventListener(CollectionEvent.COLLECTION_CHANGE, handleItemsChanged );
If you use code-completion, Flash Builder will write much of this line on your behalf. This is simply the ActionScript equivalent of adding an event listener in MXML and passing the event object.
The first parameter of the
addEventListener()call is always a String specifying the type of event. Unfortunately, in ActionScript, unlike in MXML, Flash Builder doesn’t look at the event metadata and fill in String on our behalf. It is therefore a common convention to create constants in the system, which are just strings with the name of the event preset on your behalf. This simply prevents you from making a typo by ensuring that the event type you want to listen for does in fact exist.Last thing to note: When you add an event listener in ActionScript, the second argument is a function reference. So, you don’t type
handleItemsChanged( event )as you would in MXML, but rather justhandleItemsChanged.
If you want to see how the constant works for yourself, hold down the Ctrl (Command) key and click COLLECTION_CHANGE. Flash Builder will take you to the CollectionEvent class, and you will see a constant. This line of code works the same whether you use the constant or type the string collectionChange.
- Find the
addItem()method and remove the call tocalculateTotal().Any change to the
itemsArrayCollection will now inform the ShoppingCart to recalculate itself. You no longer need to call this explicitly when adding or removing an item. - Find the
removeItem()method and also remove the call tocalculateTotal(). - Save this class and run the FlexGrocer application.
You can now add and remove items from the cart. As these items change, the total updates automatically as it responds to a notification from the items ArrayCollection.
What You Have Learned
• Learned the benefits of loosely coupled architecture (pages 262–263)
• Dispatched events (pages 263–267)
• Declared events for a component (pages 267–269)
• Identified the need for your own event classes (pages 269–270)
• Created and used an event subclass (pages 270–274)
• Learned about event bubbling (pages 274–279)
• Created the ProductEvent class (pages 280–284)
• Used ProductEvent to add and remove a product from the cart (pages 284–286)
• Used CollectionEvent to update the cart total (pages 287–288)