
Lesson 16: Customizing a Flex Application with Styles
In this lesson, you will:
• Learn how Flex applications are styled
• Set styles via tag attributes
• Learn about inheritable style properties
• Set styles via the <fx:Style> tag
• Set styles via CSS files
Out of the box, Flex provides a lot of functionality, but it has a rather generic look for an application. In this lesson, you’ll explore how to apply basic customizations to a Flex application using styles applied both inline and via CSS style sheets.

The FlexGrocer application with a new font and highlight colors
Applying a Design with Styles and Skins
You can use one of two approaches to apply a design to your Flex applications: styles or skins. Styles allow you to modify the appearance of a Flex component by using style properties to set visual elements such as the font size and background color. In this lesson, you’ll explore styles, learn about style inheritance, and learn about several ways to apply styles to your application.
Skins allow you to go beyond the functionality of styles, allowing you to change entire visual elements and rearrange those elements on the screen.
In previous versions of Flex, styles were the primary way applications were customized. In Flex 4 and later, designs for truly interesting user interfaces are a combination of the styling you’ll learn in this lesson and the skinning techniques you’ll learn in the next.
Cleaning Up the Appearance
Styling modifies the appearance of existing elements on the screen. So, before you begin styling the application, you’ll make a few minor changes to the ProductItem’s appearance to make it more conducive to the final design.
- Open ProductItem.mxml from your components package.
Alternatively, if you didn’t complete the previous lesson or your code is not functioning properly, you can import the FlexGrocer.fxp project from the Lesson16/start folder. Please refer to the appendix for complete instructions on importing a project should you skip a lesson or if you have a code issue you cannot resolve.
- Find the label with the
idofprodNameand move it directly below the<s:Image/>tag with theidofimg.Presently the product name is displayed above the image, but it will be moved lower for a cleaner appearance once styling is complete.
- Wrap the
addandremoveButton instances in an<HGroup>tag pair with itswidthproperty set to100%.<s:HGroup width="100%">
<s:Button id="add" label="Add To Cart" click="addToCart( product )"/>
<s:Button id="remove" label="Remove From Cart" click="removeFromCart(
product )"/>
</s:HGroup>As opposed to being stacked vertically, the buttons will now be displayed side by side, providing more screen space for the products.
- Shorten the label of the Add To Cart button to Add. Also shorten the label of the Remove From Cart button to Remove.
As these items are now side by side, shorter names will provide a cleaner look. Your final code should look like this:
<s:VGroup id="products">
<s:Image id="img"
scaleMode="letterbox"
source="assets/{product.imageName}"
mouseOver="this.currentState='expanded'"
mouseOut="this.currentState='State1'"
mouseDown="img_mouseDownHandler(event)"/>
<s:Label id="prodName" text="{product.prodName}"/>
<s:Label id="price" text="{ currency.format( product.listPrice ) }"/>
<s:HGroup width="100%">
<s:Button id="add" label="Add" click="addToCart( product )"/>
<s:Button id="remove" label="Remove" click="removeFromCart( product )"/>
</s:HGroup>
</s:VGroup> - Save the file and run the FlexGrocer application. The product name and buttons are now moved into a better position and ready for styling.
Applying Styles
As you have seen so far in your explorations, Flex development is performed using a number of standards-based languages, such as MXML (based on XML) and ActionScript 3.0 (based on ECMAScript). Styling is also accomplished in a standards-based way by using Cascading Style Sheets (CSS). You can apply a style by:
• Setting a single style on an individual component.
• Using CSS class selectors to set several styles together, which you can apply to multiple components.
• Using a type selector to specify that all components of a particular type (such as Button) should use a set of styles.
• Using descendant selection to indicate that components matching a particular hierarchy should use a set of styles (such as All Buttons in VGroup instances).
• Using an ID selector to specify that a component with a particular id should use a set of styles.
• Using pseudo-selectors, which allow you to style a particular state of a class (such as the Up state of a Button).
In the next several exercises, you’ll have a chance to apply styles in all these ways.
Regardless of which way you apply a style, you need to know the style property that will affect the changes you want. The ASDocs, also known as the Adobe Flex 4.5 Language Reference (which ships with Flash Builder), have a complete list of all styles available for every built-in component in Flex.
For example, here are some common styles for the Label component:
• color: Color of text in the component, specified as a hexadecimal number.
• fontFamily: Name of the font to use, specified as a string, or a comma-separated list of font names. When you specify a list, Flash uses the first font found in the list. If you specify a generic font name (such as _sans), it will be converted to an appropriate device font. The default value is Arial.
• fontSize: Height of the text, specified in pixels. Legal values range from 1 to 720. The default value is 12.
• fontStyle: String indicating whether the text is italicized. Recognized values are normal (the default) and italic.
• fontWeight: String indicating whether the text is boldface. Recognized values are normal (the default) and bold.
• paddingLeft: Number of pixels between the container’s left border and the left edge of its content area. The default value for Text controls is 0, but different defaults apply to other components.
• paddingRight: Number of pixels between the container’s right border and the right edge of its content area. The default value for Text controls is 0, but different defaults apply to other components.
• textAlign: String indicating the alignment of text within its container or control. Recognized values are left, right, center, justify, start, or end. Flex 4 text controls support bidirectional languages such as Arabic and Hebrew, so the concepts of left and right can sometimes be a bit confusing. For a person reading left to right, left padding is at the beginning of the sentence. For a person reading right to left, right padding is at the beginning of the sentence. You can specify start or end for padding, and Flex will apply it to the left or right depending on the language. The default value is start.
• textDecoration: String indicating whether the text is underlined. Recognized values are none (the default) and underline.
This is just a small sampling of the styles available for text manipulation in Flex. Each component has its own list of style properties, such as the selectionColor or rollOverColor (used in components like List and DataGrid), which accept a color as a hexadecimal value to indicate the color of the background bar around an item when you either hover over or select it.
You can find a complete list of these styles in the ASDoc Help Files for each class.
Setting Styles Inline with Tag Attributes
You can apply styles to individual instances of a component by setting the tag attribute of the component with the name of the style property and the value you want to set. For example, to give a label a larger font size, specify the following:
<s:Label text="Only a Test" fontSize="40"/>
In this exercise, you’ll set the rollOverColor and selectionColor for a DropDownList control in the second screen of the Checkout process (CreditCardInfo.mxml).
- Open CreditCardInfo.mxml from your /views/checkout package that you used in the previous exercises.
- Find the declaration for the first DropDownList control that displays credit card information. Add a tag attribute to specify the
rollOverColoras#AAAAAA.<s:DropDownList selectedItem="@{orderInfo.cardType}"
requireSelection="true"
rollOverColor="#AAAAAA">
<s:dataProvider>
<s:ArrayList>
<fx:String>American Express</fx:String>
<fx:String>Diners Club</fx:String>
<fx:String>Discover</fx:String>
<fx:String>MasterCard</fx:String>
<fx:String>Visa</fx:String>
</s:ArrayList>
</s:dataProvider>
</s:DropDownList>Letters used as part of a hexadecimal number (such as
#AAAAAA) are not case sensitive;#aaaaaaworks just as well. - Add another attribute to the same tag to specify the
selectionColoras#EA800C.<s:DropDownList selectedItem="@{orderInfo.cardType}"
requireSelection="true"
rollOverColor="#AAAAAA"
selectionColor="#EA800C">You are now telling this DropDownList control that when a user hovers the pointer over one of the items, its color should be pale gray (
#AAAAAA) instead of pale cyan (#0EFFD6), which is the default. - Save CreditCardInfo.mxml. Open and run FlexGrocer.mxml. Click Checkout in the upper-right corner. In the Customer Information form, fill out the required fields and click the Continue button. Click the Credit Card Type drop-down list and notice the color of selected and rolled-over items.
You can easily compare this with the default look of the DropDownList control because you have changed only one of the three controls on this screen. Open either of the other two drop-down lists to see the default
selectionColorandrollOverColor.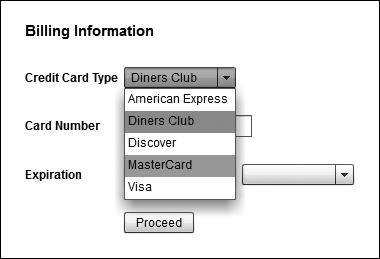
It is also possible to set styles on individual instances in ActionScript using the setStyle() method. For example, the same style could have been applied with this code:
idOfControl.setStyle("selectionColor",0xEA800C);idOfControl.setStyle("rollOverColor",0xAAAAAA);
When using setStyle(), colors are prefixed with 0x, which is the ECMAScript standard prefix for hexadecimal numbers. When applying a style in an attribute or <fx:Style> tag (as you’ll soon see), you can use a pound sign (#) instead of 0x. When set through ActionScript, numeric values (even those that are hexadecimal) do not have quotes around them.
Although setStyle() is useful for times when styles need to change at runtime, use it sparingly. setStyle() causes many of the visible portions of an application to refresh, so it is a processor-intensive operation.
Understanding Style Inheritance
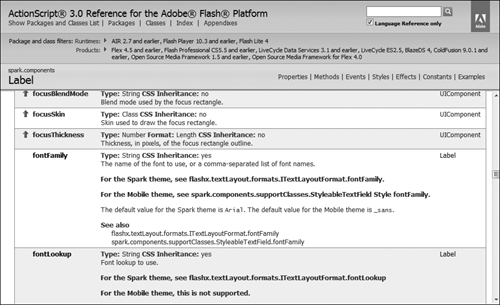
As you look at the ASDoc for various components, you can see that each style has a yes or no property for something called CSS inheritance.

For example, in this figure you see that a few styles of the DropDownList control—selectionColor and rolloverColor—do allow CSS inheritance, whereas cornerRadius does not. What this means is that if a parent container of a DropDownList control has a value for selectionColor and the DropDownList control itself does not, the container’s value will be used. However, because cornerRadius does not support inheritance, even if a parent container had a value set for cornerRadius, the DropDownList control would use the default value because it does not inherit this value.
Setting Styles with the <fx:Style> Tag
Many of you may have been exposed to CSS before when building web pages. You can also use many of the same CSS styles in your Flex applications. One way to do this is to add an <fx:Style> tag pair to the Application MXML document; you can write standard CSS style declarations between the open and close tags.
Standard CSS tends to have style properties whose names are all lowercase and uses hyphens as a separator between words:
background-color : #FFFFFF;
In the previous exercise, you used multiword styles by declaring them with camel case syntax; that is, the style declaration started with a lowercase letter and each subsequent word started with an uppercase letter, with no spaces or hyphens used:
<s:DropDownList rollOverColor="#AAAAAA"/>
The reason for the difference is that a hyphen is not a valid character for an XML attribute, and MXML tags are all XML tags. To work around this, when you set style names via attributes, set them with the ActionScript equivalent of the style name. So, for example, you use backgroundColor instead of background-color. The lowercase hyphened versions of style properties are available only for properties that exist within traditional CSS. Any styles created specifically for Flex (such as rollOverColor) are available only in camel case. When you specify a style within an <fx:Style> tag, you can use either syntax, and Flex will apply it properly.
<fx:Style>
.customDropDown{
selection-color: #AAAAAA;
}
</fx:Style>
or
<fx:Style>
.customDropDown{
selectionColor: #AAAAAA;
}
</fx:Style>
Flex supports several ways to assign multiple styles at one time via CSS. These include class selectors, type (sometimes called element) selectors, descendant selectors, pseudo-selectors, and ID selectors.
Class Selectors
A class selector defines a set of style properties as a single style class, which can then be applied to one or more components through the use of the component’s styleName property:
<fx:Style>
.customDropDown {
rollOverColor: #AAAAAA;
selectionColor: #EA800C;
}
</fx:Style>
<s:DropDownList styleName="customDropDown"/>
Here, the DropDownList control is using the customDropDown style class, which sets both the text rollOverColor and the selectionColor. You can use the styleName property to assign more than one style at a time to an instance by separating the style classes with a space:
<fx:Style>
.customDropDown {
rollOverColor: #AAAAAA;
selectionColor: #EA800C;
}
.blueStyle {
color: blue;
}
</fx:Style>
<s:DropDownList styleName="customDropDown blueStyle"/>
In this case, the DropDownList control is using the customDropDown style class and the blueStyle style class, which sets the rollOverColor, selectionColor, and color of the text.
Type Selectors
A type selector enables you to specify a set of styles that will be applied to all instances of a component type. In HTML applications, you can do this to define the look of an <H1> tag for your site. The same basic syntactic structure works to define a set of styles to be applied to all instances of a Flex control type.
Throughout this book you have worked with namespaces. Flex uses namespaces as a means of clarification. This clarification allows you to specify the type of label you want, as in <s:Label/>, or perhaps which custom component you meant when indicating <views:ShoppingView/>. In ActionScript, you can have multiple classes with the same name but not in the same namespace. So, you could have a Test class in your views package and your components package, but you could not have two Test classes in the views package.
Namespaces allow you to be specific about the component you intend to address and ensure that the Flex compiler doesn’t need to guess your intent.
The same concept is used when styling in CSS:
<fx:Style>
@namespace s "library://ns.adobe.com/flex/spark";
s|DropDownList {
selectionColor: #EA800C;
cornerRadius:5;
}
</fx:Style>
<s:DropDownList id="stateProvenceCombo"/>
<s:DropDownList id="countryCombo"/>
In this example, the cornerRadius and selectionColor style properties are being applied to all DropDownList control instances in the Spark (s) namespace.
The terms type and class selector might seem counterintuitive if you haven’t previously worked with CSS. These terms come from CSS standards, not from Adobe or Flex. The confusion is that a type selector is what you would use to affect all instances of an ActionScript class; a class selector has no relation to any ActionScript class, but instead defines a style class that can be used on several elements.
In this exercise, you’ll build a class selector and apply it to an <s:Form> tag in CreditCardInfo.mxml. Not only will this showcase using a class selector, but you’ll also see style inheritance in use as the style will be inherited by all the DropDownList controls in that form.
- Open FlexGrocer.mxml.
- Just after the closing
</fx:Script>tag, add a new<fx:Style>tag pair.When you add this tag, Flash Builder’s code completion will take over and add a namespace for every namespace presently defined in the application. Your Style tag should look like the following:
<fx:Style>
@namespace s "library://ns.adobe.com/flex/spark";
@namespace views "views.*";
@namespace services "services.*";
@namespace cart "cart.*";
</fx:Style>You now have an
<fx:Style>block, in which you can create type or class selectors. - Inside the
<fx:Style>block, create a class selector calledcustomDropDownthat specifies aselectionColorof#EA800Cand arollOverColorof#AAAAAA.<fx:Style>
@namespace s "library://ns.adobe.com/flex/spark";
@namespace views "views.*";
@namespace services "services.*";
@namespace cart "cart.*";
.customDropDown{
selectionColor:#EA800C;
rollOverColor:#AAAAAA;
}
</fx:Style>As with traditional CSS, but unlike style properties set as attributes, no quotes are used around the values of the style properties.
- Open CreditCardInfo.mxml.
- Remove the
rollOverColorandselectionColorattributes of the DropDownList control. Instead, specify astyleNameofcustomDropDownas an attribute on that ComboBox control.<s:DropDownList selectedItem="@{orderInfo.cardType}"
requireSelection="true"
styleName="customDropDown"> - Save both CreditCardInfo.mxml and FlexGrocer.mxml, and then run the application.
The DropDownList instances in the Checkout section should behave exactly as they did before. The Credit Card Type will have custom colors, whereas the other two show the default colors.
- Cut
styleName="customDropDown"from the DropDownList and instead paste it as an attribute of the<s:Form>tag.<s:Form styleName="customDropDown">
Because the form contains three DropDownList controls, applying these inheriting styles to the form will affect all the DropDownList controls within the form.
- Save and run the application.
Verify that the style is now applied to all three DropDownList controls in the form.
Setting Styles with CSS Files
You can use an <fx:Style> tag to either define a block of styles inline on the MXML document, as you did in the previous exercise, or use its source attribute to specify an external CSS file to be compiled into the application.
<fx:Style source="path/to/file.css"/>
One great advantage of using an external file is that you can share CSS files between multiple Flex applications, or even between Flex and HTML applications. This is possible because CSS parsers in both Flex and HTML are smart enough to ignore any declarations they don’t understand. So even if Flex supports only a subset of standard CSS, and in fact creates a number of its own custom declarations, neither your HTML nor your Flex applications will be hurt by declarations they cannot understand.
In this exercise, you’ll create a CSS file and begin to style the FlexGrocer application.
- Right-click the assets package of the Package Explorer. Choose New > CSS File.

- Enter defaultStore as the name in the New File dialog box and click Finish.

Flash Builder creates a new CSS File with the Spark namespace, ready for your customization.
- Open FlexGrocer.mxml, find your
<fx:Style>tag, and cut everything between the opening and closing tags. Paste this content into defaultStore.css. Your CSS file should have the following information:@namespace s "library://ns.adobe.com/flex/spark";
@namespace views "views.*";
@namespace services "services.*";
@namespace cart "cart.*";
.customDropDown{
selectionColor:#EA800C;
rollOverColor:#AAAAAA;
}Save this file. You might notice that the Outline view of Flash Builder understands CSS files as well as MXML and ActionScript. As your CSS becomes more complicated, the Outline view can be a great way to navigate through the file.

As a best practice, all styles for the application are defined in a single style sheet. This way, if you want to change the look and feel of the application at a later time, you don’t need to dig through the code to find all the places where styles were applied; instead, you can restyle the application by changing only one file.
- Return to FlexGrocer.mxml and find the
<fx:Style>tag again. Convert the style tag from a tag pair to a single self-closing tag. Add asourceattribute to the tag and sets its value toassets/defaultStore.css.<fx:Style source="assets/defaultStore.css"/>
FlexGrocer will now use the external CSS file found in the assets directory for its style information.
- Save FlexGrocer.mxml and run the application.
If all went as expected, the application will run and your DropDownList instances will still have custom coloring in the CreditCardInfo form.
Adding More Styling to the Application
You’ll now have the opportunity to work with some of the other CSS selectors to apply styles to your application and components.
- Open the defaultStore.css file you worked on in the previous exercise.
- Just above the selector for the
customDropDown, you’ll embed a font for your FlexGrocer application using the CSS syntax. Do this by adding the following code:@font-face {
src: url("assets/fonts/SaccoVanzetti.ttf");
fontFamily: SaccoVanzetti;
}This code embeds the SaccoVanzetti font found in your assets folder. It associates that font with the
fontFamilySaccoVanzetti, which you’ll use to refer to this font elsewhere.Embedding a font means the font is literally included in your application. This ensures that a user will be able to display the font exactly as you intended it to be seen—but it comes with a price. Just like embedding images or other assets, each time you embed a font, your application file size becomes larger.
The SaccoVanzetti font is part of the Open Font Library, which shares fonts under a Creative Commons License. Find more information about this font at http://openfontlibrary.org/
Although the font will now be included in your application, you have not specified where to use it.
- Add a new type selector for the Application in the Spark namespace and specify that the Application class use the SaccoVanzetti font family.
s|Application {
fontFamily: SaccoVanzetti;
}This small bit of code includes several important concepts. First, you are indicating that you want to style the Application class in the Spark namespace. How do you know that? There are a few steps to unraveling this mystery.
First, notice that in your CSS file that there is a declaration on top for the Spark namespace. This line says you are going to use the letter
sto represent the namespace found at the longer URI:@namespace s "library://ns.adobe.com/flex/spark";
When you specify
s|Applicationin your CSS file, you are clarifying that you mean the Application class found in the namespace is represented by the letters.If you were to look in your FlexGrocer application file, you would see a similar namespace declaration in the root tag:
xmlns:s="library://ns.adobe.com/flex/spark"
The difference in syntax is due to a difference in language. The
@namespacedeclaration is how CSS defines namespaces. Thexmlnsdeclaration is how XML defines a namespace. The advantage of a standards-based language like Flex is a common set of ideas and languages that can be used between the web and your applications. The disadvantage of using all these standards is that, if you did not come from a background that uses all these discrete syntax elements, you sometimes need to learn several ways to say the same thing at the same time.Ultimately, both namespaces are a way of referring to the same set of components. Because your FlexGrocer application begins with an
<s:Application>tag, the small snippet of code that you added to your CSS file effectively indicates that you want to use this font for your main application.Further, because the
fontFamilyis generally an inheriting style, by setting this style on your main application, you ensure that the same font will be used by all the controls in your project.
A note to readers with previous Flex experience: The newer text engine used in Spark components also uses a newer way to embed fonts. There is a check box in the Project Properties>Flex Compiler Options named ‘Use Flash Text Engine in MX Components’. If you are working with your older Flex project and integrating some newer spark controls, this check box allows the older component to use the font you just embedded. The other option is to set a flag in the
@font-faceblock calledembedAsCFFtofalse. That flag will force the font to be embedded using the older method, which is natively compatible with MX components. - Ensure your CSS file looks like the following code, and then save and run the application.
@namespace s "library://ns.adobe.com/flex/spark";
@namespace views "views.*";
@namespace services "services.*";
@namespace cart "cart.*";
@font-face {
src: url("assets/fonts/SaccoVanzetti.ttf");
fontFamily: SaccoVanzetti;
}
s|Application {
fontFamily: SaccoVanzetti;
}
.customDropDown{
selectionColor:#EA800C;
rollOverColor:#AAAAAA;
}You should now see the SaccoVanzetti font applied to your application.
Using a Descendant Selector
In the previous exercise, you used a type selector to indicate that the entire application should be styled in a specific way. Using selectors will inevitably lead to conflicts when the same style is set two different ways; for example, when the font’s color is set in one place to blue and in another place to black. In such a conflict, the most specific style wins. In other words, if you set the font’s color to blue at an application level but set it to black on a label tag directly, the color for that label will be black as the label’s attribute is more specific than the application setting.
Descendant selectors are a way to start adding specificity to your styling in place of generalities. Using descendant selectors, you specify the containment hierarchy as part of the styling. This means you can indicate that all classes of one type found inside all classes of another type should take on a specific style. The general syntax for a descendant selector is as follows:
ns|Component1 ns|Component2 ns|Component3 {
color: #FFFFFF;
}
This particular style will only apply to instances of Component3, found inside Component2, found inside Component1. You can nest this hierarchy as deeply as you would like to maintain.
Here you’ll choose to style all labels inside your ProductList component:
- Open the defaultStore.css file you worked on in the previous exercise.
- At the top of your CSS file under the existing namespaces, add a new one called
componentsthat maps to thecomponents.*path.@namespace components "components.*";
You’ll use this namespace to apply styles specifically to classes that exist inside the components package.
- Just above the selector for the customDropDown, add the following code:
components|ProductList s|Label {
color: #013FAC;
}In this case, you’ll set the color style on all labels found inside the ProductList.
- Save this file and run the application.

Note that the labels for any of your products, including name and price, are now blue. Because this application of styles is recursive, even the Add and Remove labels in the buttons inside the ProductList are blue. However, the description of the product is contained in a RichText tag, so it remains at its default color, along with the button for viewing the cart and similar buttons (since they were not inside the ProductList).
Using an ID Selector
So far you have applied styles to a specific component by creating a class selector and then using the styleName property on an MXML tag to apply that style. Using an ID selector is another approach that can be used when you wish to style just a single instance of a component.
Suppose you have a Label with an id of myLabel.
<s:Label id="myLabel" text="Hello"/>
You can apply a style to that instance by using a hash mark (#) combined with the id of the field:
#myLabel {
color: #dfecdc;
}
This code will apply the color style to any control with an id of myLabel.
- Open the FlexGrocer.mxml file.
- Find the List instance in the controlBarContent that displays NavigationItems.
- Add an
idproperty to this List instance and set it tocategoryList. Your List tag should look like the following:<s:List id="categoryList" left="200" height="52"
dataProvider="{categoryService.categories}"
itemRenderer="components.NavigationItem"
change="list1_changeHandler(event)">
<s:layout>
<s:HorizontalLayout/>
</s:layout>
</s:List> - Open the defaultStore.css file.
- At the bottom of the file, add the following ID selector for
categoryList:#categoryList {
rollOverColor: #dfecdc;
selectionColor: #6aa95f;
borderVisible: false;
}You are specifying new colors for both the selected and rollover colors for the list, as well as indicating that you no longer want to see any borders associated with this list.
- Save this file and run the application.
If you choose an item from the List in the control bar, you’ll now see different colors when hovering and when you select an item.
Using Pseudo or State Selectors
There is one remaining way to style components in Flex: using pseudo-selectors. With this approach, you style a view state of a component. For example, your main application has two view states (shopping and checkout and a Button has many (up, over, down, disabled, and so on). Using pseudo-selectors combined with any of the other techniques you have learned so far, you can style specific states of any Flex component.
The general form to apply a pseudo-selector in CSS looks like this:
ns|Type:viewState {
color: #FFFFFF;
}
or this:
.class:viewState {
color: #FFFFFF;
}
or this:
#id:viewState {
color: #FFFFFF;
}
This code will apply the color style to any control with an id of myLabel.
- Open the defaultStore.css file.
- Just under the
s|Applicationtype selector, add a new type selector for the application, but specifically for the shopping state. Set thebackgroundColorto#FFFFFFin this state.s|Application:shopping {
backgroundColor:#FFFFFF;
}The application in the shopping state will be set to white.
- Add another
s|Applicationtype selector specifically for the checkout state. Set the backgroundColor to#BBC8B8in this state.s|Application:checkout {
backgroundColor:#BBC8B8;
}The application in the checkout state will be set to a light green.
- Next, below that customDropDown declatation, add a class selector named
cartButtonspecifically for the over state. In this state, set thechromeColorstyle to#F3FBF4..cartButton:over {
chromeColor: #F3FBF4;
} - Add another class selector for
cartButtonspecifically for the down state. In this state, set thechromeColorstyle to#C2CBE7..cartButton:down {
chromeColor: #C2CBE7;
}You’ll use these class selectors for every button dealing with cart navigation.
- Open the FlexGrocer.mxml file.
- Find the Button instance named
btnCartView. Add astyleNameproperty to the Button indicating it should usecartButtonas its style.<s:Button id="btnCartView" y="10" right="90" label="View Cart"
styleName="cartButton"
click="handleViewCartClick( event )"/> - Open the ShoppingView.mxml from the views package.
- Find the Button instance with the label View Cart. Add a
styleNameproperty to the Button indicating it should usecartButtonas its style.<s:Button includeIn="State1"
height="17"
label="View Cart"
styleName="cartButton"
click="handleViewCartClick( event )"/> - Find the Button instance with the label Continue Shopping. Add a
styleNameproperty to the Button indicating it should usecartButtonas its style.<s:Button includeIn="cartView"
label="Continue Shopping"
styleName="cartButton"
click="this.currentState=''"/> - Save any open files and run the application.
If you switch between the checkout view and shopping view, you should see a change in background color. If you hover over either of the View Cart buttons, you should see a different hover color and a different color again when you click on them.
Changing CSS at Runtime
One drawback to the CSS approach shown in the previous section is that the CSS files are compiled into the application. This means that any changes to the application’s style sheet require that the application be recompiled. A better approach is the ability to load CSS at runtime. You do not need to follow these steps at this time, but this section has been included for future reference.
Understanding the Benefits of Runtime CSS
There are a number of benefits to being able to change CSS at runtime. Chief among them is more rapid maintenance: A designer can simply deploy a new version of the CSS to the web server, eliminating the need to recompile and redeploy the application. Another benefit is a much easier approach for deploying a single application that can be presented with multiple skins, without the need for separately deployed applications for each skin. For example, if Flex Grocer wanted to partner with local grocery stores and allow the stores to brand the application as their own, it is now possible to have a single deployed version of the application, which loads a different style sheet depending on the domain from which the application has been loaded.
Creating a SWF from a CSS File
Flash Player doesn’t natively have the ability to work with a runtime-loaded CSS file directly, so Adobe has added a simple mechanism for converting an existing CSS style sheet into a SWF, with which Flash Player can easily interact. Using the SDK, you can use the MXMLC compiler to compile a CSS file to a SWF, or it can be done even more easily within Flash Builder. All you need to do is right-click the CSS file in the Package Explorer and choose the Compile CSS to SWF option, as seen in the following figure.

Once the CSS has been compiled into a SWF, you can find the file named defaultStore.swf in your bin-debug/assets folder.
Loading a CSS SWF with StyleManager
Working with a CSS file compiled into a SWF is trivial; a single line of ActionScript is all you need to load and use that file. If you wanted to load your styles at runtime from the application, you would execute the following code from an event handler:
styleManager.loadStyleDeclarations("assets/defaultStore.swf");
This instructs StyleManager (an object in Flex responsible for managing all of the application’s styles) to load the specified file and use any styles specified within it.
If you need to unload a CSS file loaded dynamically, there is another StyleManager method, unloadStyleDeclaration, that you’ll find helpful:
styleManager.unloadStyleDeclaration("assets/defaultStore.swf");
Overriding Styles with a Loaded CSS
It’s possible to have multiple style sheets in play. These can be a combination of compiled and dynamically loaded style sheets. The fundamental rule to remember when dealing with multiple style sheets is that if any styles are defined in more than one style sheet, the one loaded last is the one that Flex will use.
For example, if you have a CSS file compiled into the application with style definitions for s|Application, .boldText, and .formHeading, and you then load a CSS file at runtime that also has a definition for s|Application and .formHeading, the .boldText style from the compiled version will be used, as well as the s|Application and .formHeading style from the loaded style sheet—whichever is defined last is the one that Flex uses.
What You Have Learned
In this lesson, you have:
• Learned how Flex applications are styled (pages 376–379)
• Set styles via tag attributes (pages 379–381)
• Learned about inheritable style properties (page 381)
• Set styles via the <fx:Style> tag (pages 382–385)
• Set styles via CSS files (pages 386–394)