
2. Managing Events
In This Chapter
Working with Clips in the Event Browser
Customizing the Event Browser Display
Selecting and Sorting Browser Items
iMovie users, Final Cut Pro’s Event Library and Event Browser will look familiar to you: The Event Library displays all the clips, audio, and graphics you’ve imported into FCP organized into events—FCP’s name for a folder containing clips.
Clicking an event folder in the Event Library displays its contents—the clips contained in that event—in the Event Browser.
The Event Browser is the window you use to organize and access individual clips, audio files, graphics, and offline clips—all the media elements you use in your project. The Event Browser performs these organizing tasks on your project’s virtual clips and sequences. Although browser items look like files on your computer desktop, browser items are references to media files, not the files themselves. The “Secrets of Nondestructive Digital Editing” section of Chapter 1 is key to understanding how FCP works.
For more information on organizing your clips and their metadata, see Chapter 4, “Organizing Clips.”
Anatomy of the Event Library
FCP’s Event Library is one part of its structure for storing and retrieving clips. The Event Library displays a list of folders, called events, containing all the clips, audio, and graphics you have imported into FCP.
Clicking an event folder in the Event Library displays its contents—the clips contained in that event—in the Event Browser. For details on the Event Browser, see “Anatomy of the Event Browser,” later in this chapter.
The Event Library also displays icons representing other types of data. Mixed into the Event Library you’ll see icons that represent keyword collections and smart collections, which are FCP–generated footage analysis data. Click a keyword collection icon in the Event Library, and the Event Browser will display only those clips tagged with a matching keyword. For more information, see “Searching for Clips in the Event Browser.”
Events in the Events Library are displayed chronologically by default, but you’re free to reorganize your clips into event folders that are useful to you. You can create new event folders, split events, combine multiple event folders into a single new event, and more.
You can use clips from multiple events in a single project.
To display the Event Library
• Click the Event Library button in the lower-left corner of the Event Browser to display the Event Library pane ![]() . Click again to hide it.
. Click again to hide it.
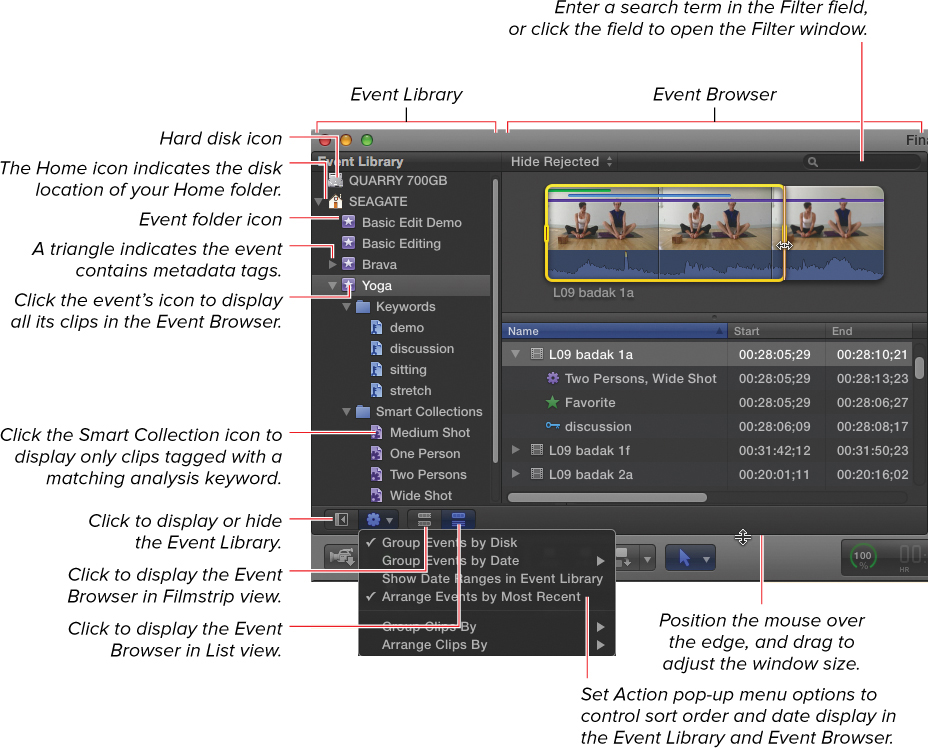
![]() The Event Library and Event Browser windows
The Event Library and Event Browser windows
Creating Events
Each time you import clips, FCP offers you the option of importing them into an existing event folder or importing into a new event. You can also create new event folders in the Event Library, which is useful for organizing great gobs of clips into neat little groups.
FCP offers other tools to help organize your clips without creating new event folders: keywords, ratings, and favorites. For more information, see Chapter 4, “Marking Clips.”
To create a new event in the Event Library
1. In the Event Browser, if the Event Library is not visible, click the Event Library button to reveal it ![]() .
.
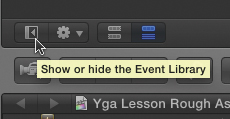
![]() Click the Event Library button to toggle the display of the Event Library.
Click the Event Library button to toggle the display of the Event Library.
2. Choose File > New Event ![]() , or press Option-N.
, or press Option-N.
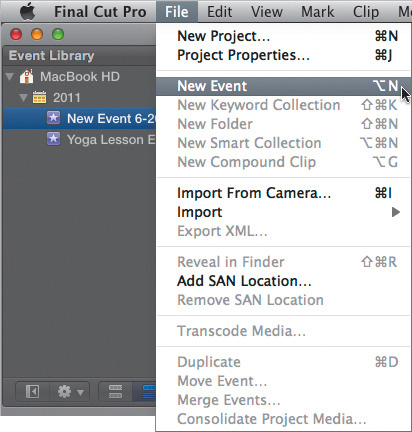
![]() Choose File > New Event to create a new event folder.
Choose File > New Event to create a new event folder.
Your new event folder appears in the Event Library with its name field selected.
3. Type a new name, and then press Enter (or Return) ![]() .
.
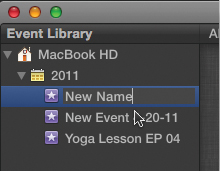
![]() Type a new name in the name field, and press Return.
Type a new name in the name field, and press Return.
When you’re organizing stuff in the Event Library, use event folders to hold clips, audio, photos, and the like. The other kind of FCP folder (known as a folder) holds keyword collections and other kinds of metadata—but it doesn’t hold clips.
To rename an event
• In the Event Library, click the name of the event you want to rename to select it, type a new name, and press Return.
To delete an event
• In the Event Library, right-click the event you want to delete and choose Move Event to Trash from the shortcut menu ![]() , or press Command-Delete.
, or press Command-Delete.
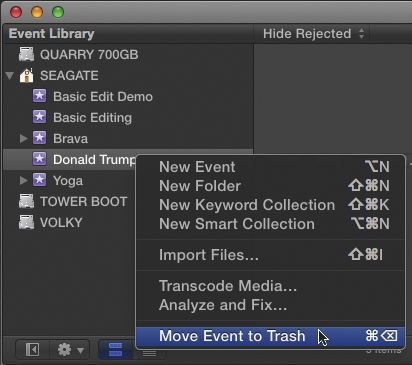
![]() Right-click the event you want to delete and choose Move Event to Trash from the shortcut menu.
Right-click the event you want to delete and choose Move Event to Trash from the shortcut menu.
FCP moves that event folder and all the clips it contains into the Trash.
Working with Event Folders
You can customize your FCP event folder setup to match your working style. You might want to organize your footage by event, with each event folder gathering the footage shot at a graduation, birthday, conference keynote, or intervention into a single event folder.
Editors who draw from stock footage or news clip libraries may prefer to configure their Event Library differently, creating permanent subject- or date-based event folders and filing clips as they acquire them.
You can merge multiple events into a single event folder.
You can create a set of new, empty events and sort clips from a single event into multiple folders by copying or moving them.
FCP’s indexes of your clip metadata—all the camera information that is imported along with your footage, plus any notes and identifiers you add later—are organized into Keyword Collection and Smart Collection folders, which also reside in the Event Library. Learn more about organizing your metadata in “Working with Keywords and Favorites” in Chapter 4.
Whenever you copy or move a clip between event folders, the clip’s source media file is moved to the disk location you select.
You can also tag footage with keywords and build virtual collections without moving your clips from their original import folders. See “Tagging Clips with Keywords” in Chapter 4.
To sort event folder listings in the Event Library
1. To control the sort order of your event folders, open the Event Library’s Action pop-up menu, and do one of the following:
• Choose Group Events by Disk to sort event folders by their hard disk location ![]() .
.
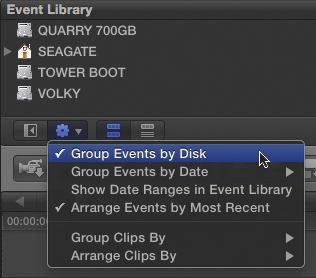
![]() Choose Group Events by Disk from the Action pop-up menu to sort event folders by their hard disk location.
Choose Group Events by Disk from the Action pop-up menu to sort event folders by their hard disk location.
• Choose Group Events by Date, and then choose an option from the submenu:
• Choose Don’t Group Events by Date to sort and display Event Library folders by name rather than by date ![]() .
.
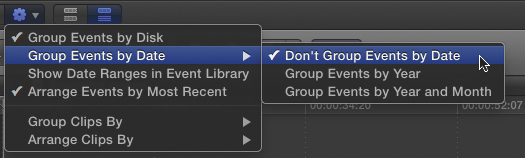
![]() Choose Don’t Group Events by Date in the Action pop-up’s submenu to sort and display Event Library folders by name rather than by date.
Choose Don’t Group Events by Date in the Action pop-up’s submenu to sort and display Event Library folders by name rather than by date.
• Choosing Group Events by Year or Group Events by Year and Month will sort your Event Library by recording date.
2. Choose Arrange Events by Most Recent to sort your newest material to the top of the Event Library list.
FCP users who don’t want to be reminded that their four-year-old vacation video is still sitting uncut in the Event Library will be relieved to know that displaying dates in the Event Library is optional. You can hide date display by unchecking Show Date Ranges in the Event Library’s Action pop-up menu ![]() .
.

![]() Hide Event Library date display by unchecking Show Date Ranges in the Action pop-up menu.
Hide Event Library date display by unchecking Show Date Ranges in the Action pop-up menu.
To merge multiple events
1. In the Event Library, select all the event folders you want to merge, and then choose File > Merge Events ![]() .
.
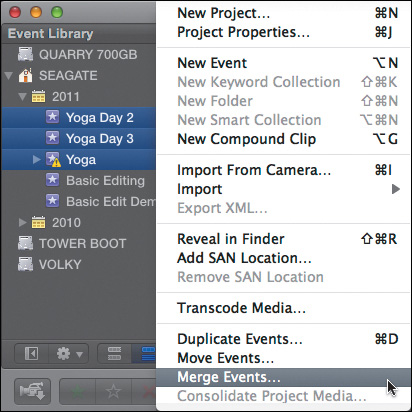
![]() Select the event folders you want to merge, and then choose File > Merge Events.
Select the event folders you want to merge, and then choose File > Merge Events.
The Merge Events window appears.
2. Type a name for your new event, choose a disk location for the merged events’ media files from the Location pop-up menu, and click OK ![]() .
.
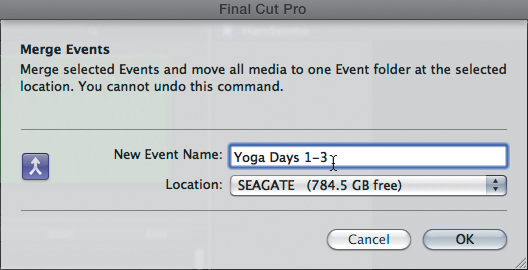
![]() In the Merge Events window, name your new event, and choose a disk location for the merged events’ media files.
In the Merge Events window, name your new event, and choose a disk location for the merged events’ media files.
FCP replaces the event folders you selected with a new event folder that contains all the clips from the selected events ![]() . The source media files for those clips are moved into a single folder at the disk location you selected in step 2.
. The source media files for those clips are moved into a single folder at the disk location you selected in step 2.
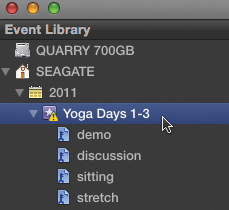
![]() A new event folder containing all the clips from the selected events replaces the event folders you selected.
A new event folder containing all the clips from the selected events replaces the event folders you selected.
To split an event into multiple event folders
1. Create new, empty event folders by choosing File > New Event, or press Option-N.
2. Name your new event folders.
3. Follow the steps in “To copy clips into a different event” to sort your clips by copying or moving them from their original event folder into the new event folders you created.
Each clip’s source media file is copied or moved into the folder destination at the disk location you select.
To copy clips into a different event
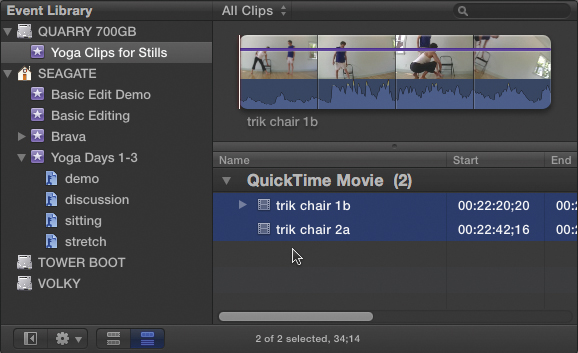
1. In the Event Library, select the event folder that contains the clips you want to copy ![]() .
.
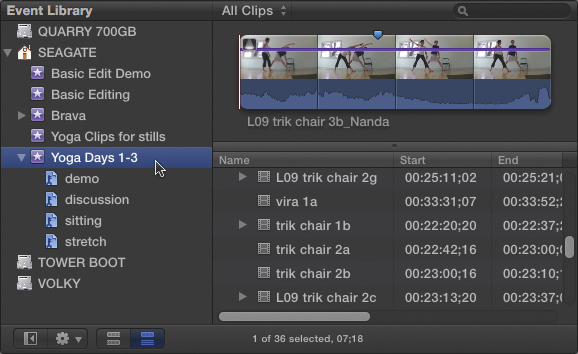
![]() Select the event folder that contains the clips you want to copy.
Select the event folder that contains the clips you want to copy.
The event folder’s contents are displayed in the Event Browser.
2. In the Event Browser, select the clips you want to copy, and then do one of the following:
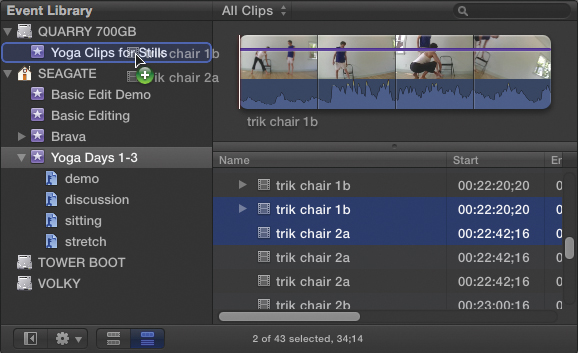
• If the destination folder is located on the same hard disk, Option-drag the selected clips to an event’s icon in the Event Library to copy them into that event ![]() .
.
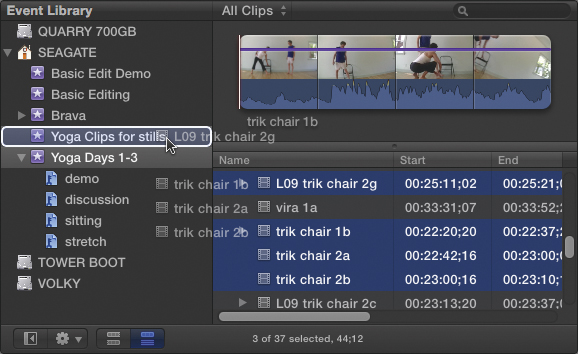
![]() Option-drag the selected clips to copy them into an event folder located on the same hard disk as the source event.
Option-drag the selected clips to copy them into an event folder located on the same hard disk as the source event.
• If the destination folder is located on a different hard disk, drag the selected clips to an event’s icon in the Event Library to copy them into that event.
Each clip’s source media file is copied into the folder destination at the disk location you select.
To move clips into a different event
1. In the Event Library, select the event folder that contains the clips you want to move.
The event folder’s contents are displayed in the Event Browser window.
2. In the Event Browser window, select the clips you want to move, and then do one of the following:
• If the destination folder is located on the same hard disk, drag the selected clips to an event’s icon in the Event Library to move them into that event.
• If the destination folder is located on a different hard disk, Command-drag the selected clips to an event’s icon in the Event Library to move them into that event ![]() .
.
![]() Command-drag the selected clips to move them into an event folder located on a different hard disk as the source event.
Command-drag the selected clips to move them into an event folder located on a different hard disk as the source event.
Each clip’s source media file is moved into the destination folder at the disk location you select ![]() .
.
![]() The selected clips are moved into the destination event folder.
The selected clips are moved into the destination event folder.
To copy an entire event to a different hard disk
1. If you haven’t already, connect the destination hard disk to your computer, and then choose Group Events by Disk from the Event Library’s pop-up menu.
The destination hard disk is added to the list of disks in the Event Library window.
2. In the Event Library, select the event folder you want to copy, and then do one of the following:
• Choose File > Duplicate Event ![]() .
.
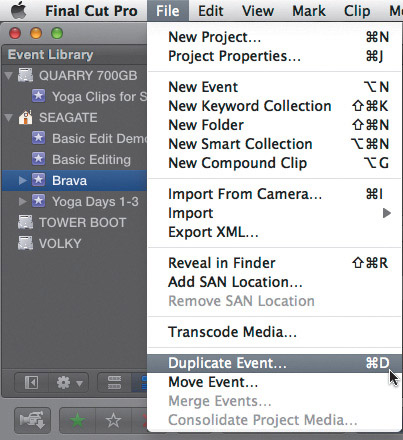
![]() Select the event folder you want to copy, and then choose File > Duplicate Event.
Select the event folder you want to copy, and then choose File > Duplicate Event.
• Drag the event to the external drive’s icon in the Event Library window.
3. In the Duplicate Event window, select the destination hard drive for your copy, enter a name for the duplicated Event, and then click OK ![]() .
.
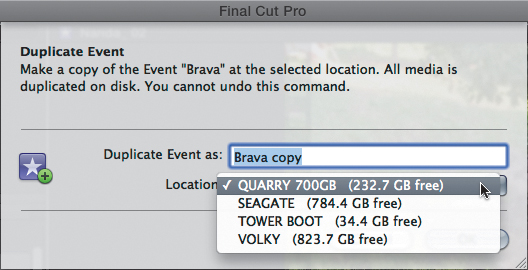
![]() In the Duplicate Event window, select the destination hard drive for your copy, and enter a name for the duplicated event.
In the Duplicate Event window, select the destination hard drive for your copy, and enter a name for the duplicated event.
FCP copies all the source media files contained in the selected event into the duplicate event folder at the disk location you selected. Copying large video files can take a few minutes.
Working with Clips in the Event Browser
The Event Browser has three primary functions:
• You use the Event Browser to organize and access individual clips, audio files, graphics, and offline clips—all the media elements you use in your project.
• You also use the Event Browser to preview, or skim, a filmstrip-sized playback of your clips. The filmstrip icons in the Event Browser are all “live” and play back any time you move your mouse over them.
• You use the Event Browser range selection and marking tools to select the section of a clip you want to include in your edit and to tag clips or parts of clips. Keyword tagging allows you to create custom categories and annotate your clips in a way that makes sense to you. FCP’s two rating tools—Favorite and Reject—help you keep track of the best and worst parts of your footage. For details, see “Working with Keywords and Favorites” in Chapter 4.
The Event Browser performs these organizing and marking tasks on your project’s virtual clips and sequences. Although Event Browser items look like files on your computer desktop, Event Browser items are references to media files, not the files themselves. File storage is independent of Event Browser organization, so you can place the same clip in several FCP projects, and each instance of the clip will include a reference to the same media file on your hard drive.
See “Secrets of Nondestructive Editing” in Chapter 1 for more background on digital editing technology.
Anatomy of the Event Browser
Clicking an event folder in the Event Library displays its contents—the clips contained in that event—in the Event Browser.
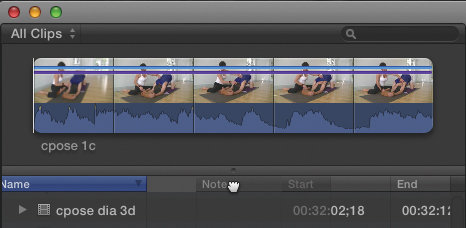
FCP opens the Event Browser in Filmstrip view by default ![]() . Filmstrip view is useful for tracking down a clip visually by skimming through the live clip icons but doesn’t provide the sorting capabilities or wealth of clip data available from the Event Browser columns in List view
. Filmstrip view is useful for tracking down a clip visually by skimming through the live clip icons but doesn’t provide the sorting capabilities or wealth of clip data available from the Event Browser columns in List view ![]() .
.
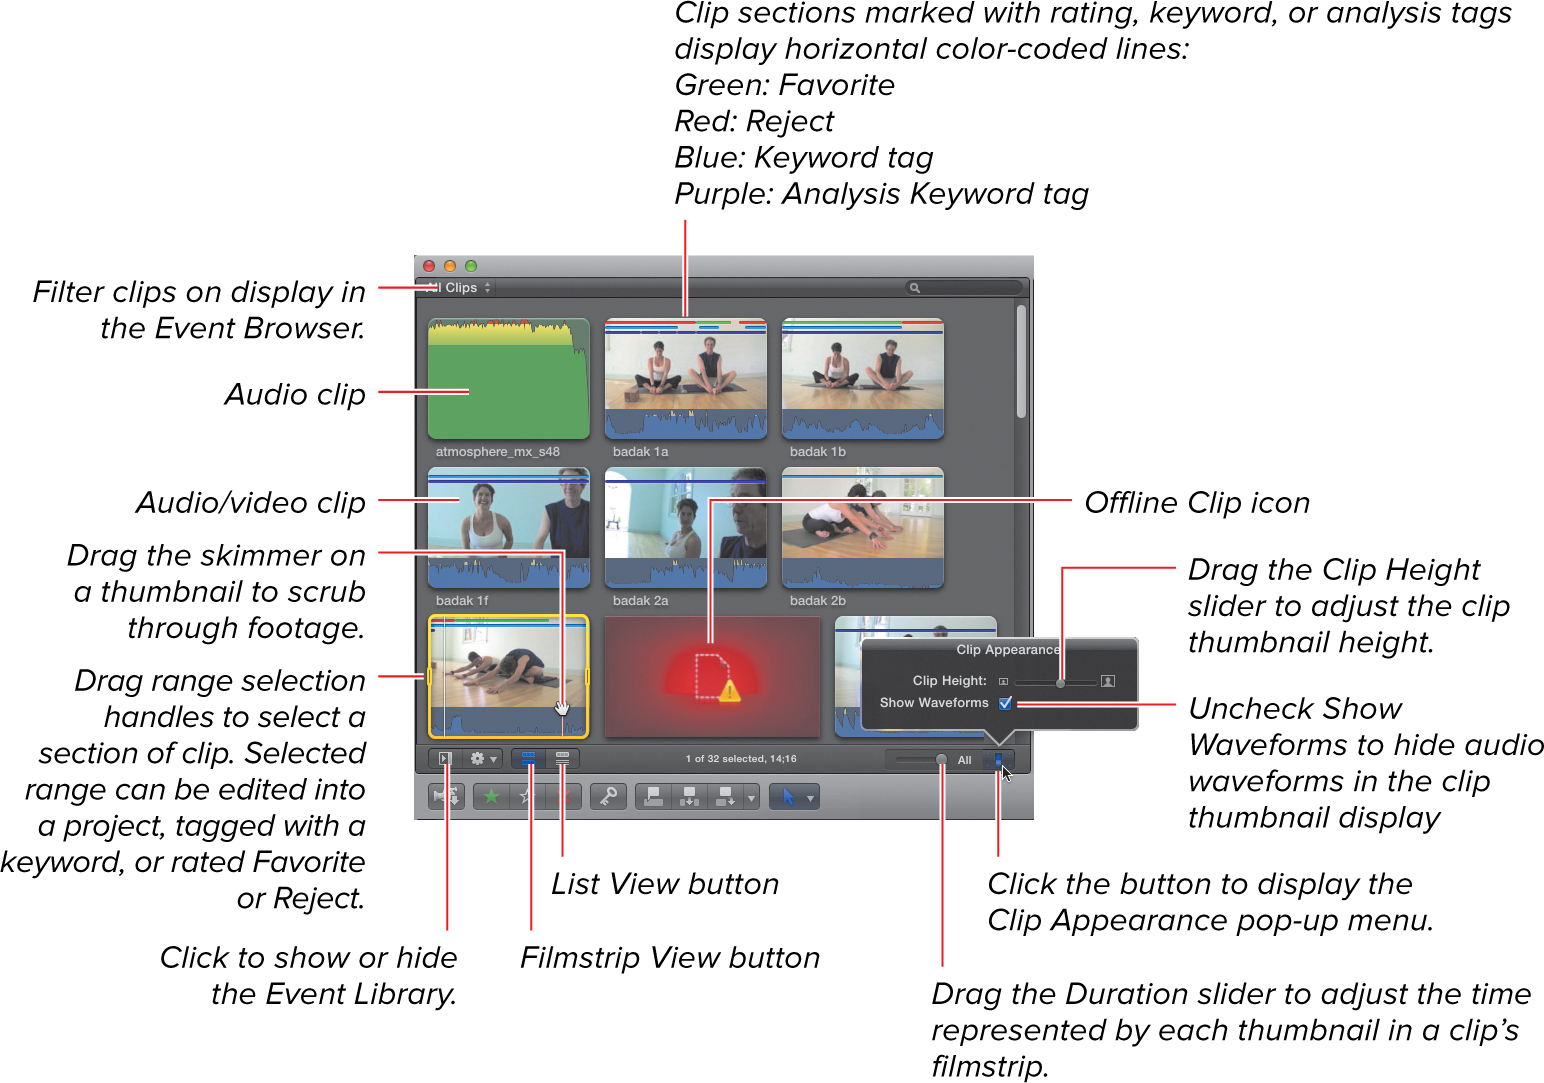
![]() The Browser window in Filmstrip view
The Browser window in Filmstrip view
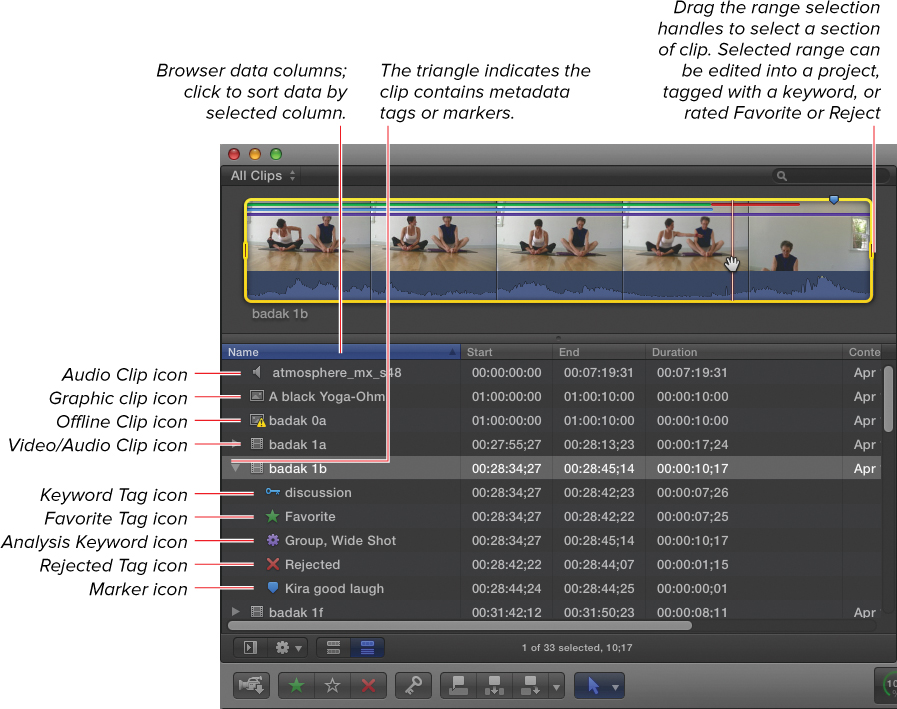
![]() The Browser window in List view
The Browser window in List view
To learn how to switch between List and Filmstrip views (and much more), see “Customizing the Event Browser Display,” later in this chapter.
Browser Window Icons
Along the left side of the window, you’ll notice icons that accompany each item listed in the Event Browser.
These icons represent file types in FCP:
![]() Clip: A media file; can represent audio, video, graphics, or other media imported into FCP.
Clip: A media file; can represent audio, video, graphics, or other media imported into FCP.
![]() Audio Clip: A media clip composed of audio samples.
Audio Clip: A media clip composed of audio samples.
![]() Graphic: A clip in a single-layer graphic file format.
Graphic: A clip in a single-layer graphic file format.
![]() Offline Clip: Yellow caution icon indicates a placeholder clip referencing media not currently on the local hard drive.
Offline Clip: Yellow caution icon indicates a placeholder clip referencing media not currently on the local hard drive.
![]() Compound Clip: An FCP clip type that can contain multiple other clips. A compound clip can also contain other compound clips, such as audition clips (not pictured).
Compound Clip: An FCP clip type that can contain multiple other clips. A compound clip can also contain other compound clips, such as audition clips (not pictured).
![]() Audition Clip: An FCP compound clip type containing selected alternate takes (not pictured).
Audition Clip: An FCP compound clip type containing selected alternate takes (not pictured).
These icons represent types of information applied to a clip—keyword tags, rating tags, or markers—and appear below a clip when you click the triangle to the left of the clip icon:
![]() Marker: A reference point in a clip
Marker: A reference point in a clip
![]() Favorite: A clip or clip section marked as a Favorite
Favorite: A clip or clip section marked as a Favorite
![]() Reject: A clip or clip section marked as Rejected
Reject: A clip or clip section marked as Rejected
![]() Keyword: A clip or clip section marked with Keyword tag
Keyword: A clip or clip section marked with Keyword tag
![]() Analysis Keyword: A clip or clip section marked with an Analysis Keyword tag
Analysis Keyword: A clip or clip section marked with an Analysis Keyword tag
For more information on FCP’s system of tagging and metadata tools, see Chapter 3.
Customizing the Event Browser Display
The Event Browser offers two different display modes: List view and Filmstrip view. Each mode offers distinct features, and you’ll find yourself using both modes as you edit.
You can use the options in FCP’s View menu to switch between views and to show or hide a variety of clip info overlays in the Event Browser.
To display the Event Browser in Filmstrip view
• In the Event Browser, click the Filmstrip View button at the bottom of the Event Browser pane, or press Command-Option-1 ![]() .
.

![]() Click the Filmstrip View button at the bottom of the Browser pane to display the Event Browser.
Click the Filmstrip View button at the bottom of the Browser pane to display the Event Browser.
To display the Event Browser in List view
• In the Event Browser, click the List View button at the bottom of the Browser pane, or press Command-Option-2.
To show or hide clip information overlays in the Event Browser
• Do one of the following:
• Choose View > Show (or Hide) Clip Names to toggle the display of clip names under Event Browser clips ![]() .
.
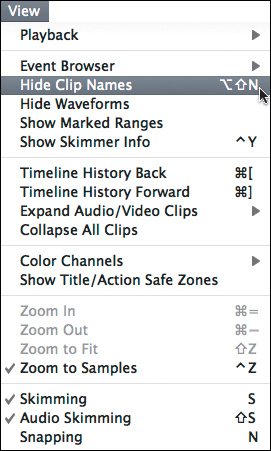
![]() Toggle the display of clip names under Event Browser clips by choosing View > Show (or Hide) Clip Names.
Toggle the display of clip names under Event Browser clips by choosing View > Show (or Hide) Clip Names.
View menu options are context-sensitive. For example, you’ll see Hide Clip Names in the menu only if names are currently showing. Tricky.
• Choose View > Show (or Hide) Waveforms to toggle the display of audio waveforms on filmstrip icons.
• Choose View > Show (or Hide) Marked Ranges to toggle the display of horizontal color-coded lines on filmstrip icons.
• Choose View > Show (or Hide) Skimmer Info to toggle the display of the floating data palette that overlays a filmstrip when you pause the skimmer ![]() . For more information on using the skimmer, see “Skimming Clips” in Chapter 3.
. For more information on using the skimmer, see “Skimming Clips” in Chapter 3.
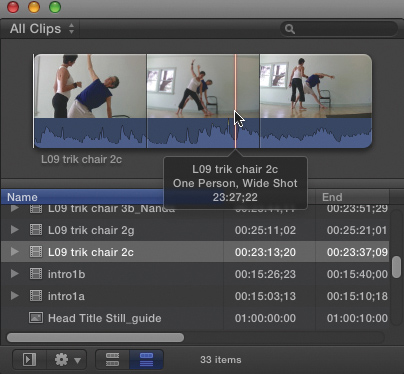
![]() Choose View > Show (or Hide) Skimmer Info to toggle the display of this floating data palette that overlays a filmstrip when you pause the skimmer.
Choose View > Show (or Hide) Skimmer Info to toggle the display of this floating data palette that overlays a filmstrip when you pause the skimmer.
To change text display size
• Choose View > Event Browser > Text Size, and then select a text size display option from the shortcut menu ![]() .
.
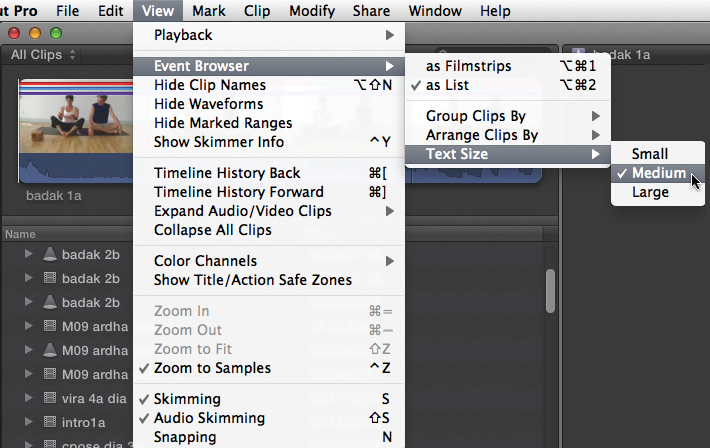
![]() Choose View > Event Browser > Text Size, and then select a Event Browser text size display option from the shortcut menu.
Choose View > Event Browser > Text Size, and then select a Event Browser text size display option from the shortcut menu.
Filmstrip View Display Options
FCP’s filmstrip display options feature scrubbable, “live” filmstrip icons you use to preview and mark footage.
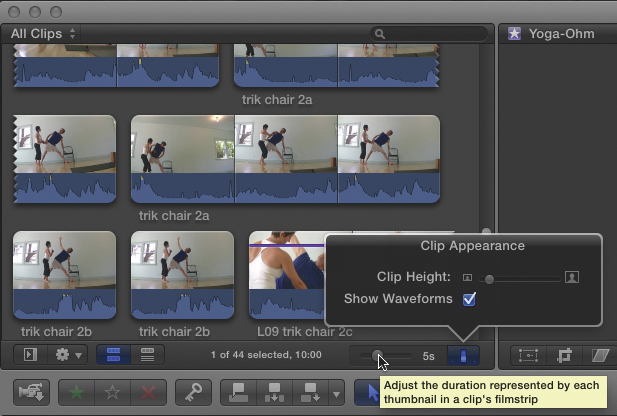
• You can adjust the playback time interval each thumbnail represents, ranging from one thumbnail frame per half second up to several minutes per thumbnail frame. The highest setting—All—fits all clips displayed in the Event Browser into the window.
• You can also adjust the filmstrip icon’s height. Larger filmstrips offer a better view of the footage you’re scanning; compact filmstrips save space in the Event Browser window.
• You can opt to show or hide audio waveforms in the filmstrip icon display.
The Filmstrip View display option controls at the bottom of the Event Browser pane are visible only when the Event Browser is set to display Filmstrip view ![]() .
.
![]() Display option controls are located at the bottom of the Event Browser pane. The controls are visible only when the Event Browser is set to display Filmstrip view.
Display option controls are located at the bottom of the Event Browser pane. The controls are visible only when the Event Browser is set to display Filmstrip view.
To expand and contract the number of thumbnail frames in a clip’s filmstrip
• Do one of the following:
• Drag the Duration slider at the bottom of the Event Browser pane to the right to increase the number of frames represented per thumbnail displayed (and create more compact filmstrips) ![]() .
.
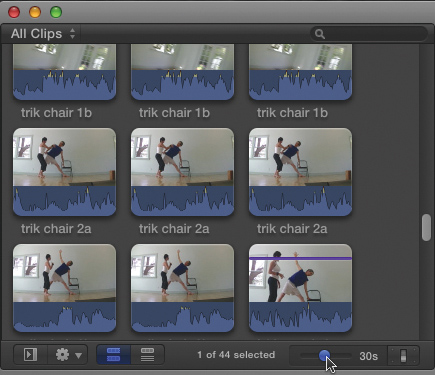
![]() Drag the Duration slider to the right to create more compact filmstrips.
Drag the Duration slider to the right to create more compact filmstrips.
• Drag the Duration slider to the left to decrease the number of frames represented per thumbnail displayed and create longer, more detailed filmstrips.
Pressing Shift-Z automatically sets the Duration slider to All and fits all clips displayed into the Event Browser window.
To adjust the clip’s filmstrip height
• In the Event Browser, click the Clip Appearance button to display its popup menu, and then drag the Clip Height slider ![]() .
.
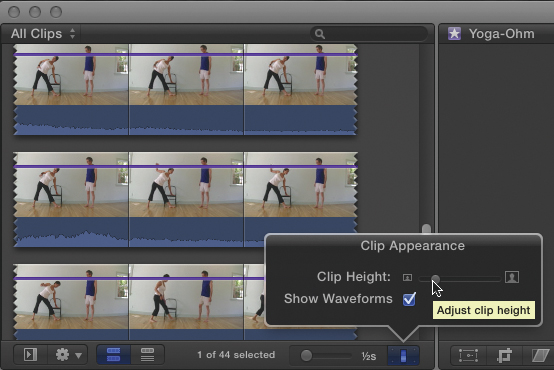
![]() Drag the Clip Height slider to adjust the filmstrip height.
Drag the Clip Height slider to adjust the filmstrip height.
To hide audio waveforms in the filmstrip icon display
• In the Event Browser, click the Clip Appearance button to display its popup menu, and then uncheck the Show Waveforms checkbox ![]() .
.
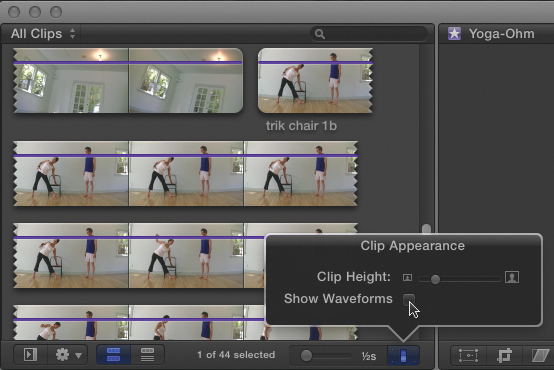
![]() Uncheck Show Waveforms to hide the Filmstrip Waveform display and make more room to adjust filmstrip height.
Uncheck Show Waveforms to hide the Filmstrip Waveform display and make more room to adjust filmstrip height.
List View Display Options
The Event Browser’s List view displays your clips in a text list. The selected clip appears across the top of the window as a live filmstrip you can skim, play back, and mark up.
The power of List view lies in the searchable, sortable data available in List view’s Event Browser columns. Some columns accommodate notes and other types of logging information that help you track and sort your clips.
Any keyword tags or markers you’ve placed in a clip will appear under that clip’s disclosure triangle in the Event Browser’s Name column.
You can enter search terms in the Event Browser’s Filter field to search for your clips based on selected clip properties, and FCP will filter the Event Browser’s display showing only clips that match your search parameters ![]() .
.

![]() Enter search terms in the Event Browser’s Filter field (located in the upper-right corner), and FCP will filter the Event Browser’s display, showing only clips that match your search parameters.
Enter search terms in the Event Browser’s Filter field (located in the upper-right corner), and FCP will filter the Event Browser’s display, showing only clips that match your search parameters.
You can customize the Event Browser’s List view in the following ways:
• Rearrange, resize, hide, or show as many columns as you like. (You can’t hide the Name column.)
• Sort Event Browser items by most columns.
• Add or modify a clip’s logging information directly by double-clicking a Event Browser column entry ![]() .
.
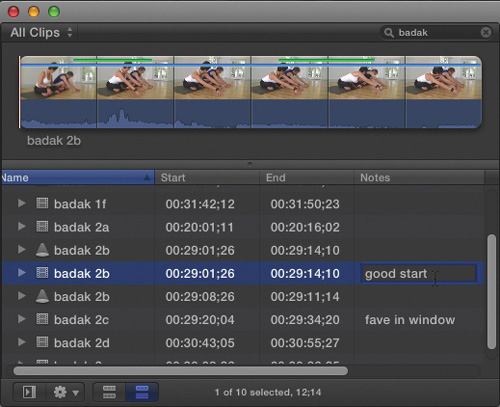
![]() You can add or modify a clip’s logging information directly by double-clicking an Event Browser column entry.
You can add or modify a clip’s logging information directly by double-clicking an Event Browser column entry.
When the Event Browser is set to List view, the filmstrip icon displayed above the list automatically adjusts its height and length to fit the window size. Increase the Event Browser window size to create a bigger, more detailed filmstrip.
Working with Browser Columns
When you work with columns in the Event Browser window, you have a number of options, including hiding, rearranging, and resizing them.
To hide a column
1. In the Event Browser window, right-click the column header.
2. From the shortcut menu, choose Hide Column ![]() .
.
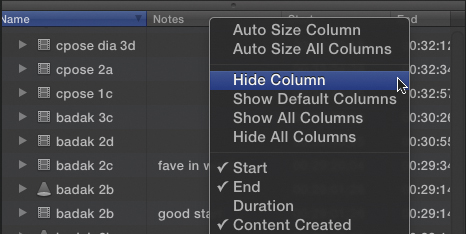
![]() Right-click the column header, and then choose Hide Column from the shortcut menu.
Right-click the column header, and then choose Hide Column from the shortcut menu.
To display a hidden column
1. In the Event Browser window, right-click the column header to the right of the place you want the hidden column to be displayed.
2. From the shortcut menu, choose the name of the column you want to display ![]() .
.
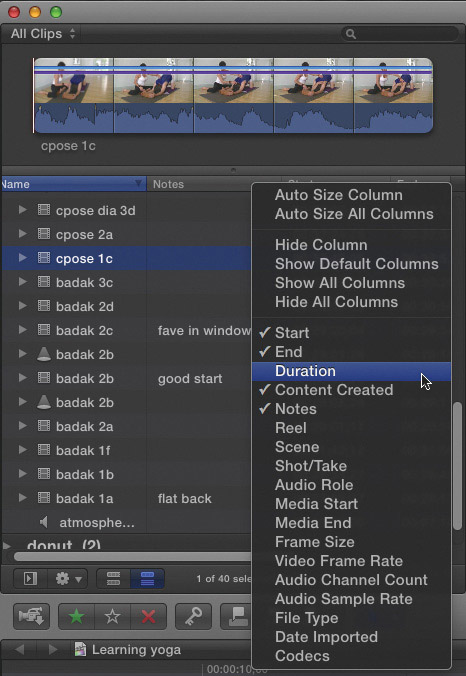
![]() Right-click the column header to the right of the place you want the hidden column to be displayed, and then choose the name of the column you want to display from the shortcut menu.
Right-click the column header to the right of the place you want the hidden column to be displayed, and then choose the name of the column you want to display from the shortcut menu.
FCP initially hides some Event Browser columns by default. Check the shortcut menu in the Event Browser’s column header for a complete list of available columns.
You can keep your Event Browser columns narrow and still see a full-length entry in every column. Hover your pointer over a column entry to view a tooltip displaying the complete contents of the column.
To rearrange columns
• Drag the column header to the new location ![]() .
.
![]() Drag a column to its new location.
Drag a column to its new location.
To resize columns
• Drag the right edge of the column header to the new width.
Selecting and Sorting Browser Items
FCP offers two types of item sorting in the Event Library and Event Browser:
• Group: This item-sorting method categorizes Event Browser items into groups and displays clip groups in the order you select.
• Arrange: This item-sorting method determines the sort order of individual Event Browser items and displays clips in the order you select.
Grouping and arranging can be used together or independently. You can choose to group clips into categories and select a sort order for clips within each group, or you can arrange clips into a preferred sort order without grouping them.
To select an item in the Event Browser
• Do one of the following:
• Click the item you want to select.
• Use the arrow keys to step through the item list until you arrive at the item you want.
Multiple-item selection in FCP’s Event Browser works in the same way as it does in the Mac OS X Finder: Command-click to select multiple items individually ![]() , Shift-click to select a range of items. In Filmstrip view, you can drag a bounding box around a group of list items or icons.
, Shift-click to select a range of items. In Filmstrip view, you can drag a bounding box around a group of list items or icons.
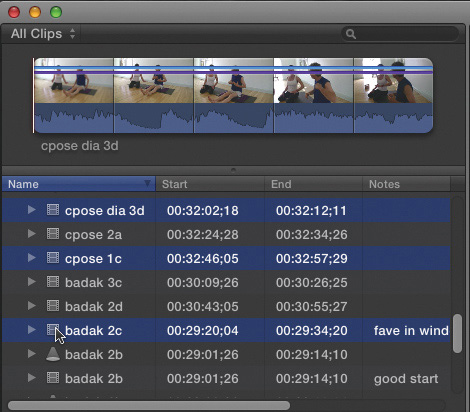
![]() Command-click to select multiple Event Browser items individually.
Command-click to select multiple Event Browser items individually.
To group Event Browser items
• Do one of the following:
• Choose View > Event Browser > Group Clips By, and then choose one of the submenu options to group your Event Browser clips into an available category ![]() .
.
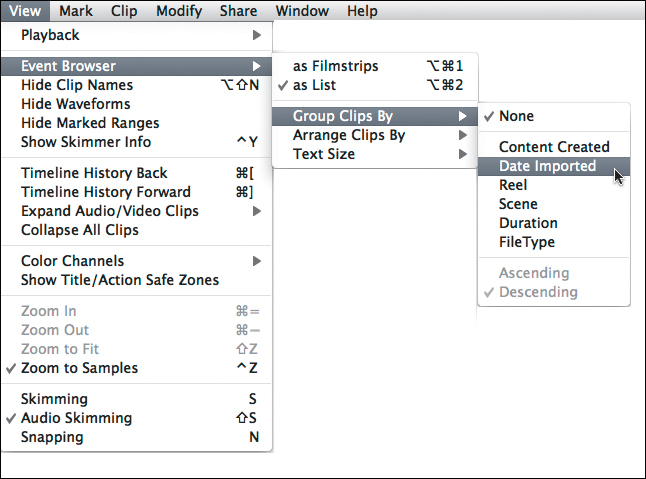
![]() Choose View > Event Browser > Group Clips By, and then choose one of the submenu options to group your Event Browser clips into an available category.
Choose View > Event Browser > Group Clips By, and then choose one of the submenu options to group your Event Browser clips into an available category.
• Choose View > Event Browser > Group Clips By > None to turn off clip grouping.
To arrange Event Browser items
• Choose View > Event Browser > Arrange Clips By, and then choose one of the sort order options available in the submenu.
Using Event Browser Columns to Sort Event Browser Items
FCP allows you to sort by almost every column you see in the Event Browser.
To sort items in the Event Browser
1. Click a column header to select the column you want to sort by ![]() . The sort column is indicated by a black arrow in the column header.
. The sort column is indicated by a black arrow in the column header.
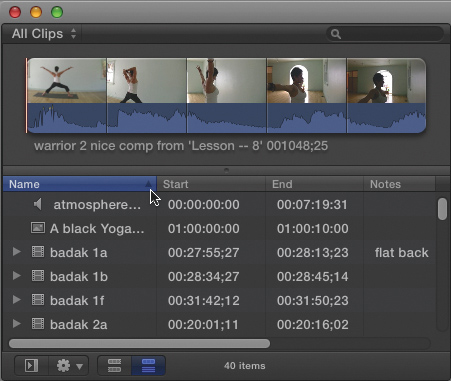
![]() Click in the column header to sort by name. The direction of the tiny arrow to the right of the column name here indicates ascending order. Click again to reverse the sort order.
Click in the column header to sort by name. The direction of the tiny arrow to the right of the column name here indicates ascending order. Click again to reverse the sort order.
2. Click again to reverse the sort order.