
Chapter 13. Visio Graphics Service Security
IN THIS CHAPTER
• Adding a New Trusted Data Provider
• Publishing an ODC file to SharePoint 2010 with Secure Store Service Security Model
Accessing data from any data source requires that a user should be authenticated by that data source first. In the case of data driven Visio web drawings, Visio Graphics Service authenticates the data source on behalf of the web drawing viewer. It either uses viewer’s SharePoint server credential or Secure Store Service account to setup a connection to the data source. Visio web drawings can be connected to both internal and external data sources as long as you are using a trusted data provider. If the provider is not registered with SharePoint 2010 then drawing will not attempt to setup a connection with the data source. This chapter discusses different aspects of data level security when dealing with Visio Graphics Service on SharePoint 2010. Visio web drawings (.VDW files) must be published to a SharePoint document library to be opened in a browser. By setting the document library permissions correctly you can limit access to a particular drawing for your viewers. This helps you with securing your content on user interface/SharePoint level. In this chapter, we will not focus on content level security but keep our focus on data level security. To learn more about content or site level security, review article shared at http://technet.microsoft.com/en-us/library/cc288189.aspx.
Internal Data Sources
If Visio web drawing is accessing data from an internal data source such as a SharePoint list or Excel workbook, Visio Graphics Service connects to it by using the viewer’s SharePoint server credentials. To use an Excel workbook as a data source, Excel Services must be started, and the workbook or list must be hosted on the same SharePoint farm as the web drawing. You can verify whether Excel Services is running by completing the following steps on the Central Administration home page: Click the Manage Service Applications link on the Central Administration home page. This will take you to Manage Service Applications page as shown in Figure 13.1. Confirm that Excel Services Application Service is already started.
Figure 13.1. Manage service applications.

External Data Sources
Visio Graphics Service can connect to external data sources such as SQL Server, IBM DB2, Oracle, other OLEDB/ODBC providers, and custom data sources. When Visio Graphics Service is loading data in a web drawing, the service checks the connection information stored in the web drawing to determine whether the specified data provider is on a trusted data provider list. If the provider is on the trusted list, a connection is tried; otherwise, the connection request is ignored. By default, the data providers shared in the Table 11.1 in Chapter 11 are already included on the list.
Adding a New Trusted Data Provider
If you are trying to use a data provider which is not registered with the trusted data provider list then you can add a new trusted data provider through the SharePoint Central Administration home page using following steps:
- Click the Manage Service Applications link on the Central Administration home page and then click the Visio Graphics Service link.
- Click the Trusted Data Providers link.
- To add a new provider, click the Add a New Trusted Data Provider link.
To edit or remove an existing data provider, select the actual data provider you want to edit or remove and choose the required action from the drop-down menu.
When adding a new data provider, you are asked for following parameter values as shown in Figure 13.2:
• Trusted Data Provider ID: The data provider ID must be the same ID used to reference the data provider in the connection string.
• Trusted Data Provider Type: The data provider type must be one of the following values:

• Trusted Data Provider Description: The data provider description is a friendly name that appears on the Trusted Data Providers page.
Figure 13.2. Adding new trusted data provider.

You can also add, edit or delete trusted data providers using Windows PowerShell command prompt. Detailed steps are shared at http://technet.microsoft.com/en-us/library/ee524056.aspx.
Data Source Delegation
Visio Graphics Service supports two types of data connections for a web drawing: embedded connection and external connection using an Office Data Connectivity (ODC) file. When creating a data connection in Microsoft Visio 2010, choose Previously Created Connection option on data selector window to provide location for an ODC file.
When using the Integrated Windows authentication model with either embedded or external connection, the Visio Graphics Service uses the viewer’s Windows credentials to authenticate with the database. Integrated Windows authentication with constrained Kerberos delegation provides the stronger security setup.
When you are using Secure Store Service model, the Visio Graphics Service uses the Secure Store Service to map the viewer’s credential to a credential with access to the database. The Secure Store Service supports mappings for both Integrated Windows authentication and other forms of authentication such as SQL Server authentication. The Secure Store Service model is supported only when the drawing uses an ODC file to connect to the data source. The ODC file specifies the Secure Store Service target application that will be used for credential mapping.
For ease of configuration, a farm administrator can also map all users to a single unattended service account with database access. This unattended service account must be a low-privilege Windows domain account that is given access to databases. The Visio Graphics Service impersonates this account if no other authentication method is specified.
When using Secure Store Service security model or an Unattended Service account, this approach does not help with auditing of database calls by individual user. Creating the Secure Store Service Target Application.
In this section we will create the Secure Store Service target application for Visio Graphics Service and then later use the same application id to connect to an external data source using an ODC file:
- Before you start, verify that you are the member of the farm administrators group.
- On the Central Administration Home page, in the Application Management section, click the Manage Service Applications link and then click the Secure Store Service link.
- Click the New button on the top ribbon. Doing so brings you to the Target Application Settings page as shown in Figure 13.3.
Figure 13.3. Target Application Settings page.

- Click the Next button after providing values for the following parameters:
• Target Application ID: The Secure Store target application ID is a unique identifier. You cannot change this property after you create the target application. Enter Visio Graphics Service SSSID in the Target Application ID text box.
• Display Name: The display name is used for display purposes only. Enter Visio Graphics Service SSSID in the Display Name text box.
• Contact Email: The contact email should be a valid email address of the primary contact for this target application. Enter your email address for now.
• Target Application Type: The target application type determines whether this application uses a group mapping or individual mapping. Ticketing indicates whether tickets are used for this target application. You cannot change this property after you create the target application. For now, select Individual from the drop-down menu.
• Target Application Page URL: The target application page URL can be used to set the values for the credential fields for the target application by individual users. You can leave it to use the default page for now.
- Click the Next button after configuring the credential field types for your target application. You can choose from multiple different field types. For now, though, we can go with default values as shown in Figure 13.4, which are Windows Username and Password.
Figure 13.4. Credential Field Type Settings page.

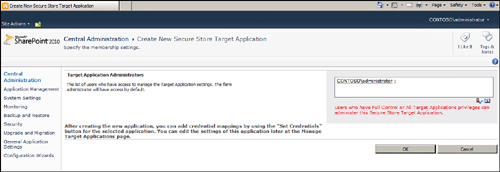
- Click the OK button after configuring the target application administrator. The target application administrator is the user (or users) who has access to manage the target application settings. The farm administrator has access by default. For now, you can enter Administrator in the text box and click the Check Names icon. After you click Check Names icon, the system will resolve the domain name for the Administrator account as shown in Figure 13.5.
Figure 13.5. Target application administrator settings.
Now that you have configured the Secure Store Service application for Visio Graphics Service, our next step is to set the credentials for this Secure Store Service application:
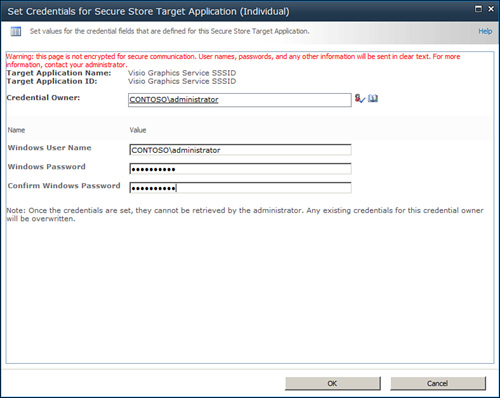
- Click the Visio Graphics Service SSSID link and then click the Set Credentials link in the drop-down menu.
- You will now see the window where you can set credentials for this service as shown in Figure 13.6. Type the username and password of the credentials to be stored. If this is an individual application ID, you also have to type the username of the credential owner. The credential owner should be a user or claim that must have permissions to access these credentials. Group application IDs already have had the credential owner specified during the application ID creation step. For now, you can use CONTOSOAdministrator account to associate with Visio Graphics Service SSSID. Click OK once your provide all the information as shared in the Figure 13.6.
Figure 13.6. Set up Windows credentials for Visio Graphics Service SSSID.
We are now ready to create an ODC file which will use the same Secure Store Service Application ID which we just created to connect to ContosoRetailsDW SQL database. Refer to our next section to accomplish this task.
Publishing an ODC File to SharePoint 2010 with Secure Store Service Security Model
As shared earlier Visio web drawings can connect to an external data source using office data connectivity (ODC) files. You can simply create one ODC file for your external data source and then publish it on your SharePoint data connection library. All Excel and Visio based reports/drawing files under document library can use the same ODC file which you will be publishing in your data connection library. This is very helpful when you have to make changes to your data connection string in future. If for example, your server location changes in future then you can simply update this ODC file with new location and all reports will be directed to the new location without making any changes to the actual report/drawing file.
In this section we will create and publish an ODC file using Microsoft Excel 2010. Use the following steps to accomplish this task:
- Open Microsoft Excel 2010 and click the Data tab from the top menu bar. Then click the From Other Source link on the ribbon and select the From SQL Server option from the drop-down menu. Doing so displays the Data Connection Wizard window.
- Type the server name and then click Next. You can choose to connect to your (local) SQL Server. On the Select Database and Table screen, choose the ContosoRetailDW database. You can uncheck the Connect to a Specific Table check box to avoid selecting any table for now. Click the Next button.
- Click on the Authentication Settings button. This will bring up the Excel Service Authentication Settings window as shown in Figure 13.7. Refer to step 4 of the previous topic to identify the name of your Secure Store Service Application ID. We will be using the same SSS ID to connect to ContosoRetailDW database via this ODC file.
Figure 13.7. ODC file settings.

- In the File Name text box provide the complete address of the data connection library where you would like to store this ODC file. You can choose any data connection library on your SharePoint site but just keep in mind that you have to save this ODC file on a same SharePoint site as your Visio web drawing.
- Click Finish when you have configured File Name and Authentication settings using the directions provided in steps 3 and 4.
- A Web File Properties window opens. Provide settings as shown in Figure 13.8 and then click the OK button.
Figure 13.8. Web file properties.

You have now successfully configured and published the ODC file to SharePoint 2010 under the Data Connections library of your choice. This ODC file is connecting to the SQL Server database using the Secure Store Service application you created earlier for Visio Graphics Service. You can now use this ODC file to develop data-driven Visio web drawings. Review Chapter 12, “Visio Graphics Service Development,” to learn more about developing Visio web drawings using ODC files.
Summary
This chapter explained how Visio web drawings can connect to internal or external data sources. It also provided the steps to add a trusted data provider in SharePoint 2010. This chapter also explained how to create an ODC file to connect to SQL Server data sources with a Secure Store Service security model. It also provided a detailed summary of data source delegation methods available when working with Visio Graphics Service on SharePoint 2010.
Best Practices
The following are best practices from this chapter:
• For stronger and enterprise-level security solutions, use Kerberos delegation and ensure that all servers reside in the same domain to be used for per-user identity data source connections.
• Most of the data providers are already listed in SharePoint 2010 Visio Graphics Service settings. Always review the existing list before adding a new data service provider.
• Keep only those data providers in the Trusted Data Providers list that you think you will use with Visio web drawings.
• Use low-privileged accounts when configuring unattended service accounts to connect to an external data source.
• If using windows authentication then External data sources must reside within the same domain as the SharePoint Server 2010 farm or Visio Graphics Services must be configured to use the Secure Store Service. For more information, review planning documentation at http://technet.microsoft.com/en-us/library/cc560988.aspx.