
1 Getting Started with Excel
Introduction
Microsoft Excel 2010 is a spreadsheet program that you can use to track and analyze sales, create budgets, and organize finances—both business and personal. You can also use Excel to manage inventory, set up investment reports or create loan amortizations. Microsoft Excel is a financial tool for performing calculations and other tasks automatically, which allows you to accomplish a variety of business or personal tasks in a fraction of the time it would take using pen and paper.
This chapter introduces you to the terminology and the basic Excel skills you can use in the program. In Excel, files are called workbooks. Each new workbook contains a default setting (which you can change) of three worksheets, which are similar to the pages in an accountant’s ledger. You can format the worksheets for your specific project at hand, or you can download pre-made templates from Microsoft’s Office.com Online Web site.
With the results-oriented visual interface, you navigate through various tasks with a click of the mouse, or by using shortcut keys on your keyboard. Microsoft Excel is set up with a tab-based Ribbon and dialog boxes that provide you with the tools you need when you need them to get tasks done. The customizable Quick Access Toolbar gives you easy access to commonly-used commands, such as Save and Print.
When you finish the design of your worksheet you can save it in a more efficient XML format or as a PDF or XPS document, send it through e-mail for review, or even collaborate and share it with co-workers using a SharePoint library. Should something happen to your workbook or worksheets, Excel has a recovery feature designed to help recover your worksheet.
Starting Excel
The two quickest ways to start Excel are to select it on the Start menu or double-click a shortcut icon on the desktop. By providing different ways to start a program, Office lets you work the way you like and start programs with a click of a button. When you start Excel, a program window opens, displaying a blank workbook, where you can begin working immediately.
Start Excel from the Start Menu
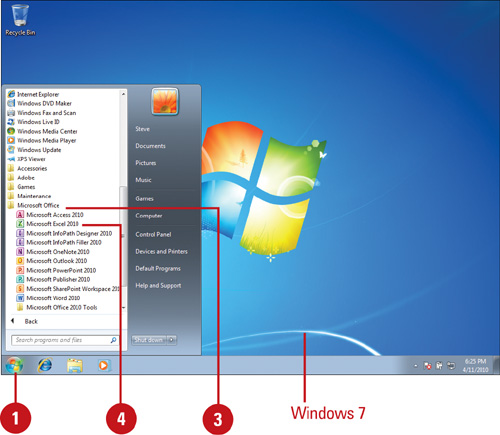
![]() Click the Start button on the taskbar.
Click the Start button on the taskbar.
![]() Point to All Programs.
Point to All Programs.
![]() Click Microsoft Office.
Click Microsoft Office.
![]() Click Microsoft Excel 2010.
Click Microsoft Excel 2010.
If Microsoft Office asks you to activate the program, follow the instructions to complete the process.
TIMESAVER To change the product key later, click the File tab, click Help, click the Change Product Key link, enter the product key, and then click Continue.
Viewing the Excel Window

Using the Ribbon
The Ribbon is a results oriented way of working in Excel 2010. It replaces menus, toolbars, and most of the task panes found in Excel 2003. The Ribbon is located at the top of the document window and is comprised of tabs that are organized by task or objects. The controls on each tab are organized into groups, or subtasks. The controls, or command buttons, in each group execute a command, or display a menu of commands or a drop-down gallery. Controls in each group provide a visual way to quickly make document changes. The Office button in Office 2007 has been replaced by the File tab (New!), which displays Backstage view, where you can access file-related commands.
TIMESAVER To minimize the Ribbon, click the Minimize the Ribbon button (Ctrl+F1) (New!) or double-click the current tab. Click a tab to auto display it (Ribbon remains minimized). Click the Expand the Ribbon button (Ctrl+F1) or double-click a tab to maximize it.
If you prefer using the keyboard instead of the mouse to access commands on the Ribbon, Microsoft Office provides easy to use shortcuts. Simply press and release the ![]() or
or ![]() key to display KeyTips over each feature in the current view, and then continue to press the letter shown in the KeyTip until you press the one that you want to use. To cancel an action and hide the KeyTips, press and release the
key to display KeyTips over each feature in the current view, and then continue to press the letter shown in the KeyTip until you press the one that you want to use. To cancel an action and hide the KeyTips, press and release the ![]() or
or ![]() key again. If you prefer using the keyboard shortcuts found in previous versions of Microsoft Office, such as Ctrl+P (for Print), all the keyboard shortcuts and keyboard accelerators work exactly the same in Microsoft Excel 2010. Excel 2010 includes a legacy mode that you can turn on to use familiar Office Excel 2003 keyboard accelerators.
key again. If you prefer using the keyboard shortcuts found in previous versions of Microsoft Office, such as Ctrl+P (for Print), all the keyboard shortcuts and keyboard accelerators work exactly the same in Microsoft Excel 2010. Excel 2010 includes a legacy mode that you can turn on to use familiar Office Excel 2003 keyboard accelerators.
Tabs
Excel provides three types of tabs on the Ribbon. The first type is called a standard tab—such as Home, Insert, Page Layout, Formulas, Data, Review, View, and Add-Ins—that you see whenever you start Excel. The second type is called a contextual tab—such as Picture Tools, Drawing, or Table—that appears only when they are needed based on the type of task you are doing. Excel recognizes what you’re doing and provides the right set of tabs and tools to use when you need them. The third type is called a program tab—such as Print Preview—that replaces the standard set of tabs when you switch to certain views or modes.
Live Preview
When you point to a gallery option, such as WordArt, on the Ribbon, Excel displays a live preview of the option change so that you can see exactly what your change will look like before committing to it.

Choosing Commands
Excel commands are organized in groups on the Ribbon, Quick Access Toolbar, and Mini-Toolbar. Commands are available as buttons or options on the Ribbon, or as menus on button or option arrows or the File tab (New!). The Quick Access Toolbar and Mini-Toolbar display frequently used buttons that you may be already familiar with from Excel 2003, while the File tab on the Ribbon displays file related menu commands in Backstage view. In addition to the File tab, you can also open a shortcut menu with a group of related commands by right-clicking an element.
Choose a Menu Command Using the File Tab
![]() Click the File tab on the Ribbon.
Click the File tab on the Ribbon.
![]() Click the command you want.
Click the command you want.
TIMESAVER You can use a shortcut key to choose a command. Press and hold down the first key and then press the second key. For example, press and hold the Ctrl key and then press S (or Ctrl+S) to select the Save command.
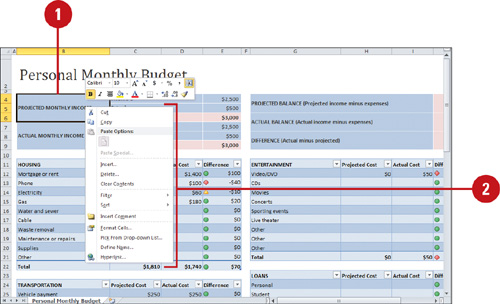
Choose a Menu Command from a Shortcut Menu
![]() Right-click an object (a cell or graphic element).
Right-click an object (a cell or graphic element).
TIMESAVER Press Shift+F10 to display the shortcut menu for a selected command.
![]() Click a command on the shortcut menu. If the command is followed by an arrow, point to the command to see a list of related options, and then click the option you want.
Click a command on the shortcut menu. If the command is followed by an arrow, point to the command to see a list of related options, and then click the option you want.
Working with the Ribbon and Toolbars
Excel includes its most common commands, such as Save and Undo, on the Quick Access Toolbar. Click a toolbar button to choose a command. If you are not sure what a toolbar button does, point to it to display a ScreenTip. When Excel starts, the Quick Access Toolbar appears at the top of the window, unless you’ve changed your settings. You can customize the Quick Access Toolbar or Ribbon (New!) by adding command buttons or groups to it. You can also move the toolbar below or above the Ribbon so it’s right where you need it. In addition to the Quick Access Toolbar, Excel also displays the Mini-Toolbar when you point to selected text. The Mini-Toolbar appears above the selected text and provides quick access to formatting tools.
Choose a Command Using a Toolbar or Ribbon
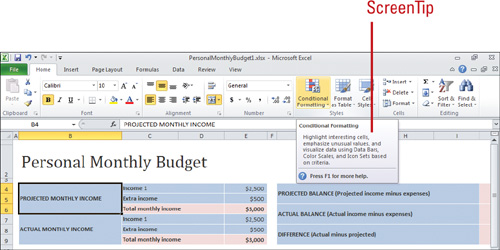
![]() Get command help. If you’re not sure what a button does, point to it to display a ScreenTip. If the ScreenTip includes Press F1 for more help, press F1.
Get command help. If you’re not sure what a button does, point to it to display a ScreenTip. If the ScreenTip includes Press F1 for more help, press F1.
![]() Choose a command. Click the button, or button arrow, and then click a command or option.
Choose a command. Click the button, or button arrow, and then click a command or option.
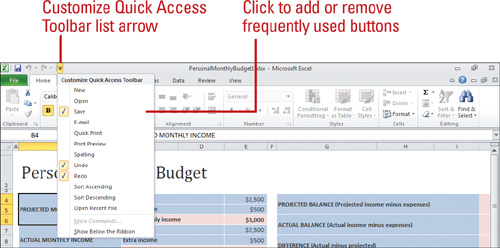
Add or Remove Items from the Quick Access Toolbar
![]() Add or remove a common button. Click the Customize Quick Access Toolbar list arrow, and then click a button name (checked item appears on the toolbar).
Add or remove a common button. Click the Customize Quick Access Toolbar list arrow, and then click a button name (checked item appears on the toolbar).
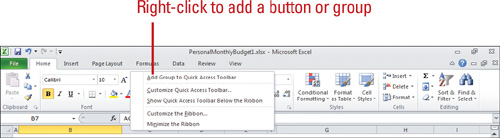
![]() Add a Ribbon button or group. Right-click the button or group name on the Ribbon, and then click Add to Quick Access Toolbar.
Add a Ribbon button or group. Right-click the button or group name on the Ribbon, and then click Add to Quick Access Toolbar.
![]() Remove a button or group. Right-click the button or group name on the Quick Access Toolbar, and then click Remove from Quick Access Toolbar.
Remove a button or group. Right-click the button or group name on the Quick Access Toolbar, and then click Remove from Quick Access Toolbar.
Customize the Ribbon or Quick Access Toolbar
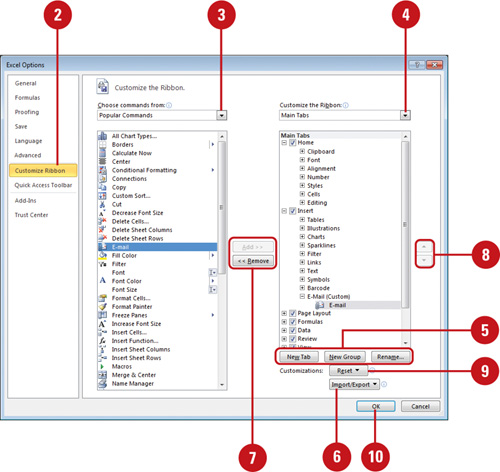
![]() Click the File tab, and then click Options.
Click the File tab, and then click Options.
![]() Click the Customize Ribbon (New!) or Quick Access Toolbar.
Click the Customize Ribbon (New!) or Quick Access Toolbar.
![]() Click the Choose commands from list arrow, and then click All Commands or a specific Ribbon.
Click the Choose commands from list arrow, and then click All Commands or a specific Ribbon.
![]() Click the list arrow (right column), and then select the tabs or toolbar you want to change.
Click the list arrow (right column), and then select the tabs or toolbar you want to change.
![]() For the Ribbon, click New Tab to create a new tab, or click New Group to create a new group on the selected tab (right column).
For the Ribbon, click New Tab to create a new tab, or click New Group to create a new group on the selected tab (right column).
![]() To import or export a customized Ribbon or Quick Access Toolbar, click the Import/Export list arrow, select a command, and then select an import file or create an export file.
To import or export a customized Ribbon or Quick Access Toolbar, click the Import/Export list arrow, select a command, and then select an import file or create an export file.
![]() Click the command you want to add (left column) or remove (right column), and then click Add or Remove.
Click the command you want to add (left column) or remove (right column), and then click Add or Remove.
![]() To insert a separator line between buttons in the Quick Access Toolbar, click <Separator>, and then click Add.
To insert a separator line between buttons in the Quick Access Toolbar, click <Separator>, and then click Add.
![]() Click the Move Up and Move Down arrow buttons to arrange the order.
Click the Move Up and Move Down arrow buttons to arrange the order.
![]() To reset the Ribbon or Quick Access Toolbar, click the Reset list arrow, and then select a reset option.
To reset the Ribbon or Quick Access Toolbar, click the Reset list arrow, and then select a reset option.
![]() Click OK.
Click OK.
Choosing Dialog Box Options
A dialog box is a window that opens when you click a Dialog Box Launcher. Dialog Box Launchers are small icons that appear at the bottom corner of some groups. When you point to a Dialog Box Launcher, a ScreenTip with a thumbnail of the dialog box appears to show you which dialog box opens. A dialog box allows you to supply more information before the program carries out the command you selected. After you enter information or make selections in a dialog box, click the OK button to complete the command. Click the Cancel button to close the dialog box without issuing the command. In many dialog boxes, you can also click an Apply button to apply your changes without closing the dialog box.
Choose Dialog Box Options
All dialog boxes contain the same types of options, including the following:
![]() Tabs. Click a tab to display its options. Each tab groups a related set of options.
Tabs. Click a tab to display its options. Each tab groups a related set of options.
![]() Option buttons. Click an option button to select it. You can usually select only one.
Option buttons. Click an option button to select it. You can usually select only one.
![]() Up and down arrows. Click the up or down arrow to increase or decrease the number, or type a number in the box.
Up and down arrows. Click the up or down arrow to increase or decrease the number, or type a number in the box.
![]() Check box. Click the box to turn on or off the option. A checked box means the option is selected; a cleared box means it’s not.
Check box. Click the box to turn on or off the option. A checked box means the option is selected; a cleared box means it’s not.
![]() List box. Click the list arrow to display a list of options, and then click the option you want.
List box. Click the list arrow to display a list of options, and then click the option you want.
![]() Text box. Click in the box and type the requested information.
Text box. Click in the box and type the requested information.
![]() Button. Click a button to perform a specific action or command. A button name followed by an ellipsis (…) opens another dialog box.
Button. Click a button to perform a specific action or command. A button name followed by an ellipsis (…) opens another dialog box.
![]() Preview box. Many dialog boxes show an image that reflects the options you select.
Preview box. Many dialog boxes show an image that reflects the options you select.

Using the Status Bar
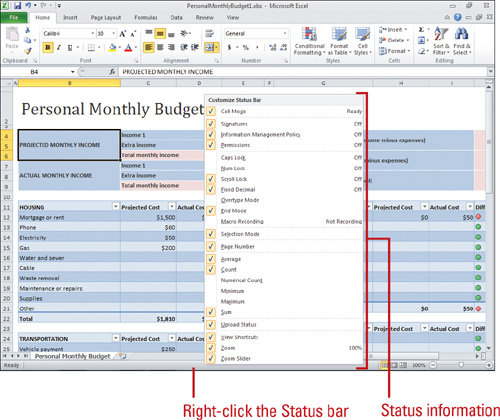
The Status bar appears across the bottom of your screen and displays workbook information—such as cell mode, Office theme name, and current display zoom percentage—and some Excel controls, such as view shortcut buttons, zoom slider, and Fit To Window button. With the click of the mouse, you can quickly customize exactly what you see on the Status bar. In addition to displaying information, the Status bar also allows you to check the on/off status of certain features, such as Signatures, Permissions, Selection Mode, Page Number, Caps Lock, Num Lock, Macro Recording and Playback, and much more.
Add or Remove Items from the Status Bar
![]() Add Item. Right-click the Status bar, and then click an unchecked item.
Add Item. Right-click the Status bar, and then click an unchecked item.
![]() Remove Item. Right-click the Status bar, and then click a checked item.
Remove Item. Right-click the Status bar, and then click a checked item.
Creating a Blank Workbook
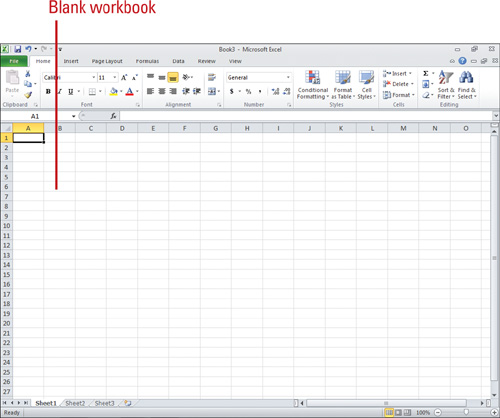
When you start Excel, the program window opens with a new workbook so that you can begin working in it. You can also start a new workbook whenever Excel is running, and you can start as many new workbooks as you want. Each new workbook displays a default name (“Bookl,” “Book2,” and so on), numbered according to how many new workbooks you have started during the work session until you save it with a more meaningful name. The workbook name appears on the title bar, and taskbar buttons.
Start a Blank Workbook Within Excel
![]() Click the File tab, and then click New.
Click the File tab, and then click New.
TIMESAVER To create a blank Office document without the New screen, press Ctrl+N.
The New screen appears.
![]() Click Blank Workbook.
Click Blank Workbook.
![]() Click Create.
Click Create.
A new blank workbook appears in the Excel window.

Creating a Workbook Using a Template
Excel provides a collection of professionally designed templates that you can use to help you create workbooks. Start with a template when you have a good idea of your content but want to take advantage of a template’s professional look. A template is an Excel workbook file that provides you with a unified document design, which includes themes, so you only need to add text and graphics. In the New screen, you can choose a template from those already installed with Excel or from the Microsoft Office.com Online Web site, an online content library. You can choose an Office.com template from one of the listed categories.
Create a Workbook with a Template
![]() Click the File tab, and then click New.
Click the File tab, and then click New.
![]() Choose one of the following:
Choose one of the following:
![]() Click Recent templates, and then click a recently used template.
Click Recent templates, and then click a recently used template.
![]() Click Sample templates, and then click a template.
Click Sample templates, and then click a template.
![]() Click My templates to open a dialog box.
Click My templates to open a dialog box.
![]() Click New from existing to open a dialog box to select a template file.
Click New from existing to open a dialog box to select a template file.
![]() Click an Office.com Templates folder (if needed), and then click a template.
Click an Office.com Templates folder (if needed), and then click a template.
![]() To navigate, click the Home, Next, or Previous button.
To navigate, click the Home, Next, or Previous button.
![]() Click Create or Download.
Click Create or Download.
![]() If necessary, click the template you want, and then click OK.
If necessary, click the template you want, and then click OK.


Opening an Existing Workbook
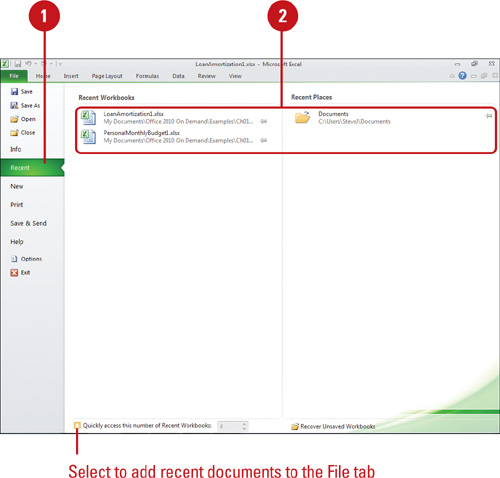
You can open an Excel workbook and start Excel simultaneously, or you can open an Excel workbook file or file created in another spreadsheet program after you start Excel. You can open an existing workbook from within Excel by using the File tab (New!). On the File tab, you can choose the Open command to locate and select the document you want or choose a recently used document from the Recent Workbooks or Recent Places list on the Recent screen (New!). Similar to the Windows Start menu, the Recent Workbooks or Recent Places list allow you to pin documents to the list that you want to remain accessible regardless of recent use. The Pin icon to the right of the file name on the File tab makes it easy to pin or unpin as needed.
Open a Workbook from the Excel Window
![]() Click the File tab, and then click Open.
Click the File tab, and then click Open.
![]() If you want to open a specific file type, click the Files of type list arrow, and then click a file type.
If you want to open a specific file type, click the Files of type list arrow, and then click a file type.
![]() If the file is located in another folder, click the Look In list arrow, and then navigate to the file.
If the file is located in another folder, click the Look In list arrow, and then navigate to the file.
![]() Click the Excel file you want, and then click Open, or click the Open button arrow, and then click one of the following options:
Click the Excel file you want, and then click Open, or click the Open button arrow, and then click one of the following options:
![]() Open Read-Only to open the selected file with protection.
Open Read-Only to open the selected file with protection.
![]() Open as Copy to open a copy of the selected file.
Open as Copy to open a copy of the selected file.
![]() Open in Browser to open the selected Web file in a browser.
Open in Browser to open the selected Web file in a browser.
![]() Open in Protected View to open the selected file in protected view (New!).
Open in Protected View to open the selected file in protected view (New!).
![]() Open and Repair to open the damaged file.
Open and Repair to open the damaged file.

Open a Recently Opened Workbook
![]() Click the File tab, and then click Recent.
Click the File tab, and then click Recent.
![]() Click the workbook you want to open in the Recent Workbooks list or a folder in the Recent Places list.
Click the workbook you want to open in the Recent Workbooks list or a folder in the Recent Places list.
![]() Pin a document/folder. Click the Pin icon (right-side) to display a green pin (document is pinned) on the Recent Workbooks or Recent Places list (New!).
Pin a document/folder. Click the Pin icon (right-side) to display a green pin (document is pinned) on the Recent Workbooks or Recent Places list (New!).
![]() Unpin a document/folder. Click the Pin icon (right-side) to display a grey pin on the Recent Workbooks or Recent Places list (New!).
Unpin a document/folder. Click the Pin icon (right-side) to display a grey pin on the Recent Workbooks or Recent Places list (New!).
Converting an Existing Workbook
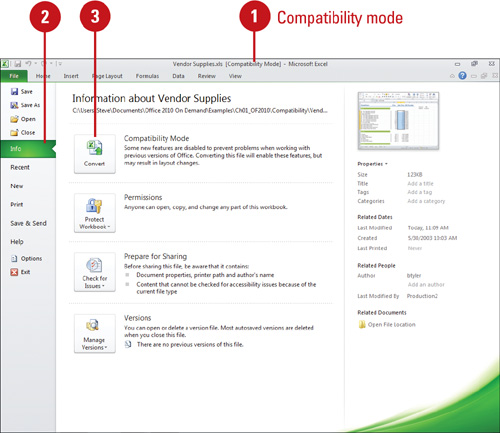
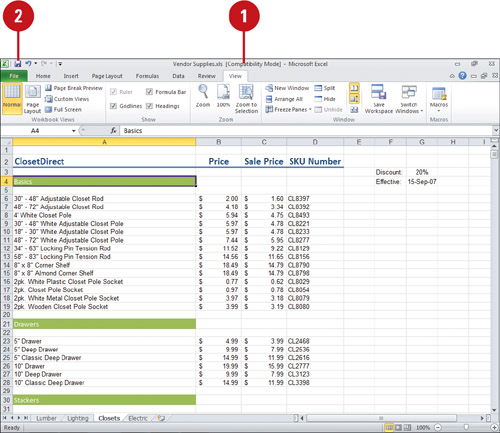
When you open a workbook from 97-2003, Excel 2010 goes into compatibility mode—indicated on the title bar—where it disables new features that cannot be displayed or converted well by previous versions. When you save a workbook, Excel 2010 saves Excel 97-2003 files in their older format using compatibility mode. The workbook stays in compatibility mode until you convert it to the Excel 2007-2010 file format. Excel 2007 and Excel 2010 use the same file format, so you don’t need to convert files between them.
Convert an Excel 97-2003 to Excel 2010
![]() Open the Excel 97-2003 workbook you want to convert to the Excel 2007-2010 file format.
Open the Excel 97-2003 workbook you want to convert to the Excel 2007-2010 file format.
The Excel 97-2003 workbook opens in compatibility mode.
![]() Click the File tab, and then click Info.
Click the File tab, and then click Info.
![]() Click Convert.
Click Convert.
![]() Click OK to convert the file to the Excel 2007-2010 format.
Click OK to convert the file to the Excel 2007-2010 format.
Excel exits compatibility mode, which is only turned on when a previous version is in use.
Using Task and Window Panes
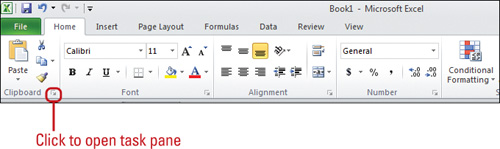
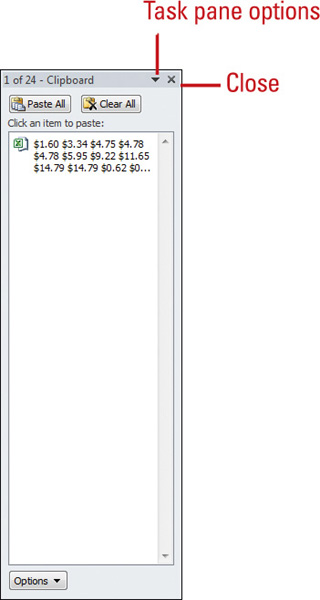
Task panes are separate windows that appear when you need them, such as Signatures, or when you click a Dialog Box Launcher icon, such as Office Clipboard and Clip Art. A task pane displays various options that relate to the current task. Window panes are sections of a window, such as a split window. If you need a larger work area, you can use the Close button in the upper-right corner of the pane to close a task or window pane, or move a border edge (for task panes) or splitter (for window panes) to resize it.
Work with Task and Window Panes
![]() Open a Task Pane. It appears when you need it or when you click a Dialog Box Launcher icon.
Open a Task Pane. It appears when you need it or when you click a Dialog Box Launcher icon.
![]() Close a Task or Window Pane. Click the Close button in upper-right corner of the pane.
Close a Task or Window Pane. Click the Close button in upper-right corner of the pane.
![]() Resize a Task Pane. Point to the Task Pane border edge until the pointer changes to double arrows, then drag the edge to resize it.
Resize a Task Pane. Point to the Task Pane border edge until the pointer changes to double arrows, then drag the edge to resize it.
![]() Resize a Window Pane. Point to the window pane border bar until the pointer changes to a double bar with arrows, then drag the edge to resize it.
Resize a Window Pane. Point to the window pane border bar until the pointer changes to a double bar with arrows, then drag the edge to resize it.
Moving Around the Workbook
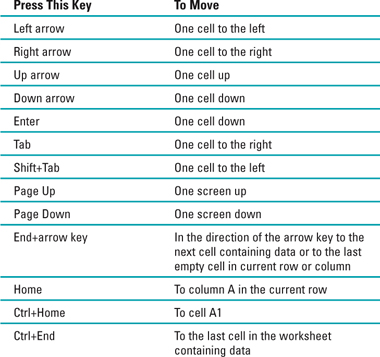
You can move around a worksheet using your mouse or the keyboard. You might find that using your mouse to move from cell to cell is most convenient, while using various keyboard combinations is easier for quickly covering large areas of a worksheet. Or, you might find that entering numbers on the keypad and pressing Enter is a better method. Certain keys on the keyboard—Home, End, and Delete to name a few—are best used as shortcuts to navigate in the worksheet. However, there is no right way; whichever method feels the most comfortable is the one you should use.
Use the Mouse to Navigate
Using the mouse, you can navigate to:
![]() Another cell
Another cell
![]() Another part of the worksheet
Another part of the worksheet
![]() Another worksheet
Another worksheet

Use the Keyboard to Navigate
Using the keyboard, you can navigate in a worksheet to:
![]() Another cell
Another cell
![]() Another part of the worksheet
Another part of the worksheet
Refer to the table for keyboard shortcuts for navigating around a worksheet.
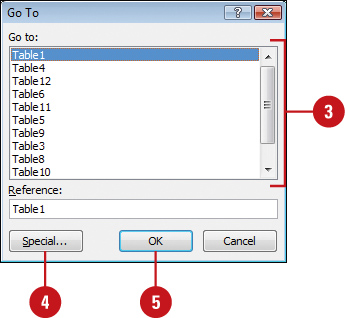
Go To a Specific Location
![]() Click the Home tab.
Click the Home tab.
![]() Click the Find & Select button, and then click Go To.
Click the Find & Select button, and then click Go To.
![]() Type the cell address to the cell location where you want to go.
Type the cell address to the cell location where you want to go.
![]() To go to other locations (such as comments, blanks, last cell, objects, formulas, etc.), click Special, select an option, and then click OK.
To go to other locations (such as comments, blanks, last cell, objects, formulas, etc.), click Special, select an option, and then click OK.
TIMESAVER To open the Special dialog box directly, click the Find & Select button, and then click Go To Special.
![]() Click OK.
Click OK.
Arranging Windows
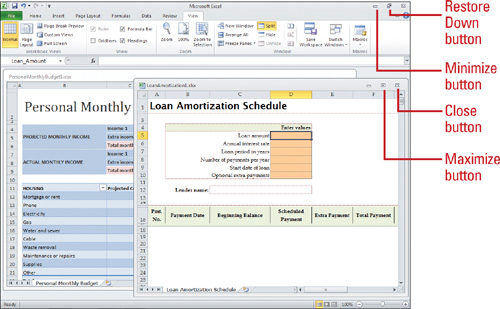
Every Office program and workbook opens inside a window, which contains a title bar, Ribbon, and work area, which is where you create and edit your data. Most often, you’ll probably fill the entire screen with one window. But when you want to move or copy information between programs or documents, it’s easier to display several windows at once. You can arrange two or more windows from one program or from different programs on the screen at the same time. However, you must make the window active to work in it. You can also click the document buttons on the taskbar to switch between open documents.
Resize and Move a Window
![]() Maximize button. Click to make a window fill the entire screen.
Maximize button. Click to make a window fill the entire screen.
![]() Restore Down button. Click to reduce a maximized window to a reduced size.
Restore Down button. Click to reduce a maximized window to a reduced size.
![]() Minimize button. Click to shrink a window to a taskbar button. To restore the window to its previous size, click the taskbar button.
Minimize button. Click to shrink a window to a taskbar button. To restore the window to its previous size, click the taskbar button.
![]() Close button. Click to shut a window.
Close button. Click to shut a window.
Resize and Move a Window Using a Mouse
![]() If the window is maximized, click the Restore Down button.
If the window is maximized, click the Restore Down button.
![]() Use the following methods:
Use the following methods:
![]() Move. Move the mouse over the title bar.
Move. Move the mouse over the title bar.
![]() Resize. Move the mouse over one of the borders of the window until the mouse pointer changes into a two-headed arrow. The directions of the arrowheads show you the directions in which you can resize the window.
Resize. Move the mouse over one of the borders of the window until the mouse pointer changes into a two-headed arrow. The directions of the arrowheads show you the directions in which you can resize the window.
![]() Drag to move or resize the window.
Drag to move or resize the window.

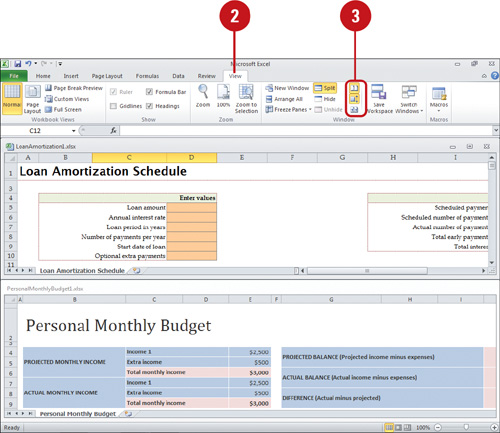
Arrange or Switch Between Windows
![]() Open the workbooks you want to arrange or switch between.
Open the workbooks you want to arrange or switch between.
![]() Click the View tab.
Click the View tab.
![]() In the Window group, perform any of the following:
In the Window group, perform any of the following:
![]() Click Switch Windows, and then click the workbook name you want.
Click Switch Windows, and then click the workbook name you want.
![]() Click Arrange, click an arrange window option (Tiled, Horizontal, Vertical, or Cascade), and then click OK.
Click Arrange, click an arrange window option (Tiled, Horizontal, Vertical, or Cascade), and then click OK.
![]() Click New Window to open a new window containing a view of the current workbook.
Click New Window to open a new window containing a view of the current workbook.

Compare Windows Side By Side
![]() Open the workbooks you want to arrange or switch between.
Open the workbooks you want to arrange or switch between.
![]() Click the View tab.
Click the View tab.
![]() In the Window group, perform any of the following:
In the Window group, perform any of the following:
![]() Click the View Side By Side button to compare two worksheets vertically.
Click the View Side By Side button to compare two worksheets vertically.
![]() Click the Synchronous Scrolling button to synchronize the scrolling of two documents so that they scroll together. To enable this feature turn on View Side By Side.
Click the Synchronous Scrolling button to synchronize the scrolling of two documents so that they scroll together. To enable this feature turn on View Side By Side.
![]() Click the Reset Window Position button to reset the window position of the documents being compared side-by-side so that they share the screen equally. To enable this feature turn on View Side By Side.
Click the Reset Window Position button to reset the window position of the documents being compared side-by-side so that they share the screen equally. To enable this feature turn on View Side By Side.
Getting Help While You Work
At some time, everyone has a question or two about the program they are using. The Excel Help Viewer provides the answers and resources you need, including feature help, articles, tips, templates, training, and downloads. By connecting to Office.com on the Microsoft Web site, you not only have access to standard product help information, but you also have access to updated information over the Web without leaving the Help Viewer. The Web browser-like Help Viewer allows you to browse an extensive catalog of topics using a table of contents to locate information, or ask a question or enter phrases to search for specific information. When you use any of these help options, a list of possible answers is shown to you with the most likely answer or most frequently-used at the top of the list.
Use the Help Viewer to Get Answers
![]() Click the Help button on the Ribbon.
Click the Help button on the Ribbon.
TIMESAVER Press F1.
![]() Locate the Help topic you want.
Locate the Help topic you want.
![]() Click a Help category on the home page, and then click a topic (? icon).
Click a Help category on the home page, and then click a topic (? icon).
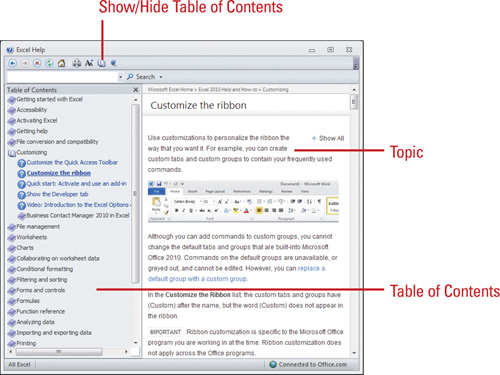
![]() Click the Show/Hide Table of Contents button on the toolbar, click a help category (book icon) and then click a topic (? icon).
Click the Show/Hide Table of Contents button on the toolbar, click a help category (book icon) and then click a topic (? icon).
![]() Read the topic, and then click any links to get Help information.
Read the topic, and then click any links to get Help information.
![]() Click the Back, Forward, Stop, Refresh, and Home buttons on the toolbar to move around in the Help Viewer.
Click the Back, Forward, Stop, Refresh, and Home buttons on the toolbar to move around in the Help Viewer.
![]() If you want to print the topic, click the Print button on the toolbar.
If you want to print the topic, click the Print button on the toolbar.
![]() To keep the Help Viewer window (not maximized) on top or behind, click to toggle the Keep On Top button(pin pushed in) and Not On Top button (pin not pushed in) on the toolbar.
To keep the Help Viewer window (not maximized) on top or behind, click to toggle the Keep On Top button(pin pushed in) and Not On Top button (pin not pushed in) on the toolbar.
![]() When you’re done, click the Close button.
When you’re done, click the Close button.

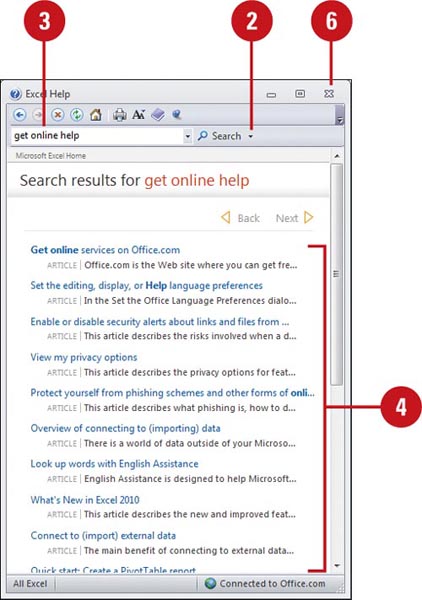
Search for Help
![]() Click the Help button on the Ribbon.
Click the Help button on the Ribbon.
![]() Click the Search button list arrow below the toolbar, and then select the location and type of information you want.
Click the Search button list arrow below the toolbar, and then select the location and type of information you want.
![]() Type one or more keywords in the Search For box, and then click the Search button.
Type one or more keywords in the Search For box, and then click the Search button.
![]() Click a topic.
Click a topic.
![]() Read the topic, and then click any links to get information on related topics or definitions.
Read the topic, and then click any links to get information on related topics or definitions.
![]() When you’re done, click the Close button.
When you’re done, click the Close button.
Check Help Connection Status
![]() Click the Help button on the Ribbon.
Click the Help button on the Ribbon.
![]() Click the Connection Status at the bottom of the Help Viewer.
Click the Connection Status at the bottom of the Help Viewer.
![]() Click the connection option where you want to get help information:
Click the connection option where you want to get help information:
![]() Show content from Office.com to get help from this computer and the internet (online).
Show content from Office.com to get help from this computer and the internet (online).
![]() Show content only from this computer to get help from this computer only (offline).
Show content only from this computer to get help from this computer only (offline).
This setting is maintained for all Office 2010 program Help Viewers.
![]() When you’re done, click the Close button.
When you’re done, click the Close button.

Saving a Workbook
When you create an Excel workbook, save it as a file on your computer so you can work with it later. When you save a workbook for the first time or if you want to save a copy of a file, use the Save As command. When you want to save an open workbook, use the Save button on the Quick Access Toolbar. When you save a workbook, Excel 2010 saves Excel 97-2003 files in their older format using compatibility mode and new Excel 2010 files in an XML (Extensible Markup Language) based file format .xlsx. The XML format significantly reduces file sizes, provides enhanced file recovery, and allows for increased compatibility, sharing, reuse, and transportability. An Excel 97-2003 workbook stays in compatibility mode—indicated on the title bar—until you convert it to the Excel 2007-2010 file format. Compatibility mode disables new features that cannot be displayed or converted well by previous versions.
Save a Workbook for Excel 2010
![]() Click the File tab, and then click Save As.
Click the File tab, and then click Save As.
![]() Click the Save in list arrow, and then click the drive or folder where you want to save the file.
Click the Save in list arrow, and then click the drive or folder where you want to save the file.
TIMESAVER Click the New Folder button in the Save As dialog box to save the file to a new folder.
![]() Type a workbook file name.
Type a workbook file name.
![]() Click the Save as type list arrow, and then click Excel Workbook.
Click the Save as type list arrow, and then click Excel Workbook.
![]() To enter Document properties, click the Authors or Tags box, and then enter the text you want.
To enter Document properties, click the Authors or Tags box, and then enter the text you want.
![]() Click Save.
Click Save.

Save an Excel 97-2003 Workbook
![]() Open the Excel 97-2003 workbook you want to continue to save in the Excel 97-2003 format.
Open the Excel 97-2003 workbook you want to continue to save in the Excel 97-2003 format.
The Excel 97-2003 workbook opens in compatibility mode.
![]() Click the Save button on the Quick Access Toolbar, or click the File tab, and then click Save.
Click the Save button on the Quick Access Toolbar, or click the File tab, and then click Save.
Excel stays in compatibility mode.
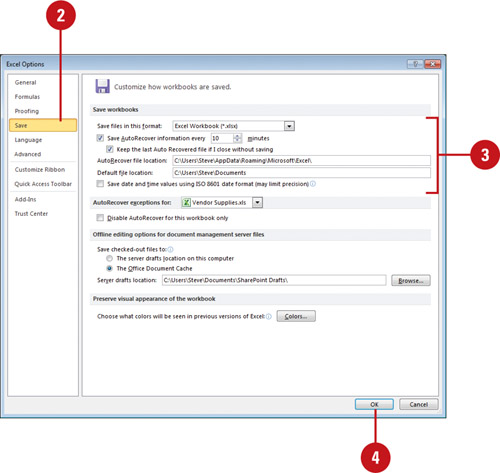
Set Save Options
![]() Click the File tab, and then click Options.
Click the File tab, and then click Options.
![]() In the left pane, click Save.
In the left pane, click Save.
![]() Set the save options you want:
Set the save options you want:
![]() Default Save Format. Click the Save files in this format list arrow, and then click the default format you want.
Default Save Format. Click the Save files in this format list arrow, and then click the default format you want.
![]() Default File Location. Specify the complete path to the folder location where you want to save your document.
Default File Location. Specify the complete path to the folder location where you want to save your document.
![]() Click OK.
Click OK.
Saving a Workbook with Different Formats
Excel is a versatile spreadsheet program that allows you to save your workbook in a variety of different formats—see the table on the following page for a complete list and description. For example, you might want to save your workbook as a Web page that you can view in a Web browser. Or you can save a workbook in an earlier version of Excel (97-2003) in case the people you work with have not upgraded to Excel 2010. If you save a workbook to Excel 97-2003, some new features and formatting are converted to uneditable pictures or not retained. The 2007-2010 format is compatible with Office 2003, Office XP, and Office 2000 with a software patch. However, for best results, if you’re creating a workbook for someone with Excel 97 to Excel 2003, it’s better to save it with the .xls file format. In addition to the new XML-based file format, Excel also allows you to save a workbook in a binary file format (or BIFF12), which is based on the segmented compressed file format. This file format is most useful for large or complex workbooks, and optimized for performance and backward compatibility.
Save a Workbook with Another Format
![]() Click the File tab, and then click Save & Send.
Click the File tab, and then click Save & Send.
![]() Click Change File Type.
Click Change File Type.
![]() Click the file type you want.
Click the file type you want.
![]() Click the Save As button.
Click the Save As button.
![]() The Save As dialog box opens with the selected file type.
The Save As dialog box opens with the selected file type.
![]() You can also click the File tab, click Save As, and then select a file format.
You can also click the File tab, click Save As, and then select a file format.
![]() Click the Save in list arrow, and then select the location where you want to save the file.
Click the Save in list arrow, and then select the location where you want to save the file.
![]() Type a file name.
Type a file name.
![]() Click Save.
Click Save.


Checking Compatibility
The Compatibility Checker identifies the potential loss of functionality when you save an Excel workbook in the Excel 97-2003 Workbook file format. The Compatibility Checker generates a report that provides a summary of the potential losses and the number of occurrences in the workbook. You can also specify what versions to show (New!) compatibility issues. Use the report information to determine what caused each message and for suggestions on how to change it. If the loss is due to a new feature in Excel 2010—such as new functions, custom layouts or Quick Styles applied to shapes, pictures, and WordArt—you might be able to simply remove the effect or feature. In other cases, you might not be able to do anything about it. To maintain a visual appearance, SmartArt graphics and other objects with new effects are converted to bitmaps to preserve their overall look and cannot be edited.
Check Workbook Compatibility
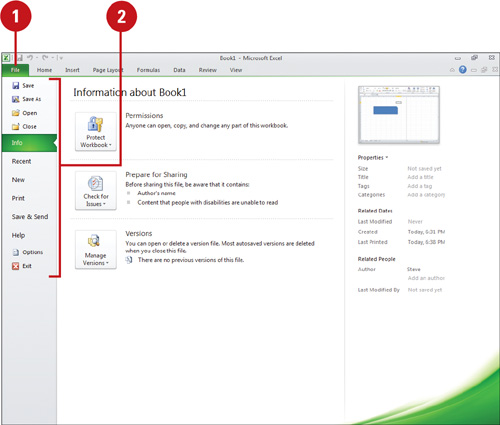
![]() Click the File tab, and then click Info.
Click the File tab, and then click Info.
![]() Click the Check For Issues button, and then click Check Compatibility.
Click the Check For Issues button, and then click Check Compatibility.
Excel checks compatibility of the workbook for non supported features in earlier versions of Excel.
![]() Click the Select versions to show list arrow, and then select one or more versions to check (New!).
Click the Select versions to show list arrow, and then select one or more versions to check (New!).
![]() View the compatibility summary information, so you can make changes, as necessary.
View the compatibility summary information, so you can make changes, as necessary.
![]() To have the compatibility checker check the workbook when Excel saves the file, select the Check compatibility when saving this workbook check box.
To have the compatibility checker check the workbook when Excel saves the file, select the Check compatibility when saving this workbook check box.
![]() Click OK.
Click OK.


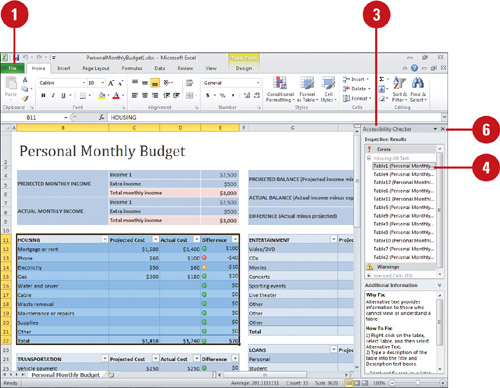
Checking Accessibility
The Accessibility Checker (New!) identifies potential difficulties that people with disabilities might have reading or interactive with an Office document. The Accessibility Checker generates a list of errors and warning and possible fixes in the Accessibility Checker panel. Use the information to determine what caused each issue and for suggestions on how to fix it. In addition to the Accessibility Checker, you can also add alternative text (also known as alt text) (New!) to objects and other items to provide information for people with visual impairments who may be unable to easily or fully see it. Alternative text also helps people with screen readers understand the content in a document. You can create alternative text for shapes, pictures, charts, tables, SmartArt graphics, or other objects. When you point to an object with alternative text in a screen reader or DAISY (digital Accessible Information System) or in most browsers, the alternative text appears.
Check Accessibility and Add Alternative Text
![]() Click the File tab, and then click Info.
Click the File tab, and then click Info.
![]() Click the Check For Issues button, and then click Check Accessibility.
Click the Check For Issues button, and then click Check Accessibility.
Excel checks compatibility for content that people with disabilities might find difficult to read.
![]() View the compatibility summary information of errors and warnings in the Accessibility Checker panel.
View the compatibility summary information of errors and warnings in the Accessibility Checker panel.
![]() Select an issue under Inspection Results to find out how to fix it under Additional Information.
Select an issue under Inspection Results to find out how to fix it under Additional Information.
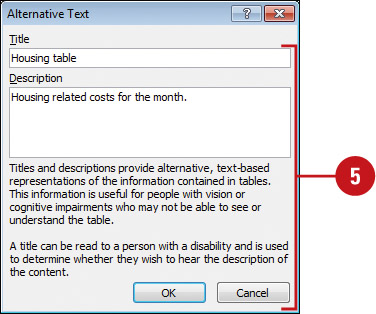
![]() To add alternative text, right-click the object or item, point to a command (varies depending on the object or item), such as Format, click Alternative Text or Alt Text, enter a title and description, and then click OK.
To add alternative text, right-click the object or item, point to a command (varies depending on the object or item), such as Format, click Alternative Text or Alt Text, enter a title and description, and then click OK.
![]() When you’re done with the Accessibility Checker panel, click the Close button on the panel.
When you’re done with the Accessibility Checker panel, click the Close button on the panel.
Documenting Workbook Properties
Excel automatically documents workbook properties while you work, such as file size, save dates, and various statistics, and allows you to document other properties, such as title, author, subject, keywords, category, and status. You can view or edit standard document properties or create advanced custom properties by using the Document Information Panel, which is actually an XML-based Microsoft InfoPath 2010 form hosted in Excel. You can use document properties—also known as metadata—to help you manage and track files; search tools can use the metadata to find a workbook based-on your search criteria. If you associate a document property to an item in the document, the document property updates when you change the item.
View and Edit Document Properties
![]() Click the File tab, and then click Info.
Click the File tab, and then click Info.
![]() To display other properties, click the Properties button, and then select an option:
To display other properties, click the Properties button, and then select an option:
![]() Show Document Panel. Shows Document panel in the document.
Show Document Panel. Shows Document panel in the document.
![]() Advanced Properties. Displays the Properties dialog box.
Advanced Properties. Displays the Properties dialog box.
![]() Enter the standard properties, such as author, title, subject, keywords, category, status, and comments.
Enter the standard properties, such as author, title, subject, keywords, category, status, and comments.
![]() Show All Properties. Click the link to displays more options.
Show All Properties. Click the link to displays more options.


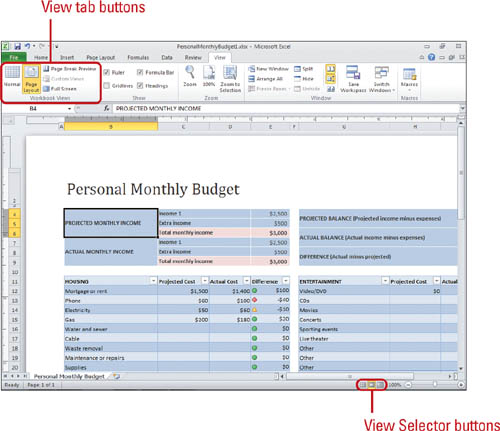
Switching Views
Excel includes a view selector in the lower-right of the workbook window, where you can use buttons to quickly switch between Excel views: Normal, Page Layout, and Page Break Preview. Normal view is the main view in Excel. It lets you focus on entering, modifying, and managing your data. Page Layout view is the printout related view. It lets you focus on how your worksheet is going to look when you print it. You can work with page setup, headers, footers, margins, and shapes in this view to make sure pages look the way you want. You use Page Break Preview view along with Page Layout view. Page Break Preview view lets you see how your worksheet data appears on pages. In addition to the view selector, you can also use the View tab to switch between views. On the View tab, you can also switch to Full Screen view, which allows you to see the maximum amount of worksheet data your screen can display without the Ribbon, tabs, or Status bar.
Switch Between Views
![]() Use the View Selector. On the right-side of the Status bar, click any of the following view buttons: Normal View, Page Layout View, or Page Break Preview View.
Use the View Selector. On the right-side of the Status bar, click any of the following view buttons: Normal View, Page Layout View, or Page Break Preview View.
![]() Use the View tab. Click the View tab, and then click any of the following view buttons: Normal View, Page Layout View, Page Break Preview View, or Full Screen.
Use the View tab. Click the View tab, and then click any of the following view buttons: Normal View, Page Layout View, Page Break Preview View, or Full Screen.
To exit Full Screen View, press Esc.
Recovering a Workbook
If Excel encounters a problem and stops responding, the program automatically tries to recover the file. The recovered files are stored and managed by Excel. You can use the Manage Versions button (New!) on the Info screen under the File tab to open any available recovered unsaved files. If you have a lot of recovered files, you can also delete all file versions to save disk space. To use the AutoRecover option, you need to enable it in the Save category of the Options dialog box. You can set AutoRecover options to periodically save a temporary copy of your current file, which ensures proper recovery of the file and allows you to revert to an earlier version of a file. In addition, if you didn’t save your changes when you closed a document, you can select an AutoRecover option to save your work as a safe guard (New!).
Recover a Workbook
![]() Click the File tab, and then click Info.
Click the File tab, and then click Info.
![]() To open a recovered or previous version, click a file from the available list.
To open a recovered or previous version, click a file from the available list.
![]() Click the Manage Versions button, and then click Recover Unsaved Workbooks.
Click the Manage Versions button, and then click Recover Unsaved Workbooks.
TIMESAVER Click the File tab, click Recent, and then click Recover Unsaved Workbooks folder icon.
![]() Select the file version you want to recover.
Select the file version you want to recover.
![]() Click Open.
Click Open.

Use AutoRecover
![]() Click the File tab, and then click Options.
Click the File tab, and then click Options.
![]() In the left pane, click Save.
In the left pane, click Save.
![]() Select the Save AutoRecover information every x minutes check box.
Select the Save AutoRecover information every x minutes check box.
![]() Enter the number of minutes, or click the Up and Down arrows to adjust the minutes.
Enter the number of minutes, or click the Up and Down arrows to adjust the minutes.
![]() Select the Keep the last Auto Recovered file if I close without saving check box as a safe guard to save your work if you don’t save it (New!).
Select the Keep the last Auto Recovered file if I close without saving check box as a safe guard to save your work if you don’t save it (New!).
![]() Specify the complete path to the folder location where you want to save your AutoRecover file.
Specify the complete path to the folder location where you want to save your AutoRecover file.
![]() To disable AutoRecover for a specific document, perform the following:
To disable AutoRecover for a specific document, perform the following:
![]() Click the File list arrow, select the document you want to disable.
Click the File list arrow, select the document you want to disable.
![]() Select the Disable AutoRecover for this workbook only check box.
Select the Disable AutoRecover for this workbook only check box.
![]() Click OK.
Click OK.

Maintaining and Repairing Office
At times you may determine that Excel or another Office program is not working as efficiently as it once did. This sometimes happens when you install new software or move files into new folders. Office does the work for you with the Repair option, which locates, diagnoses, and fixes any errors in the program itself. Note that this feature does not repair personal files like documents, presentations, or workbooks. If the Repair option does not fix the problem, you might have to reinstall Word or Office. If you need to add or remove features, reinstall Excel or Office, or remove it entirely, you can use Office Setup’s maintenance feature.
Perform Program Maintenance
![]() Insert the Office disc in your drive or navigate to the folder with the setup program.
Insert the Office disc in your drive or navigate to the folder with the setup program.
![]() In Windows Explorer, double-click the Setup icon.
In Windows Explorer, double-click the Setup icon.
![]() Click one of the following maintenance buttons.
Click one of the following maintenance buttons.
![]() Add or Remove Features to change which features are installed or remove specific features.
Add or Remove Features to change which features are installed or remove specific features.
![]() Remove to uninstall Microsoft Office 2010 from this computer.
Remove to uninstall Microsoft Office 2010 from this computer.
![]() Repair to repair Microsoft Office 2010 to its original state.
Repair to repair Microsoft Office 2010 to its original state.
![]() Enter a Product Key to type the product registration key (located in the product packaging) for Office 2010.
Enter a Product Key to type the product registration key (located in the product packaging) for Office 2010.
![]() Click Continue, and then follow the wizard instructions to complete the maintenance.
Click Continue, and then follow the wizard instructions to complete the maintenance.


Getting Updates on the Web
Microsoft offers a quick and easy way to update Excel and any other Office program with new software downloads that improve the stability and security of the program. From the Help screen on the File tab, simply click the Check for Updates button to connect to the Microsoft Update Web site to have your computer scanned for necessary updates, and then choose which Office updates you want to download and install.
Get Office Updates on the Web
![]() Click the File tab, and then click Help.
Click the File tab, and then click Help.
![]() Click Check for Updates to open the Microsoft Update Web site.
Click Check for Updates to open the Microsoft Update Web site.
![]() Click one of the update buttons to find out if you need updates, and then choose the updates you want to download and install.
Click one of the update buttons to find out if you need updates, and then choose the updates you want to download and install.

Closing a Workbook and Quitting Excel
After you finish working on a workbook, you can close it. Closing a file makes more computer memory available for other activities. Closing a workbook is different from quitting Excel; after you close a workbook, Excel is still running. When you’re finished using Excel, you should quit the program. To protect your files, always save your workbooks and quit Excel before turning off the computer.
Close a Workbook
![]() Click the File tab, and then click Close, or click the Close button on the Document window (available when documents not all shown on taskbar).
Click the File tab, and then click Close, or click the Close button on the Document window (available when documents not all shown on taskbar).
TIMESAVER Press Ctrl+W.
![]() If you have made changes to any open files since last saving them, a dialog box opens, asking if you want to save changes. Click Yes to save any changes, or click No toignore your changes.
If you have made changes to any open files since last saving them, a dialog box opens, asking if you want to save changes. Click Yes to save any changes, or click No toignore your changes.

Exit Excel
![]() Click the File tab, and then click Exit, or click the Close button on the Program window (when documents not all shown on taskbar or for the last open document).
Click the File tab, and then click Exit, or click the Close button on the Program window (when documents not all shown on taskbar or for the last open document).
![]() If you have made changes to any open files since last saving them, a dialog box opens asking if you want to save changes. Click Yes to save any changes, or click No toignore your changes.
If you have made changes to any open files since last saving them, a dialog box opens asking if you want to save changes. Click Yes to save any changes, or click No toignore your changes.
