8 Drawing and Modifying Shapes
Introduction
When you want to add objects to a workbook, you can use Microsoft Excel as a drawing package. Excel offers a wide range of predesigned shapes, line options or freeform tools that allow you to draw, size, and format your own shapes and forms.
You can add several types of drawing objects to your Excel workbooks—shapes, text boxes, lines, and freeforms. Shapes are preset objects, such as stars, circles, or ovals. Text boxes are objects with text, a shape without a border. Lines are simply the straight or curved lines (arcs) that can connect two points or are used as arrows. Freeforms are irregular curves or polygons that you can create as a freehand drawing.
Once you create a drawing object, you can move, resize, nudge, copy or delete it on your worksheets. You can also change its style, by adding color, creating a fill pattern, rotating it, and applying a shadow or 3-D effect. Take a simple shape and by the time you are done adding various effects, it could become an attractive piece of graphic art for your workbook. If you’d like to use it later, you can save it to the Clip Organizer.
Object placement on your worksheets is a key factor to all of your hard work. Multiple objects should be grouped if they are to be considered one larger object. Grouping helps you make changes later on, or copy your objects to another worksheet. Excel has the ability to line up your objects with precision—rulers and guides are part of the alignment process to help you. By grouping and aligning, you are assured that your drawing objects will be accurately placed.
Drawing and Resizing Shapes
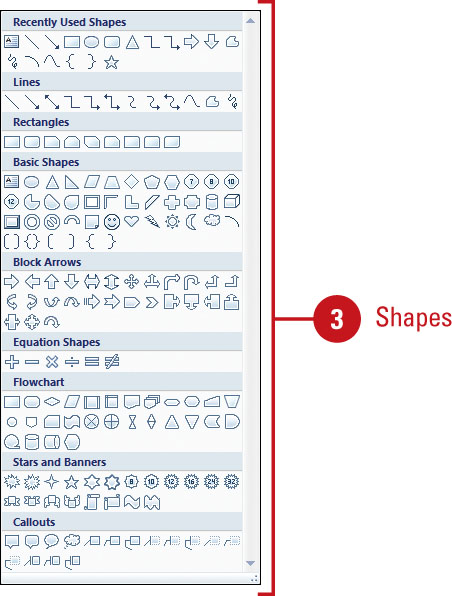
Excel supplies ready-made shapes, ranging from hearts to lightning bolts to stars. The ready-made shapes are available directly on the Shapes gallery on the Insert and Format tabs. Once you have placed a shape on a worksheet, you can resize it using the sizing handles. Many shapes have an adjustment handle, a small yellow or pink diamond located near a resize handle that you can drag to alter the shape. For precision when resizing, use the Size Dialog Box Launcher to specify the new size of the shape.
Draw a Shape
![]() Click the Insert tab.
Click the Insert tab.
![]() Click the Shapes button.
Click the Shapes button.
![]() Click the shape you want to draw.
Click the shape you want to draw.
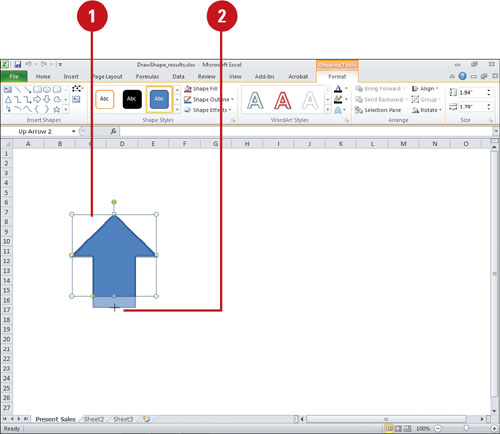
![]() Drag the pointer on the worksheet where you want to place the shape until the drawing object is the shape and size that you want.
Drag the pointer on the worksheet where you want to place the shape until the drawing object is the shape and size that you want.
The shape you draw uses the line and fill color defined by the workbook’s theme.
TIMESAVER To draw a proportional shape, hold down Shift as you drag the pointer.

Resize a Shape
![]() Select the shape you want to resize.
Select the shape you want to resize.
![]() Drag one of the sizing handles.
Drag one of the sizing handles.
![]() To resize the object in the vertical or horizontal direction, drag a sizing handle on the side of the selection box.
To resize the object in the vertical or horizontal direction, drag a sizing handle on the side of the selection box.
![]() To resize the object in both the vertical and horizontal directions, drag a sizing handle on the corner of the selection box.
To resize the object in both the vertical and horizontal directions, drag a sizing handle on the corner of the selection box.
![]() To resize the object with precise measurements, click the Format tab under Drawing Tools, and then specify exact height and width settings in the Size group.
To resize the object with precise measurements, click the Format tab under Drawing Tools, and then specify exact height and width settings in the Size group.
Adjust a Shape
![]() Select the shape you want to adjust.
Select the shape you want to adjust.
![]() Click one of the adjustment handles (small yellow diamonds), and then drag the handle to alter the form of the shape.
Click one of the adjustment handles (small yellow diamonds), and then drag the handle to alter the form of the shape.

Inserting Multiple Shapes
If you need to draw the same shape several times on one or more worksheets in your workbook, you can use Excel’s Lock Drawing Mode to draw as many of the same shapes as you want without having to reselect it from the Shapes gallery. This can be a timesaver and save you extra mouse clicks. Excel stays in Lock Drawing Mode until you press Esc. If a shape doesn’t look the way you want, you can change the shape instead of redrawing it.
Insert Multiple Shapes
![]() Click the Insert tab.
Click the Insert tab.
![]() Click the Shapes button.
Click the Shapes button.
![]() Right-click the shape you want to add, and then click Lock Drawing Mode.
Right-click the shape you want to add, and then click Lock Drawing Mode.
![]() Drag the pointer on the worksheet where you want to place the shape until the drawing object is the shape and size that you want. Continue to draw shapes as you want in your workbook.
Drag the pointer on the worksheet where you want to place the shape until the drawing object is the shape and size that you want. Continue to draw shapes as you want in your workbook.
![]() When you’re done, press Esc.
When you’re done, press Esc.

Change a Shape to Another Shape
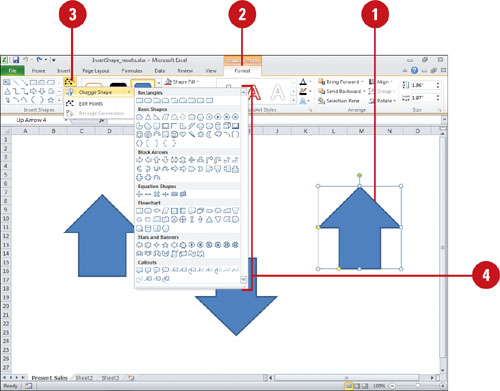
![]() Select the shape you want to modify.
Select the shape you want to modify.
![]() Click the Format tab under Drawing Tools.
Click the Format tab under Drawing Tools.
![]() Click the Edit Shape button, point to Change Shape.
Click the Edit Shape button, point to Change Shape.
![]() Click the shape you want to use from the Shapes gallery.
Click the shape you want to use from the Shapes gallery.
Adding Text to a Shape
You can add text to a shape in the same way you add text to a text box. Simply, select the shape object, and then start typing. Shapes range from rectangles and circles to arrows and stars. When you place text in a shape, the text becomes part of the object. If you rotate or flip the shape, the text rotates or flips too. You can use tools, such as an alignment button or Font Style, on the Mini-toolbar and Home tab to format the text in a shape like the text in a text box.
Add Text to a Shape
![]() Select the shape in which you want to add text.
Select the shape in which you want to add text.
![]() Type the text you want.
Type the text you want.
![]() To edit the text in a shape, click the text to place the insertion point, and then edit the text.
To edit the text in a shape, click the text to place the insertion point, and then edit the text.

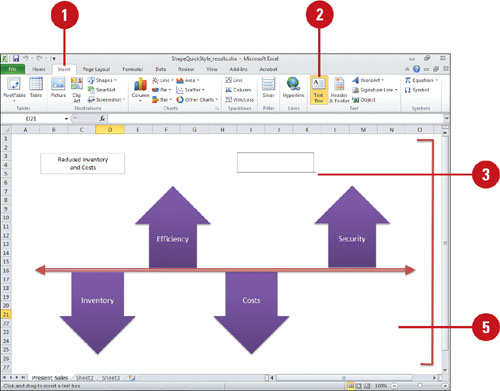
Create a Text Box
![]() Click the Insert tab.
Click the Insert tab.
![]() Click the Text Box button.
Click the Text Box button.
![]() Perform one of the following:
Perform one of the following:
![]() To add text that wraps, drag to create a box, and then start typing.
To add text that wraps, drag to create a box, and then start typing.
![]() To add text that doesn’t wrap, click and then start typing.
To add text that doesn’t wrap, click and then start typing.
![]() To delete a text box, select it, and then press Delete.
To delete a text box, select it, and then press Delete.
![]() Click outside the selection box to deselect the text box.
Click outside the selection box to deselect the text box.
Drawing Lines and Arrows
The most basic drawing objects you can create on your worksheets are lines and arrows. Use the Line shape to create line segments or the Arrow shape to create arrows that emphasize key features of your workbook. You can quickly add multiple formatting to a line or arrow using Shape Quick Styles or change individual formatting—solid, dashed, or a combination—using the Shape Outline button. The Shape Outline button lets you change the type of line or arrow you want to create. You can add arrowheads to any lines on your worksheet.
Draw a Straight Line or Arrow
![]() Click the Insert tab.
Click the Insert tab.
![]() Click the Shapes button, and then click a Line or Arrow shape in the Shapes gallery.
Click the Shapes button, and then click a Line or Arrow shape in the Shapes gallery.
![]() Drag the pointer to draw a line. The endpoints of the line or arrow are where you start and finish dragging.
Drag the pointer to draw a line. The endpoints of the line or arrow are where you start and finish dragging.
![]() Release the mouse button when the line or arrow is the correct length. Sizing handles appear at both ends of the line. Use these handles to resize your line or move an endpoint.
Release the mouse button when the line or arrow is the correct length. Sizing handles appear at both ends of the line. Use these handles to resize your line or move an endpoint.

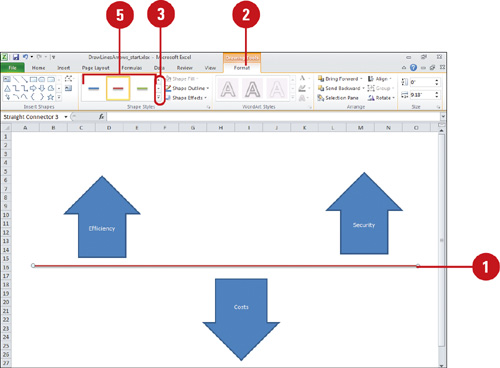
Add a Quick Style to a Line
![]() Select the shape you want to modify.
Select the shape you want to modify.
![]() Click the Format tab under Drawing Tools.
Click the Format tab under Drawing Tools.
![]() Click the scroll up or down arrow, or click the More list arrow in the Shapes Styles group to see additional styles.
Click the scroll up or down arrow, or click the More list arrow in the Shapes Styles group to see additional styles.
![]() Point to a style.
Point to a style.
A live preview of the style appears in the current shape.
![]() Click the style you want from the gallery to apply it to the selected line.
Click the style you want from the gallery to apply it to the selected line.
Change a Line or Arrow
![]() Select the line or arrow you want to edit.
Select the line or arrow you want to edit.
![]() Click the Format tab under Drawing Tools.
Click the Format tab under Drawing Tools.
![]() Click the Shape Outline button to select a line or arrow style or thickness.
Click the Shape Outline button to select a line or arrow style or thickness.
![]() Click a color, or point to Weight, Dashes, or Arrows, and then select a style.
Click a color, or point to Weight, Dashes, or Arrows, and then select a style.
![]() Drag a sizing handle to change the size or angle of the line or arrow.
Drag a sizing handle to change the size or angle of the line or arrow.

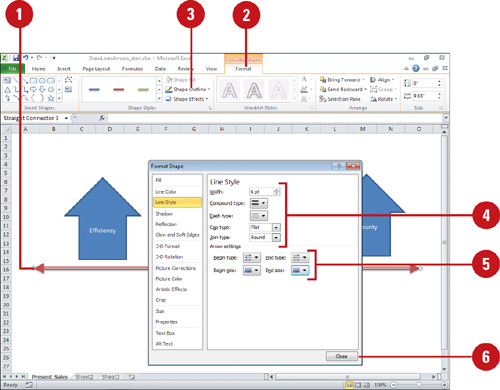
Modify a Line or Arrow
![]() Select the line or arrow you want to edit.
Select the line or arrow you want to edit.
![]() Click the Format tab under Drawing Tools.
Click the Format tab under Drawing Tools.
![]() Click the Shape Outline button, point to Weight, Dashes, or Arrows, and then click More Lines or More Arrows.
Click the Shape Outline button, point to Weight, Dashes, or Arrows, and then click More Lines or More Arrows.
![]() For a line and arrow, select a width, compound type (double or triple lines), dash type, cap type—end of line style (square, round, or flat end), or join type—style used to connect two lines together (round, bevel, or miter).
For a line and arrow, select a width, compound type (double or triple lines), dash type, cap type—end of line style (square, round, or flat end), or join type—style used to connect two lines together (round, bevel, or miter).
![]() For an arrow, select a begin type, end type, begin size, and end size.
For an arrow, select a begin type, end type, begin size, and end size.
![]() Click Close.
Click Close.
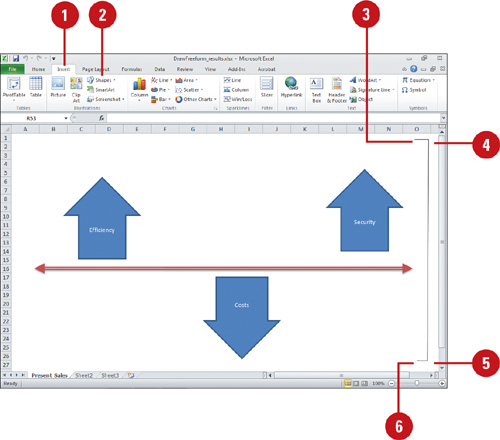
Creating and Editing Freeforms
When you need to create a customized shape, use the Excel freeform tools. Choose a freeform tool from the Lines category in the list of shapes. Freeforms are like the drawings you make with a pen and paper, except that you use a mouse for your pen and a worksheet for your paper. A freeform shape can either be an open curve or a closed curve. You can edit a freeform by using the Edit Points command to alter the vertices that create the shape.
Draw a Freeform Polygon
![]() Click the Insert tab.
Click the Insert tab.
![]() Click the Shapes button and then Freeform in the Shapes gallery under Lines.
Click the Shapes button and then Freeform in the Shapes gallery under Lines.
![]() Click the worksheet where you want to place the first vertex of the polygon.
Click the worksheet where you want to place the first vertex of the polygon.
![]() Move the pointer, and then click to place the second point of the polygon. A line joins the two points.
Move the pointer, and then click to place the second point of the polygon. A line joins the two points.
![]() To draw a line with curves, drag a line instead of clicking in steps 3 and 4.
To draw a line with curves, drag a line instead of clicking in steps 3 and 4.
![]() Continue moving the mouse pointer and clicking to create additional sides of your polygon.
Continue moving the mouse pointer and clicking to create additional sides of your polygon.
![]() Finish the polygon. For a closed polygon, click near the starting point. For an open polygon, double-click the last point in the polygon.
Finish the polygon. For a closed polygon, click near the starting point. For an open polygon, double-click the last point in the polygon.
Copying and Moving Objects
After you create a drawing object, you can copy or move it. Use the mouse to quickly move objects, or if you want precise control over the object’s new position, use Excel’s Size and Position dialog box to specify the location of the drawing object. You can copy a selected one or more objects to the Office Clipboard and then paste them in other parts of the current workbook or another existing workbook, or Office document. You can paste these items, either individually or all at once.
Copy or Move an Object in One Step
![]() Hold down the Ctrl key, and then drag the object to copy it, or simply drag the object to move it.
Hold down the Ctrl key, and then drag the object to copy it, or simply drag the object to move it.
Make sure you aren’t dragging a sizing handle or adjustment handle. If you are working with a freeform and you are in Edit Points mode, drag the interior of the object, not the border, or you will end up resizing or reshaping the object, not moving it.

Copy or Move an Object
![]() Select the objects you want to copy or move.
Select the objects you want to copy or move.
![]() Click the Home tab.
Click the Home tab.
![]() Click the Copy button (to copy) or click the Cut button (to move).
Click the Copy button (to copy) or click the Cut button (to move).
![]() Display the worksheet on which you want to paste the object.
Display the worksheet on which you want to paste the object.
![]() Use one of the following methods:
Use one of the following methods:
![]() Click the Paste button, or click the Paste button arrow, point to an option to display a live preview (New!), and then click an option to paste it.
Click the Paste button, or click the Paste button arrow, point to an option to display a live preview (New!), and then click an option to paste it.
![]() Click the Clipboard Dialog Box Launcher, and then click an item to paste it.
Click the Clipboard Dialog Box Launcher, and then click an item to paste it.

Adding a Quick Style to a Shape
Instead of changing individual attributes of a shape—such as shape fill, shape outline, and shape effects—you can quickly add them all at once with the Shape Quick Style gallery. The Shape Quick Style gallery provides a variety of different formatting combinations. To quickly see if you like a Shape Quick Style, point to a thumbnail in the gallery to display a live preview of it in the selected shape. If you like it, you can apply it.
Add a Quick Style to a Shape
![]() Select the shapes you want to modify.
Select the shapes you want to modify.
![]() Click the Format tab under Drawing Tools.
Click the Format tab under Drawing Tools.
![]() Click the scroll up or down arrow, or click the More list arrow in the Shapes Styles group to see additional styles.
Click the scroll up or down arrow, or click the More list arrow in the Shapes Styles group to see additional styles.
The current style appears highlighted in the gallery.
![]() Point to a style.
Point to a style.
A live preview of the style appears in the current shape.
![]() Click the style you want from the gallery to apply it to the selected shape.
Click the style you want from the gallery to apply it to the selected shape.
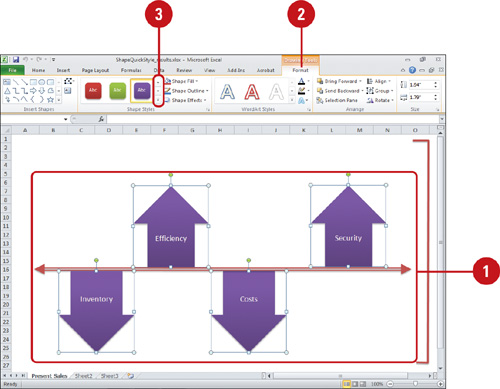

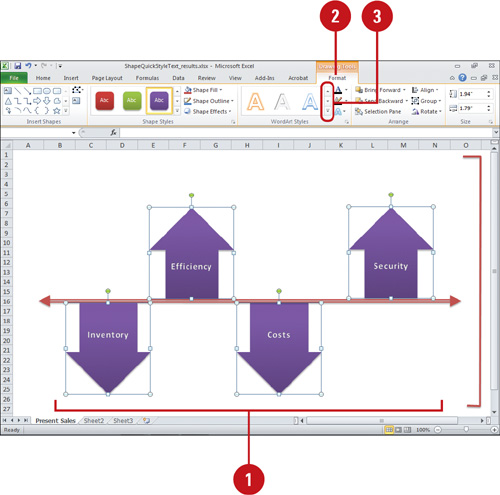
Adding a Quick Style to Shape Text
Instead of changing individual attributes of text in a shape, such as text fill, text outline, and text effects, you can quickly add them all at once with the WordArt Quick Style gallery. The WordArt Quick Style gallery provides a variety of different formatting combinations. To quickly see if you like a WordArt Quick Style, point to a thumbnail in the gallery to display a live preview of it in the selected shape. If you like it, you can apply it.
Add a Quick Style to Shape Text
![]() Select the shapes with the text you want to modify.
Select the shapes with the text you want to modify.
![]() Click the Format tab under Drawing Tools.
Click the Format tab under Drawing Tools.
![]() Click the scroll up or down arrow, or click the More list arrow in the WordArt Styles group to see additional styles.
Click the scroll up or down arrow, or click the More list arrow in the WordArt Styles group to see additional styles.
The current style appears highlighted in the gallery.
![]() Point to a style.
Point to a style.
A live preview of the style appears in the current shape text.
![]() Click the style you want from the gallery to apply it to the selected shape.
Click the style you want from the gallery to apply it to the selected shape.

Applying Color Fills
When you create a closed drawing object such as a square, it applies the Shape Fill color to the inside of the shape, and the Shape Outline color to the edge of the shape. A line drawing object uses the Shape Outline color. You can set the Shape Fill to be a solid, gradient, texture or picture, and the Shape Outline can be a solid or gradient. If you want to make multiple changes to a shape at the same time, the Format Shape dialog box allows you to do everything in one place. If the solid color appears too dark, you can make the color fill more transparent. If you no longer want to apply a shape fill to an object, you can remove it.
Apply a Color Fill to a Shape
![]() Select the shape you want to modify.
Select the shape you want to modify.
![]() Click the Format tab under Drawing Tools.
Click the Format tab under Drawing Tools.
![]() Click the Shape Fill button.
Click the Shape Fill button.
![]() Select the fill color option you want.
Select the fill color option you want.
![]() To remove a color fill, click the Shape Fill button, and then click No Fill.
To remove a color fill, click the Shape Fill button, and then click No Fill.

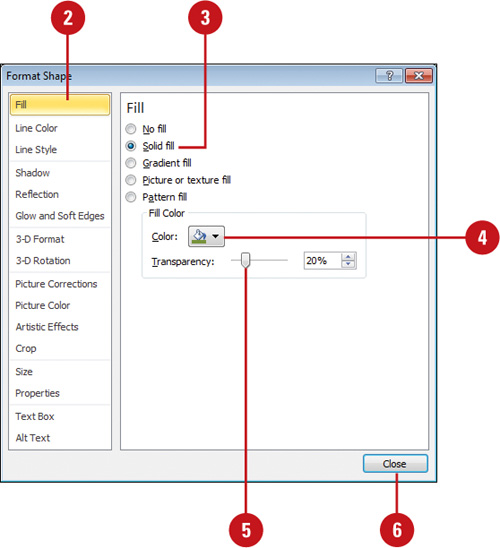
Apply a Shape Color Fill with a Transparency
![]() Right-click the shape you want to modify, and then click Format Shape or Format AutoShape.
Right-click the shape you want to modify, and then click Format Shape or Format AutoShape.
![]() In the left pane, click Fill.
In the left pane, click Fill.
![]() Click the Solid fill option.
Click the Solid fill option.
![]() Click the Color button, and then select the fill color you want.
Click the Color button, and then select the fill color you want.
![]() Drag the Transparency slider or enter a number from 0 (fully opaque) to 100 (fully transparent).
Drag the Transparency slider or enter a number from 0 (fully opaque) to 100 (fully transparent).
All your changes are instantly applied to the shape.
![]() Click Close.
Click Close.
TROUBLE? To cancel changes, click the Undo button on the Quick Access Toolbar.
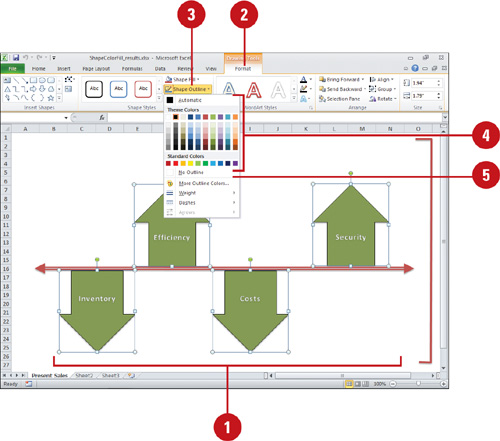
Apply a Color Outline to a Shape
![]() Select the shape you want to modify.
Select the shape you want to modify.
![]() Click the Format tab under Drawing Tools.
Click the Format tab under Drawing Tools.
![]() Click the Shape Outline button.
Click the Shape Outline button.
![]() Select the outline color you want.
Select the outline color you want.
![]() To remove an outline color, click the Shape Outline button, and then click No Outline.
To remove an outline color, click the Shape Outline button, and then click No Outline.
Applying Picture Fills
Applying a shape fill to a drawing object can add emphasis or create a point of interest in your workbook. You can insert a picture or clip art into a shape. You can insert a picture from a file or clip art from the Clip Art task pane, or paste one in from the Office Clipboard. Stretch a picture to fit across the selected shape or repeatedly tile the same picture horizontally and vertically to fill the shape. When you stretch a picture, you can also set offsets, which determine how much to scale a picture to fit a shape relative to the edges. A positive offset number moves the picture edge toward the center of the shape, while a negative offset number moves the picture edge away from the shape. If the picture appears too dark, you can make the picture more transparent.
Apply a Picture Fill to a Shape
![]() Select the shape you want to modify.
Select the shape you want to modify.
![]() Click the Format tab under Drawing Tools.
Click the Format tab under Drawing Tools.
![]() Click the Shape Fill button, and then click Picture.
Click the Shape Fill button, and then click Picture.
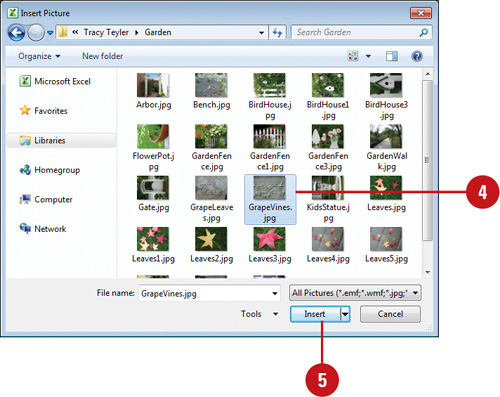
![]() Locate and select a picture file you want.
Locate and select a picture file you want.
![]() Click Insert.
Click Insert.

Applying Texture Fills
You can quickly apply a texture fill to a shape by using the Texture gallery or using the Format Shape dialog box to select custom options. Stretch a texture to fit across the selected shape or repeatedly tile the texture horizontally and vertically to fill the shape. If you tile a texture, you can also set offset, scale, alignment, and mirror options to determine the appearance of the texture in the selected shape. The offset x and y options determine how much to scale a texture to fit a shape relative to the edges, while scale x and y options determine horizontal and vertical scaling. If you want to play with the tile look, you can change the mirror type to determine whether the alternating tiles display a mirror or flip image with every other tile. If the texture doesn’t provide enough contrast in the shape, you can make the texture more transparent.
Apply a Texture Fill to a Shape
![]() Select the shape you want to modify.
Select the shape you want to modify.
![]() Click the Format tab under Drawing Tools.
Click the Format tab under Drawing Tools.
![]() Click the Shape Fill button.
Click the Shape Fill button.
![]() Point to Texture, and then select a texture from the gallery.
Point to Texture, and then select a texture from the gallery.

Applying Gradient Fills
Gradients are made up of two or more colors that gradually fade into each other. They can be used to give depth to a shape or create realistic shadows. Apply a gradient fill to a shape—now including lines—by using a gallery or presets for quick results, or by using the Format Shape dialog box for custom results. A gradient is made up of several gradient stops, which are used to create non-linear gradients. If you want to create a gradient that starts blue and goes to green, add two gradient stops, one for each color. Gradient stops consist of a position, a color, brightness (New!), and a transparency percentage.
Apply a Gradient Fill to a Shape
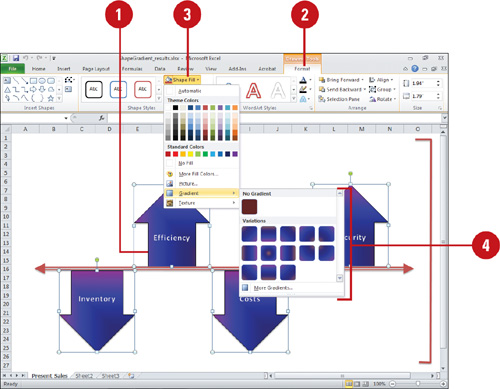
![]() Select the shape you want to modify.
Select the shape you want to modify.
![]() Click the Format tab under Drawing Tools.
Click the Format tab under Drawing Tools.
![]() Click the Shape Fill button.
Click the Shape Fill button.
![]() Point to Gradient, and then select a gradient from the gallery.
Point to Gradient, and then select a gradient from the gallery.
Four gradient modes are available: linear (parallel bands), radial (radiate from center), rectangle (radiate from corners), and path (radiate along path).
Apply a Gradient Fill with Presets
![]() Right-click the shape you want to modify, and then click Format Shape.
Right-click the shape you want to modify, and then click Format Shape.
![]() In the left pane, click Fill.
In the left pane, click Fill.
![]() Click the Gradient fill option.
Click the Gradient fill option.
![]() Click the Preset colors button arrow, and then select the built-in gradient fill you want.
Click the Preset colors button arrow, and then select the built-in gradient fill you want.
All your changes are instantly applied to the shape.
![]() Click Close.
Click Close.

Apply a Custom Gradient Fill
![]() Right-click the shape you want to modify, and then click Format Shape.
Right-click the shape you want to modify, and then click Format Shape.
![]() In the left pane, click Fill.
In the left pane, click Fill.
![]() Click the Gradient fill option.
Click the Gradient fill option.
![]() Click the Preset colors button arrow, and then select the built-in gradient fill you want.
Click the Preset colors button arrow, and then select the built-in gradient fill you want.
![]() Click the Type list arrow, and then select a gradient direction.
Click the Type list arrow, and then select a gradient direction.
![]() Click the Direction list arrow, and then select a shading progression; options vary depending on the gradient type.
Click the Direction list arrow, and then select a shading progression; options vary depending on the gradient type.
![]() If you selected the Linear type, specify the angle (in degrees) the gradient is rotated in the shape.
If you selected the Linear type, specify the angle (in degrees) the gradient is rotated in the shape.
![]() Specify the following tiling options:
Specify the following tiling options:
![]() Add. Click the Add button, and then set the gradient stop options you want.
Add. Click the Add button, and then set the gradient stop options you want.
![]() Remove. Select a gradient stop, and then click the Remove button.
Remove. Select a gradient stop, and then click the Remove button.
![]() Position. Specify a location for the color and transparency change in the gradient fill.
Position. Specify a location for the color and transparency change in the gradient fill.
![]() Color. Click the Color button, and then select a color for the gradient stop.
Color. Click the Color button, and then select a color for the gradient stop.
![]() Brightness. Drag the slider to adjust the brightness color contrast (New!).
Brightness. Drag the slider to adjust the brightness color contrast (New!).
![]() Transparency. Drag the slider or enter a number from 0 (fully opaque) to 100 (full transparent) for the selected stop position.
Transparency. Drag the slider or enter a number from 0 (fully opaque) to 100 (full transparent) for the selected stop position.
![]() Select the Rotate with shape check box to rotate the gradient with the shape’s rotation.
Select the Rotate with shape check box to rotate the gradient with the shape’s rotation.
All your changes are instantly applied to the shape.
![]() Click Close.
Click Close.


Applying Shape Effects
You can change the look of a shape by applying effects, like shadows, reflections, glow, soft edges, bevels, and 3-D rotations. Apply effects to a shape by using the Shape Effects gallery for quick results, or by using the Format Shape dialog box for custom results. From the Shape Effects gallery you can apply a built-in combination of 3-D effects or individual effects to a shape. To quickly see if you like a shape effect, point to a thumbnail in the Shape Effects gallery to display a live preview of it in the selected shape. If you like it, you can apply it. If you no longer want to apply a shape effect to an object, you can remove it. Simply select the shape, point to the effect type in the Shape Effects gallery, and then select the No effect type option.
Add a Preset Effect to a Shape
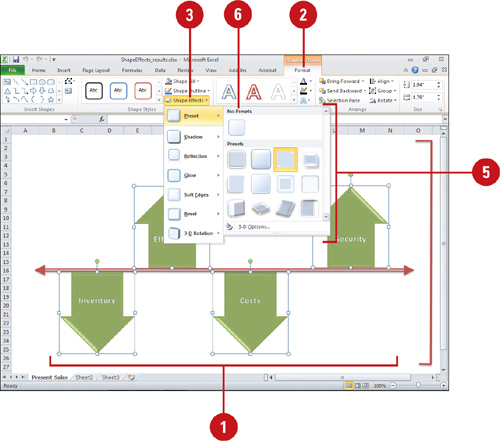
![]() Select the shape you want to modify.
Select the shape you want to modify.
![]() Click the Format tab under Drawing Tools.
Click the Format tab under Drawing Tools.
![]() Click the Shape Effects button, and then point to Preset.
Click the Shape Effects button, and then point to Preset.
The current effect appears highlighted in the gallery.
![]() Point to an effect.
Point to an effect.
A live preview of the style appears in the current shape.
![]() Click the effect you want from the gallery to apply it to the selected shape.
Click the effect you want from the gallery to apply it to the selected shape.
![]() To remove the preset effect, click the Shape Effects button, point to Preset, and then click No Presets.
To remove the preset effect, click the Shape Effects button, point to Preset, and then click No Presets.
Add Individual Effects to a Shape
![]() Select the shape you want to modify.
Select the shape you want to modify.
![]() Click the Format tab under Drawing Tools.
Click the Format tab under Drawing Tools.
![]() For Word, use the Shadow Effects and 3D Effects buttons.
For Word, use the Shadow Effects and 3D Effects buttons.
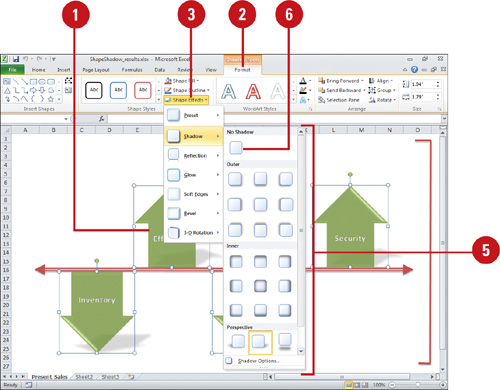
![]() Click the Shape Effects button, and then point to one of the following:
Click the Shape Effects button, and then point to one of the following:
![]() Shadow to select No Shadow, one of the shadow types (Outer, Inner, or Perspective), or More Shadows.
Shadow to select No Shadow, one of the shadow types (Outer, Inner, or Perspective), or More Shadows.
![]() Reflection to select No Reflection or one of the Reflection Variations.
Reflection to select No Reflection or one of the Reflection Variations.
![]() Glow to select No Glow, one of the Glow Variations, or More Glow Colors.
Glow to select No Glow, one of the Glow Variations, or More Glow Colors.
![]() Soft Edges to select No Soft Edges, or a point size to determine the soft edge amount.
Soft Edges to select No Soft Edges, or a point size to determine the soft edge amount.
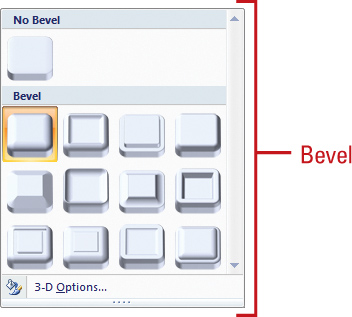
![]() Bevel to select No Bevel, one of the bevel variations, or More 3-D Settings.
Bevel to select No Bevel, one of the bevel variations, or More 3-D Settings.
![]() 3-D Rotation to select No Rotation, one of the rotation types (Parallel, Perspective, or Oblique), or More 3-D Settings.
3-D Rotation to select No Rotation, one of the rotation types (Parallel, Perspective, or Oblique), or More 3-D Settings.
When you point to an effect, a live preview of the style appears in the current shape.
![]() Click the effect you want from the gallery to apply it to the selected shape.
Click the effect you want from the gallery to apply it to the selected shape.


Adding 3-D Effects to a Shape
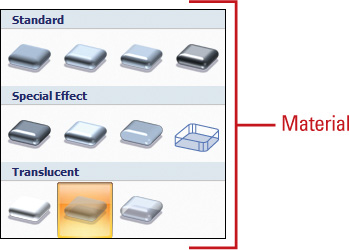
You can add the illusion of depth to your worksheets by adding a 3-D effect to a shape. Create a 3-D effect by using one of the preset 3-D styles, or use the 3-D format tools to customize your own 3-D style. The settings you can control with the customization tools include the bevel (a 3-D top or bottom edge effect), the shape depth (distance of shape from its surface), the contour (raised border), the surface material and lighting. You can apply interesting surfaces—matte, plastic, metal, wire frame, soft or dark edges, flat, translucent, and clear—to a 3-D shape. In addition, you can change the type of lighting—neutral, warm, cool, flat, glow, and bright room—applied to a 3-D shape. Each lighting type defines one or more lights that illuminate a 3-D scene, not just for the shape. Each light contains a position, intensity, and color.
Add a 3-D Effect to a Shape
![]() Select the shape you want to modify.
Select the shape you want to modify.
![]() Click the Format tab under Drawing Tools.
Click the Format tab under Drawing Tools.
![]() Click the Shape Effects button, and then point to Preset or Bevel.
Click the Shape Effects button, and then point to Preset or Bevel.
The current effect appears highlighted in the gallery.
![]() Point to an effect.
Point to an effect.
A live preview of the style appears in the current shape.
![]() Click the effect you want from the gallery to apply it to the selected shape.
Click the effect you want from the gallery to apply it to the selected shape.
![]() To remove the 3-D effect, click the Shape Effects button, point to Preset or Bevel, and then click No Preset or No Bevel.
To remove the 3-D effect, click the Shape Effects button, point to Preset or Bevel, and then click No Preset or No Bevel.

Add a Custom 3-D Effect to a Shape
![]() Select the shape you want to modify.
Select the shape you want to modify.
![]() Click the Format tab under Drawing Tools.
Click the Format tab under Drawing Tools.
![]() Click the Shape Effects button, point to Preset or Bevel, and then click 3-D Options.
Click the Shape Effects button, point to Preset or Bevel, and then click 3-D Options.
![]() Specify the following custom options:
Specify the following custom options:
![]() Bevel. Click Top or Bottom to apply a raised edge to the top or bottom of a shape. The corresponding width and height numbers appear.
Bevel. Click Top or Bottom to apply a raised edge to the top or bottom of a shape. The corresponding width and height numbers appear.
![]() Depth. Click the Color button to select a depth color, and then enter a depth number.
Depth. Click the Color button to select a depth color, and then enter a depth number.
![]() Contour. Click the Color button to select a contour color, and then enter a size.
Contour. Click the Color button to select a contour color, and then enter a size.
![]() Surface. Click Material to select a surface, and then click Lighting to specify the way light illuminates the 3-D shape.
Surface. Click Material to select a surface, and then click Lighting to specify the way light illuminates the 3-D shape.
To rotate all of the lights around the front face of a shape, enter an angle.
All your changes are instantly applied to the shape.
![]() To remove 3-D formatting and restore default setting, click Reset.
To remove 3-D formatting and restore default setting, click Reset.
![]() Click Close.
Click Close.


Adding 3-D Rotation Effects to a Shape
After you create a 3-D or even a 2-D shape, you can use 3-D rotation options to change the orientation and perspective of the shape. You can also create a 3-D rotation effect using one of the preset 3-D rotation styles, or you can use the 3-D rotation tools to create your own 3-D effect. The settings control with the customization tools include the 3-D rotation (x, y, and z axis), text rotation, and object position (distance from ground).
Add a 3-D Rotation Effect to a Shape
![]() Select the shape you want to modify.
Select the shape you want to modify.
![]() Click the Format tab under Drawing Tools.
Click the Format tab under Drawing Tools.
![]() Click the Shape Effects button, and then point to 3-D Rotation.
Click the Shape Effects button, and then point to 3-D Rotation.
The current effect appears highlighted in the gallery.
![]() Point to an effect.
Point to an effect.
A live preview of the style appears in the current shape.
![]() Click the effect you want from the gallery to apply it to the selected shape.
Click the effect you want from the gallery to apply it to the selected shape.
![]() To remove the 3-D rotation effect, click the Shape Effects button, point to 3-D Rotation, and then click No Rotation.
To remove the 3-D rotation effect, click the Shape Effects button, point to 3-D Rotation, and then click No Rotation.

Creating Shadows
You can give objects on your worksheets the illusion of depth by adding shadows. Excel provides several preset shadowing options, or you can create your own by specifying color, transparency, size, blur, angle, and distance. You can change all these shadow options at the same time in the Format Shape dialog box. Instead of starting from scratch, you can select a preset shadow in the Format Shape dialog box, and then customize it.
Add a Preset Shadow to a Shape
![]() Select the shape you want to modify.
Select the shape you want to modify.
![]() Click the Format tab under Drawing Tools.
Click the Format tab under Drawing Tools.
![]() Click the Shape Effects button, and then point to Shadow.
Click the Shape Effects button, and then point to Shadow.
The current effect appears highlighted in the gallery.
![]() Point to an effect.
Point to an effect.
A live preview of the style appears in the current shape.
![]() Click the effect you want from the gallery to apply it to the selected shape.
Click the effect you want from the gallery to apply it to the selected shape.
![]() To remove the shadow, click the Shape Effects button, point to Shadow, and then click No Shadow.
To remove the shadow, click the Shape Effects button, point to Shadow, and then click No Shadow.
Aligning and Distributing Objects
In addition to using grids and guides to align objects to a specific point, you can align a group of objects to each other. The Align commands make it easy to align two or more objects relative to each other vertically to the left, center, or right, or horizontally from the top, middle, or bottom. To evenly align several objects to each other across the worksheet, either horizontally or vertically, select them and then choose a distribution option. Before you select an align command, specify how you want Excel to align the objects. You can align the objects in relation to the worksheet or to the selected objects.
Distribute Objects
![]() Select the objects you want to distribute.
Select the objects you want to distribute.
![]() Click the Format tab under Drawing Tools.
Click the Format tab under Drawing Tools.
![]() Click the Align button.
Click the Align button.
![]() On the Align menu, click the alignment method you want.
On the Align menu, click the alignment method you want.
![]() Click Snap to Grid if you want the objects to align relative to the worksheet grid.
Click Snap to Grid if you want the objects to align relative to the worksheet grid.
![]() Click Snap to Shape if you want the objects to align relative to each other.
Click Snap to Shape if you want the objects to align relative to each other.
![]() On the Align submenu, click the distribution command you want.
On the Align submenu, click the distribution command you want.
![]() Click Distribute Horizontally to evenly distribute the objects horizontally.
Click Distribute Horizontally to evenly distribute the objects horizontally.
![]() Click Distribute Vertically to evenly distribute the objects vertically.
Click Distribute Vertically to evenly distribute the objects vertically.

Align Objects with Other Objects
![]() Select the objects you want to align.
Select the objects you want to align.
![]() Click the Format tab under Drawing Tools.
Click the Format tab under Drawing Tools.
![]() Click the Align button.
Click the Align button.
![]() On the Align menu, click the alignment method you want.
On the Align menu, click the alignment method you want.
![]() Click Snap to Grid if you want the objects to align relative to the worksheet grid.
Click Snap to Grid if you want the objects to align relative to the worksheet grid.
![]() Click Snap to Shape if you want the objects to align relative to each other.
Click Snap to Shape if you want the objects to align relative to each other.
![]() On the Align menu, click the alignment command you want.
On the Align menu, click the alignment command you want.
![]() Click Align Left to line up the objects with the left edge of the selection or worksheet.
Click Align Left to line up the objects with the left edge of the selection or worksheet.
![]() Click Align Center to line up the objects with the center of the selection or worksheet.
Click Align Center to line up the objects with the center of the selection or worksheet.
![]() Click Align Right to line up the objects with the right edge of the selection or worksheet.
Click Align Right to line up the objects with the right edge of the selection or worksheet.
![]() Click Align Top to line up the objects with the top edge of the selection or worksheet.
Click Align Top to line up the objects with the top edge of the selection or worksheet.
![]() Click Align Middle to line up the objects vertically with the middle of the selection or worksheet.
Click Align Middle to line up the objects vertically with the middle of the selection or worksheet.
![]() Click Align Bottom to line up the objects with the bottom of the selection or worksheet.
Click Align Bottom to line up the objects with the bottom of the selection or worksheet.


Connecting Shapes
Excel makes it easy to draw and modify flow charts and diagrams. Flow charts and diagrams consist of shapes connected together to indicate a sequence of events. With Excel, you can join two objects with a connecting line. There are three types of connector lines: straight, elbow, and curved. Once two objects are joined, the connecting line moves when you move either object. The connecting line touches special connection points on the objects. When you position the pointer over an object, small red handles, known as connection sites, appear, and the pointer changes to a small box, called the connection pointer. You can drag a connection end point to another connection point to change the line or drag the adjustment handle (yellow diamond) to change the shape of the connection line. After you’re done connecting shapes, you can format connector lines in the same way you format others lines in Excel, including the use of Shape Quick Styles.
Connect Two Objects
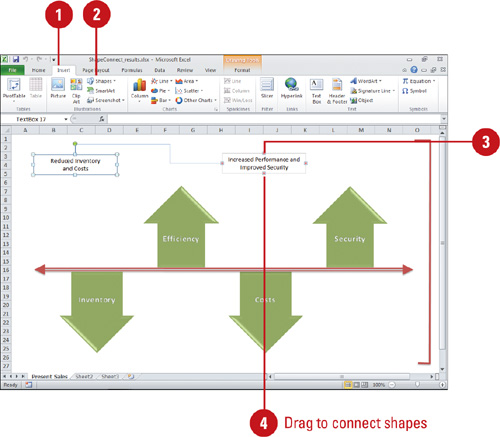
![]() Click the Insert tab.
Click the Insert tab.
![]() Click the Shapes button, and then click a connector (located in the Lines category) in the Shapes gallery.
Click the Shapes button, and then click a connector (located in the Lines category) in the Shapes gallery.
![]() To draw multiple connector lines, right-click the connector in the Shapes gallery, and then click Lock Drawing Mode.
To draw multiple connector lines, right-click the connector in the Shapes gallery, and then click Lock Drawing Mode.
TIMESAVER In the Shapes gallery, point to shapes in the Lines category to display ScreenTips to locate a connector.
![]() Position the pointer over an object handle (turns red).
Position the pointer over an object handle (turns red).
![]() Drag the connector to the object handle (turns red) on another object.
Drag the connector to the object handle (turns red) on another object.
TIMESAVER To constrain the line at 15-degree angles from its starting point, hold down Shift while you drag.
An attached connector point appears as red circles, while an unattached connector point appears as light blue (almost transparent).
Selecting Objects Using the Selection Pane
Sometimes it’s hard to select an object when it is behind another one. With the Selection task pane, you can now select individual objects and change their order and visibility. When you open the Selection task pane, Excel lists each shape on the current document by name (in terms of object type). You can click a shape title to select a “hard-to-select” object on the document, use the Re-order buttons to change the stacking order on the document, or click the eye icon next to a shape title to show or hide “hard-to-see” individual objects.
Select Objects Using the Selection Pane
![]() Display the documents with the objects you want to select.
Display the documents with the objects you want to select.
![]() Click the Format tab under Drawing or Picture Tools.
Click the Format tab under Drawing or Picture Tools.
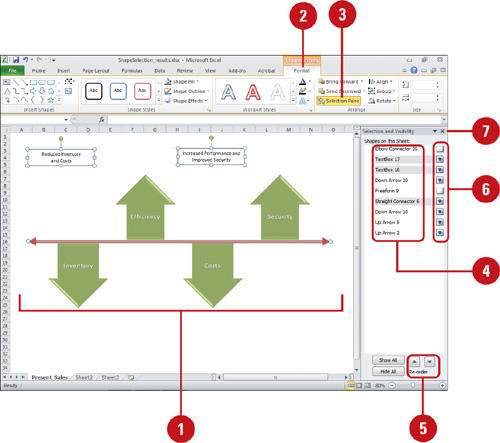
![]() Click the Selection Pane button.
Click the Selection Pane button.
Titles for all the shapes on the current document appear in the task pane.
![]() To select an object, click the title in the task pane.
To select an object, click the title in the task pane.
To select more than one object, hold down the Ctrl key while you click object titles.
![]() To change the order of the objects, select an object, and then click the Re-order Move Up or Move Down buttons in the task pane.
To change the order of the objects, select an object, and then click the Re-order Move Up or Move Down buttons in the task pane.
![]() To show or hide individual objects, click the eye icon in the task pane.
To show or hide individual objects, click the eye icon in the task pane.
![]() When you’re done, click the Close button on the task pane.
When you’re done, click the Close button on the task pane.
Changing Stacking Order
Multiple objects on a worksheet appear in a stacking order, like layers of transparencies. Stacking is the placement of objects one on top of another. In other words, the first object that you draw is on the bottom and the last object that you draw is on top. You can change the order of this stack of objects by using Bring to Front, Send to Back, Bring Forward, and Send Backward commands on the Format tab under Drawing or Picture Tools.
Arrange a Stack of Objects
![]() Select the objects you want to arrange.
Select the objects you want to arrange.
![]() Click the Format tab under Drawing or Picture Tools.
Click the Format tab under Drawing or Picture Tools.
![]() Click the stacking option you want.
Click the stacking option you want.
![]() Click the Bring to Front button arrow, and then click Bring to Front or Bring Forward to move a drawing to the top of the stack or up one location in the stack.
Click the Bring to Front button arrow, and then click Bring to Front or Bring Forward to move a drawing to the top of the stack or up one location in the stack.
![]() Click the Send to Back button arrow, and then click Send to Back or Send Backward to move a drawing to the bottom of the stack or back one location in the stack.
Click the Send to Back button arrow, and then click Send to Back or Send Backward to move a drawing to the bottom of the stack or back one location in the stack.

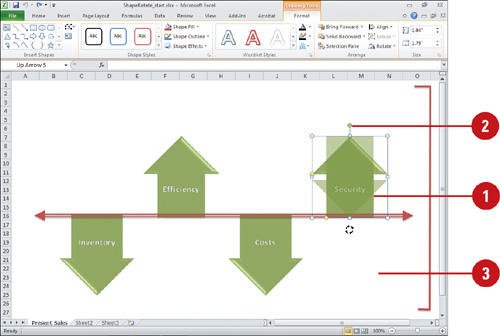
Rotating and Flipping a Shape
After you create an object, you can change its orientation on the worksheet by rotating or flipping it. Rotating turns an object 90 degrees to the right or left; flipping turns an object 180 degrees horizontally or vertically. For a more freeform rotation, which you cannot achieve in 90 or 180 degree increments, drag the green rotate lever at the top of an object. You can also rotate and flip any type of picture-including bitmaps—in a workbook. This is useful when you want to change the orientation of an object or image, such as changing the direction of an arrow.
Rotate an Object to any Angle
![]() Select the object you want to rotate.
Select the object you want to rotate.
![]() Position the pointer (which changes to the Free Rotate pointer) over the green rotate lever at the top of the object, and then drag to rotate the object.
Position the pointer (which changes to the Free Rotate pointer) over the green rotate lever at the top of the object, and then drag to rotate the object.
![]() Click outside the object to set the rotation.
Click outside the object to set the rotation.
Rotate or Flip an Object Using Preset Increments
![]() Select the object you want to rotate or flip.
Select the object you want to rotate or flip.
![]() Click the Format tab under Drawing or Picture Tools.
Click the Format tab under Drawing or Picture Tools.
![]() Click the Rotate button, and then click the option you want.
Click the Rotate button, and then click the option you want.
![]() Rotate. Click Rotate Right 90° or Rotate Left 90°.
Rotate. Click Rotate Right 90° or Rotate Left 90°.
![]() Flip. Click Flip Vertical or Flip Horizontal.
Flip. Click Flip Vertical or Flip Horizontal.

Grouping and Ungrouping Shapes
Objects can be grouped, ungrouped, and regrouped to make editing and moving them easier. Rather than moving several objects one at a time, you can group the objects and move them all together. Grouped objects appear as one object, but each object in the group maintains its individual attributes. You can change an individual object within a group without ungrouping. This is useful when you need to make only a small change to a group, such as changing the color of a single shape in the group. You can also format specific shapes, drawings, or pictures within a group without ungrouping. Simply select the object within the group, change the object or edit text within the object, and then deselect the object. However, if you need to move an object in a group, you need to first ungroup the objects, move it, and then group the objects together again. After you ungroup a set of objects, Excel remembers each object in the group and regroups those objects in one step when you use the Regroup command. Before you regroup a set of objects, make sure that at least one of the grouped objects is selected.
Group Objects Together
![]() Select the objects you want to group together.
Select the objects you want to group together.
![]() Click the Format tab under Drawing or Picture Tools.
Click the Format tab under Drawing or Picture Tools.
![]() Click the Group button, and then click Group.
Click the Group button, and then click Group.

Ungroup a Drawing
![]() Select the grouped object you want to ungroup.
Select the grouped object you want to ungroup.
![]() Click the Format tab under Drawing or Picture Tools.
Click the Format tab under Drawing or Picture Tools.
![]() Click the Group button, and then click Ungroup.
Click the Group button, and then click Ungroup.

Regroup a Drawing
![]() Select one of the objects in the group of objects you want to regroup.
Select one of the objects in the group of objects you want to regroup.
![]() Click the Format tab under Drawing or Picture Tools.
Click the Format tab under Drawing or Picture Tools.
![]() Click the Group button, and then click Regroup.
Click the Group button, and then click Regroup.

Adding a Shape to the Clip Organizer
After spending time creating an object, you might want to save it for use in future workbooks. You can add any object you create to the Microsoft Clip Organizer—an organized collection of clip art, pictures, videos, and sounds that comes with Excel. You can also find a picture in the Clip Organizer and use it as the basis for the logo for your home business. For example, you could use the basket of bread image for a home bakery.
Add Your Own Shape to the Clip Organizer
![]() Select the shape you want to add to the Clip Organizer.
Select the shape you want to add to the Clip Organizer.
![]() Click the Copy button on the Home tab.
Click the Copy button on the Home tab.
![]() Click the Start button, point to All Programs, click Microsoft Office, click Microsoft Office 2010 Tools, and then click Microsoft Clip Organizer.
Click the Start button, point to All Programs, click Microsoft Office, click Microsoft Office 2010 Tools, and then click Microsoft Clip Organizer.
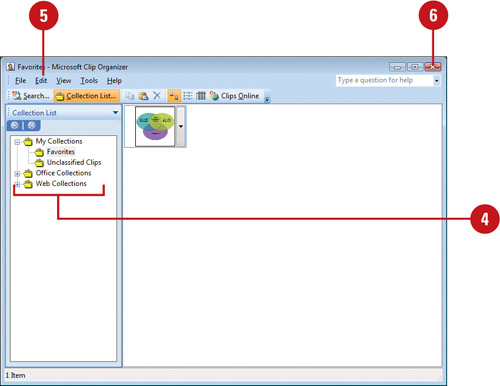
![]() In Clip Organizer, click the collection folder you want to add the clip to.
In Clip Organizer, click the collection folder you want to add the clip to.
![]() Click the Edit menu in the Clip Organizer, and then click Paste.
Click the Edit menu in the Clip Organizer, and then click Paste.
![]() Click the Close button to close the Microsoft Clip Organizer.
Click the Close button to close the Microsoft Clip Organizer.