17 Working Together on Office Documents
Introduction
Instead of storing and working on Office documents on your desktop, you can store them on the Web and work on them with an Office Web App. An Office Web App allows you to work with an Office document in a browser. The process of using the Web instead of a desktop as a base of operation is known as cloud computing.
Windows Live is a cloud computing Web site, where you can store and share information, such as contacts, e-mail (using hotmail), photos, and files. Windows Live is a free service provided by Microsoft, which is available at www.live.com with a Windows Live ID.
When you store an Office document on the Windows Live SkyDrive or on a Microsoft SharePoint server configured with Office Web Apps, you can view or edit the document in a browser using the same look and feel as an Office 2010 program. To make storing files on the SkyDrive quick and easy, Office 2010 programs provide a Save to Web command on the Save & Send screen on the File tab for you to save Office documents directly to a SkyDrive folder.
If you have access to a SharePoint server, you can save documents directly to the site from your Office program, in a similar way that you save documents on your hard disk. With Microsoft SharePoint Workspace, a program that comes along with your Office programs, you can create your own personal copy of a SharePoint server so you can access it whether or not you are connected to your network. In addition to SharePoint, you can also connect to a Groove workspace, or create a shared folder in Windows.
If you have a Windows Mobile 6.5 phone, you can use Office Mobile 2010 to work with your files from anywhere. If you have a touch screen device, you can intuitively scroll through menus and navigation documents.
Getting Started with Office Web Apps
Introduction
Any Office document that resides on Windows Live or a SharePoint server can be accessed from any computer that has an Internet connection and browser using an Office Web App (New!). Office Web Apps work in a variety of browsers, including Internet Explorer, Firefox, and Safari for the Macintosh, and are compatible with most operating systems. This means you can also view Office documents using other web-enabled devices, such as smart-phones or PDAs. An Office Web App provides a subset of the features in the desktop version. For example, in the Excel Web App, you can apply standard formatting, such as fonts, fills, and borders, but you can’t apply more sophisticated formatting, such as tables styles, cell styles, and conditional formatting.
You can use an Office Web App in your browser on Windows Live or a SharePoint server with Office Web Apps installed. Windows Live is a Web site with Office Web Apps already installed, where you can store and share information, such as contacts, e-mail (using hotmail), photos, and files. Windows Live provides drive space, called a SkyDrive, for you to store files and photos in a folder, just like your computer drive, where others with permission can access them using a browser.
Understanding File Compatibility
Before you get started working with Office Web Apps, it’s important to note that the Office Web Apps aren’t fully compatible with all types of Office documents. If you want to edit an Office document with an Office Web App, you need to use the Office Open XML file format. This includes the Office 2007 or Office 2010 or Windows or Office 2008 for Mac. If you want to view an Office document with an Office Web App, you need to use the Office 97 or later file format.
When you edit or view an Office document with an Office Web App, the file format doesn’t change or affect the content of the file. In other words, you can upload an Office file to the Web, make changes using an Office Web App, download the file back to your desktop, and then make changes to it using your desktop Office App without any problems. This is called roundtripping. Any unsupported features in the Office Web App doesn’t affect the Office file during a roundtrip.
Viewing the Office Web App Interface
Each Office Web App comes with a scaled-down version of the desktop Ribbon and Quick Access Toolbar. The Web Apps Ribbon typically comes with a File tab, Home tab, and Insert tab. Within each tab, you get a subset of commands on the desktop Ribbon. There are no contextual tabs in the Office Web Apps. The Quick Access Toolbar appears above the Ribbon and contains just the Undo and Redo buttons. The content area for each of the Office Web Apps is similar to the desktop version.
Preparing to Use Office Web Apps
Before you can use an Office Web App on the Web, you need a Web browser with the Microsoft Silverlight browser add-in and have access to a Windows Live account or SharePoint 2010 site user account.
Office Web Apps support the following browsers: Internet Explorer 7 and 8 or Firefox 3.5 running on Windows 7, Windows Vista, or Windows XP, and Firefox 3.5 or Safari 4 running on Mac OS X 10.4 or later. You can also use the iPhone’s Mobile Safari browser. If you use another browser, such as Google Chrome, it doesn’t mean you can’t use it with an Office Web App; it’s just not officially supported as of yet. Give it time.
Windows Live is a Web site, where you can store and share information, such as contacts, e-mail (using hotmail), photos, and files. Windows Live is a free service provided by Microsoft, which is available at www.live.com with a Windows Live ID.
You can improve the performance of the Office Web Apps by installing Microsoft Silverlight. This is a cross-platform browser add-in that takes some of the processing burden off the server and puts it locally on your browser and provides powerful tools and controls for developers of Web applications. The Silverlight add-in works on all supported browsers and the following operating systems: Windows 7, Windows Vista, Windows XP (Service Pack 2 or later), Windows 2000 (Service Pack 4 or later), Windows Server 208, Mac OS X 10.4.8 or later, Linux, FreeBSD, and Solaris OS.
Using Office Desktop and Web Apps
When you’re working in an Office Desktop App and want to save a document to your SkyDrive, you can use the Save to Web command on the Save & Send screen on the File tab to save Office documents directly to a SkyDrive folder using a Windows Live account. Once the Office documents are stored on the SkyDrive, or a Microsoft SharePoint server as another option, you can view or edit them in a browser using a Microsoft Office Web App, which is installed and provided by Windows Live.
An Office Web App provides a subset of the features in the desktop version. For example, in the Excel Web App, you can apply standard formatting, such as fonts, fills, and borders, but you can’t apply more sophisticated formatting, such as tables styles, cell styles, and conditional formatting.
When you’re working in an Office Web App, and want to switch to your desktop Office App, you can use the Open in Application button (such as Open in Excel) on the Home tab to close the document in the Office Web App and reopen it in the desktop version.
Setting Up to Use Office Web Apps
Before you can use an Office Web App on the Web in your browser, you need to create a Windows Live account. Windows Live is a Web site, where you can store and share information, such as contacts, e-mail (using hotmail), photos, and files. Windows Live is a free service provided by Microsoft, which is available at www.live.com with a Windows Live ID. If you already have a Hotmail, Messenger, or Xbox LIVE account, you already have a Windows Live ID. In addition to your browser, you can improve the performance of Office Web Apps by installing Microsoft Silverlight (New!). This is a cross-platform browser add-in that takes some of the processing burden off the server and puts it locally on your browser and provides powerful tools and controls for developers of Web applications.
Set Up a Windows Live Account
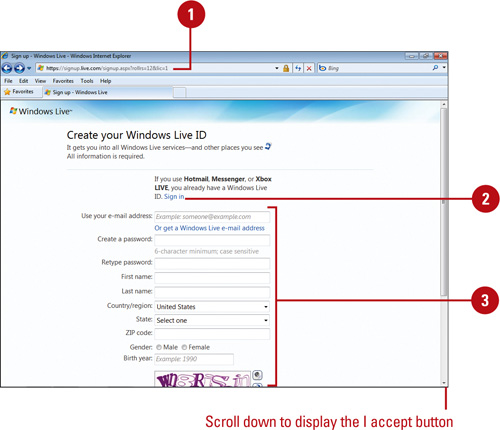
![]() Open your browser, and then go to https://signup.live.com.
Open your browser, and then go to https://signup.live.com.
![]() If you already have a Hotmail, Messenger, or Xbox LIVE account, click the Sign in link. You already have a Windows Live ID. Use your e-mail address, and password to complete the sign in.
If you already have a Hotmail, Messenger, or Xbox LIVE account, click the Sign in link. You already have a Windows Live ID. Use your e-mail address, and password to complete the sign in.
![]() Enter the information required for the Windows Live ID.
Enter the information required for the Windows Live ID.
![]() E-mail address. Use your own e-mail address or click the Or get a Windows Live e-mail address link to get a free e-mail address.
E-mail address. Use your own e-mail address or click the Or get a Windows Live e-mail address link to get a free e-mail address.
![]() Password. Enter a password with at least 6-characters; the password is case sensitive (meaning upper- and lower-case sensitive).
Password. Enter a password with at least 6-characters; the password is case sensitive (meaning upper- and lower-case sensitive).
![]() Personal Info. Enter your name, location, gender, and birth year.
Personal Info. Enter your name, location, gender, and birth year.
![]() Characters. Enter the characters in the preview box for security purposes.
Characters. Enter the characters in the preview box for security purposes.
![]() Click the I accept button.
Click the I accept button.
Windows Live creates an ID for you.
Sign in to Windows Live
![]() Open your browser, and go to www.live.com.
Open your browser, and go to www.live.com.
![]() Enter you Windows Live ID and password.
Enter you Windows Live ID and password.
![]() Select the Remember me and/or Remember my password check boxes to speed up sign in process in the future. However, it opens the door for others who have access to your computer to sign in.
Select the Remember me and/or Remember my password check boxes to speed up sign in process in the future. However, it opens the door for others who have access to your computer to sign in.
![]() Click Sign in.
Click Sign in.

Install Microsoft Silverlight
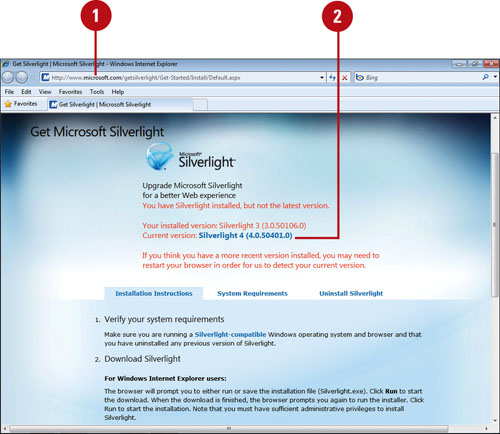
![]() Open your browser, and go to www.microsoft.com/silverlight/.
Open your browser, and go to www.microsoft.com/silverlight/.
![]() Click the Download Silverlight link, and then click any additional links to start the download and install for the browser plug-in.
Click the Download Silverlight link, and then click any additional links to start the download and install for the browser plug-in.
![]() Microsoft checks your computer to determine if Silverlight is installed, and if so, what version. It’s important to get the latest version.
Microsoft checks your computer to determine if Silverlight is installed, and if so, what version. It’s important to get the latest version.
![]() When prompted, run the installer; options vary depending on your browser.
When prompted, run the installer; options vary depending on your browser.
![]() Click Install now, and then step through the installation steps to complete the process; steps vary depending on your browser.
Click Install now, and then step through the installation steps to complete the process; steps vary depending on your browser.
![]() Upon completion, click Close, and then restart your browser.
Upon completion, click Close, and then restart your browser.
Saving and Opening Documents with Windows Live
Windows Live is a Web site, where you can store and share information, such as contacts, e-mail (using hotmail), photos, and files. Windows Live is a free service provided by Microsoft. Windows Live provides drive space, called a SkyDrive, for you to store files and photos in a folder, just like your computer drive, where others with permission can access them using a browser. To make storing files on the SkyDrive quick and easy, Office 2010 programs provide a Save to Web command on the Save & Send screen for you to save Office documents directly to a SkyDrive folder (New!) using a Windows Live account. Once the Office documents are stored on the SkyDrive, or a Microsoft SharePoint server as another option, you can view or edit them in a browser using a Microsoft Office Web App (New!), which is installed and provided by Windows Live.
Save an Office Document to Windows Live
![]() In an Office Desktop App, open the document you want to save to the Web.
In an Office Desktop App, open the document you want to save to the Web.
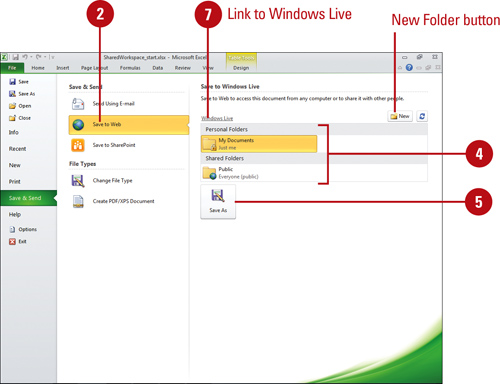
![]() Click the File tab, click Save & Send, and then click Save to Web.
Click the File tab, click Save & Send, and then click Save to Web.
![]() If necessary, click the Sign In button, enter your Windows Live ID e-mail address and password, and then click OK.
If necessary, click the Sign In button, enter your Windows Live ID e-mail address and password, and then click OK.
![]() Select a folder on the Windows Live Web site, either a personal or shared folder.
Select a folder on the Windows Live Web site, either a personal or shared folder.
![]() To create a new folder, click the New Folder button to open your browser to Windows Live, type a name, select a Share with location, click Next, and then complete the instructions.
To create a new folder, click the New Folder button to open your browser to Windows Live, type a name, select a Share with location, click Next, and then complete the instructions.
![]() Click the Save As button.
Click the Save As button.
![]() Use the default location, specify a name, and then click Save.
Use the default location, specify a name, and then click Save.
![]() To open Windows Live Web site, click the Windows Live link.
To open Windows Live Web site, click the Windows Live link.
Open an Office Document Directly from Windows Live
![]() In an Office Desktop App, click the File tab, and then click Open.
In an Office Desktop App, click the File tab, and then click Open.
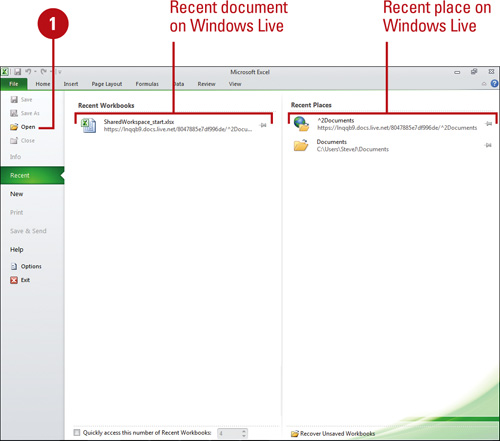
![]() To access a recently used file stored on Windows Live, click the File tab, click Recent, and then click the recent file or recent folder to open it.
To access a recently used file stored on Windows Live, click the File tab, click Recent, and then click the recent file or recent folder to open it.
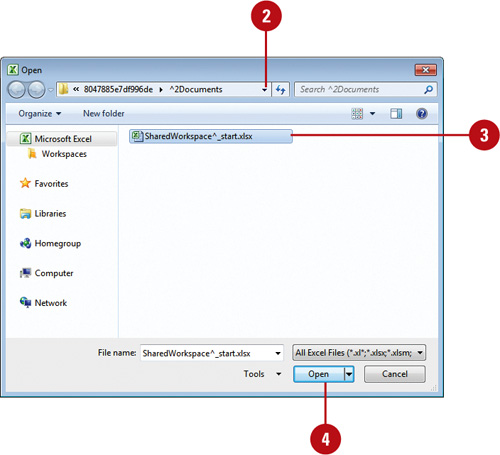
![]() Navigate to the Windows Live SkyDrive.
Navigate to the Windows Live SkyDrive.
![]() Select the file you want to open.
Select the file you want to open.
![]() Click Open.
Click Open.
![]() If necessary, enter your Windows Live ID e-mail address and password, and then click OK.
If necessary, enter your Windows Live ID e-mail address and password, and then click OK.
Comparing the Desktop App to Web App
Each Office Web App (New!) comes with a scaled-down version of the desktop Ribbon and Quick Access Toolbar. The Web Apps Ribbon typically comes with a File tab, Home tab, and Insert tab. Within each tab, you get a subset of commands on the desktop Ribbon.
There are no contextual tabs in the Office Web Apps. The Quick Access Toolbar appears above the Ribbon and contains just the Undo and Redo buttons. The content area for each of the Office Web Apps is similar to the desktop version.
Web App

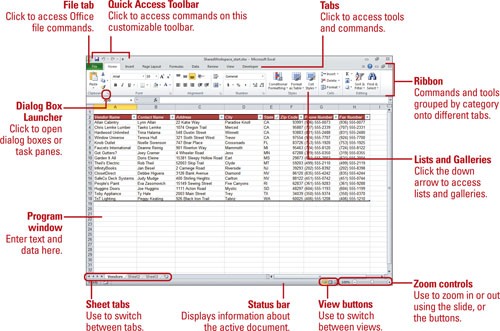
Desktop App
Accessing Documents on Windows Live
Any Office document that resides on Windows Live or a SharePoint server can be accessed from any computer that has an Internet connection. Office Web Apps (New!) work in a variety of browsers, including Internet Explorer, Firefox, and Safari for the Macintosh, and are compatible with most operating systems. This means you can also view Office documents using other web-enabled devices, such as smart-phones or PDAs. An Office Web App (New!) provides a subset of the features in the desktop version. For example, in the Excel Web App, you can apply standard formatting, such as fonts, fills, and borders, but you can’t apply more sophisticated formatting, such as tables styles, cell styles, and conditional formatting.
Browse to an Office Document on Windows Live
![]() Open your browser, go to www.live.com, and then sign in to Windows Live.
Open your browser, go to www.live.com, and then sign in to Windows Live.
![]() To go directly to the SkyDrive, go to http://skydrive.live.com.
To go directly to the SkyDrive, go to http://skydrive.live.com.
![]() Navigate to the Windows Live SkyDrive.
Navigate to the Windows Live SkyDrive.
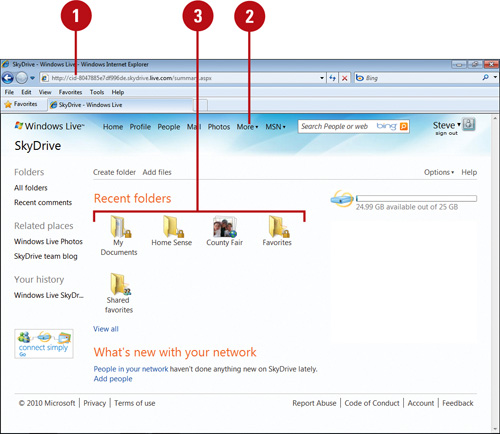
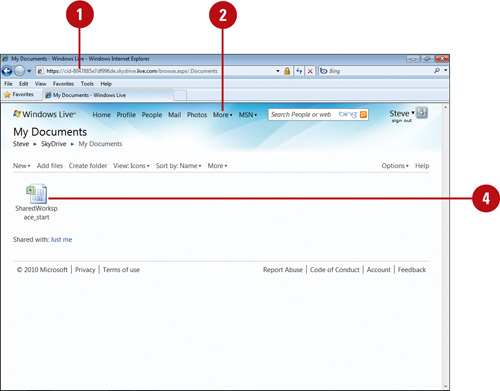
![]() Click the More link, and then click SkyDrive.
Click the More link, and then click SkyDrive.
![]() Click a folder icon to navigate to the folder with the Office document.
Click a folder icon to navigate to the folder with the Office document.
![]() To navigate back to a previous location, click a navigation link.
To navigate back to a previous location, click a navigation link.
![]() To change the view in the current folder, click the View: link, and then click Icons, Details, or Thumbnails.
To change the view in the current folder, click the View: link, and then click Icons, Details, or Thumbnails.
![]() The current view appears in the View: link, such as View: Icons.
The current view appears in the View: link, such as View: Icons.
![]() To sort the documents in the current folder, click the Sort by: link, and then click Name, Date, Size, or Type.
To sort the documents in the current folder, click the Sort by: link, and then click Name, Date, Size, or Type.
![]() The current sort by appears in the Sort by: link, such as Sort by: Name.
The current sort by appears in the Sort by: link, such as Sort by: Name.

Open an Office Document in a Browser on Windows Live
![]() Open your browser, go to www.live.com, and then sign in to Windows Live.
Open your browser, go to www.live.com, and then sign in to Windows Live.
![]() To go directly to the SkyDrive, go to http://skydrive.live.com.
To go directly to the SkyDrive, go to http://skydrive.live.com.
![]() Navigate to the Windows Live SkyDrive.
Navigate to the Windows Live SkyDrive.
![]() Click the More link, and then click SkyDrive.
Click the More link, and then click SkyDrive.
![]() Click a folder icon to navigate to the folder with the Office document.
Click a folder icon to navigate to the folder with the Office document.
![]() Click the Office document icon.
Click the Office document icon.
![]() Click the View or Edit link.
Click the View or Edit link.
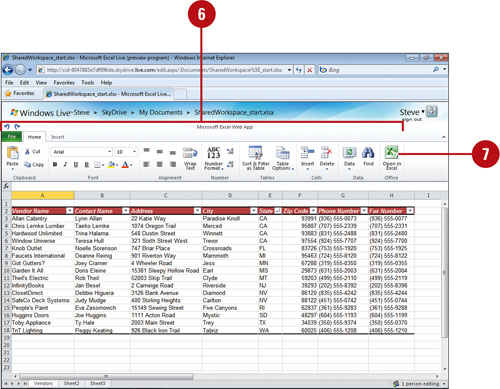
![]() Use the Ribbon tabs to make changes to the Office document; any changes in an Office Web App are automatically saved.
Use the Ribbon tabs to make changes to the Office document; any changes in an Office Web App are automatically saved.
![]() To close the Office document online and switch to work locally in Excel, click the Open in Excel link on the Home tab.
To close the Office document online and switch to work locally in Excel, click the Open in Excel link on the Home tab.
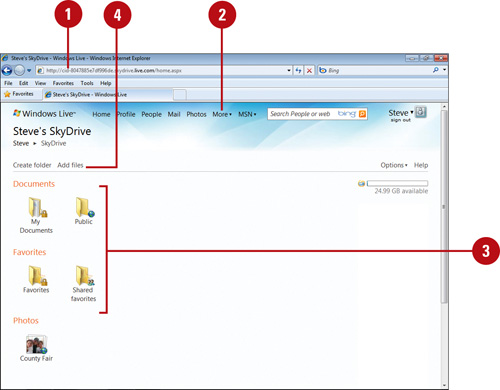
Working with Folders on Windows Live
The SkyDrive on Windows Lives comes with four default folders: My Documents, Favorites, Shared Favorites, and Public. The My Documents and Public folders store documents, while the Favorites and Shared Favorites folders store links to Web sites. The My Documents and Favorites folders are private for your eyes only, while the Shared Favorites and Public folders are viewable by everyone in your Windows Live network. If you want to share your documents with others, then add or move them to the Public folder. Instead of using the default folders, you can create and use your own and then specify permissions for access. If you no longer need a folder, you can delete it. You cannot rename a default folder, however, you can rename the ones you create.
Create a SkyDrive Folder
![]() Open your browser, go to http://skydrive.live.com, and then sign in to Windows Live.
Open your browser, go to http://skydrive.live.com, and then sign in to Windows Live.
![]() Navigate to the Windows Live SkyDrive. Click the More link, and then click SkyDrive.
Navigate to the Windows Live SkyDrive. Click the More link, and then click SkyDrive.
![]() Click a folder icon to navigate to the folder where you want to create a folder.
Click a folder icon to navigate to the folder where you want to create a folder.
![]() Click the Create folder link.
Click the Create folder link.
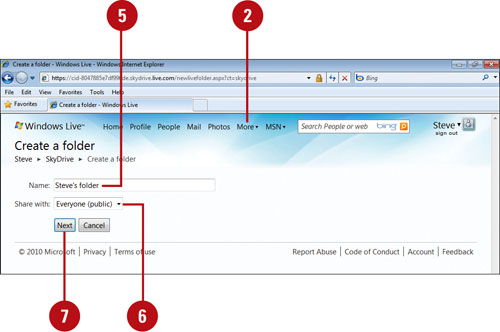
![]() Type a name for the folder.
Type a name for the folder.
![]() Click the Share with list arrow, select an option: Everyone (public), My network, Just me, or Select people.
Click the Share with list arrow, select an option: Everyone (public), My network, Just me, or Select people.
![]() Click Next.
Click Next.
![]() To create a folder without adding files, click Cancel.
To create a folder without adding files, click Cancel.
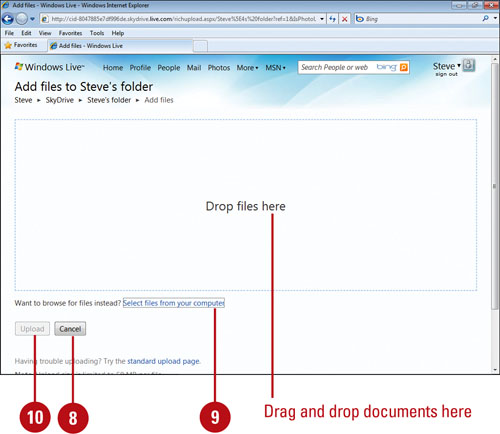
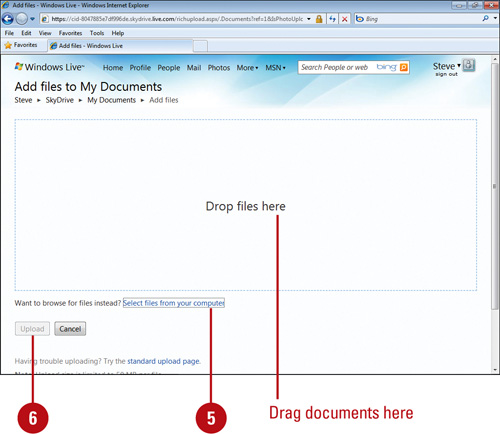
![]() Drag files from Windows Explorer to the selected area, or click the Select files from your computer link, select the files to upload, and then click Open.
Drag files from Windows Explorer to the selected area, or click the Select files from your computer link, select the files to upload, and then click Open.
![]() Click Upload.
Click Upload.
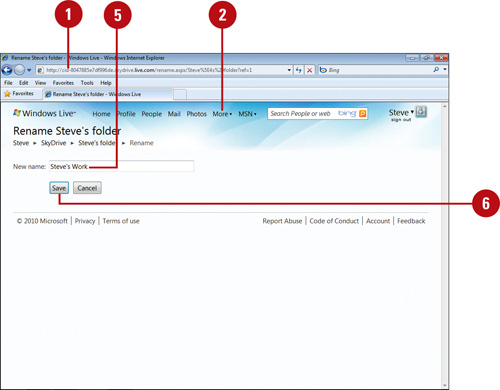
Rename a SkyDrive Folder
![]() Open your browser, go to .http://skydrive.live.com, and then sign in to Windows Live.
Open your browser, go to .http://skydrive.live.com, and then sign in to Windows Live.
![]() Navigate to the Windows Live SkyDrive. Click the More link, and then click SkyDrive.
Navigate to the Windows Live SkyDrive. Click the More link, and then click SkyDrive.
![]() Click a folder icon to navigate to the folder you want to rename.
Click a folder icon to navigate to the folder you want to rename.
![]() Click the More link, and then click Rename.
Click the More link, and then click Rename.
![]() Enter a new name for the folder.
Enter a new name for the folder.
![]() Click Save.
Click Save.
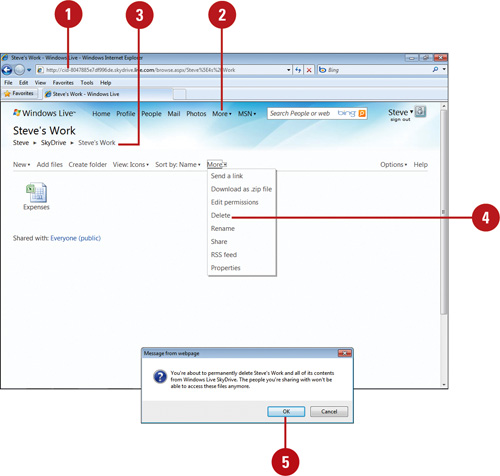
Delete a SkyDrive Folder
![]() Open your browser, go to http://skydrive.live.com, and then sign in to Windows Live.
Open your browser, go to http://skydrive.live.com, and then sign in to Windows Live.
![]() Navigate to the Windows Live SkyDrive. Click the More link, and then click SkyDrive.
Navigate to the Windows Live SkyDrive. Click the More link, and then click SkyDrive.
![]() Click a folder icon to navigate to the folder you want to delete.
Click a folder icon to navigate to the folder you want to delete.
![]() Click the More link, and then click Delete.
Click the More link, and then click Delete.
![]() Click OK to confirm the deletion of the folder and all of its contents.
Click OK to confirm the deletion of the folder and all of its contents.
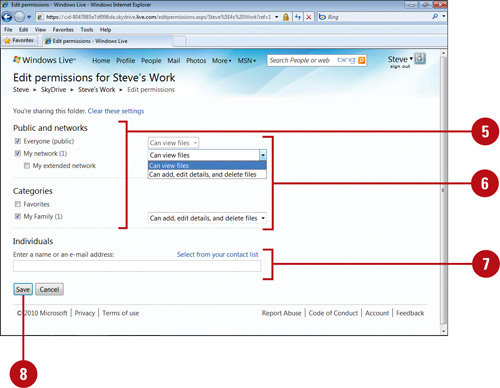
Setting Folder Permissions on Windows Live
Permissions are special properties applied to a folder that allows access to specified groups of people. You can set folder permissions that allow everyone to access a folder, a specified network of people to access a folder, or individuals to access a folder. If you want to set permissions for a group of users, you can create a user category (click the Categories link under People), and then set the permissions you want. You can assign two levels of permissions, either Can Add, Edit Details, and Delete Files or Can View Files.
Edit Permissions on a SkyDrive Folder
![]() Open your browser, go to http://skydrive.live.com, and then sign in to Windows Live.
Open your browser, go to http://skydrive.live.com, and then sign in to Windows Live.
![]() Navigate to the Windows Live SkyDrive. Click the More link, and then click SkyDrive.
Navigate to the Windows Live SkyDrive. Click the More link, and then click SkyDrive.
![]() Click a folder icon to navigate to the folder where you want to change permissions.
Click a folder icon to navigate to the folder where you want to change permissions.
![]() Click the More link, and then click Edit permissions.
Click the More link, and then click Edit permissions.
![]() Select a check box for any of the following to enable access permission to the folder:
Select a check box for any of the following to enable access permission to the folder:
![]() Everyone (public). Select to allows everyone access to this public folder.
Everyone (public). Select to allows everyone access to this public folder.
![]() My network. Select to allow your network user to access this folder.
My network. Select to allow your network user to access this folder.
![]() Categories. Select to allow a group of users to access this folder.
Categories. Select to allow a group of users to access this folder.
![]() Click the Permission Level list arrow, and then click Can view files or Can add, edit details, and delete files.
Click the Permission Level list arrow, and then click Can view files or Can add, edit details, and delete files.
![]() To allow individual user, specify a name, e-mail address or select a contact, and then press Enter.
To allow individual user, specify a name, e-mail address or select a contact, and then press Enter.
![]() Click Save, and then send a notification or skip it.
Click Save, and then send a notification or skip it.

Creating Office Documents on Windows Live
When you’re working on Windows Live, you create a new Office document (New!). You can create an Excel workbook, a PowerPoint presentation, a Word document, or an OneNote notebook. This option allows you to create a new Office document on a computer that doesn’t have the Microsoft Office software. So, if you’re working on a different computer while you’re on the road that doesn’t have the Office programs installed and you need to create a new document to get some work done, you can do it online at Windows Live.
Create Office Documents on a SkyDrive Folder
![]() Open your browser, go to http://skydrive.live.com, and then sign in to Windows Live.
Open your browser, go to http://skydrive.live.com, and then sign in to Windows Live.
![]() Navigate to the Windows Live SkyDrive. Click the More link, and then click SkyDrive.
Navigate to the Windows Live SkyDrive. Click the More link, and then click SkyDrive.
![]() Click a folder icon to navigate to the folder where you want to create an Office document.
Click a folder icon to navigate to the folder where you want to create an Office document.
![]() Click the New link, and then click a document option:
Click the New link, and then click a document option:
![]() Microsoft Excel workbook.
Microsoft Excel workbook.
![]() Microsoft PowerPoint presentation.
Microsoft PowerPoint presentation.
![]() Microsoft Word document.
Microsoft Word document.
![]() Microsoft OneNote notebook.
Microsoft OneNote notebook.
![]() Type a name for the document.
Type a name for the document.
![]() Click Create.
Click Create.


Working with Documents on Windows Live
When you’re working on Windows Live, you can add files to a SkyDrive folder. You can add files from your computer drive by using the Add files link or while you create a new folder. You can add files from your computer by using two methods: (1) by dragging files from Windows Explorer (with the Windows Explorer and your browser window side by side) or (2) by using the Select files from your computer link. Once a document is stored on Windows Live, you can copy, move, or rename the file. If you no longer need the document, you can delete it to save space.
Add Files to a SkyDrive Folder
![]() Open your browser, go to http://skydrive.live.com, and then sign in to Windows Live.
Open your browser, go to http://skydrive.live.com, and then sign in to Windows Live.
![]() Navigate to the Windows Live SkyDrive. Click the More link, and then click SkyDrive.
Navigate to the Windows Live SkyDrive. Click the More link, and then click SkyDrive.
![]() Click a folder icon to navigate to the folder where you want to add files.
Click a folder icon to navigate to the folder where you want to add files.
![]() Click the Add files link.
Click the Add files link.
![]() Drag files from Windows Explorer to the selected area, or click the Select files from your computer link, select the files to upload, and then click Open.
Drag files from Windows Explorer to the selected area, or click the Select files from your computer link, select the files to upload, and then click Open.
![]() Click Upload.
Click Upload.
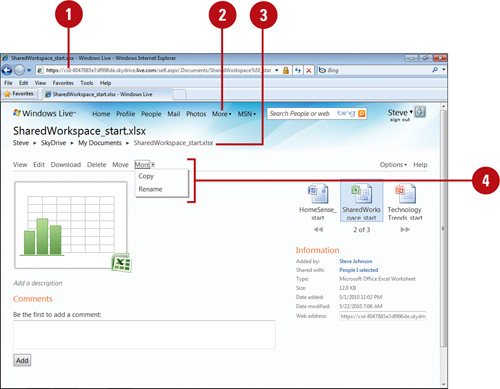
Copy, Move, Rename a Document
![]() Open your browser, go to http://skydrive.live.com, and then sign in to Windows Live.
Open your browser, go to http://skydrive.live.com, and then sign in to Windows Live.
![]() Navigate to the Windows Live SkyDrive. Click the More link, and then click SkyDrive.
Navigate to the Windows Live SkyDrive. Click the More link, and then click SkyDrive.
![]() Click a folder icon to navigate to the document, and then click the document icon.
Click a folder icon to navigate to the document, and then click the document icon.
![]() Use any of the following:
Use any of the following:
![]() Move. Click the More link, click Move, click a folder, and then click Move this file into foldername.
Move. Click the More link, click Move, click a folder, and then click Move this file into foldername.
![]() Copy. Click the More link, click Copy, click a folder, and then click Copy this file into foldername.
Copy. Click the More link, click Copy, click a folder, and then click Copy this file into foldername.
![]() Rename. Click the More link, click Rename, enter a new name, and then click Save.
Rename. Click the More link, click Rename, enter a new name, and then click Save.
Delete a Document
![]() Open your browser, go to http://skydrive.live.com, and then sign in to Windows Live.
Open your browser, go to http://skydrive.live.com, and then sign in to Windows Live.
![]() Navigate to the Windows Live SkyDrive. Click the More link, and then click SkyDrive.
Navigate to the Windows Live SkyDrive. Click the More link, and then click SkyDrive.
![]() Click a folder icon to navigate to the document you want to delete, and then click the document icon.
Click a folder icon to navigate to the document you want to delete, and then click the document icon.
![]() Click the Delete link.
Click the Delete link.
![]() Click OK to confirm the deletion of the file.
Click OK to confirm the deletion of the file.

Downloading Documents from Windows Live
When you no longer want a document or folder of documents on Windows Live or you want to share them with others, you can download them to your local drive on your computer. You can download individual files one at a time in their native Office file format, such as.xlsx, or an entire folder of documents as a zipped file. The .zip file format compresses all the files in the folder into a single file. You can open a zipped file on Microsoft Windows by double-clicking it and then using an Extract button or by using the Winzip.exe software, which you can download for free from the Web at one of many download sites, such as www.download.com.
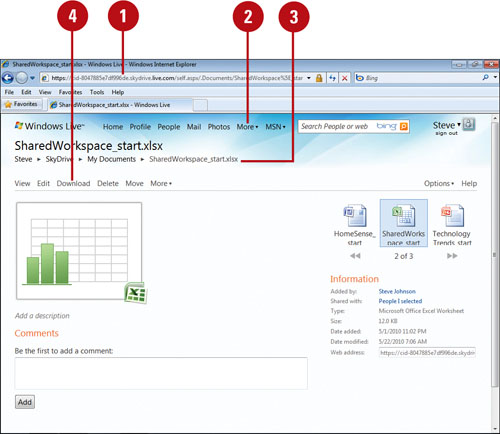
Download a File from a SkyDrive Folder
![]() Open your browser, go to http://skydrive.live.com, and then sign in to Windows Live.
Open your browser, go to http://skydrive.live.com, and then sign in to Windows Live.
![]() Navigate to the Windows Live SkyDrive. Click the More link, and then click SkyDrive.
Navigate to the Windows Live SkyDrive. Click the More link, and then click SkyDrive.
![]() Click a folder icon to navigate to the document you want to download, and then click the document icon.
Click a folder icon to navigate to the document you want to download, and then click the document icon.
![]() Click the Download link.
Click the Download link.
![]() Click Save.
Click Save.
![]() Navigate to the location where you want to download the file, and then click Save.
Navigate to the location where you want to download the file, and then click Save.
The document is downloaded to the specified folder in the native Office file format.

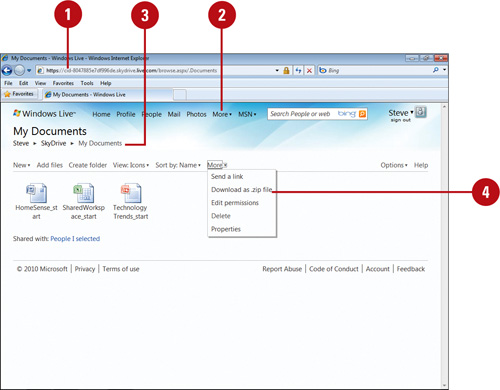
Download a Folder of Files from a SkyDrive Folder
![]() Open your browser, go to http://skydrive.live.com, and then sign in to Windows Live.
Open your browser, go to http://skydrive.live.com, and then sign in to Windows Live.
![]() Navigate to the Windows Live SkyDrive. Click the More link, and then click SkyDrive.
Navigate to the Windows Live SkyDrive. Click the More link, and then click SkyDrive.
![]() Click a folder icon to navigate to the folder of files you want to download.
Click a folder icon to navigate to the folder of files you want to download.
![]() Click the More link, and then click Download as .zip file.
Click the More link, and then click Download as .zip file.
![]() Click Save.
Click Save.
![]() Navigate to the location where you want to download the file, and then click Save.
Navigate to the location where you want to download the file, and then click Save.
All the documents in the folder are zipped and downloaded to the specified folder in the .zip file format.

Downloading or Saving Documents in Office Web Apps
If you’re working in the Excel Web App (New!), you can download a snapshot or copy of a workbook to your hard drive on your computer or save it with another name in the current SkyDrive folder on Windows Live. When you download a workbook, you can specify the location on your local hard drive where you want to store it. When you save a workbook with another name, you can specify whether you want to overwrite an existing document with the same name. The download and save as options vary in the other Office Web Apps. The Office Web Apps are continually being updated, so make sure your Office Web Apps are up-to-date.
Download a File in an Office Web App
![]() Open your browser, go to http://skydrive.live.com, and then sign in to Windows Live.
Open your browser, go to http://skydrive.live.com, and then sign in to Windows Live.
![]() Navigate to the Windows Live SkyDrive. Click the More link, and then click SkyDrive.
Navigate to the Windows Live SkyDrive. Click the More link, and then click SkyDrive.
![]() Click a folder icon to navigate to the document you want to download, and then click the document icon.
Click a folder icon to navigate to the document you want to download, and then click the document icon.
![]() Click the Edit link.
Click the Edit link.
![]() Click File tab, and then click a download option (options vary depending on the Office Web App):
Click File tab, and then click a download option (options vary depending on the Office Web App):
![]() Download a Snapshot (Excel). Downloads a copy of a workbook containing only the values and formatting.
Download a Snapshot (Excel). Downloads a copy of a workbook containing only the values and formatting.
![]() Download a Copy (Excel). Downloads the entire workbook to your computer.
Download a Copy (Excel). Downloads the entire workbook to your computer.
![]() Click Save.
Click Save.
![]() Navigate to the location where you want to download the file, and then click Save.
Navigate to the location where you want to download the file, and then click Save.

Save a File with a New Name in an Office Web App
![]() Open your browser, go to http://skydrive.live.com, and then sign in to Windows Live.
Open your browser, go to http://skydrive.live.com, and then sign in to Windows Live.
![]() Navigate to the Windows Live SkyDrive. Click the More link, and then click SkyDrive.
Navigate to the Windows Live SkyDrive. Click the More link, and then click SkyDrive.
![]() Click a folder icon to navigate to the document you want to save, and then click the document icon.
Click a folder icon to navigate to the document you want to save, and then click the document icon.
![]() Click the Edit link.
Click the Edit link.
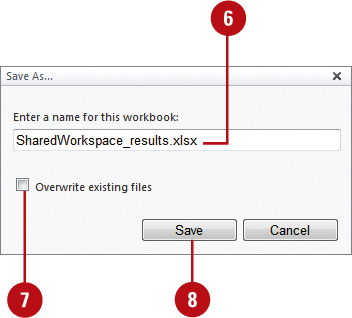
![]() Click File tab, and then click Save As.
Click File tab, and then click Save As.
![]() Type a name for the file.
Type a name for the file.
![]() To overwrite existing files in the folder, select the Overwrite existing files check box.
To overwrite existing files in the folder, select the Overwrite existing files check box.
![]() Click Save.
Click Save.

Collaborating with Documents on Windows Live
After you upload your Office documents to a SkyDrive folder and configure the folder permissions, you can start to collaborate on an Office document. With Office Web Apps you can simultaneously edit documents, known as co-authoring (New!). Co-authoring allows two or more people to work on a document at the same time in real-time without the need to save and reject or accept changes, known as sharing. If two people edit the same thing, each Office Web App deals with differently. Excel uses the last change. When another person opens a document, the Office Web App displays a pop-up message and updates the status bar text to indicate the number of people editing the document, such as 2 People Editing. If you want to see who’s working on the document, click the Status bar text to display a list of current users. Before you can co-author a document, you need to send a link in e-mail or embed a link in a blog or Web page, so others can access your folder or document.
Send a Link to Share a Folder or Document
![]() Open your browser, go to http://skydrive.live.com, and then sign in to Windows Live.
Open your browser, go to http://skydrive.live.com, and then sign in to Windows Live.
![]() Navigate to the Windows Live SkyDrive. Click the More link, and then click SkyDrive.
Navigate to the Windows Live SkyDrive. Click the More link, and then click SkyDrive.
![]() Click a folder icon to navigate to the document you want to share, and then click the document icon.
Click a folder icon to navigate to the document you want to share, and then click the document icon.
![]() Click the More link, and then click Share.
Click the More link, and then click Share.
![]() Click the E-mail a link to this item link.
Click the E-mail a link to this item link.
![]() Enter an e-mail address or select a category.
Enter an e-mail address or select a category.
![]() If you don’t want to require the recipients to create or use a Windows Live ID, then select the Don’t require to sign in with Windows Live ID check box.
If you don’t want to require the recipients to create or use a Windows Live ID, then select the Don’t require to sign in with Windows Live ID check box.
![]() Click Send.
Click Send.
![]() In the message, click the View folder or View file button.
In the message, click the View folder or View file button.
![]() Open a document, and then edit it in the Office Web App.
Open a document, and then edit it in the Office Web App.

Embed a Link to Share a Folder or Document in a Blog or Web Page
![]() Open your browser, go to http://skydrive.live.com, and then sign in to Windows Live.
Open your browser, go to http://skydrive.live.com, and then sign in to Windows Live.
![]() Navigate to the Windows Live SkyDrive. Click the More link, and then click SkyDrive.
Navigate to the Windows Live SkyDrive. Click the More link, and then click SkyDrive.
![]() Click a folder icon to navigate to the document you want to share, and then click the document icon.
Click a folder icon to navigate to the document you want to share, and then click the document icon.
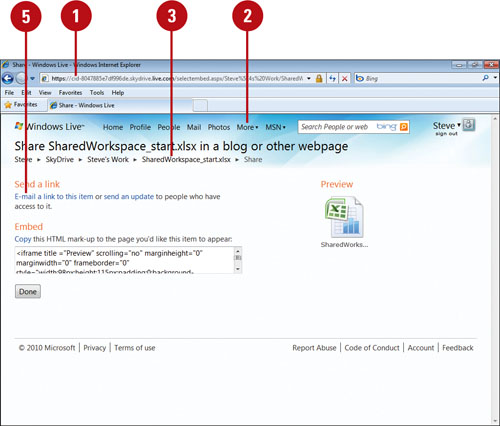
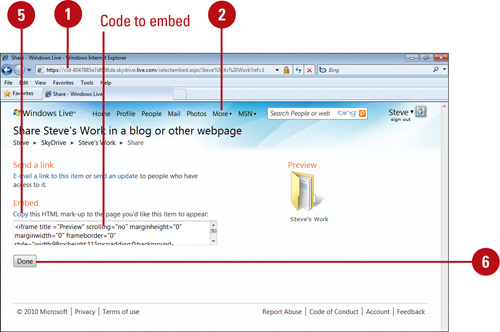
![]() Click the More link, and then click Share.
Click the More link, and then click Share.
![]() Click the Copy link, and then click Allow access.
Click the Copy link, and then click Allow access.
The embed code is copied to the Clipboard.
![]() Click Done.
Click Done.
![]() Paste the code into a blog post or Web page.
Paste the code into a blog post or Web page.
![]() Blog. Create a blog post in a blogger, such as Windows Live Writer, and then paste the code.
Blog. Create a blog post in a blogger, such as Windows Live Writer, and then paste the code.
![]() Web Page. Open a Web page in an HTML editor, and then paste the code.
Web Page. Open a Web page in an HTML editor, and then paste the code.
![]() Open your browser, display the blog post or Web page, and then click the link to the shared folder or document on Windows Live.
Open your browser, display the blog post or Web page, and then click the link to the shared folder or document on Windows Live.
![]() Open a document, and then edit it in the Office Web App.
Open a document, and then edit it in the Office Web App.
![]() To display the people editing the document, click the status bar text.
To display the people editing the document, click the status bar text.


Working with SharePoint Workspaces
A SharePoint workspace is your own personal copy of the SharePoint server, or selected lists and libraries you want to take offline and synchronize. A SharePoint workspace is useful when you want access to a SharePoint server whether or not you are connected to your network. You are the only member of the workspace and share content updates with other SharePoint members. In addition to SharePoint, you can also connect to a Groove workspace, or create a shared folder in Windows. SharePoint is a centralized server based sharing solution, while Groove is a local computer based sharing solution. When you start Microsoft SharePoint Workspace 2010 (New!), the Launchbar opens, where you can create and work with workspaces and contacts. SharePoint and Groove workspaces open in Workspace Explorer while shared folders open in a special layout in Windows Explorer.
Work with a Shared Folder
![]() Click the Start button, point to All Programs, click Microsoft Office, and then click Microsoft SharePoint Workspace 2010.
Click the Start button, point to All Programs, click Microsoft Office, and then click Microsoft SharePoint Workspace 2010.
![]() On first use, use the wizard to create an account or select an existing one.
On first use, use the wizard to create an account or select an existing one.
![]() To create a shared folder, click the New button, click Shared Folder, type a name, and then click Create.
To create a shared folder, click the New button, click Shared Folder, type a name, and then click Create.
![]() To work with the shared folder in the Launchbar, right-click it, and then select an option.
To work with the shared folder in the Launchbar, right-click it, and then select an option.
![]() To open the shared folder in the Launchbar, double-click it.
To open the shared folder in the Launchbar, double-click it.
![]() In Windows Explorer, use the available options to work with people and files.
In Windows Explorer, use the available options to work with people and files.
![]() To add a contact in the Launchbar, click the Add Contact button, and then select a contact from the server list. Click the Contacts bar to display and work with them.
To add a contact in the Launchbar, click the Add Contact button, and then select a contact from the server list. Click the Contacts bar to display and work with them.


Work with SharePoint or Groove Workspaces
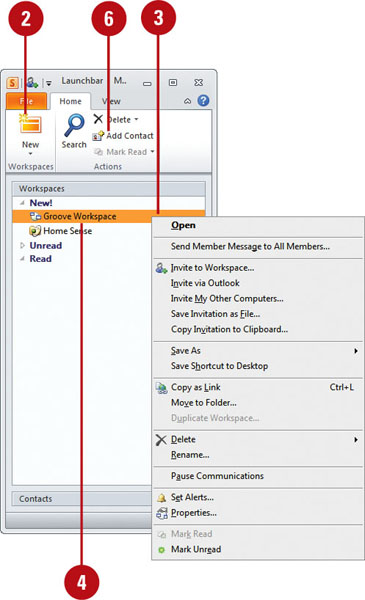
![]() Click the Start button, point to All Programs, click Microsoft Office, and then click Microsoft SharePoint Workspace 2010.
Click the Start button, point to All Programs, click Microsoft Office, and then click Microsoft SharePoint Workspace 2010.
![]() On first use, use the wizard to create an account or select an existing one.
On first use, use the wizard to create an account or select an existing one.
![]() To create a server workspace, click the New button, and then click SharePoint Workspace or Groove Workspace.
To create a server workspace, click the New button, and then click SharePoint Workspace or Groove Workspace.
![]() SharePoint Workspace. Specify a location, and then click OK.
SharePoint Workspace. Specify a location, and then click OK.
![]() Groove Workspace. Type a name for the Groove workspace, and then click Create. To specify a Groove workspace version, click Options.
Groove Workspace. Type a name for the Groove workspace, and then click Create. To specify a Groove workspace version, click Options.
![]() To work with a workspace in the Launchbar, right-click it, and then select an option.
To work with a workspace in the Launchbar, right-click it, and then select an option.
![]() To open a workspace in the Launchbar, double-click it.
To open a workspace in the Launchbar, double-click it.
![]() In the Workspace, use the available tabs and options to work with people and files.
In the Workspace, use the available tabs and options to work with people and files.
![]() To add a contact in the Launchbar, click the Add Contact button, and then select a contact from the server list. Click the Contacts bar to display and work with them.
To add a contact in the Launchbar, click the Add Contact button, and then select a contact from the server list. Click the Contacts bar to display and work with them.

Sharing Documents in a Groove Workspace
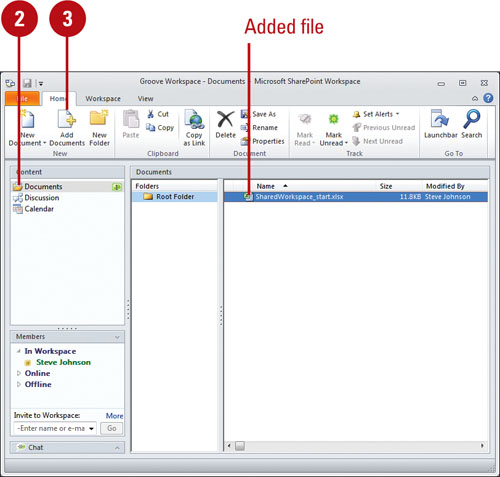
The Documents Tool in Groove allows you to share and collaborate on different types of files, including files from Microsoft Office programs. All team members of a workspace can open files that appear in the Documents Tool. When a team member opens, changes, and saves a file to the workspace, Groove automatically updates the file for all other team members. When several team members work on the same file at the same time, the first person to save changes to the workspace updates the original file. If another team member saves changes to the original version, Groove creates a second copy with the editor’s name.
Share Documents in a Workspace
![]() In SharePoint Workspace 2010 (New!), double-click the Groove workspace you want to use.
In SharePoint Workspace 2010 (New!), double-click the Groove workspace you want to use.
![]() Click the Documents tool.
Click the Documents tool.
![]() Click the Add Documents button on the Home tab.
Click the Add Documents button on the Home tab.
![]() Locate and select the files you want to add to the workspace.
Locate and select the files you want to add to the workspace.
![]() Click Open.
Click Open.
The selected files appear in the file list in the workspace.
Manage Document Tools
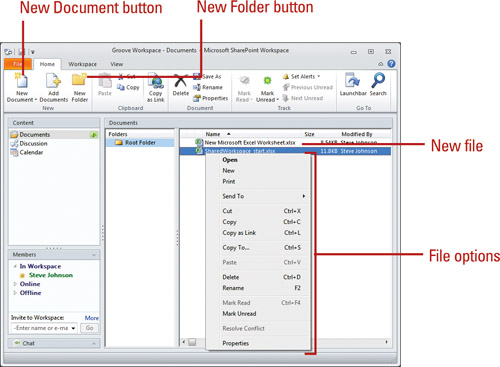
![]() New Files. Select a folder, click the Home tab, click the New Document button, click a file type, type a name, and then click OK.
New Files. Select a folder, click the Home tab, click the New Document button, click a file type, type a name, and then click OK.
![]() Open Files. Double-click it, make and save changes, and then click Yes or No to save changes.
Open Files. Double-click it, make and save changes, and then click Yes or No to save changes.
![]() Delete Files. Right-click, and then click Delete.
Delete Files. Right-click, and then click Delete.
![]() New Folder. Select a folder, click the Home tab, click the New Folder button, type a name, and then press Enter.
New Folder. Select a folder, click the Home tab, click the New Folder button, type a name, and then press Enter.
![]() Alerts. Right-click a folder or file, click Properties, click the Alerts tab, drag slider, and then click OK.
Alerts. Right-click a folder or file, click Properties, click the Alerts tab, drag slider, and then click OK.
Inviting Others to a Groove Workspace
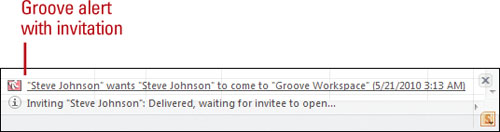
Before you can invite someone to a Groove workspace, they need to be a Groove user. Each person you invite to a Groove workspace needs to have a role, either Manager, Participant, or Guest. Each role comes with a set of permissions that allow a user to perform certain tasks. Mangers can invite others, edit existing files, and delete files or the entire workspace. Participants can edit and delete files. Guests can view existing data, but not make changes. After you send an invitation to join a workspace, check for Groove alerts in the notification area to see if the user has accepted your invitation.
Invite Users to a Workspace
![]() In SharePoint Workspace 2010 (New!), double-click the Groove workspace you want to use.
In SharePoint Workspace 2010 (New!), double-click the Groove workspace you want to use.
![]() Click the Workspace tab.
Click the Workspace tab.
![]() Click the Invite Members button.
Click the Invite Members button.
![]() Click the To list arrow, and then select a user.
Click the To list arrow, and then select a user.
If the user you want is not there, click Add More, click Search for User, type part of the user’s name, click Find, select the user’s name you want, click Add, and then click OK.
![]() Click the Role list arrow, and then click a role: Manager, Participant, or Guest.
Click the Role list arrow, and then click a role: Manager, Participant, or Guest.
![]() Enter a message.
Enter a message.
![]() Select the Require acceptance confirmation check box as a security recommendation.
Select the Require acceptance confirmation check box as a security recommendation.
![]() Click Invite.
Click Invite.
Monitor your Groove alerts for status and acceptance.

Saving a Document to a SharePoint Server
You can save documents to a Document Management Server, such as a Document Library on a SharePoint site, in a similar way that you save documents on your hard disk. After you save the document for the first time using the Save to SharePoint command (New!), you can click the Save button on the Quick Access Toolbar as you do for any document to update the document on the site. If you save a file to a library that requires you to check documents in and out, the SharePoint site checks it out for you. However, you need to check the document in when you’re done with it. If the site stores multiple content types, you might be asked to specify the content type.
Save an Office Document to a SharePoint Server
![]() Open the Office document you want to save to a Document Management Server.
Open the Office document you want to save to a Document Management Server.
![]() Click the File tab, click Save & Send, and then click Save to SharePoint.
Click the File tab, click Save & Send, and then click Save to SharePoint.
![]() Click the Save As button.
Click the Save As button.
![]() Navigate to the network folder location on the SharePoint server where you want to save the file.
Navigate to the network folder location on the SharePoint server where you want to save the file.
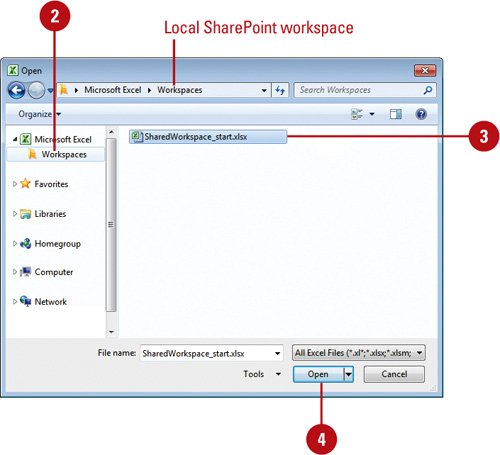
![]() If you set up a local version of a SharePoint workspace with Microsoft SharePoint Workspace 2010 (New!), you can click the Office program name in the left pane, and then click Workspaces to access it.
If you set up a local version of a SharePoint workspace with Microsoft SharePoint Workspace 2010 (New!), you can click the Office program name in the left pane, and then click Workspaces to access it.
![]() Type a document file name.
Type a document file name.
![]() If necessary, click the Save as type list arrow, and then click the file format you want.
If necessary, click the Save as type list arrow, and then click the file format you want.
![]() Click Save.
Click Save.


Open an Office Document from a SharePoint Server
![]() Click the File tab, and then click Open.
Click the File tab, and then click Open.
![]() Navigate to the network folder location on the SharePoint server where you want to save the file.
Navigate to the network folder location on the SharePoint server where you want to save the file.
![]() If you set up a local version of a SharePoint workspace with Microsoft SharePoint Workspace 2010 (New!), you can click the Office program name in the left pane, and then click Workspaces to access it.
If you set up a local version of a SharePoint workspace with Microsoft SharePoint Workspace 2010 (New!), you can click the Office program name in the left pane, and then click Workspaces to access it.
![]() Select the document.
Select the document.
![]() Click Open.
Click Open.
Using Office Mobile 2010
If you have a Windows Mobile 6.5 phone, you can use Office Mobile 2010 (New!) to work with your files from anywhere. If you have a touch screen device, you can intuitively scroll through menus and navigation documents.
You can use an Office Mobile 2010 program to view and edit Office documents stored on your phone, sent to you as e-mail attachments, or stored on a Microsoft SharePoint server through SharePoint Workspace Mobile 2010. When you use the SharePoint Workspace Mobile, you can save document changes to the SharePoint server or sync changes when you’re offline. If you need a secondary monitor, you can connect your phone to your computer using Bluetooth, and use your phone as a secondary monitor to deliver a document or presentation slide show.
Don’t Have Office Mobile 2010
You can view Office files even if your phone doesn’t have Office Mobile 2010. With Mobile Viewers for Microsoft Office, you can use your browser-enabled cell phone to read Microsoft Excel, Microsoft PowerPoint, and Microsoft Word files in organizations that have installed and configured Microsoft Office Web Apps on a SharePoint 2010 server.
The following devices provide support for Mobile Viewers for Office: Windows Mobile, BlackBerry, iPhone, iPodTouch, Android, Nokia S60, and Japan feature phones including docomo, SoftBank and KDDI by au phones. Over time, this list of supported devices will expand and grow. Check online at Office.com and search for cell phone use of Office Web Apps.