
Chapter 3. Video Capture and Import
This lesson describes how to capture and import video from your camcorder and other devices for editing in Adobe Premiere Elements, and introduces the following key concepts:
• Connecting a camcorder to your PC
• Capturing video from a DV/HDV camcorder
• Using the Video Importer to import video from a Flip, AVCHD, or DVD camcorder; digital still camera; DVD; smart phone; or other similar device
• Importing audio, video, or still images from your hard drive into a Premiere Elements project
![]()
This lesson will take approximately 1 hour.
Capturing video from your DV camera.
Capturing Video with Premiere Elements
When videographers and video enthusiasts started editing video on computers, the typical source was an analog camcorder. Today, while some Premiere Elements users still shoot analog video, most will start with DV or HDV source footage, AVCHD, video shot with a digital still camera or digital Single Lens Reflex camera (DSLR), or even video imported from a previously created DVD.
Whatever the source, Premiere Elements includes all the tools necessary to capture or import your footage so you can begin producing movies. Although the specific technique will vary depending on the source, Premiere Elements guides your efforts with device-specific interfaces. All you have to do is connect the device to your computer as described in this lesson, and choose the appropriate icon from Get Media view in the Organize workspace.
Premiere Elements has two basic interfaces for capturing or importing video. After a quick overview of these interfaces, this lesson will detail how to capture video from a tape-based camcorder and then explain how to import content from an AVCHD camcorder or any other device that stores video on a hard drive, on CompactFlash media (such as an SD card), or on optical media. All the concepts in this section and the specific Premiere Elements features that support them are described in more detail in the Premiere Elements User Guide.
Note
Premiere Elements lets you add video, audio, graphics, and still images to your project from numerous sources. In addition to capturing footage, you can import image, video, and audio files stored on your computer’s hard drive, card readers, mobile phones, DVDs, Blu-ray Discs, CDs, digital cameras, other devices, or the Internet.
Capture Interfaces
When you shoot video, it’s stored locally on your camcorder, whether on tape, SD media, a hard drive, or even an optical disc like a DVD. Before you can edit your movie in Premiere Elements, you must transfer these clips to a local hard drive. In addition to capturing or importing video from a device, you may have existing content on your hard drive to import into a project.
Tape and Live Capture vs. Clip-based Import
Premiere Elements provides three interfaces for accomplishing captures and imports. If you’re capturing video footage from a tape-based camcorder, such as a DV or HDV model, or live from a webcam, you’ll use the Capture panel.
If you’re importing video clips from a hard drive, flash media, or optical media, you’ll use the Video Importer. Again, to open the appropriate interface, just connect your device and click the appropriate icon in Get Media view in the Organize workspace; Premiere Elements will do the rest.
If the audio, video, or still image files are already on your computer’s hard drive, click the PC Files and Folders icon in Get Media view in the Organize workspace, navigate to the files, and select them as you normally would. Details concerning this procedure are at the end of this lesson.
Capturing Tape-based or Live Video
If you’re capturing from a DV or HDV camcorder, or a webcam, you’ll use the Capture panel, which you access by clicking Organize, Get Media and then the source that you’ll be capturing from. This lesson will discuss some preliminary concepts relating to these devices and then detail the procedure.
Connecting Your Device
The simplest way to capture DV or HDV video is to connect the camcorder to a computer with an IEEE 1394 port. Premiere Elements supports a wide range of DV devices and capture cards, making it easy to capture DV source files.
Some DV and HDV camcorders also have USB 2.0 ports. USB 2.0 is a high-speed transfer protocol similar to IEEE 1394. When present on a DV/HDV camcorder, the USB 2.0 connector is typically used for transferring to the computer only digital still images rather than tape-based video shot by the camcorder. When both connectors are present, use the IEEE 1394 connector for video capture.
Note
Although it’s extremely rare, sometimes when connecting your computer to your camcorder via an IEEE 1394 connector, an electrical charge from the computer can damage the camcorder. To minimize this risk, always turn off both devices before capture, connect the IEEE 1394 cable, turn on your computer, and then turn on the camcorder.
Capture Video
How to connect your DV camcorder to your computer
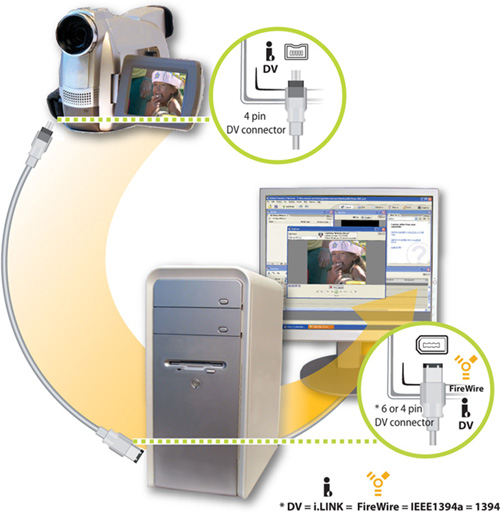
Most DV/HDV camcorders have a four-pin IEEE 1394 connector, whereas most computers have a larger, six-pin connector. Note, however, that some computers—particularly notebooks—may also have a four-pin IEEE 1394 connector. When purchasing an IEEE 1394 cable, make sure it has the appropriate connectors.
Note that most recent Macintosh computers have 9-pin IEEE 1394b 800 connectors rather than 4- or 6-pin IEEE 1394a 400 connectors. To connect your camcorder to these Macs, you’ll need an IEEE 1394b–to-IEEE 1394a adapter, which typically costs less than $15 or so.
If you’re capturing from a webcam or WDM Device (Windows)/Webcam (Mac OS), Premiere Elements will capture the video from the USB 2.0 connector used to connect the device to your computer.
Capture Options
When you capture video from a tape or live source, you have multiple capture options, including whether to capture audio and video, capture to the Timeline, and split scenes. Let’s briefly discuss each option before working through the capture process.
Capturing video or audio only
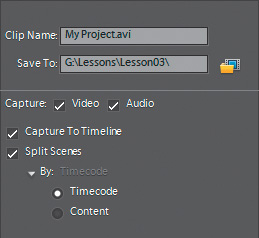
By default, Premiere Elements captures audio and video when capturing a clip. You can change this default in the Capture Settings dialog that appears in the Capture panel, which opens after you select your video source. In the top line of the dialog, Video and Audio are selected by default. To capture only audio, deselect the Video check box. To capture only video, deselect the Audio check box.
Note that you can easily remove either the audio or video portion of the captured clip during editing. Unless you’re absolutely certain that you won’t use either the audio or the video, capture both and remove the undesired media during editing.
Capture to Timeline
The Capture to Timeline option automatically inserts all captured clips into the My Project panel. By default, this option is selected. If you’d prefer to manually drag all clips to the My Project panel, deselect this option.
Capturing video clips with Scene Detect
During capture, Premiere Elements can split the captured video into scenes, which makes it much easier to find and edit the desired content. Premiere Elements can use one of two scene-detection techniques to detect scenes: Timecode-based and Content-based.
Timecode-based scene detection is available only when capturing DV source video. As the name suggests, this technique uses timecodes in the video to break the capture clips into scenes. Specifically, when you record DV, your camcorder automatically records a time/date stamp when you press Stop or Record. During capture, Premiere Elements creates a new scene each time it detects a new time/date stamp and creates a separate video file on your hard drive for each scene.
Content-based scene detection, which is your only option for HDV or webcam videos, analyzes the content after capture to identify scene changes. For example, if you shot one scene indoors and the next outdoors, Premiere Elements would analyze the video frames and detect the new scene.
When detecting scenes using Content-based scene detection, Premiere Elements stores only one video file on your hard drive and designates the scenes in the Organize and Edit workspaces. After capture, while scanning the captured video for scene changes, Premiere Elements displays a status panel describing the operation and apprising you of its progress.

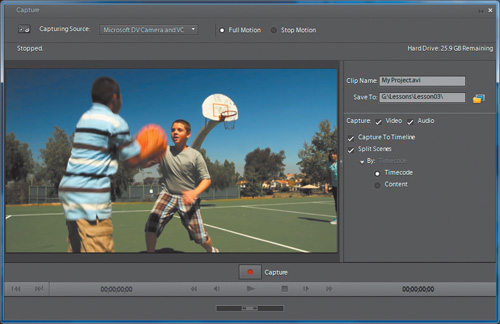
During capture, Premiere Elements defaults to Timecode-based scene detection for DV source video and defaults to Content-based scene detection for HDV and webcam-based videos. I suggest leaving Scene Detect enabled during video capture and using these defaults. To change these defaults in the Capture panel (which you’ll learn how to open shortly), do the following:
- To disable Scene Detect entirely, deselect the Split Scenes check box in the Capture settings on the right of the Capture panel.
- If you’re capturing DV, you can opt for either the Timecode-based or Content-based scene detection. In most instances, the former will be faster and more accurate. To change from Timecode-based to Content-based scene detection, select the Split Scenes check box, click the By: triangle if necessary to view both options, and click the Content radio button.
Capturing clips with device control
When capturing clips, device control refers to the ability to control the operation of a connected video deck or camcorder using controls within the Premiere Elements interface rather than using the controls on the connected device. This mode of operation is more convenient because Premiere Elements offers controls like Next Scene or Shuttle that may not be available on your camcorder’s controls.
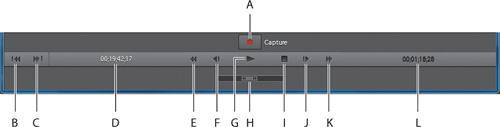
Capture panel controls:
A. Capture.
B. Previous Scene.
C. Next Scene.
D. Current Position—Timecode Display.
E. Rewind.
F. Step Back (Left).
G. Play/Pause.
H. Shuttle.
I. Step Forward (Right).
J. Fast-Forward.
K. Stop.
L. Capture Duration (active only during capture).
You probably know most of these controls because they’re similar to your camcorder or VCR. You may not be familiar with the Shuttle control, which you can drag with your pointer to the left or right to rewind or fast-forward the video. This control is position-sensitive; the farther you drag the shuttle widget from the center, the faster the tape fast-forwards or rewinds. The Previous Scene and Next Scene controls use Timecode-based scene detection to advance backwards or forwards to the previous or next scenes.
Premiere Elements should be able to establish device control with all DV and HDV camcorders, but it’s not available when capturing from webcams, WDM Device (Windows)/Webcam (MacOS), or analog camcorders. You can still capture video from these sources without device control, but the capture procedure is slightly different. Procedures for capturing with and without device control are detailed in the following section.
Capturing with the Capture Panel
With the preceding information in this lesson as a prologue, let’s look at the process for capturing video via Premiere Elements’ Capture panel.
Note
This exercise assumes that a DV camera has been successfully connected to your computer and that you have footage available to capture. If this is not the case, you can still open the Capture panel to review the interface; however, you will not be able to access all the controls.
- Connect the DV camcorder to your computer via an IEEE 1394 cable.
- Turn on the camera and set it to the playback mode, which may be labeled VTR, VCR, or Play.
- Launch Premiere Elements. Click New Project in the Welcome screen, and choose a project name and the appropriate preset.
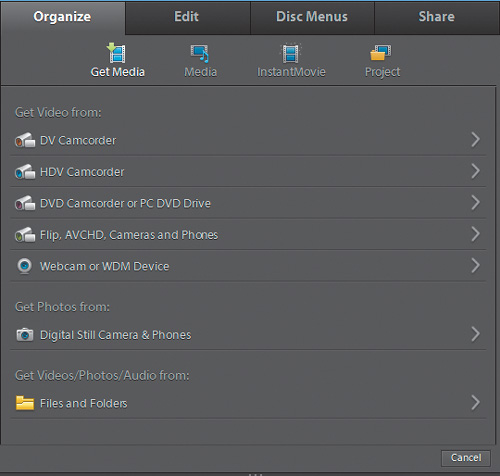
- In the Organize workspace, click Get Media.
- In Get Media view, select DV Camcorder (
 ) to follow along with this procedure. Selecting HDV Camcorder (
 ), or Webcam, or WDM Device (Windows)/Webcam (MacOS) (
 ) will also open the Capture panel, although some settings will be different from this example.
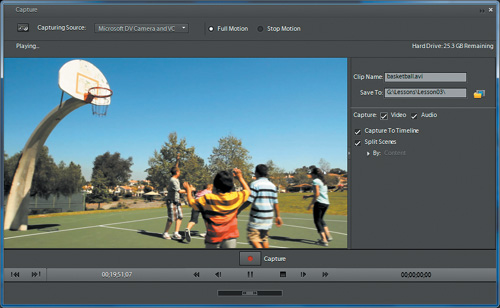
The Capture panel appears. Note that if you’re capturing from videotape, your preview screen will be black until you actually start to play the video.
Note
If your DV camera is connected but not turned on, your Capture panel will display Capture Device Offline in the status area. Although it is preferable to turn on your camera before launching Premiere Elements, in most cases turning on your camera at any point will bring it online.
Note
When capturing DV and webcam footage, you will see video in the Preview area of the Capture panel. When capturing HDV, you won’t see any video in the Preview area and will have to watch the LCD screen on your camcorder to determine when to stop capture.
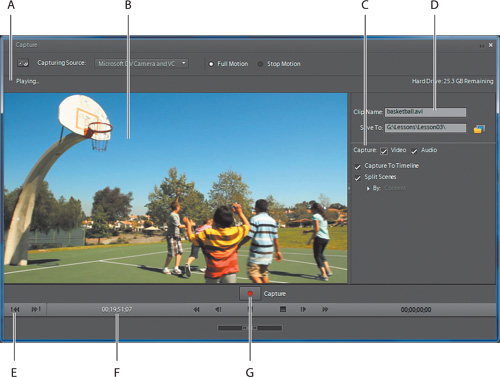
A. Status area—Displays status information about your camera. B. Preview area—Displays your current video as played through your camera. C. Capture settings—Enables you to change the capture settings. D. Clip Name—By default, Premiere Elements uses the project name to name the AVI or MOV movie clips. E. Device controls—Contains buttons used to directly control your camera. F. Current position—Timecode display. Shows you the current frame of your video, measured in the format of hours; minutes; seconds; frames. G. Capture/Pause button.
Debugging Device Control Issues
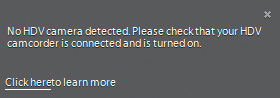
As mentioned, Premiere Elements should be able to establish device control with all DV and HDV camcorders. If you see the error message “No DV camera detected” or “No HDV camera detected,” Premiere Elements can’t detect your camcorder. In this case, you won’t be able to establish device control and may not be able to capture video. Here are some steps you can take to attempt to remedy this situation.
- Exit Premiere Elements and make sure your camcorder is turned on and running (and hasn’t timed out due to inactivity) in VCR, Play, or other similar mode. Also, check to see that your IEEE 1394 cable is firmly connected to both the camcorder’s and computer’s IEEE 1394 ports. Then run Premiere Elements again and see if the program detects the camcorder.
- If not, check your Project Settings and make sure they match your camcorder (DV project if DV camcorder; HDV project if HDV camcorder).
- If you’re still experiencing capture issues, you may have a configuration problem within Premiere Elements. In the upper-right corner of the Capture panel, click the two triangles to open the Capture panel menu and choose Capture Settings, which opens the Project Settings dialog to the Capture Format.


- In this dialog, choose the correct capture device, either DV or HDV. Note that the Mac OS dialog will list HDV/DV/QuickTime (QTKit) in that order. Close the Project Settings dialog, and then close and reopen the Capture panel. If Premiere Elements still doesn’t detect your camcorder, try step 5.
- In the Capture panel menu, choose Device Control, which opens the Preferences dialog with the Device Control view visible.
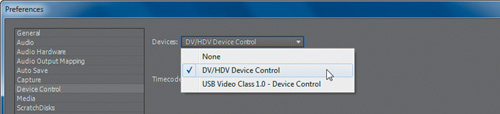
- In this dialog, make sure that DV/HDV is selected (note that the Mac OS dialog will have only two options: None and DV/HDV Device Control). Close the Preferences panel, and then close and reopen the Capture panel. If Premiere Elements still doesn’t detect your camcorder, try step 7.
- Most HDV camcorders can also record and play DV video. However, if you’re capturing DV video and your camcorder is set to record HDV, Premiere Elements may detect an HDV camcorder rather than DV (or vice versa). For example, if you shot HDV in your last shoot but were capturing DV video from a previous shoot, Premiere Elements may detect an HDV camcorder rather than a DV camcorder. In this situation, set the camcorder to record DV video, and once you return to VCR or Play mode, play a few seconds of DV video, which may enable Premiere Elements to detect the DV camcorder.
- In the upper-right area of the Capture panel, type the desired Clip Name and Save To location for the captured files. Note that Premiere Elements defaults to the project name for Clip Name and uses the folder where you stored your project file for the default Save To location. If desired, change any of the default Capture settings.
- At the bottom of the Capture panel, use the navigation controls to navigate to the first scene you’d like to capture.
- Click the Capture button (
 ). Premiere Elements automatically starts playing video on the DV camcorder, captures each scene as an individual movie clip, and adds it to your project.
 - After clicking the Capture button, the button becomes the Pause button (
 ). To stop capturing video, either click the Pause button or press the Esc key on your keyboard. If enabled, the Auto Analyze window will appear as Premiere Elements analyzes the clip and then close. Any clips you have already captured will remain in your project.
Note
When capturing without device control, use the camcorder’s playback controls to navigate to a position about 20 seconds before the first scene you want to capture. Click Play, and about 10 seconds before the actual scene appears, click the Capture button (
). Premiere Elements will start capturing the video. Capture the desired scenes, and about 10 seconds after the last target frame, click the Pause button () to stop capture. - After you’ve completed capturing your video, close the Capture panel by clicking the Close button (
 ) in the upper-right corner. Your captured clips appear in the Organize workspace in both the Media and Project views. If you enabled Capture to Timeline, Premiere Elements will also place each clip into your Sceneline in sequential order.
Note
If you receive the error message “Recorder Error — frames are dropped during capture,” or if you’re having problems with the device control, it’s likely that your hard drive is not keeping up with the transfer of video. Make sure you’re capturing your video to the fastest hard drive available, for example, an external IEEE 1394 drive rather than a hard drive inside a laptop computer.
Using the Video Importer
As mentioned at the start of this lesson, you will use Premiere Elements’ Video Importer to import video clips from Flip, AVCHD, and DVD-based camcorders, as well as smart phones with video cameras. You’ll also use Video Importer to import videos from non-copy protected DVDs and to import photos from digital still cameras and phones. In essence, if the video is stored on a hard drive, SD card, optical disc, or other storage media other than tape, you’ll import it with the Video Importer.
In this exercise you’ll use the Video Importer to import video from an AVCHD camcorder. If you don’t have an AVCHD camcorder, you can follow along using video captured on a digital still camera, DVD camcorder, or mobile phone, or even a nonencrypted DVD, such as one that you’ve previously produced with Premiere Elements. Note that Premiere Elements will not import video from DVDs that are encrypted, such as most Hollywood DVD titles.
Note
This connection procedure will vary by device: Some AVCHD camcorders require that you set the camcorder to PC mode before connecting the USB 2.0 cable, others the reverse. Generally, when working with a camcorder that writes to removable SD cards or other CompactFlash media, it’s easiest to remove the media and use an appropriate card reader to transfer the clips. Please check the documentation that came with your camcorder for additional details.
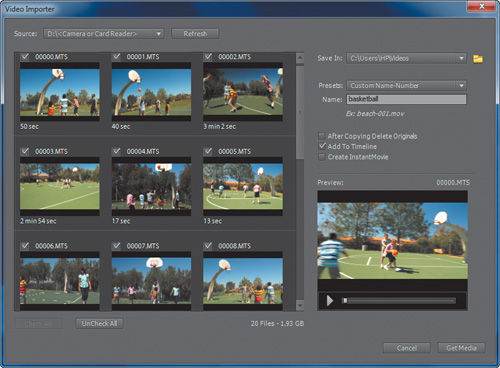
A. Available drives and devices. B. Importable files. C. Location for imported files. D. Naming convention. E. Preview window. F. Get Media button. G. Cancel button.
- Connect your AVCHD camcorder (or SD card recorded therein) to your computer via the USB 2.0 port.
- If you’re capturing from a camcorder, turn on the camcorder and set it to PC mode, or whichever mode is used to transfer video from camcorder to computer.
- Launch Premiere Elements. Click New Project in the Welcome screen, and choose a project name and the appropriate preset.
- In the Organize workspace, click Get Media.
- In Get Media view, select Flip, AVCHD, Cameras and Phones (
 ) to follow along with this procedure. Selecting DVD Camcorder or PC DVD Drive (
 ), or Digital Still Camera & Phones (
 ) will also open Video Importer, although some settings will be different from this example.
The Video Importer opens.
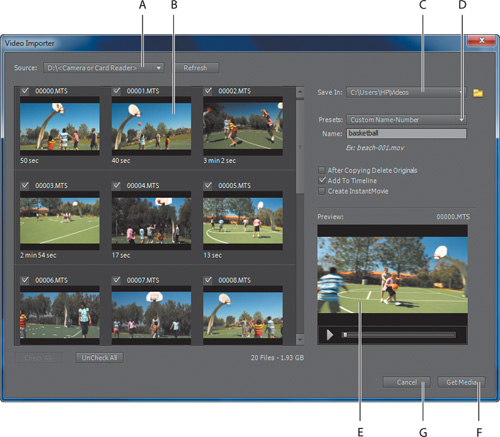
- Under Source, choose the drive or device from the drop-down list.
Note
When you import a DVD using the Video Importer, files for menus are distinguished from video files by the word Menu, as in Menu_Epgc_Esf_938876809.psd.
Once you choose the drive or device, Premiere Elements will populate the Video Importer with thumbnails of all available video and still image files.
- To preview a video file, double-click it, and Premiere Elements will load it in the preview window on the lower right. Click the Play/Pause button to play the file.
- To specify a location for the saved files, do one of the following:
• To save files to the default location—which is the location where you previously stored files captured by the Video Importer—leave the location unchanged.
• To specify a new location for saving the files, click the folder icon to open the Browse for Folder window (Windows)/Open (MacOS) dialog and choose a folder, or click Make New Folder (Windows)/New Folder (MacOS) to create a new folder.
• Optionally, Premiere Elements saves imported files to one or more subfolders with multiple naming options.
• To create a single folder with a name of your choice, select Custom Name from the Create Subfolder(s) menu and enter the name of the folder in the text box that appears.
- To rename the files using a consistent name within the folder, select an option other than Do Not Rename Files from the Rename Files menu. When the files are added to the folder and to the Media panel, the file numbers are incremented by 001. For example, if you enter Basketball as Custom Name under Rename Files, Premiere Elements will change the filenames to Basketball 001.MTS, Basketball 002.MTS, and so on.
- In the thumbnail area, select individual files to add to the Media panel. A check mark by the filename indicates that the file is selected. By default, all files are selected. Only selected files are imported. Click a check box to deselect it, thus excluding the related file from being imported.
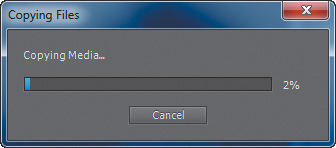
- Click Get Media. This transfers the media to the destination location, which is typically your hard drive. You can click Cancel in the Copying Files dialog at any time to stop the process.
Files that you import using the Video Importer appear in the Organize workspace, as well as Project view in the Edit workspace.
Importing Content from Your Hard Drive
Follow this procedure to import audio, video, or still-image content that’s already on your hard drive.
- In the Organize workspace, click Get Media.
- Click Files and Folders (
 ).
).
Premiere Elements opens the Add Media panel.
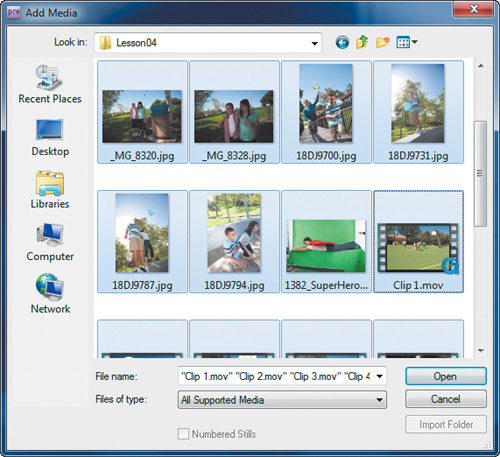
- To change to a new disk or folder, click the Look In list box (Windows)/Folder list box (Mac OS) and navigate to a new location.
- To display only certain files types in the dialog, click the Files of type list box (Windows-only), and choose the desired file type. The dialog displays only files of the selected type.
- To import files, choose them in the dialog as you normally would, and click Open.
Files that you import using the Add Media dialog appear in the Organize workspace, as well as in Project view in the Edit workspace.
Review questions
1. How do you access the Capture panel in Premiere Elements?
2. Why is having a separate hard drive dedicated to video a good idea?
3. What is Scene Detect, and how would you turn it on or off if you wanted to?
4. What is the Video Importer, and when would you use it?
Review answers
1. Click Get Media from the Organize Workspace, and then click the appropriate capture icon.
2. Video files take up large amounts of space compared to standard office and image files. A hard drive stores the video clips you capture and must be fast enough to store your video frames. Although office-type files tend to be fairly small, they can clutter a hard drive when scattered throughout the available space; the more free, defragmented space you have on a hard drive, the better the performance of real-time video capture will be.
3. Scene Detect is Premiere Elements’ ability to detect scene changes in your video (based on timecode or by content) during video capture and save each scene as an individual clip in your project. You can select or deselect Scene Detect by Timecode and Scene Detect by Content in the Capture panel menu.
4. The Video Importer is a feature of Premiere Elements that enables you to import media from AVCHD camcorders, digital still cameras, mobile phones and players, and DVDs, whether from a camcorder or PC DVD driver.
5. Device control is the ability of Premiere Elements to control the basic functions of your digital video camera (such as play, stop, and rewind) through the interface in the Capture panel. It’s available on most DV and HDV camcorders.