Chapter 10. Working with Movie Themes
In the previous six chapters, you learned how to produce a completely customized movie from your source clips. In this chapter, you’ll learn how to apply a Movie theme to your source clips to produce an engaging, stylized movie in a matter of moments.
Movie themes are collections of professionally created, theme-specific titles, effects, transitions, and background music. Before applying a theme, Adobe Premiere Elements analyzes your video footage for content, and then edits your content to best fit the tone of the theme.
As with InstantMovies, you can apply an entire theme or just parts of it to perfectly fit your creative concept. In this lesson, you’ll learn how to do the following:
• Select a Movie theme
• Choose some Movie theme properties and apply them to your clip
• Edit your movie after applying a Movie theme
![]()
This lesson will take approximately 30 minutes.
Choosing a Movie theme.
Getting Started
To begin, you’ll launch Premiere Elements, open the Lesson10 project, and review a final version of the movie you’ll be creating.
- Before you start the project, make sure that you have correctly copied the Lesson10 folder from the DVD in the back of this book onto your computer’s hard disk. See “Copying the Classroom in a Book Files” in the Getting Started section at the beginning of this book.
- Launch Premiere Elements.
- In the Welcome screen, click the Open Project button. If necessary, click Open in the pop-up menu. The Open Project dialog opens.
- Navigate to your Lesson10 folder and select the project file Lesson10_Start_Win.prel (Windows) or Lesson10_Start_Mac.prel (Mac OS). If a dialog appears asking for the location of rendered files, click the Skip Previews button.
Your project file opens with the Monitor, Tasks, and My Project panels open.
- Choose Window > Restore Workspace to ensure that you start the lesson with the default panel layout.
Viewing the Completed Movie Before You Start
To see what you’ll be creating in this lesson, take a look at the completed movie.
- In the Organize tab of the Tasks panel, click Project (
 ). In Project view, locate the file Lesson10_Movie.mov, and then double-click it to open the video into the Preview window.
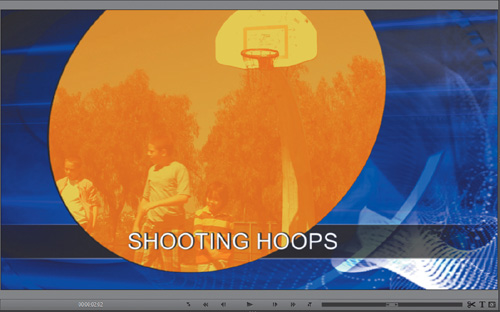
 - In the Preview window, click the Play button (
 ) to watch the video of some kids shooting hoops, which you’ll build in this lesson.
 - When finished, close the Preview window by clicking the Close button (
 ) in the upper-right corner of the window.
About Movie Themes
You first had a glimpse of Movie themes back in Lesson 4, when you learned how to create an InstantMovie from the Organizer. As you recall, an InstantMovie is a Movie theme applied to clips in the Organizer. In this lesson, you’ll learn how to apply a Movie theme to clips in the Timeline.
When should you use each approach? When you create an InstantMovie, you can choose your content via tagging and apply Smart Tagging to your source clips, which is fast and effective when attempting to identify the best three or four minutes of video from a mass of source clips.
Note that creating an InstantMovie in the Organizer differs from working in the Timeline in one fundamental way: You can’t edit source clips before applying an InstantMovie. This makes applying Movie themes in the Timeline a better option if there’s source footage that you don’t want included in the final movie.
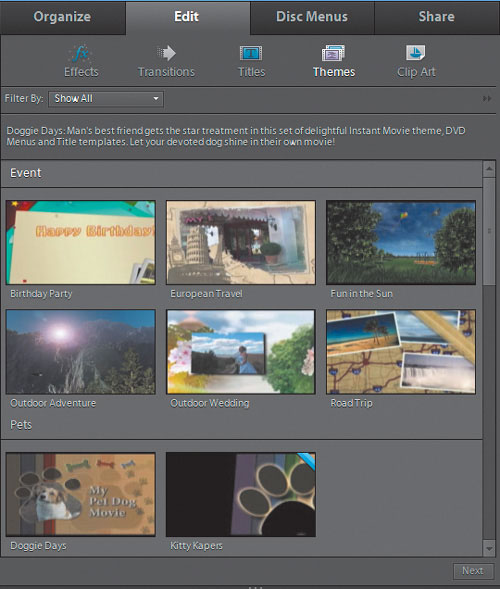
Movie themes enable you to quickly create videos with a specific look and feel. The Wedding Doves theme, for example, adds an elegant, animated introduction, an overlay of flying white doves, wedding background music, and closing credits for a wedding video. In contrast, the Comic Book theme provides more funky effects and fonts along with Picture-in-Picture overlays that might be more appropriate for a kids’ party video.
Note
When you apply a theme, all the effects and transitions that you’ve previously applied to a project are deleted and replaced by the theme. Before applying a theme, choose File > Save to save your project. If you apply a theme and then decide you don’t like it, choose Edit > Undo to return to your original version.
You can apply all the properties in a theme, choose to add only a subset, or even just modify some parts. Likewise, you can add a theme to an entire movie or to only a single clip.
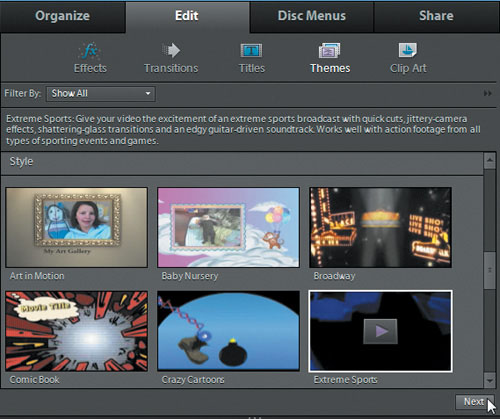
You access Movie themes via the Themes button (![]() ) in the Edit tab of the Tasks panel. The various themes use animated thumbnails that give you a good idea of the overall feel of the theme.
) in the Edit tab of the Tasks panel. The various themes use animated thumbnails that give you a good idea of the overall feel of the theme.
Applying a Movie Theme
In the exercises that follow, you’ll apply a Movie theme to the basketball clips that you’ve edited throughout the book. You’ll apply the theme to clips in the My Project panel, using the Timeline, so you should edit out any undesired scenes before applying a theme.
However, don’t spend a lot of time ordering the clips on the Timeline: If you choose, Premiere Elements will either arrange the clips to best fit the Movie theme or display them in chronological order. In addition, don’t correct brightness, contrast, or stabilization issues before applying a theme, because in order for Premiere Elements to apply the theme-specific effects, it will have to remove all the effects you’ve previously applied. Don’t worry; as with InstantMovies, you can edit your movie after applying the Movie theme and correct any color, brightness, or stabilization issues then.
When you have all the desired clips in the Timeline, follow this procedure to apply a Movie theme.
- Click the Themes button (
 ) in the Edit tab of the Tasks panel.
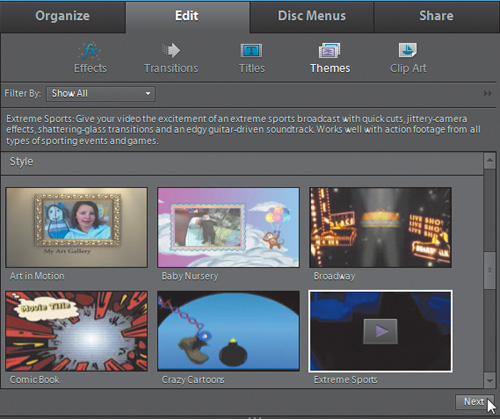
 - Click the Extreme Sports Theme to select it, and then click Next.
- Customize the theme as described here. Do the following:
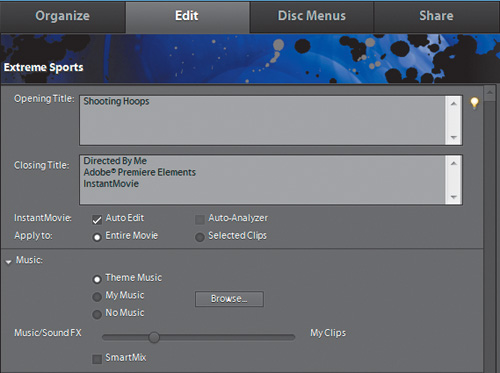
• Customize the Opening and Closing Titles. Keep the Opening Title relatively short, or your text may not fit in the title box used by many themes.
• Select the Auto Edit check box to have Premiere Elements analyze your clips and edit them to fit the selected theme. If you don’t select Auto Edit, Premiere Elements uses the clips as is and doesn’t edit them.
• Select the Entire Movie radio button to apply the theme to all clips on the Timeline.
• In the Music box, select Theme Music.
• Drag the Music/Sound FX slider to the left as shown in the previous figure to prioritize background audio over the trash-talking and wind noise in the original clips.
• If you have dialog in your project (which this clip doesn’t), select the SmartMix check box, and Premiere Elements will reduce the volume of the music track when it detects dialog.
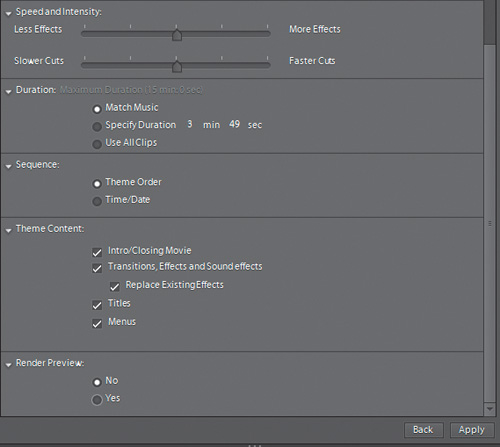
• In the Speed and Intensity dialog, adjust the Effects and Cuts sliders as desired.
• In the Duration box, select Match Music, which produces a movie that matches the duration of the selected music. This is the approach I recommend in most instances. Or, you can specify a duration or select Use All Clips, which uses all your clips at their original duration with no background music.
• In the Sequence box, select Theme Order, which allows Premiere Elements to use clips as they best match the theme. Your other option, Time/Date, uses the clips in the order that they were shot.
• In the Theme Content box, leave all check boxes selected.
• In the Render Preview box, leave No selected.
- After selecting your options, click Apply to create the InstantMovie. Click No when the InstantMovie dialog asks if you want to add more clips. Click Yes when another dialog warns that user-applied effects will be replaced.
- Premiere Elements creates the InstantMovie and inserts it into the My Project panel.
- Use the playback controls in the Monitor panel to preview the InstantMovie. If a dialog appears that asks if you want to render before previewing, click No. In general, you probably would want to render for smoother playback, but it could take a while with this source footage, and you can preview with sufficient quality for our purposes without rendering.
- Premiere Elements adds the InstantMovie to the My Project panel in consolidated form. To break apart the InstantMovie into its components to edit them, click to select the new InstantMovie, right-click, and choose Break Apart InstantMovie.

- Choose File > Save As, name the file Lesson10_End.prel in the Save As dialog, and then save it in your Lesson10 folder.
Exploring on Your Own
Experiment with the different Movie themes provided with your copy of Premiere Elements. Keep in mind that you can apply an entire theme or pick and choose parts of it.
Apply a Movie theme to selected clips in the My Project panel to become familiar with this option.
Well done—you’ve completed this lesson. You’ve learned how to apply a Movie theme and how to customize its properties.
Review questions
2. How is a Movie theme different from an InstantMovie?
3. When are InstantMovies a better option than applying Movie themes to clips in the Timeline?
4. How do you edit a movie after applying a Movie theme?
Review answers
1. Movie themes are templates that enable you to quickly turn your clips into a professional-looking movie. You can choose from event-based themes like Birthday or more style-based themes like Silent Film. A Movie theme includes coordinated transitions, effects, and music, as well as layouts for titles and credits. You can apply an entire theme or choose to select only parts of it.
2. InstantMovies are Movie themes applied to clips in the Organizer.
3. InstantMovies are a better option when you’d like to use tagging and Smart Tagging to help choose videos included in the movie. Applying Movie themes in the My Project panel is preferred when you have to edit content before applying the Movie theme.
4. Right-click the finished movie and choose Break Apart InstantMovie.