
Chapter 4. Organizing Your Content
After you’ve captured or imported your content, you can drag it to the My Project panel from either the Media view or Project view in the Edit workspace. Why two locations? As you’ll read in this chapter, each has its own unique strengths.
For example, Media view and its big brother the Organizer are ideal for tagging your clips for easy search and retrieval, for creating InstantMovies, and for creating albums to back up to Photoshop.com. Project view works well when you want to sort and trim your clips before adding them to the Sceneline or Timeline.
Fast and efficient movie production is all about organization. In this lesson, you’ll learn how to do the following:
• Manually tag your clips in the Organizer
• Apply Smart Tagging in the Organizer
• Create an album for backing up your projects to Photoshop.com
• Create an InstantMovie using manual and Smart Tagging
• Trim clips using the Preview window in Project view
• Drag clips to the My Project panel from either Media view or Project view
![]()
This lesson will take approximately two hours.
Tagging content in the Organizer.
Getting Started
Before you start working with the footage, let’s review a final version of the movie you’ll be creating.
- Make sure that you have correctly copied the Lesson04 and 05 folder from the DVD in the back of this book onto your computer’s hard disk. For more information, see “Getting Started” chapter at the beginning of this book.
- Launch Adobe Premiere Elements.
- In the Welcome screen, click the Open Project button. If necessary, click Open in the pop-up menu. The Open Project dialog opens.
- In the Open Project dialog, navigate to the Lesson04 and 05 folder you copied to your hard disk. Within that folder, select the file Lesson04_Start_Win.prel (Windows)/Lesson04_Start_Mac.prel (Mac OS), and then click Open. Make sure that you don’t select Lesson05_Start_Win.prel or Lesson05_Start_Mac.prel, which are in the same folder. If a dialog appears asking for the location of rendered files, click the Skip Previews button.
Your project file opens with the Monitor, Tasks, and My Project panels open.
- Choose Window > Restore Workspace to ensure that you start the lesson with the default window layout.
Viewing the Completed Movie Before You Start
To see what you’ll be creating in this lesson, you can take a look at the completed movie.
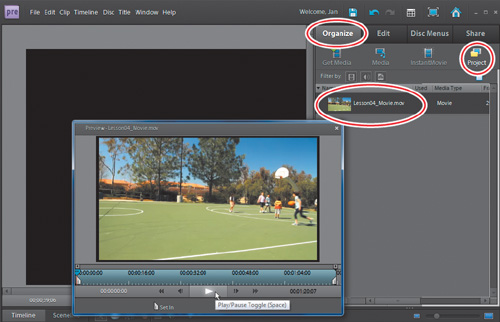
- In the Organize workspace of the Tasks panel, click the Project button. In Project view, locate the file Lesson04_Movie.mov (which should be the only file), and then double-click it to open the video into the Preview window.
- In the Preview window, click the Play button (
 ) to watch the video about some kids shooting hoops, which you’ll build in this lesson.
- When you’re finished, close the Preview window by clicking the Close button (
 ) in the upper-right corner of the window.
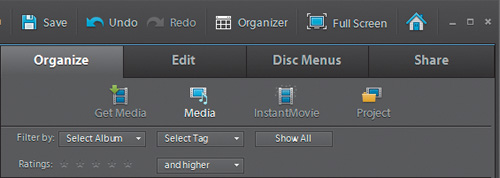
Working in the Organize Workspace
When you first open Premiere Elements, the Organize workspace is displayed. I described the separate views and functions within this workspace in Lesson 1, but since you’re here now, let’s review.
As you saw in the previous chapter, if you click Get Media (![]() ), you’ll enter Get Media view where you’ll capture or import video into your project.
), you’ll enter Get Media view where you’ll capture or import video into your project.
Media view (![]() ) should be open when you first run Premiere Elements. This is a customized view of the Organizer, which you can open by clicking the Organizer icon (
) should be open when you first run Premiere Elements. This is a customized view of the Organizer, which you can open by clicking the Organizer icon (![]() ) in the top toolbar.
) in the top toolbar.
The InstantMovie icon (![]() ) starts a wizard that automatically and quickly steps you through the selection and editing portion of movie creation, allowing you to add theme-based effects, title, transitions, and audio. You’ll produce an InstantMovie of the basketball shoot around tour later in this chapter.
) starts a wizard that automatically and quickly steps you through the selection and editing portion of movie creation, allowing you to add theme-based effects, title, transitions, and audio. You’ll produce an InstantMovie of the basketball shoot around tour later in this chapter.
In Project view (![]() ) you can view, sort, and select media you have captured or imported into your current project. There’s some overlap between Media view, Project view, and the Organizer application, so I’ll discuss that. The Organizer is a separate application that contains all audio, video, and still image content that you’ve input into either Adobe Photoshop Elements or Premiere Elements since you first installed the programs. It’s a great place to start many projects and provides access to a wide range of organization and collection functions.
) you can view, sort, and select media you have captured or imported into your current project. There’s some overlap between Media view, Project view, and the Organizer application, so I’ll discuss that. The Organizer is a separate application that contains all audio, video, and still image content that you’ve input into either Adobe Photoshop Elements or Premiere Elements since you first installed the programs. It’s a great place to start many projects and provides access to a wide range of organization and collection functions.
Media view works neatly within Premiere Elements’ Organize workspace. It doesn’t offer the breadth of capabilities enabled by the full Organizer, but it’s convenient and provides a customized subset of functions that let you efficiently find and deploy media within your movie projects.
As mentioned, Media view is the default view in the Tasks panel and should be open when you run Premiere Elements for the first time. If it’s not showing now, click Media in the Organize workspace, or choose Window > Media.
When you first run Premiere Elements, either by loading an existing project or starting with a new project, Media view will display all files currently contained in the Organizer, so you can easily reuse this content if desired. As you import content into the project, Media view will show only the newly imported content.
In contrast, Project view displays all content that you’ve imported into the project. Clips appearing in Media view and the Organizer when you first run Premiere Elements won’t appear in the Project view until you either import them or drag them to the My Project panel. Let’s load some files from the lesson folder to reinforce this point.
Follow this procedure to import audio and video clips from the Lesson04 and 05 folder.
- In the Organize workspace, click the Get Media button (
 ).
). - Click Files and Folders (
 ).
).
Premiere Elements opens the Add Media dialog.
- Navigate to the Lesson04 and 05 folder. Select the movie clips Clip 1.mov through Clip 10.mov and the Lesson04_Movie.mov. Click Open (Windows)/Import (Mac OS).
After importing the clips, Media view should display only the clips you just imported. Project view, which previously contained only the one MOV file, should contain all the new files that you just imported plus Lesson04_Movie.mov.
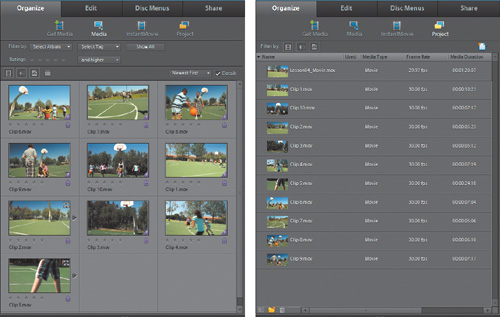
If you compare the two panels, you will see the same files in both. However, if you close the project file and later reopen it, Media view will again contain all files previously imported into all previous Premiere Elements projects, whereas Project view will contain only those files imported into that specific Premiere Elements project.
With this background information, let’s take a deeper look into both workspaces, starting with Media view.
Finding Clips in Media View
Media view’s role is to help you find files using different search methods. Some basic search methods are available without any action on your part, and advanced methods are available after you’ve rated the clips or have applied keyword or Smart Tags to your clips; all of which are discussed later in this lesson. In this short section, you’ll learn how to use the basic tools in Media view to find the desired file.
- To find files in Media view, do any or all of the following:
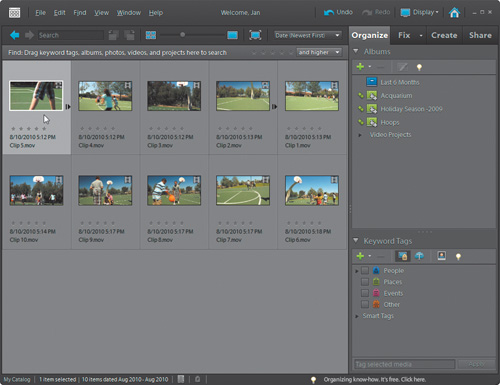
A. Show/Hide Video. B. Show/Hide Audio. C. Show/Hide Still Image. D. Set Date Range. E. Media Arrangement According to Date. F. Details check box.
• Browse through the entire catalog by using the scroll bar at the right side of Media view.
• Select either Newest First or Oldest First from the Media Arrangement According to Date menu located in the upper-right corner of Media view to sort the files in chronological or reverse-chronological order.
• Select which media type to show—or not to show—using the icons just below the Ratings field.
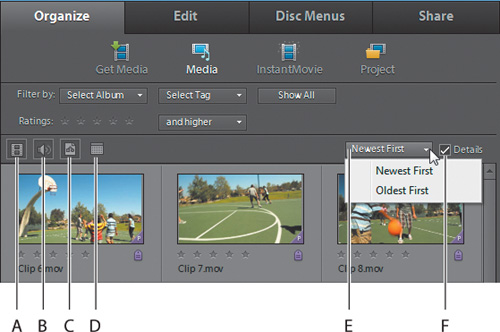
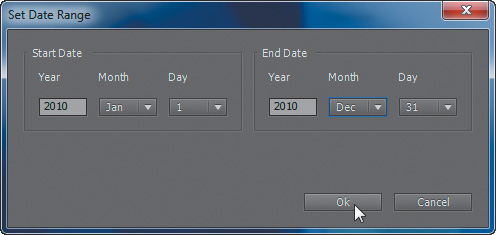
• Restrict your search to files created within a period of time by choosing Set Date Range and then entering a start and end date in the Set Date Range dialog.
• Select the Details checkbox to show star ratings, filename, and other details in Media view.
• Use the Media Arrangement According to Date menu to display the newest clips first or the oldest clips first.
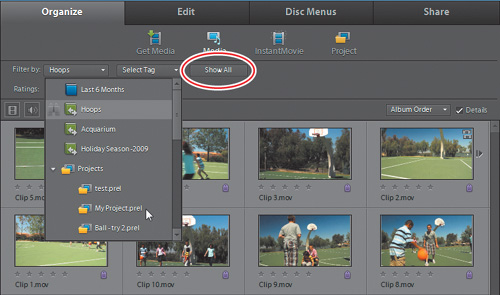
• Click the Filter By: list box and choose either an Album (
 ) or Project (
 ). Media view will display content from that Album or Project.
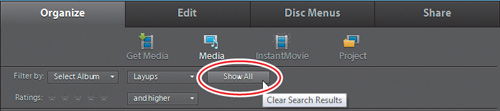
• To show all content in the Media view, click the Show All button.
Note
The Media pane shown in the figure will look different from yours because it shows all projects previously edited on this computer, as well as other content previously imported. Since it’s impossible to tell what’s in your Media pane, we decided to show what a typical Media pane would look like.
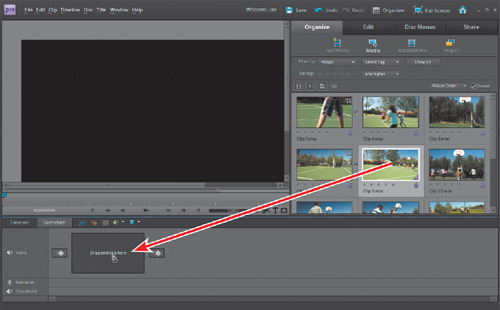
- To add a still image, video, or audio file from Media view to your project, drag the file from Media view into the Timeline or Sceneline of the My Project panel. This will also automatically add the file to Project view. Click No if Premiere Elements asks if you want to fix any quality issues in the clip, or any other questions.
Note
Sometimes when you drop a clip into the My Project panel, you’ll see a note that says “Clip being dropped contains solid background color. Do you want to apply Videomerge on this clip?” Click No if you see this message, except as directed in Lesson 6.
Tagging in the Organizer
Media view is great for quickly finding clips, but the Organizer is Premiere Elements’ best tool for serious organization and search and retrieval work. You can open the Organizer by clicking the Organizer icon (![]() ) in the top toolbar. This exercise will detail how to perform manual and Smart Tagging in the Organizer, and then how to search for clips using those tags in the Organizer.
) in the top toolbar. This exercise will detail how to perform manual and Smart Tagging in the Organizer, and then how to search for clips using those tags in the Organizer.
Let’s start with a brief description of tagging, which you perform in one or more of three ways, via star ratings (1–5), applying keyword tags, and using Smart Tags. At a high level, all tags allow you to more easily find the clips to include in a particular movie. For example, if you review and rate all your clips on a scale of 1–5, you can later search for only clips that you rated 4 or above—an easy way to find high-quality clips and eliminate poor-quality clips.
Keyword tags allow you to tag a clip by person, location, event, or other tag, with customizable categories. For example, in this exercise, you’ll apply several keyword tags to the clips from this project, and then search for clips containing these keyword tags.
When you run the Auto-Analyzer on a clip, Premiere Elements analyzes the video to detect scenes based on content; you can hunt for scenes with faces and identify scenes that are out of focus, shaky, underexposed, or overexposed. Using this qualitative data, Premiere Elements then categorizes all clips as high, medium, or low quality. This serves a valuable triage function that you can later use to search for the best clips for your movie. This analysis is also used for features like Smart Trimming, which you’ll learn in Chapter 5, and Automatic Quality Enhancement, as discussed in Chapter 6.
For example, if you shot an hour of video on your last vacation, Smart Tagging allows you to identify medium-quality-and-higher clips containing faces (presumably family members), and produce a movie containing only these clips. What would literally take you hours to accomplish manually, Smart Tagging can produce in a few moments.
Using all these tags in any combination, you can hunt for clips to manually produce into a movie or create an InstantMovie, which is a professional-looking edited movie complete with titles, soundtrack, effects, and transitions that you’ll produce using a fast and simple step-by-step process.
Tagging Clips in the Organizer
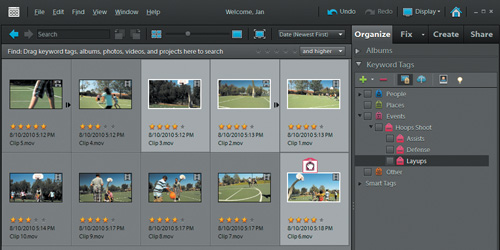
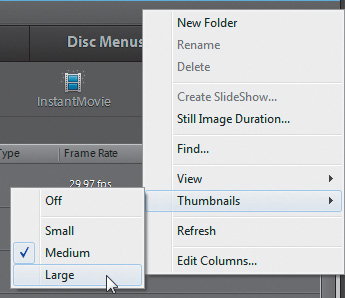
Let’s open and explore operations in the Organizer. To open the Organizer, click the Organizer icon (![]() ) in the top toolbar. To make your Organizer look like the one in the figure, click the View menu and make sure that Details, Show File Names, and Show People Recognition are all selected.
) in the top toolbar. To make your Organizer look like the one in the figure, click the View menu and make sure that Details, Show File Names, and Show People Recognition are all selected.
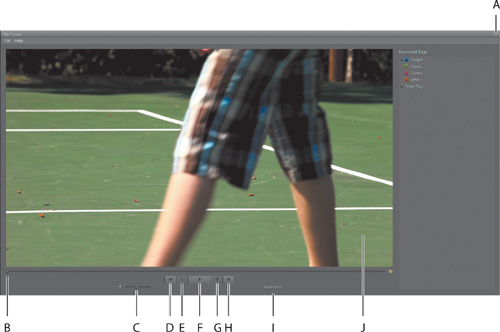
A. Close (and return to Organizer). B. Current Position. C. Volume. D. Start. E. Record. F. Play (spacebar). G. Stop. H. End. I. Current Time. J. Preview window.
- Double-click the video Clip 5.mov to open the file in the Organizer’s Preview view. Pretty snazzy pants, eh?
- Click Play to play the video file, and use the playback controls to fast-forward, rewind, and otherwise experiment with these controls.
- In the upper right of the Preview view, click the Close icon () to return to the Organizer.
Working with Star Ratings
Follow these procedures to apply and delete star ratings, and to search for clips based on the star ratings. Ratings range from 1 (on the extreme left) to 5 (on the extreme right).
Note
You can position the Organizer anywhere onscreen by grabbing the docking header and moving the panel to the new location. You can also resize the panel by grabbing and dragging any edge to the desired size.
A. Target Stars list box. B. Show All button.
- If you don’t see the star ratings, choose View > Details in the Organizer menu.
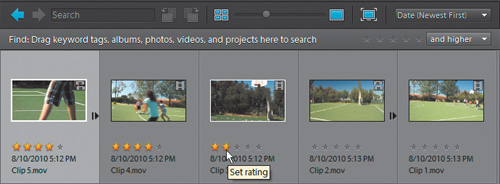
- Hover your pointer over the star ratings beneath any clip, and click the star that corresponds to the desired rating for that clip. Go ahead and rate a few clips so you can sort by rating in step 5.
- To change a rating, use the same procedure and choose a different rating.
- To delete the star rating, click the last selected star on the right (the fourth star in a clip rated four stars).
- To find clips based on their assigned ratings in the Organizer (or in Media view), click the number of target stars and adjust the list box as desired. Premiere Elements displays only those files that meet the selected criteria.
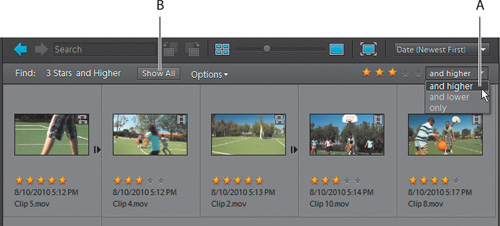
- Click the Show All button to view all clips in the Organizer (or Media view).
Working with Keyword Tags
Premiere Elements includes general categories of keyword tags that you can apply as is or customize with your own categories or subcategories. In this lesson, you’ll create and apply two custom categories in the Organizer, and then search for clips based on those keywords in Media view.
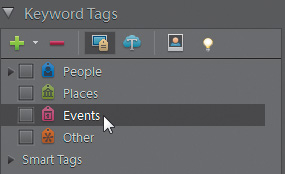
- Under Keyword Tags in the Organizer, click and select Events.
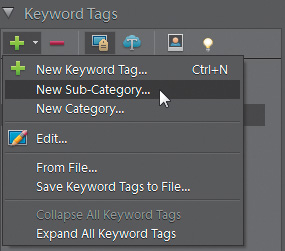
- Under Keyword Tags, click the Create New button (
 ) and choose New Sub-Category.
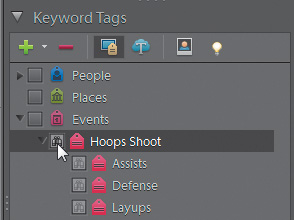
- In the Create Sub-Category panel, type Hoops Shoot in the Sub-Category Name field. Then click OK.
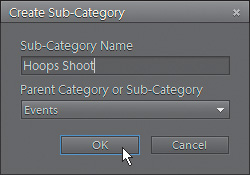
Premiere Elements creates the new subcategory.
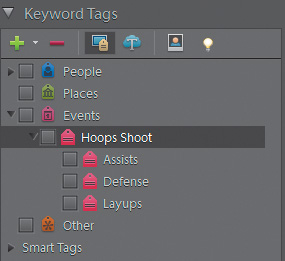
- Repeat steps 2–3 to create three subcategories beneath Hoops Shoot called Layups, Assists, and Defense.
- In the Browser panel, click Clip 1.mov. Then press and hold the Ctrl key (Windows)/Command key (Mac OS), and click Clip 2.mov, Clip 3.mov, and Clip 6.mov.
- Drag the Layups keyword tag to any of the selected clips. When you release the pointer, Premiere Elements applies the keyword tag to all selected clips.
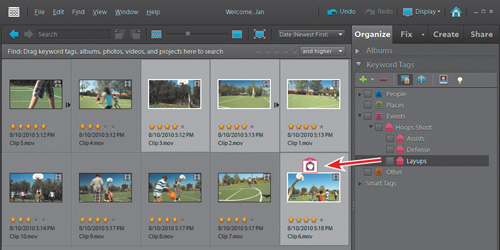
- Use the same procedure to apply the Assists tag to Clip 4.mov, Clip 5.mov, and Clip 7.mov; the Defense tag to Clip 8.mov and Clip 9.mov; and the Hoops Shoot tag to Clip 10.mov (since it doesn’t fall into any of the three more specific categories).
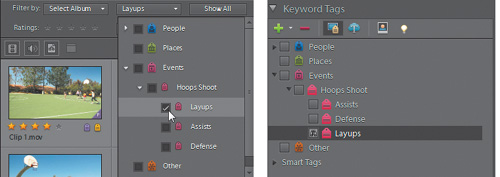
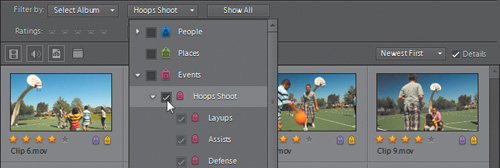
- In Media view (shown in the next figure on the left) and Organizer (on the right), or both, select the box next to the keyword tags to show only those files tagged with the selected keyword tags. In both panels, Premiere Elements will show only the Layups clips.
- In the Organizer, click the View Keyword Tag Cloud button (
 ) to view the tags as a keyword cloud, which allows you to visualize the number of clips associated with a keyword. Click the View Keyword Tag Hierarchy (
 ) to return to the default view.
About the Auto-Analyzer
As mentioned earlier, the Auto-Analyzer analyzes your video clips for content and quality, and is integral to a number of functions, including Smart Tagging, Smart Trimming, and creating InstantMovies, which you’ll learn to do later in this chapter. You can run the Auto-Analyzer manually, as you’ll learn in the next section, or run it as a background process. In fact, by default, the Auto-Analyzer will run on clips that you’ve imported anytime your system is running and idle.
To access this preference option, in Organizer, choose Edit > Preferences > Media Analysis (Windows) or Adobe Elements 9 Organizer > Preferences > Media Analysis (Mac OS). In the default setting, Premiere Elements will work in the background with imported media, so when you’re ready to edit, you won’t have to wait for the Auto-Analyzer to run.
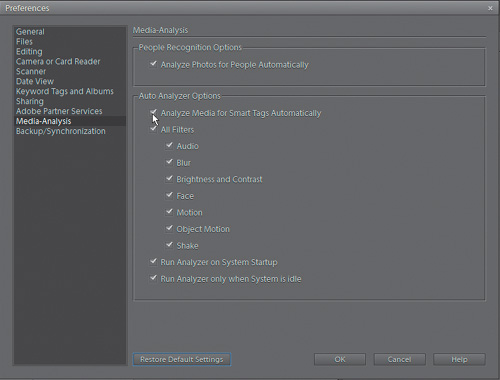
In most instances on most computers, background operation should work just fine. On older, less powerful computers, and those configured with the minimum RAM, background operation may cause a noticeable drag on foreground operations, particularly when working with H.264-based, high-definition formats like AVCHD and video shot by DSLRs. If you notice any sluggishness in your foreground operations after importing footage or experience any system instability, try disabling the Auto-Analyzer as a background operation by deselecting the Analyze Media for Smart Tags Automatically check box.
Running the Auto-Analyzer Manually
To manually run the Auto-Analyzer and apply Smart Tags to the project clips, follow these steps.
- If the Organizer isn’t open, click the Organizer icon (
 ) in the Organize workspace to open the Organizer. Otherwise, Alt+tab (Windows) or Command+tab over to the Organizer.
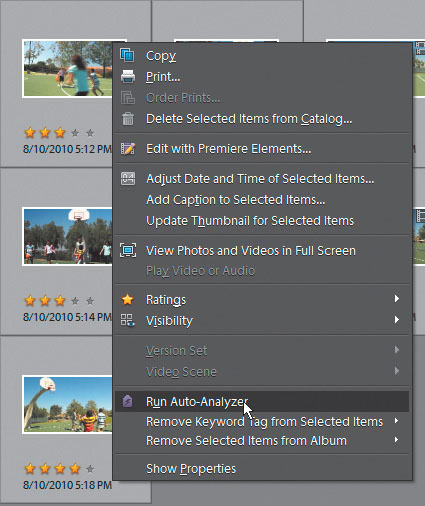
 - Click to select all clips, and then right-click and choose Run Auto-Analyzer. This can take a while, so you might want to try one or two clips first.
Tip
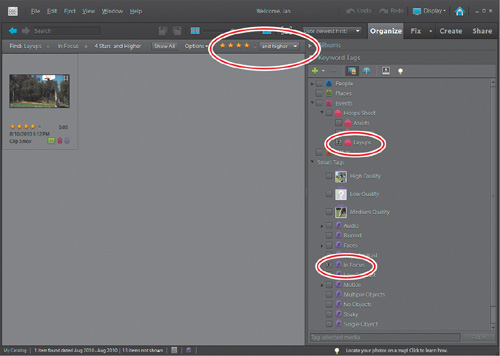
As with keyword tagging, you can use the tags created via Smart Tagging in either the Organizer or Media view. You can use these tags by themselves or in conjunction with keyword tags or even star ratings. For example, in the Organizer, click four stars “and higher” in the top toolbar, click the Layups tag in the Keyword Tags, and click In Focus in Smart Tags. Premiere Elements will display only those clips that meet these criteria.
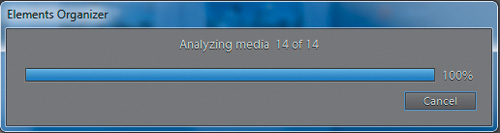
- Premiere Elements starts analyzing the clips and reports its progress in the Elements Organizer. The duration of the process will vary by clip length, clip format, and the speed of your computer. After completion, Premiere Elements will open the Elements Organizer window to let you know the process has completed; click OK to close that window.
- In the Organizer, if necessary press Ctrl+D/Command+D to ensure that Details are showing. In Media view, select the Details check box to do the same. In both panels, a purple tag (
 ) beneath the clip’s thumbnail indicates that Smart Tagging has been applied. Tags of different colors (
 ) indicate that keyword tags have been applied, whereas the Album tag (
 ) in the Organizer only indicates that the clip is in an album. To view which tags have been applied, or which album(s) into which the clip was included, hover your cursor over the respective tag in either the Organizer or Media view. Tagging details will appear beneath the Preview window.
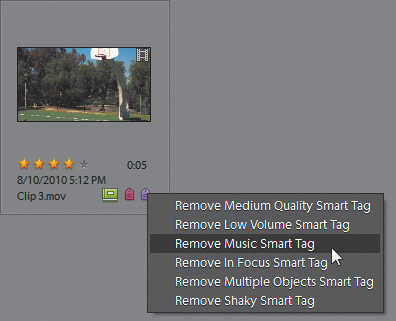
- To remove a tag, right-click the tag in the Organizer and delete the tag, or right-click the thumbnail in Media view and choose the tag to remove.
Working with Clips After Smart Tagging
Let’s take a moment to understand what happens to clips after Smart Tagging. To review, during Smart Tagging, Premiere Elements breaks the clip into different scenes based on content changes (as opposed to timecode, like DV files); finds different types of content like faces; and rates the quality of each clip based on factors like exposure, focus, and stability.
In the Organizer, you’ll know that the clip has been split into multiple scenes if there is a Step Forward icon (![]() ) on the right of the clip. Click that icon, and Premiere Elements displays all scenes separately in the Organizer, surrounded by a border that’s a lighter gray than the rest of the Organizer. This lets you know that all the scenes are part of a single clip.
) on the right of the clip. Click that icon, and Premiere Elements displays all scenes separately in the Organizer, surrounded by a border that’s a lighter gray than the rest of the Organizer. This lets you know that all the scenes are part of a single clip.
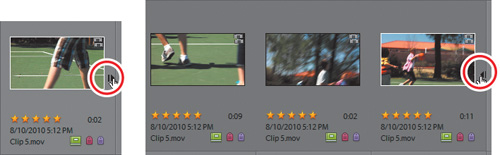
In the Organizer, you can treat each scene as a separate clip, for example, dragging it to the My Project panel to include it in a project or double-clicking it to play it in the Preview window. You can consolidate all scenes back into a single frame by clicking the Step Backward icon to the right of the final scene (![]() ). Note that you can expand and contract a clip into its separate scenes in Project view using these same controls.
). Note that you can expand and contract a clip into its separate scenes in Project view using these same controls.
Creating an InstantMovie
In this exercise, you’ll create an InstantMovie from the basketball clips that you tagged in a previous exercise. Again, an InstantMovie is a professional-looking edited movie, complete with titles, soundtrack, effects, and transitions that you’ll create by following a simple wizard.
- If necessary, switch to Premiere Elements. In Media view, click the Show All button (if it’s visible) to display all clips available in the Organizer. If the button is not visible, all available content is already displayed.
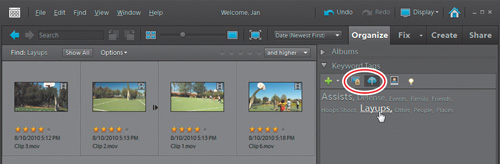
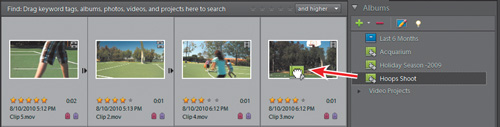
- Click the second Filter By: list box, click the triangle next to Events, and then select the check box next to Hoops Shoot. Media view will display only those clips previously tagged with the Hoops Shoot tag or clips tagged with a subcategory of the Hoops Shoot tag. Click outside the menu to close the menu.
- Press Ctrl+A/Command+A to select all clips in the Media view, and then click the InstantMovie (
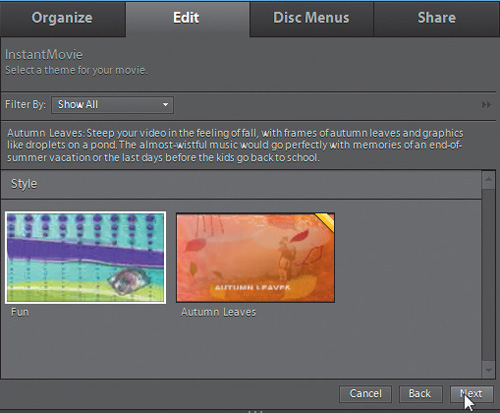
 ) button. Premiere Elements opens the InstantMovie Wizard. You can preview any Style by clicking it, and stop the preview by clicking it again.
 - Choose Fun Style and click Next. If this theme is not available, choose another.
- Customize the Theme as desired. Accept the options as is, or do any or all of the following:
• Customize the Opening and Closing Titles.
• Select the Auto Edit check box to have Premiere Elements analyze your clips and edit them to fit the selected theme, which is recommended. If you don’t select Auto Edit, Premiere Elements uses the clips as is and doesn’t edit them. Also choose whether or not to Apply the Auto-Analyzer to clips that you haven’t previously analyzed.
• In the Music box, choose the Theme Music radio button to use the background music from the selected Theme, or choose the No Music radio button. To use your own background music, click the My Music radio button, and then click the Browse button to choose the target song. Then drag the Music/Sound FX slider to the desired setting, dragging to the right to prioritize audio captured with the video clips and to the left to prioritize the selected background music. If you have dialog in your project (which these clips don’t), select the SmartMix check box and Premiere Elements will reduce the volume of the music track when it detects dialog.
• In the Speed and Intensity dialog, adjust the Effects and Cuts sliders as desired.
• In the Duration box, choose the desired option. Match Music produces a movie that matches the duration of the selected music and is recommended. Or, you can specify a duration or choose Use All Clips, which uses all clips at their original duration with no background music.
• In the Sequence box, choose Theme Order (recommended), which allows Premiere Elements to use clips as they best match the theme, or choose Time/Date, which uses the clips in the order that they were shot.
• In the Theme Content box, choose the content to incorporate into the InstantMovie and whether to replace any existing content with theme-based content.
• In the Render Preview box, choose Yes to render a preview of the InstantMovie after completion or No to preview in real time from the My Project panel (recommended).

- After selecting your options, click Apply to create the InstantMovie. Click No when the InstantMovie dialog opens and asks if you want to select more clips. Click No when Premiere Elements asks if you want to render the movie. Premiere Elements creates the InstantMovie and inserts it into the My Project panel.
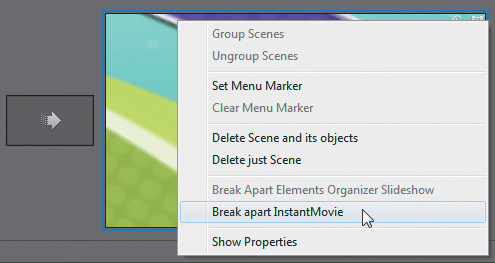
- Premiere Elements adds the InstantMovie to the My Project panel (either Timeline or Sceneline, whichever was selected) in consolidated form. To separate the InstantMovie into its components to edit them, click to select the new InstantMovie, right-click, and choose Break apart InstantMovie.
- Use the playback controls in the Monitor panel to preview the InstantMovie.
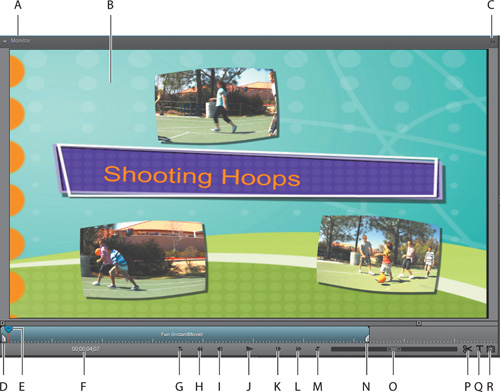
A. Docking header. B. Preview area. C. Monitor menu. D. In Point handle. E. Current Position. F. Current time in movie. G. Go to Previous Edit Point (Page Up). H. Rewind. I. Step Back (left). J. Play/Pause Toggle (spacebar). K. Step Forward (right). L. Fast Forward. M. Go to Next Edit Point (Page Down) N. Out Point handle. O. Shuttle. P. Split Clip. Q. Add Default Text. R. Freeze Frame.
Uploading Files to Photoshop.com
Depending on your membership level in Photoshop.com, you can back up at least 2 gigabytes (GB) of video, audio, and still image files to the site. To upload files, you must first create an album, and then add the video file to that album.
Follow this procedure to back up video files to Photoshop.com.
- If necessary, click the Organizer icon () in the Organize workspace to open the Organizer.
Note
Photoshop.com services are currently available only for Premiere Elements users in the United States.
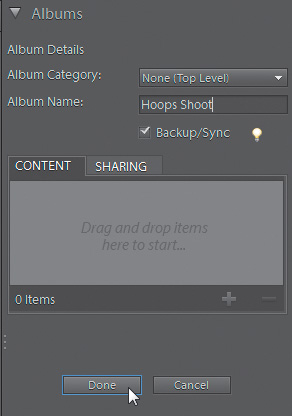
- Under Albums in the Organize workspace, click the Create New Album or Album Group button and choose New Album. Premiere Elements opens the Create Album panel.

- In the Album Name field, type Hoops Shoot, and make sure that the Backup/Sync check box is selected. Then click Done to close the panel.
- Because you also named a subcategory in Events Hoops Shoot, Premiere Elements will open a dialog asking if you want to create an album of that name as well. Click OK to close that dialog. If you’re not signed in, you will see a dialog to enter your account info or to register.
- In the Keyword Tags box, select the check box next to the Hoops Shoot tag. The Organizer will display only those clips previously tagged with the Hoops Shoot tag or a tag from any of the three subcategories.
- Press Ctrl+A/Command+A to select all clips.
- Drag the Hoops Shoot album tag to any of the selected clips. When you release the pointer, the album tag is applied to all selected clips.
Note
Once you create the album, you may be prompted to log into www.Photoshop.com. If you haven’t created an account, you can do so by clicking Join Now on the www.Photoshop.com Home page. If you don’t have an account or aren’t currently logged in, you’ll get an error message in your Preferences panel.
- In the Organizer menu, choose Edit > Preferences > Backup/Synchronization (Windows)/Adobe Elements 9 Organizer > Preferences > Backup/Synchronization (Mac OS). In this panel, if not already selected, do the following:
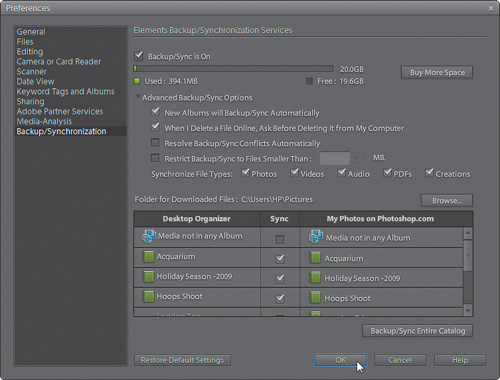
• Select the Backup/Sync is On checkbox.
• Twirl the Advanced Backup/Sync Options to reveal the advanced options. Here’s where you can set options like which file types to archive and how to resolve conflicts between your online and desktop albums. Adjust these options as desired.
• Select the Sync check box for Hoops Shoot.
- Click OK to close the Preferences panel.
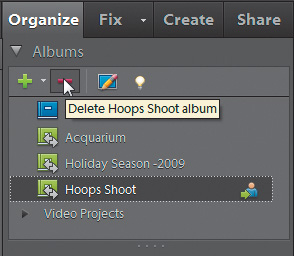
- Unless you have a burning desire to store random videos of some kids shooting hoops on your Photoshop.com site, under Albums in the Organize Workspace, click the Hoops Shoot album, and then click the Delete Album button (
 ). Premiere Elements will delete the album and remove any files from that album previously uploaded to Photoshop.com.
Note
Synchronizing video files seems like a great idea, but remember that only ten minutes of DV or HDV video will consume the entire 2 GB of starter storage space on Photoshop.com. Keep that in mind when you select the file types to synchronize.
Working with Project View
As discussed previously, Project view is where Premiere Elements stores all clips captured or imported into a project. The filenames in Project view identify the files imported into the project.
It’s important to note that files listed in Project view are simply references to the clips you import, not the actual clips. The original clips you import are on your hard disk and are untouched by Premiere Elements. Cutting or editing a clip in Premiere Elements does not affect the original file. Premiere Elements records your modifications along with the reference to the original file in Project view. This means that a 20 MB clip takes up 20 MB of space on your hard disk whether you use only a portion of the clip—by trimming away unwanted sections—or whether you use this clip in its full length (or even two or more times) in a project.
Note
By clicking the column headers, you can choose to sort by other attributes or toggle between ascending and descending order. You can customize which columns you want shown in Project view by choosing Edit Columns from the panel menu in the docking header of the Tasks panel.
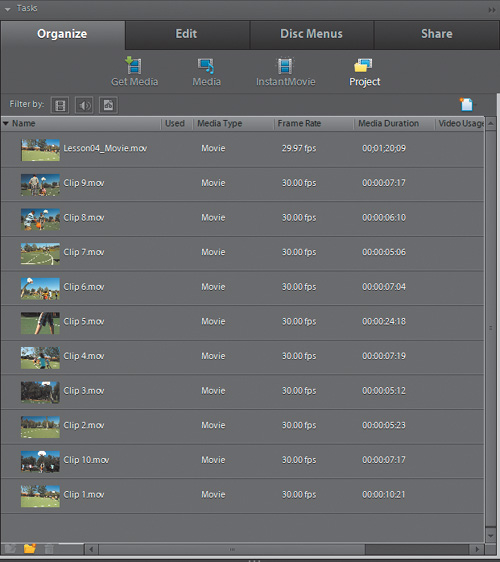
- To show Project view in Premiere Elements, select the Organize tab and then click Project. Or, choose Window > Project. Project view lists all the source clips imported to your Premiere Elements project. When you capture video or import files, the individual clips are automatically placed in Project view, as shown here.
- If necessary, use the scroll bar on the right side of Project view to scroll down toward the bottom of the list.
- To view the configuration options available for the Project panel, the docking headers must be visible. Choose Window > Show Docking Headers if they aren’t. Then click the panel menu (
 ) located at the right end of the Tasks panel docking header to view your options.
Working with Smart Albums
You know the drill. It’s holiday time or perhaps birthday time, and you’re thinking, man, I’ve gotta create a year-in-review video or perhaps a new photo collection. If you’ve been applying tags to your video all year long, you should be able to quickly search for what you want via some combination of tags, Smart Tags, star ratings, and date selection.
Alternatively, using a Smart Album in Premiere Elements, you can see all the relevant content with the click of a button. Simply stated, a Smart Album contains information based on search criteria that you insert when you create the Smart Album.
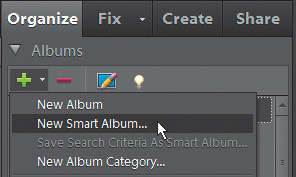
To create a Smart Album, click the Create New Album or Album Group button and choose New Smart Album. Premiere Elements opens the New Smart Album panel.
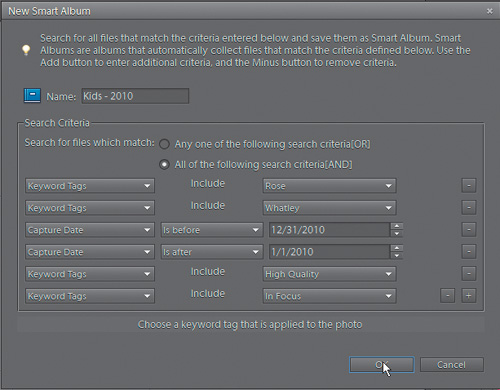
In the New Smart Album panel, you can add any number of search criteria, including keyword tags, date tags, and Smart Tags. The New Smart Album will identify all content tagged for either of my two daughters (Rose and Whatley) that was shot during 2010 and is judged High Quality and In Focus by Premiere Elements. When I’m ready to produce that year-end video, all I have to do is click the Kids—2010 Album, and the content will be there waiting for me.
Trimming a Clip in the Preview Window
One of the most important editing tasks is removing unwanted footage from the beginning and end of your clips. Premiere Elements has multiple ways of accomplishing this task, but you can access one of the simplest techniques in Project view.
Note
Trimming a clip in the Preview window does not change the In and Out points of instances of that clip already included in the My Project panel. It only sets the In and Out points for all subsequent instances of that clip placed in the My Project panel.
A. Docking header. B. Preview area. C. Close window. D. In Point handle. E. Current time in movie. F. Set In Point. G. Rewind. H. Step Back (left). I. Play/Pause Toggle (spacebar). J. Step Forward (right). K. Set Out Point L. Fast Forward. M. Clip Representation in Mini-Timeline. N. Clip duration. O. Current-time indicator. P. Out point handle.
- Locate the Clip 9.mov clip in Project view in Premiere Elements. Double-click the clip to open it in the Preview window. Note that the name of the clip is displayed in the title bar of the Preview window.

- Click the Play button () and play this clip from beginning to end. You’ll notice some unnecessary frames at the start and end of the clip. You’ll trim that out shortly.
The timecode in the lower-left corner of the Preview window displays the timecode of that clip on the original DV tape, whereas the timecode in the lower-right corner shows clip duration. You can navigate through this clip by clicking the timecode in the lower-left corner of the Preview window and then dragging left or right.
- Place your pointer over the current-time indicator (
 ) in the lower-left corner of the Preview window and drag it to the right until the current time in movie timecode beneath the window reads 00;00;00;24, which is 24 frames in from the start of the clip. Note that you can also use the left and right arrow keys on your keyboard for precise positioning.
Note
When you set In and Out points in the Preview window, they’re automatically applied–prospectively–when you drag the clip into the My Project panel, but these In and Out points aren’t retroactively applied to clips already in the My Project panel. You’ll learn how to trim clips in the My Project panel in the next chapter.
- To set a new In point, click the Set In Point button (
 ). You’ll see the In point handle (
 ) jump to the current-time indicator. Note that you could have also set the In point simply by clicking and dragging the In point handle to the desired location.
 - Next, trim out the extra celebratory frames at the end of the clip. To set a new Out point, click and drag the Out point handle (
 ) to the desired location on the mini-timeline in the Preview window (about 00;00;06;13 as shown in the lower-left corner). Or, position the current-time indicator () at the desired position (00;00;06;13), and then click the Set Out Point button (
 ).
). - Click the Close button () to close the Preview window.
Review questions
1. What’s the difference between Media view and Project view?
2. What’s the difference between the Organizer that ships with Premiere Elements and the Organizer that ships with Photoshop Elements?
3. What is Smart Tagging? Are there any situations in which you wouldn’t want to apply Smart Tagging?
4. After creating an InstantMovie, how do you break up the movie to edit it further?
5. How do you upload your clips to Photoshop.com?
Review answers
1. Media view contains clips that you’ve imported into all projects and has multiple tools to help you find your clips. Project view contains only those clips that you’ve imported into the project.
2. This is a trick question—there is no difference. If you have Premiere Elements and Photoshop Elements installed, both programs can insert content into the same shared database and sort through and retrieve data from that database.
3. When you apply Smart Tagging to a clip, Premiere Elements analyzes the clip to detect scenes based on content, hunts for certain content types like faces, and ranks the quality of your clips. Other than processing time, there’s very little downside to applying Smart Tagging. Your video clips will be divided into useful scenes, and you can find high-quality clips much faster than you could manually.
4. Click the clip with your pointer to select it, and then right-click and choose Break apart InstantMovie.
5. To upload clips to Photoshop.com, create an album in the Organizer and drag the new album tag onto the target clips. Then access the Organizer Preferences panel and make sure that that album is synced with Photoshop.com.