Chapter 6. Working with Effects
In this lesson, you’ll learn how to apply effects to the basketball clips that you used in previous lessons, and you’ll also apply these effects to several new clips. Specifically, you’ll learn how to do the following:
• Apply video effects to single and multiple clips
• Change effects and settings
• Copy effects and settings from one clip to another
• Create a pan over a still image with preset effects
• Render your entire project and a work area within a project
• Control visual effects with keyframes
• Create a Picture-in-Picture effect
• Composite one video over another with Videomerge
• Apply Motion Tracking to a clip
• Apply Effect Masking to a clip
![]()
This lesson will take approximately two hours.

Using Premiere Element’s Shadow/Highlight filter to brighten this dreary lane.
Getting Started
Before you begin the exercises in this lesson, make sure that you have correctly copied the Lesson06 folder from the DVD in the back of this book onto your computer’s hard disk. For more information, see “Getting Started” section at the start of this book.
Now you’re ready to begin working with the Lesson06 project file.
- Launch Adobe Premiere Elements.
- In the Welcome screen, click the Open Project button, and then click the Open folder.
- In the Open Project dialog, navigate to the Lesson06 folder you copied to your hard disk. Within that folder, select the file Lesson06_Start_Win.prel (Windows) or Lesson06_Start_Mac.prel (Mac OS), and then click Open. If a dialog appears asking for the location of rendered files, click the Skip Previews button.
Your project file opens with the Monitor, Tasks, and My Project panels open.
- Choose Window > Restore Workspace to ensure that you start the lesson with the default panel layout.
Viewing the Completed Movie Before You Start
To see what you’ll be creating in this lesson, you can play the completed movie.
- In the Organize tab of the Tasks panel, click Project (
 ).
). - In Project view, locate the file Lesson06_Movie.mov, and then double-click it to open the video into the Preview window.
- In the Preview window, click the Play button (
 ) to watch the video about some kids shooting hoops, which you will refine in this lesson.
 - When you’re done, close the Preview window by clicking the Close button (
 ) in the upper-right corner of the window.
Using Effects
Effects (![]() ) are located in two places in the Edit tab of the Tasks panel. “Standard” effects are in the Audio Effects folder or the Video Effects folder and are organized by type. For example, all video effects that create a blur are grouped within the Blur & Sharpen folder inside the Video Effects folder. As you’ll see, you apply these effects by dragging them onto the target clip and configuring them in the Properties view.
) are located in two places in the Edit tab of the Tasks panel. “Standard” effects are in the Audio Effects folder or the Video Effects folder and are organized by type. For example, all video effects that create a blur are grouped within the Blur & Sharpen folder inside the Video Effects folder. As you’ll see, you apply these effects by dragging them onto the target clip and configuring them in the Properties view.
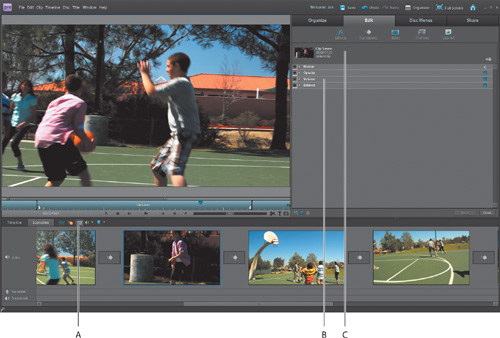
There is also a small group of video and audio effects called “fixed” effects that are applied automatically to each clip in your project. The two video effects are Motion and Opacity, and the audio effects are Volume and Balance. You access these fixed effects by clicking the clip in the My Project panel and then clicking the Properties button (![]() ).
).
Note
As a first-generation program, Premiere Elements for the Mac doesn’t have as many effects as the Windows version, although all effects discussed in this chapter are available in both versions.
Fixed effects are there for convenience; they’re the effects that you’ll use the most when editing your projects. You configure fixed and all other effects exactly the same way—you just have to apply standard effects before configuring them (the fixed effects are already there waiting to be configured).

Beyond the fixed and standard effects designation, it’s helpful to think about effects in the following categories:
A. Properties button. B. Fixed effects. C. Properties view.
• Curative effects:Curative effects correct problems in your video footage, including footage that’s too bright or too dark, backlighted video, video that’s too shaky because it was shot without a tripod, and even video that’s a bit blurry. You can find curative effects in the Adjust folder (Auto Color, Auto Contrast, Auto Levels, Image Control, and Shadow/Highlight), Blur Sharpen folder (Sharpen), Image Control folder (Black & White, Color Balance HLS, Color Balance RGB, Gamma Correction, Tint), and Video Stabilizer folder (Stabilizer).
• Overlay effects:Overlay effects allow you to composite one image over another. You can find overlay effects in the Keying and Videomerge folders.
• Artistic effects:Most other effects are artistic effects that let you create a different look or feel from the original clip. These artistic effects can be quite powerful, like the Cartoonr Plus effect in the NewBlue Cartoonr Plus Elements folder that converts your videos to cartoons, and the Old Film effect in the NewBlue Film Look folder that can make your video look like old film by adding details like scratches and graininess. Other artistic effects let you add lightning to a clip (Lightning effect in the Render folder), add earthquake-like effects (Earthquake effect in the NewBlue Art Effects Elements folder), place a spotlight on a subject (Lighting effects in the Adjust folder), and apply many other looks and characteristics.
• Speed controls:You can speed up, slow down, or reverse your clips in the Timeline of the My Project panel by right-clicking the clip and choosing Time Stretch, or by choosing Clip > Time Stretch in the Premiere Elements menu.
• Motion effects:Motion effects allow you to zoom into and around your original video clip or still image, and are used to adjust the framing of a video or create a pan-and-zoom effect. You adjust these parameters using the Motion controls found in the fixed effects that are automatically available for every clip in the My Project panel. Other fixed effects include the following:
• Image control:With image control you can control the brightness, contrast, hue, and saturation of clips.
• Opacity:The Opacity effect lets you make a clip transparent, and by using keyframes, create fades and dissolves.
• Volume:Volume lets you control the volume of audio clips.
• Balance:Balance lets you adjust the balance of audio clips.
Once you apply an effect from the Effects panel to a clip, you can also adjust its parameters and set keyframes in the Effects Properties view. All effects that you add to a clip appear in the order in which you add them.
Note
Clicking the Properties (![]() ) button in the upper left of the My Project panel opens the Edit workspace in Properties view. There you’ll find the functions of all fixed effects, which you open by clicking the twirl-down triangles to the left of each effect.
) button in the upper left of the My Project panel opens the Edit workspace in Properties view. There you’ll find the functions of all fixed effects, which you open by clicking the twirl-down triangles to the left of each effect.
Although you can apply any and all of these effects at any time during the course of a project, the recommended workflow is to apply curative filters first, then adjust speed and motion, and then add other artistic effects. You can add an effect to any clip in the My Project panel and even apply the same effect numerous times to the same clip, but with different settings. By default, when you add an effect to a clip, it applies to the entire clip. If you want to apply an effect to only part of a clip, split it first using the Split Clip icon beneath the Monitor panel, and then apply the effect to the desired clip segment.
Working with SmartFix
Unless you disable the application of the Auto-Analyzer in the Organizer, at some point Adobe Premiere Elements will analyze your clips, either in the background while you’re performing other edits or after capture or import. While analyzing the clips, Premiere Elements looks for problems in the video.
As you saw with Smart Trim in the previous chapter, Premiere Elements uses some of this information to recommend which clips to trim away. In addition, you can instruct the application to use some of this information to fix common problems like shakiness and poor exposure. This is how you do it.
- If necessary, click the Timeline icon (
 ) on the top left of the My Project panel. Then press the End key on your keyboard to move to the end of the project.
 - In the Organizer workspace, click the Media icon (
 ) to enter Media view.
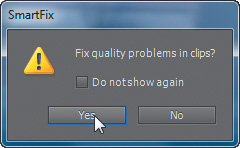
 - Scroll down until you find Clip 4.mov. If you haven’t previously run the Auto-Analyzer, click the clip to select it, right-click and choose Run Auto-Analyzer. Click and drag that clip into the Video 1 track on the Timeline. Premiere Elements opens the SmartFix window.
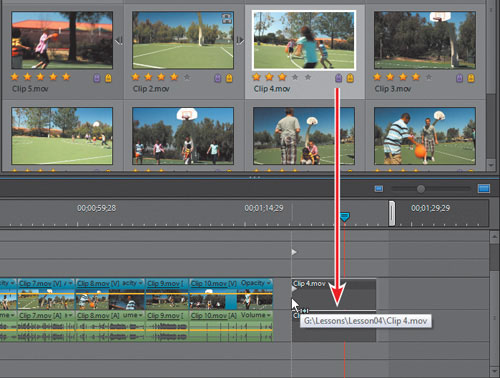
- In the SmartFix window, click Yes to fix the quality problem in the clip.
- In the Timeline, click the Clip 4.mov clip to select it, and then click the Properties button (
 ) at the top left of the Timeline. This opens the Task panel into Properties view.
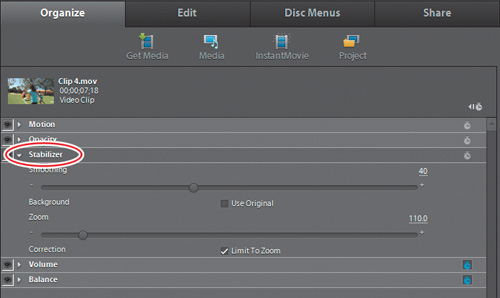
In the Properties view, you’ll note that Premiere Elements applied the Stabilizer effect to minimize the shakiness in the clip. If the clip was too dark or exposure was poor, Premiere Elements would apply the highly effective Shadow/Highlight effect.
- Let’s load a new still image that shows another automatic correction that Premiere Elements will make. In the Organize workspace, click the Get Media icon (
 ) to enter that view, and then click Files and Folders (
 ). Navigate to the Lesson06 folder, and find and import the picture Shady Lane.jpg. Click the picture to select it, right-click and choose Run Auto-Analyzer. Then drag it to the Timeline, clicking Yes in the SmartFix window.
 - Click the Properties button to open the Properties view (if necessary). You’ll see that Premiere Elements applied the Shadow/Highlight effect to the clip.
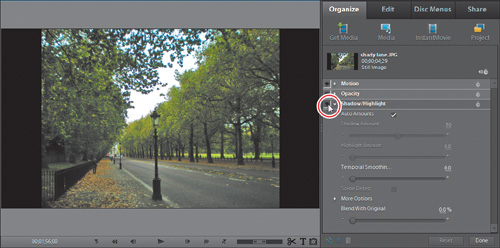
If you click the eye icon next to the effect (officially called the “toggle the effect on or off” button), you’ll see that the Shadow/Highlight effect does a marvelous job of brightening the shadows without “blowing out” the lighter regions.
Note
If you haven’t completed Lesson 4, it’s possible that Clip 4.mov is not in your Media view. If not, click Get Media > PC Files and Folders, and locate and input the file in the Lesson06 folder. Then select the file in Media view, right-click, and choose Auto-Analyze.
Note that you can adjust the setting of any effect applied by Premiere Elements or disable or delete it. Unless you have a strong reason not to do so, it’s generally a good idea to allow Premiere Elements to apply SmartFix whenever you add your clips to the My Project panel. It’s not a panacea, but it’s a great start towards improving clip quality.
- To return to the correct starting point for the rest of the chapter, either delete the two clips you just added to the project or reopen Lesson06_Start_Win.prel (Windows) or Lesson06_Start_Mac.prel (Mac OS) as described in the “Getting Started” section earlier in this chapter.
- When Premiere Elements asks if you want to save your changes, click No.
Perfecting Your Clips
All projects are unique, and all source clips present their own unique issues. Outdoor projects, like this basketball shoot, are generally fairly simple to perfect. To optimize the video in this shoot, you’ll correct backlighting in several clips and pictures, boost the color saturation in another, apply the Stabilizer effects, and reframe a shot using the Motion controls.
However, indoor shoots typically present a completely different range of problems since lighting is often inadequate and camcorders sometimes have problems producing accurate colors when shooting under fluorescent or incandescent lighting. When your personal projects involve indoor shoots, you should experiment with the Brightness, Contrast, Hue, and Saturation adjustments in the Image Control effect, and the Auto Color, Auto Contrast, Auto Levels, and Shadow/Highlight effects in the Adjust folder. Often, applying the latter three—either individually or in concert—can produce quite remarkable improvements in minimal time and with little effort.
Whether you shot the source videos outside, inside, or both, typically you’ll apply the curative effects first, fixing brightness, contrast, and color; then remove the shakes; and then reframe the video to get the best presentation possible. Thereafter you can start to apply artistic effects.
Choosing and Applying Effects
Let’s jump in and adjust brightness and contrast using the Image Control effect, which is a standard effect you’ll apply from Effects view. You can apply standard effects in either the Sceneline or Timeline; use the view that you feel most comfortable using. Let’s adjust Clip 5.mov.
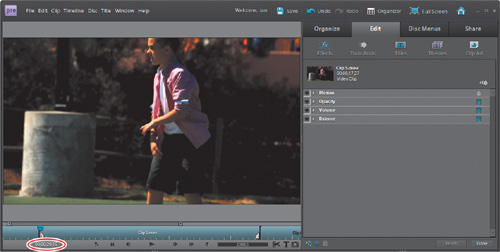
Here’s the problem. The clip was shot in the early afternoon with the sun almost directly overhead. Sometimes when shooting in these circumstances, the subjects of the shoot are a little dark. If you drag the current-time indicator to about 00;00;29;15, you’ll see what I mean: The exposure is good on the boy’s forehead, but the bushes and the rest of the boy’s face are too dark. Let’s look at a couple of alternatives you can use to fix these problems.
- If Clip 5.mov isn’t still selected, click to select it. Then select Effects () in the Edit tab of the Tasks panel.
- In the list box next to Video Effects, click and select Adjust.
- To apply the effect, drag the Image Control effect from Effects view and drop it onto Clip 5.mov. Premiere Elements applies the effect immediately, and you’ll actually see the clip darken a bit.

- Click the Properties button at the upper left of the My Project panel.
- In Properties view, click the twirl-down triangle to the left of the Image Control effect to open the parameter settings.
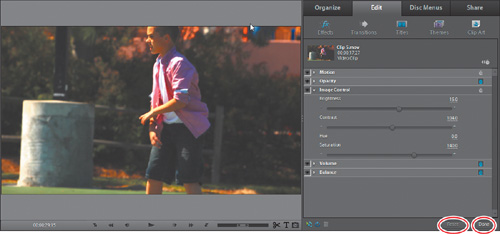
- Drag the Brightness slider to the right until it reaches the value of 15 (or click the numeric entry to make it active, type 15, and then press Enter).
- Drag the Contrast slider to the right until it reaches the value of 104 (or click the numeric entry to make it active, type 104, and then press Enter).
- Drag the Saturation slider to the right until it reaches the value of 140 (or click the numeric entry to make it active, type 140, and then press Enter). Note how the adjustment really brings the colors out in the video.
- In Properties view, adjacent to the twirl-down triangle, find the eye icon (
 ) on the left side of the Image Control effect. As mentioned previously, the eye icon toggles the effect on or off so you can compare the clip with and without the adjustments. Toggle the eye icon on and off a few times. Drag the current-time indicator through the rest of the clip to make sure that the adjustment looks good all over.
 - Click the eye icon again to toggle the effect on. Note that the eye icon isn’t simply for preview; if you don’t toggle the effect back on, Premiere Elements will ignore the effect when rendering the final movie.
- If you’re satisfied with the results, click Done in the lower right of Properties view to return to the Organize workspace.
- To reset the Image Control parameters to their default values, click the Image Control effect to select it, and then click Reset in the lower right of Properties view. This technique works for both fixed and standard effects. Choose Edit > Undo to undo the reset and keep the adjusted values.
- Choose File > Save As and save your project as Lesson06_Work.prel.
Previewing and Rendering Effects
When you apply an effect to a clip or adjust a standard effect, Premiere Elements will show a very close approximation of the effect when you preview in the Monitor panel. In most instances, this is good enough to allow you to perfect your configuration options and move on to the next edit.
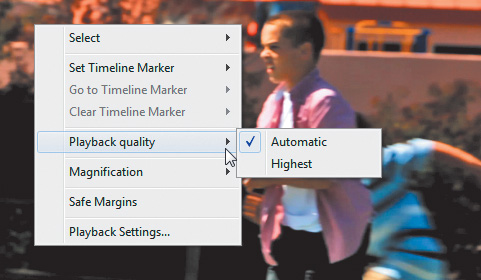
If the quality isn’t sufficient, right-click the frame in the Monitor panel and choose Playback quality > Highest. This tells Premiere Elements to prioritize frame quality over playback speed. As a result, on slower computers, playback may be jerky, but frame quality should be very good. On the other hand, if playback speed isn’t sufficient, right-click in the Monitor panel and make sure that Automatic is selected. This tells Premiere Elements to prioritize smoothness over frame quality. With Automatic selected, you might see some blurriness or pixilation in the frame, but playback should be smooth.
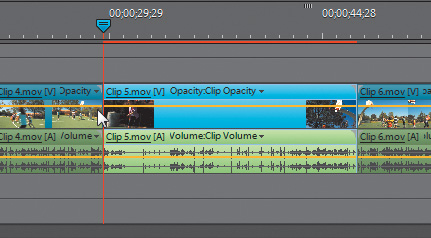
If neither setting gives you the preview quality that you need to finalize the edit, you’ll have to render the clip. Start by clicking the Timeline icon (![]() ) at the top left of the My Project panel to enter Timeline view. If you applied the Image Control effect detailed in the previous lesson, you should see a red line above Clip 5.mov in the Timeline. In this instance, the red line tells you that an effect has been applied to the clip that hasn’t been rendered.
) at the top left of the My Project panel to enter Timeline view. If you applied the Image Control effect detailed in the previous lesson, you should see a red line above Clip 5.mov in the Timeline. In this instance, the red line tells you that an effect has been applied to the clip that hasn’t been rendered.
In general, the red line tells you that some adjustment has been made to the clip that must be rendered before final production. For example, if you apply a title above a clip, you’ll see the red line. If you insert a clip into a project that doesn’t match the project preset—like the JPEG images inserted into the slide show at the end of the project—you’ll see the red line as well. You don’t have to render to preview your work; however, rendering will show you exactly how the final video will look.
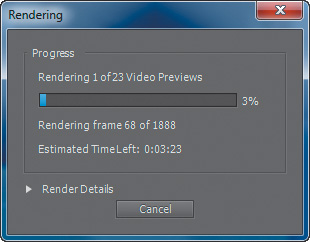
To render the entire project, click Enter/Return. Premiere Elements will open the Rendering dialog, which tells you how many clips need to be rendered and how long it will take. After rendering, Premiere Elements will turn the red bar to green, and start previewing your clip from the beginning.
Note
In Premiere Elements 8, you could elect to render in the background while performing other edits. This function was removed in Premiere Elements 9.
Rendering a Work Area
In most instances, it’s not necessary to render every edit, and sooner or later, you’ll have lots of red lines over your Timeline. At some point, you’ll apply an effect that you do want to render. If you press Enter/Return to render, you render the entire clip, which can be time-consuming. As an alternative, you can simply render the work area that you’re interested in.
We don’t have to do render a work area with our Image Control adjustment to Clip 5.mov, since that’s the only clip that should have a red line, but next you’ll learn how to render a work area using Clip 5.mov. To change the green line above the clip back to red, adjust any parameter in the Image Control effect—for example, change the Brightness value to 14.
- Press the backslash () key to show the entire project in the Timeline.

- Drag the left edge of the work area bar to the start of Clip 5.mov.
- Drag the right edge of the work area bar to the end of Clip 5.mov.
- Press Enter/Return to render the work area. Premiere Elements will render the work area and start previewing at the start of Clip 5.mov.
Again, you don’t need to render each effect to see it in final form; in most instances, the real-time approximation produced by Premiere Elements should suffice. When you need to render, however, often it’s more efficient to render a work area.
Note
Sometimes it may not be convenient to zoom out to see the entire clip and the edges of the work area bar. As an alternative to dragging the edges, you can also place the current-time indicator at the start of the work area and press Alt+[ (Windows) or Option+[ (Mac OS) to set the start of the work area. Then drag the current-time indicator to the end of the work area and press Alt+] (Windows) or Option+] (Mac OS) to set the end of the work area.
Fixing Backlighted Video
The Image Control effect works well with clips that need to be adjusted globally—for example, when the entire clip is too dark or lacks contrast. However, that’s not precisely the case with Clip 5.mov where the background area is very well lit; it’s just that some faces and other areas in the shadows are too dark. When you brighten the faces, you risk brightening the background, which really doesn’t need it.
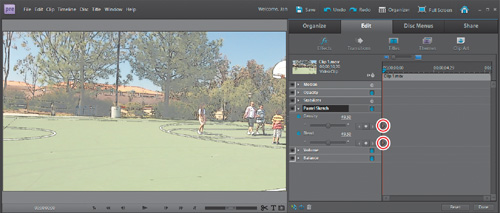
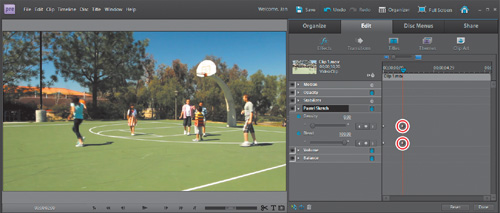
So let’s consider an alternative approach and use the Shadow/Highlight effect, which lets you brighten just the shadows in the clip without adjusting other regions. This effect is perfect for fixing backlighting, which often occurs when shooting against a bright background and is characterized by dark faces such as those in Clip 5.mov.
Note
The Shadow/Highlight effect divides each video frame into three regions based on the original brightness of the pixels in the frame, Shadows (darkest regions), Highlights (brightest regions), and Midtones (all other regions). The Shadow and Highlight sliders let you customize the adjustments to these respective regions, but the effect doesn’t modify the Midtone values.
- Click the Properties button in the upper left of the My Project panel, and then click the Edit tab to enter Effects view (if necessary).
- In the list box next to Video Effects, click and select Adjust.
- Drag the Shadow/Highlight effect from the Effects view onto Clip 5.mov. If necessary, drag the current-time indicator to 00;00;29;15 to view that frame.
- Click the Properties button at the top left of the My Project panel or the Edit Effects button at the lower left of the Effects view to open the Effects Properties view.
- In Properties view, click the eye icon next to the Image Control effect to toggle it off.
- Click the eye icon next to the Shadow/Highlight effect to toggle it on and off. Note how the effect brightens the darker background without adjusting regions that are properly exposed, such as the left side of the cement light stand.
- Click the twirl-down triangle to the left of the Shadow/Highlight effect to open the parameter settings.
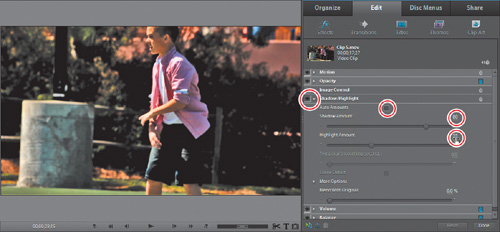
- The default parameters may be too conservative for this clip. Let’s try to improve the results. To adjust the effect manually, deselect the Auto Amounts check box.
- To adjust the darker regions, drag the Shadow Amount slider to the right to increase the brightness of pixels in the shadows (including the faces in this clip) and to the left to decrease the brightness. Try to increase brightness as much as you can without fading the video. Try a setting of about 80.
- To adjust the brightest regions, drag the Highlight Amount slider to the right to darken the brightness of highlight pixels. Try a setting of about 35. Click the eye icon to the left of the Shadow/Highlight effect to toggle the effect on and off.
These are the most important manual controls; to learn about the others, check the Premiere Elements Help file.
- Toggle the Shadow/Highlight effect off, and toggle the Image Control effect on. The Image Control effect does a nice job with the background hedges but doesn’t brighten the face as much as the Shadow/Highlight effect. For the sake of the next exercise, let’s agree that the Shadow/Highlight effect works better and delete the Image Control effect.
- Save your project as Lesson06_Work.prel.
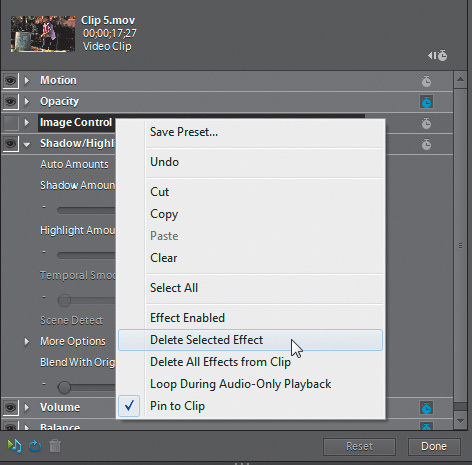
Deleting Standard Effects
You can’t delete fixed effects, but to delete any standard effect, right-click to select it in the Properties panel, and then choose either Delete Selected Effect or Delete All Effects from Clip. Use this procedure to delete the Image Control effect on Clip 5.mov.
Reframing a Clip Using Motion Controls
Let’s take a look at the fixed effects that you’ll probably use the most: the Motion controls. In this exercise, you’ll learn how to use these effects to reframe a shot; later in the lesson, you’ll learn how to use these controls to create a pan-and-zoom effect within an image.
The clip you’ll edit is the first clip of the project, Clip 1.mov. This was my “establishing shot,” which was meant to show the entire court so the viewer could get a feel for the surroundings. It turns out that it’s too much of a wide-angle shot. In this lesson, you’ll use Motion controls to reframe the shot.
- In either the Sceneline or Timeline, click Clip 1.mov.
- If you’re not already in Properties view, click the Properties button in the upper left of the My Project panel.
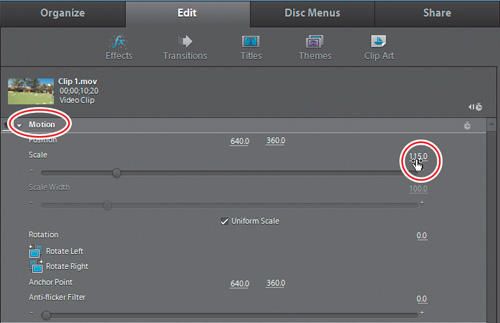
- In Properties view, click the twirl-down triangle to the left of the Motion effect to open the parameter settings.
- Zoom into the video and make it larger. Drag the Scale slider to the right until it reaches the value of 115 (or click the numeric entry to make it active, type 115, and then press Enter).
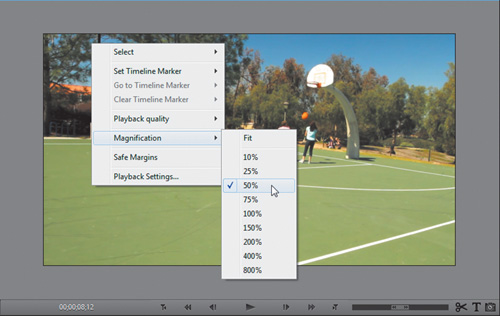
- Now let’s reframe the image. In the Monitor panel, right-click the frame and choose Magnification > 50%. If you’re working on a notebook or very small monitor, choose Magnification > 25%.
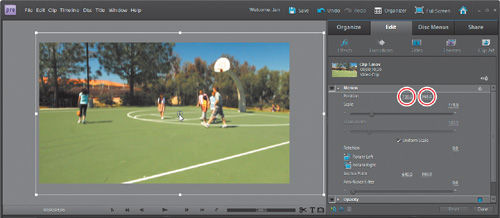
- Click the frame to make the center crosshair active. You should see a white box outside the visible frame in the Monitor panel. As you’ve probably guessed, this is an outline of the entire video, which you can drag around to optimize positioning within the visible area in the Monitor. As you drag the frame around, note that the numeric Position parameters on the right are updated as you move it. You can position the frame either by dragging it directly as you just did or by typing in new numeric parameters. I used 720 and 365, which shifted the video to the right and down slightly.
Tip
Whenever you’re repositioning a clip like this, scroll through the entire video to make sure that you don’t obscure some critical action in the shot.
- In the Monitor panel, right-click the frame and choose Magnification > 100%. This sets your preview at a pixel-for-pixel preview, which is helpful when previewing Motion control adjustments.
- Click the Play button in the Monitor panel to preview the effect.
Stabilizing Shaky Footage
One common problem with home video footage is excessive shakiness, which can occur anytime you don’t use a tripod. Via the SmartFix function, Premiere Elements will stabilize the worst of the clips, but if you elect not to use SmartFix, you’ll have to do it manually. As you probably could tell when you were reframing Clip 1.mov, it bounces around quite a bit. In this exercise, you’ll apply the Stabilize filter to correct this problem.
- In the list box next to Video Effects, click and select Video Stabilizer.
- Drag the Stabilizer effect from Effects view and drop it onto Clip 1.mov.
- Click the Properties button in the upper left of the My Project panel or the Edit Effects button in Effects view to open Effects Properties view.
- In Properties view, click the twirl-down triangle to the left of the Stabilizer effect to open the parameter settings.
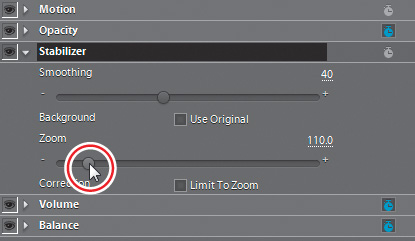
- Preview the clip. There’s no problem with this application of the Stabilizer effect, but sometimes you’ll notice a black bar on the top, bottom, or sides of the clip where the adjustment was too strong and extended beyond the frame’s edge. To correct this, in Properties view, drag the Zoom slider to the right until the bar disappears.
- Drag through the rest of the clip to see if any other bars appear. If not, click Done on the lower right in Properties view to return to the Organizer or move on to your next edit.
Play the clip, using the eye icon to the left of the Stabilizer effect to toggle it on and off. The clip is definitely easier to watch with the Stabilizer effect applied.
Changing Playback Speed
Speed changes are a commonly used effect, and Premiere Elements offers two techniques for speeding up or slowing down your video. In this exercise, you’ll learn how to adjust the speed of clips bounded by others in the Timeline. In a subsequent exercise, you’ll learn how to adjust the speed of a clip that doesn’t have a clip immediately after it on the Timeline.
Specifically, in this exercise, you’ll adjust the speed of Clip 3.mov—which is an instant replay of the layup in Clip 2.mov—slowing it down to 50 percent of its original speed. Note that you can implement this effect only in the Timeline, so step 1 will send your clip to the Timeline of the My Project panel.
- If you’re currently working in the Sceneline, in the My Project panel, click the Timeline button to switch to Timeline. If necessary, zoom into the Timeline so you can easily see the individual clips.
- Right-click Clip 3.mov and choose Time Stretch. Premiere Elements opens the Time Stretch panel.
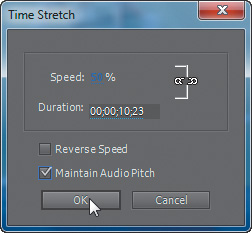
- Type 50 in the Speed box (where it will appear as 50%), and select the Maintain Audio Pitch check box.
- Click OK to close the panel. Premiere Elements extends the clip to its new duration and pushes back all subsequent files. Drag the current-time indicator to the start of the clip, and press the spacebar to play the clip and observe the slow motion. Press the spacebar again to stop playback.
- Save your project as Lesson06_Work.prel.
Working with Keyframes
Every clip in the Timeline, and most effects that you apply to them, can be modified over time. This involves a concept called keyframing. Essentially, a keyframe is a location in the Timeline where you specify a value for a specific property. When you set two keyframes, Premiere Elements interpolates the value of that property over all frames between the two keyframes, effecting a change gradually over time, basically creating an animated effect.
For example, in the next exercise, you’ll use keyframes to create an image pan, in effect simulating the movement of a camera over a still image. Or you can use keyframes to animate the appearance of an effect, which you’ll do in a subsequent exercise.
Keyframes give you significant flexibility and creativity in your projects. Although they sound challenging at first, if you work through the next few exercises, you’ll quickly grasp their operation and utility.
Creating an Image Pan with Keyframes
The image pan is a popular effect in many documentaries and films. An image pan is defined as a movement of the camera, usually from left to right, although it can be from top to bottom and also zooming in or out. In traditional production, an image pan would actually involve the physical movement of a camcorder over an image; however, if you’re working with footage from a stationary camera, Premiere Elements enables you to simulate camera movement using the Motion controls.
Note
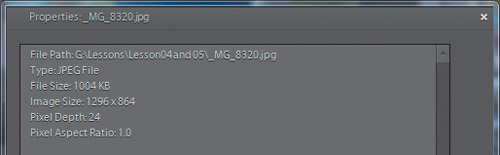
In Properties view, note that this image is 1,296 pixels wide and 864 pixels high. Although it’s not critical that the original image’s resolution exceed that of the project (1280×720 in this instance), when it does, it ensures that you can zoom (up to a point) into regions in the video without causing blurriness. In general, when adding still images to a project, it’s best to use images with a resolution larger than that of the project. Because the image is only slightly larger than the project resolution, you don’t have a lot of wiggle room to zoom into this image.
In this exercise, you’ll use a horizontal image pan to animate the third photo in your slide show.
A. Mini-Timeline. B. Current-time Indicator. C. Hide Keyframes. D. Toggle Animation button (enables keyframes). E. Horizontal and Vertical Position values. F. Scale Values (as a percentage of total size). G. Keyframes.
- In Project view, right-click the _MG8320.jpg image and choose Properties. Properties view enables you to—among other things—identify the size of the digital image you have imported. Close the Properties window.
- If necessary, click the Timeline button to switch to the Timeline in the My Project panel.
- Click to select the _MG8320.jpg image on the Timeline (it’s the third from the left). Click the time ruler above the image to move the current-time indicator to within the image, and then press the Page Up key to move the current-time indicator to the start of the image.
- The image has been automatically scaled to fit entirely into the Monitor panel. Although the original image was 1,296 pixels high, Adobe Premiere Elements automatically scaled down the image to 1280 pixels high. To return the image to its original size, right-click the image in the Timeline and choose Scale to Frame Size to deselect this option. The image zooms out to its full resolution, and you’ll see only a small section of the image in the Monitor panel.
- Click the Properties button in the upper left of the My Project panel or the Edit Effects button in Effects view to open the Effects Properties view.
- In Properties view, click the twirl-down triangle to the left of the Motion effect to open the parameter settings.
- In the upper right of Properties view, click the Show Keyframes (
 ) button. You may need to expand the size of Properties view to better view the keyframes.
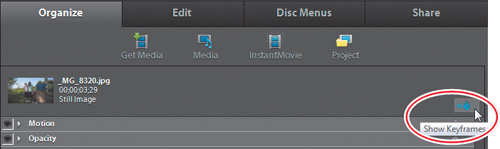
- Note the mini-timeline at the top of Properties view, which has the same values as the Timeline in the My Project panel for the selected clip and has a matching current-time indicator. In the mini-timeline, the current-time indicator should be at the start of the MG8320.jpg clip, right after the transition that Premiere Elements inserted when you created the slide show in Chapter 5. If the current-time indicator isn’t there, click the Page Up key to move it there.
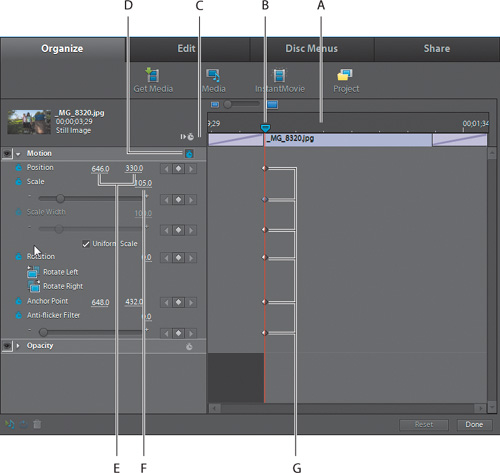
- To the right of the Motion property is a small stopwatch. Click it and notice that a small diamond appears in the mini-timeline within Properties view to the right of each property in the Motion controls. Each of these is a keyframe; next, you’ll adjust the top two.
- Click the Position values to make them active and type 646 and 330, as shown in the previous screen.
- Drag the Scale slider to the right until it reaches the value of 105, as shown in the previous screen. Or, click the numeric entry to make it active, type 105, and then press Enter.
You’ve set the keyframes for the initial position to the desired values. Now you’ll create and set the values for the second keyframe.
- Press the Page Down key to move the current-time indicator to the last frame of the image, which is at the end of a dissolve transition with the next image. The next image will appear in the Monitor panel, but you’ll still be adjusting _MG8320.jpg.
- Click the Position values to make them active and type 650 and 500. After you change the values, Premiere Elements automatically inserts a keyframe.
Note
The current-time indicators in Properties view and in the Timeline of the My Project panel are actually the same. You can use either one to navigate through your clip. However, the Timeline in Properties view enables you to navigate through only the currently selected clip and is used primarily for working with keyframes.
- Drag the Scale slider to the right until it reaches the value of 140. Or, click the numeric entry to make it active, type 140, and then press Enter.
After you change the values, Premiere Elements automatically inserts a keyframe.
- Drag the current-time indicator to the beginning of the _MG8320.jpg clip, and then press the spacebar to play the clip. You’ll see a slow zoom into the picture that will play more smoothly after rendering. If you don’t have background rendering enabled, you might want to render the effect using the technique detailed in the Premiere Elements Help file (search the Help file for “Render an area for preview”). Press the spacebar again to stop playback.
- Save your project as Lesson06_Work.prel.
Note
When adding pan and zoom effects to images like this one, sometimes it’s easiest to delete the transition by clicking it, pressing the Delete key, and then adding the Pan/Zoom effect and reapplying the transition, which you’ll learn how to do in Lesson 7.
Creating a Fade-out Using Keyframes
You can control keyframes in two locations in Premiere Elements: Properties view and the Timeline. In this exercise, you’ll adjust the opacity keyframes of a video clip in the Timeline.
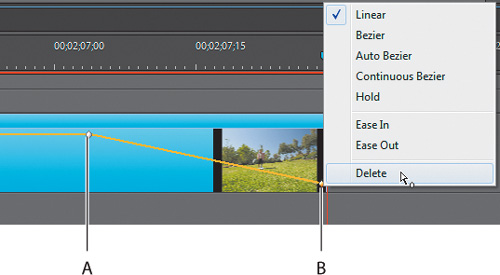
A. First keyframe (opacity at 100%). B. Second keyframe (opacity at 0%).
- Click to select the IMG_0576.jpg image, which is the last image in the Timeline. You may need to scroll to the right in the Timeline to fully see the image.
- Let’s make the video tracks as large as possible to provide some working space. To the right of the IMG_0576.jpg clip, right-click a blank area on the Timeline and choose Track Size > Large. You may have to adjust the scroll bars on the right of the Timeline to see the clip after adjusting the track size.
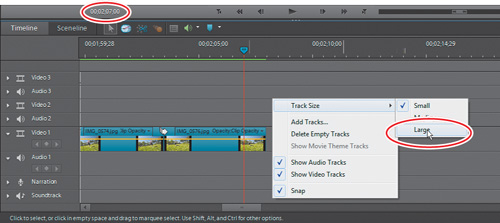
- Drag the current-time indicator to about 2;07;00 in the Timeline. For precision, you can check the timecode on the bottom left of the Monitor panel. Or, to get there quickly and precisely, click the timecode on the bottom left of the Monitor panel to make it active, type the numbers 2 0 7 0 0 on your keyboard, and press Enter. Don’t type in the semicolons, just the numbers, and the current-time indicator will move to that location when you press Enter. (If this timecode doesn’t get you to about one second before the end of the video, just drag your current-time indicator to about a second before the end—that’ll be close enough for this exercise).
- Click the Zoom In tool (
 ) in the Timeline to increase your view of the clip.
When you’re working with clip keyframes, it’s often helpful to increase the magnification. The orange line spanning horizontally across the clip is the connector line (or graph) between keyframes. By default, all clips have the Opacity property enabled.
- Working with IMG_0576.jpg, place your pointer over the orange connector line at the location of the current-time indicator. The pointer changes to a double-arrow icon (
 ).
). - Drag the connector line down towards the bottom of the clip. As you drag, you’ll see a small window with changing numbers. The numbers represent the opacity values. Drag the connector line down to approximately the 50% level. Don’t worry if you can’t get an exact number. When you release the pointer, you’ll see that the clip now has an opacity value of only 50% and is much darker than before.

- Drag the connector line back up towards the top of the clip to restore the clip’s opacity to 100%.
Now you’ll add keyframes to help Premiere Elements create a fade to black at the end of the movie.
- The current-time indicator should be positioned at 00;02;07;00; if not, drag it there (or about one second from the end of the movie). Then position your pointer on the orange connector line where it intersects with the current-time indicator line; the pointer should change to a small cross icon (
 ).
). - With the double-arrow icon as your pointer, hold down the Ctrl/Command key and click the connector line once. You should see a small yellow diamond added to the orange connector line at the beginning of the clip, representing your first keyframe.
- Press the Page Down key to move the current-time indicator to the end of the movie. Using the same procedure, create a keyframe at that location.
- Click the keyframe at the end of the movie clip and drag it down to the bottom of the track. The number on the right of the yellow box next to the pointer is the Opacity value; drag it until that value equals 0.00.
- To view the Opacity fade-out, move your current-time indicator to the beginning of the IMG_0576.jpg clip, and then press the spacebar.
- Save your project as Lesson06_Work.prel.
In Lesson 7, you’ll learn how to create a similar effect using the Cross Dissolve transition. Although the visual effect is similar, working with keyframes lets you customize the effect to a much greater degree.
Working with Keyframes
Once you’ve set a keyframe, you can modify it by dragging it to a new location or value. To delete a keyframe, right-click it and choose Delete (see the previous figure).
The other keyframe-related controls shown in the context menu are advanced options that control the rate and smoothness of change applied by Premiere Elements. For more on these options, search the Help file for “Controlling change between keyframes.”
Finally, you can access all keyframes inserted on the Timeline in Properties view. Select IMG_0576.jpg, and then click the Properties (![]() ) button in the upper left of the My Project panel. This opens Properties view.
) button in the upper left of the My Project panel. This opens Properties view.
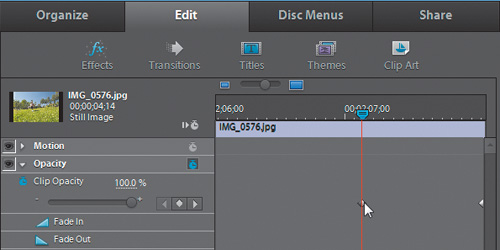
If necessary, click the Show Keyframes (![]() ) button at the top right in Properties view to view the keyframes. Then click the twirl-down triangle to the left of the Opacity effect to open the parameter settings and view the keyframes that you created in the Timeline.
) button at the top right in Properties view to view the keyframes. Then click the twirl-down triangle to the left of the Opacity effect to open the parameter settings and view the keyframes that you created in the Timeline.
You can set and modify opacity-related keyframes in either or both locations. In general, the Timeline is best for fast and simple adjustments, like the fade-out that you just applied, whereas Properties view is a better choice for complicated, more precise adjustments.
Using Keyframes to Animate Effects
You’ve learned how to apply effects and how to create and modify keyframes. Now you’ll animate an effect using keyframes. This is a very powerful capability: Essentially, it lets you create custom transitions using any Premiere Elements effect.
One word of caution: This section is more advanced than some users of Premiere Elements may need, so feel free to skip to the next lesson if you wish. However, you should know that such keyframing is the basis of animation in programs such as Adobe Premiere Pro and Adobe After Effects, which means this could be a useful introduction to using those tools, and the exercise is not difficult to complete. If you do choose to skip it, you can always revisit it later.
In this exercise, you’ll be animating the NewBlue Pastel Sketch effect to create a unique transition that you’ll apply to the start of several clips.
- Select Effects (
 ) in the Edit tab of the Tasks panel, and in the list box next to Video Effects, click and select NewBlue Art Effects Elements.
 - Press the Home key to move your current-time indicator to the start of the project. Increase the magnification of the Timeline if needed.
- Drag the Pastel Sketch effect from Effects view and drop it onto Clip 1.mov to apply it. You’ll see the effect applied in the Monitor panel.
- Click the Edit Effects button in Effects view, and then click the twirl-down triangle next to Pastel Sketch to reveal the controls.
- If keyframes are not showing, in the top right of Properties view, click the Show keyframes () button. You may need to expand the size of Properties view to better view the keyframes.
- With the current-time indicator at the start of the clip, click the small stopwatch to the right of the Pastel Sketch controls to enable animation for this property. After you click the stopwatch, a small diamond appears in the mini-timeline within Properties view to the right of the two configurable properties in the Pastel Sketch control. These are the initial keyframes.
- When producing your own movies, you might want to adjust the effect settings to customize them for your video. Let’s keep things simple here and accept the default values.
- Now you’ll set the second set of keyframes. In the mini-timeline in Properties view, drag the current-time indicator to the right to 00;00;02;00 (which you can see at the bottom left of the Monitor panel).
- Drag the Density slider all the way to the left (to a 0.00 value) and the Blend slider all the way to the right (to the 100.00 value), which essentially turns off the effect.
Changing the value automatically adds a second keyframe, which is represented as a second diamond in the Timeline in Properties view. Once animation has been turned on, Adobe Premiere Elements automatically animates the effect between the two values.
- Click the Home key to return to the beginning of the move, and then press the spacebar to play the clip and the effect. The clip starts out with the Pastel Sketch in full effect and returns to a normal appearance at the 00;00;02;00 mark. Press the spacebar again to stop playback.
- Save your project as Lesson06_Work.prel.
Copying Effects from One Clip to Another
Because effects are customized a single clip at a time, it would be quite time-consuming to place the same effect across numerous clips, especially if you had to drop the effect on each clip. Fortunately, Premiere Elements provides a simple way to copy effects and their settings from one clip to another.
- Click Clip 1.mov in either the Sceneline or Timeline to select it.
- Click the Properties button in the upper left of the My Project panel to open the Effects Properties view.
- Click the Pastel Sketch effect in Properties view.
- Choose Edit > Copy.
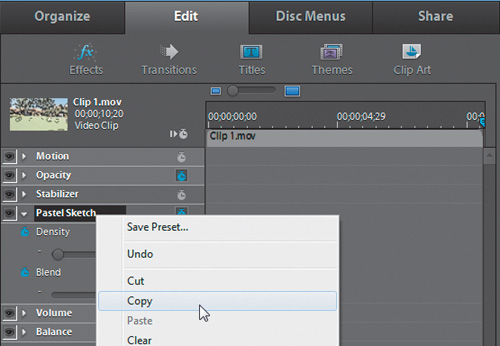
- In either the Sceneline or Timeline, click to select MG8200.jpg, the first clip in the slide show at the end of the movie. Click the Properties button on the upper left of the My Project panel to open Properties view.
- Right-click in the blank gray area beneath the fixed and standard effects in Properties view, and then choose Paste. Premiere Elements applies the Pastel Sketch effect to this clip with the same properties and keyframes.
- Click the top of the My Project panel to make it active. Press the Home key to place the current-time indicator at the beginning of the project, and then press the spacebar to begin playback. When reviewing the movie, note the effects you have applied to the clips.
- Choose File > Save As and save your project as Lesson06_End.prel.
This concludes the main lesson. Next, you’ll learn how to implement several additional effects using other source clips in a separate project file.
Creating a Picture-in-Picture Overlay
Premiere Elements can superimpose multiple tracks of video. In this exercise, you will superimpose one video clip in a small frame over your preexisting background clip that covers the entire screen. This effect is called a Picture-in-Picture (PiP) overlay.
- To load the project file containing the new content, click File > Open Project, and then navigate to the Lesson06 folder you copied to your hard disk.
- Within that folder, select the file Greenscreen_Win.prel (Windows) or Greenscreen_Mac.prel (Mac OS), and then click Open. If a dialog appears asking for the location of rendered files, click the Skip Previews button.
- Choose Window > Restore Workspace to ensure that you start the lesson with the default panel layout.
- In the Timeline, click Rockshow.mov, the only clip. The selected clip appears in the Monitor panel.
- In the Organize tab of the Tasks panel, click the Project button.
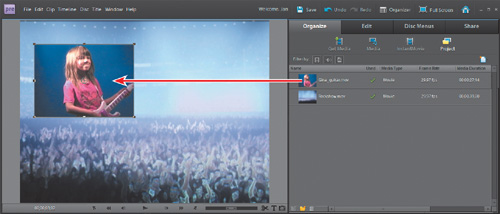
- In Project view, locate the Gina_guitar.mov clip. Click once to select the clip, hold down the Shift key, and drag the clip towards the upper-left corner of the Rockshow.mov clip in the Monitor panel.
- Release the pointer and choose Picture-in-Picture from the menu that appears.
- Click No in the Videomerge panel.
- Click to select the superimposed clip and notice that the clip changes appearance. There are now handles on the edges, indicating that the clip is active.
- Select Window > Properties to open Properties view.
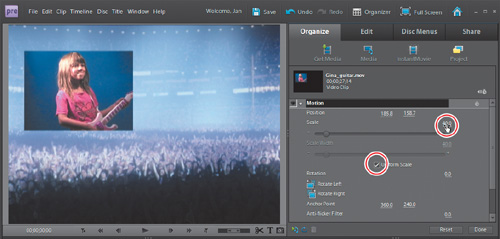
- In Properties view, click the arrow to the left of Motion to reveal its properties. Make sure the Uniform Scale check box is selected.
- Place your pointer over the value for Scale, and then drag the value to 40. As you change the scale, the Gina_guitar.mov clip shrinks to 40 percent of its original size.
- If necessary, you can reposition the clip using the Position controls, or simply drag the clip to the desired position in the Monitor panel.
- Press the Home key to go to the start of your project, and then click the Play button to review your work.
- Save your project as Lesson06_pip.prel.
Compositing Two Clips Using Videomerge
Compositing is the process of merging two clips together, one atop the other, while removing the background color of the top clip to reveal the second. This allows you to place your subject in a variety of environments, both real and simulated.
Adobe Premiere Elements’ Videomerge effect makes compositing as easy as drag and drop. Videomerge automatically determines the background of the top clip and makes it transparent. Video or image clips on the tracks below it become visible through the transparent areas. You’ll get the best results with Videomerge if you shoot the clip to be composited using the following rules:
• Create a strong (preferably dark or saturated), solid, uniform color background to shoot against.
• Make sure the background is brightly and uniformly lit to avoid shadows.
• When choosing a background color, avoid skin tones and colors that are similar to the subject’s clothing or hair color. (Otherwise, the skin, clothes, or hair will become transparent, too). Bright green and blue are the best choices.
With this information as background, reload the Greenscreen.prel project file (you should have already saved the first project as Lesson06_pip.prel) and follow this procedure.
- In the Timeline, click Rockshow.mov, the only clip. The selected clip appears in your Monitor panel.
- In the Organize tab of the Tasks panel, click the Project button.
- In Project view, locate the Gina_guitar.mov clip. Click to select the clip, hold down the Shift key, and drag the clip onto the Rockshow.mov clip in the Monitor panel.
- Release the pointer and choose Place on Top and Apply Videomerge.
Premiere Elements inserts Gina_guitar.mov in the Video 2 track over Rockshow.mov, automatically detects the blue background, and makes it transparent. The result needs a bit of work. Let’s try a manual adjustment.
- In the Timeline, click Gina_guitar.mov to select it, and then click the Properties () button on the upper left of the My Project panel.
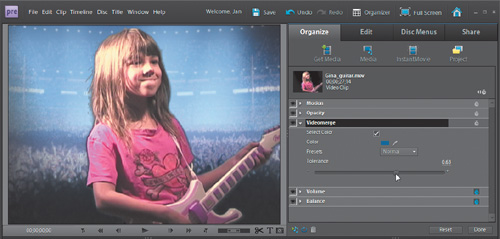
- In Properties view, click the twirl-down triangle to the left of the Videomerge effect to open the parameter settings.
- Click the Select Color check box, and then click the eyedropper (
 ) to select it. The background behind Gina will reappear. Press Ctrl/Command, and then click the blue background close to Gina’s head. This tells Videomerge which color to eliminate, and pressing Ctrl/Command averages a 5×5 pixel block surrounding the pixel that you clicked to achieve a smoother result. Much better.
 - You can try adjusting the Tolerance slider, but it makes no noticeable difference. I think we’re done here.
- Press the Home key to go to the start of your project, and then click the Play button to review your work. The clip looks good, so let’s move on to the next edit.
Changing Speed Using the Time Stretch Tool
Previously, you learned how to change the speed of clips bounded in the Timeline by other clips on both sides. Now you’ll learn how to use the Time Stretch tool to accomplish the same task but in a more visual way.
Here’s the problem you’ll solve. The Rockshow.mov clip used as a background in the previous two exercises is 31 seconds long, and the Gina_guitar.mov clip is about 27 seconds long. You could just trim the Rockshow clip to the same duration, but that would delete content at the end of that clip.
A more elegant solution is to use the Time Stretch feature to speed up the Rockshow.mov clip so that it’s the same duration as Gina_guitar.mov.
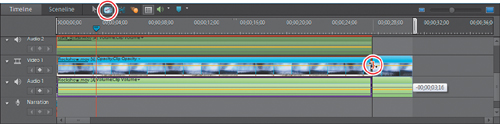
- In the Timeline, click the Time Stretch icon (
 ) at the upper left of the My Project panel.
 - Hover your pointer over the right edge of the Rockshow.mov clip until the Time Stretch icon (
 ) appears.
 - Drag the right edge of the Rockshow.mov clip to the left until it aligns with the end of the Gina_guitar.mov clip.
- Click the Selection tool (
 ) at the upper left of the My Project panel to restore the normal pointer.
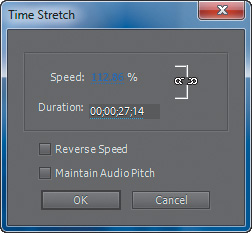
 - Right-click Rockshow.mov and choose Time Stretch.
Premiere Elements opens the Time Stretch panel. Note that the speed should have increased to 112.86, which is precisely the correction needed to make Rockshow.mov the same duration as Gina_guitar.mov. In most instances, you would click Maintain Audio Pitch to maintain the pitch of the clip, but since Rockshow.mov has no audio, that isn’t necessary in this case.
- Save your project as Lesson06_videomerge.prel.
Working with Motion Tracking
Motion Tracking gives you the ability to automatically track moving objects in a project so you can add labels, thought bubbles, or other effects to the moving object. This exercise teaches you how to use this function.
- To load the project file containing the new content, click File > Open Project, and then navigate to the Lesson06 folder you copied to your hard disk.
- Within the Lesson06 folder, select the file Motion_Tracking_Win.prel (Windows) or Motion_Tracking Mac.prel (Mac OS), and then click Open. If a dialog appears asking for the location of rendered files, click the Skip Previews button.
- Click to select the clip in the My Project panel, Alfie.mov.
- Select the Motion Tracking icon (
 ) at the upper left of the Timeline to turn on Motion Tracking mode. If the dialog opens, click Yes in the Motion Tracking window to enable Premiere Elements to track moving objects in the clip. The Auto-Analyzer starts to run.
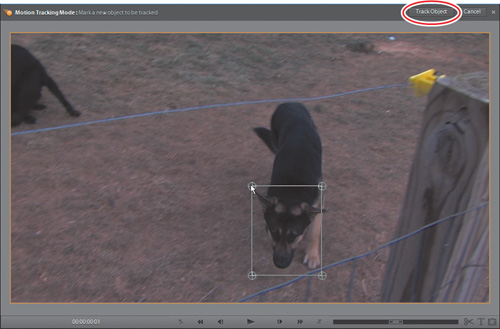
 - Drag the current-time indicator to 00;00;02 where a big yellow box enters the frame. Motion Tracking starts by tracking the largest object in the frame. You could jump to step 8 here and add the thought bubble, but I want to track Alfie’s head, which is more precise than tracking the entire body. So right-click the yellow box (which then turns blue) and choose Delete Selected Object.
- On the upper right of the Monitor panel, click the Add Object button (
 ). Premiere Elements adds a scalable box to the Monitor panel. Drag the box over the object that you’d like to track (in this case Alfie’s head), and then drag the edges to fit the object.
- In the upper-right corner of the Monitor panel, click Track Object (
 ). Premiere Elements analyzes the clip to track the moving object.
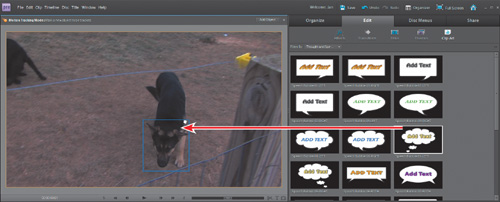
 - Click the Edit tab (
 ) to enter the Edit workspace, and then click Clip Art (
 ) to view that content. In the Filter By: list box, click and choose Thought and Speech Bubbles. Click SpeechBubble05-LEFT and drag it over the box that you just created.
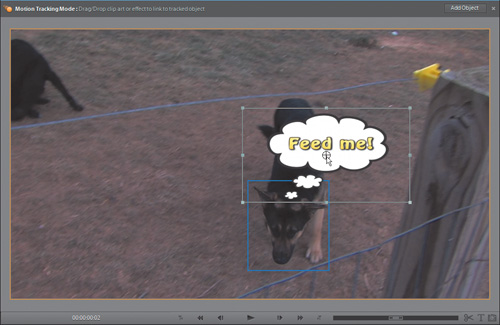
- In the Change Text dialog, type Feed me! Then click OK to close the dialog.
- Drag the Position controls to finalize placement of the thought bubble over Alfie’s head.
Note
In addition to thought bubbles, you can use Motion Tracking with other clip art, titles, graphics, and Picture-in-Picture effects.
Note
You can use the Add Object/Track Object procedure to add and track multiple objects in a single video.
Note
In my version of Premiere Elements, this exercise ran correctly only one time, which was the first time the application analyzed Alfie.mov. After that, the rectangle won’t reappear. If you want to run the exercise again, go to the Elements Organizer and delete Alfie.mov. The next time you run the project, Premiere Elements will have to reanalyze the clip, and the exercise should work as detailed here.
- Press the Home key to move to the start of your project, and then click the Play button to review your work. Watch how the thought bubble moves with Alfie.
- Save your project as Lesson06_Alfie.prel.
Working with Effect Masking
Effect Masking gives you the ability to constrain an effect to a certain section of an image, and if that section is moving, to track it around the frame. For example, reload the project file from the previous exercise—Motion_Tracking_Win.prel (Windows) or Motion_Tracking Mac.prel (Mac OS)—without saving the project you just created, and work through steps 1–7 again. Then follow these steps.
- Select Effects () in the Edit tab of the Tasks panel, and in the list box next to Video Effects, click and select NewBlue Cartoonr Plus Elements.
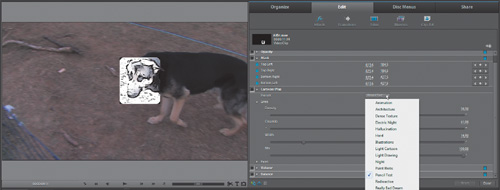
- Drag the Cartoonr Plus effect from Effects view and drop it onto the little box you created in the Alfie.mov clip. You should see the Monitor panel flash briefly. If the box shifts a bit, re-drag the edges to the desired coverage.
- Click Alfie.mov to select it, then click the Edit Effects button in Effects view, and then click the twirl-down triangle next to Cartoonr Plus to reveal the controls. You can experiment with the different presets, but Pencil Test worked best for me.
Note
You can apply a static mask to any clip by right-clicking the clip and choosing Effects Mask > Apply.
Premiere Elements applies the effect only within the box (called a mask), and the box follows Alfie’s motion in the video.
Note
I used the Cartoonr Plus effect because it’s new and cool, and because I wanted to show it to you. If you’re looking for the witness-protection look, which may make more sense in this application, try either the Gaussian Blur effect (in the Blur & Sharpen group) or the Mosaic effect (in the Stylize group).
Exploring on Your Own
Congratulations! Now you understand how to apply video settings, change effects and settings, copy effects from one clip to another, create an image pan, animate an effect with keyframes, create a Picture-in-Picture effect, and composite one video over another with Videomerge. You also know how to use Motion Tracking and how to “mask” an effect. Here are some effects that you can experiment with on your own.
- Create a PiP effect using two or more clips on the same screen.
- Experiment with alternative effects such as Adjust > Brightness & Contrast, or Distort > Bend. To get a sense of the different effects available in Premiere Elements, choose Help > Premiere Elements Help, or press F1 to access the Help guide. The Applying Effects section includes a gallery of video effects.
- Experiment with the various effects presets located in the Effects panel—specifically, the Horizontal and Vertical image pans.
Review questions
1. What are curative effects, and when should you apply them?
2. What’s the quickest way to apply identical effects and settings to multiple clips?
3. What are fixed effects, and what is their purpose?
4. What is a keyframe, and what does it contain?
5. How do you modify keyframes once they’ve been added to a clip?
6. How do you apply the same effect to multiple clips on the Timeline?
Review answers
1. Curative effects improve one or more aspects of a clip, such as exposure, backlighting, or excessive shakiness. You should apply curative effects to a clip before applying artistic and other effects.
2. After selecting the clip that contains the effect or effects that you want to copy, click an effect to select it in the Properties panel or Shift-click to select multiple effects. Copy your selection by choosing Edit > Copy. Then select the clip to which you want to transfer the effects and choose Edit > Paste.
3. Fixed effects are the Property parameters that every clip in Premiere Elements has enabled by default. These effects are Motion, Opacity, and Volume. Within the Motion effect, Scale, Position, Rotation, and Anchor Point are all properties that can be adjusted to create, for example, a PiP effect.
4. A keyframe contains the values for all the controls in an effect and applies those values to the clip at the specific time.
5. Once keyframes have been added to a clip, they can be adjusted by clicking and dragging them along the connector line. If there are two keyframes, moving one keyframe farther away from the other extends the duration of the effect; moving a keyframe closer to another keyframe shortens the effect.
6. Select all target clips in the My Project panel and apply the effect to any single clip.