14. Proofing and Printing Documents
Introduction
The Print command is probably the most used of all Illustrator’s print options. The Print command is a portal to other menus that let you control specific printing functions, such as crop marks and bleeds, output ink, graphics, and color management. Color separations divide artwork into four plates by color, known as process colors. Each plate represents a CMYK (Cyan, Magenta, Yellow, and Black) color. The Separations Preview panel allows you to preview color separations on your screen. You can preview spot color objects and check for rich black areas and overprinting. If you frequently use custom settings to send an Illustrator document to a local printer or commercial printer for printing, you can save time by creating a preset. Before you print your document, it’s important to check the Summary category in the Print dialog box. The summary information is good to have if you’re having problems printing your job at a commercial printer.
When you save a document, you have the ability to save more than just Illustrator information. You can save copyright, camera, and even image category information. This data is saved with the file as metadata in the XMP format (Extensible Metadata Platform) in Illustrator files, and can be recognized and accessed by any application, such as Adobe Bridge, that reads XMP metadata. The Document Info panel allows you to view information about a selected object or the entire document. You can display information about graphic styles, brushes, spot colors, patterns, gradients, fonts, linked images, and embedded images by using the Options menu.
Using Spell Check
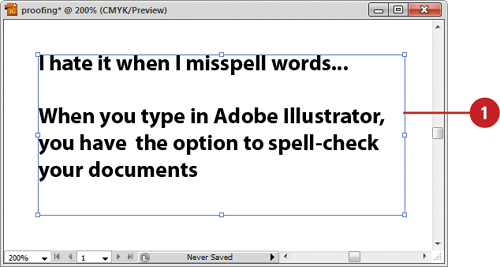
There’s nothing more embarrassing than creating a document that contains misspelled words. Although you wouldn’t use Illustrator if all you needed to do was create a text document, Illustrator includes a fully functional spell checking system, which at least lets you make sure all of your words are spelled correctly.
Use Spell Check
![]() Open a document that contains one or more Type objects.
Open a document that contains one or more Type objects.


![]() Click the Edit menu, and then click Check Spelling.
Click the Edit menu, and then click Check Spelling.
![]() Click Start.
Click Start.
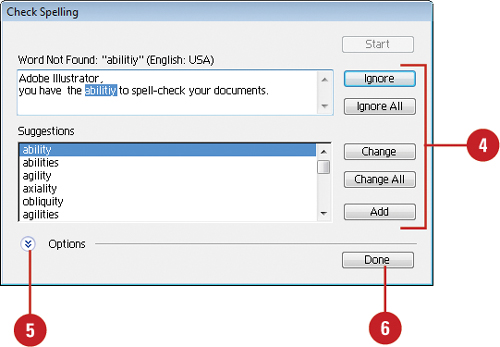
![]() When Illustrator encounters a word not in its dictionary, it displays that word in the Word Not Found box, and allows you to choose one of the following options:
When Illustrator encounters a word not in its dictionary, it displays that word in the Word Not Found box, and allows you to choose one of the following options:
• Ignore. Ignore this word one time.
• Ignore All. Ignore all instances of this word.
• Change. Change the word, based on the selected suggestion.
• Change All. Change all occurrences of the word, based on the selected suggestion.
• Add. Add the word to Illustrator’s dictionary.
Illustrator continues to highlight misspelled words until the document is completely scanned.
![]() To specify additional find and ignore options, click the Options button.
To specify additional find and ignore options, click the Options button.
![]() When you’re finished, click Done.
When you’re finished, click Done.
Using Custom Dictionaries
Illustrator comes with a custom dictionary for the spell checker. If you need to manage dictionary content, you can use the Edit Custom Dictionary dialog box to add, delete, or edit words. The ability to edit the dictionary becomes useful when you accidentally enter a word that you don’t want in the dictionary, or you have some specialty words that you want to enter in all at once.
Use a Custom Dictionary
![]() Click the Edit menu, and then click Edit Custom Dictionary.
Click the Edit menu, and then click Edit Custom Dictionary.
![]() Do any of the following:
Do any of the following:
• Add an Entry. Enter an entry, and then click Add.
• Delete an Entry. Select an entry, and then click Delete.
• Change an Entry. Select an entry, edit it, and then click Change.
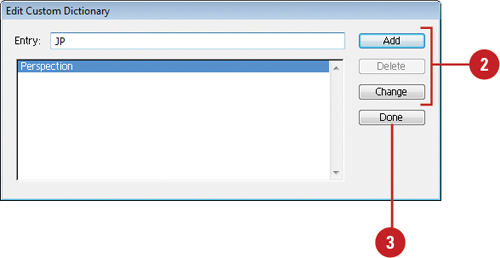
![]() When you’re finished, click Done.
When you’re finished, click Done.
Finding and Replacing Text and Elements
In the editing process, it is sometimes helpful to find and replace a particular word or phrase because the text needs to be changed, either in one spot or globally throughout the document. The Find and Replace command makes it easy to locate and replace specific text in a document. In addition to text, you can also find and replace other elements, such as a bullet character, tab character, Em Space, and quotation marks.
Use Find and Replace
![]() Click the Edit menu, and then click Find and Replace.
Click the Edit menu, and then click Find and Replace.
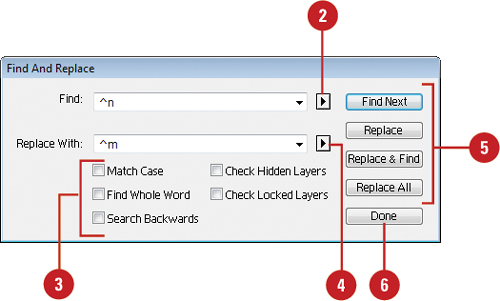
![]() Enter the text to locate in the Find box.
Enter the text to locate in the Find box.


![]() Select from the following Find and Replace options:
Select from the following Find and Replace options:
• Match Case. Select to search for the word in the same case as typed in the Find box.
• Find Whole Word. Select to search for whole words as typed in the Find box.
• Check Hidden Layers. Select to search hidden layers.
• Check Locked Layers. Select to search locked layers.
• Search Backwards. Select to search in the reverse direction.
![]() Enter the replacement text in the Replace With box.
Enter the replacement text in the Replace With box.
![]() Click Find Next to locate the next occurrence of the word:
Click Find Next to locate the next occurrence of the word:
• Click Replace to change the word.
• Click Replace & Find to automatically change the word and locate the next occurrence.
• Click Replace All to change all occurrences of the word.
![]() When you’re finished, click Done.
When you’re finished, click Done.
Use Find and Replace Elements
![]() Click the Edit menu, and then click Find and Replace.
Click the Edit menu, and then click Find and Replace.
![]() Click the Arrow button next to the Find box, and then select the element type that you want to find.
Click the Arrow button next to the Find box, and then select the element type that you want to find.

The special characters are added to the Find box. You can also add text.
![]() Select from the following Find and Replace options:
Select from the following Find and Replace options:
• Match Case. Select to search for the word in the same case as typed in the Find box.
• Find Whole Word. Select to search for whole words as typed in the Find box.
• Check Hidden Layers. Select to search hidden layers.
• Check Locked Layers. Select to search locked layers.
• Search Backwards. Select to search in the reverse direction.
![]() Click the Arrow button next to the Replace With box, and then select the element type that you want to use for replacement.
Click the Arrow button next to the Replace With box, and then select the element type that you want to use for replacement.
The special characters are added to the Replace With box. You can also add text.
![]() Click Find Next to locate the next occurrence of the word:
Click Find Next to locate the next occurrence of the word:
• Click Replace to change the word.
• Click Replace & Find to automatically change the word and locate the next occurrence.
• Click Replace All to change all occurrences of the word.
![]() When you’re finished, click Done.
When you’re finished, click Done.
Finding and Changing Fonts
Say you create some artwork using a certain font. After the customer or client reviews, they ask you to change it. Instead of manually changing each use of the font, you can use the Find Font command to quickly find and change every instance of the font in your document. If you’re not sure what fonts are used in your document, the Find Font dialog box gives you a list. If there are paragraphs with inconsistent use of capitalization in your document, you can also use change case options to fix them.
Find or Change a Font
![]() Click the Type menu, and then click Find Font.
Click the Type menu, and then click Find Font.
The fonts in the top list are the ones currently used in your document. The list at the bottom displays fonts in your document or on your computer, depending on your setting.
![]() To find a specific font, select it in the top list.
To find a specific font, select it in the top list.

![]() Select the check boxes at the bottom to specify the font attributes that you want to find.
Select the check boxes at the bottom to specify the font attributes that you want to find.
![]() To replace the font in the top list, select a font in the bottom list. Click the Replace With Font From list arrow, and then click System to show all the fonts on your computer.
To replace the font in the top list, select a font in the bottom list. Click the Replace With Font From list arrow, and then click System to show all the fonts on your computer.
![]() Click Find to display the first instance of the font, and then click Change to replace it, or click Change All to replace all uses of the font in your document.
Click Find to display the first instance of the font, and then click Change to replace it, or click Change All to replace all uses of the font in your document.
![]() When you’re done, click Done.
When you’re done, click Done.
Change Case
![]() Select the type for which you want to change case.
Select the type for which you want to change case.
![]() Click the Type menu, and then point to Change Case.
Click the Type menu, and then point to Change Case.


![]() Select one of the following:
Select one of the following:
• UPPERCASE.
• lowercase.
• Title Case.
• Sentence case.
Printing a Document
The Print command is probably the most used of all Illustrator’s print options. The Print command is a portal to other menus that let you control specific printing functions, such as crop marks and bleeds, output ink, graphics, and color management. Understand that the options available for the Print command will be partially determined by your default printer. For example, if your default printer uses more than one paper tray, you will see options for selecting a specific tray for the current print job. In spite of the differences, there are some universal options for all print jobs, and these are covered here.
Print a Document
![]() Click the File menu, point to Document Color Mode, and then click CMYK Color or RGB Color.
Click the File menu, point to Document Color Mode, and then click CMYK Color or RGB Color.
• Check your printer for the best color mode setting.
![]() Click the File menu, and then click Print.
Click the File menu, and then click Print.
![]() Click the Print Preset list arrow, and then select a preset.
Click the Print Preset list arrow, and then select a preset.
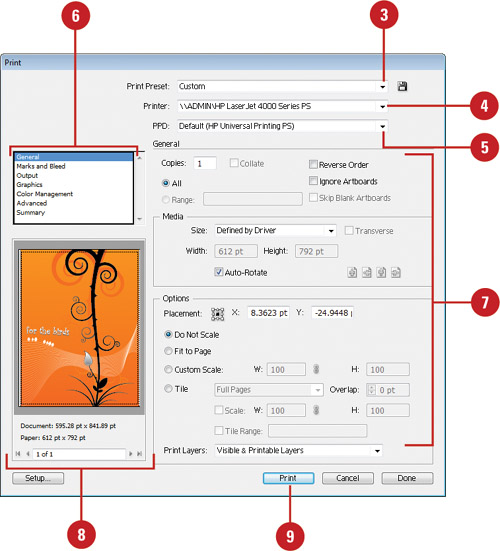
![]() Click the Printer list arrow, and then select an available printer.
Click the Printer list arrow, and then select an available printer.
![]() Click the PPD list arrow, and then select a PPD (if available).
Click the PPD list arrow, and then select a PPD (if available).
• A PPD (PostScript Printer Description) is a printer driver, a specific file used by commercial and specialty printers to define an output device.
![]() Select a print category (General, Marks and Bleed, Output, Graphics, Color Management, Advanced) with your desired settings.
Select a print category (General, Marks and Bleed, Output, Graphics, Color Management, Advanced) with your desired settings.
![]() Select the options that you want; see other pages in this chapter for option specifics.
Select the options that you want; see other pages in this chapter for option specifics.
![]() Use the navigation buttons to view preview pages. Drag artwork in the preview to move it around.
Use the navigation buttons to view preview pages. Drag artwork in the preview to move it around.
![]() When you’re finished, click Print.
When you’re finished, click Print.
Printing with Presets
If you frequently use custom settings to send an Illustrator document to a local printer or commercial printer for printing, you can save time by creating a preset. Adobe Creative Suite programs, including Illustrator, InDesign, Photoshop, and Acrobat, provides built-in presets that you can use in any of the programs. When you create your own preset, you can also use it in other CS programs.
Create a Preset for Printing
![]() Click the Edit menu, and then click Print Presets.
Click the Edit menu, and then click Print Presets.
![]() Perform any of the following:
Perform any of the following:
• New. Click New, specify the options that you want, and then click OK.
• Edit. Select a custom preset (not a predefined one), click Edit, change the options, and then click OK.
• Delete. Select a custom preset (not a predefined one), and then click Delete.
• Import. Click Import, navigate to the preset file, select it, and then click Open.
• Export. Select a preset, click Export, specify a location and name, and then click Save.
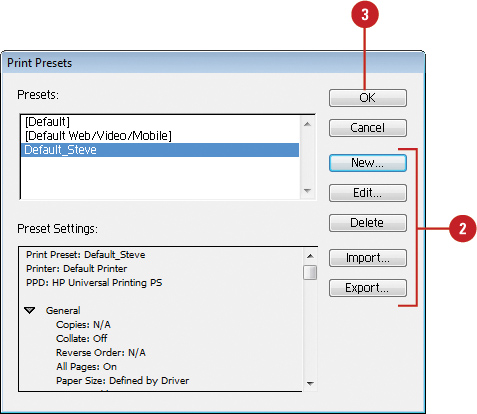
![]() Click OK.
Click OK.
Setting General Print Options
The General category in the Print dialog box allows you to set the page size and orientation (Portrait Up, Portrait Down, Landscape Left, Landscape Right), number of artboards to print, and artboard scale and tiling options. You can also ignore and skip blank artboards for printing. In addition, you can specify which layers you want to print: Visible & Printable Layers, Visible Layers, or All Layers.
Set General Print Options
![]() Click the File menu, and then click Print.
Click the File menu, and then click Print.
![]() Click the General category.
Click the General category.

![]() Select from the various General and Media options:
Select from the various General and Media options:
• Copies. Enter the number of copies you want to print.
• Collate. Select to print artboard pages in collated order.
• All or Range. Select an option to print all or a range of artboard pages.
• Reverse Order. Select to print artboard pages in reverse order.
• Ignore Artboards. Select to print artwork from all artboards on a single page.
• Skip Blank Artboards. Select to not print blank artboard pages.
• Size. Select a page size.
• Transverse. Select to rotate the printed artwork 90 degrees.
This option is only available when your PPD supports it.
• Width and Height. For a custom page size, specify a width and height.
• Auto-Rotate. Select to automatically rotate artboards to print to the media size. (Selected by default (New!))
• Orientation. Click an icon to select a page orientation.
![]() Select from the various options:
Select from the various options:
• Placement. Click a square on the Placement icon to select an origin for aligning artwork to the page.
• Do Not Scale. Select to not scale artboards during printing.
• Fit to Page. Select to scale artboards to the page during printing.
• Custom Scale. Select to specify a custom width and height for artboards during printing.
• Tile. Select to tile artwork on multiple pages.
• Print Layers. Select an option to print layers: Visible & Printable Layers, Visible Layers, or All Layers.

![]() When you’re finished, click Done.
When you’re finished, click Done.
Did You Know?
You can show and hide print tiling in the document window to preview pages. Click the View menu, and then click Show Print Tiling or Hide Print Tiling.
Setting Marks and Bleed Options
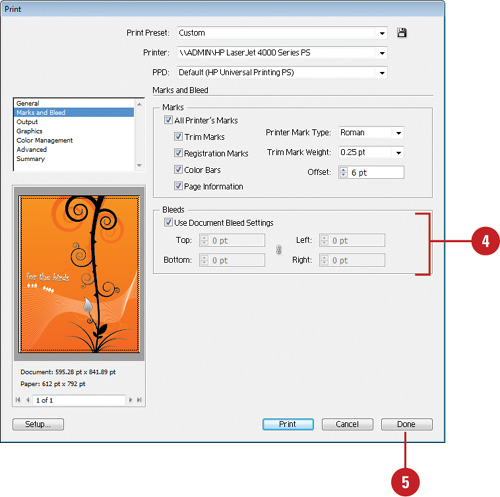
The Marks and Bleed category in the Print dialog box allows you to select printer’s marks and create a bleed. Printer marks appear at the edge of the printable page. Commercial printers use printer marks to trim the paper, registration marks to align printing plates, and color bars to print colors properly. Bleed is the amount of artwork that appears outside of the printing area, which includes the bounding box and trim marks. Bleed is useful as a margin of error. It makes sure that ink is printed to the edge of the page so that there are no gaps between the artwork and the edge of the trimmed document page. Your commercial printer can advise you on bleed settings based on your print job.
Set Marks and Bleed Print Options
![]() Click the File menu, and then click Print.
Click the File menu, and then click Print.
![]() Click the Marks and Bleed category.
Click the Marks and Bleed category.
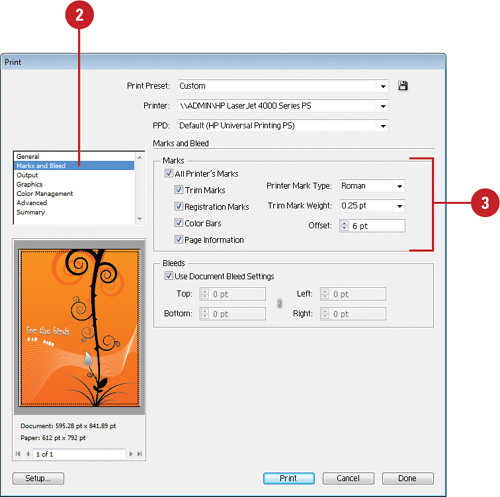
![]() Select from the various Marks options:
Select from the various Marks options:
• All Printer’s Marks. Select to enable the following check boxes: Trim Marks, Registration Marks, Color Bars, and Page Information.
• Trim Marks. Select to add trim lines for cutting the page.
• Registration Marks. Select to add small targets for aligning color separations.
• Color Bars. Select to add small color squares with color information for the printer.
• Page Information. Select to add labels with document information: name, artboard number, time and date, plate color, and screen angle.
• Printer Mark Type. Select a type: Roman or Japanese.
• Trim Mark Weight. Specify a thickness for the trim marks.
• Offset. Specify an offset value (0-72 points) for the distance between trim marks and the bounding box.
Enter an offset value to make sure that any printer’s marks will not be overlapped by the bleed.
![]() Select from the various Bleeds options:
Select from the various Bleeds options:
• Use Document Bleed Settings. Select to use bleed settings defined in the New Document dialog box.
• Top, Left, Bottom, and Right. Enter values to define the bleed area.
Your commercial printer can advise you on bleed settings based on your print job.
![]() When you’re finished, click Done.
When you’re finished, click Done.
Setting Graphics Options
The Graphics category in the Print dialog box allows you to set printing options for paths, fonts, PostScript files, gradients, meshes, and blends. The Flatness option (under Paths) controls how well objects in your document print on a PostScript printer. The Automatic setting is recommended. If a document has problems printing, adjust the Flatness level. When you include type in your document, the printer that you use in your document need to be downloaded to your printer.
Set Graphics Print Options
![]() Click the File menu, and then click Print.
Click the File menu, and then click Print.
![]() Click the Graphics category.
Click the Graphics category.
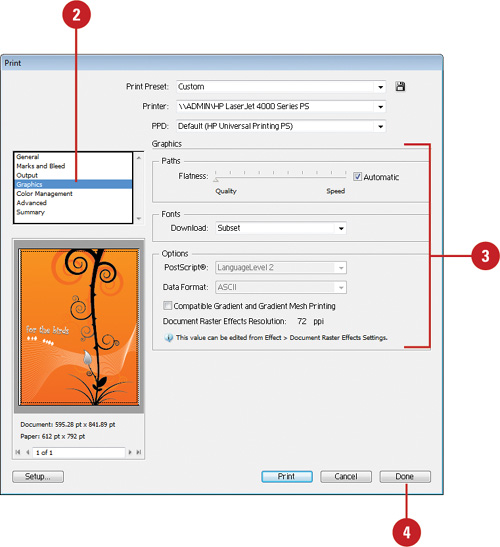
![]() Select from the various Graphics options:
Select from the various Graphics options:
• Flatness (Paths). Select the Automatic check box to use a setting supplied by Illustrator.
If you have problems printing a document, adjust the Flatness level, and then reprint it.
• Download (Fonts). Select a download option: None, Subset (only characters, or glyphs, used), or Complete (all fonts used).
• PostScript (Options). Choose from Language Level 2 or Language Level 3. Level 3 delivers the best speed and quality if you are printing to a PostScript 3 device.
• Data Format (Options). Choose ASCII or Binary to determine how the data is sent to the printer.
• Compatible Gradient and Gradient Mesh Printing. Select only if you’re having problems printing gradients or gradient meshes.
![]() When you’re finished, click Done.
When you’re finished, click Done.
Previewing Color Separations
Color separations divides artwork into four plates by color, known as process colors. Each plate represents a CMYK (Cyan, Magenta, Yellow, and Black) color. The Separations Preview panel allows you to preview color separations on your screen. You can preview spot color objects and check for rich black areas and overprinting. Rich black is process black ink mixed with color inks for increased opacity and richer color instead of a normal black, while overprinting prevents the knockout of overlapping areas and makes those areas transparent. This is used to avoid the need for trapping and avoid gaps between touching colors. Use it when your artwork doesn’t share common ink color. In the Separations Preview panel, you can use the Visibility column to show and hide different separation color inks to preview your artwork on the artboard.
Preview Color Separations with the Separations Preview Panel
![]() Open a document that contains the artwork that you want to preview.
Open a document that contains the artwork that you want to preview.
![]() Select the Separations Preview panel.
Select the Separations Preview panel.
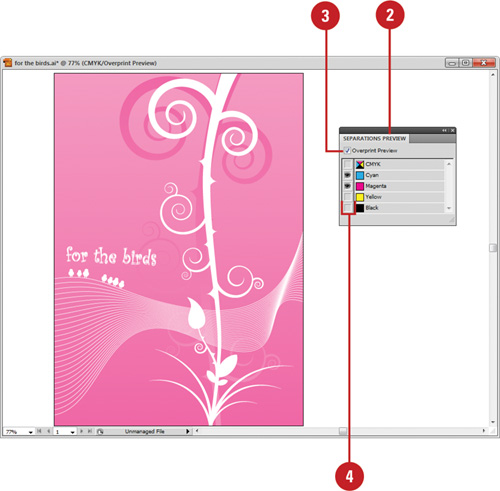
![]() Select the Overprint Preview check box.
Select the Overprint Preview check box.
![]() Do any of the following:
Do any of the following:
• Hide Separation Ink. Click the eye icon for each ink you want to hide. Click the eye icon again to make the effects of the ink visible.
• Hide All Separation Inks Except One. Alt+click (Win) or Option+click (Mac) the eye icon to show just one ink color. Click the eye icon again to make all the inks visible.
• View All Inks. Click the CMYK eye icon.
![]() Deselect the Overprint Preview check box to return to normal view.
Deselect the Overprint Preview check box to return to normal view.
Setting Output Options
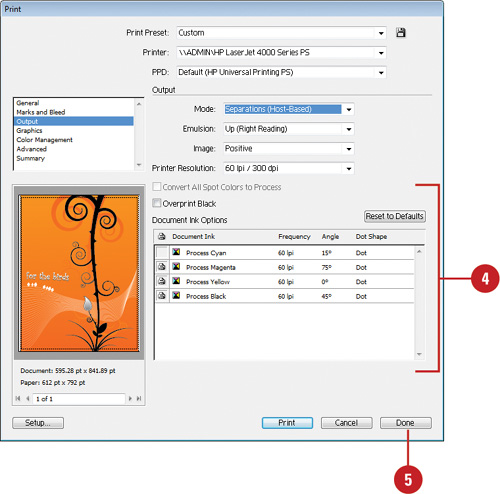
The Output category in the Print dialog box allows you to create and print color separations. When you choose to create color separations, you also have the option of selecting which color plates that you want to print. Since options vary from job to job, check with your commercial printer for help with specific values for your print job. Some of the options include Mode (composite or separation), Emulsion, Image, and Resolution.
Set Output Print Options
![]() Click the File menu, and then click Print.
Click the File menu, and then click Print.
![]() Click the Output category.
Click the Output category.

Check with your commercial printer for help with specific values for your print job.
![]() Select from the various Output options:
Select from the various Output options:
• Mode. Select an output mode: Composite, Separations (Host-Based), or In-RIP Separations.
Use Composite to print a general print job (not separations); use Separations (Host-Based) to have Illustrator create the separations; or use In-RIP Separations to have Illustrator create a PostScript file that creates the separations.
• Emulsion. Select an option: Up (Right Reading) or Down (Right Reading).
• Image. Select an option: Positive or Negative.
• Resolution. Select a printer resolution. The first number represents the halftone screen ruling (LPI) and the second number represents the device resolution (DPI).
Check with your commercial printer for these settings.
![]() If you selected a Separation option from the Mode menu, select from the various Document Ink options:
If you selected a Separation option from the Mode menu, select from the various Document Ink options:
• Document Inks. For each process or spot color that you don’t want to print, click the printer icon.
• Convert All Spot Colors to Process. Select to convert all spot colors in the artwork to process colors.
• Overprint Black. Select to allow black fills and strokes to overprint color underneath.
![]() When you’re finished, click Done.
When you’re finished, click Done.
Setting Advanced Options
The Advanced category in the Print dialog box allows you to set options for the overprinting and transparency flattening of vector artwork when you print. You can set overprint options for fills and strokes for color composite or separations printing. You can use the Flattener Preview panel to highlight the areas affected by flattening artwork. If you have problems printing vector objects to a non-PostScript printer, select the Print as Bitmap option to convert vector objects to bitmap raster images for print purposes.
Set Advanced Print Options
![]() Click the File menu, and then click Print.
Click the File menu, and then click Print.
![]() Click the Advanced category.
Click the Advanced category.

![]() Select from the various Advanced options:
Select from the various Advanced options:
• Print as Bitmap. Select if you have problems printing vector objects to a non-PostScript printer.
• Overprints. Select an overprint option:
Preserve. Use to keep the file’s overprint settings.
Discard. Use to discard the file’s overprint settings.
Simulate. Use to simulate overprinting for proofing purposes.
• Preset. Select a resolution option:
High Resolution. Use for high-quality color separations.
Medium Resolution. Use for desktop PostScript printing.
Low Resolution. Use for black and white printing.
Custom. Click to select custom settings.
![]() When you’re finished, click Done.
When you’re finished, click Done.
Preview Flattened Artwork
![]() Click the Window menu, and then click Flattener Preview.
Click the Window menu, and then click Flattener Preview.
![]() Click the Highlight list arrow, and then select a highlight option.
Click the Highlight list arrow, and then select a highlight option.
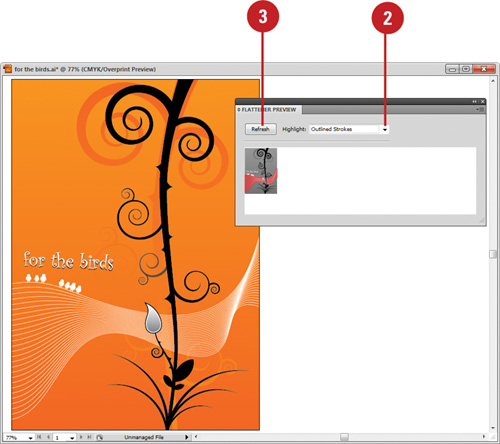
Options vary depending on the content of the artwork.
![]() To display a fresh preview based on your current settings, click Refresh.
To display a fresh preview based on your current settings, click Refresh.
Create a Preset for Transparency Flattener
![]() Click the Edit menu, and then click Transparency Flattener Presets.
Click the Edit menu, and then click Transparency Flattener Presets.
![]() Perform any of the following:
Perform any of the following:
• New. Click New, specify the options that you want, and then click OK.
• Edit. Select a custom preset (not a predefined one), click Edit, change the options, and then click OK.
• Delete. Select a custom preset (not a predefined one), and then click Delete.
• Import. Click Import, navigate to the preset file, select it, and then click Open.
• Export. Select a preset, click Export, specify a location and name, and then click Save.
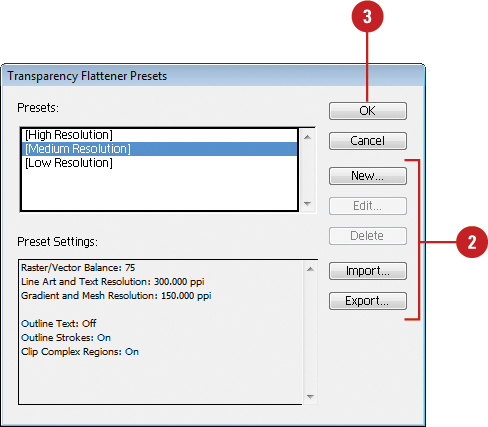
![]() Click OK.
Click OK.
Setting Color Management Options
The Color Management category in the Print dialog box allows you to select a printer profile and rendering intent for printing. Rendering intent specifies how the program converts colors to the destination color space. In most cases, it’s best to use the default options for Color Management unless you’ve been give specific instructions from a printer to change them.
Set Color Management Print Options
![]() Click the File menu, and then click Print.
Click the File menu, and then click Print.
![]() Click the Color Management category.
Click the Color Management category.

![]() Select from the various Color Management options:
Select from the various Color Management options:
• Color Handling. Select a color option: Let Illustrator determine colors or Let PostScript printer determine colors.
• Printer Profile. Select the profile for your output device.
• Rendering Intent. Select an option to specify how the program converts colors to the destination color space.
• Preserve CMYK Numbers. Select to preserve the CMYK color mode when a color profile is not available. Deselect to have Illustrator convert colors for use on the output device.
![]() When you’re finished, click Done.
When you’re finished, click Done.
Checking for Print Problems
Before you print your document, it’s important to check the Summary category in the Print dialog box. The summary information is good to have if you’re having problems printing your job at a commercial printer. You can save the information and send it to the printer to help diagnose the problem. The important area is the Warnings box, which displays warning about printing problems with your document. Check to make sure your print job is clear of all warnings before you send it to a printer.
View Summary Print Options
![]() Click the File menu, and then click Print.
Click the File menu, and then click Print.
![]() Click the Summary category.
Click the Summary category.
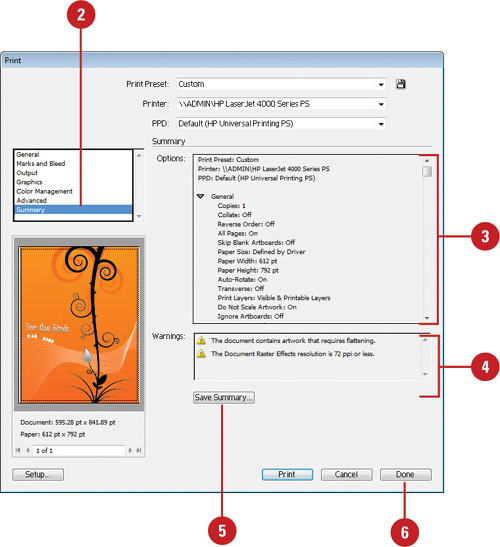
![]() Scroll through the print summary to review your print settings.
Scroll through the print summary to review your print settings.
![]() Check the Warnings box for problems or warning that you should fix before you print.
Check the Warnings box for problems or warning that you should fix before you print.
![]() To print the summary information to a file, click Save Summary, enter a name, specify a location, and then click Save.
To print the summary information to a file, click Save Summary, enter a name, specify a location, and then click Save.
![]() When you’re finished, click Done.
When you’re finished, click Done.
Inserting File Information
When you save a document, you have the ability to save more than just Illustrator information. You can save copyright, camera, and even image category information. This data is saved with the file as metadata in the XMP format (Extensible Metadata Platform) in Illustrator files, and can be recognized and accessed by any application, such as Adobe Bridge, that reads XMP metadata. In addition, if an image is a photograph, you can save data specifying the type of image, where it was shot, or the camera used. You can even get information on shutter speed and fstop. You can do the same with video and audio data too. That information will not only protect your intellectual property, but will supply you with vital statistics on exactly how you created that one-of-a-kind artwork.
Insert File Information into a Document
![]() Open a document.
Open a document.
![]() Click the File menu, and then click File Info.
Click the File menu, and then click File Info.
![]() Click the Description tab, and then enter information concerning the document title, description of file, author and any copyright information.
Click the Description tab, and then enter information concerning the document title, description of file, author and any copyright information.
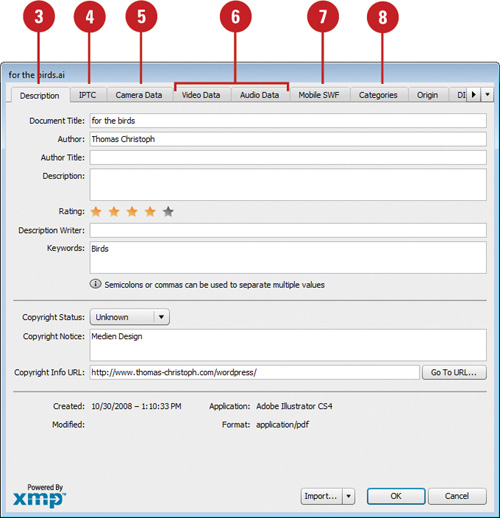
![]() Click the IPTC tab to enter information concerning the image’s creator, description and keywords, location where photograph was taken, date created, copyright, and usage terms.
Click the IPTC tab to enter information concerning the image’s creator, description and keywords, location where photograph was taken, date created, copyright, and usage terms.
![]() Click the Camera Data tab, which reveals information about the camera that took the image.
Click the Camera Data tab, which reveals information about the camera that took the image.
![]() Click the Video Data tab or Audio Data tab to reveal information about video and audio data, and then enter your video and audio data.
Click the Video Data tab or Audio Data tab to reveal information about video and audio data, and then enter your video and audio data.
![]() Click the Mobile SWF tab, and then enter the file information for a mobile SWF document.
Click the Mobile SWF tab, and then enter the file information for a mobile SWF document.
![]() Click the Categories tab, and then enter category keywords for search purposes.
Click the Categories tab, and then enter category keywords for search purposes.
![]() Click the Origin tab, and then enter data pertaining to the origin of the image.
Click the Origin tab, and then enter data pertaining to the origin of the image.

![]() Click the DICOM tab, and then enter data pertaining to the Digital Imaging and Communications in Medicine options (patient name, ID, etc.).
Click the DICOM tab, and then enter data pertaining to the Digital Imaging and Communications in Medicine options (patient name, ID, etc.).
![]() Click the History tab to view historical information about the active document, such as dates last opened and saved, and a list of image adjustments.
Click the History tab to view historical information about the active document, such as dates last opened and saved, and a list of image adjustments.

![]() Click the Illustrator tab, and then select an Illustrator document profile.
Click the Illustrator tab, and then select an Illustrator document profile.
![]() Click the Advanced tab to view additional information on the active document, such as EXIF, and PDF document properties.
Click the Advanced tab to view additional information on the active document, such as EXIF, and PDF document properties.
![]() Click the Raw Data tab to view raw RDF/XML information.
Click the Raw Data tab to view raw RDF/XML information.
![]() Click OK.
Click OK.
Did You Know?
You can add metadata to files saved in the PSD, PDF, EPS, PNG, GIF, JPEG, and TIFF formats. The information is embedded in the file using XMP (Extensible Metadata Platform). This allows metadata to be exchanged between Adobe applications and across operating systems.
You can use the XMP Software Development Kit to customize the creation, processing, and interchange of metadata. You can also use the XMP kit to add fields to the File Info dialog box. For information on XMP and the XMP SDK, check the Adobe Solutions Network.
Using the Document Info Panel
The Document Info panel allows you to view information about a selected object or the entire document. You can display information about graphic styles, brushes, spot colors, patterns, gradients, fonts, linked images, and embedded images by using the Options menu. If you want to use the provided information in another document, you can also save the data as a text file.
Use the Document Info Panel
![]() Select the object that you want to review information about.
Select the object that you want to review information about.
![]() Select the Document Info panel.
Select the Document Info panel.
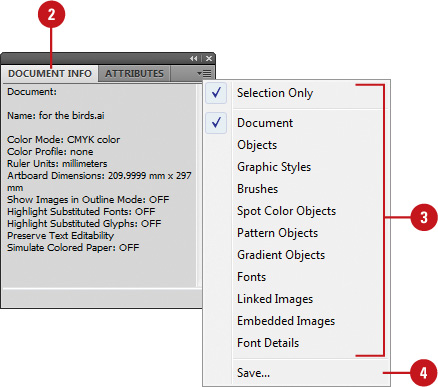
![]() Click the Options menu, and then select any of the following:
Click the Options menu, and then select any of the following:
• Selection Only. Select for info on the current selection. Deselect for all objects.
• Document.
• Objects.
• Graphic Styles.
• Brushes.
• Spot Color Objects.
• Pattern Objects.
• Gradient Objects.
• Fonts.
• Linked Images.
• Embedded Images.
• Font Details.
![]() To save the information to a text file, click the Options menu, click Save, enter a name for the file, specify a location, and then click Save.
To save the information to a text file, click the Options menu, click Save, enter a name for the file, specify a location, and then click Save.