13. Automating the Way You Work
Introduction
Actions are similar to recording information on a tape; they record Illustrator commands and, like a tape recorder, can be played back at any time. Actions can be applied to any number of images. You can modify existing actions, and save them into a user-defined set. It’s even possible to save them and send them to another Illustrator user. This chapter is dedicated to all the Illustrator users who are tired of doing something over and over again. If you have ever considered using actions as a part of your design workflow, then you’re in for a wonderful journey of discovery.
A script is a series of commands that instructs Illustrator to perform a set of specified actions. These actions can be simple, affecting only a single object, or more complex, affecting many objects. Scripts are useful for repetitive tasks and can be used as a creative tool to streamline tasks that are time consuming and boring. You can use one of Illustrator’s built-in scripts, such as ExportDocsAsFlash or Live Trace, or create one of your own.
Examining the Actions Panel
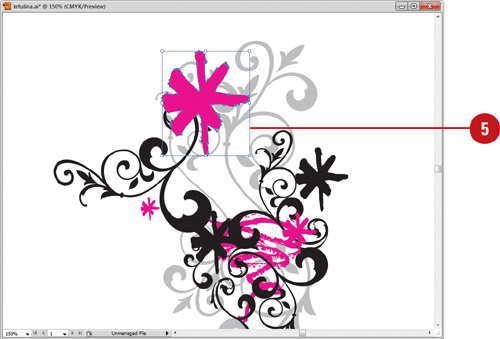
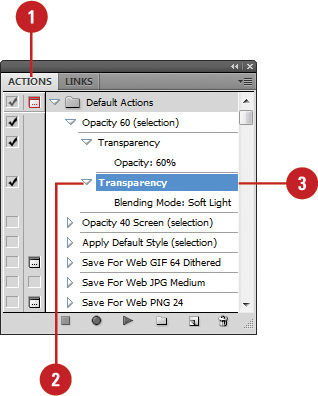
The Actions panel is where you create, save, modify, and store all of your actions. The analogy of a tape recorder is often used in describing the Actions panel, and it’s actually a good way to think of actions. The action itself is a recording, and the Actions panel is the tape recorder. When you begin an action, the panel records each step in the process, saves them, and then lets you play them back on another image. In order to record and play actions, you need to understand how to use the Actions panel.
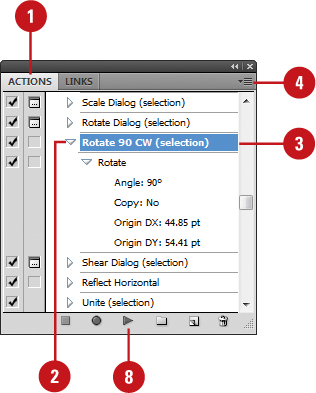
Examine the Actions Panel
![]() Select the Actions panel.
Select the Actions panel.

![]() Check the toggle box to toggle an action on or off.
Check the toggle box to toggle an action on or off.
![]() Click the dialog box to toggle the dialog function on or off.
Click the dialog box to toggle the dialog function on or off.
![]() Click the expand triangle to expand or contract an action or set.
Click the expand triangle to expand or contract an action or set.
![]() Click the Options menu to access all of the Actions panel options.
Click the Options menu to access all of the Actions panel options.
Did You Know?
You can convert your Actions into single-click buttons. Click the Options menu on the Actions panel, and then click Button Mode. When the Actions panel is in Button Mode, you cannot access or edit the steps in the individual actions. To access the standard Actions panel, click the Options menu on the Actions panel, and then click Button Mode to uncheck the option.
![]() The following buttons are accessible at the bottom of the Actions panel, from left to right:
The following buttons are accessible at the bottom of the Actions panel, from left to right:
• Stop. Click to stop recording and save an action.
• Record. Click to begin recording an action.
• Play. Click to begin execution of the selected action.
• Create New Set. Creates a new action set.
Sets are like file folders; they store individual actions.
• Create New Action. Starts the process of creating a new action.
• Delete. Click to delete the selected action or set.

Did You Know?
You can save actions into sets. Action sets are like file folders; they hold groups of actions. Select the Actions panel, click the Create New Set button, enter a name for the set, and then click OK.
You can save action sets as files. Select the Actions panel, click the set you want to save, click the Options menu, click Save Actions, enter a name for the file, specify a location, and then click Save.
You can restore actions to the default set. Select the Actions panel, click the Options menu, click Reset Actions, and then click OK to replace or Append to combine with the current set.
Building a New Action
Building an action is almost as simple as clicking the record button on a tape recorder. Actions are simply a series of program instructions. When you build an action, you’re instructing Illustrator what to name the action, where to store it, and what shortcut keys, if any, will be used to activate the action. Since an action is simply a record of the work performed on an image, it’s a good idea to plan out what you intend to do, and then build the action. Remember, actions are designed for tasks you plan to do repeatedly. It wouldn’t make sense to create an action for a one-time use.
Build a New Action
![]() Open a document, and then select the Actions panel.
Open a document, and then select the Actions panel.
![]() Click the Create New Action button.
Click the Create New Action button.
![]() Enter a name for the action in the Name box.
Enter a name for the action in the Name box.

![]() Click the Set list arrow, and then select in which set to save the Action.
Click the Set list arrow, and then select in which set to save the Action.
![]() Click the Function Key list arrow, and then click F1 - F12 to assign your new action to a function key.
Click the Function Key list arrow, and then click F1 - F12 to assign your new action to a function key.
![]() Select the Shift or Control (Win) or Command (Mac) check boxes to require the pressing of the Shift key, or the Ctrl (Win) or
Select the Shift or Control (Win) or Command (Mac) check boxes to require the pressing of the Shift key, or the Ctrl (Win) or ![]() (Mac) key in conjunction with the function key.
(Mac) key in conjunction with the function key.
For example, F1, or Shift+F1, or Ctrl+F1, or Shift+Ctrl+F1.
![]() Click the Color list arrow, and then select from the available colors.
Click the Color list arrow, and then select from the available colors.
Important
If you choose a color for the action, it will only be visible if the actions are viewed in Button Mode.
![]() Click Record to begin creating the action.
Click Record to begin creating the action.
![]() Click the Stop button on the Actions panel.
Click the Stop button on the Actions panel.
Controlling the Playback of a Command
Not all actions are created perfectly. Sooner or later, you’ll work through the process of action building only to find out (after the action is saved), that you forgot a step, or you need to remove or modify an existing step. Fortunately, Illustrator doesn’t make you recreate the action; all you have to do is modify it. When you create an action, all of the commands execute in the order they appear in the list of action steps. However, it’s possible you might occasionally want to skip one of the steps in the list, without permanently deleting it. To play an action, simply select it and then click the Play button.
Control the Playback of a Command
![]() Open a document, and then select the Actions panel.
Open a document, and then select the Actions panel.
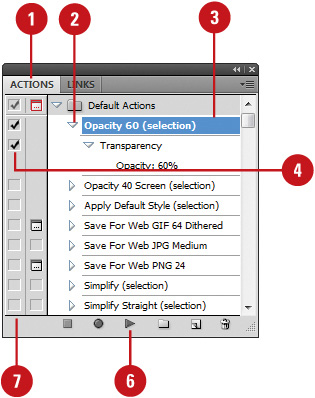
![]() Click the expand triangle of the action you want to modify.
Click the expand triangle of the action you want to modify.
![]() Select the action that you want to play.
Select the action that you want to play.
![]() To remove commands from playback, uncheck the command or commands you do not want to execute.
To remove commands from playback, uncheck the command or commands you do not want to execute.
![]() Make a selection if necessary for use with the action.
Make a selection if necessary for use with the action.
![]() Click the Play button on the Actions panel to run the action without executing the unchecked command(s).
Click the Play button on the Actions panel to run the action without executing the unchecked command(s).
![]() Recheck the command(s) to return them to executable status.
Recheck the command(s) to return them to executable status.
Did You Know?
You can specify the playback speed. Select the Actions panel, click the Options menu, click Playback Options, specify a speed (Accelerated, Step By Step or Pause For), and then click OK.
You can copy an action. Select the Actions panel, drag the action over the Create New Action button on the panel or select the action, click the Options menu, and then click Duplicate.
Adding a Stop to an Action
There are times when you want to make changes to individual files during the playback of an action. For example, you create an action to balance the contrast in an image, and one of the commands you use is a Levels adjustment. Although none of the other commands need user modification during playback, an optimum Levels adjustment is specific to individual images. What you want is the action to perform (automatically) all of the steps, except Levels. When the action reaches the point where the Levels adjustment would be applied, you want the action to stop and let you make changes that are appropriate for that particular image and then move on to complete the rest of the steps when you’ve finalized the Levels adjustment by clicking OK.
Add a Stop to an Action
![]() Open a document, and then select the Actions panel.
Open a document, and then select the Actions panel.
![]() Click the expand triangle of the action you want to modify.
Click the expand triangle of the action you want to modify.
![]() Click the command directly above where you want to place the action.
Click the command directly above where you want to place the action.
![]() Click the Options menu, and then click Insert Stop.
Click the Options menu, and then click Insert Stop.
![]() Enter a message associated with the purpose of the stop action.
Enter a message associated with the purpose of the stop action.

![]() Select the Allow Continue check box to add a Continue button to the stop alert box.
Select the Allow Continue check box to add a Continue button to the stop alert box.
![]() Click OK.
Click OK.
![]() Click the Play button on the Actions panel to run the action.
Click the Play button on the Actions panel to run the action.
Did You Know?
You can run an action inside an action. Select the Actions panel, click the command directly above where you want to insert the run step for another action, click the Record button, click the action to be added, click the Play button to record the second action into the first action, and then click Stop.
Inserting a Non-Recordable Command into an Action
When you create an action, not all commands and tools can be recorded, such as Selection, Pen, Paintbrush, Pencil, Pencil, Gradient, Mesh, Eyedropper, Live Paint Bucket, and Scissors tools or Effects and View menu commands. However, you can insert many non-recordable commands into an action by using an Insert Menu Item command. The Insert Menu Item command can be used when recording an action or after it has been recorded. Inserted commands do not execute until the action is played, so the file remains unchanged when the command is inserted. This gives you the ability to experiment with different non-recordable commands without the risk of damaging a valuable image.
Insert a Non-Recordable Command into an Action
![]() Open a document, and then select the Actions panel.
Open a document, and then select the Actions panel.

![]() Click an action, and then click the expand triangle.
Click an action, and then click the expand triangle.
![]() Click the name of the action to insert the item at the end of the action, or click a specific action step to insert the item after the selected step.
Click the name of the action to insert the item at the end of the action, or click a specific action step to insert the item after the selected step.
![]() Click the Options menu, and then click Insert Menu Item.
Click the Options menu, and then click Insert Menu Item.
![]() Select a command from the available options (the command is selected by clicking and selecting an item from Illustrator’s drop-down menu system).
Select a command from the available options (the command is selected by clicking and selecting an item from Illustrator’s drop-down menu system).
![]() Click OK.
Click OK.
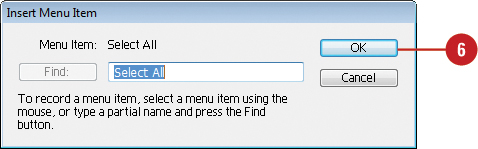
The non-recordable command is added to the action steps.
Important
When you use the Insert Menu Item command for a command that opens a dialog box, you cannot disable the modal control in the Actions panel.
Adding a Command to an Action
Actions are very versatile; in fact, almost anything that can be done to an image can be placed into an action. You might find that as you perform an action, you need to add an additional command. You can do this with ease; that’s why actions are so great to work with. For example, you might create an action to convert an image from the RGB to the CMYK mode, and after you save the action, you decide it would be great to include an effect. You don’t have to throw away the previous action and start all over; all you have to do is select where the command will be inserted, restart the action, and perform the new step. The Actions panel is a powerful time-saving tool, and if you forget a step, it’s also a breeze to modify.
Add a Command to an Action
![]() Open a document, and then select the Actions panel.
Open a document, and then select the Actions panel.

![]() Click the expand triangle of the action to which you want to add the command.
Click the expand triangle of the action to which you want to add the command.
![]() Click the command directly above where you want to insert the new command.
Click the command directly above where you want to insert the new command.
![]() Click the Options menu, and then click Start Recording.
Click the Options menu, and then click Start Recording.
![]() Add the additional command by selecting an Illustrator option.
Add the additional command by selecting an Illustrator option.
![]() When you’re finished adding commands, click the Stop button on the Actions panel.
When you’re finished adding commands, click the Stop button on the Actions panel.
The next time the action is run, the additional command will be performed.
Did You Know?
You can change the order of commands in an action. Select the Actions panel, drag the command you want to change up or down in the actions stack. Release the mouse when you see a dark line underneath the command where you want the action.
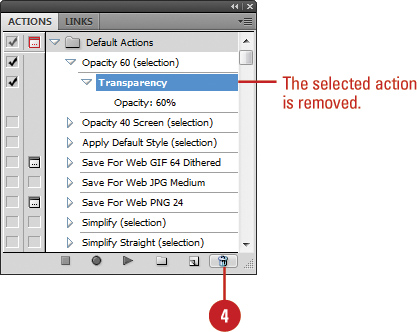
Deleting a Command from an Action
Occasionally, you may want to permanently delete a command from an existing action. If that’s the case, Illustrator makes the process quick and easy. An action consists of a group of steps. As the action executes, each step is completed in the order in which it appears within the action list. No one step is dependent upon another, so if you want to remove a step, it’s a simple process of deletion. Once the command is removed, the action will perform as if the deleted command never existed.
Delete a Command from an Action
![]() Open a document, and then select the Actions panel.
Open a document, and then select the Actions panel.
![]() Click the expand triangle of the action from which you want to delete the command.
Click the expand triangle of the action from which you want to delete the command.
Important
You cannot delete a command from a running action.
![]() Click the command you want to delete.
Click the command you want to delete.
![]() Select from three deletion methods:
Select from three deletion methods:
• Drag the command over the Delete button.
• Click the command, click the Delete button, and then click Yes in the Delete the Selection alert box.
• Click the command, and then hold down the Alt (Win) or Option (Mac) key, and then click the Delete button to delete the command without the alert box message.
Working with Batch File Processing
There is nothing more exciting than working on a new creative project, and watching your designs come to life. Conversely, there is nothing more tiresome than having to apply a new creative concept or correction individually to many additional images. For example, you just spent three hours coming up with a procedure to apply color and blending modifications to one of the company’s logos. The photo logo looks great; however, you now have to apply color and blending modifications to one of the company’s logos. You could create an action, but you would still have to open each image and apply the action 50 times. The solution is to batch process the images after you have created the action. Batch file processing lets you apply an action to an entire folder of images, and all you have to do is click a button. Now, what could be simpler than that?
Work with Batch File Processing
![]() Create a new folder, and then move all the images into the folder.
Create a new folder, and then move all the images into the folder.
Important
These files must be Illustrator files. There should not be any other files, such as text files, inside this folder.
![]() Create a second folder to hold the modified images (optional).
Create a second folder to hold the modified images (optional).
![]() Select the Actions panel.
Select the Actions panel.
![]() Click the Options menu, and then click Batch.
Click the Options menu, and then click Batch.
![]() Select from the following Play options:
Select from the following Play options:
• Click the Set list arrow, and then select the Set containing the Action you want to apply to the images.
• Click the Action list arrow, and then select the correct Action.
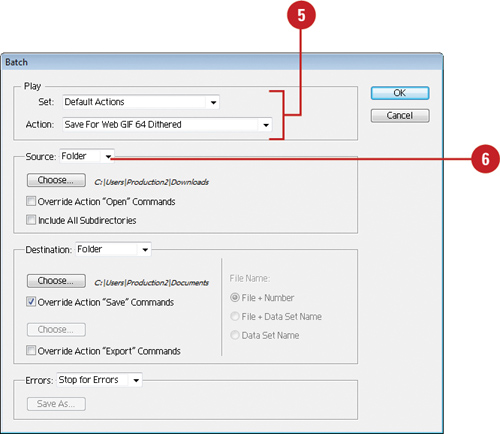
![]() Click the Source list arrow, and then select an image source from the following: Folder, or Data Sets.
Click the Source list arrow, and then select an image source from the following: Folder, or Data Sets.
![]() Click Choose (available if Folder is selected as the source), and then select the location of the image folder.
Click Choose (available if Folder is selected as the source), and then select the location of the image folder.

![]() Select the check boxes for any options you want:
Select the check boxes for any options you want:
• Override Action “Open” Commands. Select to use an open command embedded into the Action.
• Include All Subdirectories. Select to batch process any images located in folders embedded in the main image folder.
![]() Click the Destination list arrow, and then click None, Save and Close, or Folder.
Click the Destination list arrow, and then click None, Save and Close, or Folder.
![]() Specify options for the Save or Export commands:
Specify options for the Save or Export commands:
• Click Choose (available if Folder is selected as the source), and then select the destination of the modified images.
• Select the Override Action “Save” Commands or Override Action “Export” Commands check box to use a save or export command embedded into the Action.
• Select File Name options to create sequential files name in a batch sequence.
![]() Click the Errors list arrow, select an errors option, and then click Save As to save your error information, if necessary.
Click the Errors list arrow, select an errors option, and then click Save As to save your error information, if necessary.
![]() Click OK.
Click OK.
Opening and Using Scripts
A script is a series of commands that instructs Illustrator to perform a set of specified actions. These actions can be simple, affecting only a single object, or more complex, affecting many objects. The actions can call not only Illustrator, but also invoke other applications. Scripts are useful for repetitive tasks and can be used as a creative tool to streamline tasks that are time consuming and boring. A scripting language lets you ask a question (an event), and use the answer to that question to perform any commands (an action) that are available in Illustrator. You can use one of Illustrator’s built-in scripts, such as Export Docs As Flash or Live Trace, or create one of your own. To create your own scripts you need a working knowledge of a scripting language like JavaScript, and either a script-editing application or a simple text editor, such as Notepad (Win), TextEdit (Mac) BBEdit or even Microsoft Word. The languages you can use to perform scripting are varied and include Visual Basic, AppleScript, and JavaScript, to name a few. As a matter of fact, the Scripts Events Manager lets you set JavaScript and Illustrator Actions to run automatically when a specified Illustrator event occurs.
Use Built-in Scripts
![]() Click the File menu, and then point to Scripts.
Click the File menu, and then point to Scripts.
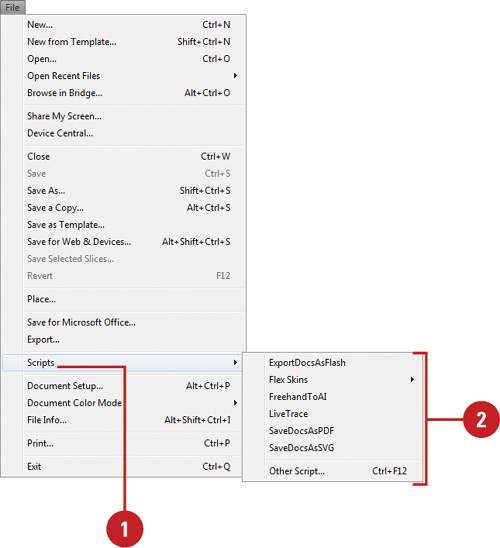
![]() Select one of the following built-in scripts:
Select one of the following built-in scripts:
• ExportDocsAsFlash.
• Flex Skins. Then select Create Flex 3 Skin or Export Flex 3 Skin.
• FreehandToAI. (New!)
• LiveTrace.
• SaveDocsAsPDF.
• SaveDocsAsSVG.
Open and Use Enhanced Scripting
![]() Open a text editor, and then create a script using any approved scripting language.
Open a text editor, and then create a script using any approved scripting language.
![]() Save the document with the correct extension, for example, ActiveLayer.js for JavaScript.
Save the document with the correct extension, for example, ActiveLayer.js for JavaScript.
![]() To access the script in Illustrator, click the File menu, point to Scripts, and then click Other Script.
To access the script in Illustrator, click the File menu, point to Scripts, and then click Other Script.
Timesaver
Press ![]() +F12 (Mac) or Ctrl+F12 (Win).
+F12 (Mac) or Ctrl+F12 (Win).
![]() Navigate to the folder or drive where your script file is located.
Navigate to the folder or drive where your script file is located.
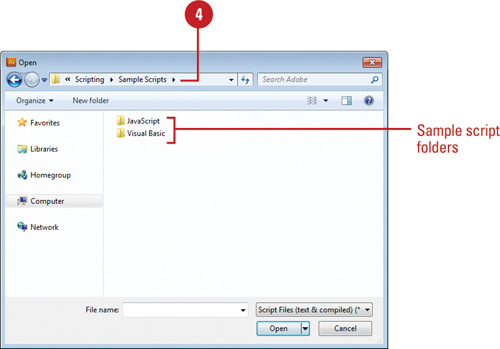
![]() Click the script that you want to run.
Click the script that you want to run.

![]() Click Open to run the script.
Click Open to run the script.
Your script appears in a browser window.
Defining and Editing Data Variables
When you work with objects in Illustrator, you can define variables to drive them in a template document. Data-driven objects make it possible to create multiple versions of an object quickly and precisely. For example, you need to produce several web banners using the same template. Instead of creating each banner, one at a time, you can use data-driven graphics to generate web banners using variables and data sets. Any artwork can be converted into a template for data-driven graphics by defining variables for objects in the image. A data set is a collection of variables and associated data. You can switch between data sets to upload different data into your template. You can work with variables and data sets in the Variables panel. The left column displays the variables name and the right column displays the bound object name as shown in the Layers panel. There are four types of variables: Visibility, Text String, Linked File, and Graph Data.
Create Data Variables
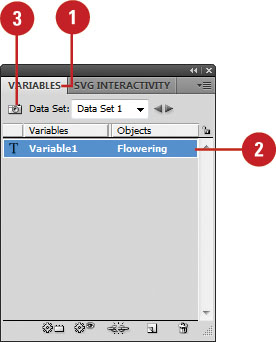
![]() Select the Variables panel.
Select the Variables panel.


![]() Select from the available options:
Select from the available options:
• Visibility. Select the object that you want to show or hide, and then click the Make Visibility Dynamic button.
• Text String. Select the text object, and then click the Make Object Dynamic button.
• Linked File. Select the linked file, and then click the Make Object Dynamic button.
• Graph Data. Select the graph object, and then click the Make Object Dynamic button.
• Variable. Click the New Variable button. To bind it to an object, select the object and variable, and then click the Make Object Dynamic or Make Visibility Dynamic button.
![]() To delete a variable, select it, click the Delete Variable button, and then click Yes or No for all occurrences.
To delete a variable, select it, click the Delete Variable button, and then click Yes or No for all occurrences.
Create a Data Set
![]() Select the Variables panel.
Select the Variables panel.
![]() Display the variables that you want in the data set.
Display the variables that you want in the data set.
![]() Click the Capture Data Set button on the panel to create a data set.
Click the Capture Data Set button on the panel to create a data set.
![]() Edit the objects associated with the variables on the artboard.
Edit the objects associated with the variables on the artboard.
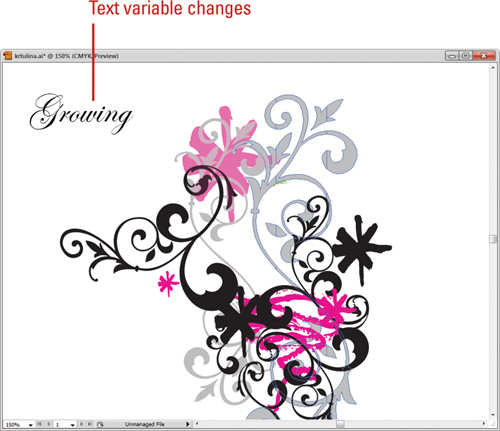
Image visibility, the text in a type layer, or exchanging one image for another, can now be controlled through changing variables.
![]() Click the Capture Data Set button on the panel to create another data set.
Click the Capture Data Set button on the panel to create another data set.

![]() Repeat Steps 4 and 5 for each variable in the template.
Repeat Steps 4 and 5 for each variable in the template.
![]() To switch between data sets, click the Data Set list arrow, and then select a data set.
To switch between data sets, click the Data Set list arrow, and then select a data set.
![]() To apply the data on the artboard to the current data set, click the Options menu, and then click Update Data Set.
To apply the data on the artboard to the current data set, click the Options menu, and then click Update Data Set.
Did You Know?
You can delete a data set. Select the Variables panel, click the Data Set list arrow, select the data set that you want to delete, click the Options menu, and then click Delete Data Set.
You can rename a data set. Select the Variables panel, click the Data Set list arrow, select the data set that you want to rename, select the name in the Data Set box, type a name, and then press Enter (Win) or Return (Mac).
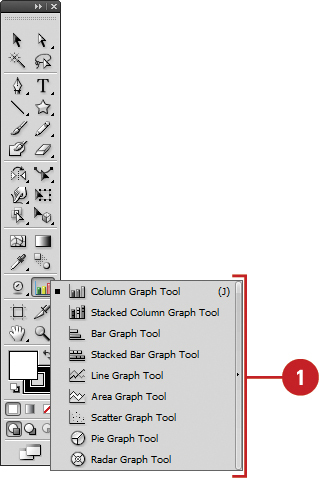
Creating and Formatting a Data Graph
A graph allows you to display data in a visual way. With Illustrator, you can create nine different graphs: Column, Stacked Column, Bar, Stacked Bar, Line, Area, Scatter, Pie, and Radar. After you select the type of graph you want to create, you draw the size of the graph you want, and then enter data in the Graph Data window. To edit and modify a graph, select the graph object, and use commands on the Graph submenu on the Object menu. After you create a graph, you can format it. You can change the appearance and position of the graph’s axes, add drop shadows, move the legend, and combine different types. For a more customized look, you can change colors, shading, typeface, and apply transparency, gradient, blends, brush strokes, and graphic styles.
Create a Data Graph
![]() Select a graph tool on the Tools panel.
Select a graph tool on the Tools panel.
![]() Drag to create a data graphic the size that you want. Alt+drag (Win) or Option+drag (Mac) to draw from the center.
Drag to create a data graphic the size that you want. Alt+drag (Win) or Option+drag (Mac) to draw from the center.

![]() Enter data labels in the first row and column for the graph in the Graph Data window. Press Enter (Win) or Return (Mac) to add the text.
Enter data labels in the first row and column for the graph in the Graph Data window. Press Enter (Win) or Return (Mac) to add the text.
![]() Enter data for the graph in the Graph Data window. Press Enter (Win) or Return (Mac) to add the data.
Enter data for the graph in the Graph Data window. Press Enter (Win) or Return (Mac) to add the data.
![]() Click the Apply button to display your data changes in the graph on the artboard.
Click the Apply button to display your data changes in the graph on the artboard.
![]() When you’re done, click the Close button in the Graph Data window.
When you’re done, click the Close button in the Graph Data window.
![]() To edit and modify graphs, select the graph object, click the Object menu, point to Graph, and then select a graph command: Type, Data, Design, Column, or Marker.
To edit and modify graphs, select the graph object, click the Object menu, point to Graph, and then select a graph command: Type, Data, Design, Column, or Marker.
Format a Data Graph
![]() Select the Selection tool on the Tools panel.
Select the Selection tool on the Tools panel.

![]() Select the graph.
Select the graph.
![]() Click the Object menu, point to Graph, and then click Type.
Click the Object menu, point to Graph, and then click Type.
Timesaver
Double-click the Graph tool on the Tools panel.
![]() Do any of the following to format the data graph:
Do any of the following to format the data graph:
• Type. Click a type button.
• Value Axis. Places axis values on the left, right, or both sides.
• Add Drop Shadow. Applies a drop arrow behind items.
• Add Legend Across Top. Displays the legend horizontally.
• First Row In Front. Controls the overlap of graph data.
• First Column In Front. Places the column of data on top.

![]() Select the graph specific options you want; the options vary depending on the graph type. For line graphs, select check boxes to Mark Data Points, Connect Data Points, and Draw Filled Lines.
Select the graph specific options you want; the options vary depending on the graph type. For line graphs, select check boxes to Mark Data Points, Connect Data Points, and Draw Filled Lines.
![]() Click OK.
Click OK.
![]() To select parts of a graph, click the Group Selection tool on the Tools panel, and then click the graph part. To select a group of parts, click the graph part again.
To select parts of a graph, click the Group Selection tool on the Tools panel, and then click the graph part. To select a group of parts, click the graph part again.
![]() To change the color, stroke, style, or opacity, select the graph part, and then use the options on the Control panel.
To change the color, stroke, style, or opacity, select the graph part, and then use the options on the Control panel.
• To combine graph types, select the graph data part, double-click the Graph tool, select a type, and then click OK.

Adding Graph Designs to a Graph
You can use graph designs to add graphics or symbols to columns or markers in a graph. You can create your own graph designs using a graphic or symbol, or use one of the sample swatch libraries provided by Illustrator (in the Adobe/Adobe Illustrator CS5/Cool Extras/Sample Files/Graphics Designs). After you create a graph and select a column or marker (line or scatter type), you can add a graph design to it.
Add a Graph Design to a Graph
![]() Select the Group Selection tool on the Tools panel.
Select the Group Selection tool on the Tools panel.
![]() Select the column or marker in the graph you want to replace.
Select the column or marker in the graph you want to replace.
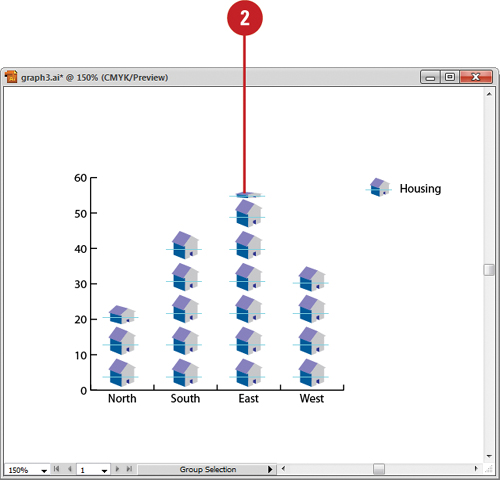
![]() Click the Object menu, point to Graph, and then click Column or Marker.
Click the Object menu, point to Graph, and then click Column or Marker.
![]() Select the design you want to use.
Select the design you want to use.
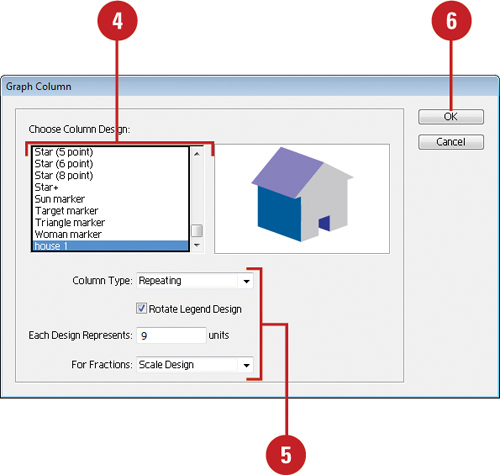
![]() For a column design, select any of the following:
For a column design, select any of the following:
• Column Type. Select a column type: Vertically Scaled, Uniformly Scaled, Repeating, or Sliding (scale bottom, not top).
• Rotate Legend Design. Rotate the design in the legend.
• Each Design Represents. The number of units per design (Repeating type).
• For Fractions. Chop or scale a partial design (Repeating type).
![]() Click OK.
Click OK.
Did You Know?
You can create a column or marker design. Create the design using any of the drawing tools. Select the design with the Selection tool. Click the Object menu, point to Graph, click Design, click New Design, click Rename, type a name, click OK, and then click OK.