6. Working with Points and Paths
Introduction
When you use Illustrator’s vector drawing, or pen tools, Illustrator creates a path to store that information. Paths are defined mathematically using anchor points and segments. Once created, they can be precisely modified to fit any design situation.
Working with the various Pen tools, it’s possible to create precise paths, and even create complicated selections around virtually any shape. Once the path is created, it’s a simple matter to subtract anchor points, and add new or modify existing anchor points to produce complex paths. It’s even possible to convert straight segments (the visible line that connects two anchor points together) into elegantly curved segments, or you can remove the curve from a segment with a single click.
Paths can be used to precisely guide a brush stroke, or the interior of a path can be filled with any color, pattern, or gradient available in Illustrator using Stroke and Fill commands. Paths can even be used to create a clipping mask, which is an object whose shape masks out everything except the contents behind the shape.
Drawing with the Pen Tools
When you work with Illustrator’s Pen tool, you’re creating a path. The path consists of curved and straight segments connected by anchor points. When you click with the Pen tool, you create corner points and straight segments. When you drag with the Pen tool, you can create smooth points and curve segments, which have direction handles you can use to change the curved segment. The shape of the curve segment is defined by the length and direction of the direction handles. As you create drawings with the Pen tool, you can turn on Smart Guides to help you align the segments.
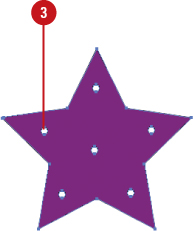
Draw a Polygon with the Pen Tool
![]() Click the Fill box on the Tools panel and then click the Color or None to specify whether you want to fill the object or not.
Click the Fill box on the Tools panel and then click the Color or None to specify whether you want to fill the object or not.
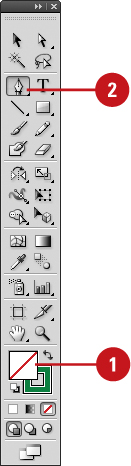
![]() Select the Pen tool on the Tools panel.
Select the Pen tool on the Tools panel.

![]() Click to create the first anchor point.
Click to create the first anchor point.
• To draw segments constrained to 45 degrees, hold down Shift while you click.
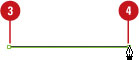

![]() Click to create the second anchor point at another location.
Click to create the second anchor point at another location.
A line segment appears between the two anchor points.
![]() Continue to add anchor points.
Continue to add anchor points.
![]() Do any of the following to complete the shape as a:
Do any of the following to complete the shape as a:
• Open Path. Click the Pen tool or any other tool on the Tools panel, or Ctrl+click (Win) or ![]() +click (Mac) outside the new shape to deselect it.
+click (Mac) outside the new shape to deselect it.
![]()
• Closed Path. Point to the starting anchor point, and then click it.

Draw Curves with the Pen Tool
![]() Click the Fill box on the Tools panel and then click the Color or None to specify whether you want to fill the object or not.
Click the Fill box on the Tools panel and then click the Color or None to specify whether you want to fill the object or not.

![]() Select the Pen tool on the Tools panel.
Select the Pen tool on the Tools panel.
![]() Click and drag to create the first anchor point.
Click and drag to create the first anchor point.

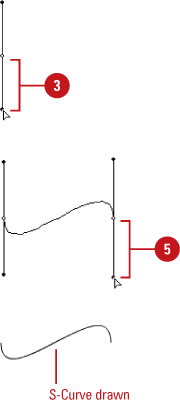
As you drag, the direction handles move.
![]() Release the mouse, and then move to where you want the second point.
Release the mouse, and then move to where you want the second point.
![]() Click and drag to create the second anchor point.
Click and drag to create the second anchor point.
A curve segment appears between the two anchor points. As you drag, the direction handles move, which changes the the curve segment.
The shape of the curve segment is defined by the length and direction of the direction handles.
![]() Continue to add anchor points and direction handles.
Continue to add anchor points and direction handles.
![]() Do any of the following to complete the shape as a:
Do any of the following to complete the shape as a:
• Open Path. Click the Pen tool or any other tool on the Tools panel, or Ctrl+click (Win) or ![]() +click (Mac) outside the new shape to deselect it.
+click (Mac) outside the new shape to deselect it.
• Closed Path. Point to the starting anchor point, and then click it.
Setting Anchor Point Preferences
Illustrator’s Selection & Anchor Displays preferences allow you to set selection and anchor options. The Anchor Display options allow you to determine how handles and anchors appear on the screen. As you work with anchor points, it’s easier to select them when they appear highlighted on a mouse over, which you can enable in this dialog box.
Move an Anchor Point or Segment
![]() Click the Edit (Win) or Illustrator (Mac) menu, and then point to Preferences.
Click the Edit (Win) or Illustrator (Mac) menu, and then point to Preferences.
![]() Click Selection & Anchor Display.
Click Selection & Anchor Display.
![]() Select the Anchor Point and Handle Display options you want to use:
Select the Anchor Point and Handle Display options you want to use:
• Anchors. Specify the display of anchor points.
• Handles. Specify the display of handle end points (direction points).
• Highlight anchors on mouse over. Select to highlight the anchor point located directly below the mouse pointer.
• Show handles when multiple anchors are selected. Select to display direction lines on all selected anchor points when you use the Direct Selection or Group Selection tool to select an object.
Deselect to display direction lines for an anchor point when it is the only anchor point on the path or when the Bezier segment for the direction line is selected and the anchor point is not selected.
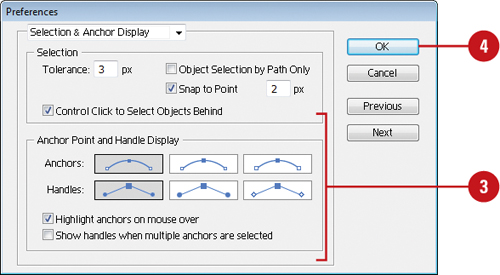
![]() Click OK.
Click OK.
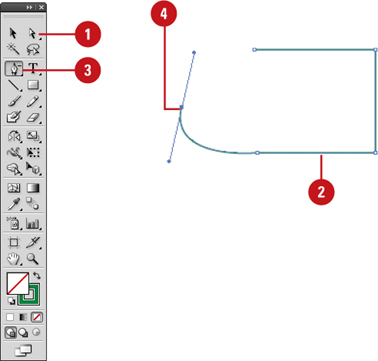
Moving Points and Segments
It’s hard to draw a segment right the first time. Moving anchor points and segments is all part of the process of creating artwork. When you move an anchor point, the segments that are connected to it change. When you move a straight segment, the anchor points on the segment move with it. When you move a curve segment, the curve changes, but the connecting anchors remain the same. You can also change a curve segment by adjusting a direction point on the direction handle.
Move an Anchor Point or Segment
![]() Select the Direct Selection tool on the Tools panel.
Select the Direct Selection tool on the Tools panel.

![]() Click a blank area to deselect all points.
Click a blank area to deselect all points.
![]() Drag an anchor point or drag the middle of a segment.
Drag an anchor point or drag the middle of a segment.
• For a smaller move, click the anchor point or segment, and then press an arrow key.
• To constrain the movement of anchor points or segments to 45 degrees, hold down Shift while dragging.

![]() To reshape a curve segment, click an anchor point or a curve segment, and then drag a direction point at the end of the direction handle.
To reshape a curve segment, click an anchor point or a curve segment, and then drag a direction point at the end of the direction handle.

Did You Know?
You can average the position of anchor points. Select the anchor points you want with the Direct Selection tool, click the Object menu, point to Path, click Average, click the Horizontal (x axis), Vertical (y axis) or Both option, and then click OK.
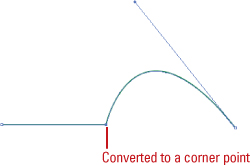
Converting Points
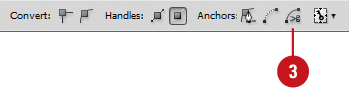
When you create a curve with the Pen tool, the curve segment after the second anchor point appears on the opposite side as the first curve segment. If you want the second curve segment to appear on the same side as the first, you need to convert the anchor point from a smooth point to a corner point. You can make this conversion as you create the curve segment with the Pen tool or you can do it later with buttons on the Control panel or with the Convert Anchor Point tool.
Convert Points on a Path Using the Control Panel
![]() Select the Direct Selection tool on the Tools panel.
Select the Direct Selection tool on the Tools panel.
![]() Click the point that you want to convert.
Click the point that you want to convert.

![]() Click one of these buttons on the Control panel:
Click one of these buttons on the Control panel:
• Convert to Smooth. Click the Convert Selected Anchor Points to Smooth button.
• Convert to Corner. Click the Convert Selected Anchor Points to Corner button.

Did You Know?
You can convert a mesh object back to a path object. Select the mesh object, click the Object menu, point to Path, click Offset Path, enter 0 for the offset value, and then click OK.
Convert Points on a Path Using the Convert Anchor Tool
![]() Select the Convert Anchor Point tool on the Tools panel.
Select the Convert Anchor Point tool on the Tools panel.
• To turn the Pen tool into a temporary Convert Anchor Point tool, hold down Alt (Win) or Option (Mac).

![]() To convert a corner point to a smooth point, drag a direction handle from a corner point.
To convert a corner point to a smooth point, drag a direction handle from a corner point.

![]() To convert a smooth point to a corner point, click a smooth point.
To convert a smooth point to a corner point, click a smooth point.
• To convert a smooth point to a corner point with a nonsmooth curve, drag a smooth point so it forms a V shape.

Adding and Deleting Anchor Points
Creating a path is not necessarily the end of the job; in fact, there are many ways you can modify a path once it’s been created. For example, you can add, subtract, or delete anchor points on an existing path. You can also modify those points to conform to any desired shape. In addition, existing anchor points can be modified to change the segments connecting the points. Just like anything else in Illustrator, paths are flexible. They can be modified to meet whatever design considerations are needed to make the job successful.
Add Anchor Points
![]() Select the Direct Selection tool on the Tools panel.
Select the Direct Selection tool on the Tools panel.

![]() Select the object to which you want to add an anchor point.
Select the object to which you want to add an anchor point.

![]() Select the Add Anchor Point tool on the Tools panel.
Select the Add Anchor Point tool on the Tools panel.

![]() Click once on the path to add a new anchor point.
Click once on the path to add a new anchor point.
• If you missed the path, click OK in response to the alert, and then try again.
When you add an anchor point to a curve segment, a smooth point appears on the path. When you add an anchor point to a straight segment, a corner point appears.

![]() Click and drag on the path to add and modify the segment.
Click and drag on the path to add and modify the segment.
Add Anchor Points to an Open Path
![]() Select the Pen tool on the Tools panel.
Select the Pen tool on the Tools panel.

![]() Point to the endpoint to which you want to add an anchor point.
Point to the endpoint to which you want to add an anchor point.
A slash appears next to the Pen pointer.

![]() Click the endpoint to make it a corner point or drag it to make a smooth point.
Click the endpoint to make it a corner point or drag it to make a smooth point.
![]() Click once on the path to add a new anchor point.
Click once on the path to add a new anchor point.
Delete Anchor Points
![]() Select the Direct Selection tool on the Tools panel.
Select the Direct Selection tool on the Tools panel.
![]() Select the object from which you want to delete an anchor point.
Select the object from which you want to delete an anchor point.
![]() Select the Delete Anchor Point tool on the Tools panel.
Select the Delete Anchor Point tool on the Tools panel.
![]() Click once on an existing anchor point to remove it from the path.
Click once on an existing anchor point to remove it from the path.
The anchor points on either side of the deleted point are now used to define the segment.
• You can also click a point with the Direct Selection tool, and then click the Remove Selected Anchor Points button on the Control panel.
Aligning and Joining Anchor Points
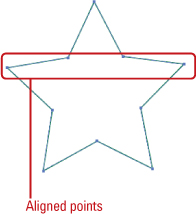
In addition to aligning objects, the Align buttons on the Control panel can also align points on a path along the horizontal and vertical axis. For example, you can use the Vertical Align Center button to align two anchor points to the center point between the two original points along the vertical axis. If you have an open path with two endpoints that you want to connect, you can use the Connect Selected End Points button to connect them with a straight line. You can also join two endpoints into a single point. If you want Illustrator to join the closes end points for two paths, you can select the paths with the Selection tool, and then use the Join command (New!).
Align Anchor Points
![]() Select the Lasso tool on the Tools panel.
Select the Lasso tool on the Tools panel.

![]() Drag to select two or more points on the path.
Drag to select two or more points on the path.
• If you want to select points individually, select the Direct Selection tool, and then Shift+click the points that you want to select.

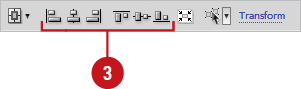
![]() Click any of the following buttons on the Control panel:
Click any of the following buttons on the Control panel:
• Horizontal. Click one of the Horizontal Align buttons to move and align the points horizontally.
• Vertical. Click one of the Vertical Align buttons to move and align the points vertically.
• Overlap. Click a Horizontal Align button and then click a Vertical Align button (or vice versa) to move and align the points horizontally and vertically.
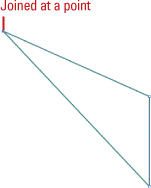
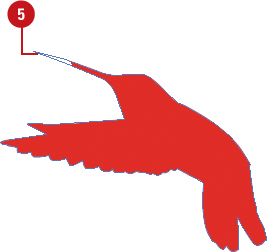
Join Anchor Endpoints with a Straight Line
![]() Select the Direct Selection tool on the Tools panel.
Select the Direct Selection tool on the Tools panel.

![]() Shift+click the two endpoints that you want to join.
Shift+click the two endpoints that you want to join.
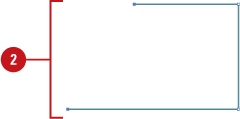
![]() Click the Connect Selected End Points button on the Control panel.
Click the Connect Selected End Points button on the Control panel.


A straight line segment connects the two endpoints.
Did You Know?
You can join two or more paths. Select the paths you want with the Selection tool, click the Object menu, point to Path, and then click Join (New!). Illustrator joins the closes end points.
Join Anchor Endpoints into a Single Point
![]() Select the Direct Selection tool on the Tools panel.
Select the Direct Selection tool on the Tools panel.

![]() Shift-click the two endpoints that you want to join.
Shift-click the two endpoints that you want to join.
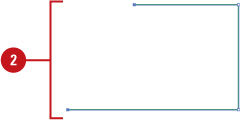
![]() Use the Horizontal Align and Vertical Align buttons on the Control panel to have the endpoints meet in the middle (one on top of the other).
Use the Horizontal Align and Vertical Align buttons on the Control panel to have the endpoints meet in the middle (one on top of the other).
![]() Click the Connect Selected End Points button on the Control panel.
Click the Connect Selected End Points button on the Control panel.
The Join dialog box appears.
![]() Click the Corner or Smooth option.
Click the Corner or Smooth option.
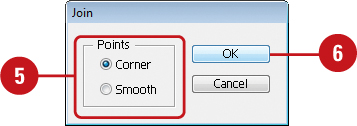
![]() Click OK.
Click OK.
Reshaping Paths
The Reshape tool on the Tools panel allows you to move points and segments around to modify paths. This tool is useful for extending the side of an object path. When you select multiple points, you can extend or contract the selected point while leaving the unselected points unchanged. You can also reshape a path with the Pencil or Paintbrush tool.
Use the Reshape Tool
![]() Select the Direct Selection tool on the Tools panel.
Select the Direct Selection tool on the Tools panel.
![]() Click a blank area to deselect everything, and then click to select an anchor point on a path.
Click a blank area to deselect everything, and then click to select an anchor point on a path.

![]() Select the Reshape tool on the Tools panel.
Select the Reshape tool on the Tools panel.

![]() To drag multiple points at the same time, Shift+click or use a selection tool to select the ones that you want.
To drag multiple points at the same time, Shift+click or use a selection tool to select the ones that you want.
![]() Drag any point or segment.
Drag any point or segment.
Did You Know?
You can change the pointer into cross hairs. Press Caps Lock to change the pointer into a Precise Cursor (cross hairs). Press Caps Lock again to change it back.
Reshape a Path with the Pencil or Paintbrush Tool
![]() Select the Pencil tool on the Tools panel to reshape a path that doesn’t have a brush stroke, or select the Paintbrush tool to reshape a path with a brush stroke.
Select the Pencil tool on the Tools panel to reshape a path that doesn’t have a brush stroke, or select the Paintbrush tool to reshape a path with a brush stroke.
![]() Select the path that you want to reshape. Ctrl+click (Win) or Command+click (Mac) a path.
Select the path that you want to reshape. Ctrl+click (Win) or Command+click (Mac) a path.

![]() Drag the edge of the path to reshape it.
Drag the edge of the path to reshape it.
Did You Know?
You can set Paintbrush options. Double-click the Paintbrush tool on the Tools panel, set the options that you want, including Edit Selected Paths Within X pixels, and then click OK.
Simplifying Paths
After you create a path, you can simplify it, which reduces the files size and makes it display and print faster. Simplifying a path removes extra anchor points without changing the shape of the path. You can specify how you want Illustrator to reshape the path by using the Curve Precision and Angle Threshold sliders.
Simplify a Path
![]() Select the Direct Selection tool on the Tools panel.
Select the Direct Selection tool on the Tools panel.

![]() Select the object with the path that you want to simplify.
Select the object with the path that you want to simplify.

![]() Click the Object menu, point to Path, and then click Simplify.
Click the Object menu, point to Path, and then click Simplify.
![]() Select the Preview check box to show a preview of the simplified path as you make changes.
Select the Preview check box to show a preview of the simplified path as you make changes.

![]() Drag the sliders to adjust the Curve Precision and Angle Threshold.
Drag the sliders to adjust the Curve Precision and Angle Threshold.
• Curve Precision. Specify a percentage value between 0 and 100. A higher percentage creates more points and a close fit.
• Angle Threshold. Specify a degree angle between 0 and 180 to control the smoothness of corners. This is useful to keep corners sharp, even if the Curve Precision is low.
![]() Select the Straight Lines check box to creates straight lines between the object’s original anchor points.
Select the Straight Lines check box to creates straight lines between the object’s original anchor points.
![]() Select the Show Original check box to show the original path behind the simplified path.
Select the Show Original check box to show the original path behind the simplified path.
![]() Click OK.
Click OK.
Dividing Paths
The Divide Objects Below command allows you to use an object shape to cut out other objects to divide them. Think of it like a cookie cutter. When you cut through other objects, Illustrator discards the original selection. In addition, you can use the Split Into Grid command to divide objects into a grid or the Knife tool to cut objects along a freehand path you draw with the tool, dividing objects into their compound filled faces. A face is an area undivided by a line segment.
Divide a Path
![]() Create or select an object (not a group) that you want to use as the cutting object.
Create or select an object (not a group) that you want to use as the cutting object.

![]() Select the Selection tool on the Tools panel, and then move the cutting object on top of the objects that you want to divide.
Select the Selection tool on the Tools panel, and then move the cutting object on top of the objects that you want to divide.

![]() Click the Object menu, point to Path, and then click Divide Objects Below.
Click the Object menu, point to Path, and then click Divide Objects Below.
![]() Drag the edge of the path to reshape it.
Drag the edge of the path to reshape it.
![]()
Did You Know?
You can divide objects into a grid. Select one or more closed path objects, click the Object menu, point to Path, click Split Into Grid, specify values for the grid, and then click OK.
You can cut objects with the Knife tool. Select the Knife tool on the Tools panel, drag the pointer over an object with a curved path, or Alt+drag (Win) or Option+drag (Mac) the artboard with a straight path.
Splitting Paths
The Scissor tool on the Tools panel allows you to split an open path into two paths or open a closed path. You can split a path at an anchor point or in the middle of a segment. If you want to split a path at an anchor point, you can also use the Cut Path at Selected Anchor Points button on the Control panel.
Split a Path
![]() Select the Direct Selection tool on the Tools panel.
Select the Direct Selection tool on the Tools panel.
![]() Select the object with the path that you want to split.
Select the object with the path that you want to split.
![]() Select the Scissor tool on the Tools panel.
Select the Scissor tool on the Tools panel.
![]() Click the object’s path where you want to split it.
Click the object’s path where you want to split it.

If you click on a closed path, it turns into an open path. If you click on an open path, it splits it into two paths.
If you click a line segment, two endpoints appear, one on top of the other.
![]() To move the endpoints, select the Direct Selection tool, and then drag the selected endpoint to display the endpoint below it.
To move the endpoints, select the Direct Selection tool, and then drag the selected endpoint to display the endpoint below it.
Split a Path Using the Control Panel
![]() Select the Direct Selection tool on the Tools panel.
Select the Direct Selection tool on the Tools panel.
![]() Select the object with the path, and then click the anchor point that you want to split.
Select the object with the path, and then click the anchor point that you want to split.

![]() Click the Cut Path at Selected Anchor Point button on the Control panel.
Click the Cut Path at Selected Anchor Point button on the Control panel.
A new anchor point appears on top of the selected one.
![]() To move the anchor point, drag the selected point to display the other anchor point below it.
To move the anchor point, drag the selected point to display the other anchor point below it.

Merging Paths
The Blob Brush tool on the Tools panel allows you to merge adjacent paths without strokes. When drawing with the Blob Brush tool, new paths merge with the topmost matching the path that it connects with. This works when the Blob Brush tool is set up to paint with the exact same fill and appearance settings. When you intersect the paths, the Blob Brush tool creates paths with a fill and no stroke.
Create Merged Paths with the Blob Brush Tool
![]() Select the Direct Selection tool on the Tools panel.
Select the Direct Selection tool on the Tools panel.
![]() Click a blank area to deselect everything, and then click to select an anchor point on a path.
Click a blank area to deselect everything, and then click to select an anchor point on a path.

![]() Select the Appearance panel.
Select the Appearance panel.

![]() Click the Options menu, and then deselect the New Art Has Basic Appearance option.
Click the Options menu, and then deselect the New Art Has Basic Appearance option.
When this option is deselected, the Blob Brush tool uses the attributes of the selected artwork.
![]() Select the Blob Brush tool on the Tools panel.
Select the Blob Brush tool on the Tools panel.
Make sure the Blob Brush is set up to have the same fill color, no stroke, and appearance settings as the artwork.

![]() Draw paths that intersect with the artwork.
Draw paths that intersect with the artwork.

Set Blob Brush Options
![]() Double-click the Blob Brush tool on the Tools panel.
Double-click the Blob Brush tool on the Tools panel.

![]() Select from the following options:
Select from the following options:
• Keep Selected. Select to keep all paths during the merge selected.
• Selection Limits Merge. Select to have the Blob Brush merge only with the selected artwork.
• Fidelity. Specify how far (0.5 to 20 pixels) you need to move to add an anchor point.
• Smoothness. Specify the amount of smoothing applied to the path. The higher the percentage, the smoother the path.
• Size. Specify the size of the brush.
• Angle. Specify the angle of rotation for the brush.
• Roundness. Specify the roundness of the brush.
![]() Click OK.
Click OK.

Working with Shape Mode
If you have overlapping objects, you can use Shape Mode buttons on the Pathfinder panel to create compound shapes, which are editable and releasable (restoring original attributes). You can use Shape Mode buttons (Add to Shape Area, Subtract from Shape Area, Intersect Shape Area, or Exclude Overlapping Shape Areas) on almost any object, except placed or rasterized images, mesh objects, or a single group.
Apply a Shape Mode Command
![]() Select two or more overlapping objects.
Select two or more overlapping objects.

![]() Select the Pathfinder panel.
Select the Pathfinder panel.
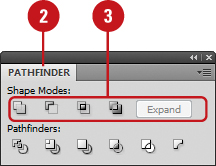
![]() Select from the following Shape Mode buttons:
Select from the following Shape Mode buttons:
• Add to Shape Area. Use to join the outer edges of selected objects into a compound shape.
• Subtract from Shape Area. Use to remove objects in front of other objects and still preserve paint attributes.
• Intersect Shape Area. Use to preserve object areas that intersect.
• Exclude Overlapping Shape Areas. Use to change overlapping areas to transparency.


Did You Know?
You can expand a compound shape to create a single path. Select the Selection tool on the Tools panel, select the compound shape, and then click the Expand button on the Pathfinder panel.
You can release a compound shape to restore object attributes. Select the Selection tool on the Tools panel, select the compound shape, and then click the Release Compound Shape on the Options menu on the Pathfinder panel.
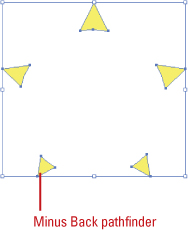
Working with Pathfinder
The commands in the Pathfinder panel allow you to create a group of separate, non-overlapping closed paths or lines. You start with overlapping objects and you end up with non-overlapping ones. When you use the Pathfinder commands—Divide, Trim, Merge, Crop, Outline, and Minus Back—the original objects can’t be restored. You can only undo the operation.
Apply a Pathfinder Command
![]() Select two or more overlapping objects.
Select two or more overlapping objects.

![]() Select the Pathfinder panel.
Select the Pathfinder panel.

![]() Select from the following Pathfinder buttons:
Select from the following Pathfinder buttons:
• Divide. Use to create a separate, non-overlapping object from an overlapping area.
• Trim. Use to preserve the frontmost object and delete objects behind and overlapping.
• Merge. Use to merge adjacent or overlapping objects with the same fill attributes.
• Crop. Use to crop the frontmost object; similar to a clipping mask.
• Outline. Use to create an outline of the overlapping objects.
• Minus Back. Use to remove objects in the back, leaving only part of the frontmost object.

Did You Know?
You can convert a stroke into a filled object. Select an object with a stroke, click the Object menu, point to Path, and then click Outline Stroke.
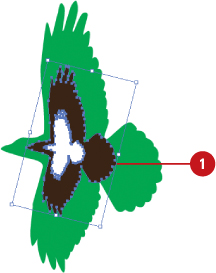
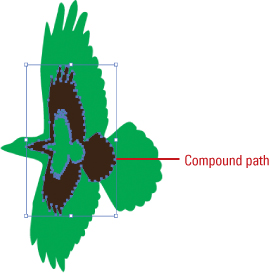
Creating a Compound Path
A compound path is a single object made up from two or more objects. In overlapping areas, a compound path removes the overlapping space displaying the attributes of the backmost object behind it. Think of it like a cookie cutter. After you create a compound path, you can release (restore) it at any time. However, the results are not exact. If you want to add another object to the compound path, you need to arrange the object in front or back of the compound object, select them, and then re-use the Make command for Compound Path.
Create a Compound Path
![]() Arrange your objects so that the frontmost object will cut out to reveal the attributes of the backmost object.
Arrange your objects so that the frontmost object will cut out to reveal the attributes of the backmost object.
![]() Select all the objects that you want to include in the compound path.
Select all the objects that you want to include in the compound path.
![]() Click the Object menu, point to Compound Path, and then click Make.
Click the Object menu, point to Compound Path, and then click Make.
![]() To add another object to the compound path, arrange the object in front or back of the compound object, select them, and then click the Object menu, point to Compound Path, and then click Make.
To add another object to the compound path, arrange the object in front or back of the compound object, select them, and then click the Object menu, point to Compound Path, and then click Make.
Did You Know?
You can convert strokes to compound paths. Select the object, click the Object menu, point to Path, and then click Outline Stroke. The compound path is grouped with the filled object. To modify it, ungroup it from the fill or select it with the Group Selection tool.
Reverse an Object’s Fill in a Compound Path
![]() Click in a blank area to deselect the compound path.
Click in a blank area to deselect the compound path.
![]() Select the Direct Selection tool on the Tools panel.
Select the Direct Selection tool on the Tools panel.
![]() Click the edge of the object for which you want to reverse the fill.
Click the edge of the object for which you want to reverse the fill.
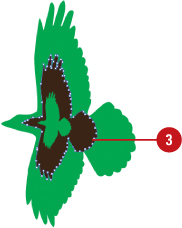

![]() Select the Attributes panel.
Select the Attributes panel.
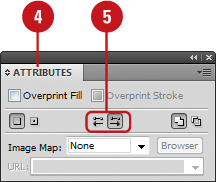
![]() Click the Reverse Path Direction Off button or Reverse Path Direction On button.
Click the Reverse Path Direction Off button or Reverse Path Direction On button.
Release a Compound Path
![]() Select the compound path.
Select the compound path.

![]() Click the Object menu, point to Compound Path, and then click Release.
Click the Object menu, point to Compound Path, and then click Release.

The single object reverts back to individual objects. All the objects are selected and painted with the attributes from the compound path, not their original attributes.
Creating a Clipping Set
A clipping mask, or clipping path, is an object whose shape masks out everything except the contents behind the shape. The clipping mask (vector only) and the masked objects (any artwork) are called a clipping set. You can create a clipping set from a selection of two or more objects or from all objects in a group or layer. The main thing to remember is that the clipping mask object needs to be above the object that you want to mask in the Layers panel or group. When you move or transform a masked object, Illustrator displays only the masked area.
Create a Clipping Mask
![]() Create or select the clipping mask object that you want to use as the mask.
Create or select the clipping mask object that you want to use as the mask.

![]() Move the clipping mask object above the object that you want to mask.
Move the clipping mask object above the object that you want to mask.
![]() Select the clipping mask object and the objects you want to mask.
Select the clipping mask object and the objects you want to mask.
![]() Click the Object menu, point to Clipping Mask, and then click Make.
Click the Object menu, point to Clipping Mask, and then click Make.

Create a Clipping Mask for a Group or Layer
![]() Create or select the clipping mask object that you want to use as the mask.
Create or select the clipping mask object that you want to use as the mask.
![]() Select the Layers panel.
Select the Layers panel.

![]() Move the clipping mask object and the object that you want to mask into a layer or group.
Move the clipping mask object and the object that you want to mask into a layer or group.
![]() Move the clipping mask object above the object that you want to mask in the Layers panel or group.
Move the clipping mask object above the object that you want to mask in the Layers panel or group.
![]() Select the layer or group.
Select the layer or group.
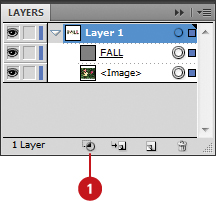
![]() Click the Make/Release Clipping Mask button in the Layers panel.
Click the Make/Release Clipping Mask button in the Layers panel.
Release Objects from a Clipping Mask
![]() Do one of the following to release objects:
Do one of the following to release objects:
• Select the layer that contains the clipping mask in the Layers panel, click the Make/Release Clipping Mask button.
• Select the group that contains the clipping mask, click the Object menu, point to Clipping Mask, and then click Release.
Editing a Clipping Set
After you create a clipping set, you can edit the clipping mask or the paths within the clipping set. At the same time you edit a clipping mask, you can add or remove an object from the masked artwork. You can also view and edit the mask independently of all other objects in Isolation Mode. When you’re editing a clipping set, the main thing to remember is that the clipping mask object needs to be above the object that you want to mask in the Layers panel or group.
Edit a Clipping Set
![]() Do one of the following to select the clipping path or set:
Do one of the following to select the clipping path or set:
• Select and target the clipping path in the Layers panel.
• Select the clipping set, click the Object menu, point to Clipping Mask, and then Edit Mask.

![]() Do any of the following to edit the clipping mask:
Do any of the following to edit the clipping mask:
• Select the Direct Selection tool on the Tools panel, and then drag the object’s center reference point to move it.
• Select the Direct Selection tool on the Tools panel, and then reshape the clipping path.
• Apply a fill and stroke to a clipping path.
![]() To add or remove an object from the masked artwork, drag the object into or out of the group or layer that contains the clipping path.
To add or remove an object from the masked artwork, drag the object into or out of the group or layer that contains the clipping path.

Edit Paths Within a Clipping Set
![]() Do one of the following to select the clipping path or set:
Do one of the following to select the clipping path or set:
• Select and target the clipping path in the Layers panel.
• Select the Direct Selection tool on the Tools panel, and then point to and click the paths outline.

![]() Drag to edit the path.
Drag to edit the path.

Edit the Masked Object in Isolation Mode
![]() Do one of the following to edit the Masked object in Isolation Mode:
Do one of the following to edit the Masked object in Isolation Mode:
• Select the masked object, and then click the Isolate Selected Object button on the Control panel.
• Select the layer with the masked object in the Layers panel, click the Layers Option menu, and then click Enter Isolation Mode.
![]() Edit the masked object.
Edit the masked object.

![]() Click the gray bar or press Esc to exit Isolation Mode.
Click the gray bar or press Esc to exit Isolation Mode.
Erasing to Reshape Paths
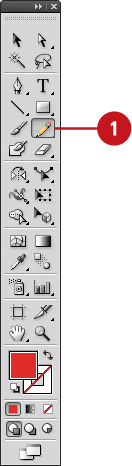
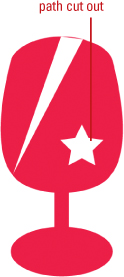
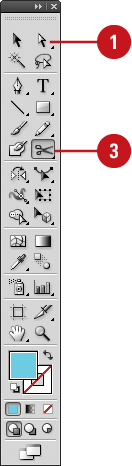
When you use the Eraser tool on the Tools panel to remove parts of an object, the remaining parts of the object path are reconnected to reshape and close the path. When you erase inside of a filled object, Illustrator creates a compound path. This is useful when you want to simplify a complex drawing or remove a background. To make it easier to erase, you can also press [ or ] to decrease or increase the Eraser tool diameter.
Erase Parts of Paths
![]() Select the objects that you want to reshape with the Eraser tool.
Select the objects that you want to reshape with the Eraser tool.
![]() Select the Eraser tool on the Tools panel.
Select the Eraser tool on the Tools panel.

![]() Drag across the parts of the objects that you want to erase.
Drag across the parts of the objects that you want to erase.
• Press [ or ] to decrease or increase the Eraser tool diameter.
The remaining parts of the path reconnect to close the path.
Did You Know?
You can set Eraser tool options. Double-click the Eraser tool on the Tools panel, and then set the options that you want, including Angle, Roundness, and Diameter, and then click OK.