
Chapter 18
Fixing Common Problems
In this chapter:
• Understanding the various versions of QuickBooks
• Suggestions for entering your data into QuickBooks
• The various types of backups
• Working with your printers
• Banking issues and some general reconciliation tips
• Payroll ideas and comments
• Prepayments, undeposited funds, and other Accounts Receivable issues
• Using the Loan Manager to fix old paid bills
• Dealing with sales tax issues
• Using reports in QuickBooks
• Working with inventory
• Using a QuickBooks Advisor
Although QuickBooks is easy to set up and use, occasionally, mispostings or other computer misfortunes occur. This chapter discusses some of those misfortunes and explains how to avoid them, or fix them if they cannot be avoided. It also includes suggestions and tips that you may find useful for your company.
Version Comparisons
To choose the QuickBooks version that is best for your company, consider the following differences between the desktop versions. Table 18-1 does not include QuickBooks Online features. Remember that each computer must have a licensed copy of QuickBooks installed.
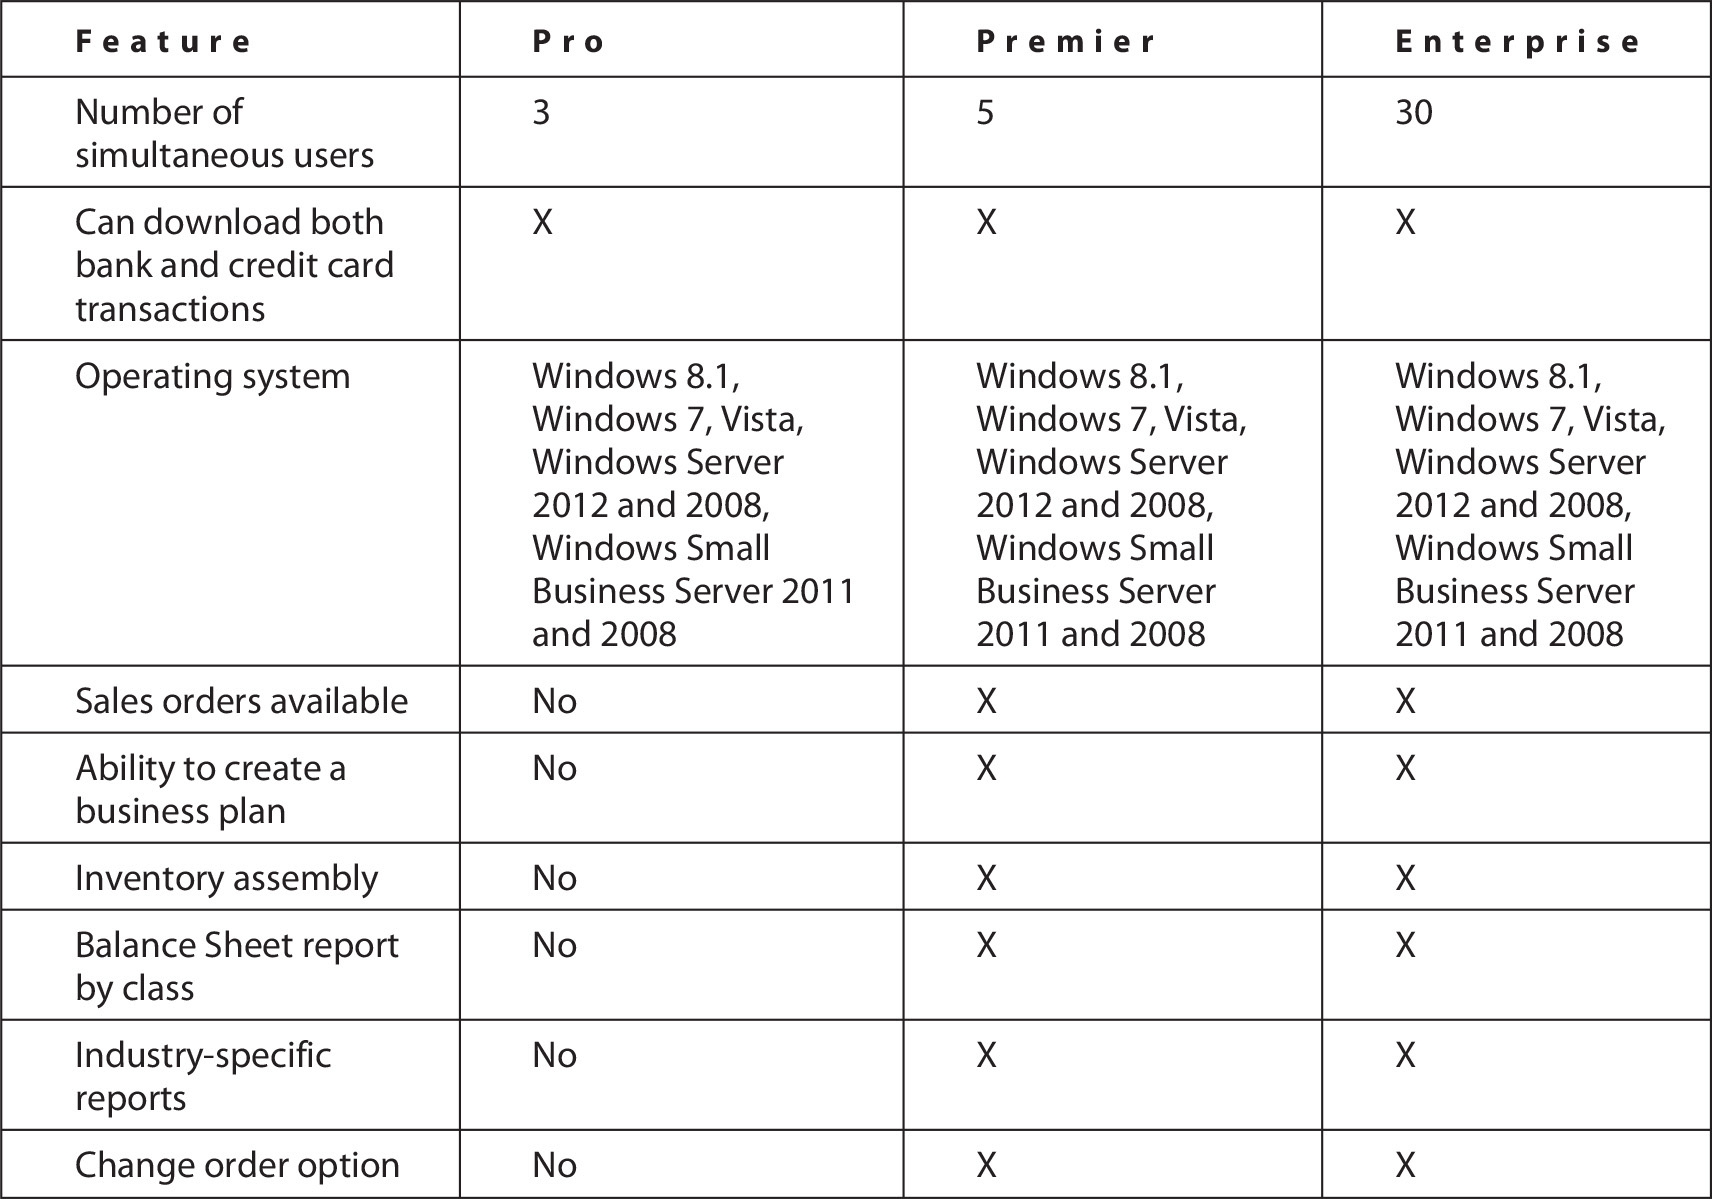
TABLE 18-1 QuickBooks Version Comparisons
Data Entry Issues
Whether you are entering transactions manually or downloading them from your bank or credit card company, it is easy to mistype, transpose, miscode, or simply not see a transaction. Consider these tips when entering data:
• Enter data in batches and verify each 10 to 20 entries to find typos before they cause a problem and transpositions.
• Enter all transactions for one income or expense account at one time to ensure you have coded each transaction correctly.
• Use the Multiple Entry option when possible, both to save time and to see each entry in the group.
• Use the Spell Checker preference to ensure that your spelling is correct. Click Edit | Preferences | Spelling and select Always Check Spelling.
![]()
List Entries
One of the most common problems with data entry is duplicate entries in lists. For example, you may have entered a vendor as “Smith, John,” while another user has entered the vendor name as “John Smith.” To eliminate such issues, first create a company-wide protocol for entering customer and vendor names and ensure that each user understands the process. This can be last names first or first names first, as long as everyone is consistent.
To solve this type of entry issue once it occurs, you can do the following:
• Delete a name if that name is not used in any transactions.
• Inactivate a name used in transactions if it will not be used again. To do so, double-click the name and check the (Vendor/Customer/Job/Account) Is Inactive check box.
• Merge the two names as explained in Chapter 2; remember that you cannot undo a merge.
Account Type Errors
If an account has been entered as the wrong type, such as Income instead of Expense, you can usually correct it by doing the following:
1. Right-click the account name and choose Edit Account Window.
2. Select the proper type from the Account Type drop-down list.
3. Click Save & Close to close the window.
You cannot change the type of a subaccount. Only parent account types can be changed. To change a subaccount type, you must first make it a parent account and then change the type. Then you can change it back to a subaccount.
Duplicate Name/Functions
QuickBooks does not allow duplicate names to be used for different functions. For example, if you have a customer with the name “John Smith” and purchase items from that customer, you should create a vendor name such as “John Smith-Vendor” to be used when you purchase goods. If you use the customer name “John Smith” when you purchase goods, your financial statements may be incorrect.
Understand Name Types in QuickBooks
Review the name types in QuickBooks to ensure that each name you add is properly classified. You can change the name type in the Other Name list into one of the other three types. If you need to change the name type for a customer, vendor, or employee, you will need to delete or inactivate the original name and create a new name in the appropriate list. Following are the four name types you can use:
• Customer These people pay your company after you have sold them either merchandise or services.
• Employee These folks receive a paycheck through QuickBooks payroll. If you reimburse an employee for merchandise purchased on behalf of your company, create a name in the Vendor section, adding a “V” to the name to make it different from the employee name. This will help avoid confusion that the reimbursement is part of payroll.
• Vendor Vendors are companies or people that you pay for providing goods or services, including utilities such as the telephone company. You could even create a vendor name to record draws made by owners or partners.
• Other Name These folks do not fit in any of the three main categories.
Keyboard Shortcuts
Table 18-2 shows some common QuickBooks keyboard shortcuts. You can see many more in QuickBooks Help by clicking Help | QuickBooks Help and typing Keyboard Shortcuts in the Search box.
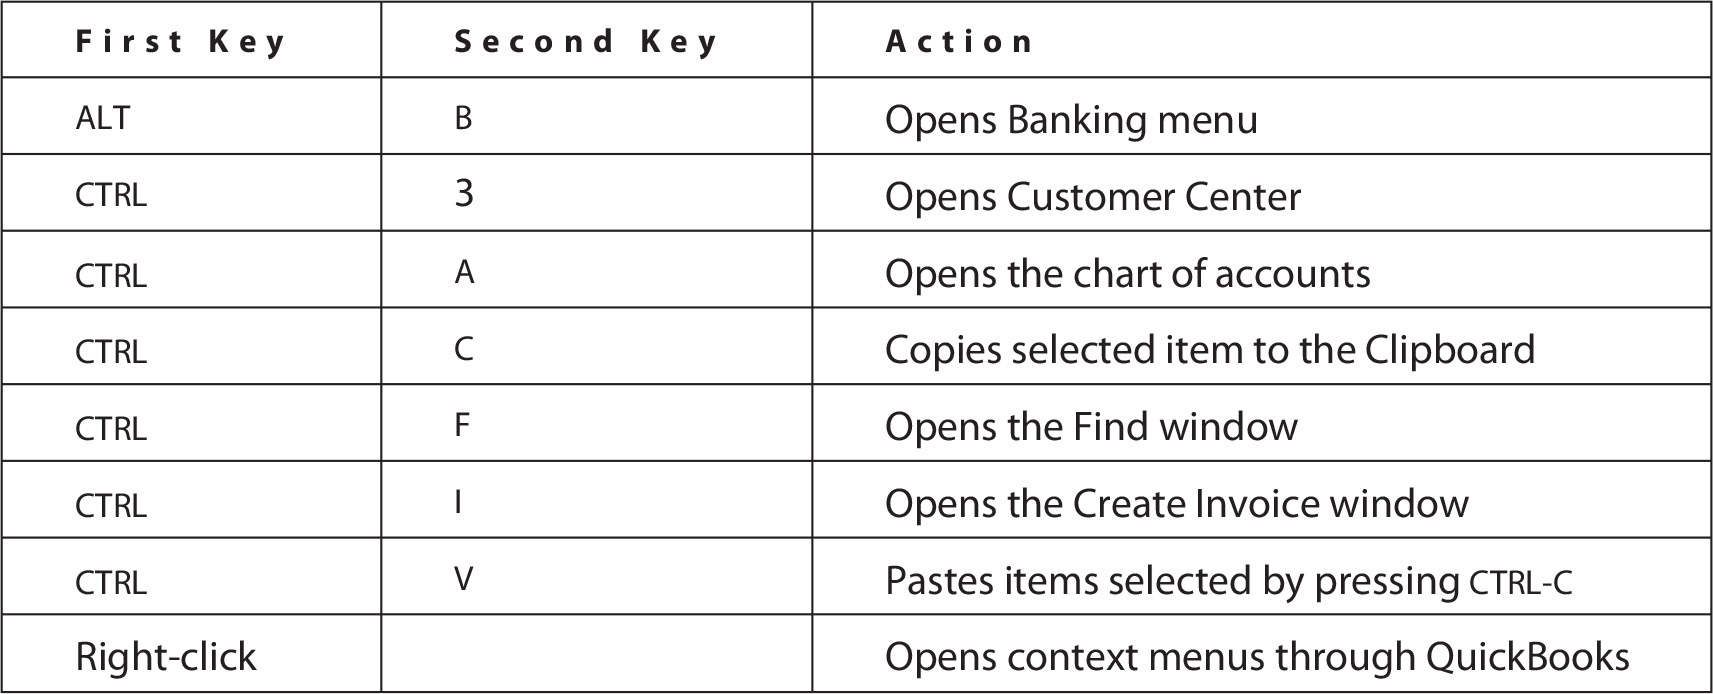
TABLE 18-2 QuickBooks Keyboard Shortcuts
![]()
QuickBooks Maximum File Sizes
As discussed in earlier chapters, no hard-and-fast rule governs file sizes in QuickBooks. There is no built-in warning when you are approaching the maximum. You may, however, notice some of the following signs that indicate you are getting close:
• QuickBooks shuts down with a variety of error messages.
• You can’t run a backup properly.
• The Rebuild or Verify utilities do not appear to be working.
• It takes forever to run a report or for a report to display.
To view the information about your file, press the F2 key to open this screen:

There are three areas to watch.
File Size
According to QuickBooks, the file size should be less than 150 MB. Again, according to Intuit’s guidelines, the file size that QuickBooks will support depends on the amount of RAM on your computer as well.
List Information
According to QuickBooks guidelines, QuickBooks Pro and Premier can accommodate a total of 14,500 names in the Employee, Customers, Vendors, and Other Names lists. (The guidelines suggest a maximum of 10,500 entries in an individual list.) The same maximum exists for the Items list. If you upgrade to QuickBooks Enterprise, that number increases to 100,000 for both Names and Items lists.
DB File Fragments
In this case, DB stands for database. If your QuickBooks database is fragmented—that is, this field shows a number of 10 or less—then according to QuickBooks guidelines, there is no problem. If that number approaches 20, try to reduce the fragments using one of these steps:
• Rebuild your data. Click File | Utilities | Rebuild Data. This process requires a backup. Remember that you can never have enough backed up files. Follow the onscreen instructions.
• Use the Windows Defragmentation tool on the computer where your files are stored. If your file is stored on a server, work with your IT administrator before attempting this process.
• In Windows 8.1, open the Search application, type defrag, and select Defragment and Optimize Drive. Follow the directions on the screen.
• In Windows 7, click Start and type defrag in the search box. Select Defragment Your Hard Drive from the menu and follow directions.
• Use the Condense Data utility (click File | Utilities | Condense Data), as discussed in Chapter 15.
![]()
General Data Entry Tips
Here are several tools and tips you can use when entering data into QuickBooks:
• Use the QuickMath calculator. Click inside a field (such as the Amount field on an invoice) and press the equal sign (=) on your keyboard to open the calculator. Or, when your cursor is in any field that contains a dollar amount, press +-* or press /.
• Use a QuickBooks folder. Create a QuickBooks folder on your desktop for file copies you want to copy to a flash drive or CD/DVD.
• Keep your chart of accounts simple. Use only the subaccounts you need to track so your reports are useful.
• Close the QuickBooks windows. Close all windows when quitting for the day. Click Window | Close All. This not only saves time but allows QuickBooks to load faster the next time.
Back Up, Back Up, Back Up
Backing up your data could be the most important way of saving your data and even your business. Back up your QuickBooks data to an external hard drive and take the drive home, and/or back up to an online storage service such as Dropbox or ShareFile. Back up your data at least daily.
You can choose from several types of backups:
• Full backup This method backs up all selected files and folders. It takes time and storage space, but should be performed at least weekly.
• Incremental backup This method backs up files and folders that have been added or changed since the last backup. For example, if you do a full backup on Wednesday evening and an incremental on Thursday evening, all changes since the Wednesday evening backup will be recorded. If you do another backup on Friday, only the files changed since the backup on Thursday are amended. While this type of backup is faster, if you need to restore the data, you must restore the full backup first and then restore each incremental backup in the order that the incremental backup was performed.
• Differential backup This type backs up all files and folders that have been changed since the last full backup. For example, if you do a full backup on Wednesday and a differential backup on Thursday and Friday, Friday’s backup will include all changes from both Thursday and Friday, essentially duplicating the differential backup from Thursday. To restore the data, you only need the full backup and the latest differential backup.
![]()
General Backup Tips
The following tips will help you create your company backup policies and procedures:
• Create a checklist to ensure the most important files are backed up first.
• Make sure the backup storage media has enough room for your QuickBooks file.
• Create at least two copies of your backed-up files on two different storage mediums.
• If you have problems, use another form of backup media.
• Use the Verify Data and Rebuild utilities if you continue to have problems.
• Double-check your media to ensure that the file exists. A QuickBooks backup filename has a .qbb extension.
• Create a backup schedule and vary the locations. Ensure that everyone using QuickBooks adheres to the same schedule.
• If you have only a few files to back up, consider copying them rather than using a backup procedure. Copying a file is much quicker than restoring it from a backup.
Printer Issues
Printer issues reported by QuickBooks users cover a wide range of concerns. Often, the problem is with the printer itself:
• Ensure that the printer has paper and that it has been loaded correctly.
• Make sure the printer is connected both to your computer and to an electric outlet and that the cables are seated securely.
• Test the printer outside of QuickBooks by printing from another program.
• If you encounter a problem, turn off the printer and then your computer. Restart your computer and then turn the printer back on.
![]()
The New Printer Won’t Print
You have just installed a new printer and verified through Windows that it functions and prints a test page, but QuickBooks will not recognize it. Try the following first:
1. Click File | Printer Setup. From the Form Name drop-down list, choose the form that won’t print.
2. Click the Printer Name drop-down list to select the appropriate printer for this form.
3. Click Options and choose the appropriate orientation and any other settings for the form.
4. Click OK to return to the Printer Setup window. Select Printer Type and any other options to complete your choices. Click OK to close the window and print your form. If that does not work, close and restart QuickBooks and try again.
If you still can’t print to your new printer, close QuickBooks, and from Windows, search for a file named qbprint.qbp. Rename that file qbprint.qbp.old. Restart QuickBooks and you should be able to print to the new printer.
![]()
Check Printing Isn’t Working
Printing checks, especially payroll checks, can be frustrating. From checks printing in reverse order to strange looking text, consider the following if you encounter problems.
If the text (printing) looks odd, make sure you have aligned your check stock:
1. Click File | Printer Setup. Select Check/Paycheck.
2. Click the Align button.
If the checks printed in reverse order, follow these steps:
1. In Windows 7, click Start and open the Control Panel.
2. In Hardware and Sound, click View Devices and Printers. Right-click your printer’s icon.
3. Look to see whether your printer prints the first or last page first. Make any necessary corrections and save.
Or, simply change the check numbers in your register!
Banking Issues
Banks make errors as well as people. When reviewing your bank statements, check for errors or additional charges before you start a reconciliation and enter any necessary corrections or charges. If you download your transactions, review each transaction rather than accepting them all at once.
![]()
Bank Reconciliation Issues and Tips
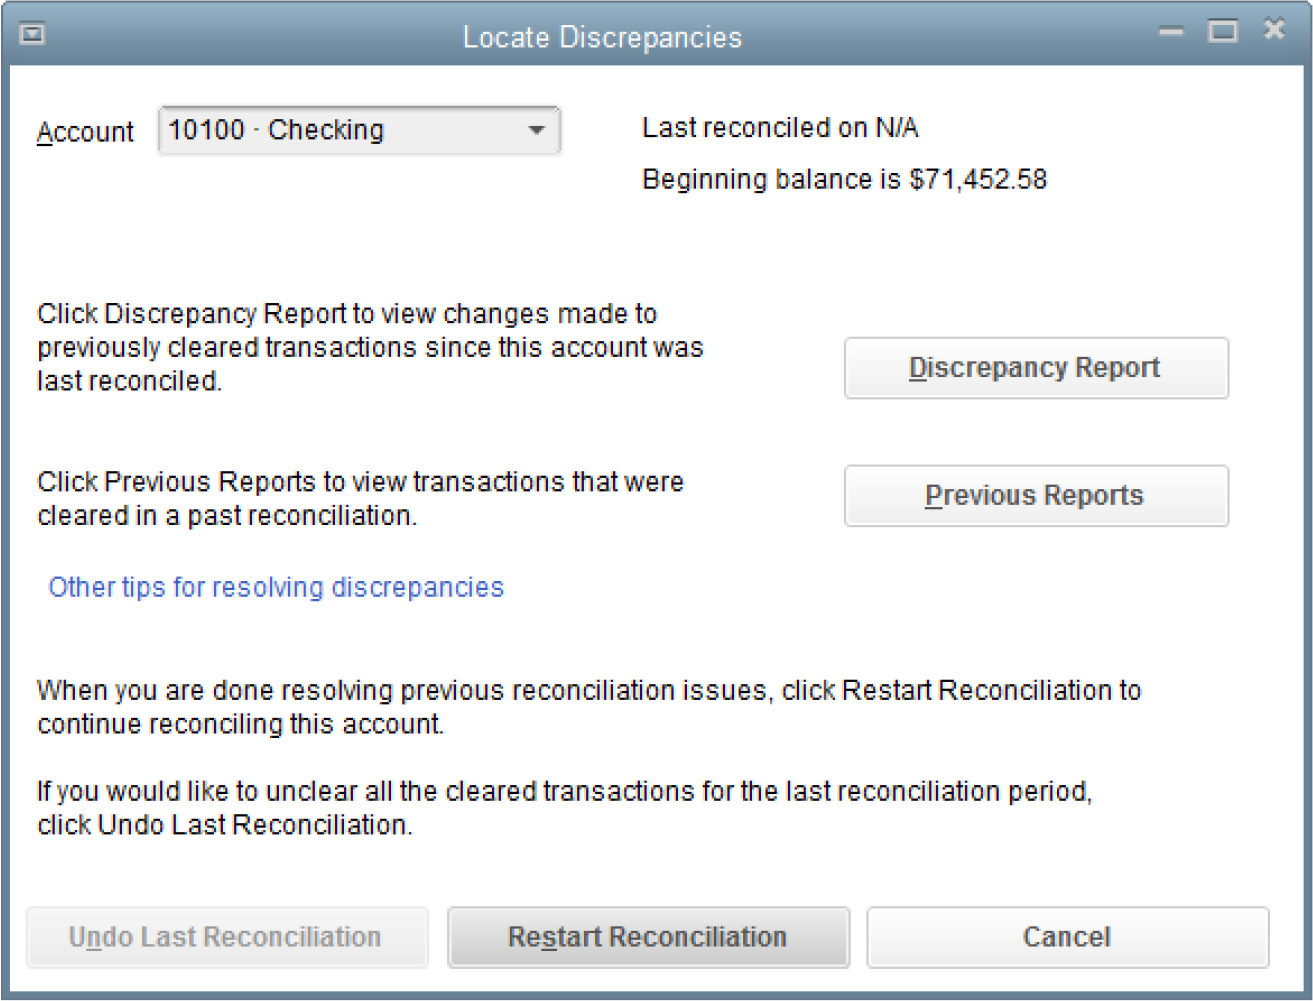
As you enter information into the Begin Reconciliation window, ensure that you have entered the appropriate ending date from the bank statement. Then, make sure that the beginning balance matches both your bank statement and your previous month’s ending balance. If your beginning balance is not correct and you cannot locate the problem by clicking the Locate Discrepancies button, undo the last reconciliation. If that beginning balance does not match, go back to the point where the beginning balance matches the bank statement and redo all the reconciliations to solve the problem.
Double-check the balance you entered into the Ending Balance field to guard against transpositions. Hide any transactions after the bank statement’s ending date and ensure that old, uncleared transactions are legitimate.
If you find problems when reconciling your bank account, click the Locate Discrepancies button to open the screen shown next. From here, you can run a Discrepancy Report, see Previous Reports, and click the link for other reconciliation tips from QuickBooks. The problem may be deleted transactions or items that have changed since you last reconciled.
![]()
General Banking Tips
As you continue to work with QuickBooks, you may find that you want more detail about your bank accounts or are having trouble during reconciliations. If so, consider the following:
• Consider creating a separate expense account for credit card fees and other bank charges so that you can track the cost. Over time, these fees can eat up profits, and many banks will waive them to keep your business.
• Watch for reversed transactions if you enter your data manually. For example, did you enter a deposit as a check or vice versa?
• Ensure that you are reconciling the correct bank account if nothing looks right.
Payroll Issues
Payroll is one of the most sensitive areas in accounting. If you are unsure of how to set up payroll, work with your outside accountant to use the QuickBooks payroll setup wizard. Here are two of the more common issues:
• Payroll item types, including addition or deduction items, and company contributions
• Understanding when a payroll item is tax-exempt
After you have completed the setup, create a Payroll Item report for review.
![]()
Paying Payroll Tax Liabilities
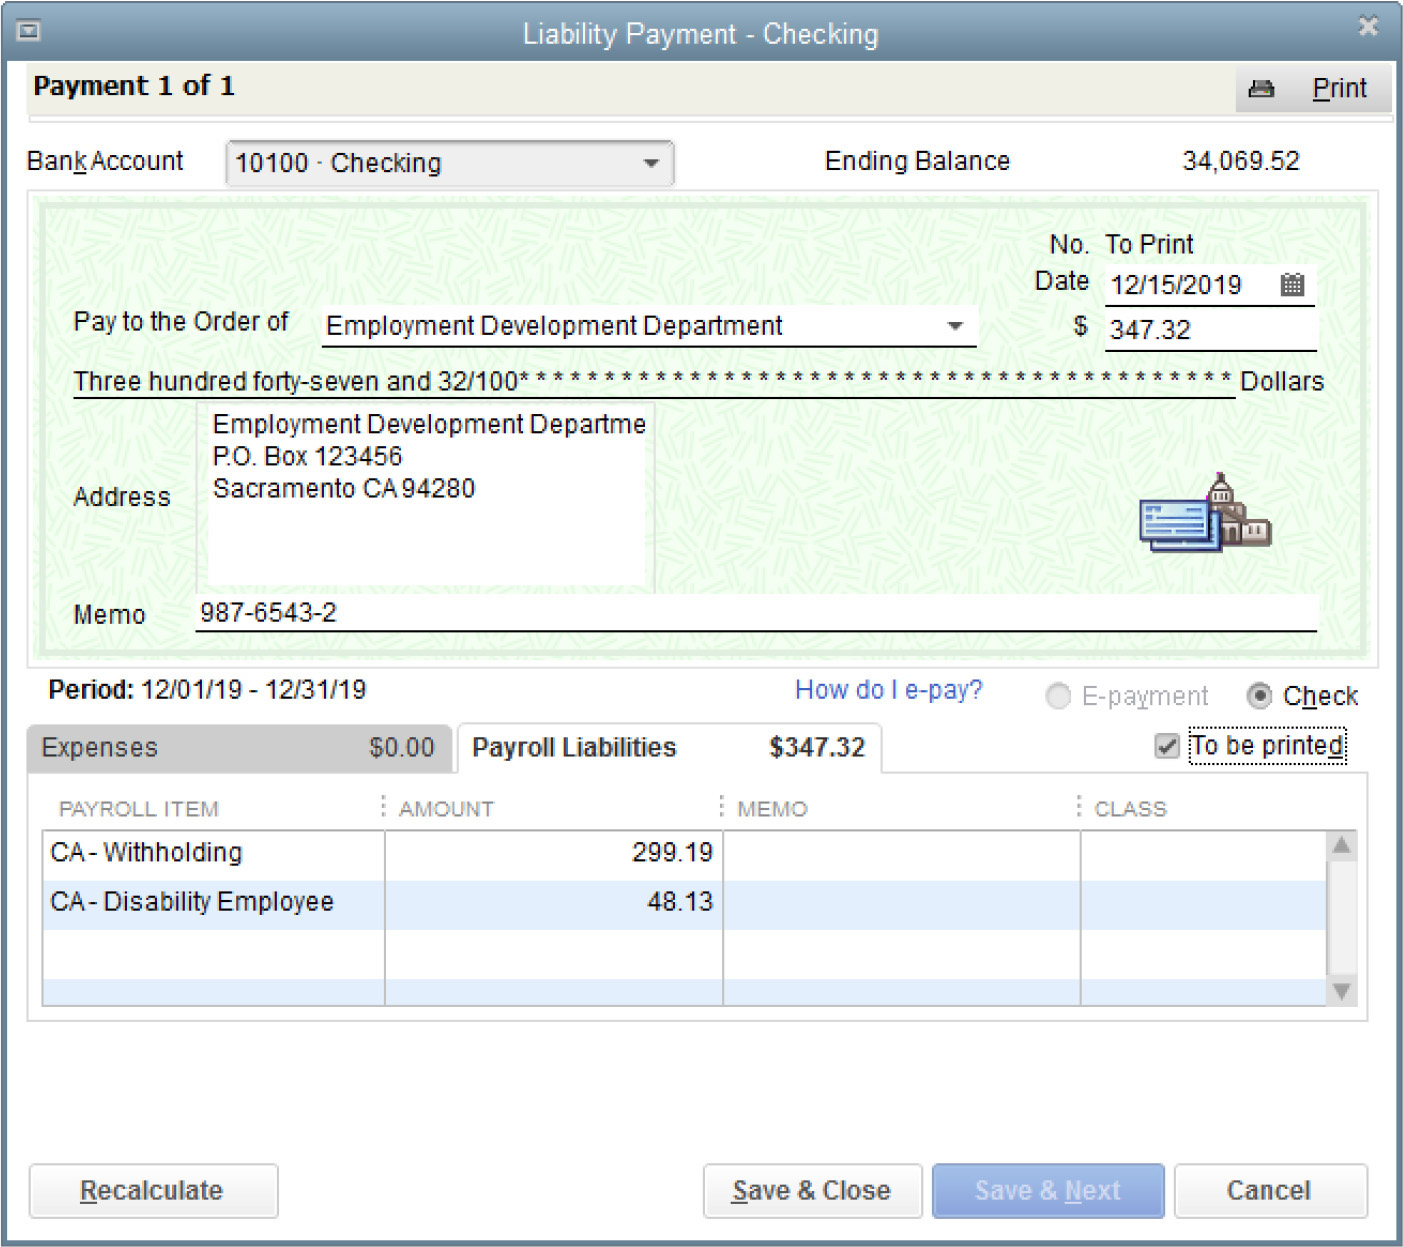
When you create paychecks, QuickBooks adds the tax amounts due (your payroll liabilities) in special accounts. Do not pay payroll taxes with the Write Checks window. Instead, use the Pay Liabilities window:
1. Click Employees | Payroll Taxes And Liabilities and choose Pay Scheduled Liabilities.
2. Select the liability you want to pay and click the View/Pay button at the bottom right of the Pay Taxes section.
3. The payment appears in the Liability Payment window, as shown next. If it does not already appear on the check memo, enter the payroll period this payment covers and the appropriate tax form. Then print the check.
![]()
General Payroll Tips
Tracking employee and payroll information is important to every company. Follow these tips to ensure your records provide the information you need.
• Create item-specific expense and liability accounts, such as Medicare Expense and Medicare Withheld and Payable, rather than lumping everything into one expense and one liability account, such as Payroll Tax Expenses and Payroll Taxes Payable.
• Make sure you update your payroll data regularly. Do not ignore that message from QuickBooks.
• Consider creating a default employee template if many of your employees have similar jobs.
• Review the rules for employees versus independent contractors with your tax professional to ensure that your company is complying with current law.
• Ensure that tax deposits cover the appropriate payment period. The taxes are due based on the date the payroll is paid, not the period for which it was earned.
Account Receivable Issues
This section deals with some of the more common errors affecting your accounts receivable records and your financial statements.
![]()
Prepayments and Customer Deposits
When you receive a down payment or other prepaid funds, it becomes yours only when you perform the services or supply the goods. Therefore, the money you are holding is a liability until the transaction is complete. Enter the funds as shown here:
• Memo Down payment received from Smith
• Debit Bank Account
• Credit Unearned Revenue (Customer Funds Held)
![]()
Making Deposits to the Bank
When you go to the bank, you probably take several checks to deposit at the same time. That’s the beauty of the Undeposited Funds account in QuickBooks: it keeps your deposits together so that you can tell QuickBooks which checks you deposited at the same time. Use this account so that QuickBooks recognizes that you deposited 10 checks equaling $6259.50 instead of having to figure out which payments were included in that $6259.50 shown on the bank statement. To use the Undeposited Funds account properly when receiving a customer payment, follow these steps:
1. Click Customers | Receive Payments.
2. In the Receive Payments window, enter the information. Notice the Where Does This Payment Go? link in the middle of the screen. Click it to see the QuickBooks explanation of the Undeposited Funds account.

3. When you have completed entering the payment, click Save & Close, or, if you will be entering additional payments, click Save & New.
4. When you are ready to go to the bank, select Banking | Make Deposits to open the Payments To Deposit window.
5. Select the checks you will include in this deposit and click OK. The Make Deposits window appears showing each of these checks.

6. Add any other deposits you might be including and note the Deposit Total field. This shows the amount that will appear on your bank statement.
![]()
Undeposited Funds Balance Increases, or Accounts Receivable Aging Shows Old, Paid Invoices
If your Undeposited Funds account seems to grow without ever shrinking, someone may be entering deposits directly into the check register instead of using the Receive Payments and Make Deposits windows. Two issues, each explained separately here, may be the cause. If the bank account has not been reconciled, try the following steps.
Undeposited Funds Account Has High Balance
If you see a high balance in the Undeposited Funds account, do the following:
1. Open your check register and delete the deposit made directly into the register.
2. Click Banking | Make Deposits | Payments To Deposit and select the appropriate checks for each group deposit.
3. Make the deposit and close the Make Deposit window.
Accounts Receivable Aging Shows Old, Paid Invoices
If you see old, paid invoices in the Accounts Receivable account, do the following:
1. Open your check register and delete the deposit made directly into the register.
2. Click Customers | Receive Payments and enter the appropriate customer payments.
3. Deposit these payments by clicking Banking | Make Deposits | Payments To Deposit and completing that process.
If the bank account has been reconciled, undo the reconciliation, delete the deposits that have been entered directly, enter the payments and deposits properly, and reconcile the statement again. If this has been going on for several months, you may have to undo the reconciliations for several months and start at the month in which this first happened.
![]()
Customer Balance Is Zero but Shows Open Invoices
This usually happens when the person entering the payment does not check the invoice being paid in the Receive Payments window. To solve the problem, follow these steps:
1. From the A/R Aging Summary, select either the payment or the negative amount and choose Payment to open the Receive Payments window for that payment.
2. Check the invoice that was paid with that check.
4. To verify the transaction, rerun the A/R Aging Summary, and that customer’s balance will show properly.
If there are open credits that should apply to payments, follow the same procedure, but select the open credits before you click Save & Close the Receive Payments window.
![]()
General Accounts Receivable Tips
The following tips may help prevent accounts receivable issues:
• To ensure that deposits have been entered properly through the Receive Payments and Make Deposits windows, review both the Payments To Deposit windows and the A/R Aging Summary before reconciling each month’s bank statement.
• Click Preferences | Sales & Customers | Company Preferences to ensure the Use Undeposited Funds As A Default Deposit To Account is checked for all users.
• If there are small amounts due, write them off. Consider using a separate account to see what effect, if any, write-offs have on your bottom line.
• Review your Customer/Jobs list to ensure there are no duplicate entries. Merge any that are duplicated.
• Ensure that your jobs are assigned properly.
Accounts Payable Issues
Paying bills is just as important as collecting the money from your customers. One source of confusion is understanding the difference between “cash” basis and “accrual” basis accounting for your vendor bills. If you record each vendor bill when it arrives and pay that bill from the Pay Bills window at a later date, you are using accrual accounting for that bill. If you simply write a check for a vendor’s bill and record the expense at that time, you are using cash basis accounting for paying your bills.
Many companies have experienced difficulties when previously recorded bills are paid without using the Pay Bills window. If you see unusual numbers on your Payable reports, check for unapplied Vendor credits or bills paid with a regular written check instead of through the Pay Bills window.
![]()
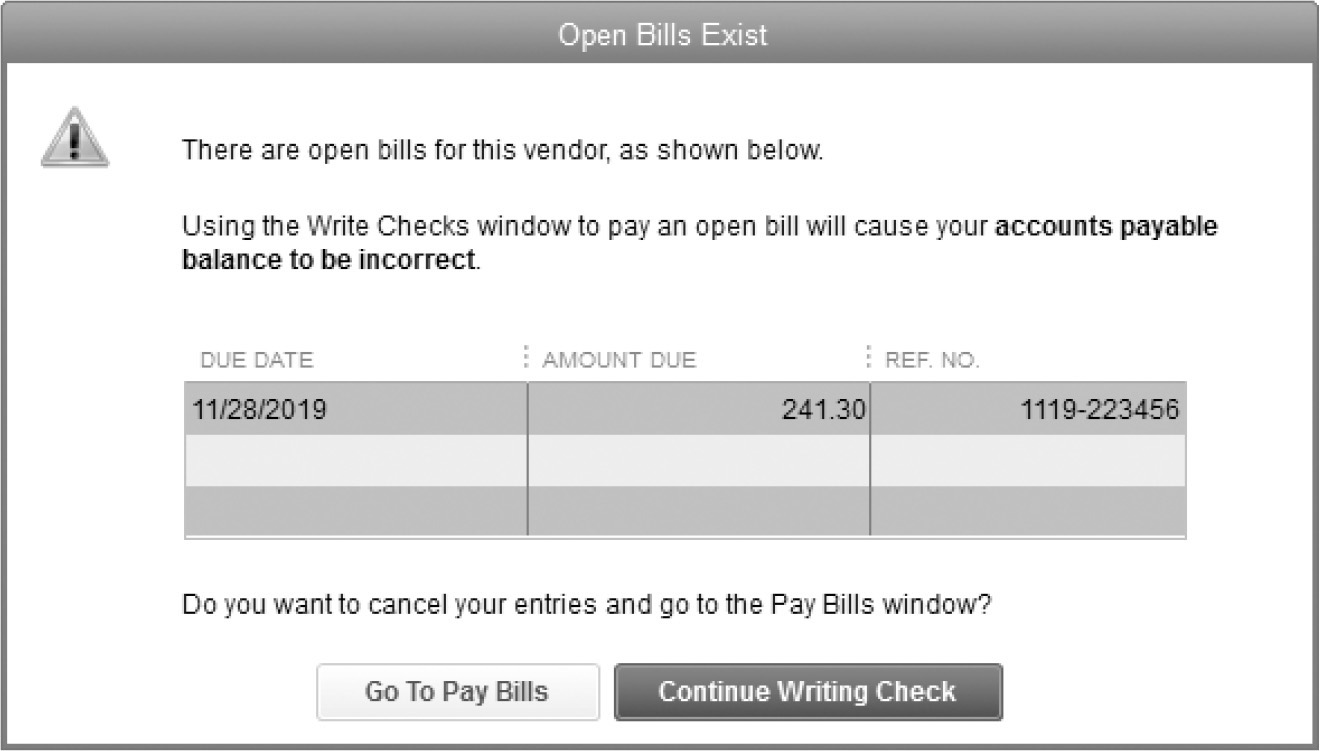
Old Paid Bills Show in Bills to Pay
If your company enters bills, sometimes a bill is paid through the Write Checks window as a hand check instead of creating the check through the Pay Bills window. In this case, the original bill continues to appear in your Bills To Pay list. Normally, when you try to pay a bill you’ve entered with a regular check, you’ll see the warning message shown here:
However, occasionally, if someone has written a hand check to pay a recorded bill, you can solve the issue when your books are kept on an accrual basis by following these steps:
1. Click Vendors | Pay Bills and select the bill that was paid.
2. In the Payment section, type the date of the original check.
3. In the Method section, select Check, Assign Check Number and choose the account from which you originally wrote the check.
4. Click Pay Selected Bills and insert the Check Number and the original date of the check.
5. Click OK.
If necessary, void the original check.
To solve the issue when you work on a cash basis, follow these steps:
1. Find the check and change the account to Accounts Payable. Include the vendor name in the Customer:Job field on the check.
2. A message will appear asking if you want to record your changes. Click Yes.
3. Link the check to the bill by opening the Pay Bills window. Select the appropriate bill and click Set Credits to open the Discount And Credits window shown next.
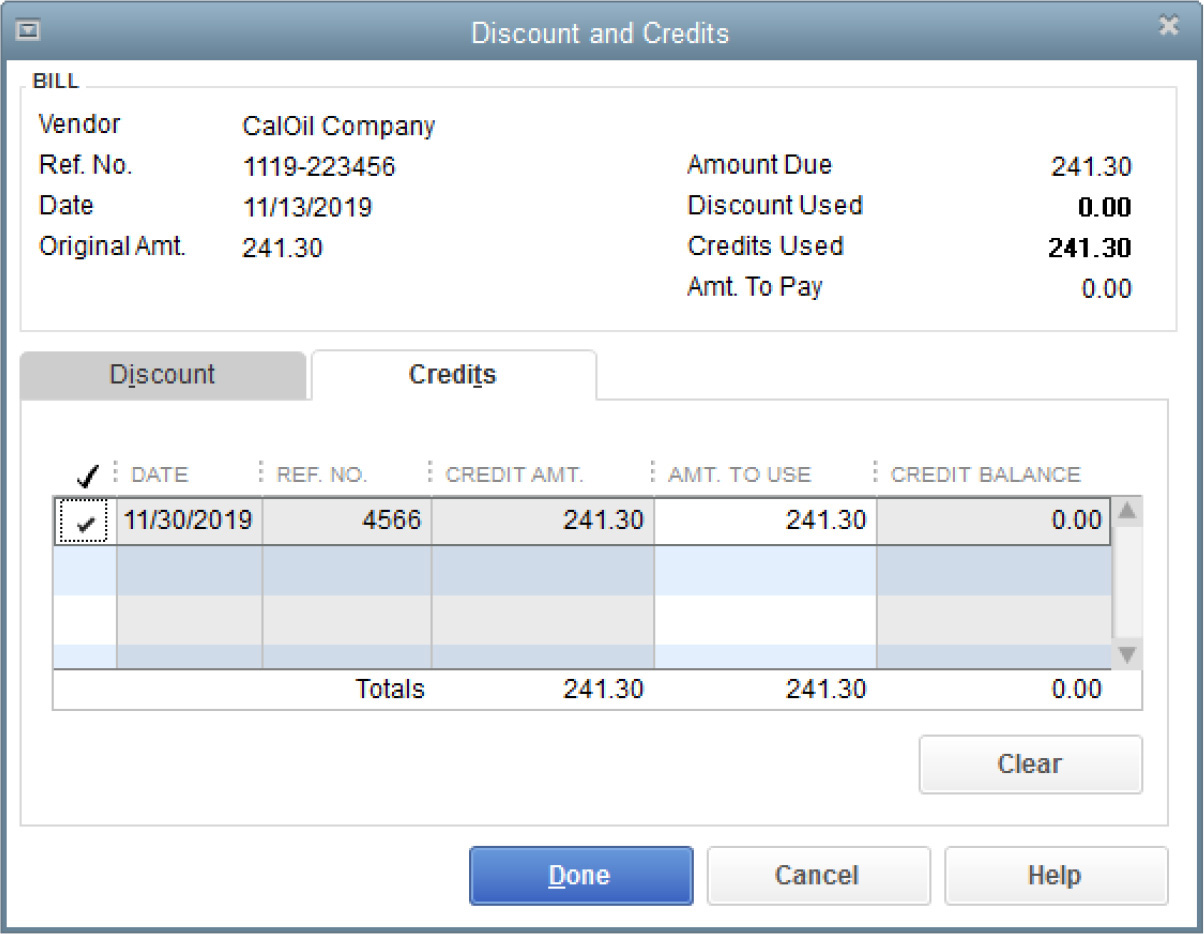
4. Select the appropriate credit. That credit is applied to the bill and shows the Amount To Pay as zero, since you have now linked the payment and the bill.
5. Click Done to close the window and return to the Pay Bills window.
![]()
Using the Loan Manager to Fix Balance Sheet Issues
Many QuickBooks users enter their monthly payments as bills and in that way create problems with their Balance Sheet and other reports. QuickBooks helps solve that problem with the Loan Manager. Before you start, do the following:
• Gather all of the loan papers so you have the pertinent information at hand.
• Then create a fixed asset for the total cost of the item if this loan is for real property, equipment, furniture, or another fixed asset. Include a subaccount for depreciation. Enter down payment information to this account.
• Create a liability account for the balance due (loan amount) and include any information about this loan that the Loan Manager can use, such as account number, lender contact name, and so on.
• Create an asset account if you pay escrow payments for taxes or insurance.
• Create an expense account for the interest you will be paying.
Then take the following steps:
1. From the Banking menu, click Loan Manager | Add A Loan. In the Add Loan window, complete the information as shown here.
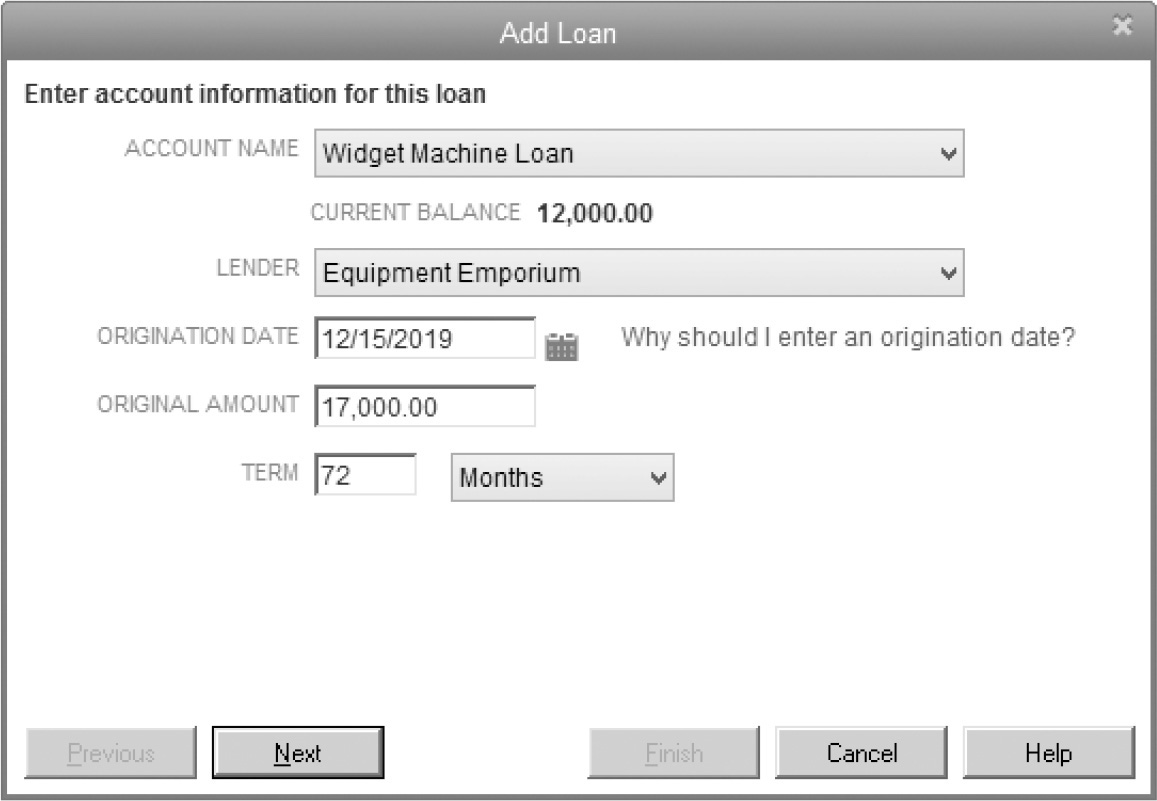
2. Click Next to enter the payment information.
3. Add any escrow payments if they apply and clear the Alert Me 10 Days Before a Payment is Due check box if you do not want the alert.
4. If you have not entered the vendor information, including address and contact name, enter that information.
5. Click Next to enter interest information and indicate the accounts that will be affected by these payments.
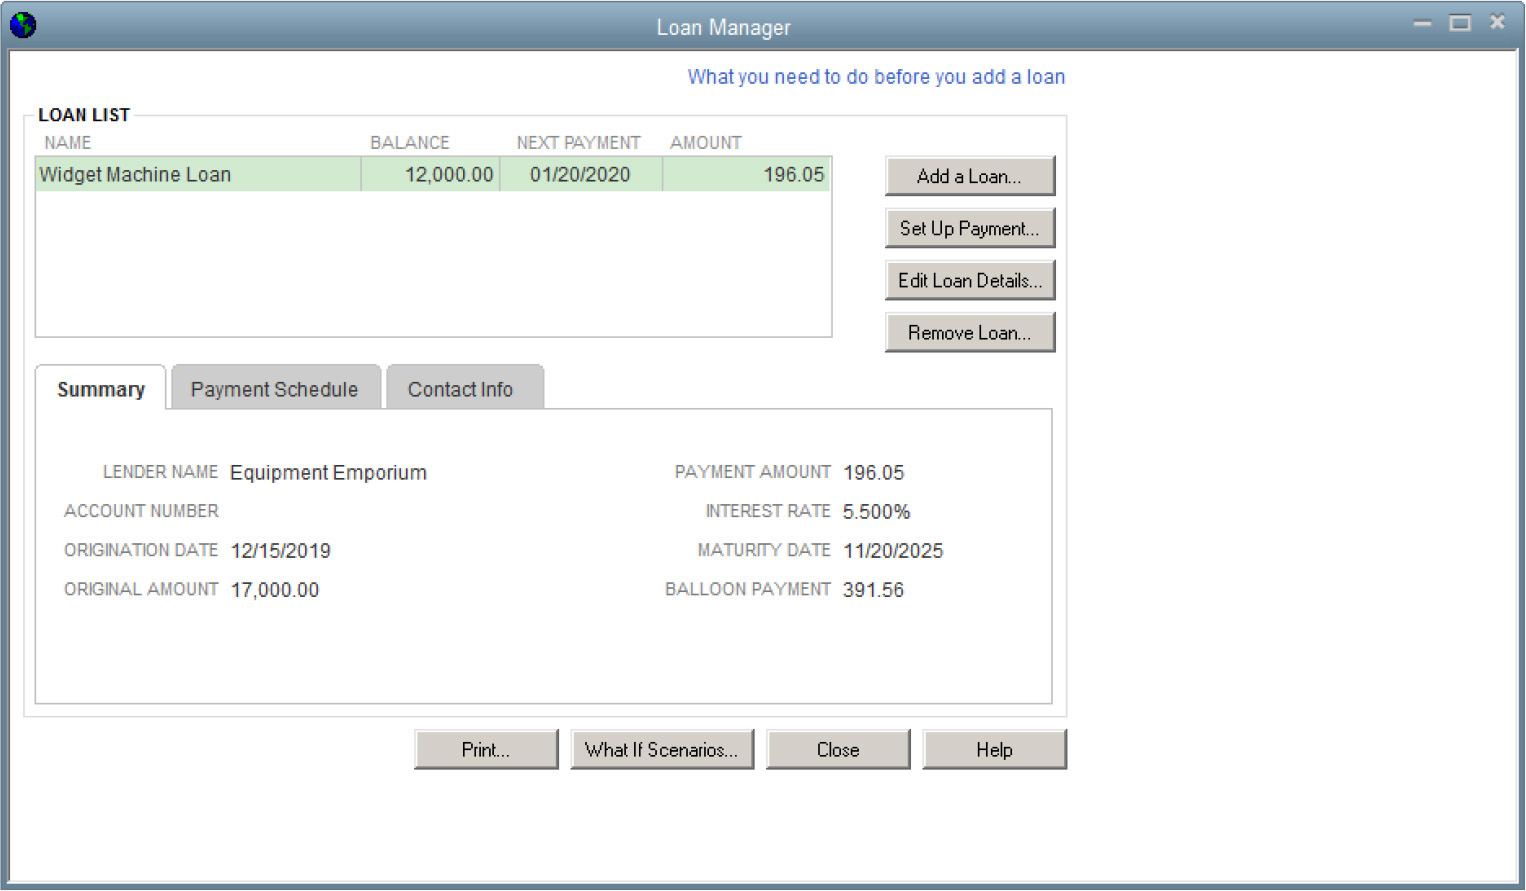
6. Click Finish, and from the Loan Manager screen, click Close to complete the process, as shown next:
![]()
General Accounts Payable Tips
Following these suggestions can help you ensure that reports and financial statements reflect the proper amounts:
• Don’t enter both a credit card charge and a bill in the Enter Bill section for the same expense. If it is a charge, use the Enter Credit Card Charge window and do not enter it in the Enter Bills window.
• Use subaccounts for tracking expenses. For example, rather than grouping all utilities together, consider using subaccounts such as Electricity, Propane, Waste Collection, and Water to see what each service is costing your company. Do be aware, however, that subaccounts can be an issue if there are too many. Talk to your outside accountant before creating too much detail.
• If your company pays vendors who should receive a 1099 form at the end of the year, work with your tax professional to ensure you are following all 1099 regulations and are properly tracking those vendors.
You can use your QuickBooks data to create letters to mail using Microsoft Word 2007, 2010, and 2013, and Office 365 (both 32-bit and 64-bit versions). Follow these steps:
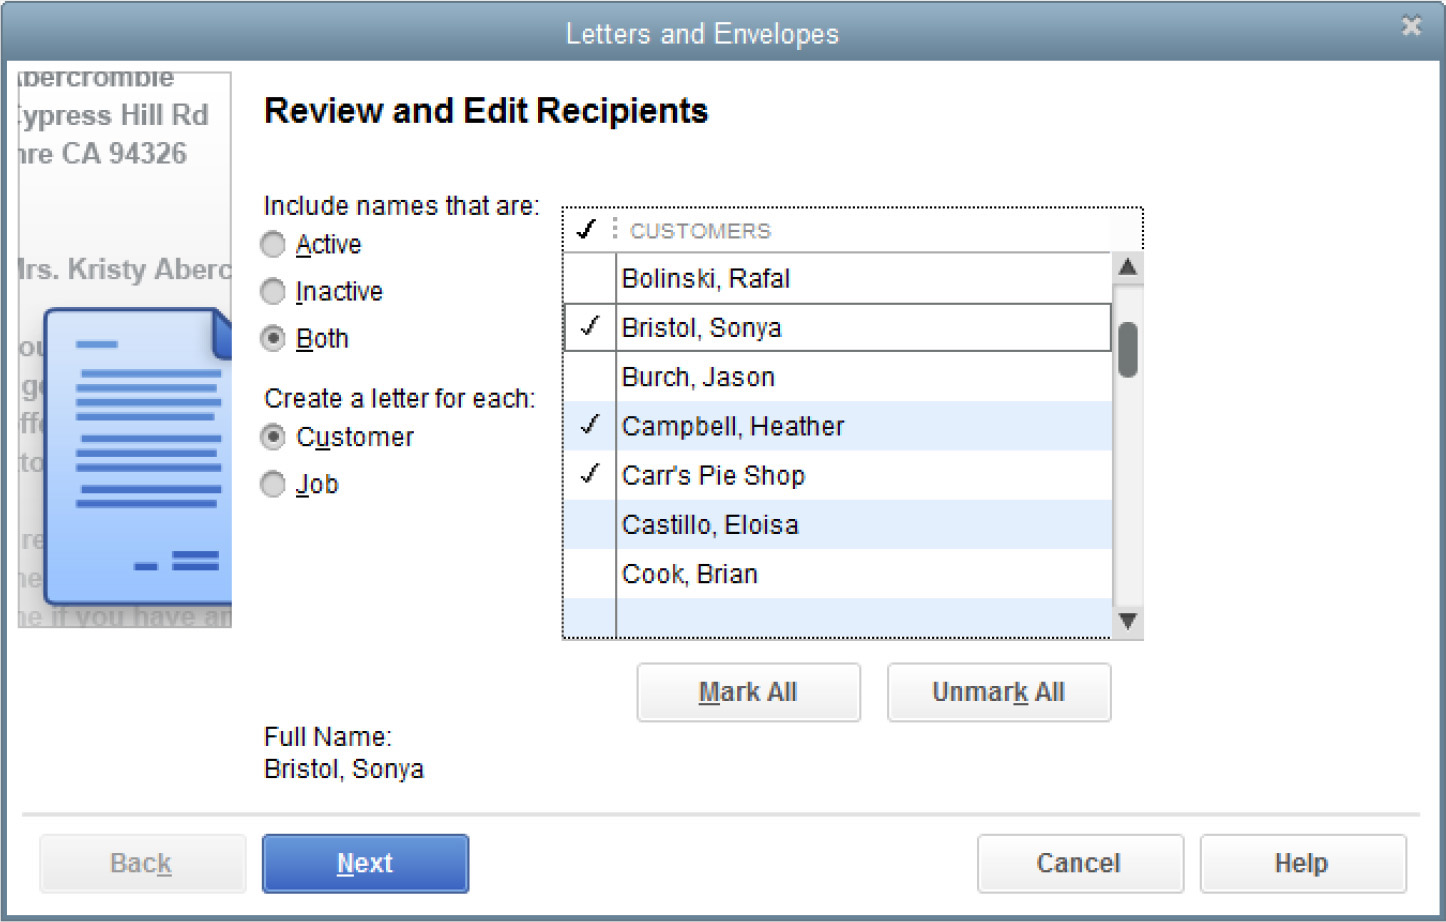
1. Click Company | Prepare Letters With Envelopes. Select the type of letter you want to use from the menu. For this example, we’re sending letters to Customers.
2. Depending on the letter you chose in Step 1, you see a list of recipients from which to choose in the Letters and Envelopes window. Select the names you want, as shown here, and click Next.
3. Choose a letter template from the list and click Next. You can create a new template or edit an existing template.
4. Enter a name and title for the person who will be signing the written letter. Click Next.
5. After Word creates the letter, click File | Print to print the letter or File | Save to save it and print it later.
6. If you want to print an envelope at this time, in the Print Letters And Envelopes window, select Next. Otherwise, click Cancel to close the window.
Sales Tax Issues
Chapter 6 discusses paying and reporting sales tax, but it is important to ensure your sales tax obligations are properly set up for each sales tax jurisdiction as each has its own rules. You have two ways of reporting (and paying) your sales tax obligations: when you make a sale, even if you have not yet received payment (this is called paying on an accrual basis), or when you actually receive funds from your customer (the cash basis). You tell QuickBooks the appropriate method in Preferences. Follow these steps:
1. Click Edit | Preferences and choose the Sales Tax icon on the left side of your screen.
2. Select Company Preferences.
3. In the Owe Sales Tax area, choose either As Of Invoice Date or Upon Receipt Of Payment.
Once you’ve selected an option, QuickBooks shows the appropriate sales tax due on the Balance Sheet.
![]()
Sales Tax on Discounted Items
Depending on how you set them up, discount items affect sales tax calculations when they are applied. For example, you may find your sales tax is less than you expect if your discount item is a specific dollar amount and you have several line items on your invoice. In this case, the discount is distributed proportionally over each line item appearing above the discount item.
When you set a discount as a percentage of the sale, unless you add a subtotal item before you insert the discount item on your invoice, the sales tax is applied only to the item directly above the discount item.
![]()
When the Pay Sales Tax Window and the Sales Tax Liability Report Totals Don’t Match
When you pay sales tax, the Pay Sales Tax and the Sales Tax Liability report totals should match. If they do not, here are some things to check:
• Check your Preferences to ensure all settings are correct.
• Check the ending dates for both reports to make sure those dates match.
• Compare your Sales Tax amounts. Double-click each amount in the Sales Tax Liability report Sales Tax Payable column to look for
• Adjustments
• Each item includes the proper sales tax GROUP instead of a sales tax item.
• BILLPMT or CHK checks instead of TAXPMT checks paying the sales taxes due
• Transaction dates to ensure this transaction is in this period
• Journal entries that may not affect sales taxes due
• Sales tax payments for previous periods
Create Reports to Find Problems
Take the time to review both your Profit & Loss statement and your Balance Sheet regularly. The Profit & Loss statement can be a quick way of identifying problem areas or even incorrect coding. The Balance Sheet items should reconcile and be matched to the latest statements from your bank, credit card, and loan accounts. Tax and asset accounts can be reconciled as well. In addition, ensure that your credit card charges (and credits) are entered in the same way as any other bill and review the expenses regularly.
Most companies print and review their monthly (and year-to-date) Profit & Loss and Balance Sheet reports regularly. However, QuickBooks provides other reports that offer more information and additional detail.
![]()
Five (or More) Year Profit & Loss Comparison
To create a Profit & Loss comparison report for more than two years, follow these steps:
1. From the Reports menu, select Company & Financial | Profit & Loss Prev Year Comparison.
2. Click Customize Report.
3. Change the Dates to the years you want to use. For example, 01/01/2015 through 12/31/2019.
4. In the Columns field, from the drop-down list, change the display to Years.
5. In the Add Subcolumns For area, clear the Previous Year check box.
6. Click OK to see your report, an example of which is shown next.

![]()
Balance Sheet Reports
In addition to the standard Balance Sheet, each of the other Balance Sheet reports affords the reader a better understanding of the totals. All of the Balance Sheet reports can be accessed through the Report Center or from the Report menu. Click Report | Company & Financial | Balance Sheet xxxxx.
Balance Sheet Detail
If your Accounts Receivable total appears odd, run the Balance Sheet Detail report to see the individual transactions in the account for the last month. If there are too many transactions for the month, run the report by week or even by day, changing the Dates at the top of the report.
Balance Sheet Prev Year Comparison
This report helps you compare your cash and other accounts for this year to the balances in those accounts at the same time last year. Review the following for odd discrepancies or changes you did not expect:
• Cash
• Accounts Receivable
• Inventory
• Accounts Payable
• Loans Payable
• Payroll Taxes Payable
![]()
Customer and Receivables Reports
Ensuring your company receives invoice payments regularly is important throughout the year. Consider using the following reports regularly to identify problems and collect overdue accounts. All of these reports are found in the Report Center and by selecting Reports | Customers & Receivables.
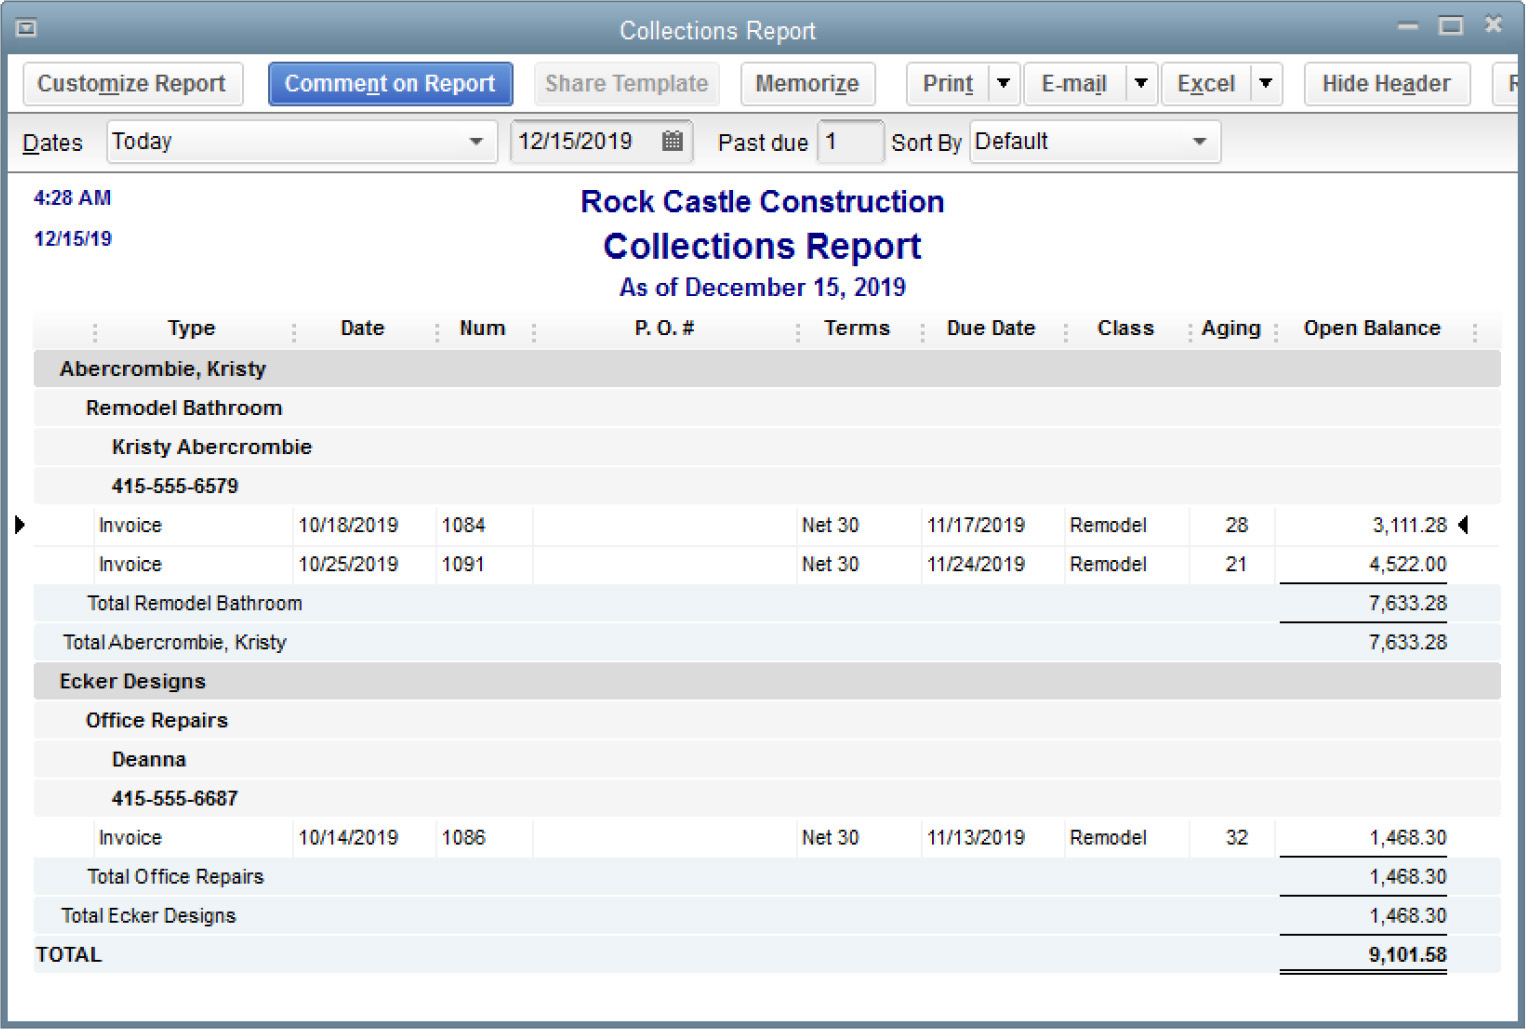
Collections Report
This report, shown here, shows unpaid, overdue invoices and includes the customer’s telephone number. You can use this report to call or e-mail invoice copies to the customer.
To send the overdue invoices via e-mail:
1. Double-click the amount to open the invoice and select Send at the top of the invoice.
2. Make the subject Overdue Invoice and add text to the e-mail.
Unbilled Costs by Job
This report lists any expenditures you have made that have not yet been billed to the customer. Consider running this report each month (or week) to ensure that all costs are billed promptly.
![]()
Accounts Payable Reports
Paying vendors promptly is just as important as collecting money from your customers. Although many smaller companies choose not to use the Enter Bills function and simply pay each bill with a check, during turbulent economic times, entering bills to ensure each bill is paid promptly can be useful. If your company chooses to do so, the A/P Aging Summary and Unpaid Bills Detail reports can be very useful. Consider running them monthly.
![]()
Using the Audit Trail
The Audit Trail report includes changes to any transaction in QuickBooks that impacts the accounting process. You can identify each change easily because it appears in bold italics, as shown next. The transaction itself is in boldface text, with a description of the type of transaction, followed by any applicable document number.

The following columns display content:
• Num This is the transaction number for each modified or deleted transaction. If this field is blank, the transaction may not yet have been assigned a number, such as a check ready to be printed.
• Entered/Last Modified and Last Modified By These columns show both the date on which the modification was made and the person making that change.
• State You will see either Latest or Prior in this column. Latest is the last time this particular transaction was changed, and Prior shows all the previous modifications.
• Date This is the original date of the transaction.
• Name The names shown here are either the original names of vendors, customers, and/or employees and the new names.
• Memo This column shows any memo attached to this transaction.
• Account This field shows both the original account numbers and any changes.
• Split This information comes from the original transaction.
• Amount The amount of the original transaction and any changes.
Track Inventory Issues
If you track inventory through QuickBooks, you may encounter some errors.
![]()
Negative Inventory
A negative inventory can occur when items have been received and sold but the stock has not been entered into QuickBooks. Although QuickBooks does warn you that you do not have enough stock on hand to fill an order, you can still create a sales receipt or invoice for these items. To solve the issue, ensure that all merchandise you receive for resale is posted into QuickBooks promptly, as your financial statements can be impacted if there are negative inventory items.
![]()
Item Mistakes
Often inventory errors are traced back to the Item list.
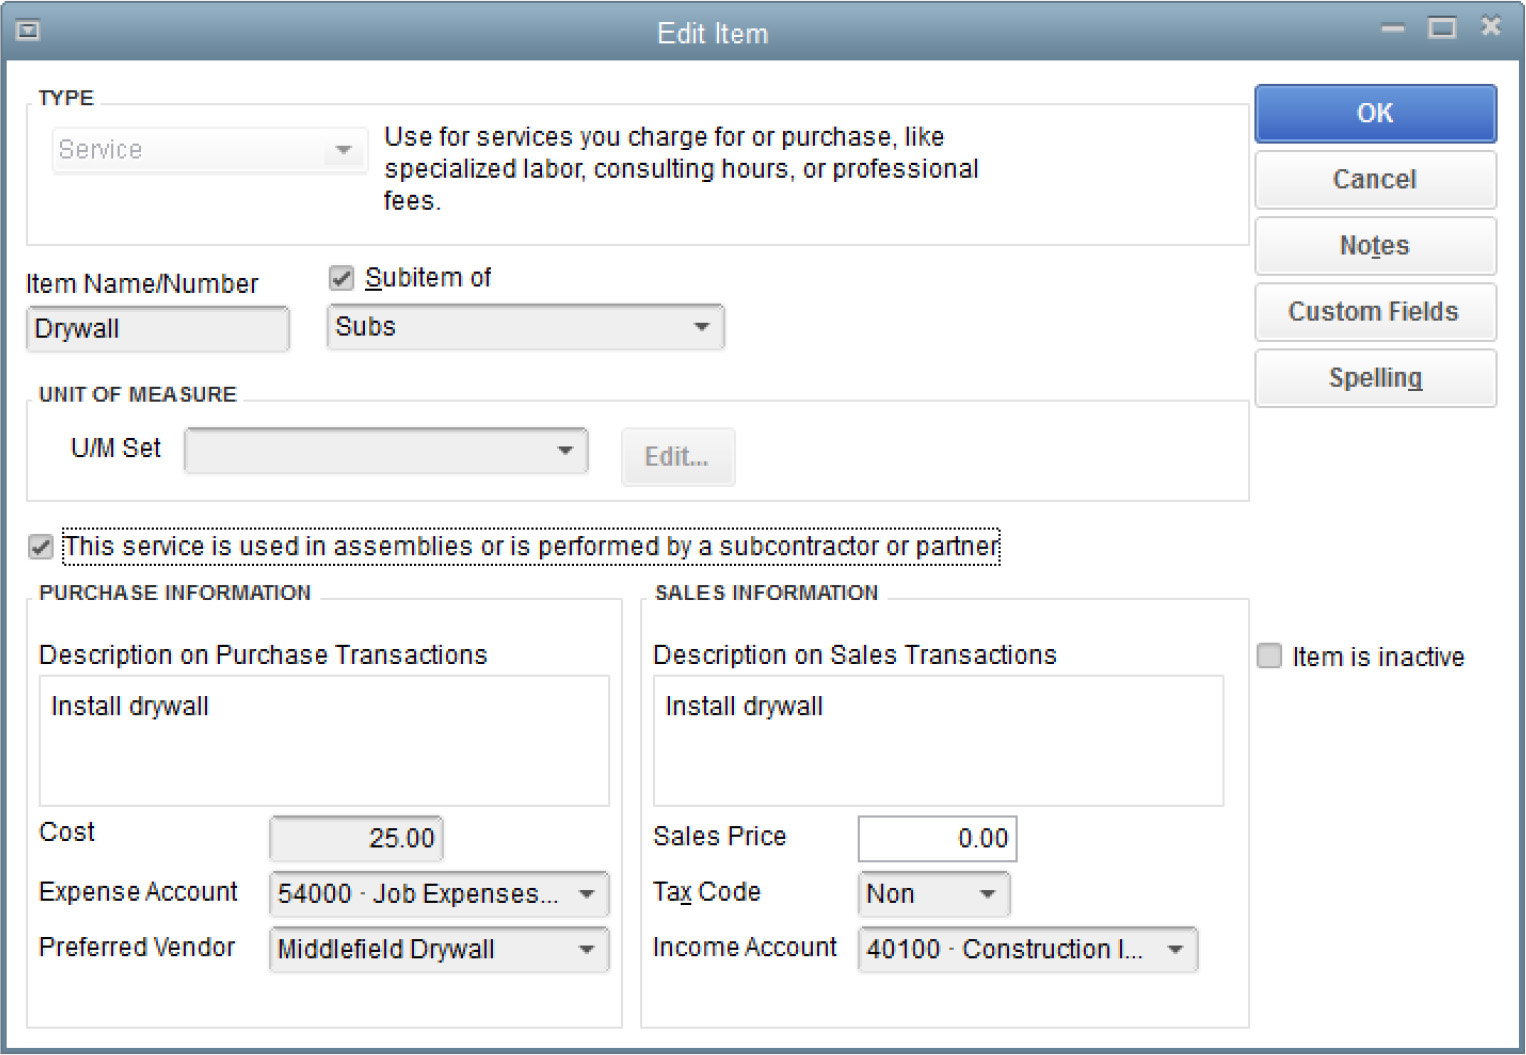
Item Is Used in Both Purchase and Sales Transactions
One of the most common item issues is when an item is used in both purchase and sales transactions and someone forgot to click the This Item Is Used In Assemblies Or Is Performed By A Subcontractor or Partner check box. When this happens, both the purchase information and the income information are posted to the income account. To solve the issue:
1. Click Lists | Item List.
2. Select the item, and in the Edit Item window, click the This xxx is Used in xxx check box and select the appropriate expense account, as shown next.
Item Is Assigned the Wrong Account
You can change the assigned account for any item except a Sales Tax type item. If someone has assigned the wrong account, open the item and change the account to the correct one. You will see this message:

If you click Yes, all existing transactions will also be changed, and that will create a change in your financial statements. Check with your accountant before making such a change if there are many transactions in previous months or years.
QuickBooks Advisors
One of the main complaints about problem-solving tips is that the fix to your problem is not included. Consider connecting with a QuickBooks Advisor in your area to learn more about this great accounting program!