Chapter 1. Design and First Forms
In this chapter you will begin to create a Windows application. You will find that we get down to business immediately with as little fuss as possible. The introductory comments are intended to set the stage for everything else we’re doing. I’ll keep them short.
The requirements for a meaningful Windows application will be spelled out in this chapter, and the rest of the book will focus on implementing that application. We will finesse the design, exploring design decisions as we go, and our general approach will be that of successive approximation; that is: get it working and keep it working, as you add new functionality.
At times, this approach will cause us to write and rewrite the same section. One could argue that had we designed in advance we would avoid those cul-de-sacs, but it is exploring these dead ends, and the improvements we can make as we progressively improve our product, that will bring out essential aspects of Visual Basic 2005 programming.
The Requirements
Over the course of part one of this book, we will create an application based on a real-world application I recently built for one of my clients. We will use the application to explore retrieving and updating data from the Northwind Database that comes with SqlServer and SqlExpress.
Tip
At the time of this writing, Microsoft is urging that .NET applications use SqlExpress in preference to Access, and so we shall in this book, though converting the code to support an Access database should not be difficult.
The opening form for the application allows you to search for or display all the Customers, Orders, Suppliers, and Employees listed in the Northwind tables, as shown in Figure 1-1.

The details page provides details on one company. It is tabbed and has a menu item, as shown in Figure 1-2. (Actual fields to be displayed will correspond to what is in the database.)

This form will be used to demonstrate menus, events, data display, data binding, data updating, and so on.
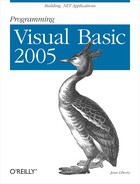
If you click All Customers from the main menu, you will be brought to a custom Rolodex®, as shown in Figure 1-3.
The user can scroll through all the customers or click on a letter to advance immediately to customers whose name begins with that letter. This will show a fairly sophisticated custom control, as well as advanced use of inheritance and polymorphism, as we reuse the basic structure of the Rolodex to be able to scroll through both customers and suppliers.
Double-clicking the customer entry in the Rolodex will bring you to the details page (as shown earlier).
You’ll create the Rolodex in Chapter 4.
Getting Started
The hardest part of any project, for me, is getting started. There is a simple problem of mental inertia that is overcome only by firing up Visual Studio 2005 and dragging some controls onto a form.
To begin, start Visual Studio 2005 and create a Visual Basic 2005 Windows application, as shown in Figure 1-4. (If you are already in Visual Studio 2005, choose File → New project.)

Warning
Visual Studio 2005 has short-cut keys for almost every important command. These key combinations are configurable, however, and it would be confusing to include short-cut keys in this book when yours may be different. The best way to learn the short-cut key combinations is to look at the menu choices as you go.
Once the project is created, you are put into the Designer, with a blank form (titled Form1). The Toolbox is typically on the left, the Solution explorer and Properties windows are usually on the right, and a number of other useful windows may be minimized on the bottom, as shown in Figure 1-5.
Rearranging Windows
You can rearrange all of these Visual Studio elements by dragging and dropping the various windows. While you are in the editor, drag one of the windows from its docked position. As soon as you begin to move the window around, the docking diamond appears, as seen in Figure 1-6.
As you move the window, the four arrows of the diamond point to where you may dock. If you place the cursor over one of the arrows, it darkens and the placement for the window is previewed. If the window can join a tabbed group, the center of the diamond darkens as you pass the cursor over it. Hover over the darkened center and release the mouse and your window is automatically added to the tabbed group.
Renaming and Sizing the Form
The very first step will be to rename the Form1.vb file to Welcome.vb. Visual Studio 2005 will do the necessary work to make the changes throughout the solution. To rename the file click on Form1.vb within the Solution explorer and either right-click and choose Rename or change the File Name property in the Properties window.

We’ll also change the window caption on the form to say “Welcome to Northwind.” Changes to the form are accomplished by clicking on the form and then editing the properties in the Properties window. In VB.NET, the Text property controls the window caption.
Tip
VB6 NOTE: If you’re familiar with Visual Basic 6 or earlier, you may recall that a form’s caption was defined by its Caption property, not its Text property. In addition to the Visual Basic Form object, controls such as Checkbox, CommandButton, Frame, Label, and Option had a Caption property for static, display-only text. In contrast, the Text property was used for text that could usually be modified by the user. In .NET controls, these have been replaced by a single Text property.
The next step is to resize the form, which you can do by grabbing and dragging one of the sizing handles on the form itself, or by setting its Size property (click on the form, then click on the Size property in the Properties window). Notice that Size is expandable, and under Size you can set Width and Height separately. Set the Width to 582 and the Height to 582.

MinimumSize and MaximumSize
The form may be resized by your user. You can control how much your form may be made smaller or larger using the MinimumSize and MaximumSize properties. These default to 0,0, which effectively disables these properties.
For this form, you may well want to create a MinimumSize that prevents the user from hiding one or more of the group boxes, or you may choose to leave the properties at their default values, which allows the user to set the form to any convenient size.
Using Picture Boxes, Panels, and Labels
To place the logo in the upper lefthand corner, follow these steps:
Right-click on the project in the Solution explorer and add a folder. Name it Images.
Copy the LAlogo.gif file (downloaded with the source code for this book) into the Images directory.
Add a
PictureBoxcontrol to your form with Location 0, 0.Click on the Ellipsis button within the
Imageproperty of the Picture box. Import the GIF file. Size the picture box to fit (133,129).
To create the banner “Northwind Data Central” you’ll use two more controls. First, drag a panel into position by just touching the logo. (Its Location property should be 133,0.) Drag the panel’s sizing handles to make the panel as tall as the logo, and wide enough to fill the form. (Its Size should be 445,128.) Set its name to pnlBanner. Set its BackColor to White (click on BackColor, drop down the color picker, and pick either a standard or a custom color).
Tip
All links mentioned in this book are available as hyperlinks in the file ProgrammingVisualBasic2005links.html included with the downloadable source code.
Next, drag a label onto the Panel. Set its name to lblBanner and its BackColor to White. Set its ForeColor to Blue (type in the name Blue, or pick it from Custom colors). Open the Font property and set the font size to 24. In the Text property, type in the text you want, Northwind Data Central. The label will expand to fit the text. You may want to click on it and choose Format → CenterInForm → Horizontally—it will center itself in the panel.
Press F5 to run the application. You should see a logo across the top of your form.
Adding Group Boxes, Buttons, and Text Boxes
You are now ready to create your four groups (Employees, Customers, Orders, and Suppliers), as shown in the specification.
Begin by dragging a group box onto the form. Name it grpEmployees and set its Text property to Employees (which sets the text in the border of the group box). Drag a button into the group box and name it btnAllEmployees. Set its Text property to All Employees. Grab the side of the button and stretch it so that the words fit. A reasonable location for the group lbox is 29,162, and a reasonable size is 247,166.
Aligning controls
Visual Studio 2005 provides extensive help for aligning the controls in your form. As you add controls, blue alignment lines appear to show you how to align various controls. Alternately, you are free to select (Shift-click) two or more controls and then use the alignment menu choices under Format.
For example, if you’d like your button centered within the group box, select the button and choose Format → Center In Form → Horizontally.
Drag two text boxes onto the group box, right below the All Employees button, and name them txtEmployeeFirst and txtEmployeeLast. To center the two text boxes, you’ll need to select them both (click on the first text box, and Shift-click to highlight the second). This group of two text boxes can now be centered by choosing Format → Center In Form → Horizontally.
Drag two labels onto the group box and use the blue alignment lines to place them below the text boxes. Name them lblEmployeeFirst and lblEmployeeLast and set their text to First Name and Last Name, respectively.
Finally, click on the All Employees button and copy and paste it in place. Drag the new button below the text boxes and labels. Name it btnEmployeesFind and set its Text property to Find.
All of the elements in the group box should now be centered horizontally; let’s center them vertically as well. To do so, put the cursor in the upper lefthand corner and drag to the lower righthand corner, marking all the controls . Next, use the menu item Format → Center In Form → Vertically.
You will want to explore the impact of using the various Format options, including aligning objects, equalizing the spacing, and centering objects within the group box. You can also use the blue alignment lines to help you quickly realign the various controls.
Copying and moving controls
Once the group box looks the way you want, use the mouse to select the group box and copy and paste so that you have a duplicate (which is pasted on top of the original, offset slightly). You can now drag the new group box below the first group box. (When you click on the group box, a move handle will appear, as shown in Figure 1-7, which allows you to drag the group box where you desire.)
Rename the new group box grpOrders and set its text to Orders. Fix the text on the buttons and labels, and rename all the controls (e.g., btnAllOrders, etc.), as shown in Table 1-1.
|
Control |
ControlID |
Notes |
|
Button |
|
Centered (like All Employees) |
|
Textbox |
|
Good size is 100,20 |
|
Textbox |
|
Align with first text box |
|
Label |
|
Text: Begin Date |
|
Label |
|
Text: EdDate |
|
Button |
|
Centered as before |
Copy and paste a third group box and name it grpCustomers. Delete the text box and label on the left. Move the right text box and label, stretching out the text box for Customer Name. Change the Text property of the Label to Customer Name. Rename the control and change the Text property of btnAllCustomers to All Customers. The new group box should look like Figure 1-8.

Finally, copy this third group box and create a fourth group box for Suppliers, as shown in Table 1-2.
|
Control |
ControlID |
Notes |
|
Button |
|
Centered |
|
Textbox |
|
Same size as for customers |
|
Label |
|
Test: Supplier Name |
|
Button |
|
Centered as before |
When you are done, you should have a form that looks more or less like Figure 1-9.

Once you get comfortable with the tools, this form should take about 10 minutes to create! The good news is you now have a working form; unfortunately, the buttons don’t actually do anything yet!
Events
The logic you will eventually implement is this: if the user clicks (for example) All Employees, you will open a form with a Rolodex that will allow the user to scroll through all the Employees. That form will also allow the user to filter which Employees are shown and to jump to those Employees whose name begins with a specific letter. All of that will be implemented with fairly advanced features such as custom controls in Chapter 4, so for now we’ll stub out these buttons.
You can, of course, have the buttons do nothing, but it would be nice to have them pop up a message box saying, “Not yet implemented.”
To make that work, you’ll need to respond to the button click event, and you’ll need to put up a message box.
Every control “publishes” a number of events that other parts of your program can respond to or handle. Buttons, of course, publish a click event. The click event “fires” every time the button is clicked.
Buttons also publish events that fire when the button’s size is changed, when its background color changes, when its image changes, when its cursor changes, for drag over or drag/drop and so forth. You can find the events for buttons by either checking the documentation, or by selecting a button in the designer and then, in the Properties window, clicking the lightning bolt. This lightning bolt button switches the property window to show the control’s events, as shown in Figure 1-10.
Creating Event Handlers
You now have three ways to create the Click event handler:
You can type a method name in the property box next to Click, to create a method handler with that name, and press Enter.
You can click in that box and drop down the list of already existing event handlers. (In this case, there won’t be any yet, but later in the program you can use this approach to share event-handler methods among more than one control. More on that idea shortly.)
You can double-click in the property box. Visual Studio 2005 will name the method for you.
Whichever of these you decide on, Visual Studio 2005 will bring you to the code editor for the event handler. If you let Visual Studio 2005 name the method, you will find yourself inside a Sub named btnAllEmployees_Click.

Default Event Handler
Every control has a default
event. In the case of the button, it is (no surprise) “Click.” That is the event most often handled, and so the Button designer set it to be the default event. You can double-click on the button and Visual Studio 2005 will act as if you had single-clicked on the button and then double-clicked on the Click event—that is, it will create the btnAllEmployees_Click event handler and put the editor into that subroutine.
Event-Handler Parameters
The convention is for .NET Event handlers to take two parameters
. The first is of type Object (see sidebar "Classes, Objects, and Derivation“) and is filled at runtime with a reference to the object that triggered the event (in this case, the button).
The second is an object of type EventArgs or a type derived from EventArgs. EventArgs itself is not useful, but the types derived from EventArgs contain very pertinent information. (See the sidebar "Classes, Objects, and Derivation.”)
In this case, we want to put up a message box saying that the handler has not yet been implemented. The Framework Class Library (FCL) that comes with .NET provides you with a number of useful classes
, one of which is the MessageBox class. The MessageBox class has a shared method (see sidebar "Shared Methods and Properties“) Show that is overloaded (see the sidebar "Overloading Methods“).
When you type the word MessageBox and then type a period, Visual Studio 2005’s IntelliSense
will display all the shared members of the MessageBox class. (The shared members are displayed because you placed the dot after a type name; had you typed the dot after an instance variable, the nonshared members would be displayed.
Click on Show and type an open parenthesis, and you’ll see a tool tip indicating that there are 21 overloaded versions of this method. You want the one that lets you put in text, a title, and which buttons and icon you want to appear, as shown in Figure 1-11.
As you are about to enter each parameter, the tool tip will describe what it is looking for. When you get to the choice for the MessageBoxButtons, the tool tip will offer you one of the allowed values. These values are enumerated constants (see sidebar "Enumerated Constants“) and thus IntelliSense can help you make a valid choice, as shown in Figure 1-12.
Similarly, IntelliSense will help you choose one of the valid options for the icon. When you are done, your event handler will look like Example 1-1.

Private Sub btnAllEmployees_Click(ByVal sender As System.Object, _
        ByVal e As System.EventArgs) Handles btnAllEmployees.Click
    MessageBox.Show("Not yet implemented", "Not Yet Implemented", _
        MessageBoxButtons.OK, MessageBoxIcon.Exclamation)
End Sub
Tip
The code in this and all examples has been broken into shorter lines to fit within the book; in Visual Studio 2005 you will find the entire signature (name and parameters) for the method on a single line. If you break a line in Visual Basic 2005 you must use the line continuation character—an underscore (_)—preceded by a space.
Run the application and click on All Employees. A message box will pop up with the message, title, icon, and button you designated, as shown in Figure 1-13. Congratulations! You just wrote your first event handler.

Tip
VB6 NOTE: You may be wondering what happened to the MsgBox function, the standard Visual Basic language function for displaying a message box. The answer is that it still exists in Visual Basic (it’s a part of the Interaction class of the Microsoft.VisualBasic namespace) and can still be called from your Visual Basic code just as you always did. (Interestingly, it can also be called from any other .NET-compliant language, like C#, although it needs to be called as a shared method of the Interaction class.) Moreover, the syntax of MsgBox is largely identical to its VB6 counterpart, except that the final two optional parameters (which specify the location of a help file and the help context ID in the help file that contains information about the MsgBox display) have been eliminated.
.NET uses the more versatile MessageBox.Show method rather than the VB6 MsgBox, and we will use MessageBox throughout this book.
Sharing Event Handlers
It is possible, and often much cleaner, for more than one event to share a single event handler. Since the functionality of All Employees, All Customers, All Orders, and All Suppliers is very similar, it might make sense to give all four of these a common event handler.
Tip
VB6 NOTE: In VB6 and earlier versions, you could share event handlers by creating a control array. When the control array’s event handler was invoked, Visual Basic passed it a single parameter, the index of the control that had fired the event. The VB6 control array, however, is not supported by Visual Basic .NET, which offers a much more flexible method of sharing event handlers.
To do so, open the code editor and change the name of btnAllEmployees_Click to btnAll_Click. When you do, an underline will appear near the new method name. Clicking on the underline will open a smart tag, and dropping the smart tag will open a command offering to rename the function for you, as shown in Figure 1-14. Clicking this will not only rename the function in place, but will “fix up” all references to this function (including in the designer-generated code).
Return to the design mode, click on the All Employees button, and then click on the lightning bolt in the properties to see the Events. Notice that the handler associated with the click event is now btnAllClick. Copy and paste that event handler name to the Click event handler for the other three related buttons, or click on the button and then in the properties/events window click on the “click” event and use the drop-down menu of event handlers to pick the one you want to use. Run the application and you’ll see that all four buttons now bring up the same message box.
Differentiating Which Button Was Pressed
While having shared event handlers is fine, you may need to know which button was actually pressed. In our simple case, it would be nice to have the error message reflect the button (e.g., “All Employees not yet implemented.”).
You can do this by casting
the object passed into the event handler to type Button (using the CType conversion function):
CType(sender, Button)
This call to CType returns an object of type Button, representing the button that caused the event to fire. You can ask that button for its Text property, and assign the string returned to a variable:
Dim buttonName As String = CType(sender, Button).Text
You can then add that variable into the message box’s message:
MessageBox.Show(buttonName + " not yet implemented", "Not Yet Implemented", _
            MessageBoxButtons.OK, MessageBoxIcon.Exclamation)
Each button’s message is specialized, as shown in Figure 1-15.

Creating the Customer Detail Page
Once the program is fully functional, the Find button will examine the contents of the text boxes and seek to find all the customers that match the text provided. If a single match is found, a form will open with details about that customer.
For now, we’ll bypass the issue of what happens when multiple matches are found, and we’ll even bypass the database search, and just build the form that will be filled in with the customer’s details.
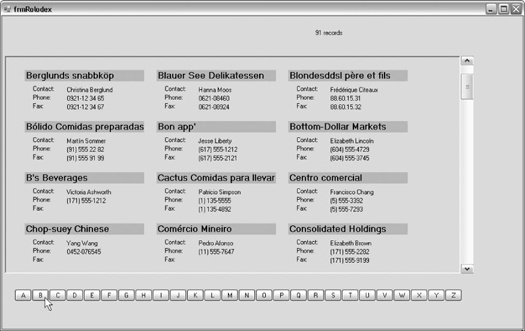
To get started, you need to create a second form, frmCustomerDetails. Right-click on the solution and choose Add Class. From within the dialog, choose Windows Form as the type of item you wish to add, and name the form frmCustomerDetails.vb, as shown in Figure 1-16. Click Add to add the new form.
Resize your form to 600,300. Click on your form and change the caption (using the Text property) to Customer Details.
Our task for this form is to add a menu, tab controls, and the controls necessary to display and edit the Customer information. The specifications call for this form to open in Read Only mode; the user must explicitly choose the menu item Edit to make the fields editable, and then Save to save the changes made in Edit mode (which returns the user to Read Mode).
Adding a Menu
You’ll begin by adding
a menu to the form. To do so, first drag a menu strip onto the form. Two things will happen: your menu will be represented by a MenuStrip instance in the “tray” at the bottom of the form, and the menu itself will be docked to the top of the form. Notice that the menu has an area that says Type Here. Enter the text for the top-level menu, Customer, and notice that when you hit enter, two more Type Here boxes appear, one for a second top-level menu item (we won’t need this for now) and one for a sub-menu. In that sub-menu enter the word Edit. As you do, another box will open below it. Enter the three remaining choices (Save, Cancel, Close) one by one.
Right-click on a menu item to see some of the common actions you might want to take. This allows you to edit the text or change the behavior of the menu items. For now, you won’t need any of these options.
Hooking Up the Second Form to the First
We’re going to hardwire this form (for now) to the Find Customer button in the Welcome page. Return to the Welcome page and double-click on the All Customers button in the Customer group box. In the Event handler, enter this one line of code:
frmCustomerDetails.Show()
This opens the new dialog, but passes in no information about the customer’s name. We’ll fix that later when we are ready to search for a customer in the database.
Adding Tab Controls
The Customer Details page has four tabs. Drag a TabControl onto the form, and size it to fill most of the form, as shown in Figure 1-17.

Notice that the TabControl
starts with two tabs, labeled TabPage1 and TabPage2. Click on the TabControl itself, then click on the first tab (TabPage1). Look in the Properties window. It should say:
TabControl1 System.Windows.Forms.TabControl.
Change its Name property to tclCustomerDetails. The Properties window should now say:
tclCustomerDetails System.Windows.Forms.TabControl.
Adding Tabs to the TabControl
Click within the first tab and the Properties window should show you that you are in TabPage1. Use the name property to change the name of the tab to tabCustomerInfo and the Text field to change the text that appears on the tab to Customer.Info.
To get to the second tab, you’ll need to click on TabPage2 twice. The first click will choose the TabControl, and the second click will bring TabPage2 forward. You’ll then need to click in the page itself to get to TabPage2. Rename it tabCustomerDemographics and change its Text to Demographics.
You are now ready to add a third tab. Click on the TabControl itself, and in the Properties window scroll down to TabPages. Click the Ellipsis button to open the TabPage Collection Editor. Click Add to add a new page, and use the properties to set both the name and the text, as shown in Figure 1-18.

You now have a details page with three tabs. You are ready to populate these tabs with controls that will reflect the data held in the Customer Database (and that will build on the structure provided by Microsoft).
You can also add and remove tabs using the TabControl’s smart tag, as shown in Figure 1-19.

The first tab will be used to display (and update) the information contained in the Customers Table, whose design is shown in Figure 1-20.

Each of these items can be displayed with a simple combination of labels and text boxes, as shown in Figure 1-21. The label that reads “Company Name Here” should have a font size of 20, with the font’s Bold attribute set to True. Also, the field’s ForeColor should be Blue. Accept the default field names that Visual Basic assigns. You’ll give them more precise names in Chapter 2.
